C H A P T E R 3
Applications in the Wild
In this chapter, we’ll take a look at some applications built by developers in the PC Kinect app scene’s first year that demonstrate the functionality you can take advantage of in your own programs. As you install the applications on your own computer, consider how the developers have leveraged the capabilities of the Kinect to create a unique experience in their applications. In later chapters, it will be your turn to design an application, so use this chapter for inspiration.
Control news and other realtime information from the Web with a wave of your hand using SenseCast. Practice your super powers as Ultra Seven or Kamehameha transforms your body movements into laser beams and exploding light. Freak yourself and your friends out as you adjust the “puffiness” of the world around you with the clever Body Dysmorphia Toy. Finally, discover the wonders of volumetric photography as an art form with MatterPort, an application that lets you scan the physical world to produce 3-D photographic models of objects and environments.
OTHER SOURCES FOR KINECT APPLICATIONS
Sensecast: Minority Report Meets the Web
Sensecast is a program that was created to help designers and content creators easily wrap text, images, videos, RSS feeds, Twitter streams, and other Web-based media in a motion-controlled interface. Combined with an online service to manage the media you publish to your displays, Sensecast aims to be a complete authoring and publishing platform for motion-controlled content.
Sensecast is ideal for Web-like content such as photo slideshows and news feeds. The free Sensecast client software (which you download to your computer) pulls media from the Web and/or your local machine and arranges it in a series of menus and pages that you can then navigate with hand swipes and hovers. Just plug in your Kinect, download and launch the client, and voila! You’re flicking text and images around the screen like it’s 2054, as shown in Figure 3-1.

Figure 3-1. Creator Jonathan C. Hall demos Sensecast’s Kinect-aided motion controls.
Created by one of our co-authors, Jonathan Hall, Sensecast aims to lower the barriers to entry for companies that want to put interesting content, rather than just signage and advertising, on public and quasi-public screens. We walk you through using the free client software in this chapter. However, Sensecast also offers a commercial version that integrates with social media channels, provides content performance metrics, etc. Of course, there’s nothing to stop you from setting up Sensecast to run a Kinect-enabled display anywhere your heart desires, even in your own home. Want to flip through recipes for inspiration while kneading pizza dough in the kitchen? How about setting up a touch-free, germ-free bulletin and message board at your local school or community center? Or maybe you just want to build the coolest motion-controlled multimedia doorbell in your neighborhood. Sensecast can help.
In this exercise, we’ll simply download and run the free client software available for Mac. More information is available online for those who want to tweak our Kinected display. Note that the Sensecast client can be configured to download assets from the Web or we can supply content manually for the display. Supplying your own content allows you to run Sensecast as a standalone without an Internet connection or content management system (CMS). The look and feel of the display is also completely customizable: you just have to edit the markup in the included presentation.xml file and add any of your own creative assets, such as fonts, images and sounds. In fact, there’s a lot we can do with this little package. For those who want to explore beyond the simple content browser application presented in this section, there’s an expanding library of tips and tricks available online.
Step 1: Download the Client
The first thing you’ll want to do is find and download the latest build of the Sensecast client software for Mac by going to http://sensecast.com/downloads.
Download the Sensecast disk image file (.DMG) and double-click to mount if it does not mount automatically. You should see an install window something like the one in Figure 3-2.

Figure 3-2. Sensecast installer window
Step 2: Install the Dependencies
Next, you’ll need to run the installer to set up the correct builds of Sensecast, OpenNI, NITE, and the device driver for your Kinect (or similar sensor). Double-click the installer, agree to the terms (if you want) and follow the instructions of the install process. The installer will ask you where you want to store Sensecast’s data as shown in Figure 3-3. This is where all the program will look for settings and assets. By default, it creates a Sensecast folder in your Documents folder.

Figure 3-3. Sensecast installer dialog
In the final steps of the install process, you should probably reject the Advanced Option to run Sensecast on startup (which is intended for deployed Sensecast installations) and then select the sensor you want to setup, as shown in Figure 3-4.

Figure 3-4. Sensecast installer dialog final steps
When the installer completes, go ahead and quit out of it. Now, as with the other Mac applications, Sensecast has placed an application icon in your Applications folder. Find it, plug in your Kinect and double click when ready!
Step 3: Launch Sensecast
Launch Sensecast to see how the application runs out of the box. A motion-controlled image and news browser will appear, as shown in Figure 3-5. Now, your whole screen is filled with Kinected-content joy!

Figure 3-5. The Sensecast app that ships with the software
Step 4: Rock Out!
By default, Sensecast uses only the hand-tracking machinery of OpenNI/NITE for navigation and requires a “focus gesture” before it will start tracking your hand. If you’re standing in front of the display and you move around a little bit, you will be prompted to “Wave your hand back and forth to take control of the screen.” Go ahead and wave at the screen until you see the hand cursor appear and the feedback image indicate that it’s now tracking your hand. Now, as the Xbox folks say, you are the controller!
Take a minute to explore the Sensecast demo. Find the hover controls and the swipe controls by roaming the interface with the hand cursor. Browse the dummy content. This demo shows you the basic set of elements and interactions that you can use to make your own content similarly navigable by hand-waving magic. If this kind of thing floats your boat, you can check out http://sensecast.org to learn how to customize Sensecast and to see more examples.
Ultra Seven
Do you sometimes dream of conquering the universe and beyond? Try out the Ultra Seven program designed for Windows that will transform you into an intergalactic warrior. Ultra Seven is a popular Japanese superhero from the 1960’s show of the same name. He is a soldier from Nebula M-78, who becomes smitten with Earth while on a mission to map the Milky Way. Ultra Seven has several signature moves that lend themselves well for use with the Kinect’s gestural recognition capabilities.
Kinect-Ultra is available for Windows PCs with fairly fast CPUs and fairly advanced GPUs. You must have at least OpenGL 2.0 and programmable shader capabilities in your graphics card. If your machine meets those requirements, you shouldn’t have too much of a problem. If it doesn’t, please skip past this application and the Kamehameha application. This app is at OpenNI Arena, which can be found at http://bit.ly/ultraseven.
The project’s original page, where you can read more detailed instructions, updates, and watch example videos is at http://code.google.com/p/kinect-ultra/. Check that you have the versions of OpenNI, NITE, and SensorKinect that will work with this application as indicated in the documentation.
Once you have followed these instructions and have everything you need, plug in your Kinect, and connect the Kinect to your computer. Open the application. Make sure the sensor can see you clearly and you have enough space to move around freely. If you are having trouble, please consult the FAQ at http://code.google.com/p/kinect-ultra/wiki/FAQ_en.
Going into the calibration pose with your arms up around your head will signal the sensor to “clothe” you in the Ultra Seven costume. Figure 3-6 shows you how this transformation should look. Now your body should be clothed in red, with your “skeleton” visible and a mohawkish boomerang perched on top of your head. You are now ready to battle monsters, aliens, and your cat.

Figure 3-6. Calibration pose transforms you into Ultra Seven!
The crest alighting your crown is called the Eye Slugger. This fashionable head topper doubles as a removable weapon. By reaching your hands to the back of your head, then thrusting them forward, you can hurl this weapon in the direction you are facing. Don’t worry; it’ll return to you, too.
You can also place the Eye Slugger in midair. Stretch out your left arm to let the Kinect know what you’re doing, then grab the weapon with your right hand, and place in front of you. Now you can move your forearm in a chopping motion to strike your opponent/cat/laundry hamper with the weapon, as shown in Figure 3-7.

Figure 3-7. Top row: demonstration of how to fling the Eye Slugger ; bottom row: advanced Eye Slugger maneuver
Another trick up Ultra Seven’s sleeve is the Wide Shot, which allows you to shoot out a super stream of energy by making an L shape with both arms. Bend your left arm across your chest and hold your right arm vertical from the elbow with your hand up. The energy stream will fire out in the direction that your body is oriented. Objects that the Kinect senses in the foreground will not be hit by the energy stream; instead, it will pass by such objects and continue on its path.
Lastly, you also have at your fingertips the Emperium Beam. In the TV show, this energy ray would shoot out from a green gem on Ultra Seven’s forehead. Bring your fingers to the sides of your forehead to signal the beam. Aim! Fire! Figure 3-8 shows these slick moves.

Figure 3-8. Top row: a powerful stream of energy triggered with pose ; bottom row: Emperium Beam in action
After a couple minutes of play, your superhero cloak will start to blink on and off, signaling that it is time for Ultra Seven to depart from Earth. In the TV show, the Ultramen could only stay on Earth for short periods of time. When you begin to flash, crouch down and then thrust upwards. Your avatar will shoot straight out the top of the screen, presumably bound for Nebula M-78 once again.
Kamehameha
A similar application by the same developer, Tomoto Washio, allows you to morph into a Super Saiyan. If you are not familiar with the Dragon Ball Z series, a Super Saiyan is a powerful, rage-induced transformation that may be achieved by advanced members of the Saiyan race under extraordinary circumstances. The result of the transformation is apparently a flaming, golden aura and hair that defies gravity, as shown in Figure 3-9.
This application is also available at OpenNI Arena. The short link to the site is http://bit.ly/arkamehameha, and additional information can be found on the project page at http://code.google.com/p/kinect-kamehameha. Like the previous superhero app, Kamehameha works on faster Windows PC computers only. Follow the instructions and suggestions on the site. Make sure you have the correct versions of OpenNI, NITE, and SensorKinect. Once you are ready, plug in your Kinect, connect the Kinect to your computer, and then open the application.
Standing in front of the Kinect sensor so that your body is visible, assume the standard calibration pose with arms up around your head and your elbows bent, as shown in Figure 3-9. Allow the sensor time to find your shape. You should begin to flash, and soon an aura and a head of electric hair will appear around you. If the sensor is having a hard time finding you, try switching to party mode for easier calibration.

Figure 3-9. Kamehameha calibration and transformation
Kamehameha was the name of the first king of Hawaii. He was purportedly born around 1738 when Haley’s Comet was making its fiery journey across the sky. The timing was significant because legend at the time spoke of a great king born under a comet who would unify the islands.
In the Dragon Ball series, Kamehameha refers to a signature energy attack, which is the move that you will be able to perform with this application. The Kamehameha is formed when cupped hands are drawn in front of the user and their latent energy is concentrated into a single point between the cupped hands. The hands are then thrust forward to shoot out a streaming, powerful beam of energy. First, hold your hands close together so that the sensor can see them. You will see a white ball of light form between your hands that should look similar to the first image in the series in Figure 3-10.

Figure 3-10. Kamehameha attack
Keeping your hands cupped, bend from the knee to lower your center of gravity. This movement should signal the light to increase in intensity. From here, you can push the energy ball out from your hands in any direction. Extend your arms out in a controlled motion and hold them towards your target to see what happens.
If the motion detection isn’t working very well, try switching to Party Mode. Please note that this technology is all relatively new, what some might call the bleeding edge, so developers are still trying to work the kinks out. Kamehameha isn’t a title put out by a major game studio for sale on Xbox and understandably is not yet as polished as a commercial program. Tomoto’s two Kinect apps are noteworthy for being a couple of the first apps out that really put the motion control abilities to use. Also, Tomoto provides all the code under an open source license for people to modify and learn from.
Body Dysmorphia
This Mac only app made with the Cinder creative coding framework is simple, but quite entertaining. Basically you can make yourself look fat or thin in realtime. Body dysmorphia is a psychological disorder that affects perhaps 1% of the population and causes the afflicted to obsess over a perceived defect in one’s own appearance. Use this program created by Robert Hodgin to see yourself, your cat, and the world in Stay Puft Marshmellow form.
A quick link to the download the program is at http://bit.ly/dysmorphia, and you can learn more about the creator at http://roberthodgin.com/ and http://www.flight404.com/. Take a look at the instructions on the first site and click the link to download the application. Keep in mind that this application will only work on a Mac operating system. Before opening the application, make sure that your Kinect is plugged in and also connected to your computer. Once the green light is visible, you can launch the application and start playing!
As soon as you open the program, you will see objects within the scope of your Kinect dysmorphed in realtime. At the bottom left-hand side of the screen, you will find a key for various adjustments to the image. Hold down the “P” key to inflate your subject and lowercase “p” to shrink it. Basically, the data from the Kinect is manipulated by increasing or decreasing the radius of the points in the cloud. This has a comical and cartoonish effect as you expand the points into puffy lumps and blobs. Do not expect a realistic-looking image, but instead have fun adjusting the colors and textures in various ways using the key.
Pressing “b” or “B” will adjust the amount of blur applied to the image. Adding blur by pressing down an uppercase “B” will smooth out the points along the surface so the image is less lumpy. Play around with the blur levels to find an amount you like in correlation to an amount of puffiness. If you turn the blur up all the way, the image will look extremely impressionistic and lose detail, especially if you also turn up the amount of puffiness, as shown in Figure 3-11. Increasing both blur and puffiness can also erase the appearance of depth.

Figure 3-11. Body Dysmorphia Toy showing the user fully puffed and blurred
Remember that the Kinect has a limited usable range of about 2′ to 20′. Therefore, if you get too close or far away from the sensor, the dysmorphia filter will not work. The ideal range for using this application is around 5′ to 10′.
Next to the key along the bottom edge of your screen, you will find the gray scale depth map that the infrared sensor has produced. Anything outside the recordable range of the Kinect will appear in black, as shown in Figure 3-12. You can use this guide and know that anything appearing in black will be clipped and unaffected by the dysmorphia filter.

Figure 3-12. The Body Dysmorphia Toy applies puffiness to the user on the left within the range of depth sensor, but not to the user on the right who is too close to the sensor.
You can also control what is viewable on your screen by adjusting the clipping plane. You can make adjustments to decrease the usable depth as an easy way to isolate your subject from an object-filled background. Simply adjust the clipping plane to include only the subject you are interested in, cutting out elements from the foreground or background you’d like to discard, as shown in Figure 3-13.

Figure 3-13. Body dysmorphia application used to clip information from the background
Hodgin’s body dysmorphia app shows how a novel, yet very straightforward use of the camera and depth map data stream can provide an entertaining experience without even using gesture recognizers and body data mappings. The next app we will show will reveal another level of usage for the same data when matched with more sophisticated algorithms for 3-D scene reconstruction.
MatterPort
Photography takes a step towards its volumetric 3-D future with the software MatterPort. Go to http://matterport.com to download the application, which is currently available only for Windows. This program will allow you to easily take volumetric snapshots of objects or entire scenes and then stitch them together to be viewable from all angles in a single 3-D model.
Snapshots are automatically taken based on your movements. The idea is that you move around the room carrying the Kinect device. Every time you move to a new position and then pause, a picture is automatically taken. The software in combination with the Kinect is able to detect your motion and pausing, and take photos at each pause. You are thus able to capture an entire scene without returning to the keyboard over and over again.
After each photo, the system shows a rough alignment of the overall scene. You are then able to fill in the spots you missed. Once the basic alignments have been found, the program will spend some time optimizing the alignments for maximum visual quality.
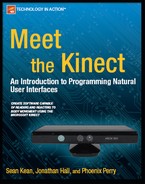
Begin by plugging in your Kinect, connecting the Kinect to your computer, and opening the MatterPort software. On the right hand side of the screen, you will see the MatterPort Controls, as shown in Figure 3-14. The top image on the screen will show the live camera view, which is what the Kinect is pointed at right at that moment. The image underneath will be the last good capture, which will update to show the past capture point as soon as you begin to capture a different image. You will use the control buttons at the bottom of the panel on the screen as you go through the process of capturing a scene. START is a toggle button that will initiate the capture and that you can use to pause and resume the process. Backup will let you go back and remove the last capture in the series. Restart lets you start all over again from scratch. The control buttons to the right enable you to refine a model, save a model, and load files.

Figure 3-14. MatterPort live camera view, last good capture, and the various control buttons
To capture the room you are in, stand in the middle of the room and point the Kinect at a corner. Click START, and MatterPort will begin to capture an image, as shown in Figure 3-15. You can click START, which serves as a PAUSE button once the capture begins, if you need to take a break from the process.

Figure 3-15. MatterPort Cloud Viewer window to the left of the control panel showing start of process with one good capture displayed
When the image is captured, the application will make a sound. Once you hear the sound, a screenshot will appear in the Last good capture section of the control panel. This screen will show the last scan taken. There is no need to check the screen as you continue to scan. Every time you hear the capture noise, you can quickly move the Kinect to a new position to cover more area in the room. The new position should overlap with at least some of the area from the previous capture. As more images are captured, they will automatically be aligned in the composite image.
Figure 3-16 shows how the 3D model gets built as you take more photos. The full-resolution of the most recent capture will appear in the Cloud Viewer window to the left of the MatterPort controls. The rest of the model will appear in reduced resolution. You can see in Figure 3-16 how the sharpest part of the image in the Cloud Viewer corresponds to the last good capture image in the control panel to the right.
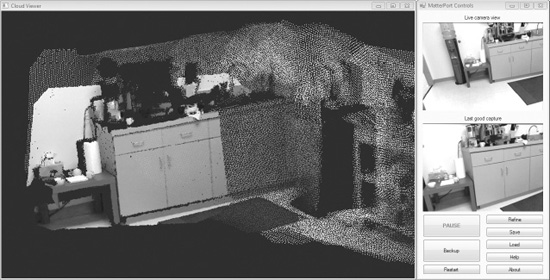
Figure 3-16. MatterPort capture in progress showing last good capture aligning with incoming capture information
If you move the Kinect too fast, the alignment will fail. In such instances, move the camera so that the view is similar to that shown in the last good capture. If the program does not create proper alignment between items, you can repeatedly hit Backup to go back until the bad alignment is removed. After a large number of capture screens, objects may align only roughly, as shown in Figure 3-17.
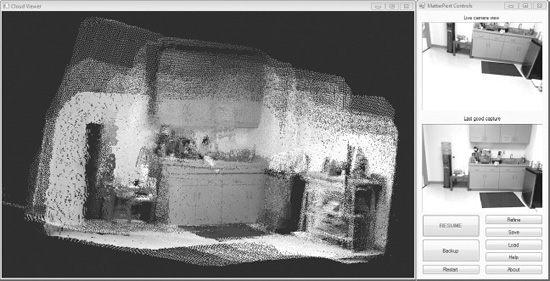
Figure 3-17. MatterPort showing a roughly aligned 3-D capture
Use the mouse to browse around the composite image from different angles. Small misalignments are okay since they can be fixed by clicking Refine, which will create a final result like that shown in Figure 3-18. However, a large misalignment must generally be fixed by clicking Backup until the alignment problem is removed. This final screenshot will continue to show a reduced-resolution cloud, but a final full-resolution point cloud will be written to disk. Don’t forget to save your final, composite image! MatterPort saves your composite image as a point cloud in a .ply file that can be opened in Meshlab, which you can find at http://meshlab.sourceforge.net/.
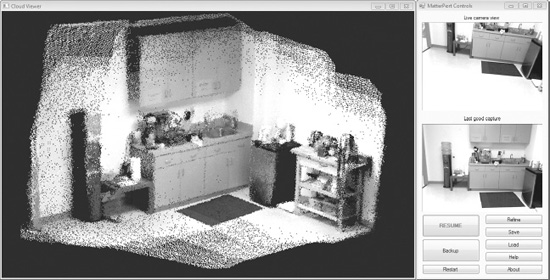
Figure 3-18. MatterPort showing rough mesh enhanced by using the Refine button
Now that you’ve walked through a number of different applications created by other users, start thinking about how you can approach designing your own. In the following chapters, you’ll get acquainted with various development environments and see what it’s like to put your ideas into action.