
4
MAGICAL MAGNETISM
As you saw in Chapter 1, the micro:bit has a built-in magnetometer that serves a variety of purposes. In this chapter, we’ll use it to turn your micro:bit into a compass that tells you which direction you’re facing. We’ll also measure the magnetic fields of neodymium magnets. Then, we’ll make a magnetic alarm that rings whenever someone opens the door.
PROJECT: COMPASS

Difficulty: Easy
In this project, shown in Figure 4-1, you’ll use the micro:bit’s built-in magnetometer as a compass. It will display an arrow on the screen that points toward magnetic north.
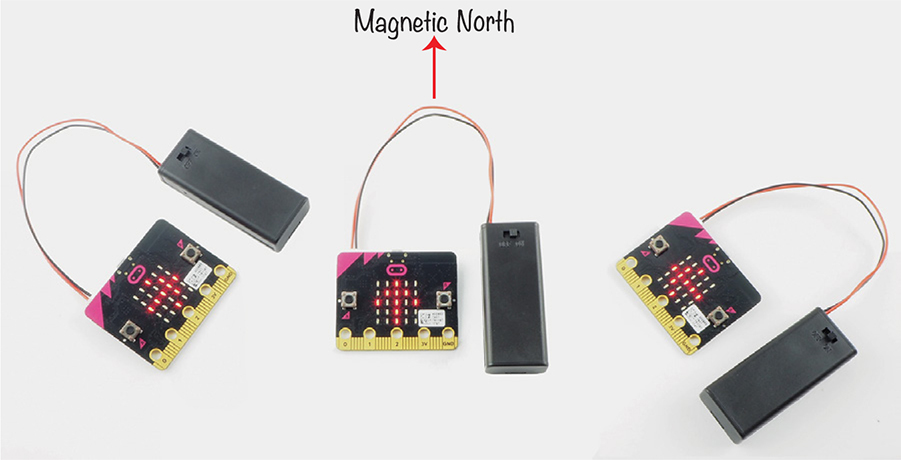
Figure 4-1: Finding north with a micro:bit compass
Unlike a conventional compass, this compass doesn’t always point north. Instead, it shows you which way to turn in order to be facing north.
Rotate until the arrow is facing straight ahead, and you’re looking north!
What You’ll Need
For this experiment, you will need:
Micro:bit
Battery pack
You only need a micro:bit to make this compass, but if you plan to navigate outdoors, then you’ll need a battery pack as well.

Construction
- Go to https://github.com/simonmonk/mbms/ to access the book’s code repository and click the link for Compass. Once the program has opened, click Download and then copy the hex file onto your micro:bit. If you get stuck on this section, head back to Chapter 1, where the process of getting programs onto your micro:bit is explained in full.
If you prefer to use Python, then download the code from the same website, along with instructions for downloading and using the book’s examples. The Python file for this experiment is ch_04_Compass.py.
- Once you’ve loaded the program onto your micro:bit, you’ll see a message prompting you to move your micro:bit in a certain way. Follow the instructions. This will happen every time you flash a program onto the micro:bit that uses the magnetometer.
The purpose of moving your micro:bit this way is to calibrate its magnetometer. The magnetometer chip on the micro:bit is sensitive to local magnetic field variations. By moving the magnetometer in different directions, you help its internal filtering software to compensate for the local distortions to Earth’s magnetic field. This is why it’s a good idea to calibrate your compass again if you take it outside, away from the metal objects commonly found indoors. Also, a battery pack can affect the magnetometer, so it’s best to calibrate with the same hardware you’ll use on the final project.
Calibrating your micro:bit’s magnetometer is a bit like doing a puzzle. As you move your micro:bit, more LEDs will light up (Figure 4-2).
Figure 4-2: Calibrating your micro:bit’s magnetometer
- To use the compass, attach a battery pack to your micro:bit and take it outside, well away from items such as computers and household appliances. Hold the micro:bit level (so it’s flat). If the arrow points to the right or left, slowly turn in that direction until the arrow points straight ahead. When it does, you’re facing magnetic north.
If the compass isn’t pointing north, try calibrating it again by pressing button A.
Code
The Blocks and MicroPython versions of the code follow the same pattern. The heading, or bearing, (the direction the micro:bit is pointing) is measured and then the program decides which of the three arrows (north, west, or east) it should display in order to direct the user in the right direction.
Blocks Code
Here is the Blocks code for this project.
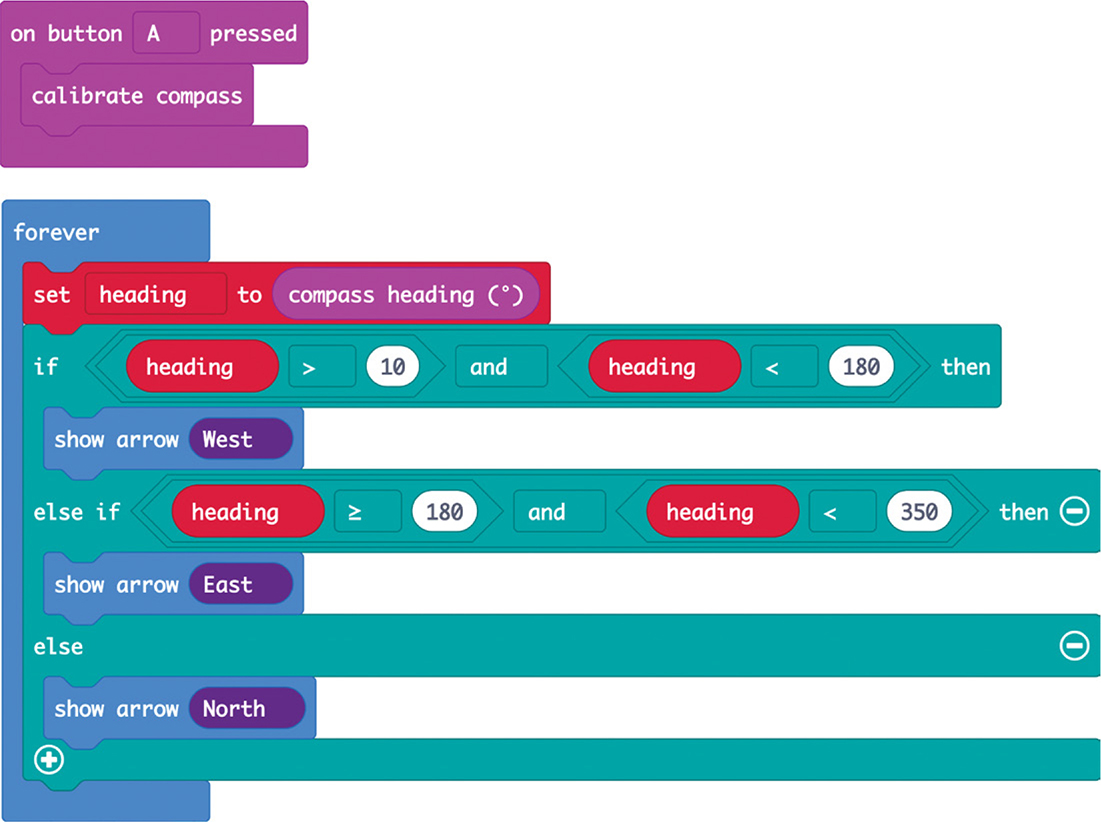
In this project, we’ll set up the code so that you can calibrate the magnetometer any time you want by pressing button A.
The calibrate compass block is inside the on button A pressed block. The calibrate compass block will display the dot we used to calibrate the magnetometer earlier. You can then roll it around the display, as we did at the start of this project.
In the forever block, assign the value of compass heading (degrees from 0 to 359) to a variable called heading, which will contain this heading.
Then create a large if block that consists of an if, an else if, and an else. This big block will test which direction the micro:bit is facing and display an arrow on the LED display showing you which way to turn to be facing north.
If you’re writing this code yourself, you will notice that the Blocks code library seems to offer only two kinds of if blocks: if then and else. To add the else if then section, click the + circled in Figure 4-3.
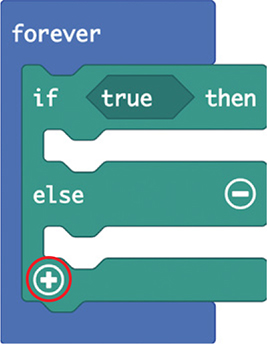
Figure 4-3: Adding another section to if blocks
The first line of the large if block tests whether heading is between 10 and 180 degrees, where 0 degrees is north. Thus, a heading value between 10 and 180 would indicate that you were facing east. In this case, the micro:bit would display the west arrow, which points left. This arrow tells you to turn to the left in order to face north.
If heading is not between 10 and 180, then the else if part of the block tests whether heading is greater than or equal to 180 and less than 350 degrees. If it is, then the micro:bit displays the east arrow, which tells you to go right.
If heading is between 350 and 10 degrees, the else part of the if block will display the north arrow, which points forward—you’re on the right track! Figure 4-4 shows how this works (the numbers are possible values of heading).
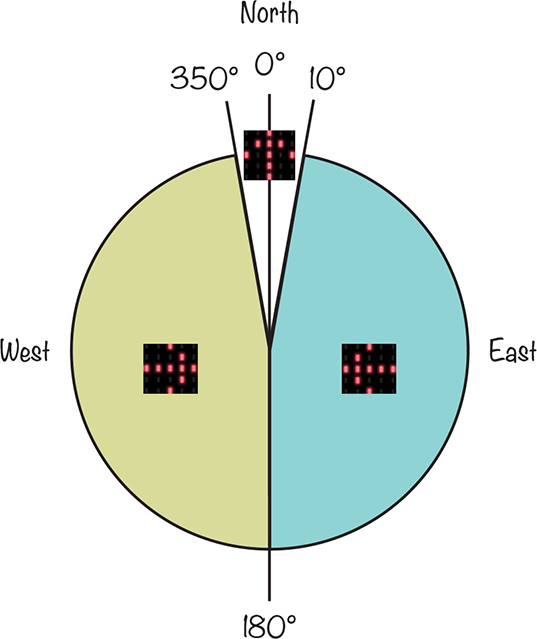
Figure 4-4: The arrow will point in one of three directions, guiding you north.
MicroPython Code
Here is the MicroPython code for the project:
while True:
heading = compass.heading()
if heading > 10 and heading < 180:
display.show(Image.ARROW_W)
elif heading >= 180 and heading < 350:
display.show(Image.ARROW_E)
else:
display.show(Image.ARROW_N)
if button_a.was_pressed():
compass.calibrate()
This code uses the same logic as its Blocks code equivalent: it checks the reading of the magnetometer and tells the micro:bit to display an arrow. Again, if the heading is between 10 and 180 degrees from north, the micro:bit shows a west arrow; if it’s between 180 and 350 degrees, the micro:bit displays an east arrow; and if the heading is within 20 degrees of north, an arrow points straight up, telling you to keep going in the same direction.
Things to Try
See whether you can use a magnet to confuse the compass about which direction is north.
How It Works: The Earth’s Magnetic Field
Earth’s magnetic north and south poles have strong charges, creating a magnetic field all around the globe, as shown in Figure 4-5.
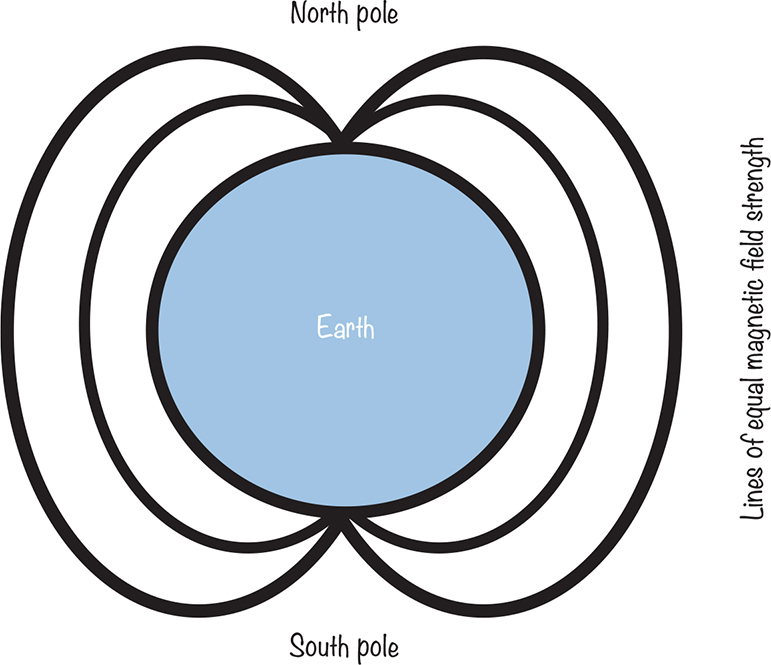
Figure 4-5: Earth’s magnetic field
The micro:bit’s magnetometer measures the strength of Earth’s magnetic field to deduce the direction the micro:bit is facing.
Interestingly, the magnetic north pole is not exactly at the top of the spinning ball that is Earth. The magnetic field can be centered up to 20 degrees away from the geographic poles, depending on where you are in the world.
Another interesting fact about the magnetic poles is that they’re shifting at a rate of about 6 miles (10 km) a year. One day, the poles will flip completely, meaning that magnetic north will be at the southern end of the globe. This process happens on Earth about every 450,000 years.
EXPERIMENT 4: MEASURING MAGNETIC FIELDS

Difficulty: Medium
As we just saw, the micro:bit’s built-in magnetometer is sensitive enough that you can use it as a compass to find north. It’s also a great tool for measuring the strength of a nearby magnet. In this experiment (shown in Figure 4-6), you’ll measure the strength of a magnetic field at various distances.
What You’ll Need
In this experiment, you’ll need the following:
Micro:bit
Strong neodymium magnet
Ruler (preferably showing millimeters)
You’ll find all sorts of shapes and sizes of magnets on eBay. As you can see in Figure 4-6, I’m using a disk-shaped one with a diameter of 10 mm, but any neodymium magnet of a similar size should work. Note that I’ve put a bit of tape labeled N on one side of the magnet (more on this later).

Figure 4-6: The neodymium magnet used for Experiment 4
WARNING Neodynmium magnets are very strong, so be careful when handling them. If two of them get stuck together, it can be hard to separate them.
Construction
The program repeatedly scrolls a number across the micro:bit’s display. This number represents the overall magnetic field strength detected by the magnetometer. We are going to measure the field strength at various distances from the magnet.
- Go to https://github.com/simonmonk/mbms/ to access the book’s code repository and click the link for Experiment 4: Magnetic Fields. Once the program has opened, click Download and then copy the hex file onto your micro:bit. If you get stuck on this, head back to Chapter 1, where the process of getting programs onto your micro:bit is explained in full.
If you prefer to use Python, download the code for this project from the same website, along with instructions for downloading and using the book examples. The Python file for this experiment is Experiment_04.py.
- Set your magnet on a flat surface so that it’s balanced on its curved edge. A neodymium magnet is so strong that if you set it down in this way, it will align itself with Earth’s magnetic field (by spinning until one side is facing north), just like a compass needle. Allow your magnet to do this and then put a piece of tape on the side that’s facing north. (You might need to use the Compass project, described earlier in this chapter, to find north so you don’t accidentally mark south instead.)
- Align your ruler so the 0 cm mark is pointing north and the 30 cm mark is pointing south, as shown in Figure 4-7. The ruler allows you to make sure the magnet continues to face north so that the effect of Earth’s magnetic field remains constant.
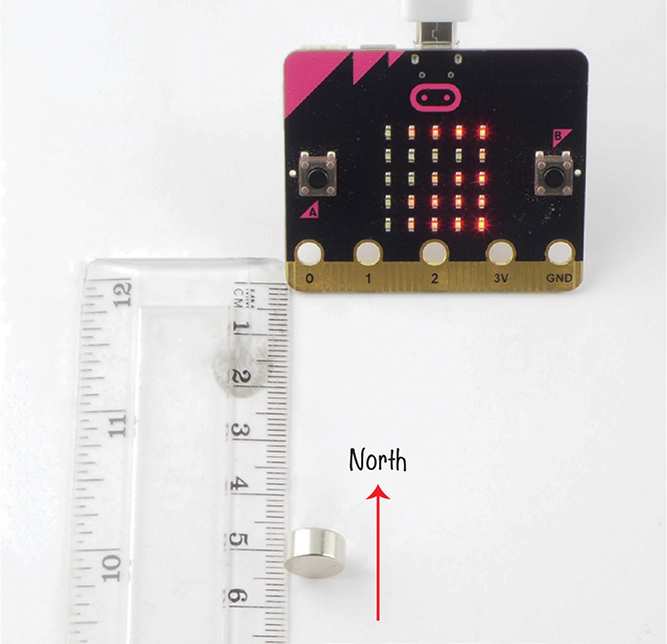
Figure 4-7: Place the ruler in the north–south direction to make sure your magnet continues to face north.
- Set the magnet on its curved edge next to the 1 cm mark on the ruler. Make sure the north side is facing the micro:bit. Point the micro:bit south and align its edge with the 0 cm mark. Record the reading displayed on the micro:bit in the following table, in the 1 cm row. The unit of magnetic field strength is a tesla (which is a very, very strong magnetic field), so the readings from the micro:bit are in microtesla or millionths of a Tesla, represented by µT).
Distance from micro:bit to magnet (cm)
Magnetic field strength (µT)
1
___________________________________
2
___________________________________
3
___________________________________
4
___________________________________
5
___________________________________
6
___________________________________
7
___________________________________
8
___________________________________
9
___________________________________
10
___________________________________
- Move the magnet so it’s next to the 2 cm mark on the ruler. Enter the new number displayed on the micro:bit in the corresponding row in the table. Repeat this process for all the readings up to 10 cm. Notice that the field strength decreases quickly as you move the magnet away from the micro:bit.
- Once you’ve taken all the readings, try plotting a chart of your results. Make the vertical axis, or Y axis, show the field strength in µT and plot the distance of the magnet from the micro:bit in cm against the horizontal axis, or X axis.
You can plot this graph by hand on paper, or, if you prefer, you can make a copy of the Google Sheets spreadsheet I’ve created for this experiment and then replace my readings with the numbers you have just written down. You will find a link to this spreadsheet at https://github.com/simonmonk/mbms/. Open this link and, from the spreadsheet menu, select File▸Make a Copy to make your own copy. Figure 4-8 shows the completed spreadsheet with a chart of the readings underneath it.
Note that your readings might be different, as your magnet may be weaker or stronger.
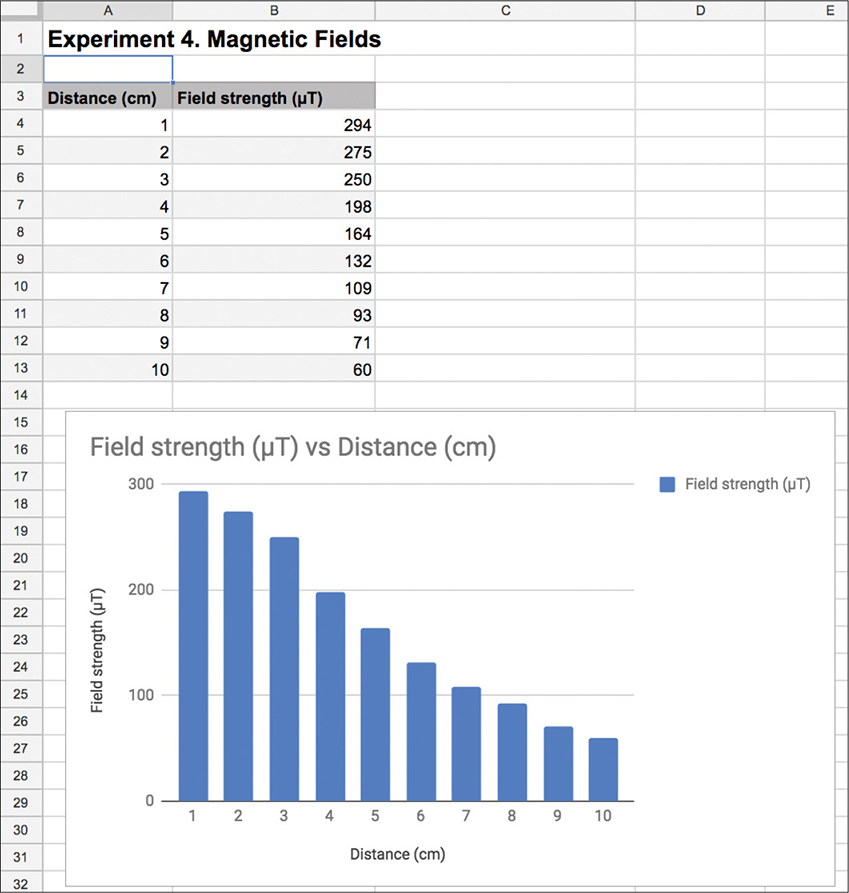
Figure 4-8: Make a graph of your results.
We’ll discuss these results in “How It Works: The Strength of Magnets” on page 99.
Code
The code for this experiment is simple. It takes a reading, displays it, and then repeats.
Blocks Code
Here is the Blocks code for this project.
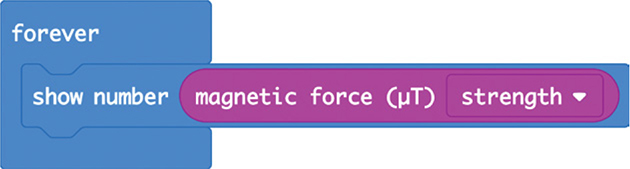
The show number block displays the result of the magnetic force block inside the forever block.
The magnet force block has four options, which you can see in the drop-down menu of this block. You can either get a separate reading for the force in one of the three dimensions X, Y, or Z, or you can get the combined force measurement from all three dimensions. We will use the combined measurement, which is the strength option in the drop-down menu.
MicroPython Code
Here is the MicroPython version of the code:
while True:
display.scroll(str(int(compass.get_field_strength() / 1300)))
In MicroPython, the get_field_strength function takes readings from the micro:bit’s magnetometer. Unlike the magnetic force block of the Blocks code, the MicroPython code does not specify the units for the measurement it returns, but the reading we get back is about 1,300 times the reading reported by the equivalent magnetic force block. Therefore, divide the number by 1,300 and then convert this value with the int function to make it an integer.
Use the str function to convert the number to a text string so the scroll function can display it on the micro:bit screen.
Things to Try
Using the program for Experiment 4, try moving the magnet farther and farther away to see how far away the magnet can be and still show up on your micro:bit.
How It Works: The Strength of Magnets
The chart in Figure 4-8 shows that as you move the magnet away from the micro:bit, the magnetic field strength falls very rapidly at first and then gradually levels off. In fact, the relationship between magnetic field strength and distance from the magnet follows something called the inverse square rule. That is, the field strength is proportional to 1 divided by the square root of the distance from the magnet.
What this means is that when the distance between the magnet and the micro:bit doubles, the field strength falls to a quarter of its previous strength.
The strength of Earth’s magnetic field when measured on the ground ranges from 25 to 65 µT. When you measure the magnetic force without a magnet nearby, you should get readings in this range. Even the super-strong neodymium magnet used in this experiment has a field strength of only a few hundred µT at a distance of a few centimeters. Magnets that are used to look inside human bodies during magnetic resonance imaging (MRI) scans typically have a field strength (where the person lies) of 0.5 to 1.5 T. That’s several thousand times stronger than the neodymium magnet. This is why you have to take off any metal you are wearing when you go into an MRI scanner!
PROJECT: MAGNETIC DOOR ALARM
Difficulty: Medium
We’re going to create a door alarm! By attaching a magnet to a door and a micro:bit to a door frame, the Mad Scientist can be alerted to the arrival of guests. The micro:bit will sound an alarm when it detects a change in the strength of the magnetic field. This is exactly what happens when someone opens the door, moving the magnet farther away.
Figure 4-9 shows the project attached to the Mad Scientist’s door.

Figure 4-9: A magnetic door alarm
What You’ll Need
For this project, you will need the following items:
Micro:bit
3 × Alligator clip cables To connect the micro:bit to the speaker. These cables should be at least 15 cm (6 inches) long.
USB power adapter or switched 3V battery pack To power the micro:bit and speaker. See the appendix for other options for powering your micro:bit.
Speaker You can use any of the methods for getting sound out of a micro:bit discussed in Chapter 2. Here, I used a Monk Makes Speaker for micro:bit.
Adhesive putty or self-adhesive pads To attach the micro:bit and speaker to the door frame and the magnet to the door
Neodymium magnet As used in Experiment 4
Construction
Make sure to test the project before you install it on your door, since you’ll need to experiment a little to determine the right field strength to use. You’ll also need to calibrate the magnetometer before sticking it to a door frame.
- Connect the speaker to the micro:bit using the three alligator cables, as shown in Figure 4-9.
It’s a good idea to color-code your cables by using black for GND, red for 3V, and any other color for the audio connection from pin 0 of the micro:bit. That way, you won’t forget which cable is which. You’ll need to place the speaker at least 15 cm away from the micro:bit, as speakers have strong magnets that can disrupt the micro:bit’s magnetometer.
- Go to https://github.com/simonmonk/mbms/ to access the book’s code repository and click the link for Magnetic Alarm. Once the program has opened, click Download and then copy the hex file onto your micro:bit. If you get stuck on this, head back to Chapter 1.
If you prefer to use Python, you’ll find the code for this at the same website, along with instructions for downloading and using the book’s examples. The Python file for this experiment is ch_04_Magnetic_Alarm.py.
- Once you have programmed the micro:bit, when you put the magnet close to the micro:bit, the speaker should be silent. Then when you move the magnet more than a few inches away, the alarm should sound. Once the program is working, disconnect the micro:bit from your computer and attach it to either a USB power adapter or battery pack. Then attach the micro:bit and speaker to your door frame. Fix the magnet to the door itself, within an inch (2.5 cm) of the micro:bit.
WARNING Adhesive putty can make a mess, so make sure you get permission before you start sticking things to the door and frame.
If you’re using a USB power adapter, you’ll need an electrical outlet close enough to the door for the USB power adapter to reach.

Code
In both versions of the code, the magnetic field strength is first read and then compared with a threshold. If the threshold is exceeded, then a note is played.
Blocks Code
Here is the Blocks code for the project.
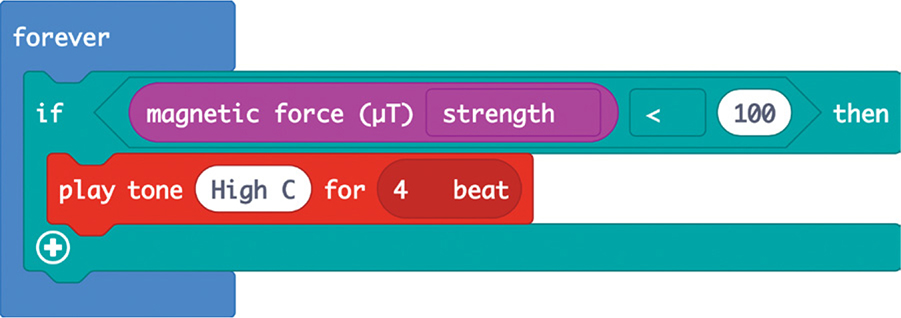
This code is basically saying that if the micro:bit reads a magnetic force strength of less than 100 µT, it should play a particular note for 4 beats. Since the strength of Earth’s magnetic field at the surface has a range of 25 to 65 µT, setting a threshold at 100 µT should ensure we’re detecting the magnet and not just picking up Earth’s magnetic field.
MicroPython Code
Here’s the MicroPython version of the program:
import music
while True:
if compass.get_field_strength() < 160000:
music.pitch(523, 1000)
This code works in the same way as the Blocks code, but because the units of get_field_strength are different from those of the magnetic force block, the threshold for sounding the alarm is different than in the Blocks code version. The units of the field strength returned by get_field_strength are not specified in its documentation (https://microbit-micropython.readthedocs.io/en/latest/compass.html), so I chose the threshold value of 160,000 by trial and error.
We supply the command music.pitch with a frequency of tone to produce. Unlike with the Blocks code, here we have to specify the frequency of the sound wave rather than a note. A frequency of 523 hertz (Hz) is the frequency of high C. The music.pitch command also requires a length of time to play the note. Here we’ve told the micro:bit to play the note for 1,000 milliseconds, or 1 second.
Things to Try
Could a thief defeat your new alarm? Try placing a second magnet on the other side of the door frame, opposite the micro:bit. If the second magnet is close enough to the micro:bit, you may be able to open the door without triggering the alarm.
You could also change the alarm tone by changing the frequency to some other value. The following table shows some notes and their corresponding frequencies (to the nearest whole number).
Note |
Frequency (Hz) |
Middle C |
262 |
D |
294 |
E |
330 |
F |
349 |
G |
392 |
A |
440 |
B |
494 |
High C |
523 |
You can find a full table of musical notes and their frequencies at https://www.liutaiomottola.com/formulae/freqtab.htm.
SUMMARY
The micro:bit’s magnetometer is useful for more than working out which direction you’re facing. In this chapter, we’ve explored how you can use it to sense the presence of a magnet and even to do some science by measuring magnetic field strength.
In the next chapter, we’ll explore one of the micro:bit’s other built-in sensors—its accelerometer.