
- Microsoft® Visual Studio® Tips
- SPECIAL OFFER: Upgrade this ebook with O’Reilly
- Praise for Microsoft Visual Studio Tips . . .
- Foreword
- Introduction
- Acknowledgements
- 1. Get Back to Basics with Your Editor
- Basic Editing
- Text Editing
- Tip 1.1: How to not accidentally copy a blank line
- Tip 1.2: How to cycle through the Clipboard ring to paste different things
- Tip 1.3: You can use Ctrl+Enter to insert a line above and Ctrl+Shift+Enter to insert a line below
- Tip 1.4: You can use Ctrl+W to select the current word
- Tip 1.5: You can use Ctrl+Delete to delete the next word and Ctrl+Backspace to delete the preceding word
- Tip 1.6: You can use Ctrl+L to cut the current line and Ctrl+Shift+L to delete the current line
- Tip 1.7: How to delete horizontal white space at the beginning of a line
- Tip 1.8: You can drag code or text to a new location
- Tip 1.9: You can right-drag code to Move Here or Copy Here
- Tip 1.10: How to transpose characters, words, and lines in the editor
- Tip 1.11: You can use a keyboard shortcut to uppercase or lowercase a word in the editor
- Undo/Redo
- Text Editing
- Scrolling and Navigation
- Scrolling
- Navigating Within and Among Editors
- Tip 1.16: How to navigate forward and backward in the editor all because of go-back markers
- Tip 1.17: How to use Undo to jump the cursor back to the last insertion point
- Tip 1.18: How to reach the navigation bar via the keyboard
- Tip 1.19: How to split a window and create new windows
- Tip 1.20: You can use F6 to jump between split panes in the editor
- Tip 1.21: How to enable URL navigation within the editor
- Tip 1.22: How to use Ctrl+G without the Go To Line dialog box popping up
- Word Wrap versus Virtual Space
- Editor Fonts and Colors
- Printing
- Status Bar
- Basic Editing
- 2. Make Your Editor Work for You
- Advanced Editing
- Selection
- Tip 2.1: How to use box/column selection in the editor
- Tip 2.2: How to jump to the beginning of some selected text when hitting escape
- Tip 2.3: You can use Ctrl+= to select code from the current cursor location to the last go-back marker
- Tip 2.4: How to swap the current anchor position in the editor
- Commenting
- Formatting
- Tip 2.6: You can display guidelines in the editor to help format your code
- Tip 2.7: How to format the document, the selected text, or just the current line
- Tip 2.8: How to keep tabs or to insert spaces
- Tip 2.9: How to convert spaces to tabs and tabs to spaces
- Tip 2.10: You can increase and decrease the line indent from the text editor toolbar
- Tip 2.11: What’s the difference between smart indenting and block indenting?
- Outlining
- Emulations
- Binary Editor
- Delimiter Highlighting and Brace Matching
- Clean up unused code
- AutoRecover
- File Extensions
- Selection
- Opening Files
- Opening Files and Editor Windows
- Tip 2.22: How to reuse the same editor window when opening files
- Tip 2.23: How to automatically refresh an open document in the editor
- Tip 2.24: How to edit a read-only file in Visual Studio
- Tip 2.25: How to customize what directory the File–Open–File dialog box opens to
- Tip 2.26: How to customize the number of items shown in the Recent Files lists (and where to find those lists)
- Opening Files and Editor Windows
- Bookmarks
- IntelliSense
- Statement Completion, Parameter Info, and Complete Word
- Tip 2.30: You can use Ctrl+J to invoke statement completion
- Tip 2.31: How to display parameter info for a function
- Tip 2.32: How to display quick info for a function
- Tip 2.33: How to complete a word
- Tip 2.34: How to increase the statement completion font size
- Tip 2.35: You can resize the statement completion dialog box
- Tip 2.36: You can toggle between the Common and All Statement Completion tabs via the keyboard
- Tip 2.37: How to turn off IntelliSense by default
- Statement Completion, Parameter Info, and Complete Word
- Code Snippets
- Using Code Snippets
- Tip 2.38: You can use Ctrl+K, Ctrl+X to insert a code snippet
- Tip 2.39: You can insert a code snippet via its shortcut keyword
- Tip 2.40: You can insert a snippet by pressing Tab Tab
- Tip 2.41: How to browse code snippets and add new ones
- Tip 2.42: How to change default values and variables in a code snippet
- Tip 2.43: How to share code snippets with your team
- Tip 2.44: How to insert a code snippet around a block of code
- Using Code Snippets
- Advanced Editing
- 3. Find What You Are Searching For
- 4. Manage Your Environment Layout
- Document Windows
- File Tab Channel
- Tip 4.1: You can use Ctrl+Alt+Down Arrow to drop down the file tab channel file menu
- Tip 4.2: You can use Close All But This on files in the file tab channel
- Tip 4.3: You can copy a file’s full path from the file tab channel
- Tip 4.4: You can open a Windows Explorer browser directly to the active file
- Tip 4.5: How to close just the selected files you want
- Tip 4.6: Under what condition does the file tab channel drop-down button change its icon?
- IDE Navigator
- Keyboard Navigation
- MDI Mode
- File Tab Channel
- Tool Windows
- Dockable State
- Autohiding State
- Tip 4.17: You can autohide all of your tool windows with one command
- Tip 4.18: You can customize how pressing a tool window push pin autohides the tool window or tool window tab group
- Tip 4.19: You can show autohiding tool windows via the tool window autohide channel
- Tip 4.20: You can double-click the tool window title bar to redock the tool window
- Tip 4.21: You can use Shift+Click to automatically dock an autohiding tool window
- Tip 4.22: You can speed up or slow down how fast a tool window slides out from a docked position
- Floating State
- Tabbed Document State
- Keyboard Navigation
- Hide State
- Hidden Keyboard Shortcuts
- Window Layouts
- Toolbars and Context Menus
- Toolbars
- Tip 4.36: You can make a toolbar float
- Tip 4.37: You can hide or show the default buttons from any toolbar
- Tip 4.38: How to display any toolbar at any time
- Tip 4.39: You can switch and swap buttons on the toolbars while the Tools–Customize dialog box is showing
- Tip 4.40: You can show shortcut keys in toolbar ToolTips
- Context Menus
- Toolbars
- Document Windows
- 5. Discover More Tools for Your Design Time, Part 1
- Tool Windows
- Command Window
- Output Window
- Tip 5.6: You can use F8 and Shift+F8 to navigate among errors in the Output window
- Tip 5.7: You can double-click messages in the Output window to jump to that location in the code
- Tip 5.8: You can use the keyboard to jump to various panes within the Output window
- Tip 5.9: How to stop the Output window from showing itself during a build
- Tip 5.10: You can enable word wrap in the Output window
- Tip 5.11: You can customize the color scheme in the Output window
- Tip 5.12: You can redirect debug messages to the Output window
- Tip 5.13: You cannot enable Stop Search on the Output window
- Toolbox
- Tip 5.14: You can drag and drop code onto the Toolbox’s General tab
- Tip 5.15: Why does each Toolbox group have a Pointer control?
- Tip 5.16: How to stop the Toolbox from autopopulating with items found in the solution
- Tip 5.17: You can use * to expand all and / to collapse all in the Toolbox
- Tip 5.18: You can use Ctrl+Up Arrow and Ctrl+Down Arrow to move among the various control groups in the Toolbox
- Tip 5.19: You can sort items in the Toolbox alphabetically
- Tip 5.20: You can switch between the Icon view and List Item view in the Toolbox
- Tip 5.21: You can use Show All to find your hiding Toolbox controls
- Tip 5.22: You can use Ctrl+C to copy controls in a Toolbox tab and then use Ctrl+V to paste the controls into another Toolbox tab
- Tip 5.23: You can create new Toolbox tabs
- Task List
- Tip 5.24: You can use the Task List to create user tasks that are separate from your code
- Tip 5.25: You can assign a priority to your Task List’s user tasks
- Tip 5.26: How to create and view TODO comments in the Task List
- Tip 5.27: You can create shortcuts in your Task List
- Tip 5.28: You can show HACK, UNDONE, and custom tokens in the Task List
- Tip 5.29: How to disable the prompt for deleting the Task List’s user tasks
- Tip 5.30: You can show a full file path in the Task List
- Tip 5.31: You can create keyboard shortcuts to navigate among the various Task List categories (by using View.NextTask and View.PreviousTask)
- Object Browser
- Tip 5.32: You can use Ctrl+Alt+J to open the Object Browser window
- Tip 5.33: You can specify to show components in your solution only in the Object Browser
- Tip 5.34: You can create a custom list of components for the Object Browser
- Tip 5.35: You can add references to your solution directly from the Object Browser
- Tip 5.36: How to use navigate forward and back in the Object Browser
- Tip 5.37: You can create a keyboard shortcut for adding references to a solution from the Object Browser
- Tip 5.38: You can customize both your Object pane and Members pane in the Object Browser
- Tip 5.39: You can choose whether to show base types in the Object Browser
- Tip 5.40: You can hide or show hidden members and types in the Object Browser
- Tip 5.41: You can mark methods and types as Hidden so that they don’t appear in Microsoft IntelliSense or in the Object Browser
- Tip 5.42: What does Other mean in Show Other Members in Object Browser Settings?
- Tip 5.43: How to stop displaying all inherited members in the Object Browser Member pane
- Tip 5.44: You can show extension methods in the Object Browser
- Tip 5.45: What are the two primary means of searching for objects in the Object Browser?
- Tip 5.46: You can use F12 in the Object Browser to go to the definition of whatever is selected
- Tip 5.47: You can use a Find Symbol search (Shift+F12) in the Object Browser
- Tip 5.48: How to use type-ahead selection support in the Object Browser
- Tip 5.49: You can export all your Object Browser customizations in a .vssettings file
- Tip 5.50: Why the Object Browser has so many commands you can bind to (and how to create a keyboard shortcut to clear the search results)
- Tip 5.51: You can use the View.Forward (Alt+Right Arrow) and View.Backward (Alt+Left Arrow) global commands in the Object Browser
- Tool Windows
- 6. Discover More Tools for Your Design Time, Part 2
- Dialog Boxes
- Import And Export Settings
- Tip 6.1: How to find what development settings you last reset to
- Tip 6.2: How to reset your environment settings via Tools–Import And Export Settings
- Tip 6.3: What settings are contained in the New Project Dialog Preferred Language category
- Tip 6.4: You can add your own files to the Import And Export Settings–Reset page list
- Tip 6.5: What’s the difference between resetting settings and importing settings?
- Tip 6.6: You can save your current settings prior to doing an Import or Reset
- Tip 6.7: How Visual Studio automatically saves all your current settings every time you close it
- Tip 6.8: You can copy the full file path from the final wizard page when exporting settings
- Tip 6.9: You can use team settings to keep Visual Studio settings on different machines in sync
- External Tools
- Tip 6.10: You can run external tools from the IDE
- Tip 6.11: You can add your own external tools to the list
- Tip 6.12: You can rearrange the list of external tools and create mnemonics
- Tip 6.13: You can have your external tool’s text displayed in the Output window
- Tip 6.14: How the external tools tokens work
- Tip 6.15: You can prompt for arguments when you run an external tool
- Import And Export Settings
- Find Combo Box
- Find Combo Box Runs Commands
- Tip 6.16: How to have fun with the Find combo box
- Tip 6.17: You can press Ctrl+/ to run Visual Studio commands in the Find combo box
- Tip 6.18: How to open a file in the solution without using either a tool window or a dialog box
- Tip 6.19: You can set a breakpoint on a function from the Find combo box
- Find Combo Box Runs Commands
- Start Page
- Dialog Boxes
- 7. Know Your Solutions, and Other Project and Debugging Tweaks
- Project and Solution System
- Multitargeting
- Projects
- Tip 7.2: How to change the default new-project location
- Tip 7.3: You can toggle between small icons and large icons in the New Project dialog box
- Tip 7.4: You can use solution folders to hide projects
- Tip 7.5: You can create temp or "throw away" projects
- Tip 7.6: How to hide or show the Project Location Is Not Trusted message box
- Build Configurations
- Solution Explorer
- Tip 7.8: How to show the Miscellaneous Files project in the Solution Explorer
- Tip 7.9: There is type-ahead selection support in the Solution Explorer
- Tip 7.10: You can add a solution to a solution
- Tip 7.11: You can automatically perform a rename within an entire project when you rename a file in the Solution Explorer
- Tip 7.12: How to hide or show a solution in the Solution Explorer
- Tip 7.13: How to have the Solution Explorer always show (or not show) the file currently opened in the editor
- Debugging
- Tracepoints
- Breakpoints
- Tip 7.15: You can set a breakpoint by clicking the indicator margin
- Tip 7.16: You can press F9 to set a breakpoint on the current line
- Tip 7.17: You can use Ctrl+F9 to enable or disable a breakpoint
- Tip 7.18: You can set conditional breakpoints
- Tip 7.19: You can use breakpoint filters to break the right process
- Tip 7.20: You can press Ctrl+B to set a breakpoint at the desired function
- Tip 7.21: You can press Ctrl+Alt+B to open the Breakpoints window
- Tip 7.22: You can press Ctrl+Shift+F9 to delete all breakpoints
- Tip 7.23: You can disable the warning message before you delete all breakpoints
- DataTips
- Multiple Projects
- Compiling and Debugging Windows
- Error List
- Tip 7.28: You can use Ctrl+Shift+F12 to view the next error listed in the Error List
- Tip 7.29: How to customize your Error List view
- Tip 7.30: You can view an error’s documentation directly from the Error List
- Tip 7.31: You can do multicolumn sorting (secondary sort, and so forth) in both the Error List and the Task List
- Tip 7.32: You can bind the show Errors, Warnings, and Messages buttons to keyboard shortcuts
- Tip 7.33: How to show or prevent the Error List from appearing after a failed build
- Watch Window
- Immediate Window
- Project and Solution System
- A. Visual Studio Factoids
- Visual Studio Q&A
- Why is the executable file called devenv.exe instead of visualstudio.exe?
- Is the Visual Studio logo an infinity symbol or Möbius strip?
- What do the colors in the Visual Studio logo signify?
- Solution Explorer: Is it on the left side or right side of the IDE?
- Why is there a "Solution" concept?
- Why Are the Tool Window Tabs Shown at the Bottom of a Tool Window Group and the File Tabs Are at the Top of the File Tab Channel?
- Why is Common7 not Common8 or Common9?
- Visual Studio Q&A
- B. Tips on Blogging Tips
- Secret "Tip of the Day" Formula
- Tip 1: Focus on one specific action per tip
- Tip 2: Provide an image with each tip
- Tip 3: Reference a credible source
- Tip 4: Share and collect stories whenever possible
- Tip 5: Queue up your tips far, far in advance
- Tip 6: Set your tips to go live before dawn
- Tip 7: Use Windows Live Writer to write and queue your tips
- Secret "Tip of the Day" Formula
- C. Software Testing Tips
- D. How I Started Programming
- E. About the Author
- F. Additional Resources for Developers from Microsoft Press
- G. More Great Developer Resources
- Index
- SPECIAL OFFER: Upgrade this ebook with O’Reilly
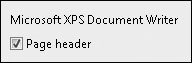
It was a bittersweet day when I learned that you can print to a file, using the Microsoft XPS Document Writer that appears in the list of installed printers in the Print dialog box. It was sweet because it made testing printing so much faster. But it was bitter because all my grand plans of buying a top-of-the-line color printer for my office became moot.
We all have to print at some point. So, when the time comes for you to print a file, it’s good to know what your options are in customizing how your printed pages look.
Sara Aside
Back in the Visual Studio .NET 2003 days, you had to go to File–Page Setup and check Line Numbers (in the lower left corner) to print line numbers, regardless of whether they were visible in the editor. For Visual Studio 2005 and beyond, we moved this option to the Print dialog box.
To print line numbers, go to File–Print, and on the lower left, you’ll see two options:
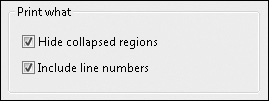
Here’s a bonus tip, because I cannot bring myself to write a "Did you know ... how to hide collapsed regions when printing" tip. It makes me yawn. You can also hide collapsed regions. I’ve used this when I wanted to print out just my test case function and I didn’t want to print out any of the helper functions because they all lived in the same test case file.
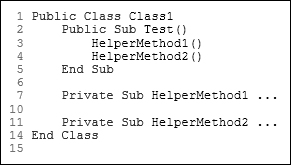
The preceding illustration, which I printed to an .xps file (no, I didn’t scan in a printed page), shows how the hidden collapsed regions will print out as ellipses.
I think we all, at one point in time, have tried to customize our editor colors or change keywords to bold or something else, and then pressed the Print button. Yet, we arrive at the printer confused that our changes haven’t been applied.
To customize your fonts and colors for printing, go to Tools–Options–Environment–Fonts And Colors and change the selection in the Show Settings For drop-down list to Printer. Now you can customize your fonts and colors, including bold.

Additionally, let’s say that you’ve already tweaked your colors or just want to use what you see in the editor. Then press the Use button and select Text Editor Settings. The default settings are restored to the original text editor defaults.
-
No Comment