All good things must come to an end.
Throughout the book, I’ve talked about having tested nearly every feature area of Microsoft Visual Studio, moving to a new area every six months or so. Testing the project and solution feature area completed my tour of the core IDE features. After four and a half years of testing Visual Studio by using the build of Visual Studio we were testing to write test code (yes, it is meant to be recursively confusing) and after three product cycles, I decided it was time to get up and stretch my program management skills. Shortly after Visual Studio 2005 launched, I moved to the Visual Studio Community Team as a program manager.
I definitely miss software testing. It was so much fun to be creative and break stuff. But then again, getting to spray-paint "Embrace Open Source on CodePlex" on your Microsoft office window is a pleasure that’s right up there with "You broke it, and I’m telling."
You will always have a solution to contain your projects, even if you have only one project. The solution concept started in Visual Studio .NET 2002 as a way to support having one IDE for all the various languages. Following are some tips for interacting with both your project (or projects) and your solution.
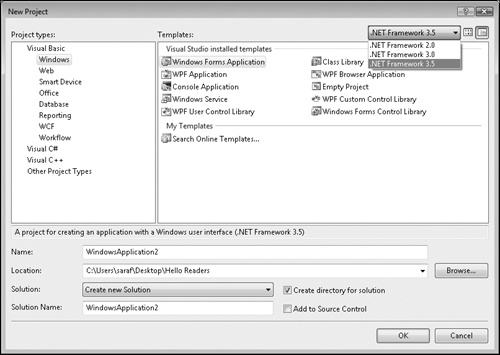
Prior to Visual Studio 2008, there was only one version of the Microsoft .NET Framework supported for any given version of the IDE. Multitargeting allows you to use the latest features in the Visual Studio 2008 IDE while providing the flexibility to choose which version of the .NET Framework to target.
A popular new feature for Visual Studio 2008 is the ability to multitarget the .NET Framework. This means that you can use the latest version of the IDE but still be able to target the .NET Framework 2.0 (or .NET Framework 3.0) as needed.
Scott Guthrie has an excellent write-up on multitargeting support on his blog at http://weblogs.asp.net/scottgu/archive/2007/06/20/vs-2008-multi-targeting-support.aspx.
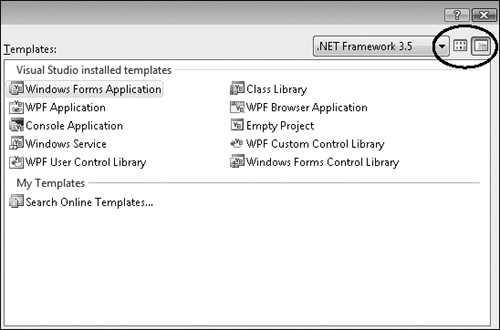
Because Scott did his write-up in C#, I’ll take a picture using Visual Basic. And apparently Scott knows about Tip 7.3: You can toggle between small icons and large icons in the New Project dialog box. =)
This section contains small tweaks for customizing your projects, ranging from using solution folders to hide your project to creating "throw away" projects that won’t cause the ConsoleApplication57 phenomenon.
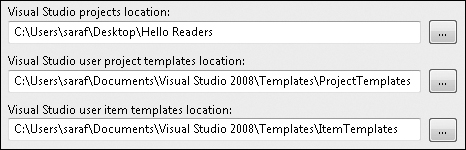
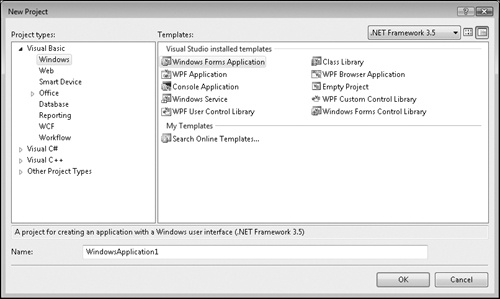
In the New Project dialog box, you can change the default new-project location.
The option to do so lives in Tools–Options–Projects And Solutions–General.
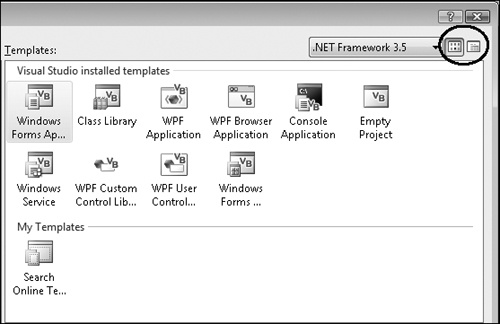
Okay, be honest, how long have you been using Visual Studio and are just now noticing those icons for the first time? =) I had been on the Visual Studio team for an entire year before someone pointed them out to me. You learn something new every day.
Here’s the New Project dialog box using small icons.
And here’s the New Project dialog box using large icons.
In the Solution Explorer, you can group projects inside of solution folders to improve the manageability of solutions that contain a large number of projects.
With the focus on the Solution node in the Solution Explorer, the Add New Solution Folder button becomes available. Now you can drag projects into this solution folder, as shown next.
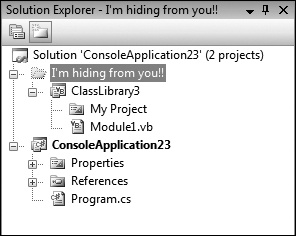
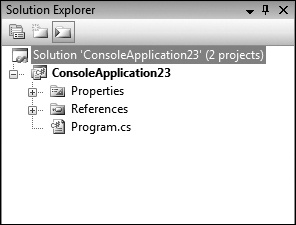
But let’s actually hide the project. Right-click your newly created solution folder and choose Hide Folder. Now the project is hidden, and a new icon appears to unhide the projects. And yes, you can still build successfully in this state.
If you need to create small projects to try things out or you’re not sure how you want to set up things before you save, there’s an option for this.
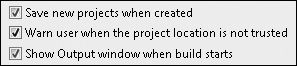
Go to Tools–Options–Projects And Solutions–General, and uncheck the Save New Projects When Created check box.
When this option is unchecked, the Location edit box and several others will be gone from the New Project dialog box.
This tip is helpful to know in case you, like several readers who have contacted me, accidentally find yourself missing a few edit boxes.
When you attempt to open a project hosted on a Universal Naming Convention (UNC) share (for example, \serverfolder), you’ll get the following warning message box.
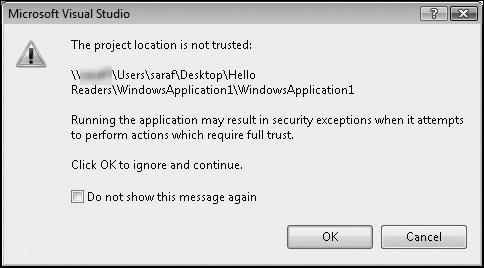
If you want to see this message again, but previously you checked the Do Not Show This Message Again check box, you can go to Tools–Options–Projects And Solutions–General and check the Warn User When The Project Location Is Not Trusted check box.
For more information on why UNC shares are not trusted or what to do about it, here’s a pointer to the documentation: http://msdn.microsoft.com/en-us/library/bs2bkwxc.aspx.
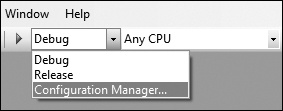
The Configuration Manager controls what flavors of builds to produce. The simplest of these are Debug, for testing proposes, and Release, for actual end-user use, but you can also create your own. There are various ways of tweaking your build configuration throughout the IDE, but for some projects, a lot of this functionality isn’t needed. In these cases, there’s a feature called Simplified Build Configurations, which hides a lot of these options.
If you have never touched the Debug or Release configurations or have never heard of the Configuration Manager, you might want to try this tip.
Under Tools–Options–Projects And Solutions, you’ll see the Show Advanced Build Configurations option. Unchecking this option does quite a few things behind the scenes, but first, I’ll briefly describe the Show Advanced Build Configurations option.
By default, Visual Studio comes with two build configurations: Debug and Release. You are free to create your own build configurations via the Configuration Manager. Check out some of my old blog posts on how the Configuration Manager works, if you want to create your own custom build configurations: http://blogs.msdn.com/saraford/archive/2005/08/16/452423.aspx and http://blogs.msdn.com/saraford/archive/2005/08/18/453346.aspx.
If you are using a custom build configuration and you uncheck the Show Advanced Build Configuration check box, Visual Studio will pretend you still have it checked, enabling you to still open the Configuration Manager.
When you are working in Simplified Build Configuration mode, the following happens behind the scenes:
F5 (Debug.Start) runs under the debugger in the Debug configuration. This means that the binaries will be produced in a Debug folder in the output file path.
Ctrl+F5 (Debug.StartWithoutDebugging) runs (with no debugger) in Release configuration. This means the binaries are produced in a Release folder in the output file path.
If you change the Build output path (for example, binmyRelease) and use Debug. StartWithoutDebugging (Ctrl+F5), Visual Studio builds the release in the myRelease folder. But if you press F5, Visual Studio still puts it in the Debug folder.
From a UI perspective, Visual Studio hides all access points to the Configuration Manager when in Simplified Build Configuration. For example, the Configuration (Release or Debug) and Platform (Any CPU, and so forth) options disabled on the standard toolbar.

Additionally, the Configuration Manager command disappears on the Solution Explorer context menu, and Configuration and Platform disappear from the Project Properties–Debug page.
And that’s more than I ever wanted to type about Simplified Build Configurations, and probably more than you ever wanted to know, but at least now you understand what that little option does. =)
The Solution Explorer contains all the files associated with your project (or projects), and obviously, it also contains your solution. Regardless of how much time you spend in the IDE, you are almost guaranteed to use the Solution Explorer at some point, whether it is to add a reference to the project or simply open a file. This section explores some tips on how to customize and navigate the Solution Explorer.
On the Tools–Options–Environment–Documents page, you’ll find the Show Miscellaneous Files In Solution Explorer option.

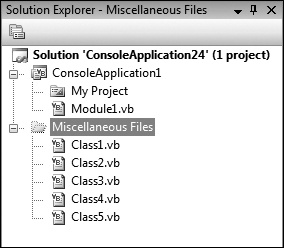
I find this feature very useful when I’m constantly looking at the same files that live outside my current solution. For example, when writing test cases, I would have the actual test case code as its own solution and just reference the test library DLLs. When stepping through the test library, these files get collected under the Miscellaneous Files project. Yes, Miscellaneous Files is actually a project.
When you reopen the solution, the various miscellaneous files will tag along, just how you left them, provided you have the subsequent option X Items Saved In The Miscellaneous Files Project set to something greater than 0.
I think this tip is really cool. I didn’t know this one until a coworker showed me, and this was after five years of working on the Visual Studio team.
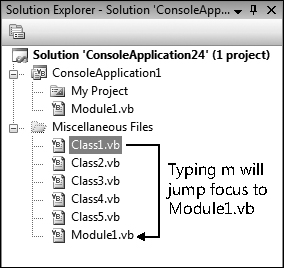
The Solution Explorer supports type-ahead selection, so wherever you are in the tree view, just start typing the full name of your file and the focus will jump to that match, whether a partial match or a full file name match.
Today’s tip falls into the "You can do what!?" category.
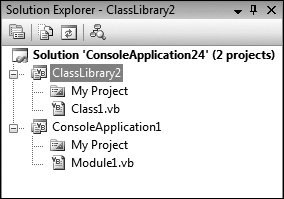
Open your primary solution (the solution you want to add another solution to).
Go to File–Add–Add Existing Project.
Change Files Of Type to Solution Files.
Select the solution file you want to add.

These steps add the contents of ClassLibrary2.sln to the ConsoleApplication1 solution, as shown here.
Let’s say you create a new class file called Class1. If you try to rename Class1 in the Solution Explorer, Visual Studio prompts you to decide whether you want to rename all references to this code element in your project.
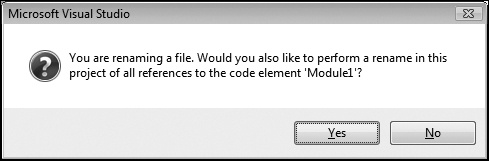
But I’m more of an IDE tips know-it-all, so the real "Did you know" here is this: Did you know you can disable this prompt and just have Visual Studio automatically do the rename for you?
Go to Tools–Options–Projects And Solutions–General and uncheck the Prompt For Symbolic Renaming When Renaming Files option.
Sometimes, you might find yourself in a state where the solution is not shown. For example, some of the default environment settings, like the Visual Basic Development Settings, have this behavior enabled.
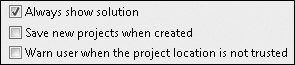
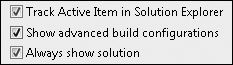
If you find yourself in this state and want the solution back, go to Tools–Options–Projects And Solutions–General and check the Always Show Solution check box.
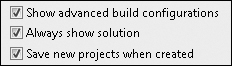
Having said all this, I’ll warn you that Visual Studio overrides this setting and always shows the solution if the solution has two or more projects in it.
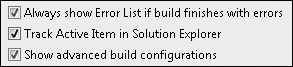
Because the default is to have the Track Active Item In Solution Explorer option enabled in the General Development Settings, a more appropriate tip is one that shows you either how to turn it back on or how to turn it off.
On the Tools–Options–Projects And Solutions–General page, there’s the Track Active Item In Solution Explorer check box. When enabled, this option will sync your Solution Explorer with the open document.