
29. Form Validation Using ASP.NET
The Need for Form Validation
You’re no doubt familiar with the saying “Garbage in, garbage out.” Web applications that require data entry by users provide the perfect opportunity to put that old saying into practice. Try as you might, you can never predict the actions of users of your site. That’s why you must take every opportunity to prevent any user from shooting himself or herself in the foot, or worse yet, corrupting your data with bad input.
Web developers have always struggled with implementing robust form validation. Many web developers are not experts at client-side scripting, and because the most efficient form validation is client-based, that puts them at a distinct disadvantage. Perhaps you are one of those JavaScript-challenged developers yourself. Well, fear not. ASP.NET can solve the problem of form validation for you.
The ASP.NET Validation Controls
To access the ASP.NET validation controls, click the plus sign next to Validation in the ASP.NET Controls section of the Toolbox. Six validation controls are available. Before we dig too deep into how to use the validation controls provided by ASP.NET, let’s first have a look at the various controls that are available.
CompareValidator
CompareValidator compares the value in one form field to the value in a second form field to see if they are equal. For example, when asking a user to create a password, it’s common practice to present the user with one text box for the password and a second text box to confirm the password. CompareValidator can be used to easily ensure that both text boxes contain the same password.
RangeValidator
RangeValidator is used to ensure that the value entered in a form field falls within a specified range. When using this control, you specify minimum and maximum values for a particular form field. Validation fails if a value entered is outside that range.
RegularExpressionValidator
RegularExpressionValidator is one of the most versatile validation controls. It enables you to validate a form field based on a regular expression. Several common regular expressions are provided for you.
The ASP.NET validation controls are powerful, but some developers want even more, especially in the area of cross-browser compatibility.
If you’re interested in enhancing the ASP.NET validation controls, you might want to check out Peter Blum’s “Professional Validation and More” suite of controls at www.peterblum.com/VAM/Home.aspx. These controls add significant functionality to the validation controls that ship with ASP.NET. Keep in mind, however, that you won’t be able to add these controls to the Expression Web Toolbox. If you want to use them from the Toolbox, you’ll need to use Visual Web Developer Express or Visual Studio.
RequiredFieldValidator
RequiredFieldValidator enables you to specify that a particular form field is required. The user will then be required to enter a value or validation will fail.
CustomValidator
CustomValidator enables you to implement form field validation when no other control is suitable for your needs.
When you use the CustomValidator control, you can specify the name of a client-side function that is used to validate your form field.
ValidationSummary
The ValidationSummary control displays a summary of all validation failures in one location on your page. This control is most useful when you have a large form and want validation problems to appear in one place to make it easier on your users.
Regular expressions are difficult to learn. If you want to learn more about regular expressions, read Sams Teach Yourself Regular Expressions in 10 Minutes from Sams Publishing. The title obviously is not realistic, but this is an excellent book in downloadable format (from www.samspublishing.com).
I highly recommend this book to anyone who is interested in learning how to take advantage of regular expressions. I discovered it a couple of years ago, bought it immediately, and it has become an important reference for me.
Common Properties
Several validation controls have common properties. The ValidationSummary control, however, is an exception. After you learn how to use these properties for one of the controls, you’ll be able to easily use the same techniques in any of the other validation controls.
ErrorMessage
The ErrorMessage text property is displayed when a validation error occurs. Suppose you have a RequiredFieldValidator attached to a text box for the user’s name and the user attempts to submit a form without entering her name in the required field. In that scenario, your ErrorMessage property might be something like “Name is a required field. Please enter your name.”
Form field validation is vital to the security of your site. In a real-world application, you should always implement form field validation on both the client and the server.
ASP.NET validation controls will always validate on the server as well, but if you implement your own validation instead of using the validation controls, make sure you validate user input in your server-side code.
ControlToValidate
The ControlToValidate text property defines the ASP.NET control on the page to which the validation control is connected. Expression Web provides a drop-down list in the Tag Properties pane that lists all the valid controls on the page. To set this property, simply select the name of the control from the list.
You can change the color of the text by changing the ForeColor property using the Tag Properties pane.
Display
The Display property can be set to None, Static, or Dynamic. Static is the default value.
This property controls the CSS code that is generated by ASP.NET for the validation control. Because a validation control is displayed on a page only when validation fails, the appearance of the control can sometimes cause other page elements to shift. When that happens, the shifting of the other page elements can result in poor appearance.
When the Display property is set to Static, the validation control renders with a visibility style of hidden. Therefore, the control takes up its normal amount of space on the page but is not visible. This setting prevents other page elements from shifting when the validation control becomes visible.
When the Display property is set to Dynamic, the control renders with a display attribute of none. This causes the browser to not render the control at all until it is required. This can result in the shifting of other page elements when the validation control is displayed.
If you are not interested in displaying the validation error message next to controls (such as when you are using a ValidationSummary control), set the Display property to None to prevent the rendering of the controls in all cases.
EnableClientScript
By default, ASP.NET validation controls generate client-side JavaScript to validate form fields. If validation fails, users are notified immediately without having to wait for a return trip to the web server. If you want to prevent ASP.NET from generating the client script used for validation, you can set the EnableClientScript property to false.
You might be wondering why you would want to disable client scripts. Suppose you are using validation controls for server-side validation only. You have some custom scripts that you or another developer wrote that are handling all the client-side validation. In that case, you would want to disable ASP.NET’s generated code. You also might want to disable the client-side script if you are using numerous validation controls and you determine that the generated code makes the page too large to download quickly.
Remember that ASP.NET validation controls will always validate on the server as well. Therefore, even if you set the EnableClientScript property to false, your validation will still occur when the user submits the form.
SetFocusOnError
The SetFocusOnError property specifies whether focus should be given to a form field when validation fails. For example, suppose you have a Text box control for a user’s phone number and you have added a RequiredFieldValidator to that text box with the SetFocusOnError property set to true. If the user fails to enter a value and attempts to submit the form, the text in the ErrorMessage property will be displayed and the cursor will be placed inside the text box so the user can correct the error.
ValidationGroup
The ValidationGroup property enables you to assign one or more validation controls to a group. This property makes validating multiple forms on a page without having them interfere with each other easy. You’ll read more on validation groups later in this chapter.
Creating a Validated Form
Now that we’ve covered the basic properties and concepts behind validation controls, let’s build a form that utilizes ASP.NET validation controls.
![]() For more information on using the Microsoft Expression Development Server, see Chapter 33, “Using the Microsoft Expression Development Server.”
For more information on using the Microsoft Expression Development Server, see Chapter 33, “Using the Microsoft Expression Development Server.”
Create a new disk-based site and add an ASP.NET Web Form. We’ll create a contact form with the following requirements:
• The user’s first name and last name are required fields.
• The user will be required to enter his phone number in the format ###-###-####.
• The user will be required to provide a valid email address.
• The user must repeat his email address for verification.
• The user can optionally provide a street address and city.
• The user can provide a U.S. ZIP code, but if provided, it must be in the proper five-digit format.
![]() For more information on creating sites, see Chapter 2, “Creating, Opening, and Importing Sites.”
For more information on creating sites, see Chapter 2, “Creating, Opening, and Importing Sites.”
![]() For more information on creating ASP.NET Web Forms, see Chapter 25, “Using Standard ASP.NET Controls.”
For more information on creating ASP.NET Web Forms, see Chapter 25, “Using Standard ASP.NET Controls.”
I’ve asked you to create a disk-based site so you can use the Microsoft Expression Development Server to test it. If you have a local copy of IIS installed and you want to use it, please do so. Just be sure that ASP.NET is working properly on it before you begin.
Creating the Form
Before we add validation controls to the page, let’s create the form:
1. Position the insertion point inside the Web Form and create a new table that is 2 rows by 2 columns. Be sure to set the border width to 0 and the width of the table to 550px.
2. Drag the vertical separator between columns to the left so the left column is approximately 150px in width.
![]() For more information on creating tables in Expression Web, see Chapter 5, “Using Tables.”
For more information on creating tables in Expression Web, see Chapter 5, “Using Tables.”
3. In the upper-left cell, enter the text First name:.
4. In the upper-right cell, insert an ASP.NET TextBox control.
5. In the left cell of the second row, enter the text Last name:.
6. In the right cell of the second row, insert an ASP.NET TextBox control.
7. Click to the right of the text box you’ve just added so it is no longer selected.
8. Press Tab to insert a new table row.
9. Enter the text Phone number: in the left cell of the new row.
10. Add an ASP.NET TextBox control to the right cell of the new row.
11. Create a new table row.
12. Enter the text E-mail address: in the left cell of the new row.
13. Add an ASP.NET TextBox control to the right cell of the new row.
14. Create a new table row.
15. Enter the text Confirm e-mail address: in the left cell of the new row.
16. Add an ASP.NET TextBox control to the right cell of the new row.
17. Create a new table row.
18. Enter the text Address: in the left cell of the new row.
19. Add an ASP.NET TextBox control to the right cell of the new row. Change the width of the new text box to 300px.
20. Create a new table row.
21. Enter the text City: in the left cell of the new row.
22. Add an ASP.NET TextBox control to the right cell of the new row.
23. Create a new table row.
24. Enter the text State: in the left cell of the new row.
25. Add an ASP.NET TextBox control to the right cell of the new row. Change the width of the new text box to 50px.
26. Create a new table row.
27. Enter the text ZIP Code: in the left cell of the new row.
28. Add an ASP.NET TextBox control to the right cell of the new row.
29. Create a new table row.
30. Add a new ASP.NET Button control to the right cell of the new row.
31. Change the align property of the right cell to right.
Your table should look like Figure 29.1.

Figure 29.1. Using a table to lay out your form will make for a more appealing form because it enables you to precisely align your form elements.
You’ve now created a form that can collect all the information you need. However, at this stage, your users have control over the data. They can literally enter anything they want into your form. Adding some validation controls can put you back in control of the data you are collecting.
ASP.NET automatically prevents some dangerous data in form fields. For example, suppose someone enters some JavaScript into one of your form fields. Even without any validation controls, ASP.NET will recognize this as dangerous data and will disallow it.
Adding Form Validation
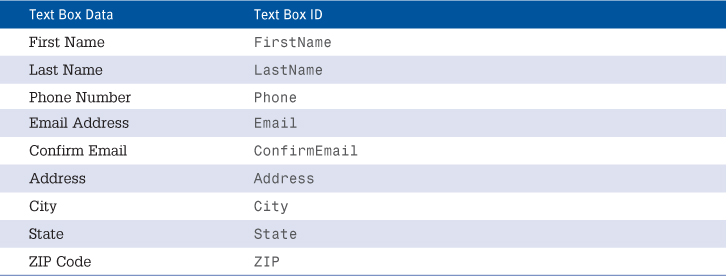
Before we add validation controls, we should change the name of the form fields on the form. Doing so makes configuring the validation controls much easier.
To change the names of the form fields, we use the ID property of each TextBox control. Configure the ID of each text box as described in Table 29.1.
Now we’re ready to add the validation controls and finish the form:
1. Add a new RequiredFieldValidator immediately to the right of the FirstName TextBox control.
2. Change the ErrorMessage property of the RequiredFieldValidator to Required Field. This is what appears if the user fails to complete this required field.
3. Click the drop-down for the ControlToValidate property of the RequiredFieldValidator and select the FirstName TextBox control, as shown in Figure 29.2.

Figure 29.2. The ControlToValidate property can be set easily using the drop-down in the Tag Properties pane.
4. Add another RequiredFieldValidator next to the LastName TextBox control and configure it the same way that you did the first RequiredFieldValidator, but this time, set the ControlToValidate property to the LastName TextBox control. (You can copy and paste the first RequiredFieldValidator to make this faster.)
5. Repeat the same process to add a RequiredFieldValidator for the phone number and email address TextBox controls. Configure the ControlToValidate property so it validates the Phone and Email text boxes, respectively.
6. Add a new CompareValidator to the right of the ConfirmEmail text box.
7. Change the ErrorMessage property to Addresses must match.
8. Set the ControlToCompare property to the Email TextBox control.
9. Set the ControlToValidate property to the ConfirmEmail TextBox control.
10. Make sure the Operator property is set to Equal. This forces validation to fail if the values of the controls specified in the ControlToValidate and ControlToCompare properties are not the same.
11. Add a new RegularExpressionValidator to the right of the ZIP text box.
12. Change the ErrorMessage property to ZIP Code is Invalid.
13. Set the ControlToValidate property to the ZIP text box.
14. Click the ... button next to the ValidationExpression property in the Tag Properties pane to display the Regular Expression Editor (see Figure 29.3).
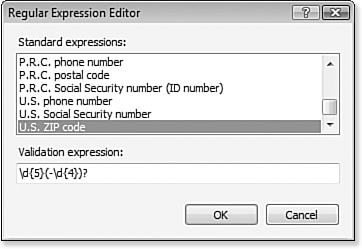
Figure 29.3. If you don’t know how to write regular expressions, you can still take advantage of them using the Regular Expression Editor.
15. Select U.S. ZIP Code from the list of regular expressions.
16. Click OK.
We now have a functioning form, but you can enter an invalid phone number or email address. Let’s add a couple more RegularExpressionValidators to fix that:
1. Add a new RegularExpressionValidator to the right of the RequiredFieldValidator for the Phone TextBox control.
2. Set the ControlToValidate property to the Phone text box.
3. Set the ErrorMessage property to Invalid Phone Number.
4. Set the ValidationExpression to U.S. Phone Number.
5. Add a new RegularExpressionValidator to the right of the RequiredFieldValidator for the Email TextBox control.
6. Set the ControlToValidate property to the Email text box.
7. Set the ErrorMessage property to Invalid Email.
8. Set the ValidationExpression to Internet email address.
You can now save and browse the form. Notice that when you do, the spacing on the Phone TextBox control is thrown off a bit by the validation controls, as shown in Figure 29.4. You can easily resolve that using the Display property.
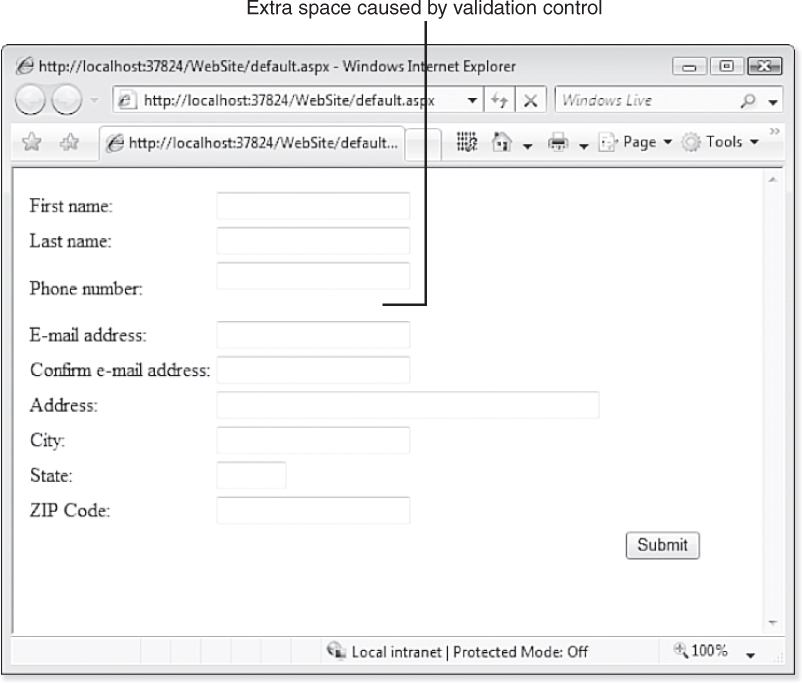
Figure 29.4. Because the Phone text box has two validation controls associated with it, the space below it is thrown off by the space reserved for the validation controls.
Change the Display property for both validation controls associated with the Phone text box to Dynamic. Now save and browse the form again and you’ll see that the spacing between all the TextBox controls is consistent.
As mentioned previously, ASP.NET also validates your form on the server. If you want to test this, disable JavaScript in your browser and test your form. You’ll see that your validation controls still display the error messages when they fail, but it requires a round trip to the server to validate.
Testing the Form
To test the form, enter your name and then enter 1-555-222-1212 for the phone number. Click another field (not the Submit button) or press Tab to go to the next field. You will see a validation failure immediately on the phone number field because the number is in an incorrect format. Change the phone number value to 555-222-1212 and it will pass validation. Test the other validation controls as well to ensure that we’ve met the requirements outlined earlier.
Validation Groups
You’ve seen the power and versatility of ASP.NET validation controls, but what happens when you have two or more different areas of a page that act as separate forms? For example, suppose you have three different mailing lists that users of your site can sign up for. You have an email TextBox control and a button for each mailing list. You also hook up a RegularExpressionValidator and RequiredFieldValidator control to each text box so you get good email addresses.
Imagine the frustration of your users when they realize that to sign up for any mailing list, they must enter a valid email address into the TextBox controls of all three mailing lists! Validation groups are a new feature to ASP.NET, and they were created to solve just this kind of problem.
As you can see, ASP.NET validation controls are a powerful way to help improve the security of your site. However, they are just one step in protecting your data. If you want a more comprehensive approach to securing your application, the Microsoft Developer Network (MSDN) site offers many great resources, including a comprehensive white paper at http://msdn.microsoft.com/msdnmag/issues/05/11/SecureWebApps/default.aspx.
Each of your TextBox controls and each of your validation controls will have a ValidationGroup property. (The ValidationGroup property is not specific to text boxes, but our example is.) By entering the same value for the ValidationGroup property of a TextBox control and a validation control, you create a relationship between those controls. Validation controls will pay attention only to controls that are within the same validation group.
You can easily solve the problem outlined previously by creating three validation groups, one for each mailing list.