
37. Creating and Manipulating an Add-in User Interface
Planning an Add-in
In Chapter 36, “Expression Web 4 Add-in Basics,” you learned the details of the Expression Web add-in manifest. You learned how to create panels, menu items, and toolbar items. In this chapter, you’ll put that knowledge to use and create an add-in with all of those elements.
In this chapter, you’ll create an add-in that shows you various properties about the document currently open in Expression Web. Information is displayed in a panel, but the add-in also creates a menu option on the Tools menu that opens an options dialog for setting options for the add-in.
You develop this add-in in five steps.
1. Create the manifest with the Add-in Builder.
2. Create the user interface for the main interface as a panel.
3. Create the user interface for the options dialog.
4. Develop the JavaScript code for the panel.
5. Develop the JavaScript code for the options dialog.
The first step in creating any add-in is to create the manifest.
Creating the Manifest with the Add-in Builder
The easiest way to create an add-in manifest is to use the Add-in Builder, an add-in that Microsoft wrote for the purpose of creating add-ins easily without messing with XML code.
Download the Add-in Builder from http://gallery.expression.microsoft.com/en-us/AddinBuilder. The file that you download is a .xadd file, and it doesn’t matter where you save it. Once you’ve successfully downloaded the Add-in Builder, follow these steps to install it:
1. Launch Expression Web.
2. Select Tools, Add-Ins.
3. Click the Install button.
4. Browse to the location where you saved the AddinBuilder.xadd file, select it, and click Open.
5. In the Add-in Install Complete dialog, click Yes to activate the add-in.
The add-in you will create has a panel and a dialog. The dialog is launched using a menu item on the Tools menu or a toolbar button on the Common toolbar. Let’s use the Add-in Builder to create a manifest for the add-in.
Creating the Manifest
To create a manifest with the Add-in Builder, launch Expression Web. If a site is already open in Expression Web, first close it. The Add-in Builder isn’t designed to work with an existing site. Instead, it creates a new site in the Add-ins folder that contains the files necessary for your add-in.
Select Tools, Add-in Builder to launch the Add-in Builder. The top portion of the Add-in Builder dialog contains general add-in settings such as Name, Description, and Author. The bottom portion of the dialog contains three tabs: Panels, Dialogs, and Assemblies.
In this section, I cover the Panels and Dialogs tabs. The Assemblies tab is used to load a managed assembly so that you can access it using JavaScript. I cover doing that later.
![]() For more information on accessing a managed assembly using JavaScript, see “Accessing Managed Classes from JavaScript,” p. 682, later in this chapter.
For more information on accessing a managed assembly using JavaScript, see “Accessing Managed Classes from JavaScript,” p. 682, later in this chapter.
Start by filling in the general information about your add-in.
1. Enter Page Info in the Name box.
2. Enter a description in the Description box. The description should be brief.
3. Enter your name in the Author box.
4. Enter 1.0 in the Version box.
5. Check the Developer Mode box.
The Add-in Builder dialog should now look like Figure 37.1.

Figure 37.1. The Add-in Builder with the general information for our add-in filled in.
Now you need to add the panel that serves as the main interface for your add-in. To do that, follow these steps:
1. Make sure that the Panels tab is selected and click Add Panel.
2. Enter Page Info in the Name box.
3. Enter panel.htm in the Source box.
4. Enter MainUI in the Id box.
5. Check the HTML-DOM check box.
6. Enter ActivatePanel() in the Activate box.
7. Enter ClearPanel() in the Deactivate box.
The Define a Panel dialog should look like the one shown in Figure 37.2. Click Insert to add the panel to your manifest.
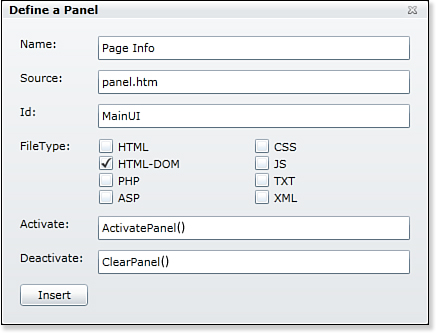
Figure 37.2. The completed Define a Panel dialog with all the properties entered for the main interface.
You can’t edit an add-in with the Add-in Builder, so don’t click the Create Add-in button until you have finished entering all of the information for your add-in. If you do, you’ll have to manually edit the manifest to add any additional features such as a panel, a dialog, or menu or toolbar items.
Don’t worry about the fact that the panel.htm file doesn’t currently exist. When you click Create Add-in, the Add-in Builder automatically creates a blank HTML file named panel.htm. The ActivatePanel and ClearPanel entries you made are JavaScript functions that you’ll write later in this chapter.
Remember that panels automatically have a menu item added to the Panels menu in Expression Web. Therefore, there’s no need to create a menu item for a panel, and in fact, the Expression Web manifest doesn’t even provide a means for doing so.
Now you need to add a dialog for the options dialog so that users can configure your add-in. To do that, follow these steps:
1. Click the Dialogs tab and click Add Dialog.
2. Enter Page Info Options in the Title box.
3. Enter options.htm in the Source box.
4. Enter pageInfoOptions in the Id box.
5. Enter 125 in the Height box.
6. Enter 300 in the Width box.
7. Leave all of the File Type check boxes unchecked.
By leaving all of the File Type check boxes unchecked, the Page Info Options menu item will always be available to the user.
The Define a Modal Dialog dialog should now look like the one shown in Figure 37.3.

Figure 37.3. The Define a Modal Dialog dialog now contains the settings for the options dialog.
Finally, you need to create the menu item for the options dialog.
1. Click the Add Menu Item button.
2. Select &Tools from the Parent Menu drop-down.
3. Leave the Before box empty so that the menu item will be placed at the bottom of the Tools menu.
4. Enter _Page Info Options... in the Label box.
5. Enter Page Info Options in the Tooltip box.
The Define a Menu dialog should now look like the one shown in Figure 37.4. Click the Create button to add the menu item.
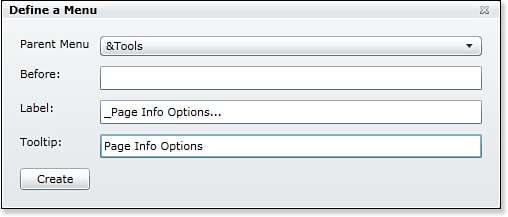
Figure 37.4. The Define a Menu dialog with all the settings for the menu item.
Now click Insert to add the dialog to the manifest. Once you’ve done that, click the Create Add-in button to create the manifest. When you do, the Add-in Builder creates a new site in the Add-ins folder. That site contains all the files for your add-in as shown in Figure 37.5.

Figure 37.5. The Add-in Builder creates all the files necessary for your add-in.
At this point, close Expression Web and then launch it again. Click on the File menu, and you should see your add-in’s menu option at the bottom of the menu. Why is the menu item on the File menu when you chose to place it on the Tools menu in the Add-in Builder? There’s a bug in the Add-in Builder that causes it to always add menu items to the File menu regardless of which menu you choose in the Parent Menu drop-down, and to fix that, we need to edit the manifest.
If you select Tools, Add-Ins, you see your add-in listed. However, the Remove button is not enabled for your add-in. To enable the Remove button, create an empty text file called installedByXWeb.txt in your add-in’s folder.
Editing the Manifest
At this point, the Page Info site should be open in Expression Web. If it’s not, open it from %userprofile%AppDataRoamingMicrosoftExpressionWeb 4AddinsPage Info. Double-click on the manifest (addin.xml) to open it and look for the following line:
<menuitem label="_Page Info Options..." parent="MENU_File" tooltip="Page Info
Options" />
The parent attribute identifies the menu on which the menu item should appear. The parent attribute is currently MENU_File. Change it to MENU_Tools.
We also need to add the attributes to specify the size of the Options dialog. We entered these properties in the Add-in Builder, but there’s another bug in the Add-in Builder that prevents them from being added to the manifest.
Locate the following line in the manifest:
<command id="pageInfoOptions"
onclick="xweb.application.showModalDialog('options.htm',
'Page Info Options'),">
Change this line to read as follows:
<command id="pageInfoOptions"
onclick="xweb.application.showModalDialog('options.htm',
'Page Info Options', 'dialogHeight:125;dialogWidth:300;scroll:no'),">
After making that change, close and save the manifest. Close Expression Web and launch it again. When it reopens, you see that the menu item now correctly appears on the Tools menu where it should be, and if you select the Page Info Options menu item, it launches the Page Info Options dialog.
At this point, both the Page Info panel and the Page Info Options dialog are blank. In the next section, I show you how to create the user interface for the panel and the dialog.
It’s important to realize that when you are developing an add-in in Expression Web, you typically want to open the add-in’s folder as a site so that you can work on the site. That’s why the Add-in Builder opens the add-in’s folder as a site.
Creating the User Interfaces
Add-in user interfaces are built using HTML elements. You can use any of the tools in the HTML section of the toolbox when creating your user interfaces. You can even use multimedia components in your user interface.
In this section, you’ll create the user interface for the Page Info panel and for the Page Info Options dialog.
Creating a Custom Page Size for Panels
As I mentioned in the Panels section in Chapter 36, panels are a suitable interface for your add-in as long as the interface can fit within a space of 275 pixels in width. To better visualize my panel’s interface, I like to create a custom page size in Expression Web of 275 pixels by 600 pixels. I can then use this custom page size to easily design my panel’s interface.
To create a custom page size for a panel, follow these steps:
1. Make sure that a page is open in Design view in Expression Web.
2. Select View, Page Size, Modify Page Sizes.
3. In the Modify Page Sizes dialog, click the Add button.
4. Enter 275 in the Width box and 600 in the Height box.
5. Enter Panel Add-In in the Description box.
6. Click OK to add the new page size.
7. Click OK to return to Design view in Expression Web.
You can now select the new page size using the View, Page Size menu in Expression Web or by clicking on the page size indicator on the Status Bar as shown in Figure 37.6.
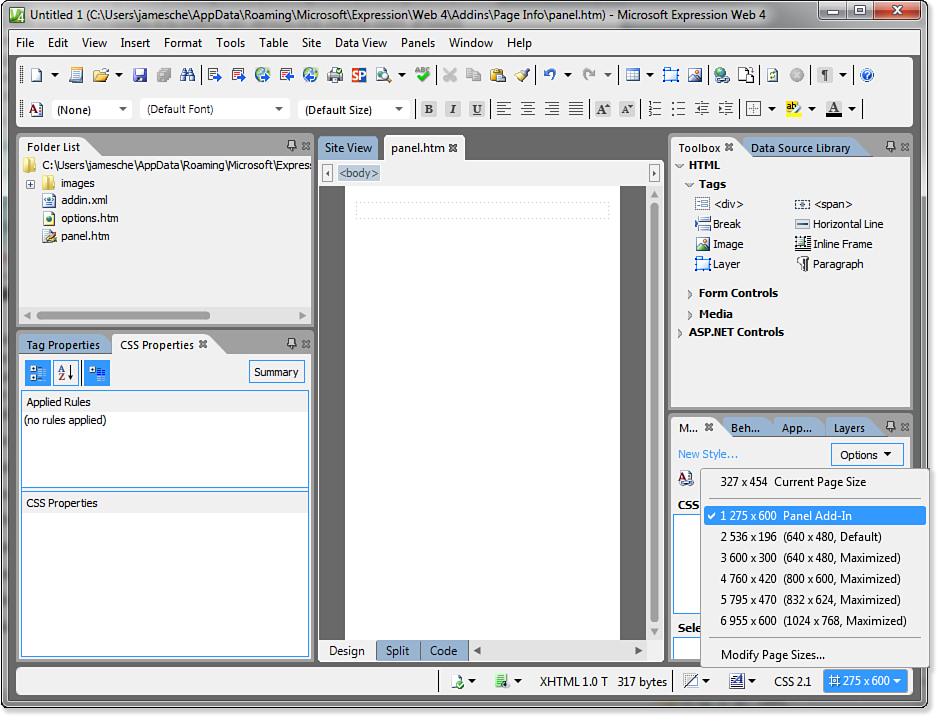
Figure 37.6. Creating a custom page size helps you to better visualize your panel’s interface.
Creating the Panel’s Interface
The user interface for panels and dialog boxes is created using HTML. However, creating an add-in interface presents challenges that you often don’t encounter when designing web pages. Unlike pages of a website, panels and dialog boxes are designed using a single page. Therefore, if you need to design an interface that has multiple states, you need to take that into account as you design your interface.
The panel interface for the Page Info add-in has three states:
• State 1—No pages are open in Expression Web.
• State 2—An unsaved page is open in Expression Web.
• State 3—A saved page is open in Expression Web.
Depending on which state exists, a different interface needs to be displayed to the user.
As a general rule, I use a <div> to define each state of my add-in. I can then use CSS rules to set the display property of each <div> so that I can control which state is visible to the user. However, for the Panel Info panel, I used two <div> elements, one for state 1 and 2 and a second for state 3.
To create the interface for the panel, open panel.htm in Expression Web. Switch to Code View and add the HTML code shown in Listing 37.1.
Listing 37.1. HTML Code for the Panel Interface
<html>
<head>
<meta content="en-us" http-equiv="Content-Language">
<style type="text/css">
p {
font-size: .7em;
font-family: Arial, Helvetica, sans-serif;
color: #808080;
}
.centered {
text-align: center;
padding-top: 25px;
}
#pageInfo {
overflow: hidden;
}
#panelHeader {
background-color: #C0C0C0;
}
</style>
</head>
<body>
<div id="blank" class="centered">
<p>Open a page to display properties.</p>
</div>
<div id="pageInfo">
<div id="panelHeader">
<p style="color: black">
<strong>Current Page:</strong> <span id="pageUrl">
</span>
</p>
</div>
<p>
<strong>Title:</strong> <span id="pageTitle"> </span>
<br><br>
<strong>Created:</strong> <span id="pageCreated"> </span>
<br><strong>Modified:</strong> <span id="pageModified"> </span>
</p>
<p>
<strong>Size:</strong> <span id="fileSize"> </span> bytes
</p>
<div id="titleWarning">
<hr size="1">
<p style="color: black; margin-top: -4px">
<p style="color: red; margin-top: -4px; background-color: white">
Title is undefined.
</p>
</div>
</div>
</body>
</html>
After adding this code to panel.htm, the page should look like the one shown in Figure 37.7.
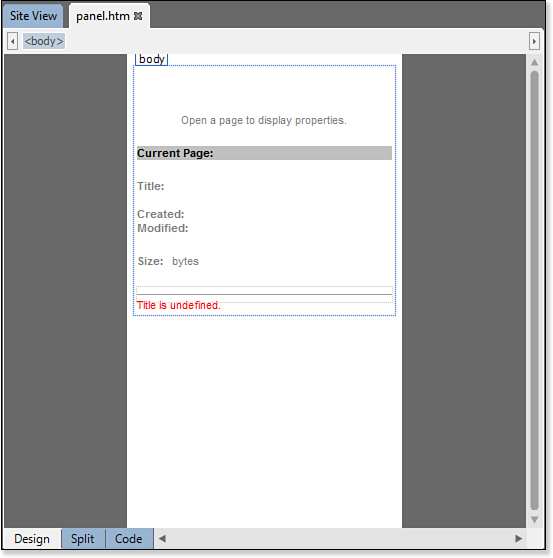
Figure 37.7. The completed user interface for the Page Info panel.
You may have noticed that there’s no DOCTYPE specified in panel.htm. You can specify a DOCTYPE if you want to, but since this page will only be viewed from within a panel in Expression Web, it’s not necessary to use one.
There are two top-level div elements in panel.htm, one with an ID of "blank" and another with an ID of "pageInfo". The "blank" div displays a message telling the user to open a page to display properties in the panel while the "pageInfo" div contains all of the page elements used to display page properties. Each property is identified by a span, and each span contains an ID attribute so that I can set the text for the span using JavaScript code.
Save panel.htm and then select Panels, Page Info to see what the panel looks like in its current state. Notice that both the "blank" div and the “panelInfo” div are visible as shown in Figure 37.8.
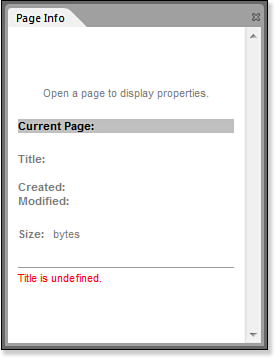
Figure 37.8. Both the blank and pageInfo div are visible at this point. We’ll fix that soon with some JavaScript.
Creating the Options Dialog Interface
The next step in creating the Page Info add-in is to create the interface for the Options dialog. The Options dialog allows a user to specify whether to display a warning when a title isn’t defined for the current page.
Open options.htm, switch to Code View, and add the code in Listing 37.2 to the page.
Listing 37.2. HTML Code for options.htm
<html>
<head>
<style type="text/css">
p {
font-family: Arial, Helvetica, sans-serif;
font-size: .75em;
}
input {
font-family: Arial, Helvetica, sans-serif;
font-size: .85em;
}
}
</style>
</head>
<body onload="SetCheckboxByAppSettings();">
<p>
<input name="WarnCheckbox" type="checkbox" checked="true">
Display warning when <title> not detected.
</p>
<p style="text-align: right;">
<input name="OK" type="button" value="OK" style="width: 60px"
onclick="SetWarningOption();">
</p>
</body>
</html>
Notice that the OK button is configured to call the SetWarningOption JavaScript function when it’s clicked. You’ll add that function in the next section. You’ll also add the SetCheckboxByAppSettings function that is called in the onload event of the page.
Save options.htm and close it. You can now select Tools, Page Info Options, and the Page Info Options dialog loads. The Page Info Options dialog is shown in Figure 37.9.
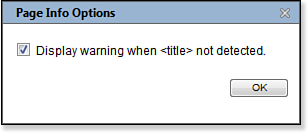
Figure 37.9. The Page Info Options dialog.
Now it’s time to write some JavaScript code to implement the functionality for our add-in.
If you click a button in the Page Info Options dialog, you’ll get a script error because the JavaScript code that runs when the button is clicked hasn’t been added to the page yet.
Adding Functionality with JavaScript
There are two facets to adding functionality to an add-in with JavaScript. One is writing code that interacts with elements in your user interface, typically to change the interface based on certain conditions. The other facet is writing code that interacts with the Expression Web interface itself.
If you’ve ever written JavaScript when designing a site, you’ve certainly used the window and document objects before. The same techniques used when writing JavaScript code for a site are used when writing code to interact with an add-in user interface.
To interact with elements in your user interface, the window and document objects from the browser’s document object model (DOM) are used. The window object refers to the window for your interface, a panel or a dialog box depending on the type of interface you’re using. The document object refers to the page displayed within the window.
To interact with the Expression Web interface, Microsoft developed a completely new application programming interface (API) that makes it easy to interact with the Expression Web application itself and with the document and site that is open within Expression Web.
![]() For a complete reference on the Expression Web JavaScript API for developing add-ins, see Chapter 39, “Expression Web 4 JavaScript API Reference.”
For a complete reference on the Expression Web JavaScript API for developing add-ins, see Chapter 39, “Expression Web 4 JavaScript API Reference.”
Let’s add some JavaScript code to the add-in’s pages that controls the functionality of the add-in.
Throughout the rest of this chapter, I often refer you to Chapter 39 for more information on the JavaScript API in Expression Web. This chapter is meant to familiarize you with the concepts needed to develop add-ins and is not meant as a reference for the JavaScript functions.
JavaScript for panel.htm
Let’s review the <panel> element from the Page Info add-in manifest.
<panel src="panel.htm" id="MainUI" title="Page Info" filetype="HTML-DOM"
activate="ActivatePanel()" deactivate="ClearPanel()" />
The JavaScript functions for each page can be placed anywhere on the page within a script block. If you need to see an example of the scripts placed in the page, you can download the completed add-in from www.informit.com/register.
Remember from the Chapter 36 that the activate attribute specifies a JavaScript function that runs when the panel is activated, and the deactivate attribute specifies a JavaScript function that runs with the panel is deactivated. In this section, you’ll write the ActivatePanel and ClearPanel JavaScript functions. I cover the ClearPanel function first because it’s a simpler function.
The ClearPanel function changes the panel’s interface to display an informational message asking the user to open a page to view page information. Listing 37.3 contains the code for the ClearPanel function.
Listing 37.3. The ClearPanel Function
function ClearPanel() {
var blank = window.document.getElementById("blank");
var ui = window.document.getElementById("pageInfo");
var titleWarning = window.document.getElementById("titleWarning");
blank.innerHTML = "<p>Open a web page to display properties.</p>";
blank.style.display = "block";
ui.style.display = "none";
titleWarning.style.display = "none";
}
The first three lines of this function create three variables. Each variable refers to a particular div in panel.htm. To get a reference to a particular div, the ClearPanel function uses the getElementById JavaScript function and uses the ID of the div as an argument to that function. Consider the following div from panel.htm:
<div id="blank" class="centered">
To obtain a reference to this div in your JavaScript code, you would use the following code:
window.document.getElementById("blank");
The next line of code sets the innerHTML property of the "blank" div so that it displays an information message telling the user to open a web page to display properties. Here is that line of code:
blank.innerHTML = "<p>Open a web page to display properties.</p>";
While developing this add-in, I show you the basics of interacting with web pages using JavaScript. Although a complete discussion on using JavaScript functions to interact with the DOM is outside the scope of this book, a reference is available at http://msdn.microsoft.com/en-us/library/ms533050(v=VS.85).aspx.
I’ve used the innerHTML property because the value I’m using contains HTML tags. The innerHTML property adds the HTML code that I’ve specified inside the div referenced by "blank". After setting the innerHTML property, the code for the div is as follows:
<div id="blank" class="centered">
<p>Open a web page to display properties.</p>
</div>
The next three lines set the CSS display property for the "blank" div, the "ui" div, and the "titleWarning" div.
The "blank" div contains a message that we want displayed when a page isn’t open. The "ui" div contains the user interface used to display page information. When there isn’t a page open in Expression Web, we want the "blank" div to be displayed, and we want the "ui" div to be hidden. By setting the CSS display property of the "blank" div to block and the display property of the "ui" div to none, the panel is displayed correctly to the user.
The "titleWarning" div displays a warning message to the user when there isn’t a title defined for the page that is open in Expression Web. The user can control whether to display this warning using the Options dialog.
The ActivatePanel function is called when a page is opened that matches the type of file specified in the filetype attribute in the manifest. Listing 37.4 shows the code for the ActivatePanel function. (Line numbers are included for reference only.)
Listing 37.4. The ActivatePanel Function
1 function ActivatePanel() {
2 var loc = xweb.document.location;
3 if (loc.protocol == "unsaved:")
4 {
5 ClearPanel();
6 window.document.getElementById("blank").innerHTML =
"<p>Save this page to display properties.</p>";
7 }
8 else
9 {
10 var fileName = xweb.document.name;
11 var pathFromRoot = xweb.document.pathFromSiteRoot;
12 var fileUrl;
13 var blank = window.document.getElementById("blank");
14 var ui = window.document.getElementById("pageInfo");
15 var title = xweb.document.getElementsByTagName("title")[0];
16
17 if (pathFromRoot == undefined || pathFromRoot == "") {
18 fileUrl = fileName;
19 } else {
20 fileUrl = pathFromRoot + "/" + fileName;
21 }
22 blank.style.display = "none";
23 ui.style.display = "block";
24
25 SetLabel("pageUrl", fileUrl);
26 SetLabel("pageCreated", xweb.file.getCreationDate("site:" + fileUrl));
27 SetLabel("pageModified", xweb.file.getModificationDate("site:" +
fileUrl));
28 SetLabel("fileSize", xweb.file.getSize("site:" + fileUrl));
29
30 if (title != undefined) {
31 SetLabel("pageTitle", title.innerText);
32 } else {
33 var ShowWarning = xweb.application.settings.read
("WarnOnMissingTitle");
34 if (ShowWarning == undefined || ShowWarning == "true")
35 {
36 titleWarning.style.display = "block";
37 } else {
38 titleWarning.style.display = "none";
39 }
40 window.document.getElementById("pageTitle").innerHTML =
"[No Title] <a href="javascript:void()"onclick=
"SetTitle();">Click to set title.</a>";
41 }
42 }
43 }
This code is a bit more complex than the code for the ClearPanel function. Some of the code is similar to what you saw in the ClearPanel function, but the ActivatePanel function also contains code that uses the Expression Web JavaScript API. Let’s look at this function in detail.
In Line 2, a variable called loc is declared and set to xweb.document.location. xweb is the root namespace of the Expression Web JavaScript API. Because object names aren’t guaranteed to be unique, it’s necessary to group objects within a logical container. That logical container is called a namespace, and the highest level namespace is called a root namespace.
Had I not specified the xweb namespace in Line 2, Expression Web would infer that the document object refers to window.document in the browser’s DOM. Because window.document.location returns the path to the file displayed in the panel and not the file open in Expression Web, the code would not have worked as expected. By using the xweb namespace, I’m letting Expression Web know that "document" refers to the document object within the Expression Web API and not the browser’s DOM.
When writing add-in code, follow this simple rule. If you want to refer to the page that contains your add-in’s interface, use the window object. If you want to refer to the page open in Expression Web, always use objects in the xweb namespace.
The xweb.document.location property returns an IHTMLLocation object that contains information about the location of the file open in Expression Web. The protocol member of the IHTMLLocation object contains a string that defines the protocol of the open file. If the file has never been saved, the protocol will be "unsaved:" and properties for the file won’t be available. In that case, we want to let the user know to save the file to display properties.
Line 3 checks the protocol of the loc object. If it’s "unsaved:", ClearPanel is called to clear any existing information, and the “blank” div is changed to display a suitable message.
The rest of the function (beginning with Line 10) is the code that runs when the protocol of the open file is not "unsaved:". This is the code that uses the Expression Web JavaScript API to obtain properties about the current page and display them in the panel.
Line 10 defines a variable called fileName and sets it to xweb.document.name. The xweb.document.name property returns the name of the file open in Expression Web along with the file extension. The path to the file is not returned by xweb.document.name.
Line 11 defines a variable called pathFromRoot and sets it to xweb.document.pathFromSiteRoot. The pathFromSiteRoot property returns the relative path to the open file from the root of the site. For example, if I open default.html from inside a folder called news, pathFromSiteRoot would return news/.
Line 12 defines a variable called fileUrl with no value. We use this variable later to populate the value we want to display for the current page name.
Lines 13-15 get references to the "blank" div, the "pageInfo" div, and the title tag for the page. The technique used to do so should be familiar to you at this point.
Line 17 checks the value of pathFromRoot to determine whether the file that’s open is in a subfolder. If it isn’t, Line 18 sets the fileUrl variable to the value of fileName. Otherwise, fileUrl is set to a concatenation of pathFromRoot and fileName in Line 20.
Lines 22 and 23 set the CSS display property for the "blank" and "ui" div. The technique used should be familiar to you.
Lines 25-28 call the SetLabel JavaScript function. (We haven’t written this function yet.) The SetLabel function takes two arguments: the name of a page element and a value. It then locates the page element passed to it and sets the innerText property of the element to the value that is passed to the function. By incorporating this functionality into its own function, it’s more convenient to reuse the functionality in other parts of the add-in. It also makes the add-in’s code easier to maintain. If a change is necessary in the code that sets the labels, the code only has to be changed in one place.
Line 25 passes the value of the fileUrl variable to the SetLabel function.
Lines 26, 27, and 28 use the xweb.file.getCreationDate, xweb.file.getModificationDate, and xweb.file.getSize functions to get information about the current file. Note that the argument to these functions is "site:" followed by fileUrl. When you’re writing add-ins using the JavaScript API, file paths that refer to files in the site open in Expression Web are preceded by site:, and file paths that refer to files in the add-in’s folder are preceded by addin:.
![]() For more information on the
For more information on the getCreationDate, getModificationDate, and getSize functions, see Chapter 39, “Expression Web 4 JavaScript API Reference.”
Line 30 checks to see whether the title variable is defined. The title variable is set to the title element on the page on Line 15. However, if the title element is missing from the page, the title variable will be undefined. If the title variable is not undefined, SetLabel is called (Line 31) and the innerText property of the title element is passed to it so that we can display the title in the panel. If a title element isn’t defined, the add-in reads a setting called WarnOnMissingTitle (Line 33) and uses that to determine whether to display the titleWarning element on the page in Lines 34-39.
![]() For more information on using the xweb.application.settings.read function to read add-in settings, see Chapter 39, “Expression Web 4 JavaScript API Reference.”
For more information on using the xweb.application.settings.read function to read add-in settings, see Chapter 39, “Expression Web 4 JavaScript API Reference.”
Finally, in Line 40, the innerHTML property of the pageTitle element is set to a value letting the user know that no title exists on the page. A hyperlink is also added that calls the SetTitle function. We review the code for that function shortly.
As you saw in the ActivatePanel function, the SetLabel function is used to set the text displayed in page elements on the panel. The SetLabel function takes two arguments. The first is the ID of the page element that is being modified, and the second is the value that should be displayed in that element. Here is the code for the SetLabel function:
function SetLabel(label, value) {
window.document.getElementById(label).innerText = value;
}
This code should be familiar to you by now.
The last function in panel.htm is the SetTitle function. Remember from Listing 37.4 that if a title isn’t specified for the page, the Page Info add-in displays a hyperlink allowing the user to set a title. When this link is clicked, the SetTitle function is called. Listing 37.5 shows the code for the SetTitle function.
Listing 37.5. The SetTitle Function
function SetTitle() {
var ret = xweb.application.showModalDialog('addin:settitle.htm',
'Set Page Title','dialogHeight:125;dialogWidth:300;scroll:no'),
var title = xweb.document.getElementsByTagName("title")[0];
if (ret)
{
// update title display
SetLabel("pageTitle", title.innerText);
}
}
This function uses the xweb.application.showModalDialog function to display a dialog that prompts the user for a title for the page. The technique used here is one that you’ll likely use often in your add-ins. The variable ret is set to the value returned by the dialog. (The return value is actually set in the code contained within the setttile.htm page, and we look at that code next.) If the value returned by the settitle.htm dialog is true, SetLabel is called to update the title that is displayed in the panel.
![]() For more information on the
For more information on the xweb.application.showModalDialog function, see Chapter 39, “Expression Web 4 JavaScript API Reference.”
JavaScript for options.htm
The Options dialog contains two JavaScript functions: SetCheckboxByAppSettings and SetWarningOption. SetCheckboxByAppSettings sets the initial state of the check box (shown previously in Figure 37.9) by reading an application setting. The following code listing shows the JavaScript code for this function:
function SetCheckboxByAppSettings()
{
var WarnCheckbox = window.document.getElementsByName("WarnCheckbox")[0];
var ShowWarning = xweb.application.settings.read("WarnOnMissingTitle");
if (ShowWarning == false) WarnCheckbox.checked = false;
}
The first line of this function gets a reference to the check box control on the dialog. Because the HTML for the check box sets the name attribute to WarnCheckbox, the getElementsByName function is used to obtain a reference to it. Since the getElementsByName function returns an array of elements that match the name passed to it, the code gets the first element returned by using the [0] index.
The checked attribute of the input element that defines the check box is set to true. Therefore, the check box is checked by default. However, we need to read the application setting so that the check box reflects the setting as configured by the user.
The next line of code reads an application setting called WarnOnMissingTitle. (I’ll cover the details on reading and writing application settings in Chapter 39, “Expression Web 4 JavaScript API Reference.”) The next line sets the checked property of the check box based on the value of the WarnOnMissingTitle setting.
The WarnOnMissingTitle setting is set by the SetWarningOption function that is called when the OK button is clicked. Here is the JavaScript code for that function:
function SetWarningOption()
{
var WarnCheckbox = window.document.getElementsByName("WarnCheckbox")[0];
xweb.application.settings.write("WarnOnMissingTitle", WarnCheckbox.checked);
xweb.application.endDialog(true);
}
Just as with the SetCheckboxByAppSettings function, the first line of SetWarningOption gets a reference to the WarnCheckbox check box control. The next line sets the WarnOnMissingTitle application setting based on whether the WarnCheckbox control is checked. It then calls endDialog to close the dialog.
Application settings are stored in the add-in’s folder in a file called user.config. For details on this file and how Expression Web stores settings, see the documentation on xweb.application.settings in Chapter 39.
The Set Page Title Dialog
The Set Page Title dialog is called from the SetTitle function in panel.htm.
The Set Page Title dialog is implemented in settitle.htm. Create a new page and save it as settitle.htm. Once you’ve done that, switch to Code view and enter the code in Listing 37.6. Line numbers are for reference only.
Listing 37.6. Code for the Set Page Title Dialog
1 <html xmlns="http://www.w3.org/1999/xhtml">
2 <head>
3 <meta content="text/html; charset=utf-8" http-equiv="Content-Type" />
4 <style type="text/css">
5 p {
6 font-family: Arial, Helvetica, sans-serif;
7 font-size: .75em;
8 }
9 input {
10 font-family: Arial, Helvetica, sans-serif;
11 font-size: .85em;
12 }
13 </style>
14 <script type="text/javascript">
15
16 function SetTitle() {
17 var newTitle = window.document.getElementsByName("title")[0];
18 var titleEle = xweb.document.getElementsByTagName("title")[0];
19 var headEle = xweb.document.getElementsByTagName("head")[0];
20
21 if (titleEle == undefined) {
22 headEle.innerHTML += "<title></title>";
23 titleEle = headEle.childNodes[headEle.childNodes.length -1];
24 }
25
26 titleEle.innerText = newTitle.value;
27 xweb.application.endDialog(true);
28 }
29
30 function CancelDialog() {
31 xweb.application.endDialog(false);
32 }
33
34 </script>
35 </head>
36
37 <body>
38 <p>Enter title for page:<br />
39 <input name="title" type="text" style="width: 95%" /></p>
40 <p style="text-align: right">
41 <input name="OK" type="button" value="OK" style="width: 60px"
onclick="SetTitle();" />
42 <input name="Cancel" type="button" value="Cancel"
style="width: 60px" onclick="CancelDialog();" />
43 </p>
44 </body>
45 </html>
The HTML code for this page is simple. It contains a text box named title and two buttons. The OK button calls the SetTitle function when it’s clicked, and the Cancel button calls the CancelDialog button when it’s clicked. (The OK button calls the SetTitle function defined in settitle.htm and not the SetTitle function defined in panel.htm.)
If a user enters a title and clicks OK, SetTitle is called, and the title element of the page open in Expression Web is updated to reflect the new title. If the user clicks Cancel, the dialog is closed without any updates to the page.
The SetTitle function begins at Line 16 in Listing 37.6. Line 17 gets a reference to the title text box defined in settitle.htm.
Remember that window.document always refers to the document displayed in the add-in’s panel or dialog, and xweb.document always refers to the document open in Expression Web.
Line 18 gets a reference to the title element on the page open in Expression Web. The title element may not even exist, and we’ll check for that condition in Line 21.
Line 19 gets a reference to the head element on the page. If there isn’t a title element on the page, the add-in has to create one. Having a reference to the head element allows the add-in to create the title element in the correct place on the page.
Line 21 checks to see whether titleEle is undefined. If titleEle is undefined, it means a title element doesn’t exist on the page. A title element is added in Line 22 by adding <title></title> to the current value of headEle.innerHTML. Once Line 22 is executed, the title element will be the last child element inside the head element. Line 23 gets a reference to the last child element in the head element and assigns it to the titleEle variable.
Line 26 assigns the value entered into the title text box to the title element, and Line 27 calls xweb.application.endDialog and passes an argument of true. Remember that the SetTitle function in panel.htm checks for the return value from the call to xweb.application.showModalDialog to know whether to update the title displayed in the panel. The return value of showModalDialog is set by the argument passed to endDialog.
The CancelDialog function starts on Line 30. It’s implemented using one line of JavaScript on Line 31 that calls endDialog and passes an argument of false. This value is checked in the SetTitle function in panel.htm. If the user clicks Cancel in the Set Page Title dialog, the code in panel.htm knows that it’s not necessary to update the title displayed in the panel.
You now have a completed add-in that displays several properties about the page that is open in Expression Web. It can also warn a user when a title isn’t set for a page, and in such cases, it allows the user to easily set a title. While this add-in may not be the most useful add-in, it has illustrated several important concepts regarding add-ins in Expression Web. By building the Page Info add-in, you’ve learned:
• How to create an add-in manifest that defines a menu item, a dialog, and a panel.
• How to use JavaScript to manipulate an add-in’s user interface.
• How to use the new JavaScript API in Expression Web.
• How to display dialogs and store application settings.
If your add-in doesn’t work at this point, you can find tips on troubleshooting and debugging it in Chapter 38.
The Page Info add-in used only a small fraction of the capability provided by the JavaScript API. As you progress to the next chapter, you’ll gain in-depth knowledge of the entire JavaScript API so that you can build your own add-ins.
As you build more complex add-ins, it’s likely that you’ll eventually want to add functionality that the JavaScript API doesn’t provide. Fortunately, it’s possible to create a class using the .NET Framework that adds additional functionality to an add-in. In the next section, I’ show you how you can call a .NET Framework class from JavaScript.
Thanks to John Dixon, a developer on the Expression Web team, for his assistance in detailing how to call managed classes from JavaScript add-ins. You can read John’s blog post on the topic at http://blogs.msdn.com/b/jdixon/archive/2010/08/09/calling-managed-code-from-expression-web-4-html-js-extensibility-add-ins.aspx.
Accessing Managed Classes from JavaScript
The functionality provided by the JavaScript API is sufficient for many add-in developers. However, some add-ins require additional capabilities not available in the JavaScript API. In these cases, creating a managed class and calling that class from your JavaScript add-in can add significant functionality.
Let’s create a simple managed class that we can call from the JavaScript API. You need a version of Visual Studio to complete this exercise. If you don’t have a full version of Visual Studio, you can download Visual C#2010 Express from http://www.microsoft.com/express/Downloads/#2010-Visual-CS.
I’ve chosen C# as the language used for the managed class example because the vast majority of add-in developers are C# developers. The C# syntax is also similar to JavaScript syntax.
Creating a Managed Class
Follow these steps to create a managed class that you can call from JavaScript:
1. Open Visual Studio (or Visual C# 2010 Express) and select File, New Project.
2. In the Installed Templates pane, select Visual C#.
3. If you’re using Visual Studio 2010, make sure that .NET Framework 4 is selected in the drop-down at the top of the dialog.
4. Select Class Library from the list of project templates.
5. Enter the location where you want to create your project and enter ManagedClass in the Name box as shown in Figure 37.10.

Figure 37.10. The New Project dialog in Visual Studio is used to create a class library that you can call from your JavaScript add-in.
6. Click OK to create the class library project.
Once your class library project is created, the Class1.cs code file is displayed. Change the name of your class from Class1 to AddinUtility by changing this code:
public class Class1
to this:
public class AddinUtility
In this section, I show you the steps necessary to create a managed class that you can call from a JavaScript add-in. I won’t go into detail on some of the concepts presented because creating managed classes is outside the context of this book.
Next, select File, Save Class1.cs As and save the file as AddinUtility.cs.
To use your new class from a JavaScript add-in, add the following code to the top of AddinUtility.cs.
using System.Runtime.InteropServices;
You then need to make your class visible to Expression Web. To do that, change your class declaration from this:
public class AddinUtility
to this:
[ComVisible(true)]
public class AddinUtility
Now you need to add a reference to the extensibility DLL so that you can use functionality provided by that DLL. To do that, follow these steps:
1. Select View, Solution Explorer (or View, Other Windows, Solution Explorer in Express Edition) to ensure that the Solution Explorer is visible.
2. Right-click on the References folder in Solution Explorer and select Add Reference.
3. Click the .NET tab in the Add Reference dialog.
4. Select extensibility from the list of components as shown in Figure 37.11 and click OK.

Figure 37.11. Adding a reference to the extensibility DLL.
You now need to make another change to the class declaration so that your managed class can make a connection to Expression Web. Change the class declaration from this:
public class AddinUtility
to this:
public class AddinUtility : Extensibility.IDTExtensibility2
Don’t press Enter after adding this code. Instead, hover over the word “Extensibility” and click the button that appears beneath it. Select Implement Interface ‘Extensibility.IDTExtensibility2’ from the menu that appears as shown in Figure 37.12. When you do, Visual Studio adds some required code to your class.

Figure 37.12. Implementing the IDTExtensibility interface requires some code to be added to your class.
You may notice that each of the functions that are part of the IDTExtensibility2 interface contain the following line of code:
throw new NotImplementedException();
This line causes an error to occur when any of these functions are called. Because Expression Web calls the OnConnection function automatically when your add-in loads, you need to remove this line of code from that function. After you do, the OnConnection function should contain no code at all.
IDTExtensibility2 is a special programming construct called an interface and using an interface is called implementing the interface. An interface is a kind of programming contract, and when you implement an interface, you agree to abide by that contract. The code that Visual Studio adds to your class is part of that contract.
Now we need to add a function to our managed class that we can call from JavaScript. For this example, we add a function that returns the amount of memory that the Expression Web process is using, something that’s not possible using the JavaScript API.
Add the following function to the code for the AddinUtility class. Make sure that you add this code immediately after the opening curly bracket for the class.
If you want some code to run when your add-in loads, you can put that code into the OnConnection function.
public Int64 GetMemoryUsage()
{
long totalMemory;
Int64 privateMemory;
System.Diagnostics.Process webProcess =
System.Diagnostics.Process.GetCurrentProcess();
totalMemory = webProcess.PrivateMemorySize64;
totalMemory = (totalMemory / 1024) / 1024;
privateMemory = Convert.ToInt64(totalMemory);
return privateMemory;
}
This code uses the System.Diagnostics.Process.GetCurrentProcess function to return a reference to the ExpressionWeb.exe process. It then uses the PrivateMemorySize64 property of the process to find out how much memory is being used by the process. PrivateMemorySize64 returns the memory usage in bytes, so that value is converted to megabytes and assigned to the privateMemory variable. The function then returns the privateMemory variable.
Once you’ve added this code, compile the AddinUtility class by selecting Build, Build ManagedClass. Visual Studio compiles your DLL and saves it to the binDebug folder within your project’s folder. Copy ManagedClass.dll from that folder to your add-in’s folder.
Editing the Add-in Manifest to Load the Managed Class
Managed classes are loaded by using the load element in the add-in’s manifest. To load the ManagedClass.dll assembly, add the following code into the addin.xml file in your add-in’s folder. For reference, I’ve included the addin element in the following code. However, you’ll want to add only the load element into your manifest.
<addin developer="yes">
<load type="ManagedClass.AddinUtility,ManagedClass" name="util"/>
Save your manifest and close and reopen Expression Web if necessary.
Calling the Managed Class
To call the GetMemoryUsage from your JavaScript add-in, open panel.htm and locate the following line of code in the ClearPanel function:
blank.innerHTML = "<p>Open a web page to display properties.</p>";
Add the following two lines directly under the existing line:
blank.innerHTML += "<p>Memory usage: <span id='memSize'> </span>MB</p>";
SetLabel("memSize", util.GetMemoryUsage());
This code defines a new span for displaying the memory used. It then calls the GetMemoryUsage function in the managed class using the util namespace as defined by the load element added to the manifest. The SetLabel function is used to set the innerText of the span to the value returned by the GetMemoryUsage function.
Save panel.htm and right-click within the Page Info panel and select Refresh. If you open any page and then close all pages, you see a message in the panel that tells you how much memory is being used by Expression Web.
In this example, you’ve seen how you can use a managed class to obtain functionality that’s not possible from the JavaScript API. The possibilities available when using managed classes are almost infinite. For more information on what’s possible using the .NET Framework, see the .NET Framework Developer Center at http://msdn.microsoft.com/en-us/netframework/default.aspx.
Don’t be alarmed if you see that Expression Web is using more than 100MB of memory. Expression Web is a managed process, and managed processes typically use more memory than other processes.
Summary
In the past two chapters, you learned some of what’s possible with the JavaScript API. You also learned how to extend that functionality by creating a managed class and calling functions on that class from your JavaScript add-in.
You now have the basic skills necessary to create your own add-ins for Expression Web. You know how to create a manifest, add menu and toolbar items, create panels, and create dialogs.
In the next chapter, you learn how you can troubleshoot and debug your add-ins as you develop them. You learn about ways you can troubleshoot your add-ins from within Expression Web, and you also learn how you can use Visual Studio’s powerful debugging features to debug your add-ins.