
Computer security has unfortunately become a very important topic. With the almost universal use of the Internet and email, it's easier than ever for various kinds of malicious software such as viruses to spread. Security issues also include message privacy and verification of people's identities. Because email is the favored means of spreading such malware, Outlook users have to be particularly vigilant. This chapter explains the various tools that Outlook provides to enhance your security.
Everyone has heard about viruses, those malicious software elements that infect and harm computer systems. Viruses range from the merely annoying to the truly disastrous, but they all have one thing in common—you do not want them on your system! Because viruses often spread by means of email, Outlook provides you with some defenses against them.
It's important to understand that Outlook itself does not have any anti-virus capabilities. An anti-virus program is specialized to detect and remove viruses and will have a way to automatically download the latest virus definitions so it can stay up to date. Symantec, Zone Alarm, and McAfee are three of the better-known publishers of anti-virus software. Most systems have anti-virus software installed, and part of protecting yourself against viruses that come with email is to make sure your anti-virus program is configured properly. Specifically, you should set the anti-virus program's options so that it always scans incoming email and attachments for viruses before they get to Outlook. It's also advisable to set the program to scan outgoing email and attachments to prevent you from inadvertently spreading a virus that you have been infected with through other means (such as a floppy disk).
If you have an Outlook-compatible anti-virus program installed, you will find two virus-related commands on Outlook's Tools menu:
Scan for Viruses: Opens your anti-virus program and performs an immediate virus scan of email items according to the program options. Use this command when you are not sure that the anti-virus program's automatic scanning is enough.
Email Scan Properties: Opens your anti-virus program's Options dialog box where you can specify the details of how the program scans email items for viruses.
The details of how the virus scan works and how you set options will depend on the specific anti-virus program that you have installed. Please refer to that program's documentation for more information.
One of the most common ways for viruses to spread is by means of email attachments. However, all attachments are not equal in their ability to spread a virus. Certain file types are potentially very dangerous, such as executable programs, batch files, and installation files. Others, such as image and music files, are generally safe.
Because of the potential danger posed by some file types, Outlook blocks certain kinds of attachments sent to you—you receive the message with a notification that an unsafe attachment has been blocked. This blocking is built in to Outlook and cannot be turned off or changed. The blocked file types are listed in Table 20.1.
Outlook also catches these file types on the way out—that is, if you try to send them as an attachment. They aren't necessarily blocked, but Outlook reminds you that the recipient—particularly if they too use Outlook—will not be able to receive them and asks you if you want to proceed.
Table 20.1. File Types Blocked by Outlook
Extension | File Type |
|---|---|
.ADE | Access Project Extension (Microsoft) |
.ADP | Access project (Microsoft) |
.APP | Executable application |
.ASP | Active Server Page |
.BAS | BASIC source code |
.BAT | Batch processing |
.CER | Internet Security Certificate file |
.CHM | Compiled HTML help |
.CMD | DOS CP/M command file, or a command file for Windows NT |
.COM | Command |
.CPL | Windows Control Panel Extension (Microsoft) |
.CRT | Certificate file |
.CSH | csh script |
.DER | DER encoded X509 certificate file |
.EXE | Executable file |
.FXP | FoxPro compiled source (Microsoft) |
.HLP | Windows Help file |
.HTA | Hypertext application |
.INF | Information or Setup file |
.INS | IIS Internet Communications settings (Microsoft) |
.ISP | IIS Internet Service Provider settings (Microsoft) |
.ITS | Internet Document Set, Internet Translation |
.JS | JavaScript source code |
.JSE | JScript encoded script file |
.KSH | UNIX shell script |
.LNK | Windows Shortcut file |
.MAD | Access Module shortcut (Microsoft) |
.MAF | Access (Microsoft) |
.MAG | Access diagram shortcut (Microsoft) |
.MAM | Access macro shortcut (Microsoft) |
.MAQ | Access query shortcut (Microsoft) |
.MAR | Access report shortcut (Microsoft) |
.MAS | Access Stored Procedures (Microsoft) |
.MAT | Access table shortcut (Microsoft) |
.MAU | Media Attachment Unit |
.MAV | Access view shortcut (Microsoft) |
.MAW | Access Data Access Page (Microsoft) |
.MDA | Access Add-in (Microsoft), MDA Access 2 Workgroup (Microsoft) |
.MDB | Access Application (Microsoft), MDB Access Database (Microsoft) |
.MDE | Access MDE database file (Microsoft) |
.MDT | Access Add-in Data (Microsoft) |
.MDW | Access Workgroup Information (Microsoft) |
.MDZ | Access Wizard Template (Microsoft) |
.MSC | Microsoft Management Console Snap-in control file (Microsoft) |
.MSH | Microsoft Shell |
.MSH1 | Microsoft Shell |
.MSH2 | Microsoft Shell |
.MSHXML | Microsoft Shell |
.MSH1XML | Microsoft Shell |
.MSH2XML | Microsoft Shell |
.MSI | Windows Installer File (Microsoft) |
.MSP | Windows Installer Update |
.MST | Windows SDK Setup Transform Script |
.OPS | Office Profile settings file |
.PCD | Visual Test (Microsoft) |
.PIF | Windows Program Information file (Microsoft) |
.PLG | Developer Studio Build Log |
.PRF | Windows System file |
.PRG | Program file |
.PST | Exchange Address Book file, Outlook Personal Folder File (Microsoft) |
.REG | Registration Information/Key for Registry Data File |
.SCF | Windows Explorer command |
.SCR | Windows screen saver |
.SCT | Windows Script component, FoxPro screen (Microsoft) |
.SHB | Windows Shortcut into a document |
.SHS | Shell Scrap Object file |
.TMP | Temporary file/folder |
.URL | Internet location |
.VB | VBScript file or any VisualBasic source |
.VBE | VBScript encoded script file |
.VBS | VBScript script file, Visual Basic for Applications script |
.VSMACROS | Visual Studio .NET binary-based macro project (Microsoft) |
.VSW | Visio workspace file (Microsoft) |
.WS | Windows script file |
.WSC | Windows script component |
.WSF | Windows script file |
.WSH | Windows Script Host settings file |
Some other file types are not on the blocked list even though they have the potential to carry viruses. The reason these file types are not blocked is because they are very commonly sent as attachments. They include Microsoft Word documents (*.DOC), Excel workbooks (*.XLS), and PowerPoint files (*.PPT). When you receive this kind of file as an attachment, it's important for you to be aware of the potential for harm. Even if you have anti-virus software, you cannot be sure it will catch every virus, particularly because new ones are being created regularly.
The general rule of thumb is to not open any such file unless you trust the source. It is also wise to have macro security set to a safe level, as described elsewhere in this chapter.
Many people have perfectly legitimate reasons for sending blocked file types as attachments. There are two ways you can get around Outlook's restrictions to do this:
Change the file's extension. For example, if you want to forward a compiled HTML help file named MyHelp.CHM, change the file extension to something that Outlook will not block, such as MyHelp.TXT. In your message, instruct the file recipient to change the file extension back before using the file.
Put the file in a ZIP or other kind of archive. This kind of file is permitted by Outlook. You need to instruct the recipient as to how the file can be extracted, of course.
A macro is a sequence of program commands that have been recorded and saved and can be executed with a single command. Outlook has its own macro capabilities, as is covered in Chapter 22. More germane to the topic of security, however, are the macros in programs such as Microsoft Word and Excel. Such macros are part of the document file and as such will be included when the file is sent as an email attachment. A malicious macro can be set to execute automatically when the file is opened, and has the potential to wreak havoc on your system and data files. Such viruses are called macro viruses.
Anti-virus programs catch most macro viruses, and the precaution of not opening attachments from unknown sources is another layer of protection. The final layer of protection against macro viruses is the macro security level in your programs.
Macro security applies to all Office programs, and it is set in the Trust Center. The Trust Center is an Office component, not specifically part of Outlook or any other any program. On Outlook, you access the Trust Center by selecting Trust Center from the Tools menu. Then, in the list on the left, click Macro Security. The Macro Security screen is shown in Figure 20.1.
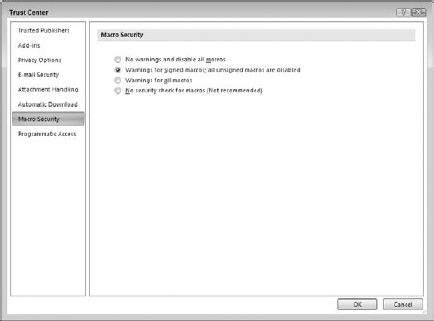
You can see that the options mention signed macros. Digital signing is a way that the person who creates a macro can "sign" it so the recipient can be assured that it comes from a trusted source. You learn more about digital signatures later in this chapter. You can choose from four levels of macro security, described here from the strictest to the least strict:
No Warnings and Disable All Macros: No macros, whether signed or not, are ever run.
Warnings for Signed Macros; Unsigned Macros Are Disabled: For a signed macro, the program displays a warning and asks you if it should be run. Unsigned macros are never run. This is the default macro security level.
Warnings for All Macros: The program displays a warning for any macro, signed or unsigned, and asks you if it should be run.
No Security Check for Macros: All macros are run without a warning. For reasons probably obvious, this level is not recommended.
It is recommended to maintain the default level of macro security for all Office programs. You can always set a lower level temporarily if you want to run some unsigned macros from a trusted source.
A certificate, also known as a digital ID, provides a higher level of security with Outlook. You can use a certificate to send encrypted emails so that only the intended recipient can view the contents. You can also use them to sign messages to prevent tampering and prove your identity. Finally, you can use a digital ID in lieu of a username and password to access certain restricted web sites, although this use is not relevant to Outlook.
Digital IDs are based on the technique of a public/private key pair. These are two long numbers related to each other. You can use either key of the pair to encrypt data, and only people who have the other key of the pair are able to unencrypt the data. When you have a digital signature, you keep your private key secret and make your public key freely available. Then, here's how it works:
To send an encrypted message to someone, you use their public key to encrypt it. Only they can unencrypt the message because no one else has their private key.
To prove your identity, encrypt some data using your private key. When the recipient of a message decrypts the data using your public key, if the data is intact they will know you must have encrypted it because nobody else has your private key.
Digital certificates have expiration dates, typically one year after they are issued.
If you are using Outlook at work, your employer may provide a digital ID to you which you'll import as described in the next section. Otherwise, you can get your own. Digital IDs are provided by independent companies for a small fee. A digital ID is linked to a specific email address and cannot be used with other addresses.
To get your own digital ID:
Select Trust Center from the Tools menu to open the Trust Center.
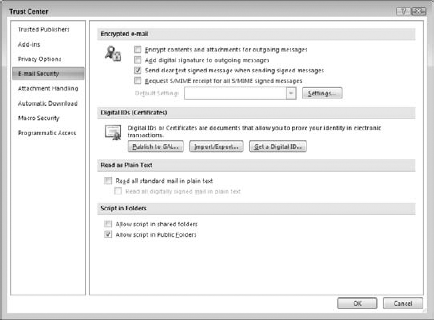
Click Email Security in the list on the left to display the E-mail Security page (see Figure 20.2).
Click the Get a Digital ID button. Your web browser opens and displays a Microsoft page listing companies selling digital IDs.
Select the company you want and follow the prompts to register for and pay for your digital ID.
After you complete the ordering process, the issuing company will send you an email containing instructions for installing the digital ID.
Digital IDs can be provided to you in a file as well as obtained over the Web as described in the previous section. Your employer may provide you with an ID in a file, and you can also export an existing ID to a file for backup purposes. These files are password-protected for security reasons.
Select Trust Center from the Tools menu to open the Trust Center.
Select E-mail Security from the list on the left.
Under Digital IDs, click the Import/Export button to display the Import/Export Digital ID dialog box (see Figure 20.3).
Select the Import Existing Digital ID option.
Enter the name of the file in the Import File box, or use the Browse button to locate it. Digital ID files have the .EPF, PFX, or .P12 extension.
Enter the file password in the Password box.
Enter a name of your choosing for the certificate in the Digital ID Name box.
Click OK.
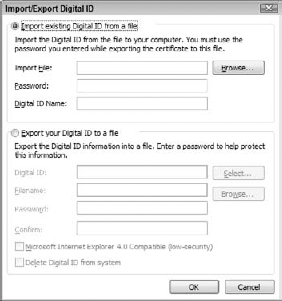
Exporting a digital ID uses the same dialog box except that you must select the Export option. Then:
If you have more than one digital ID, use the Select button to choose the ID to export.
Enter the export filename in the Filename box, or use the Browse button to select an export location.
Enter and confirm the password in the boxes provided.
Select the Microsoft Internet Explorer 4.0 Compatible option only if you will use the exported ID with older versions of Internet Explorer.
Select Delete Digital ID from System if you want to completely delete the ID rather than export it.
Click OK.
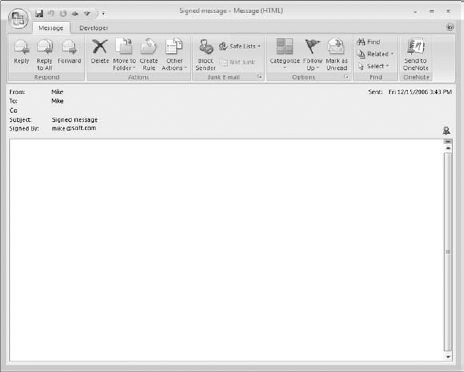
When you receive a digitally signed message, the only difference is that the message says "Signed By XXXX" (where XXXX is the sender's email address) in the header, just below the subject line. You can use such a message to add the sender's public key to your Contacts list, as explained in the next section.
Just because a message is signed does not mean that the signature is legitimate. On the same line as the "Signed By XXXX" is displayed, Outlook displays a red ribbon icon as shown in Figure 20.4 to indicate the signature is valid. If the signature is not valid, the message "There are problems with the signature" is displayed, and you can click a button to view the details. A digital signature could be invalid because it has expired, the issuing authority has revoked it, or the server that verifies the certificate is invalid.
To send an encrypted message to someone, you must have their public key. You can get this from a signed message the person sent you. Their certificate is added to their entry in Contacts, and is available for you to use to send encrypted email:
Open the digitally signed message.
Right-click the sender's name or address in the From box.
Select Add to Outlook Contacts from the context menu.
If the contact already exists in your Contacts folder, Outlook will notify you. Select Update Information of Selected Contact.
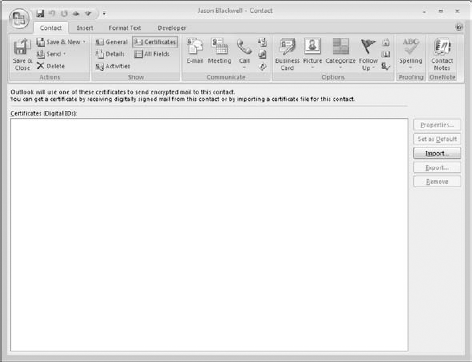
You can view a contact's certificates by opening the contact and clicking the Certificates button in the Show section of the ribbon. Outlook displays a list of the contact's certificates, if there are any, as shown in Figure 20.5. You can take the following actions by clicking the buttons at the right side of this window:
Properties: View the certificate details, including the name of the issuing company and its expiration date.
Set as Default: If the contact has more than one certificate, this command sets the one that will be used as the default for encrypting messages to the contact.
Import: This option lets you import a person's certificate from a file. Certificate files have the .P7C or .CER extension.
Export: This option lets you export the certificate to a file. This can be useful when you want to transfer a contact's certificate to another computer.
Remove: This option deletes the certificate from the contact information.
It's important to understand that encrypting a message and signing a message are two different things:
Encrypting uses the recipient's public key to encrypt the message and attachments so that only the recipient can read them.
Signing uses your digital ID to mark a message so that recipients can verify that it really came from you.
You can send an encrypted message to anyone for whom you have the public key—in other words, you have their certificate as part of their contact information. You can encrypt single messages or specify that all messages be encrypted (when possible).
To encrypt a single message:
Create the new message.
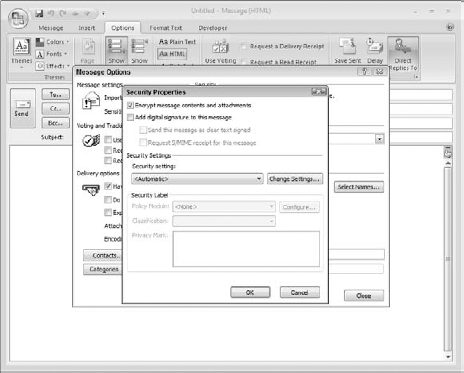
Click the arrow in the Options section of the Message ribbon to display the Message Options dialog box.
Click the Security Settings button to open the Security Properties dialog box (see Figure 20.6).
Select the Encrypt Message Contents and Attachments option.
Click OK, then click Close, to return to the message.
Of course, a message can be encrypted only when it is going to one or more recipients for whom you have a certificate. If you request encryption for a message going to people for whom you do not have a certificate, Outlook displays a message and gives you the option of sending the message without encryption.
You can also tell Outlook to encrypt all outgoing messages and attachments. Of course, this affects only messages that you send to people whose public key you have.
Select Trust Center from the Tools menu to open the Trust Center window.
Select E-mail Security from the list on the left.
Select the option Encrypt Contents and Attachments for Outgoing Messages.
As with encryption, you can apply digital signatures to individual outgoing messages or to all of them.
To add a digital signature to an individual message:
Create, compose, and address a new email message as usual.
Click the arrow in the Options section of the Message ribbon to display the Message Options dialog box.
Click the Security Settings button to open the Security Properties dialog box (shown earlier in Figure 20.6).
Select the Add Digital Signature to the Message option.
Click OK, then click Close, to return to the message.
To add a digital signature to all outgoing messages:
Select Trust Center from the Tools menu.
Click E-mail Security.
In the Encrypted E-mail section, select the Add Digital Signature to Outgoing Messages option.
Click OK.
Because HTML messages can contain script and ActiveX controls, they are a potential source of virus attacks. To guard against any HTML viruses that make it past your anti-virus software, you can tell Outlook to display HTML messages as plain text. Because scripts and ActiveX controls are not activated until the HTML is displayed, this prevents them from doing harm.
To guard against malicious HTML messages:
Select Trust Center from the Tools menu.
Click E-mail Security.
Under Read as Plain Text, select the Read All Standard Mail in Plain Text (this means unsigned messages).
If you want to include digitally signed messages, select the Read All Digitally Signed Mail in Plain Text option.
Click OK.