
About the Outlook Object Model
Creating object references
The Object Model hierarchy
Referencing Outlook folders
Programming email items
Programming calendar items
In order to program Outlook with macros, it is necessary to have some understanding of the Outlook Object Model. Though this may sound intimidating, it is actually a great help to the macro programmer and makes your job much easier.
This chapter gives you an overview of programming the Outlook Object Model and presents numerous examples. The focus is on programming mail items and calendar items because it is these two aspects of Outlook that benefit the most from macro programming. The next chapter develops a few of the programming concepts presented here into full VBA applications you can use or modify.
All Office programs operate on the principle of objects. This means that internally, all the various components of the program are represented by their own kind of object. In Word, for example, a paragraph is an object, a table is an object, and an entire document is an object. In Excel, a worksheet is an object, and charts and cells are objects, too. Outlook works the same way.
From the perspective of the end user, the fact that a program is structured as objects does not make any practical difference. For the macro programmer, however, it makes a world of difference because all the objects are available for you to use in your macros. Each type of object has a great deal of functionality built in, and that functionality is all ready for you to use with very little programming effort. To be an effective macro programmer, therefore, you need to know about the Outlook Object Model.
Before you can work with an object in your VBA code, you must have a reference to it. A reference is simply a variable name. Instead of holding data, however, an object reference lets you work with an object in your code.
There are two parts to obtaining an object reference. First, you must create a variable that is of the proper type to hold a reference to the specific kind of object you are dealing with. The preferred way to do this is as follows:
Din RefName As type
This looks like a regular Dim statement for declaring a variable—and in fact, it is the same except that type refers to the specific type of object and not to a data type. For example, in the Outlook Object Model the object type MailItem represents an email message. To declare a variable that can reference a message, you would write the following:
Dim MyMessage As Outlook.MailItem
Note that the Outlook prefix to the object name is used to ensure that you are referencing the Outlook Object Model, because some object names are duplicated between programs.
At this point you have a name that can refer to the specified type of object—Outlook.MailItem in this case—but it does not yet refer to an actual object. Your next step will take one of two paths depending on your needs.
First, you can create a new object of the specified type and set the variable name to refer to it. You do this with the Set and New keywords:
SetRefName= Newtype
However, this technique cannot be used with many kinds of objects, including MailItem. Rather, you must get a reference to an instance of the object using the Outlook Object Model. For example, you cannot create a new MailItem object with the following code:
Set MyMessage = New Outlook.MailItem
You see exactly how to create references to Outlook objects throughout the chapter.
Collections are an important part of Outlook macro programming. Whenever the Object Model requires more than one of something, it uses a collection to keep track of them. For example, in Outlook each mail folder, such as the Inbox, is represented by an object. A folder can contain any number of email messages, and these messages are represented as a collection. Collections are designed with built-in tools that make is easy to find an individual object in the collection or to do something with all of the objects in the collection. Every collection has the Count property, which tells you the number of elements in the collection.
The most common use for collections is when you want to process every item in the collection. For example, suppose you want to write a macro that looks at every email message in the Inbox and moves those messages from a certain sender to another folder. By looping through the collection of email messages in this folder, the task is easily accomplished no matter how many or few messages there are in the folder. You use the For Each...Next loop, introduced in Chapter 23, for this purpose.
First, you must declare an object variable of the same type as the objects in the collection. Continuing with the email example:
Dim msg As Outlook.MailItem
Then create a reference to the object that contains the collection—in this case, an Outlook folder—specifically, the Inbox:
Dim f As Outlook.Folder
Dim MyOutlookNamespace As Outlook.NameSpace
Set MyOutlookNameSpace = GetNameSpace("MAPI")
Set f = MyOutlookNameSpace.GetDefaultFolder(olFolderInbox)
Finally, loop through the collection as follows:
For Each msg in f.Items
  ' With each repetition of the loop, msg refers to the   ' next
message in the collection.
Next
The previous code examples are missing a couple of details and will not actually run, but they serve to illustrate the principle of collections. You'll note that this is one of those exceptions where a collection—Items in this case—is not named as the plural of the kind of object it contains, MailItems.
If you examine the previous code snippet, you'll see this line of code:
Set f = GetDefaultFolder(olFolderInbox)
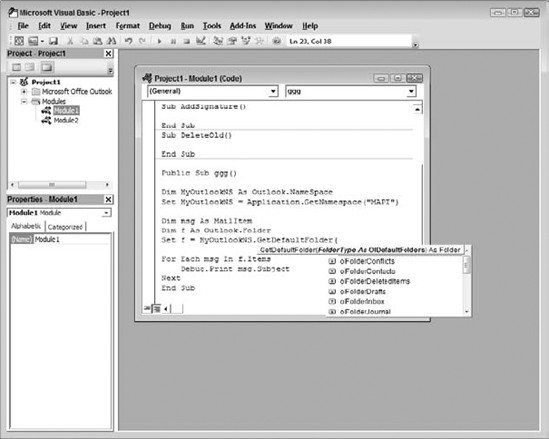
What is olFolderInbox? It's not a variable that you have declared. Rather it's one of the named constants in the Object Model. Some methods (a procedure that is part of an object) require an argument to tell them what to do. Rather than use hard-to-remember numbers, the Object Model provides these descriptive constants that are a lot easier to remember. What's more, the VBA Editor's IntelliSense feature will list the available constants as you are typing in your code, as shown in Figure 24.1.
The Object Models for all Office applications are arranged in a hierarchical structure. Two of the top-level objects in this arrangement are Application and Namespace.
At the very top of the Outlook Object Model is the Application object. As you might have already guessed, this object represents the Outlook application itself. All other objects in the hierarchy are subsidiary to the Application object. Often, when you are trying to locate data in Outlook, you start with the Application object and work down to levels of greater detail.
The Application object is available as an implicit reference for VBA code in Outlook. This means that you do not have to use the term in your code—it is understood automatically. If you were writing VBA code to run in another Office application, such as Word, you would have to explicitly reference the Outlook Application object.
For example, the GetNamespace() method is part of the Outlook Application object. Full syntax for this would be
Application.GetNamespace()
but because of the implicit availability of the Application reference, you can write it like this:
GetNamespace()
Another high-level object in the Outlook Object Model is the Namespace object. It exists because Outlook was designed to be usable with different kinds of data, each of which would be identified by its own namespace. So far, only one kind of data is supported in Outlook, MAPI data (MAPI stands for Messaging Application Programming Interface). Therefore there is only one namespace. Though it seems like unnecessary effort, you must use this namespace when accessing email and other items in Outlook. In many of the code examples in this and later chapters, you'll see a few lines of code like this:
Dim MyOutlookNamespace As Outlook.Namespace
Set MyOutlookNamespace = GetNamespace("MAPI")
Then, the Namespace object is used when accessing mail and other folders:
Set f = MyOutlookNS.GetDefaultFolder(olFolderInbox)
Outlook items are all stored in folders, and before you can work with items you need to get a reference to the containing folder. Outlook has two types of folders: the default folders and user-created folders.
A default folder is one of the folders that is part of Outlook and cannot be deleted, such as the Inbox, the Deleted Items folder, and the Notes folder. To get a reference to one of these folders, which are represented by the Folder object, you use the GetDefaultFolder() method. This method takes one argument that specifies the folder you are interested in:
Dim folder As Outlook.Folder
Set folder = MyOutlookNamespace.GetDefaultFolder(foldertype)
The foldertype argument can be one of the named constants listed in Table 24.1, along with the folder each returns. This table lists only those constants used frequently; you can refer to online help for the complete list.
Table 24.1. Constants for the GetDefaultFolder Method's foldertype Argument
Constant | Folder Containing |
|---|---|
| Calendar items |
| Contacts |
| Items that have been deleted |
| Drafts of incompleted items |
| Received email messages |
| Journal entries |
| Note entries |
| Email messages waiting to be sent |
| Email messages that have been sent |
| Task entries |
Folders that the user has created are not default Outlook folders and references to them are obtained from the Folders collection. Because folders can themselves be organized in a hierarchy, things are arranged as follows:
Each top-level folder is a member of the
NameSpaceobject'sFolderscollection.Each of these top-level folders has its own
Folderscollection, which contains any subfolders that the folder contains.Each folder in turn has its own
Folderscollection.
User-created folders are identified by name, which is obtained from the Folder object's name property. To get a reference to a folder, assuming that you do not know exactly where it is located, you must look through all folders until you either find it or run out of places to look. This technique can locate the default folders as well, based on their name, but the technique using the GetDefaultFolder() method, described in the previous section, is easier to use.
In the folder hierarchy, what the user considers a top-level folder is in fact a second-level folder. Thus, for example, in the folder structure shown in Figure 24.2, Clients is considered a second-level folder and Acme, Consolidated, and National are third-level folders. The top-level folders are Personal Folders, Archive Folders, Internet Calendar, and similar items.
To get a reference to a specific folder, you can use the function in Listing 24.1. This function is passed the name of the desired folder and returns a reference to the desired folder, if it exists, or else the value Nothing. Be aware that folder names in Outlook are case-sensitive. If the folder does not exist, the value Nothing is returned. You can check for the Nothing value using Is Nothing as explained earlier in this chapter.
This function looks at second- and third-level folders but does not go any deeper. Thus, looking at the folder structure in Figure 24.2 the function would find Clients, and it would find Acme, Consolidated, and National, but it would not find any folders nested deeper than that. It could easily be modified to do so, however, and that would be a good programming exercise for you.

Example 24.1. A Function to Obtain a Reference to a User-Created Folder
Public Function FindFolder(FolderName As String) _
    As Outlook.Folder

Dim folder1 As Outlook.Folder
Dim folder2 As Outlook.Folder
Dim folder3 As Outlook.Folder
Dim FoundFolder As Outlook.Folder
Dim MyOutlookNamespace As Outlook.NameSpace

Set MyOutlookNamespace = GetNamespace("MAPI")
Set FindFolder = Nothing

For Each folder1 In MyOutlookNamespace.Folders
    ' We know that top-level folders will not match
    ' so no comparison is needed here.
    For Each folder2 In folder1.Folders
        If folder2.Name = FolderName Then
            Set FindFolder = folder2
            Exit Function
        End If
        For Each folder3 In folder2.Folders
            If folder3.Name = FolderName Then
                Set FindFolder = folder3
                Exit Function
            End If
        Next
    Next
Next

End FunctionEvery folder can contain items, and the purpose for getting a reference to an Outlook folder is almost always to do something with the items that it contains. With user-defined folders, you specify the type of Outlook item the folder will contain when you create the folder. When you are working with a folder in VBA, you may want to determine its default type of item. For example, perhaps you are writing a macro that will look for certain information in all email messages in all folders. You can iterate through all Outlook folders using the techniques described earlier in this chapter, and then process the folder items only if its default item type is email.
To determine a folder's default item type, look at its DefaultItemType property. The values that can be returned are represented by named constants as described in Table 24.2. This property is read-only, which means that you cannot change it.
Table 24.2. Named Constants for the Folder Object's DefaultItemType Property
Value | Meaning | |
|---|---|---|
|
| Appointment items |
|
| Contact items |
|
| Exchange distribution list items (relevant to Exchange Server accounts only) |
|
| Journal items |
|
| Mail items (email messages) |
|
| Note items |
|
| Post items (an item posted to a public folder) |
|
| Task items |
In Outlook, an email message is represented by the MailItem object. Once you have a reference to a folder containing email items, you can loop through the folder's Items collection to access each email in turn. You can also create macros that compose and send email messages.
Many of the things you'll do with email messages that you have received involve message properties that provide information about the subject, recipients, sender, and other aspects of the message. The MailItem properties used most often when working with received messages are described in Table 24.3.
Table 24.3. MailItem Properties Used When Working with Received Messages
Property | Description |
|---|---|
| A collection of |
| Text of the message (if the message is in plain text format). |
| The date when the message was created (as a type |
The text of the message (if the message is in HTML format). | |
| Returns the importance level of the message as one of the following values: |
| Returns the date specifying when the message was received (as a type |
| A collection of |
| True if the message has been saved since it was last modified, False otherwise. |
| The display name of the message sender. |
| The date when the message was sent (as a type |
| The message subject. |
| A semicolon-delimited list of the message recipients' display names. |
| Returns True if the message has not been opened. False if it has been. |
Next look at some examples of writing macros to perform useful, everyday tasks in Outlook.
One way you can use macros is to go through any folder containing email messages, typically the Inbox, and move messages to various other folders depending on their sender, subject, or other characteristics.
The first step in doing this is to get a reference to both folders. You have already seen how to get a reference to the Inbox using the GetDefaultFolder() method, and how to get a reference to a user-created folder using the FindFolder() procedure presented earlier in this chapter.
Next you must loop through all the messages in the Inbox, checking each one to see whether it meets the criterion for being moved. You use a For Each...Next loop for this purpose. For this code snippet, assume that:
fInboxis a reference to the Inbox.The variable
mhas been declared as typeOutlook.MailItem.The variable
Subjectholds the text you want to look for.
For Each m In fInbox.Items
    If InStr(m.Subject, Subject) > 0 Then
        ' Move the message here.
    End If
Next
Note the use of the Instr() function. This is one of VBA's built-in string functions. It looks for one string in another and returns a value greater than 0 if it is found. In this example you use Instr() to see whether the subject text you are looking for, in the variable Subject, is found in the message's subject, obtained as the m.Subject property.
The final step is moving the message. This is easily done with the Move method. If fDestination is the folder you want to move the message to, and m is a reference to the message, you would write:
m.Move fDestination
There's a small wrinkle, however. If you move a message out of the Inbox before you have completed looping through all the messages, the For Each...Next loop can sometimes be thrown off and the process will not be completed properly. For this reason, it is necessary to keep a list of the messages to be moved without actually moving them until the For Each...Next loop has finished looking through the Inbox. You see how this is done in the full application presented in Chapter 25.
An email message can contain one or more attachments. An attachment can be either an actual file or a link to the file location. A MailItem object, representing an email message, has the Attachments collection, which contains one Attachment object for each attachment associated with the message.
When you are dealing with a received message, you can determine how many attachments the message has from the MailItems.Attachments.Count property. If this property returns a non-zero value, you can loop through the attachments using a For Each...Next loop:
Dim at As Outlook.Attachment
For Each at in MyMailItem.Attachments
  ' Deal with each attachment here.
Next
The Attachment object has the following properties that you can use to work with it:
DisplayName: The name that Outlook displays below the attachment's icon when the message is displayed on-screen. This is often, but not necessarily, the same as the attachment's filename.FileName: The filename of the attachment.PathName: The full path to an attached linked file. This property is valid only for linked attachments.Type: The type of the attachment. Possible settings areolByValue(an attached file), andolByReference(a link to a file).
To save an attached file (but not a linked file) to disk, call its SaveAsFile method. This method's one argument is the path and filename for the file. You can, but do not have to, use the original attachment filename when saving, as shown in this example, which saves all attachments to disk under their original name and using the specified path:
Dim at As Outlook.Attachment

For Each at in MyMailItem.Attachments
    If at.Type = olByValue Then
        at.SaveAsFile("c:data" & at.FileName)
    End If
NextIn addition to processing received messages, you can write macros that create and send email messages. Outlook's Object Model makes the task relatively simple. The MailItem object has some properties mostly relevant when you are creating a new message to send. These properties are described in Table 24.4.
Table 24.4. Properties of the MailItem Object for Creating and Sending Messages
Property | Description |
|---|---|
| A collection that contains one |
| A semicolon-delimited list of display names for the blind carbon copy (BCC) recipients. |
| The text of the message for plain text messages. |
| A semicolon-delimited list of display names for the carbon copy (CC) recipients. |
| The text of the message for HTML format messages. |
| Set to True in order to request a read receipt for the message, False by default. |
| A collection that contains one |
| The Outlook folder where a copy of the message will be saved when it is sent. The default is the Sent Items folder. |
| True if the message has been sent, otherwise False. |
| A semicolon-delimited list of display names for the message recipients. |
The general procedure for creating and sending an email message is as follows:
Create a new
MailItemobject.Put the message text in the
Bodyproperty (for plain text messages) orHTMLBodyproperty (for HTML format messages).Put the message subject in the
Subjectproperty.Put one or more recipients in the
Recipientscollection.Call the
MailItemobject'sSend()method.
The following sections look at some details.
As mentioned, creating a new message means creating a new MailItem object. However, you cannot do this in the usual way using the New keyword. Rather, you must use the CreateItem() method as shown here:
Dim msg As Outlook.MailItem
Set msg = CreateItem(olMailItem)
Once you have the new MailItem, you can address, compose, and send it.
Each recipient of a message is represented by a Recipient object. All message recipients are placed in the MailItem object's Recipients collection. This is true for regular "To" recipients as well as CC and BCC recipients. Whether a given recipient is To, CC, or BCC is controlled by its Type property.
To add a recipient to message, call the Add() method of the MailItem.Recipients collection and pass it the recipient's email address. This method returns a reference to the new recipient, which you'll need as I soon show you. Assume that msg refers to the new MailItem object created as described in the previous section:
Dim recip As Outlook.Recipient
Set recip = msg.Recipients.Add("[email protected]")
By default, new recipients are considered "To" recipients. To change a recipient to CC or BCC, set the Recipient.Type property to either of the named constants olCC or olBCC:
recip.Type = olCC
You can also add a recipient based on his or her display name as shown here:
Dim recip As Outlook.Recipient
Set recip = msg.Recipients.Add("Jane Austin")When you use this approach, the recipient must be resolved before you can send the message. This procedure looks through the Outlook address book for the specified display name. If it is found, the corresponding email address is added to the recipient and you can send the message. If a message has one or more unresolved recipients, trying to send it will cause an error.
To resolve a recipient, call the Resolve() method. The method returns True if the resolution was successful, False if not. Here's an example:
Dim recip As Outlook.Recipient
Set recip = msg.Recipients.Add("Jane Austin")
If recip.Resolve Then
  ' Resolved OK - safe to send.
Else
  ' Resolution failed - take steps to correct.
End IfWhen you are writing VBA code to create email messages, you can add attachments to each message as desired. You use the Attachments collection's Add() method, which has the following syntax:
MailItem.Attachments.Add(Source, Type, Position, DisplayName)Sourceis a required argument specifying the path and name of the file to attach.Typeis an optional argument specifying the type of the attachment:olByValue(for an attached file) orolByReferencefor a link (shortcut) to a file. The default isolByValue.Positionis an optional argument specifying the position of the attachment in the message. The default is for attachments to be placed at the end of the message.DisplayNameis an optional argument giving the attachment's display name. If this argument is omitted, the name of the file will be used as the display name.
It is recommended to save a message before adding or removing attachments. Here's a code example that attaches two file attachments to a message:
MyMailMessage.Save
With MyMailMessage.Attachments
    .Add "c:dataTechnologyWhitePaper.doc", olByValue, , _
        "White Paper"
    .Add "c:dataMedicalExpenses.xls"
End WithOther than addressing an email message, a message needs a subject line and a body. The subject is set by assigning text to the MailItem.Subject property.
The body is not quite so simple because you have the option of sending a plain text format message, a Rich Text Format (RTF) message, or an HTML format message. When you create a new MailItem object, the format is set to the default message format as specified in Outlook's mail options (refer to Chapter 5 for more information). To change the format for an individual message, set the MailItem.BodyFormat property to one of these constants: olFormatHTML, olFormatPlain, or olFormatRichText.
You assign the actual body of the message to either the Body property or the HTMLBody property depending on whether or not the text includes HTML formatting tags. Of course, the HTMLBody property is irrelevant for a plain text format message.
Finally, call the MailItem.Send() method to send the message.
The first thing you must do to work programmatically with calendar items is to get a reference to the Calendar folder. Because this is one of Outlook's default folders, you obtain this reference using the GetDefaultFolder() method just like you learned earlier in this chapter for the Inbox folder:
Dim MAPINameSpace As Outlook.NameSpace
Dim CalendarFolder As Outlook.Folder
Set MAPINameSpace = GetNameSpace("MAPI")
Set CalendarFolder = _
    MAPINameSpace.GetDefaultFolder(olFolderCalendar)
Once you have this reference, you can start accessing the individual calendar items. Though several kinds of objects can be present in the Calendar folder, the most important one is the AppointmentItem object, which represents one-time appointments, recurring appointments, all-day events, and multi-day events. This object has a set of properties that hold information about the appointment. The AppointmentItem properties that you are most likely to need in your macro programming are described in Table 24.5.
Table 24.5. Properties of the AppointmentItem Object
Property | Description |
|---|---|
| True if the appointment is an all-day event, in which case the start and stop times are ignored. |
| The main body of the appointment. |
| Holds information about the appointment category, if any. |
| Returns a date value indicating the date and time when the appointment was created. |
| The duration of the appointment, in minutes. |
| A date value specifying the ending date/time for the appointment. |
| Specifies the importance of the appointment. Possible values are indicated by the constants |
| True if the appointment is recurring. |
| Specifies the location of the event. |
| The number of minutes before the start of the appointment that the reminder is to be displayed. |
| A True/False value specifying whether a reminder will be displayed before the appointment start time. |
| A date specifying the starting date/time for the appointment. |
| The subject of the appointment. |
To create a new appointment, you use the CreateItem() method. The syntax is
Dim NewAppt As Outlook.AppointmentItem
Set NewAppt = CreateItem(olAppointmentItem)
The new appointment is, of course, blank—you must fill in the various details such as subject, start/stop times, and whether a reminder will be displayed. A new appointment created in code is not visible on the screen. There are two approaches to filling in the details of a new appointment.
You can do it all in code without ever making the appointment visible to the user. In this case you must save the appointment by calling the Save() method:
Dim NewAppt As Outlook.AppointmentItem
Set NewAppt = CreateItem(olAppointmentItem)
NewAppt.Subject = "Sales review meeting"
NewAppt.Location = "Conference Room B"
NewAppt.Start = #9/26/2006 1:00:00 PM#
NewAppt.End = #9/26/2006 3:00:00 PM#
NewAppt.Body = "Make sure to bring the worksheet."
NewAppt.Save
The other approach is to display the appointment to the user by calling its Display() method. The user fills in the appointment details and saves it by clicking the Save & Close button, as usual.
You access existing appointments using the Calendar folder's Items collection. You can retrieve an appointment based on its subject. Here's how to retrieve an appointment by its subject, in this case "New Employee Training" (assume that CalendarFolder is a reference to Outlook's Calendar folder):
Dim MyAppt As Outlook.AppointmentItem
Set MyAppt = CalendarFolder.Items("New Employee Training")
The problem with this approach is that if there are multiple appointments with the same subject, it retrieves only the first one. It is preferable to loop through all the appointments in the folder with a For Each...Next statement, looking for one or more appointments of interest. Here's an example that sets the variable MyAppt to point at the first appointment that has "New Employee Training" as its subject. If there is no such appointment, a message is displayed alerting the user.
Warning
If you try to retrieve an appointment by subject and there is no matching appointment, a runtime error occurs. This error can be trapped, but it is better to avoid trying to retrieve individual appointments in this manner.
Dim MyAppt As Outlook.AppointmentItem
Dim Appt As Outlook.AppointmentItem
Dim Found As Boolean

Found = False
For Each Appt In CalendarFolder.Items
    If Appt.Subject = "New Employee Training" Then
        Found = True
        Set MyAppt = Appt
End If
Next
If Found Then
' Process the matching appointment here.
Else
MsgBox "Appointment 'New Employee Training' not found."
End IfChapter 25 presents a complete calendar application that creates and prints a document listing all the appointments for the upcoming week. This demonstration also shows you how an Outlook VBA program can control other Office applications.