
Installing Windows Server 2003
This section covers the Windows Server 2003 installation process, and is intended for readers who aren't familiar with Windows Server 2003. Readers who are already familiar with Windows Server 2003 or for installation scenarios where Windows Server 2003 is already installed, and patched, with the server configured as an application server, can skip ahead to the next section, which discusses installing Windows SharePoint Services. To install Windows Server 2003, follow these steps:
Configuring the Server as an Application Server
After the configuration of Windows Server 2003 is complete and you log in as the Administrator, use the Configure Your Server Wizard to configure the Windows Server 2003 server as an application servers, which also installs IIS 6.0. If the Manage Your Server tool doesn't appear automatically, click Start and select Manage Your Server. Here are the steps required:
1. | Click on Add or Remove a Role. At this point, a reminder appears to verify that the modems and NICs are attached, all necessary cables are attached, the Internet is accessible (only if needed), peripherals are turned on, and the Windows Server 2003 CD is available or the network installation path is available. After these items have been checked, and any connectivity issues are resolved, return to this screen and click Next. |
2. | Figure 6.1 shows the options available at this point. Select Application Server (IIS, ASP.NET) and, if more information is desired on the functionality of IIS and ASP.NET, click on the Read About Application Servers hyperlink. When you are ready to proceed, click Next. |
3. | At this point, the option to install FrontPage Server Extensions and Enable ASP.NET is given. Select only to Enable
ASP.NET. FrontPage Server Extensions were used with SharePoint Team Services v1.0 and IIS with IIS 5.0 running in isolation mode, but Windows SharePoint Services requires IIS to run in IIS 6.0 worker process isolation mode, and the default virtual server won't extend if FrontPage Server Extensions are installed. Click Next. |
4. | The next screen summarizes the options selected, which in this case are Internet Information Services (IIS), Enable COM+ for Remote Transactions, Enable Microsoft Distributed Transaction Coordinator (DTC) for Remote Access, and Enable ASP.NET. Click Next and IIS will install. |
5. | When the installation process is complete, a message appears stating that “This Server is Now an Application Server,” and a hyperlink becomes available titled View the Next Steps for This Role. If you select this hyperlink, information is available that can be useful in explaining additional steps available. For example
|
6. |

Enabling HTTP Compression
IIS 6.0 offers the ability to use HTTP compression which reduces the size of files sent from the web server to the web browser by an average of 30 to 50%. The process of compressing data does impact the processor of the server and workstation, but in many cases performance improvements can be realized. It is generally recommended to install IIS without HTTP compression for testing purposes, and then enable HTTP compression after a baseline has been recorded to see the performance differential.
To enable global HTTP compression by using IIS Manager, follow these steps:
1. | |
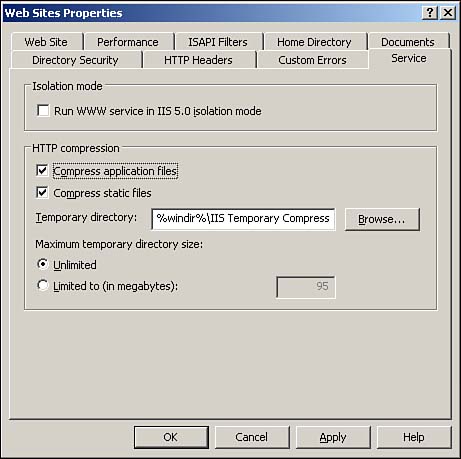
2. | Click the Service tab, and in the HTTP compression section, select the Compress application files check box to enable compression for dynamic files. Figure 6.2 shows the Web Sites Properties window. Figure 6.2. Web Sites Properties window.
|
3. | Select the Compress static files check box to enable compression for static files. |
4. | In the Temporary directory box, type the path to a local directory or click Browse to locate a directory. Once a static file is compressed, it is cached in this temporary directory until it expires, or the content changes. The directory must be on the local drive of an NTFS–formatted partition. The directory cannot be compressed or shared, and the access control lists (ACLs) for the directory must include Full Control access to the identity of the application pool or to the IIS_WPG group. |
5. | Under Maximum temporary directory size, click a folder size option (Unlimited or Limited to (in megabytes)). If you specify a maximum size under Limited to (in megabytes) (the default setting is 95MB), then when the limit is reached, IIS automatically cleans up the temporary directory by applying the “least recently used” rule. |
6. |
Activating Remote Administration
To configure remote access of the new server, enable Remote Desktop through Terminal Services, by following these steps:
1. | Right-click on My Computer and select Properties. |
2. | Select the Remote tab and check the box next to Allow Users to Connect Remotely to This Computer. |
An additional tool is provided that can also be used, which is the HTML Remote Administration tools. To activate it follow these steps:
1. | |
2. | Click on Add/Remove Windows Components. |
3. | Select Application Server (but do not click on the check box; clicking on the check box selects all components under Application Server), and click Details. |
4. | |
5. | |
6. | Select the Remote Administration (HTML) check box. Click OK three times and then click Next and the components are configured. |
7. | Click Finish when the process completes. |
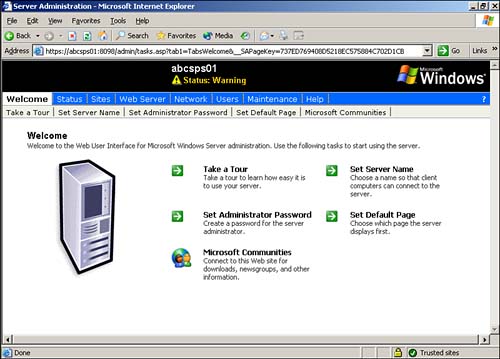
8. | To run the Remote Administration, open IE and type the URL https://computername:8098 (where computername is the name of the server being connected to); then enter the appropriate login name and password. Figure 6.3 shows the Welcome screen for this interface. The different tabs provide access to a number of helpful tools for quickly checking the server's configuration. For example, clicking on the Sites tab gives a summary of the websites currently installed on the server, and which ports they are using. |
Running and Configuring the Windows Update
After the Windows Server 2003 software is installed and configured, and has been configured as an Application Server, the latest service packs and updates should be installed and verified. Only after the Windows Server 2003 updates and patches have been installed should Windows SharePoint Services be installed. This ensures that the server is up to snuff from a security standpoint and has the latest technology fixes installed.
The company policy may need to be consulted to ensure that the service packs and updates installed are approved and tested for compatibility with the network environment. This also is a good time to configure the Windows Automatic Update options if it will be used.
CAUTION
Many organizations prefer not to have their servers access the Internet at all, and choose not to use Windows Automatic Update. Any updates and service packs will be downloaded to a different server or system and installed manually, or by using a product such as Microsoft Windows Software Update Services (WSUS).
If SUS, SMS, or another software distribution system is not in place, the Windows Update website and tools make the Server OS updating process easy. To access Windows Update Services follow these steps:
1. | Open Internet Explorer and enter the address of http://windowsupdate.microsoft.com. Internet Explorer Enhanced Security Configuration is enabled by default on new Windows Server 2003 installations. So when Internet Explorer is opened, a message window will appear stating that Microsoft Internet Explorer's Enhanced Security Configuration is currently enabled. Click OK to close the message or click the hyperlink to learn more about the subject. | ||||||
2. | The site being accessed can be added to the Trusted Sites Zone by clicking the Add button in this window, clicking the Add button in the next window, and then clicking the Close button. Although this is time consuming, it helps secure the server from downloading or executing unsafe scripts from websites. NOTE IE Enhanced Security Configuration can be turned off if needed by performing the following steps:
| ||||||
4. | Once the Microsoft Update URL has been added to Trusted Sites, the site will be accessible. Choose the Scan for Updates option, which starts a quick scan of the local server and then updates the left-hand pane with recommendations for the Critical Updates and Service Packs, Windows Server 2003 family, and Driver Updates. |
CAUTION
Although applying updates to a Windows Server 2003 system is a more reliable process than with previous versions of the server OS, and less likely to result in problems with server functionality, they should be tested in a lab environment first and approved for use on the network before being implemented on a production Windows Server 2003 system.
At this point, a decision needs to be made—whether to install Windows Server 2003 SP1 or to install the individual patches and updates. Some organizations have chosen to hold off on the SP1 update, which bundles the previous patches and updates.
If Windows Server 2003 SP1 is not approved for use, it is generally recommended to start with the Critical Updates and Service Packs, which should all be installed unless the organization has specific guidelines about which ones are approved for use on a Windows Server 2003 system, and then the Windows Server 2003 family items should be reviewed and installed. The Driver Updates are generally optional, and, once again, company standards should be adhered to in terms of which drivers are standard for server use. Note that during the installation process certain updates and service packs require a server reboot, which should be performed each time it is requested to ensure the proper installation of each item.
After the patches and updates are installed, the Windows Update page provides a View Installation History option in the Windows Update pane, which lists the patches and fixes downloaded from the site. This list will not be 100% accurate if changes have been made to the items installed (for example, if one or more patches or hot fixes have since been uninstalled), but it provides a good record of what has been downloaded and the status of the installation. If one or more items failed to install, they may need reinstallation.
In addition, the hot fixes can be viewed by accessing Start, Control Panel, Add or Remove Programs. Additional information on each item can be accessed by clicking once on the item, which brings up the option to Remove the item from the server, as well as a hyperlink to support.microsoft.com and a Knowledge Base article with more technical information about the hot fix.
Installing Windows Server 2003 SP1
Windows Server 2003 SP1 provides further enhancements and features to protect the server. These include
Security Configuration Wizard— (SCW) provides guided attack surface reduction for your server.
Data Execution Prevention (DEP)— A set of hardware and software technologies that perform additional checks on memory to help protect against malicious code exploits.
Monitor and audit your IIS XML-based metabase configuration settings— The ability to audit this store allows network administrators to track what, when, who, and how a metabase change has been made.
Updates to Internet Explorer— Updates to this application help prevent unintentional downloads of misrepresented, malicious code and the automatic resizing of browser windows as a ruse to extract sensitive data from employees.
Updating the WebDAV Redirector— Enables customers to access Web-based Distributed Authoring Versioning (WebDAV) servers, such as Windows SharePoint Services and MSN Communities, as if they were standard file servers, and this update prevents customers' credentials (username, password) from being transmitted over unencrypted channels during such exchanges.
Windows Server 2003 SP1 must be installed separately from other patches due to its complexity. Many organizations have chosen to hold off on the installation of SP1 until it has been thoroughly tested in their network environment as it makes a number of changes to the server it is installed on.
Windows Server 2003 SP1 is roughly 330MB in size, so downloading can take some time. If the server has valuable data on it, a full backup is recommended. Once it is downloaded, perform the following steps to complete the installation:
1. | Once the file has finished downloading, and the Windows Server 2003 Service Pack 1 Setup Wizard window appears, click on Next. |
2. | |
3. | Change the Uninstall Folder location if needed, and then click Next. The setup wizard will then inspect the current configuration, archive the current files, and perform the installation. |
4. | |
5. | After reboot there will be a Security Configuration Wizard help shortcut on the desktop which opens up the Security Configuration help interface when double-clicked. Refer to this reference for more information about the wizard. |
6. | If you choose to use the Security Configuration Wizard, follow these steps:
|
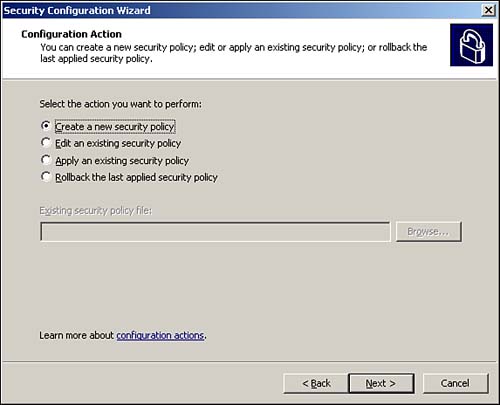
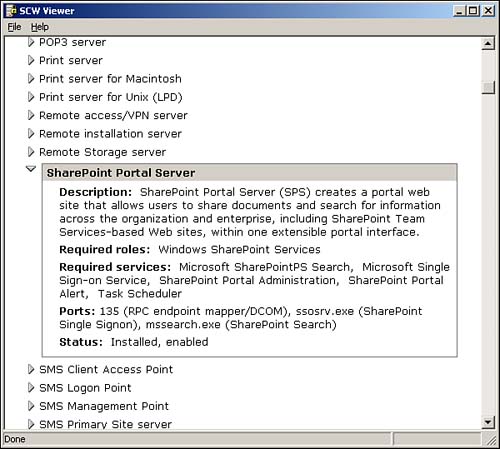
If the Create a new security policy option is selected, the server needs to be identified, and then the Security Configuration Database will be processed. Once completed, the Configuration Database can be viewed, as shown in Figure 6.5, which shows the information for SharePoint Portal Server.
Figure 6.5. Security Configuration Database, SharePoint Portal Server details.
A full exploration of all of these options is beyond the scope of this chapter, but the wizard can be a powerful tool for organizations who are seeking to lock down the server as completely as possible to protect valuable data stored in the SharePoint 2003 environment.
Configuring the Automatic Update Process
If the organization allows servers to receive automatic updates from the Internet, the automatic update process should be configured. A general best practice is to inform the administrator that updates are available, but to notify rather than automatically download them. To ensure that changes aren't made to the server without the approval of the administrator follow these steps:
1. | Click the Start button, and right-click My Computer in the Folder pane. |
2. | Select Properties and the Automatic Updates tab, and click on Notify Me Before Downloading Any Updates And Notify Me Again Before Installing Them On My Computer. |
3. | Click OK. |