Chapter 5. Creating External Lists and Using External Data in Lists and Libraries
In this chapter, you will:
Create and use external lists
Use external data in lists and libraries
Use external data actions
In Chapter 4, you learned how to create and maintain external content types (ECTs). Once an ECT is created, you can then create solutions with that ECT using the browser or Microsoft SharePoint Designer 2010. You can also create custom Web Parts or Windows Forms applications with Microsoft Visual Studio 2010 that can access the data defined in the Business Data Connectivity (BDC) metadata store, which is where ECTs are stored.
No matter which version of SharePoint 2010 you have installed, the preferred method of displaying data from external data sources is to use external lists. Depending on the operations you have specified in the ECT, the external list can provide create, read, update, and delete (CRUD) capabilities. The external list can also be added to a SharePoint page as an XSLT List View (XLV) Web Part and you can then configure additional columns, conditional formatting, sorting, and grouping in the browser and in SharePoint Designer.
Note
If you have Microsoft SharePoint Server 2010 Enterprise Edition, you can also use the Business Data Web Parts. For more information about these Web Parts, see Chapter 6.
You create external lists using the browser, SharePoint Designer, Windows PowerShell, or code.
Creating and Using External Lists
External lists are created from external content types (ECTs). Each external list contains a number of pages that allow you to create, read, update, or delete data from the external system that you can connect to using the ECT. The pages created when an external list is created are dependent on the operations defined in the ECT. Pages that display multiple items from the external system are called views and are based on the Read List operation defined in the ECT. Pages that allow you to create a new item in the external system, modify an external data item, or display an external data item are called forms. To create an external list, the minimum operations you have to define on an ECT are the Read List operation and the Read Item operation.
Creating an External List
Before you create an external list, you must complete the following tasks:
Create an ECT that exposes the data from the external system. You will find details on how to create an ECT in Chapter 4.
Ensure that the Business Data Connectivity (BDC) service application administrator gave you the Selectable In Client permission on the ECT and the Execute permission on the operations and method instances defined by the ECT. The Selectable In Client permission allows you to use the ECT picker so you can choose the ECT to build the external list. The Execute permission allows you to execute the ECT operations to complete create, read, update and delete (CRUD) operations on the external data. You can find more details about security options in Chapter 3.
Create a list in the site where you want to create the external list. Creating an external list is no different from creating any list within a SharePoint site—that is, you must have the Manage Lists permission at the site level. On a team site, this permission is usually incorporated into the Full Control permission level, which is mapped to the site’s Owners SharePoint group. On publishing sites, the Design permission level also includes the Managed Lists permission, and the Design permission level is mapped to the Designers SharePoint group. So unless you have created your own SharePoint groups and permission levels, you must be a member of the site’s Owners group or Designers group, or you must have your user ID mapped to either the Full Control or Design permission levels.
Activate the site feature Team Collaboration Lists if you plan to create an external list using the browser. When you use SharePoint Designer to create an external list, this feature does not need to be active.
Ensure you are able to access the content in the external system. You may not have to do anything special to access the content stored in the external system, as the BDC service application administrator and the ECT creator may have configured the authentication and authorization settings to allow you access. If, however, the business solution requires that each person who uses the external list have their own credentials, then you may be prompted for those credentials before you are able to view the external content in the external list.
To create an external list with the browser, use the following steps:
Open the site on which you want to create the external list. Click Site Actions, and then select More Options.
On the Create page, click external list, and then click Create. If you have a large number of list types, it’s easier to find the external list option by clicking Data under All Categories.
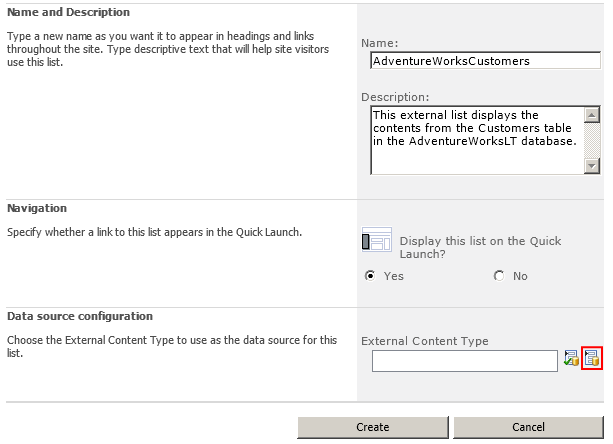
On the New page, enter the name and description for the external list, and then select whether you want a link to this external list on the Quick Launch toolbar.
Note
An external list is just like any other list when you enter a name and description—that is, the name you type in the Name text box is used by SharePoint as both the URL for the list and the list title, which is sometimes referred to as the user-friendly name. The URL name is also of importance for the SharePoint Server search relevance algorithm, known as URL Matching. The text for the list title and the list description is used by search to measure content relevancy.
You are able to change the list title later, but you are not able to change the URL. Therefore, do not use the characters / : * ? “ < > | # { } % & <Tab> ” !, do not use spaces as they get converted into the character %20, keep the name short and meaningful, and include terms that users will enter as keywords in their search queries if they want to find this list.
Be consistent in your naming conventions. Some users create the list’s URL name by concatenating two or more words. Each word is composed of two or more letters, with no spaces between the words. The first letter of each word is capitalized and the remaining letters are lowercase, such as AdventureWorksCustomers. This formatting is known as camel case. You might see the use of underscores (_) or hyphens (-) to separate words in a URL name, but hyphens are used as break points to wrap text on separate lines, so URLs that contain hyphens can cause problems similar to spaces with email and text editors. If you do not like camel case formatting, you can use underscores, so the list name would be Adventure_Works_Customers. Do take the time to consider the naming conventions you want to use for lists as well as other SharePoint components, such as sites, column names, and views.
To the right of the External Content Type text box, click the Select External Content Type icon, as shown in Figure 5-1.
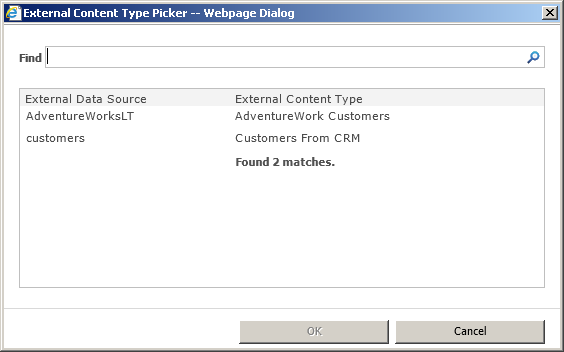
The External Content Type Picker dialog box appears, as shown in Figure 5-2.
The dialog box displays the name of the external system and the display name of the ECT. It is important that your ECT designers have created a meaningful display name for the ECT, so that end users can quickly identify the external content they want to work with. Once the external list is created, you cannot choose a different ECT. You would need to delete the external list and recreate it, choosing the correct ECT. The external list acts as a virtual container, displaying the contents from the external system; therefore, when you delete an external list or ECT, you are not deleting any content from the external system, just the virtual container and the definition of external content.
In the External Content Type Picker, select the ECT that defines the external content you want to display in your external list, such as AdventureWorks Customers, and then click OK to close the External Content Type Picker dialog box. The ECT that you have chosen is specified in the External Content Type text box.
Click Create. The external list displays, with content from the external system shown in the Read List view.
External lists have similar functionality to other SharePoint lists you are familiar with. The default view of the external list is based on a standard view, so you can use the individual column headers to sort or filter the external data. Similar to Microsoft Excel, filtering is enabled on the upper-right corner of every column, and a unique list of the values for each column is generated and presented in a drop-down list, as shown in Figure 5-3. If your external list contains a large number of unique values for the column you have chosen to use as a filter, then creating the drop-down list can put an excessive load on your browser.

Filters are cumulative but are only set temporarily. That is, the next time a list view is selected, filter values are not remembered and have to be set again. If users want to filter the contents of an external list often, the list owner should create additional views where the filters and sorts are preconfigured.
Note
You cannot associate RSS feeds to external lists, and you cannot create a view using the datasheet view or Access view.
Whenever you create a list, you should complete a number of other tasks, such as giving the list a user-friendly name, setting permissions, and creating additional views. Also, once you create an external list, you might find that no data from the external system is displayed. For example, if you create filters on the ECT Read List operation, then the default view will not display any data from the external system. You need to amend the view and configure the filter for the external data to be displayed.
As with other lists or libraries, each item within an external list is provided with a contextual drop-down list on the field defined in the ECT as the identity field, known as the list item menu (LIM). In Microsoft Windows SharePoint Services 3.0, this was known as the edit control block (ECB). The LIM provides functionality, including View Item, Edit Item, and Delete Item. You can add more actions to the LIM using SharePoint Designer.
Note
You may want to remove the LIM from an external list when only the Read List and Read Item operations are defined—that is, when the data displayed in an external list is read-only. For information about how to hide the LIM, see http://msdn.microsoft.com/en-us/library/cc768565.aspx.
You may also find that in place of the data, an error message is displayed. For example, the default view of an external list might display the error message “Login failed for user ‘NT AUTHORITYANONYMOUS LOGON’,” as shown in Figure 5-4.
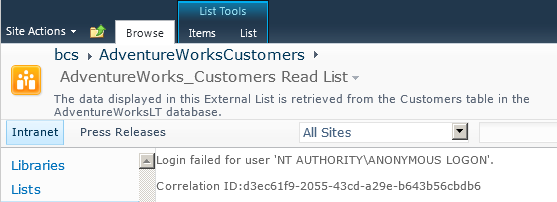
You may receive this message for a number of reasons:
This message could indicate the double-hop issue if you are using the user’s identity to authenticate with the external system, as explained in Chapter 2.
You do not have BDC permissions to execute the operations defined in the ECT.
Your user ID does not have the correct access permissions in the external system.
Although you may have permissions to create the BDC model, ECT, and external lists, you may not be able to see the data in the external list or when a page that contains an external list XLV Web Part is displayed. You may need to contact your BDC application services administrator or the ECT creator before you can progress further with your solution.
Note
See Also See the section Troubleshooting Connection Problems in Chapter 3 for information on correlation IDs and how they can help you troubleshoot problems.
Creating External Lists Using SharePoint Designer
In SharePoint Designer, you can create and manage external lists from the Lists and Libraries gallery, the Data Sources gallery, the ECT gallery, and the ECT settings page. To create an external list from the ECT gallery, follow these steps:
In the Navigation pane, click External Content Type. The ECT gallery is displayed.
Click the icon to the left of an ECT, such as AdventureWorks_Customers, and on the External Content Types ribbon tab, in the New group, click External List, as shown in Figure 5-5.
The Create External List dialog box opens.
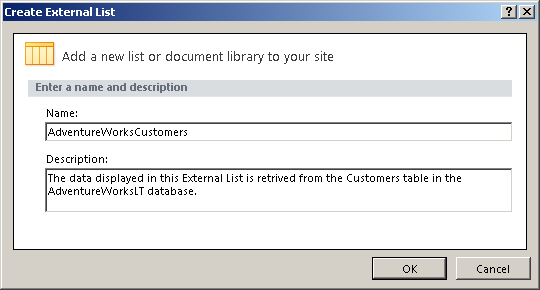
In the Name text box, type AdventureWorksCustomers, and in the Description text box, type a description of the list contents. The text you enter in the Description text box will be used by the SharePoint search engine to identify content relevant to search queries. For example, type The data displayed in this External List is retrieved from the Customers table in the AdventureWorksLT database., as shown in Figure 5-6.
Note
Similar to when you create an external list with the browser, the contents of the Name text box are used for the URL of the list as well as the title of the list. As noted in the previous section when you created an external list using the browser, you are able to change the list title later, but you are not able to change the URL, so type in the Name text box the URL that you would like to use for the external list. Also, you cannot have two lists with the same name, so the name you give the list must be unique within the site.
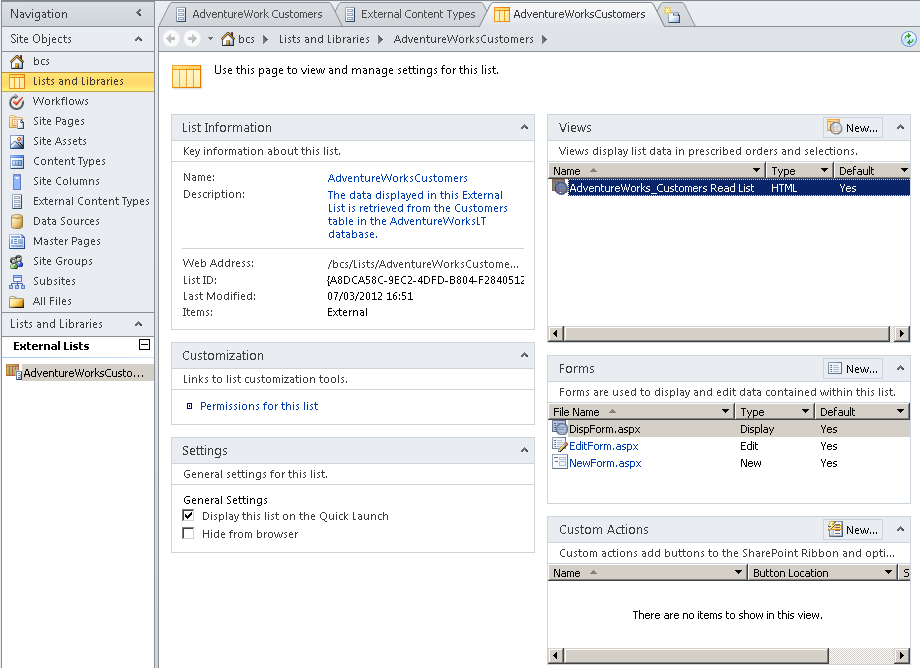
Click OK. The AdventureWorksCustomers list settings page displays in a new Workspace tab, as shown in Figure 5-7. In the Views area, one view is listed: AdventureWorks_Customers Read List. In the Forms area, three forms are listed: DispForm.aspx, EditForm.aspx, and NewForm. aspx. The view and the three forms use the XLV Web Part to display and update data on the external system.

To create an external list from the ECT settings page using SharePoint Designer, follow these steps:
In the Navigation pane, click External Content Type and then click the ECT you want to be the basis for your external list. The ECT settings page appears.
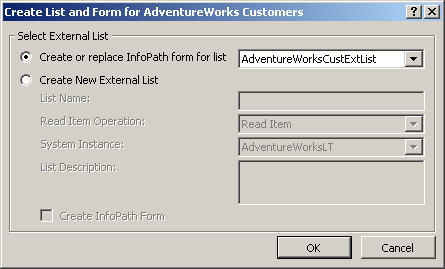
On the External Content Types ribbon tab, in the Lists & Forms group, click Create Lists & Forms. The Create List and Form dialog box displays, as shown in Figure 5-8. If this is the first list created from the external list, then the Create New External List option is selected.
Select Create New External List and type the name of the external list and the Read Item operation the external list is to be based on. You can also select the Create InfoPath Form check box to create the three form files as InfoPath forms.
Managing External List Views and Forms
When you create an external list, one or more views and up to three forms are created. A view is created for each Read List operation you created for the external content type (ECT). The view name is created from the display name of the ECT Read List operation. The default view uses an XSLT List View (XLV) Web Part to display the data returned when default ECT Read List operation is executed. Forms are created when you define the ECT Create, Update, and Read Item operations.
The ECT Read List operation and any filters that you configure define the data that is transported across the network from the external system to the SharePoint server. You can also configure the view to limit the data transferred across the network from the SharePoint server to the user’s computer, where the user is displaying the view pages in a browser. You have two places to define the data that you want to present on the page to the user: the ECT Read List operation and the view (see Figure 5-9).

If your external system uses a product designed for data manipulation, such as a database, it is better to configure the ECT operation to use the external system to filter and sort the external data than to place extra load on the SharePoint server to complete those activities.
When an end user can create external lists or create views on an external list, but the user cannot create or modify ECTs, then defining ECT filters allows the external list owner to control what is transferred from the external system to the SharePoint server. Thus, the creator of the external list or views can minimize the manipulation of the external data that a SharePoint server has to complete, which in turn improves the performance of the views. This is an important point to emphasize when training external list owners. The configuration of the Columns, Sort, and Filter sections on a view define the work that you want the SharePoint server to do. The SharePoint server saves in memory only the data in the columns you specified in the view, and sorts that data as per your view’s configuration.
External Data and Throttling
The data retrieved by executing the ECT Read List operation is limited by the throttling settings for Business Connectivity Service (BCS) data. The throttling limit for external data is not the same as when the data is stored in SharePoint lists and libraries. The data presented in external list views bypasses the setting for lists and libraries and uses external system throttling rules, as described in Chapter 3. For example, the default maximum number of rows that can be obtained from a database is limited to 2,000 items. If more than 2,000 items are returned, the message in Figure 5-10 appears.

The error message displayed in the browser does not reflect that there is a throttling issue, but when your SharePoint farm administrator reviews the ULS logs for this problem, and your external system is a database, the message states: “Database response throttled. Maximum number of rows that can be read through the database system utility is 2000.”
Note
Only SharePoint farm administrators can modify the throttling limits using Windows PowerShell, as described in Chapter 3 and in the Microsoft Knowledge Base article at http://technet.microsoft.com/en-us/library/ff607630.aspx.
Creating Views Using the Browser
To create a new view for an external list using the browser, follow these steps:
On the List ribbon tab, in the Manage Views group, click Create View. The Create View page displays.
Under Choose a View Format, click Standard View.
In the Name section, type ByCustomer. In this section, you can also make this new view the default view.
In the Audience section, select to make this view either a personal view or a public view.
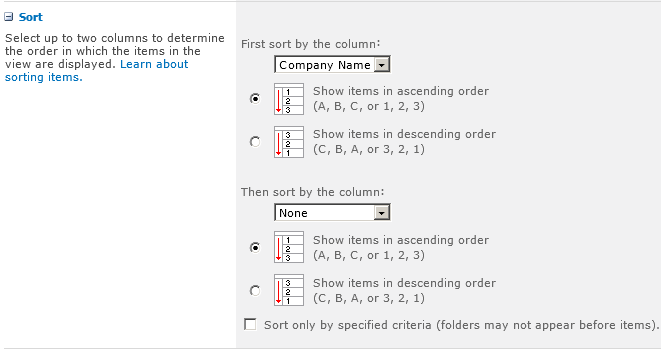
In the Columns section, select those columns you want to display in your view, as shown in Figure 5-11, and then in the Sort section, select the column that you want the data to be sorted by. For example, select the column CompanyName and select the option to show items in ascending order.
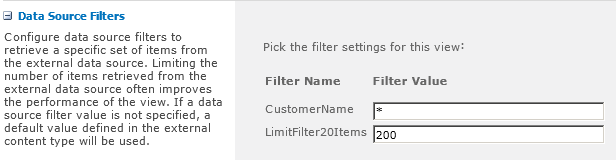
You then have two ways of filtering the data, as shown in Figure 5-12: the Data Source Filters section and the Filter section.
Figure 5-12. When creating a view, use the Data Source Filters section to select the Read List operation to use to obtain data from the external system.When you first create a view, the Data Source Filters section lists the ECT Read List operations defined for the ECT. When you modify the view, you are able to set values for the filters, as shown in Figure 5-13, if you defined any filters on the ECT Read List operation.
To minimize network traffic between the external system and the SharePoint server, and to avoid exceeding the throttle limit, use the Data Source Filters section instead of the Filter section. When no filters are defined on the Read List operation, the Data Source Filters section contains the text “No data source filters available.”
When you use the Filter section to reduce the number of items displayed in the view, and a filter limit has been defined with, for example, a limit of 200 on the ECT Read List operation, then your filter is applied to the 200 items provided by the external system.
You can configure the remaining options as with any other SharePoint list or library view. Click OK to save your view configurations.

Creating Views Using SharePoint Designer
To create new views for an external list using SharePoint Designer, follow these steps:
Click List and Libraries in the Navigation pane to display the List and Library gallery. Under External Lists, click the external list where you want to create a new view, such as Adventure-WorksCustomers.
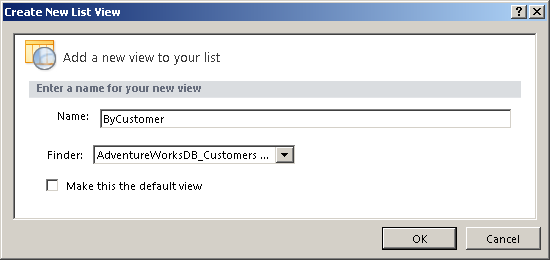
On the List Settings ribbon tab, in the New group, click List View. The Create New View dialog box opens.
In the Name box, type ByCustomer, and then in the Finder list, select the ECT Read List operation that you want to create the view from, as shown in Figure 5-14.
Click OK. The Create New List View dialog box closes. In the Views area, ByCustomer appears, as shown in Figure 5-15.

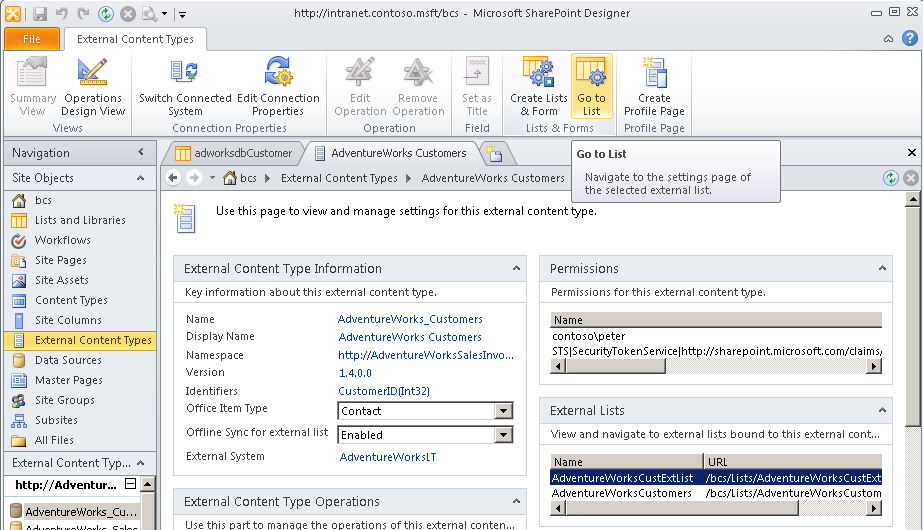
You can also navigate to the external list in SharePoint Designer by displaying the ECT Settings page. Then in the External Lists area, click the list where you want to create a new view, and on the External Content Types ribbon tab, in the Lists & Forms group, click Go to List, as shown in Figure 5-16.
To modify a view in SharePoint Designer, use the following steps:
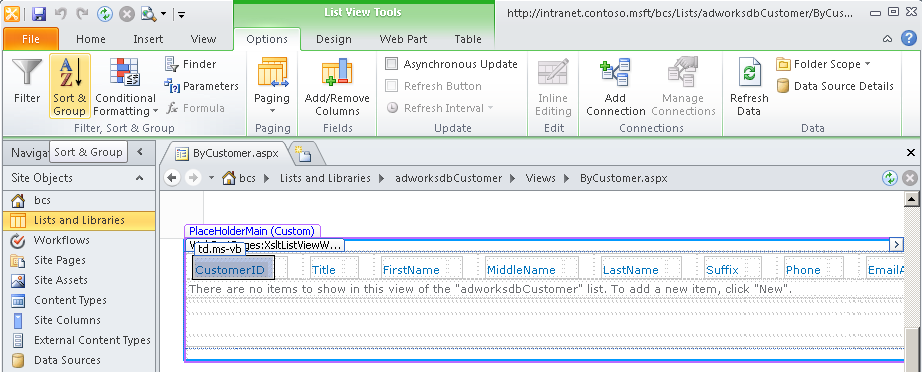
Display the external list settings page in the SharePoint Designer workspace area, and then in the Views area, click the view you want to modify, such as ByCustomer. The ByCustomer.aspx page opens in edit mode, and the XLV Web Part is displayed within a blue rectangle named PlaceHolderMain.
In Design view, click CustomerID to display the List View Tools ribbon tab set, and then on the Options ribbon tab, click Sort & Group, as shown in Figure 5-17.
Note
When editing an XLV Web Part via the SharePoint Designer Options ribbon tab, the Finder command in the Filter, Sort & Group group is activated. When you click this command, the Configure Finder dialog box opens, allowing you to change the Read List operation associated with the Web Part and to configure the filters associated with the selected Read List operation.
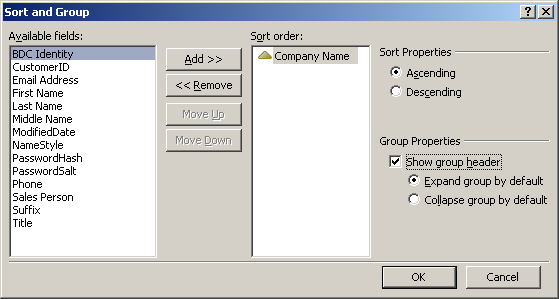
In the Sort and Group dialog box, under Available Fields, click Company Name, and then click Add. Under Group Properties, select Show Group Header, as shown in Figure 5-18. Click OK.
The Sort and Group dialog box closes, and the XsltListViewWebPart displays the contents from the AdventureWorks database sorted and grouped by company name, as shown in Figure 5-19.

Note
The XLV Web Part in SharePoint Designer shows only five items from the AdventureWorks database, even though there are more rows in the Customers table. When you use the browser to request ByCustomer.aspx, the rows are returned in sets of 30 items.
In SharePoint Designer, you can only create pages that display data from an external list using the XLV Web Part. With other SharePoint lists and libraries, and with external systems that are defined in SharePoint Designer as data sources, you can use the Data Form Web Part (DFWP) as well as the XLV Web Part to display data. When you try to create a DFWP by creating an empty data view, no external lists are displayed in the Data Source Picker dialog box. DFWP can only be used to create external list forms.
Creating and Modifying Forms
If you used the browser to create the external list, then by default the edit, new, and display forms are created as .aspx pages using the XSLT List Form (XLF) Web Part. You can modify this Web Part using the browser or SharePoint Designer.
Managing Forms Using the Browser
Modifying an external list form using the browser can be difficult because by default the forms are displayed as dialogs. On other lists, you can disable launching forms in a dialog by using the Advanced Settings page, which you can navigate to from the List Settings page. The Advanced Settings link is not available on the List Settings page for external lists.
Note
On external lists, you can disable displaying forms as dialogs by using Windows PowerShell or code.
The workaround is to first display the form as a dialog, and then right-click in the body of the form. On the browser menu, click Properties, as shown in Figure 5-20.
In the Properties dialog box, obtain the URL of the form by placing your cursor in the URL to the right of Address, pressing Ctrl+A, and then pressing Ctrl+C (see Figure 5-21).


In the browser, paste the URL in the Address box, removing &isDlg=1 from the end of the URL. Doing so displays the form with the Site Actions menu. For example, the URL of your external list NewForm should look similar to the following URL:
http://intranet/Lists/Customers/NewForm.aspx?RootFolder=%2Fbcs%2FLists%2FCustomers
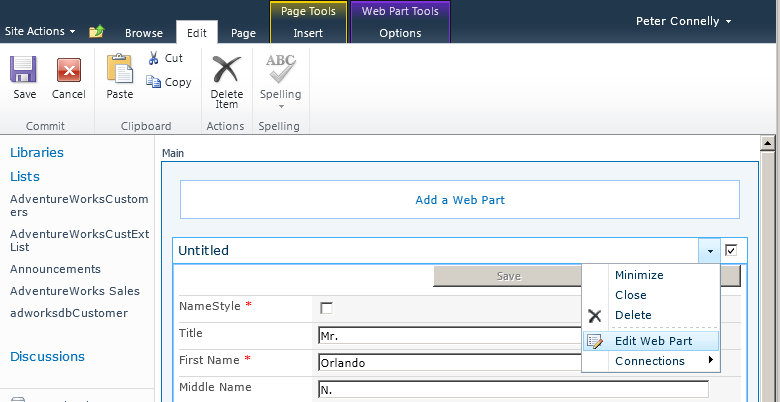
To edit the form, click Site Actions, and then click Edit Page. Click the down arrow to the right of the Web Part title, and then click Edit Web Part, as shown in Figure 5-22, to display the Untitled Web Part tool pane.
The XLF Web Part does not provide you with many options to customize the form or modify the fields to display on the form. You are dependent on the fields defined in the Create, Read Item, and Update ECT operations.
Note
See Also Web Part properties are discussed in Chapter 6.
You can create new forms with the browser by using the Form Web Parts menu option on the List ribbon tab in the Custom List group, as shown in Figure 5-23. However, you are still limited to using the XLF Web Part and the fields defined in the ECT operations.

The alternative to using the XLF Web Part is to create forms using either InfoPath Designer to create an InfoPath form or SharePoint Designer to create an .aspx page that contains a DFWP. Both procedures allow you to build more complex forms and to choose which fields to display on the form. If you alter the ECT to include additional fields, both forms will need to be amended. However, such amendments to the ECT may be so drastic that you would have to recreate the external list as well.
InfoPath forms can be displayed in the browser only if you are using the Enterprise edition of SharePoint Server and have configured InfoPath Services. With other lists, you can use the browser to create InfoPath forms for the three types of forms by clicking Form Settings on the List Settings page. This option is not available for all lists, including external lists—for example, it is not available for calendar, group calendar, circulations, phone call memo, resources, discussions, surveys, and libraries.
Creating Forms in SharePoint Designer
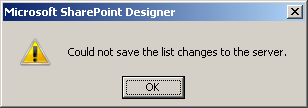
You can use SharePoint Designer on other lists to create .aspx forms by using the List Form command in the New group on the external list’s List Settings ribbon tab or by using one of the three form commands in the New group on the Forms ribbon tab. However, if you try this option for an external list, a dialog box displays stating that SharePoint Designer could not save the list changes to the server as the list does not exist (see Figure 5-24).
The workaround is to modify an existing form .aspx page or create a new .aspx or Web Part page in SharePoint Designer. On the Insert ribbon tab, depending on the type of form you want to create, in the Data Views & Forms group, click New Item Form, Edit Item Form, or Display Item Form, and then click Custom List From. The List or Document Library Form dialog box opens, from which you can select an external list. This creates a DFWP on the page.
You can use the DFWP in many business scenarios where traditionally a developer was needed to create a custom Web Part. Like other Web Parts, the DFWP and the XLV and XLF Web Parts follow these rules:
They can be placed inside and outside EmbeddedFormField controls on wiki pages or Web Part zones on Web Part pages. That is, you can use both types of Web Part on pages other than external list view and form .aspx pages.
They have the standard properties shared by all Web Parts, such as Title, Height, Width, and Frame State.
Depending on the settings of the Web Part zone properties, they can be relocated to other Web Part zones by using the browser.
Web Part properties can be accessed through the browser Web Part tool pane.
When inside a Web Part zone, they support personal and shared views.
Table 5-1 describes the differences between the DFWP and the XLV and XLF Web Parts.
Using SharePoint Designer, you can also create InfoPath forms for external lists and other lists. You have two methods for creating InfoPath forms with SharePoint Designer:
On the External Content Types ribbon tab, in the List & Forms group, use the Create Lists & Forms command to display the Create List and Form dialog box, as shown in Figure 5-8. This method allows you to create new forms, and edit and display forms. You used the Create List and Form dialog box earlier in this chapter to create an external list.
Create and edit the form from the List Settings ribbon tab, in the Actions group, by using the Design Forms in InfoPath command as described in the following steps:
Click Lists and Libraries in the Navigation pane to display the Lists and Library gallery. Under External Lists, click the external list where you want to create a new form.
On the List Settings ribbon tab, in the Actions group, click Design Forms in InfoPath, as shown in Figure 5-25. InfoPath Designer 2010 opens.
Once you have completed your customizations, save the InfoPath file (.xsn). Publish it to the external list by clicking File to display the Microsoft Backstage view, and then click Publish Your Form. The default location to save the form is a folder named Item, below the external list.

Site Columns and External Data
You cannot create a site column that directly accesses data from an external system; however, you can create a site column where the type of information in the column looks up information from an external list. The external list should already be created on the site where the site column is created.
Manipulating Data in External Lists with Workflows
You cannot bind workflows to data that is not stored in SharePoint. Data presented in external lists is not stored in SharePoint, so SharePoint cannot trigger workflows on changes to the data that is made in the external system. However, using SharePoint Designer, you can create a site, list, library, or reusable workflow, and in those workflows you can look up, copy, delete, or modify data from one or more external lists.
Using External Data in Lists and Libraries
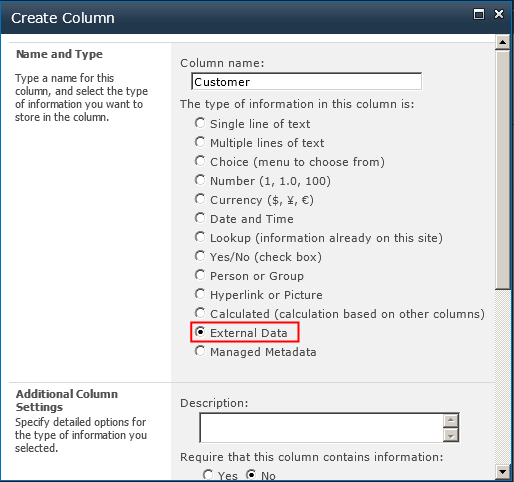
External data columns allow you to add external content to a standard SharePoint list or library. The external data column is similar to a lookup column, but in place of choosing values stored in another list or library, the data is retrieved from an external system. You create an external data column as you do any other column—that is, on the List tab, click Create Column. Then on the Create page, enter a column name, and then select External Data as the column type, as shown in Figure 5-26.
In the Additional Column Settings section, to the right of the External Content Type text box are two icons: the Check external content type (ECT) icon, which you use when you know the name of the ECT, and the Select ECT icon, which when clicked opens the External Content Type Picker dialog box.
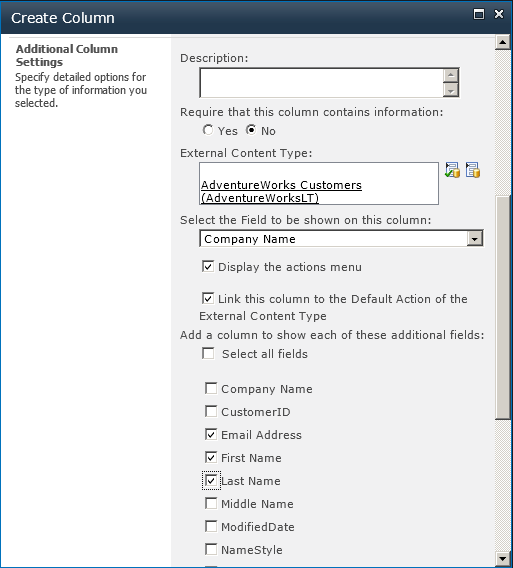
Once you select an ECT, the Additional Column Settings section contains a list of properties associated with the ECT, as shown in Figure 5-27. In the Select the Field to Be Shown on This Column drop-down list, select the column that your users usually associate with the external content. If the external content is a customer relationship management (CRM) system, then this column might be the customer name. You can then choose to add one or more fields from the ECT to become columns in your list or library, such as Email Address, First Name, or Last Name. You can also choose to add the fields to all content types, as well as adding them to the default view.
Only when you add a new list item or document and click the Select External Item(s) icon will the Business Data Connectivity (BDC) runtime connect to the external system to retrieve data to populate the Choose dialog box, as shown in Figure 5-28. The dialog box shows only those fields that had the external item picker check box selected when you configured the ECT Read List operations. When the external item picker check box is not selected for any field, all fields are displayed in the Choose dialog box.
The Choose dialog box is limited to the number of records returned from the external system. The person who created the ECT should have created filters, so that users can quickly find the data from the external system that they want to associate as metadata with the list item or document.
When the new list item or document is saved, the external data is stored in the SharePoint SQL content database, unlike when you use external lists, where the data is always retrieved from the external system and no external data is stored in the SQL database. To update the data in the external column, click the Refresh icon to the right of the external data column name, as shown in Figure 5-29.


A webpage is displayed, as shown in Figure 5-30, that warns you that this operation could take a long time. If you click OK, the BDC runtime connects to the external system. A copy of the updated external data is stored in the SQL database.

When you copy external data into a list or library, the data inherits all list type operations, such as views, filters, and the ability to be used to trigger list workflows. When an external data column is added to a library, then the values in the external column can be made available as content controls in Microsoft Word 2010.
Using External Data Actions
When you create an external data column in a list or library, an icon appears on each list item to the left of the external content. This icon provides a drop-down list of links to pages that display information relevant to the external content type (ECT) item, such as the following:
These links are called actions, and a SharePoint farm administrator can create them with the SharePoint 2010 Central Administration website, using the following steps:
Navigate to the Business Data Connectivity (BDC) service application where the ECT is defined.
On the Edit tab of the Service Application Information page, in the View group, click External Content Types from the drop-down menu.
Click the ECT to display the External Content Type Information page.
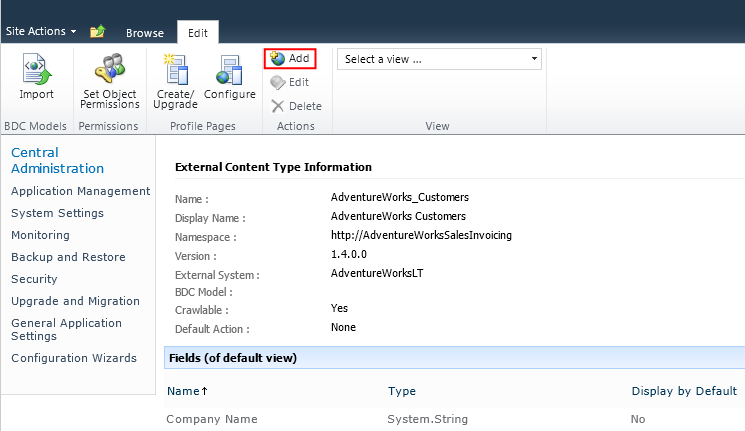
On the Edit tab, in the Actions group, click Add, as shown in Figure 5-31.
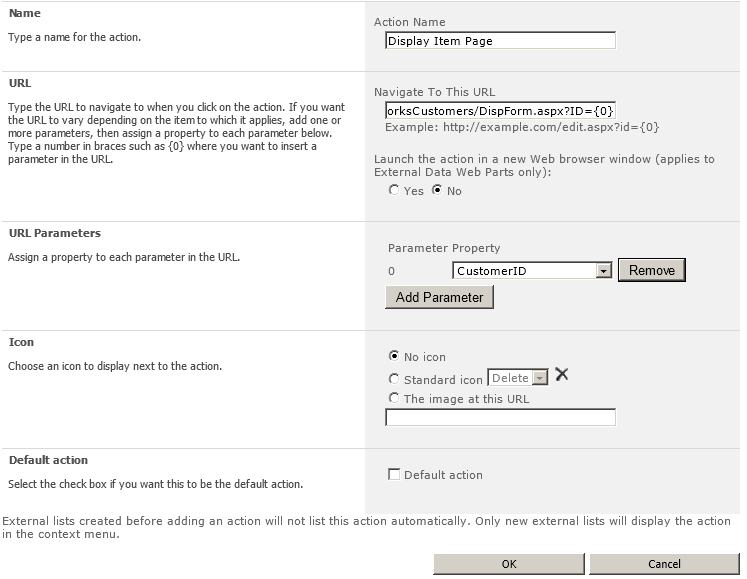
On the Add Action page that appears (see Figure 5-32), type a name for the action, type the URL, specify whether to launch the action in a new browser window or not (default), add parameters to the URL if required, and then add the icon to display next to the action. You can choose from the Delete, Edit, or New icons, or you can choose your own image.
Profile Page
If you are using the Enterprise edition of SharePoint Server, you can create a profile page automatically using either the SharePoint 2010 Central Administration website or SharePoint Designer, as explained in Chapters Chapter 3 and Chapter 4. The profile page created uses two Business Data Web Parts, Business Data Item Builder and Business Data Details, which are available only in the Enterprise edition of SharePoint Server 2010 and in the Office 365 E3 and E4 plans. At the same time that SharePoint creates the profile page, it also creates an external data action named View Profile.
Note
See Also For more information about the Business Data Web Parts, see Chapter 6.
If you are not using the Enterprise edition of SharePoint Server or the Office 365 E3 or E4 plans, then you will need to create a profile page and external data action for each ECT to you create. This is easy to accomplish using external lists:
Create a single dedicated SharePoint site to host the profile pages for all your ECTs, as per Microsoft’s recommendation. Ensure that the web application where the site is created is associated with the BCS service applications whose metadata store contains the ECT.
On the site, create an external list for each ECT you create. This will create at a minimum one view based on the Read List operation and a display form from the Read Item operation.
Give all users who will use the profile page at least read-only permissions to the external list. If you do not know who these users are, you should contact the BDC service application administrator, as they would have configured such users with similar access to the ECT object within the metadata store.
Ask the BDC service application administrator to create an external data action configured as follows:
Ensure the URL is the display form with one parameter—for example, http://intranet/bcs/AdventureWorksCustomers/DispForm.aspx?ID={0}.
Add a parameter that maps parameter 0 to the identify field for the ECT.
Associate an icon with the action (optional). The standard icons provided on the Add Action page do not match the display form page, so you would need to create an image, save it to a library on the site, and configure permissions on the library so users who will use the action have Read permissions to the icon.
Set the action as the default action.
It is likely that this procedure will be completed by the BDC service application administrator or the creator of the ECT, although there is the option to create the display form as either an InfoPath form or by using a DFWP, as discussed earlier in this chapter. It is unlikely you will use an InfoPath form for the display form, as the reason for following the preceding procedure is that you are not using the Enterprise edition of SharePoint Server, and without that version of SharePoint Server, you cannot create InfoPath forms that can be displayed in webpages.
Summary
The preferred method of displaying data from external data sources is to use external lists. You create external lists using the browser, Microsoft SharePoint Designer, Windows PowerShell, or code. When you have created these lists, you will find that they have similar functionality to other SharePoint lists you are familiar with; however, you cannot associate RSS feeds to external lists. There is also no datasheet view, and you cannot bind workflows to the data in an external list, because the data is not in SharePoint, so SharePoint cannot trigger workflows on data changes in an external system. However, using SharePoint Designer, you can create a site, list, or reusable workflow that accesses one or more external lists.
By default, the XSLT List View (XLV) Web Part is used on external list views, and the XSLT List Form (XLF) Web Part is used on external list forms. You can replace these Web Parts either by using the Data Form Web Part (DFWP) or Business Data Web Part or by using InfoPath forms.