Chapter 10. Exploring Office 365 and Connecting to External Data
In this chapter, you will:
Learn about Microsoft Office 365
Explore Business Connectivity Services functionality in Microsoft SharePoint Online
Learn the differences between Business Connectivity Services in Office 365 and in on-premises SharePoint 2010 installations
Build Business Connectivity Services solutions in SharePoint Online
In Chapter 8, you learned how to connect Microsoft Office 365 to external systems when using the Microsoft cloud platform. In this chapter, you will take a look at Microsoft SharePoint Online to get an understanding of how it compares to and contrasts with working with the on-premises version of SharePoint with regard to Business Connectivity Services (BCS). You will then work through an example of building a SharePoint Online solution.
Introducing Office 365
As previously stated, Office 365 is Microsoft’s solution for communicating and collaborating in the cloud. Office 365 currently allows users to host SharePoint, Exchange, and Lync online. These cloud services enable businesses to change the way they think about their IT infrastructure and allow organizations to relieve the burden of requiring on-premises hardware and technical expertise. There are pros and cons for both options—running your own hardware and using services in the cloud. If you choose to run your own hardware, you have greater control of your environment, and this may be the only option for some secure environments. The downside is the cost of the hardware and the infrastructure to support it. However, Office 365 offers a compelling, useful solution if you want to use SharePoint without purchasing the hardware to support it and you can scale the solution as the demand requires, but you will be sacrificing some control.
SharePoint Online comes in two flavors: Standard and Dedicated. SharePoint Online Standard is the multitenant environment in which you are sharing hardware with other users. SharePoint Online Dedicated is where you get dedicated hosting and hardware to run your SharePoint environment in the cloud. There are a few differences between these options with regard to how much control you have over the environment and the degree to which you can customize it. Table 10-1 outlines some of the differences between hosting SharePoint Online Standard and Dedicated.
Feature | SharePoint Online Standard | SharePoint Online Dedicated |
Tenancy | Multitenant | Dedicated |
Hardware | Shared | Dedicated |
Location | Microsoft datacenters | Microsoft datacenters |
Code support | Partial trust | Full and partial |
Customization | SharePoint Designer | SharePoint Designer and Visual Studio |
Target audience | Any company size | Companies with 20,000+ seats |
Custom solutions (Full-trust code) | No | Yes |
Sandboxed solutions (Partial-trust code) | Yes | Yes |
Silverlight Web Part (.xap files) | Yes | Yes |
BCS (back-end LoB integration) | Yes | No |
SharePoint Designer 2010 | Yes | Yes |
Client Object Model | Yes | Yes |
Web services | Yes | Yes |
OOB browser configuration (Web Parts, themes) | Yes | Yes |
Visual Studio 2010 (SharePoint Tools) | Sandbox only | Farm and sandbox |
InfoPath forms | Sandbox only | Admin and sandbox |
Workflows | Declarative only | Custom and declarative |
Exploring BCS Functionality in SharePoint Online
SharePoint Online provides much of the same functionality that is available when working with the on-premises version of SharePoint. You get access to the following:
External lists
External data columns
Business Data Web Parts
Secure Store
Client Object Model
You can provide the same level of collaboration with your external system line-of-business (LoB) data as with the on-premises version of SharePoint.
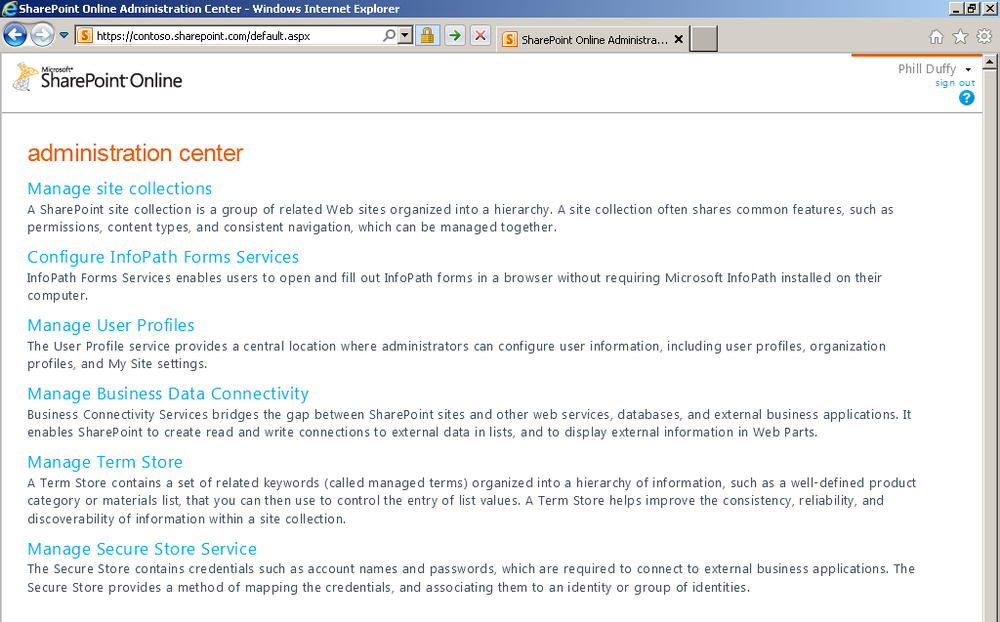
Let’s take a look at the available options with SharePoint Online. In the Administration Center, you can find a Manage Business Data Connectivity section, as shown in Figure 10-1.
Take a look at the options available for Managing Business Data Connectivity. You will see many of the same options when you work with BCS on-premises. You can see any external content types (ECTs) that have been deployed, and you are able to perform actions such as importing models, creating profile pages, and setting permissions on the model, as shown in Figure 10-2.

Differences Between BCS in Office 365 and On-Premises SharePoint 2010 Installations
With Office 365 multitenant, you are able to connect only to Windows Communication Foundation (WCF) services. Direct connections to databases and connections to SQL Azure are only supported in Office 365 Dedicated. The fact that you are unable to deploy a DLL to SharePoint Online means that creating a .NET Assembly Connector is not an option. A WCF web service can still call any external system that you can with the .NET Framework, and there are even some new features available that allow you to still work with on-premises data while hosting SharePoint and your WCF service in the cloud.
You won’t be deploying the BDC models using WSP packages with Office 365. Instead, the tool to use is SharePoint Designer, where you are able to build and save the ECTs directly to your Office 365 multitenant environment.
Building BCS Solutions in SharePoint Online
The simplest way to create a BCS solution for SharePoint Online is to use SharePoint Designer. Because SharePoint Online is only able to connect to WCF services, you need to have a WCF web service to connect to in order to surface your data.
When building your BCS solution for SharePoint Online, make sure that you are connecting to a compatible WCF web service that is surfacing its data in a way that is compatible with BCS. In this section, you will learn how to build a cloud-based BCS solution.
Different SharePoint Online Scenarios
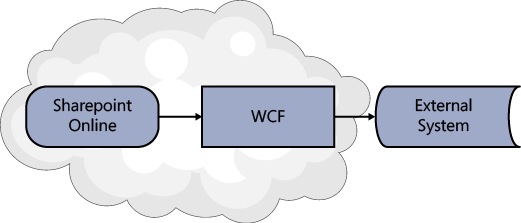
This section presents several different scenarios for connecting to external data. In the first scenario, the external system is also in the cloud, such as SQL Azure (see Figure 10-3).

Another scenario is when you are connecting to an external system that is public-facing but could be hosted anywhere, such as servers inside an organization (see Figure 10-4).
If you want to have data on-premises but still make it available through SharePoint Online, there is a third scenario, which is to use the service bus that allows BCS to work with data behind a corporate firewall (see Figure 10-5).
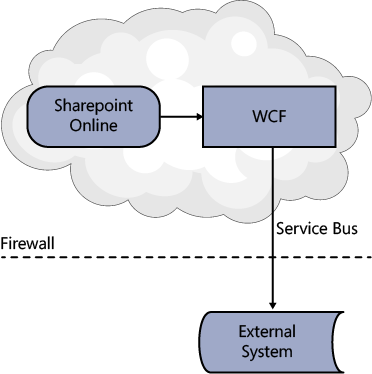
The Windows Azure Service Bus provides a convenient way to access your LoB system inside your own firewall from SharePoint Online. The service bus acts as a messenger between your on-premises data and the cloud. The benefit of this setup is that it allows you to host SharePoint online but still retain control over your data systems. Due to the nature of what the service bus is achieving, you need to take a few steps to make it work.
Connecting to SQL Azure with SharePoint Online
If you want to connect to SQL Azure using SharePoint, you will need to use an Azure web service. The following sections walk you through the steps required to create the SQL Azure database, create the Azure web service, and then build the model using SharePoint Designer.
Creating the SQL Azure Database
To begin, you need a Windows Azure account. If you don’t have an account yet, you can obtain a trial by visiting www.microsoft.com/windowsazure/free-trial/. Once you have an account, head over to https://windows.azure.com/default.aspx and log in with your credentials.
In the bottom-left of the Azure homepage, click the Database button, as shown in Figure 10-6.
You will see a few options in the main panel. When you click Create a New SQL Azure Database, you are prompted for a subscription to use. On the next screen, you choose the name, edition, and size of the database. Table 10-2 lists the database settings.

Click Finish to create the database. The next step is to add your machine to be able to connect to the remote database using Microsoft SQL Server Management Studio. By default, the firewall will block access and require that the IP address be added. Figure 10-7 shows the error that displays if the IP address is not enabled.

To enable the IP address, click the server from your chosen subscription and add a new rule for the IP address being used. When you connect again, you should be successful. You can find the server address by clicking the server name under the Windows Azure subscription. It will appear in the Properties pane with the label Fully Qualified DNS Name.
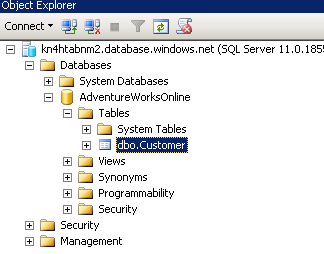
Once you have connected to the SQL Azure database using SQL Server Management Studio, you can create a new table. In this example, you will create a very simple Customer table using the following SQL script:
CREATE TABLE [Customer](
    [CustomerID] [int] IDENTITY(1,1)NOT NULL PRIMARY KEY CLUSTERED,
    [Title] [nvarchar](8)NULL,
    [FirstName] [nvarchar](50)NOT NULL,
    [LastName] [nvarchar](50)NOT NULL,
)
Once you execute this script, the table is created, as shown in Figure 10-8.
Next, use the following script to populate the table with some sample data, so there is something to see when you call the table from BCS:
INSERT INTO [Customer]
    ([Title],[FirstName],[LastName])
VALUES
    ('Dr', 'Julia', 'Ilyina'),
    ('Mr', 'Tom', 'Perham'),
    ('Ms', 'Timm', 'Linda'),
    ('Mrs', 'Roxanne','Kenison'),
    ('Mr', 'Justin','Thorp' ),
    ('Mr', 'Mohammad','Chami' ),
    ('Mr', 'Peter','Fischer'),
    ('Mr', 'Manjinder','Kaur'),
    ('Mr', 'Shmuel', 'Yair'),
    ('Mrs', 'Karen', 'Berg'),
    ('Ms','Isabel', 'Martins')
You can test that the rows were added by performing a simple select query on the data, as shown in Figure 10-9.
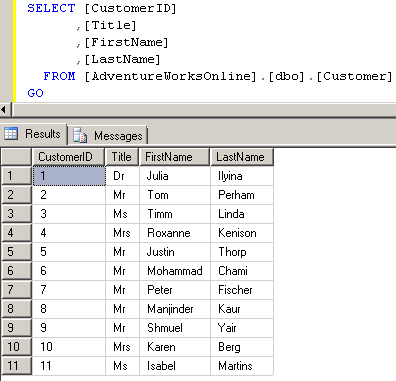
So far, you have created the data for the external system in SQL Azure. Only a connection to a WCF service is supported by SharePoint Online, so the next step is to create a WCF service that exposes this data in a format that BCS can consume.
Creating the Windows Azure WCF Web Service
You can create a WCF web service using Microsoft Visual Studio 2010. First, install the Azure SDK, which you can download from www.windowsazure.com/en-us/develop/downloads. After you install the SDK, access the Windows Azure Project in Visual Studio, as shown in Figure 10-10.

Create a new project in Visual Studio and name it AzureExternalSystemProject. On the next screen, you are prompted for the role to use. Click WCF Service Web Role, click the right arrow to add it, and rename the role as SPO_ExternalSystem, as shown in Figure 10-11.

When you click OK, Visual Studio will add a service project along with the Azure project.
The next step is to add a way for the WCF service to interact with the data from SQL Azure. One way to achieve this is to use the Entity Data Framework (EDF). The EDF requires a data source to connect to—in this case, the SQL Azure database. In Visual Studio, click the Data menu bar, click Add New Data Source, click Database, and then click Entity Data Model. Another wizard page appears, asking how you want to create the Entity Data Model. Click Generate from Database, as shown in Figure 10-12, as you will use the Tables structure to build the EDF model.
You are then asked for the connection details to the database. You can enter the server information as you did when connecting. Using SQL Server Management Studio, you can test the connection to make sure you entered the correct details.

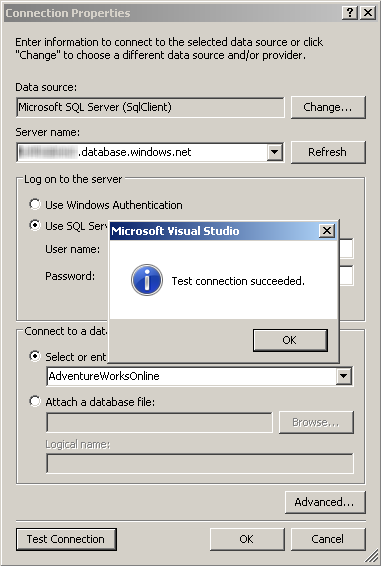
You can choose whether to store the connection details in web.config or obfuscate them in your application code. For simplicity in this case, the connection details will be stored in web.config, but the decision of where to store the connection information will require careful consideration for production code, just as you would treat any sensitive connection string. When you click Next, the wizard connects to the SQL database and returns a list of tables available to you. Expand the Tables node and select the Customer table (the one you created earlier). Leave the other default values and click Finish. The EDF model is added to your project. To ensure this model gets compiled and copied without issues, select the Model1.edmx file from the Solution Explorer and make sure the two properties are set as listed in Table 10-3.
Next, you’ll add a code representation of your Customer table, so you’ll add a strongly typed class. Right-click the SPO_ExternalSystem project, click Add, and then click New Item. From the C# node, select Class, and name the new file AzureCustomer.cs. In this class, you want to add the corresponding properties to match the fields in your database table. Edit the class so it contains the following code:
namespace SPO_ExternalSystem
{
    public class AzureCustomer
    {
        public int CustomerId { get; set; }
        public string Title { get; set; }
        public string FirstName { get; set; }
        public string LastName { get; set; }
    }
}
This is the object that will be returned by the WCF web service. The next step is to define the WCF interface that provides a contract of the service methods. Open the IService1.cs file. Clear out the existing code such that you are left with the following:
using System.ServiceModel;
namespace SPO_ExternalSystem
{
    [ServiceContract]
    public interface IService1
    {

    }
}
Now you can add interface signature methods. Only provide a Finder and a SpecificFinder method, which will return all records and just a single record, respectively. The method signatures are fairly simple. The Finder method will return an array of AzureCustomers, and the SpecificFinder method will be passed in a CustomerId and return the matching AzureCustomer. Update the code so that you now have the two methods added:
using System.ServiceModel;
namespace SPO_ExternalSystem
{
    [ServiceContract]
    public interface IService1
    {
           // Finder Method
           [OperationContract]
           AzureCustomer[] GetCustomers();

           // Specific Finder Method
           [OperationContract]
           AzureCustomer GetCustomer(int customerId);
    }
}
Now you need to implement the methods defined in the interface. The Service1.svc has some code-behind inheriting from the IService.cs interface, so you’ll need to go in here and implement the methods. Open the Service1.svc.cs class and remove the existing two methods so that you are left with the following:
namespace SPO_ExternalSystem
{
    public class Service1 : IService1
    {

    }
}
It is time to add the methods that will retrieve the data from SQL Azure via the Entity Data Framework. Start with the Finder method, which means you need to add a method signature that matches the interface’s signature for the Finder method:
public AzureCustomer[] GetCustomers()
{
    // Get Connection to External System through Entity Data Framework
    using (var db = new AdventureWorksOnlineEntities())
    {
        // Return records as strongly typed Azure Customer
        return db.Customers.Select(customer => new AzureCustomer
                                                   {
                                                       CustomerId = customer.CustomerID,
                                                       Title = customer.Title,
                                                       FirstName = customer.FirstName,
                                                       LastName = customer.LastName
                                                   }).ToArray();
    }
}
With the Finder method completed and returning an array of the strongly typed AzureCustomer class for each record in the external system, you can move on to the SpecificFinder method. Add the following method just below the Finder method:
public AzureCustomer GetCustomer(int customerId)
{
    // Get Connection to External System through Entity Data Framework
    using (var db = new AdventureWorksOnlineEntities())
    {
        // Get single record matching the Customer ID
        var matchedCustomer = db.Customers.Single(c => c.CustomerID == customerId);

        // Return AzureCustomer with the details of the matched customer
        return new AzureCustomer
                   {
                       CustomerId = matchedCustomer.CustomerID,
                       Title = matchedCustomer.Title,
                       FirstName = matchedCustomer.FirstName,
                       LastName = matchedCustomer.LastName
                   };
    }
}
You can now deploy your solution to Windows Azure in a couple of ways. Read this article to see how it can be achieved: http://msdn.microsoft.com/en-us/library/windowsazure/ff683672.aspx.
Once the service has been achieved, you can find the path by going to the Hosted Services, Storage Accounts & CDN section of Windows Azure, locating your project, and then viewing the DNS name, as shown in Figure 10-14.

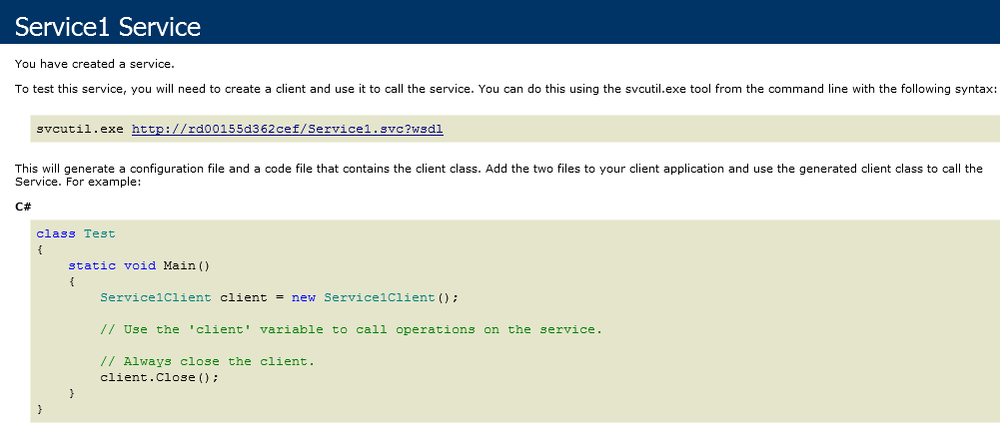
Navigate to the URL and append Service1.svc to get to your service, such as http://XXXXXXX.cloud-app.net/Service1.svc. You will see a screen similar to the one shown in Figure 10-15.
You now have a web service running in Windows Azure that is referencing the data in SQL Azure. The final step is to configure a BDC model using SharePoint Designer to consume the web service.
Connecting to the Windows Azure Web Service Using SharePoint Designer
You connect to a Windows Azure web service in the same way you connect to any other web service, but this time you will connect to it from SharePoint Online.
Open SharePoint Designer and click Open Site. Enter the URL of your SharePoint Online account. You will be prompted for your Office 365 credentials (see Figure 10-16).

Once you have connected, on the External Content Types ribbon tab, in the New group, click External Content Type.
Change the Name of the ECT to SPOCustomers, and then click the Click Here to Discover External Data Sources and Define Operations link. On this page, you can add the connection to your WCF web service. Click the Add Connection button and choose WCF Service. Table 10-4 lists some example credentials to enter in the next dialog box.
Once you have connected to the web service, you will see your methods appear in the Data Source Explorer, as shown in Figure 10-17.

You now want to use these methods as your BCS methods. Right-click GetCustomers (Finder method), and from the new method menu click New Read List Operation, as shown in Figure 10-18. Doing so adds the method as a Finder method.

Once you have selected the method type, a wizard will appear where you can configure some properties and behaviors for the model. You don’t need to do anything on the Operations Properties page or the next page, Input Parameters Configuration. On the Return Parameter page, define the field that is the identifier—in this case, CustomerId. Select the field in the Data Source Elements pane and then choose Map to Identifier from the Properties pane. Click Finish to complete adding the Finder method.
You add the SpecificFinder method GetCustomer in a similar fashion, although this time you are adding a new Read Item operation, and you need to configure the Input parameter, too. Add the Read Item method, and on the second page select CustomerId and choose Map to Identifier. Click Next. Again, you will need to specify in the Return parameter for the method which field is the identifier, just like you did for the Finder method. Click the CustomerId field, and then choose Map to Identifier from the Properties pane. Click Finish.
It is time now to save the ECT and test it out on SharePoint Online. Navigate to a SharePoint page and add a Business Data List (see Figure 10-19).

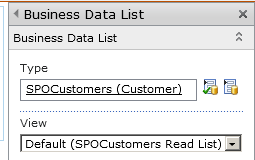
Once you have added the Business Data List, you can configure it to use the ECT you just created, as shown in Figure 10-20.
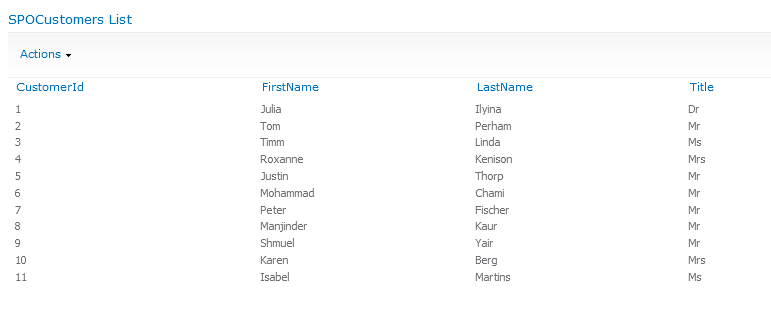
Once you have configured the Web Part, you are able to see your SQL Azure data in SharePoint Online, as shown in Figure 10-21.
Using a Data Source in SharePoint Designer to Expose External Data
You can expose external data in other ways to SharePoint Online without needing to use BCS. SharePoint Designer provides a way to add a data source, as shown in Figure 10-22.
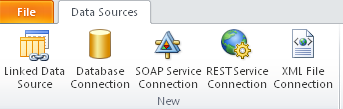
As you can see, SharePoint Designer offers connections to numerous sources:
Linked Data Source
Database Connection
SOAP Service Connection
REST Service Connection
XML File Connection
These methods of connecting to data sources provide a way to connect to external systems using SharePoint Online if you do not want to make use of the complete BCS functionality and just want to display data on a SharePoint page.
Note
See Also For more information about SharePoint Designer data sources, see http://office.microsoft.com/en-us/sharepoint-designer-help/CH010373541.aspx.
Summary
The example in this chapter showed you how to use data stored in SQL Azure and surface it to SharePoint Online by making use of a Windows Azure WCF service. This scenario works well if you want to store your data in SQL Azure and you want to be able to scale as the data and demand for the data grows. You can make use of the Azure platform to scale with you. SQL Azure is not the only external system that you can connect to with Windows Azure—you can also easily connect to any other system supported by the .NET Framework.