Chapter 11. Using Client-Side Code and External Data
In this chapter, you will:
Create web-based solutions using external data
Understand the SharePoint 2010 Client Object Model
Build external data solutions using jQuery
Create client application solutions
Create Visual Studio Tools for Office add-ins
Use the Business Connectivity Services Artifact Generator
Learn how to package client-side solutions
In previous chapters, you learned how to build a Business Connectivity Services (BCS) model and how the data from an external system can be displayed through the various out-of-the-box Web Parts, search, and Office client applications. You have many options for working with your line-of-business (LoB) data, but what happens when you want to create your own application or web-based solution that makes use of the external data? In this chapter, you will learn how to leverage client-side code to create solutions, and in Chapter 12, you will examine what you can achieve using server-side code.
Many applications have been created to read and write data to a LoB system. The new external list functionality in Microsoft SharePoint 2010 handles many of the basic chores associated with creating such applications. With the user interface (UI) creation being taken care of by SharePoint, you can easily add functionality to create, read, update, and delete (CRUD) data in a data source. The ability to edit the Microsoft InfoPath 2010 forms makes adding business logic and branding customizations much easier and quicker than if you were creating your own application with forms to interact with your business data.
For example, if you have a database that contains a list of customers, and you want to keep that list updated through SharePoint, you simply create an external content type (ECT) for the Customers table with the CRUD methods (also known as operations) defined, and it is uploaded into SharePoint and an external list is created using the ECT.
Previously, when you required a solution for working with LoB data, you needed to develop the application around a technology that supported the external system. For example, a developer would need to know how to code against the Oracle database to be able to write an application with Oracle as its back-end data store. The same was true if a developer coded against Microsoft SQL Server, a web service, or even an Open Database Connectivity (ODBC) system such as MySQL, AS400, or DB2. With the use of these separate systems, it took time and knowledge to build and maintain the business solution.
With SharePoint and the BCS architecture, you now simply need to create the Business Data Connectivity (BDC) model, which includes the ECT and the CRUD methods, and it is deployed to the SharePoint environment with the ECTs available. Then any solutions that you want to work with the external data can do so through the SharePoint Object Model.
The BDC model is the “translator,” as it were, between the different types of connections supported by BCS, enabling development to be done against the SharePoint Object Model without concern to what the external system is. In the real world, this means that your developers just need to program against the ECT, and that will perform the required functions on the external data without the developers needing to know exactly how to program against each individual external system. Having a single object model makes it easier to develop solutions, and SharePoint offers a great framework for working with ECTs.
In this chapter, you will work with external data using client-side code rather than server-side code. You will learn how and why to do this, and you will see some examples that show that by leveraging client-side applications, you can greatly extend how users work with your LoB data.
Creating Web-Based Solutions Using External Data
With most users’ experience of using SharePoint being in the browser, the most obvious solutions to build are web based and typically consist of a Web Part on a Web Part page or an Application page, but these aren’t the only ways to work with external data. Developers have the option to choose where the code is executed, depending on different requirements; they can write code that executes either on the client or on the server. Next, you’ll look at the differences between and uses of server-side and client-side code.
Server-Side vs. Client-Side Code
The two different coding options both have advantages and uses when working with ECTs.
Server-side operations are concerned with processing the external data on the SharePoint server, as the name suggests. If a page requires any more information—for example, when a user chooses a category to see the products in it—then the page needs to perform a postback, where information is sent back to the server, and the server performs the new operation before sending the new content back to the browser to display on the page. Typically, server-side code is written in either C# or Visual Basic, and the SharePoint server itself executes the code and performs the required functionality. With the SharePoint server doing the main work, it is possible for developers to have more control of the ECT and its behavior. In Chapter 12, you will learn how to leverage server-side code to great effect.
Client-side code offloads most of the work to the client—that is, to the user’s computer—so that the load can be lessened on the server. The SharePoint server is still used to retrieve the data, but its role is changed to being the data provider rather than being in charge of displaying the data. In SharePoint 2010, you can use an extra Client Object Model, which allows you to create solutions that don’t need to be located on the server. You have different sorts of clients to consider when thinking about client-side versus server-side code with SharePoint—the client could be a browser, an Office application, or another standalone .NET application.
Client-side code is often used when presenting the data to an end user in a Web Part, application page, or desktop application, whereas server-side code can be used in workflows—for example, where a decision is made based on values in an external system. Essentially, server-side code does most of its processing on the SharePoint server, and client-side code performs its duties in a client, whatever that client may be.
Now that you know the differences between client-side and server-side code, you can start investigating working with external data on the client side. Next, you will look at how you can use the Client Object Model to create a web-based solution.
SharePoint 2010 Client Object Model
As mentioned previously, SharePoint 2010 offers developers a new programming object model to use when working with SharePoint: the Client Object Model. You can now create solutions that use only SharePoint to provide data, rather than being limited to server-side solutions. While it was possible to write client-side solutions in SharePoint 2007 by calling the exposed web services, it did not offer as much flexibility or functionality as in SharePoint 2010. It’s worth remembering that even though you are using the Client Object Model, some actions are still performed by the server.
Three flavors of the Client Object Model are available:
ECMAScript Client Object Model ECMAScript is a scripting language (such as JavaScript and JScript). The JavaScript Object Model (JSOM) is designed for working with SharePoint in an asynchronous manner and is extremely useful when you want to work with the data once it has been loaded to the client in a browser, for example. JSOM is a collection of JavaScript libraries that provide the necessary functionality to work with SharePoint objects.
Silverlight Client Object Model As its name suggests, this model is for writing solutions in Microsoft Silverlight that have access to SharePoint. With the user experience capabilities Silverlight offers, it is possible to create rich interactions within your SharePoint environment.
.NET Managed Client Object Model This option allows developers to work with SharePoint in a “managed” code language, such as C# or Visual Basic. It is possible to create desktop applications, web solutions, or Microsoft Office add-ins using the .NET Managed Client Object Model. When you are working with the Client Object Model, you have a limited set of functionality compared to working with the full SharePoint Object Model. One of the great advantages of working with the Client Object Model is that calls are executed in batches, resulting in fewer trips to and from the server to get data.
The following list describes a few scenarios for each of the Client Object Models:
.NET managed applications Custom .NET applications in your organization can now use the Client Object Model to interact with the SharePoint Object Model directly. This approach allows for synchronous interactions with SharePoint.
Silverlight applications Silverlight applications give you the chance to work with the SharePoint Object Model with a rich UI, which can run in the browser or outside of the browser for a desktop-type experience. Silverlight applications can run synchronously or asynchronously, depending on your requirements.
ECMAScript (JavaScript) ECMAScript provides a way for developers to work with the SharePoint Object Model using JavaScript, allowing applications to run entirely within a browser. By using the Client Object Model, these applications can interact with the SharePoint data asynchronously. This is particularly useful if you want to create solutions that run in the browser, but you don’t want the page to refresh when you display new data, as you can implement AJAX functionality.
The three platforms have been designed so their usage is very similar. They closely resemble the Server Object Model, providing a consistent, familiar means of developing against the different models.
The Client Object Model makes use of a SharePoint web service called Client.svc, which takes a request from the client, gets the requested information or performs the desired action on the server, and then returns the result. Figure 11-1 shows the information flow between the client and the server.
As shown in Figure 11-1, an XML request is built by the Client Object Model and passed to the Client.svc web service, which then performs the action using the SharePoint Server Object Model and returns a JavaScript Object Notation (JSON) object back to the client.

Client Object Model and Business Data Connectivity
You have a few limitations when working with external data and the Client Object Model. This section explores some of these limitations and how you can use the Client Object Model to work with external data.
The Client Object Model cannot perform any actions directly on an ECT, so any actions on external data must be performed via an external list (see Chapter 5). When you use an external list, be aware of the following .NET types, which you are not able to use and are omitted from the list:
System.GUID
System.Object
System.URI
System.UInt64
System.Int64
You can, however, use these fields with the BDC Object Model.
When using one of the Client Object Models, developers are able to write code against an external list as if it was a standard SharePoint list. There is no way to page or get chunks of data from the external list. It is not possible to run bulk operations, such as reading 25 instances simultaneously. Also, it is not possible to stream binary large objects (BLOBs), and complex associations cannot be used.
The following example demonstrates how you can use the Client Object Model to provide an alternate way of displaying products from the product list. Figure 11-2 shows the standard list, and Figure 11-3 shows how it looks with a little bit of Client Object Model coding in a Web Part.

The Client Object Model is useful when retrieving data from SharePoint, but if you want to create an alternate way of interacting with the data, a framework such as jQuery makes this task a lot easier. In the next section, you will learn some of the functionality that can enhance the user’s experience of working with external data in the browser.

Building External Data Solutions Using jQuery
This section’s example demonstrates how you can use jQuery to create a rich UI for working with external data from within SharePoint. jQuery is a JavaScript library that simplifies HTML coding tasks and provides a great partner to the Client Object Model.
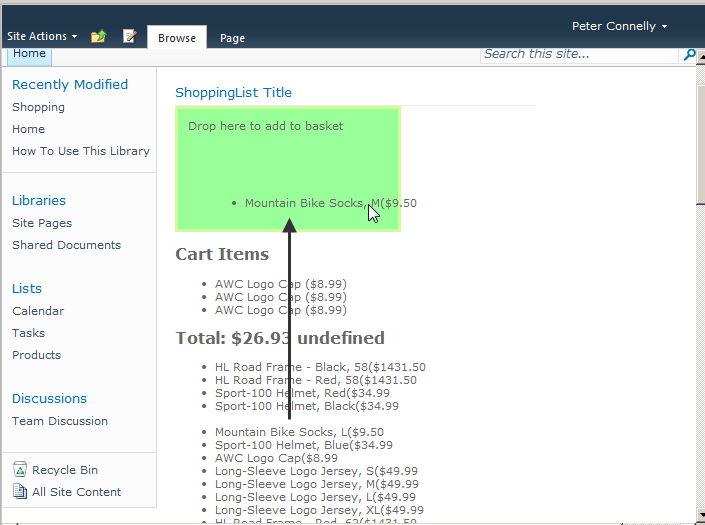
Figure 11-4 shows an interactive page of business data, in which end users are allowed to drag and drop products from the list to a shopping cart, where the total cost for the order is displayed. You can easily implement drag-and-drop operations and other such features using jQuery.
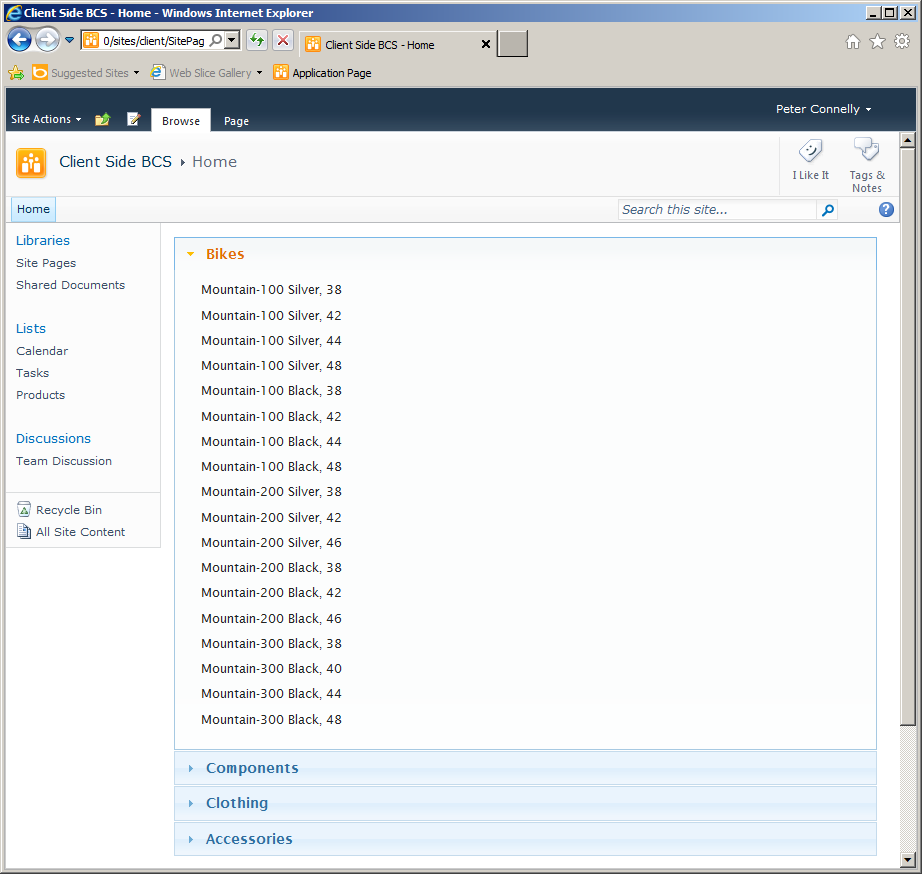
You can also use jQuery widgets to help display your business data in a rich UI. For example, you could use the Accordion widget, which is part of the jQuery UI plug-in, to split products into their product categories to allow users to easily find products by expanding the relevant accordion menu (see Figure 11-5).
When working with external lists, you are not restricted to just reading the information. As long as you created the methods on the ECT, it is also possible to update, add, and delete. Figure 11-6 shows an example of how an end user could use a custom UI to update the list price of some items.
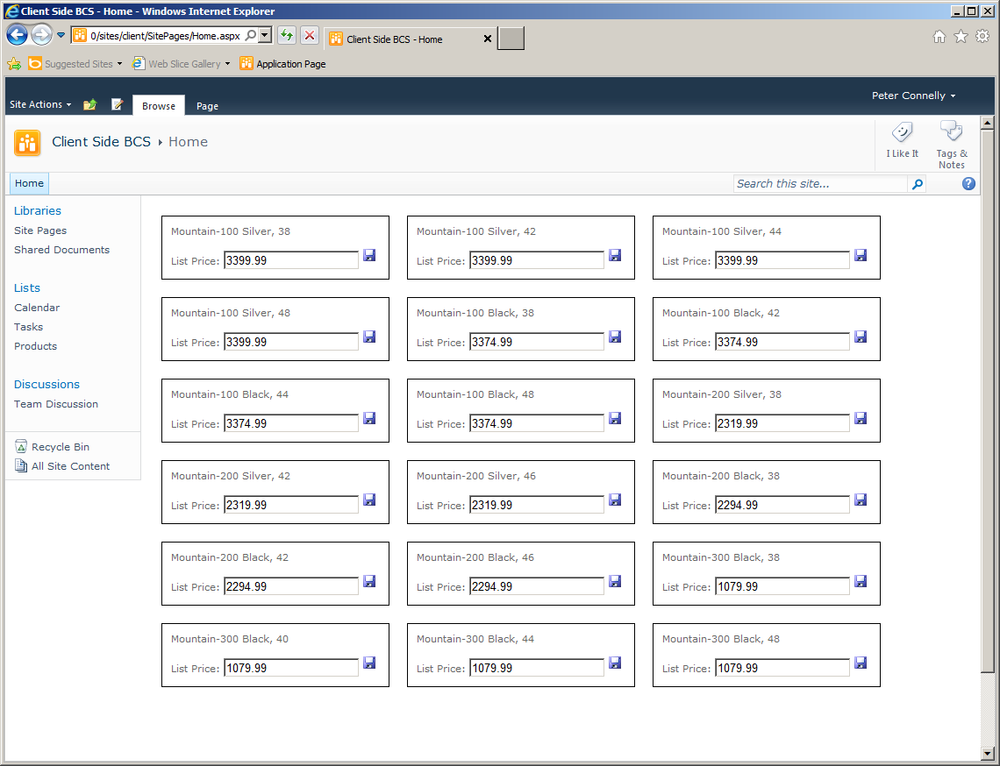
Editing a value and clicking the save icon reflects the changes back in the external system. For example, the first item, Mountain-100 Silver, 38, has a price of $3,399.99. Entering 2500 in the List Price box and clicking the save icon updates the LoB system with the new value of $2,500. Figure 11-7 shows the updated value in SQL Server.

Other Example Scenarios
There are many other ways you can use the Client Object Model in the browser to make business data accessible. The following are just a few examples of different ways to present your LoB data:
KPI Web Part Allow users to easily filter items depending on the status of the indicator.
Reorder Page Show a list of items that are nearing their minimum stock levels. Because you cannot use workflows on an external list, you can simply show a list of items needing reordering, allow users to specify a new order, and then update the changes.
BI Dashboard Show business intelligence in various formats, and allow users to see how information is related by making use of BCS associations.
Creating Client Application Solutions
The previous examples showed how to use various Client Object Model calls. Another way to work with information from your external system is to use the BCS Client Runtime.
Client Object Model vs. BCS Client Runtime
When creating a solution using the Client Object Model, whether it is using the JavaScript, Silverlight, or .NET Client Object Model, you are using the Client Object Model method to connect to your external system and you are working via SharePoint. The BCS Client Runtime allows for solutions that work directly with the external system, bypassing SharePoint, as shown in Figure 11-8.

You can use a couple of additional features in the BCS Client Runtime: BCS Cache and BCS Sync.
BCS Cache
The BCS Cache allows for an offline experience and helps client applications perform more efficiently by working with a local copy of the data rather than calling the external system each time. A great way to think of this is that if information workers who are out in the field still want work with the business data, then they can—provided that the information has been copied to the cache first. The cache is a SQL Compact Edition (CE) database created in the profile for the logged-on user in Windows when the BCS Sync service first synchronizes. When using the cache offline, a user can create, read, update, and delete business information and then synchronize it with the external system when the user comes back online.
The SQL CE database is secured initially by the fact that the database is tied to the user. For added security, you can use a data-protection feature such as BitLocker to encrypt the drive and database.
Because the cache is stored for the individual user in the user’s profile, the same cache could be used in any Office application or other application that makes use of the BCS Client Runtime. This way, the data needs to be duplicated only once from the external system to the user’s cache, rather than needing a cache for each application accessing the data.
Earlier in the chapter when looking at the Client Object Model for web-based solutions, you saw how solutions can work with external data by communicating through SharePoint. The same is true when working with either the .NET Managed Client Object Model or the Silverlight Client Object Model. Both need to be given a SharePoint context in which to run, and the solution can execute in that context.
BCS Sync
The BCS Sync service is responsible for automatically refreshing the cache and for synchronizing that data between the local machine and the external system. It runs as a service on the client’s machine and is installed only as part of the Office 2010 suite.
Using the BCS Client Runtime in an Excel Add-In
Using Microsoft Visual Studio 2010, you can create add-ins for most of the Microsoft Office client applications, as shown in Figure 11-9.
Visual Studio provides these out-of-the-box project templates:
In all these Office client applications, you can combine the power of these applications with data from an external system by using the BDC Client Runtime Object Model.
There are many different scenarios in which you can use the client runtime. For example, you can pull through data for a report in a Word document, analyze information in an Excel workbook, or graph the latest business data in a PowerPoint presentation.

Creating VSTO Add-Ins
Creating a Visual Studio Tools for Office (VSTO) ClickOnce package is now much easier in Visual Studio 2010 than in previous versions with the VSTO Project types, which have all of the necessary files to add custom ribbon elements and begin to build the solution. In the example in this section, you will read and write data from an Excel document. The example solution makes use of the ribbon in Excel, but it could use a tool pane if that was required.
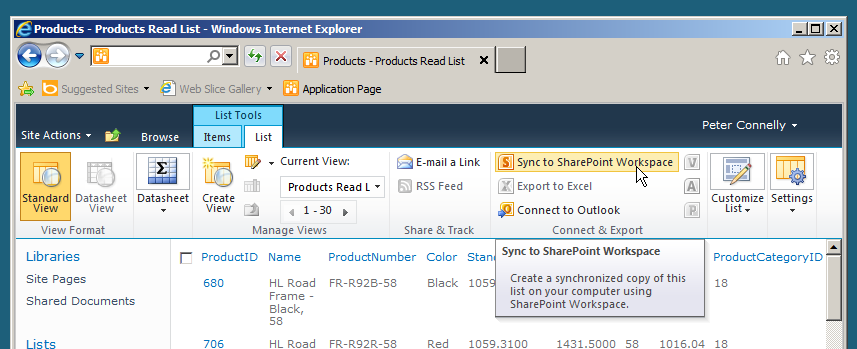
The example solution also makes use of the BCS Cache. As you learned in Chapter 7, it is possible to cache data from an external system for processing offline on a user’s computer and then have it synced back to the external system once the user is back online. SharePoint 2010 makes use of Microsoft SharePoint Workspace 2010 to synchronize the data. When you display an external list in the browser, on the Lists ribbon tab, in the Connect & Export group, click Sync to SharePoint Workspace, as shown in Figure 11-10. This command makes the list and the external data available to SharePoint Workspace, as well as to add-ins using the BDC Client Runtime.
When you click Sync to SharePoint Workspace, the dialog box shown in Figure 11-11 appears, warning you of the implications of synchronizing data on your computer.

When you click OK, the dialog box shown in Figure 11-12 opens, asking whether you want to install a package. The package contains the BDC model, and once you install it, the BCS Client Runtime directly connects with the external system.
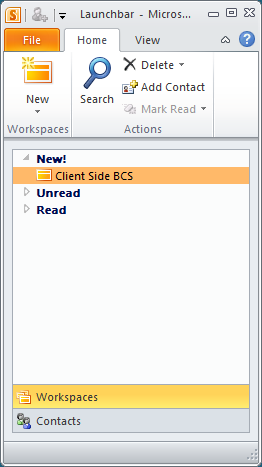
With the deployment completed, you should see the list appear in SharePoint Workspace, as shown in Figure 11-13.

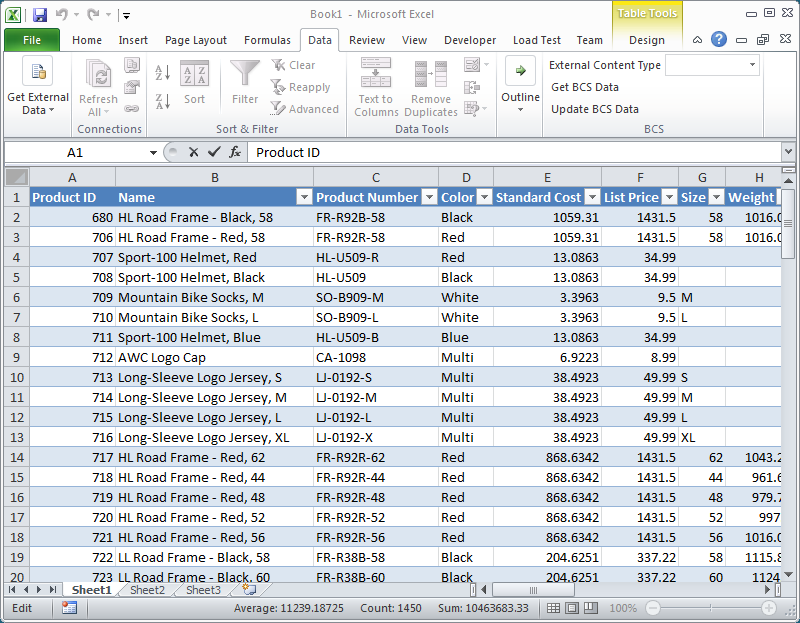
As mentioned previously, this example uses an Excel add-in to populate an Excel worksheet. In the following screenshot, you can see the new elements added to the ribbon. On the Data ribbon tab, there is a command in the BCS group to select the ECT, as shown in Figure 11-14. Once you select the ECT, click Get BCS Data to execute the ECT Finder method (operation).

The only ECTs available are those that you have made available. When writing against the BCS Object Model, it is possible to choose these methods of working with the ECT data:
Get the data from the external system directly
Work with the cached version
Do a mixture of both, where the code will get the latest version from the external system if available, or it will use the cached version if not
To recap, the ECT Finder method is the method that returns all data from the external system. If a filter is being used, then you can add extra UI functionality to allow the user to enter one or more values, and those values would limit the amount of data returned. In this example, however, no filters have been defined, so all data is returned.
After you click Get BCS Data, the Finder method executes and populates the Excel worksheet with all of the information stored in the cache, as shown in Figure 11-15. Bringing the data into Excel enables you to easily analyze it.
If you want to edit the data as a whole, Excel provides you with helpful features, such as data sheet view and the ability to update items in bulk. With this solution, you can use Excel to manipulate the data, and then using a combination of your own business logic and the BDC Object Model, you can easily update the information to your external system by clicking the Update BCS Data command on the Data ribbon tab, in the BCS group (see Figure 11-16). You can then write the information back to your external system.

Declarative Outlook Solutions
BCS enables information workers to surface ECTs, such as Customer, Employee, or Order, within Microsoft Outlook 2010 as a native Outlook item type, such as a Contact, Task, Post, or Appointment. You don’t need to write any code to do this—it can all be done declaratively. To do so, configure the ECT to map columns to the Office item columns, so that Outlook can parse the data when an external list is connected to it. In Microsoft SharePoint Designer 2010, on the Summary View of the ECT, in the External Content Type Information area, select an Office item type, as shown in Figure 11-17.

Note
See Also For more information on Office item types, see Chapter 4.
The fields of the SpecificFinder are the fields used by the consuming Office application. When you first create the method, you receive a number of warnings to set up some minimum mappings for the Office item mapping to work. For example, when the Office item type is Contact, you must map a column to either the LastName or FullName Office property, as shown in Figure 11-18.

Once you have configured all the columns and the ECT has been deployed, you can then use the ECT in Outlook via an external list by clicking Connect to Outlook on the List ribbon tab, as shown in Figure 11-19.
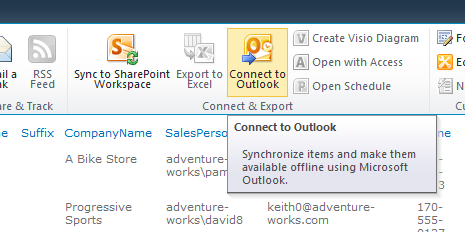
A VSTO package is created, and it installs the required files into Outlook, making the contacts available. If the full CRUD methods have been created, you can read to and write from Outlook to the external system. As the tooltip shown in Figure 11-19 states, this data will be available through caching even when the user is offline. In Figure 11-20, the contacts are shown as if you had created a normal contacts list in Outlook.

This method of pulling data from an external system into Outlook is known as a simple Outlook solution, where just the flat data is pulled through. But what happens if you want to be able to see all of a customer’s orders alongside their contact information, to save your users from changing systems to view this information? This is possible by progressing to an intermediate declarative Outlook solution. A couple more steps are required for the intermediate version, and some tools are available to help you out. Alternatively, you can write the necessary files to get the results you want. The following are two tools you will use in this example:
BCS Artifact Generator Creates the necessary files to tell Outlook how to subscribe to the external system. The Artifact Generator gets fed in a BDC model and then generates the necessary files. The BCS Artifact Generator is available from the MSDN Archive at http://archive.msdn.microsoft.com/odcsps14bcsgnrtrtool.
BCS Packager Takes the files generated from the Artifact Generator to build a VSTO package that enables you to deploy the solution to Outlook. The BCS Packager is available at https://archive.msdn.microsoft.com/odcsps14bcspkgtool.
Creating a Declarative Outlook Solution for BCS
In this walk-through, you will see the different components required to create an intermediate declarative Outlook solution. First up is the BCS Artifact Generator. You can create the files generated manually, but for most situations, using the BCS Artifact Generator will meet your requirements or at least get you most of the way to a complete solution. As mentioned previously, this tool requires a BDC model that is used by the solution to work with your external system. In this scenario, you are pulling customer contact details and the customer order history. To create a master-detail scenario of customers and orders, create a BDC model using either SharePoint Designer or Visual Studio, with the two ECTs with an association method on the Orders ECT, which will get the orders for a particular customer.
Note
See Also For more information on creating associations, see Chapter 4.
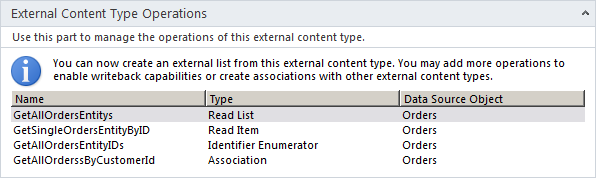
Figure 11-21 shows that the ECT for the orders has the association defined.
The second ECT is the one used in the previous example, where the Customer ECT has its Office item type set to Contact. With the two ECTs configured, you need to export them so that they are both contained in one BDC model, and the BCS Artifact Generator tool can work with associations. From the External Content Types gallery in SharePoint Designer, select both ECTs by holding down the Shift or Ctrl key. Right-click and then select Export BDC Model, as shown in Figure 11-22.
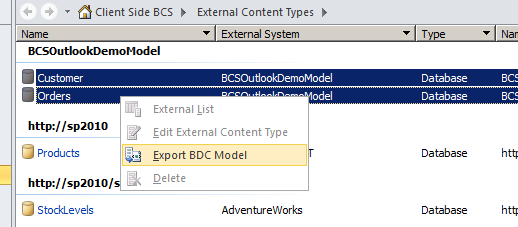
Both ECTs are saved in one BDC model file. This file is required for the next step, when you use the BCS Artifact Generator.
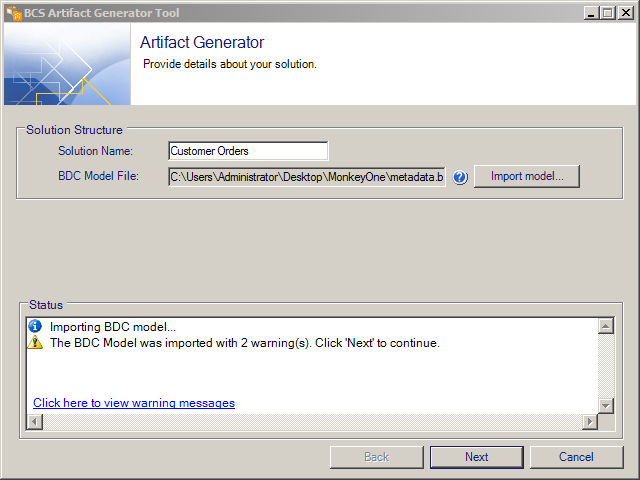
Run the BCS Artifact Generator tool. You are presented with a simple form, where you enter the location of the exported BDC model file and provide a name for the solution. The application will validate the model and display any error or warning messages in the Status text box, as shown in Figure 11-23, where a warning is shown. These errors are due to the fact that both the Order and the Customer ECTs used in this example have no filters defined. You’ll address this issue later.
Click Next to show all the ECTs defined in the BDC model and some information about them. To see the associated orders for a customer, you customize the imported BDC model and “declaratively” tell Outlook to generate a task pane to contain the information.
The customization process starts a wizard that takes you through up to three pages. Click Customize to the right of the Customers ECT to start the wizard and display the Item Details page, where you can configure the Display Name and Icon settings. Click Next.
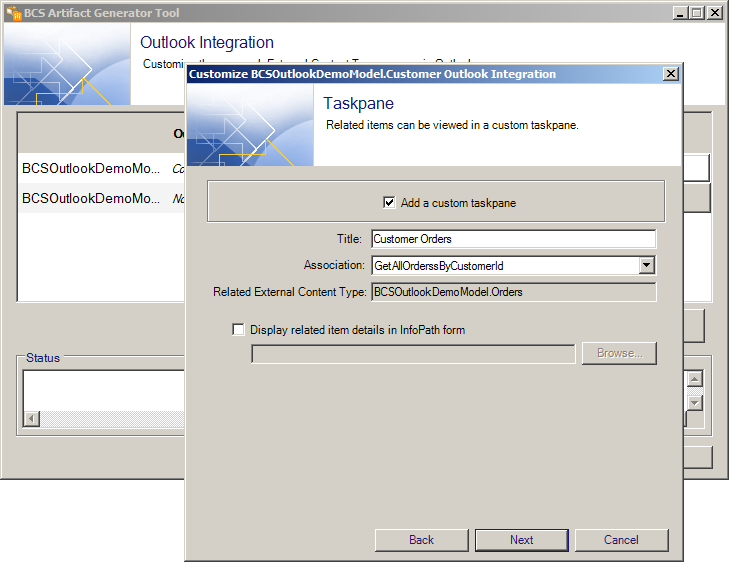
When an association is defined in the BDC model, the BCS Artifact Generator displays the Taskpane page so it can create a form automatically for you to show the data from the associated ECT, which in this example is Orders, as shown in Figure 11-24. However, you can also create your own form using InfoPath to display the information to suit your business requirements and choose the region in which the information is displayed. In that case, select Display Related Item Details in InfoPath Form, and then specify the location of the InfoPath form.
Note
The easiest way to create an InfoPath form is to create an external list from the associated ECT – Orders. Create the InfoPath form on that list and then export the .xsn form using SharePoint Designer.
Once you have selected Add a Custom Taskpane, accept the default, and then click Next to display the Action page. You can add actions and ribbons to Outlook to enhance the way in which the ECT can be used; for this example, however, you are interested only in showing the related data. When the wizard is completed, you are returned to the overview page, where you confirm that the settings are updated, as shown in Figure 11-25. Notice that Customers is an Outlook Contact type, the custom region will be autogenerated, and there will be a task pane.

Click Generate Artifacts to create the files, as shown in Figure 11-26. These artifacts include subscription files, an OIR file, the BDC model file, and a relationship file.

Subscription Files
There are the two subscription files: one for customers and one for orders. A subscription file contains the following information:
Queries These are the Finder queries that must be executed to get the entity instances into the cache. These queries can take filters, if provided in the BCS model, to limit the information being subscribed to.
Associations These are related entity instances from the external data source. You should add associations to the subscription file only if you need to use them; otherwise, they represent an unnecessary overhead to the BCS Client Object Model.
Explicit identities These are explicit requested items from your external system, even though they may not be returned by the queries. For example, if you’re returning customers and filtering them by their state, but you want to make sure a few other people from another state are included, you can do so by explicitly stating those customers’ identifiers.
The file also contains information about how long to cache the information or whether it should be cached at all.
OIR File
The OIR file is a solution manifest file that contains the details Outlook uses to create the UI, behavior, and business logic associated with the ECTs in the solution. As well as mapping the ECT to the Outlook type and properties, the file also adds the various UI elements, such as declaratively adding ribbons, buttons, or even actions to Outlook. An action, for example, could be to show the task pane associated with the solution.
When you configure the ECT using the BCS Artifact Generator and you choose to customize it, the OIR file gets updated. If you want to configure the file further than is possible to do with the Artifact Generator tool, then you can make changes such as presenting the data in an InfoPath form, creating regions, or adding Outlook folders.
Packaging the Outlook Declarative Solution
To package the files generated by the BCS Artifact Generator, use the BCS Solution Packaging tool. The Packaging tool takes the artifacts and generates a ClickOnce package to allow you to deploy the intermediate declarative Outlook solution.
The BCS Solution Packaging tool, as shown in Figure 11-27, allows you to name the solution, provide a version number, select a solution type such as Outlook Intermediate Declarative Solution, point the source folder path to where the artifact files are located, and then choose a path where you want the packaged files to be created.
Note
You can use the BCS Solution Packaging tool to create other solutions, such as an Outlook advanced code-based solution or a data solution for Office add-in. These solutions are covered later in the chapter.
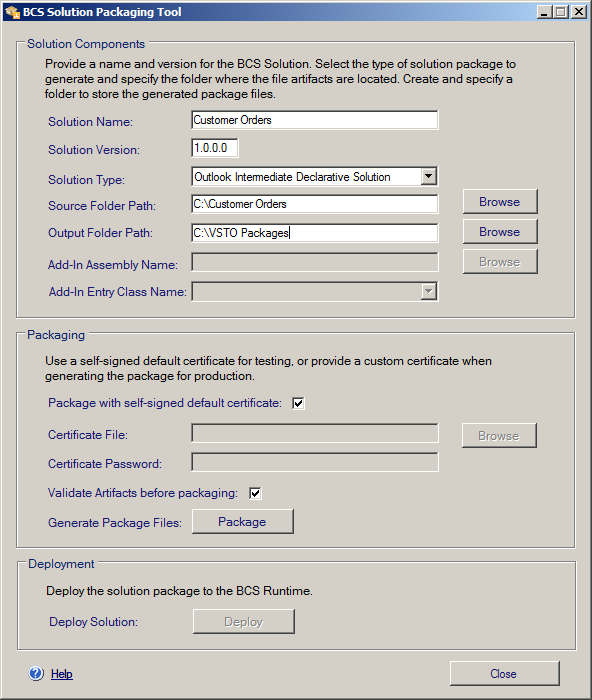
You are able to sign the file; doing so removes the security warning when the package is used. It also indicates to end users that this solution comes from a trusted source.
In the Packaging section, click the Package button to create the necessary files to deploy the solution. You can then either take a look at the generated files or deploy them to your current environment to test them out immediately. Once you have created a package, the Deploy button in the Deployment section of the tool becomes active. Clicking Deploy installs and opens Outlook, where you can see the Customer Orders solution alongside the standard Outlook items, as shown in Figure 11-28.
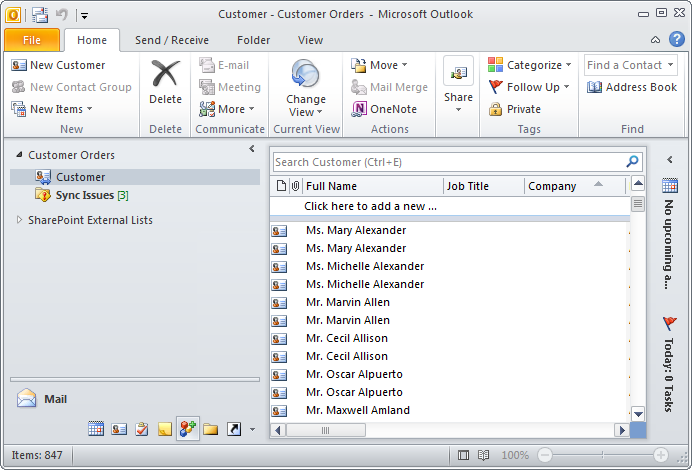
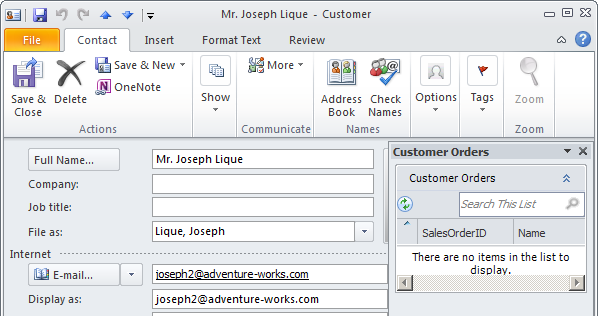
Currently, you have the same level of functionality as you had earlier when you clicked the Connect to Outlook button on the Lists ribbon tab for an external list. However, if you double-click a contact, in the detail view you can see a pane that shows the contact’s orders (as shown in Figure 11-29).
It is very useful to be able to supplement Outlook with business data using a declarative solution that doesn’t require you to write any code, yet can make good use of your business data. If you want more control, you can write an add-in and further tailor your end-user experience, or you can add custom business logic and still have your end users using the familiar Outlook interface.
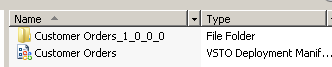
To make this solution available to your SharePoint users, simply put the files and folder in the same format in which they were created by the tool into a document library, as shown in Figure 11-30.
The easiest way to add the files is to use the multiple upload functionality of a document library, as shown in Figure 11-31. This allows the files to be dragged from Windows Explorer onto the dialog box.

After you’ve uploaded the files in a document library, provide a link to the VSTO file in an email or on a page. A user can then click the link to install the package. Usually, though, developers add a command button on the ribbon that points to a link to the package, providing users with a similar experience to the Connect to Outlook command. Once the user clicks the link, the Microsoft Office Customization Installer dialog box opens and asks the user to confirm the installation, as shown in Figure 11-32.

Outlook Advanced Code-Based Solutions
In addition to creating intermediate declarative Outlook solutions, you can also create advanced solutions, which allow you to use code for greater control and enable further customization of the user experience using BCS with Outlook. The types of solutions you can create include code-based actions that allow for greater meshing between the data and Outlook. For example, you can create an Outlook task to follow up with a customer or add information to the Outlook Calendar. Another possibility is to create data parts, which give you the opportunity to create a user control element in which to interact with the data in ways above and beyond what you are able to do declaratively.
Data Solution for Office Add-In
BCS supports VSTO add-in projects for any Office Professional Plus 2010 application, which can access external data from either an external data source directly or the BCS Rich Client Cache through runtime APIs. For a data solution for an Office add-in type, a developer can create two different types of solutions.
The first solution is an Office add-in: a standard VSTO Office Add-In Project. Within the project, runtime APIs are invoked to access external data. The solution should be implemented to ensure that the data solution is functioning before invoking the runtime APIs.
The second is a data solution for Office add-in. This is a special solution component that does not provide any UI in the Office application. The sole purpose of this solution component is to manage the lifecycle of the BDC metadata and the BCS Rich Client Cache population.
Client-Side Authentication Considerations
When creating solutions that make use of client-side code, it is important to understand how you plan to authenticate with the external system. If you are creating a declarative solution, then the solution will use the authentication method defined in the BCS model. If the model is using Windows or claims-based authentication, then it will be able to use those credentials to connect to the external system. In a scenario where credentials other than the identity of the logged-on user are required, then the authentication can be achieved using credentials stored in the Credential Manager tool in Windows. BDC models that use either the Secure Store Service or an application pool ID will require a different authentication mode, as these are unavailable to a solution that bypasses SharePoint. In such cases, the user is prompted to provide the credentials to be used to authenticate with the external system.
Note
See Also For more information on authentication and authorization security options, see Chapter 3.
Client-Side Caching Considerations
When working with the metadata cache, you should take several things into consideration, such as how often the cache is updated, what happens when the connection to the external system is unavailable, and so on. It is worth noting that SharePoint doesn’t ever cache BCS data on the server; only Office clients have this functionality. SharePoint caches only the BDC model on servers that are configured in the web role.
When the VSTO package is installed, the installation stores the files from the VSTO package into the user’s AppData folder: C:Users{UserName }AppDataLocalMicrosoftBCS. This is also the location of the SQL CE database, which is where the cached data is stored. For each entity, a table is created in the database. The database should not be edited in any way, as this is an unsupported activity; however, you can use the Cache Object Model to access information in the cache to complete activities such as refreshing the data.
Note
See Also You can find information on coding against the client cache at http://msdn.microsoft.com/en-us/library/ie/ee558772.aspx.
The BCSSync.exe service is responsible for providing automatic cache refresh and data synchronization. This service processes the subscription files and is used to populate the metadata cache using the Finder method, SpecificFinder method, and associations, depending on the queries in the subscription files. This service ensures that data stored in the cache is kept up to date according to the settings in the subscription. As mentioned previously, each element of the subscription file contains information on how long to persist the data using the RefreshInterval attribute. Also, garbage collection is part of the synchronization process. During garbage collection, data that is no longer required in the cache—that is, information that is no longer in the external system—is removed. This process keeps the cache file size down. If the BCSSync.exe process is no longer running, data synchronization will not happen, but the Office solution will still continue to work with the cached data.
Operations on the data are not performed directly against the external data. Rather, they are put in an operation queue, which is a location in the cache, to be performed one by one when the external data source is available.
Summary
The client side of Business Connectivity Services (BCS) gives an organization the ability to express its data and make it accessible to those who require it. Applications that used to take a long time for developers to write because they had to learn the ins and outs of a particular line-of-business (LoB) system can now be developed in a fraction of the time.
The other benefit of BCS is that because SharePoint can talk to any of the external systems in a uniform manner, a front end to the data—whether that is a web-based solution using the Client Object Model, a jQuery solution, an Office add-in, or a declarative solution—can be written without any regard to what the back-end system is.
Microsoft Office provides a rich, familiar user interface to information workers. As a result, there are benefits associated with providing your users with the information they need in the applications they use to perform most of their duties.