Chapter 9. Using External Data in User Profiles
In this chapter, you will:
Explore User Profile service applications
Learn how to import user profile properties from external systems
Use external data and My Sites together
Understand Duet Enterprise for Microsoft SharePoint and SAP
Users of SharePoint today are likely familiar with social networking sites such as LinkedIn, Facebook, and Twitter. If you apply the same social networking technologies within a private organization, the result can be an extremely powerful way to share information among users throughout the business. User profile information in Microsoft SharePoint Server 2010 enables users to find others easily through SharePoint Server 2010 people searches, SharePoint content can be targeted to audiences, and users can discover other users through My Sites.
User profile information can be populated by users within SharePoint via their My Sites. When you first create your My Site, you have the opportunity to complete your profile and provide information such as the skills you have, who you report to, your colleagues, and which office you are based out of. Even without having a My Site, a user profile can be created. By having complete user profile information, you are able to easily discover useful business information from your colleagues. For example, you may have a need to hire an employee with a specific skill, such as copywriting ability. Using a people search, you may be able to discover existing employees who have that skill or appropriate accreditation.
In addition to easily discovering other users, as a user yourself with a complete user profile, you will find that the information you view throughout SharePoint becomes more relevant to you. You can configure audience targeting to create audiences of users with commonalities among parts of their profiles. For example, you may have a New York audience for users based at your New York office, and perhaps a Developers audience for users with development skills. With audience-enabled lists, when you create a list item, you can target that item to a particular audience. All users with appropriate permissions will be able to view the content, even if it is targeted to an audience that they are not a member of. However, when you aggregate that content using a tool such as the Content Query Web Part (CQWP), you are able to target the rolled-up items to the logged-on user, meaning different content will be rolled up for each user, as user profiles differ.
You can also use audience targeting with Web Parts, allowing you to show entire Web Parts only to specific audiences. Consider a Business Data List Web Part configured to display data specific to the New York office. Users based in the London office may not find the information valuable at all and therefore don’t need to see the Web Part. You may choose to display the Web Part only to users who are a member of the New York audience. Users who set their user profile location field to New York become members of the New York audience.
As with many things in SharePoint, if users don’t adopt the technology and don’t complete their user profiles, the solution becomes less useful. That said, much of the user profile information may already exist elsewhere within your organization. Some of it may be stored in Active Directory (AD), but other external data sources, such as human resource (HR) databases or enterprise relationship programs (ERP) such as SAP, may contain more authoritative and up-to-date user profile data. You can connect to this external data using Business Connectivity Services (BCS), allowing user profiles to be populated from the external data source.
In this chapter, you will first learn about the benefits of using SharePoint 2010 features such as people search and audience targeting. You will then learn how to configure the User Profile service application both for AD and an external data source. Finally, you will look at a specific example of obtaining user profile information from a SAP human resources data source.
Audience Targeting
Audience targeting in SharePoint Server 2010 is often confused with SharePoint permissions. Permissions in SharePoint can be set for a user or a group, granting a certain level of permission for an object such as a list item. If you do not have permission to read the list item, you will not be able to view it while logged into SharePoint with your own credentials. Audience targeting is different—it is about providing content that is of relevance to you based upon your user profile. If you have an interest in car racing, rugby, and fine foods, information about these topics will likely be of interest to you, whereas information about bicycles may not. If you apply that analogy to a business, you can see how beneficial it can be to provide users with information targeted to their interests. Perhaps you don’t have time to read announcements from every department or team site within your SharePoint environment on a daily basis, as not every announcement is relevant to you. There is nothing preventing you from reading all announcements if you choose to navigate to every announcements list, but a rollup tool such as the Content Query Web Part (CQWP) enables you to view just the announcements targeted to an audience that you are a member of, saving you time and energy.
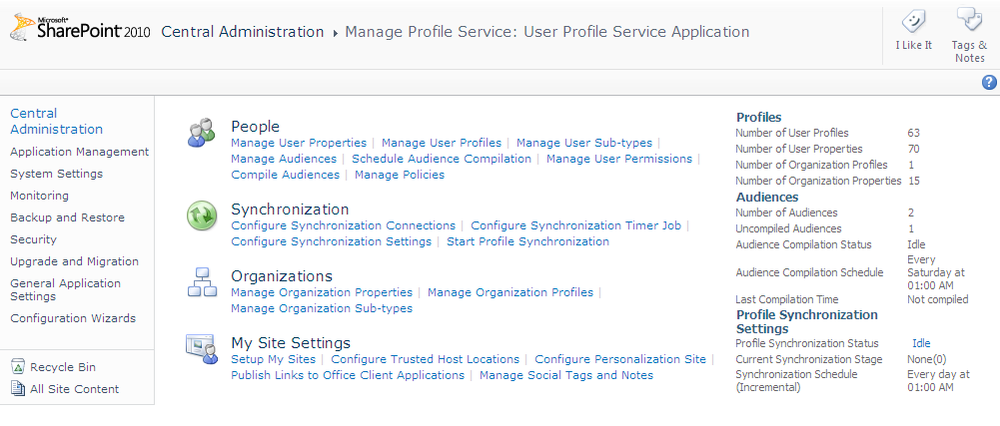
You configure audiences in SharePoint using the User Profile service application settings available through the SharePoint 2010 Central Administration website, as shown in Figure 9-1. Within the People category is the Manage Audiences link, which provides you with the options necessary to configure your audiences.

Click Manage Audiences in the People section to see a list of your compiled audiences and the option to create a new audience. You create audiences with a rule that determines how each user becomes a member. The rule can be based upon a domain group that the user is a member of or one or more properties that are set in the user’s profile. A default audience exists that includes every user and is listed as All Site Users.
After you click New Audience, you are able to set a name for the new audience, a description of the audience, the audience’s owner, and the rules option. With the rules option, you have two choices: the user has to satisfy either all of the defined rules or any of them. For example, you could populate users in an audience based on their being a member of a Developers domain group or having .NET development skills. Selecting the Satisfy Any of the Rules option allows this to be the case, as this option is essentially an AND or an OR statement. Figure 9-2 shows the creation of a SharePoint Developers audience.

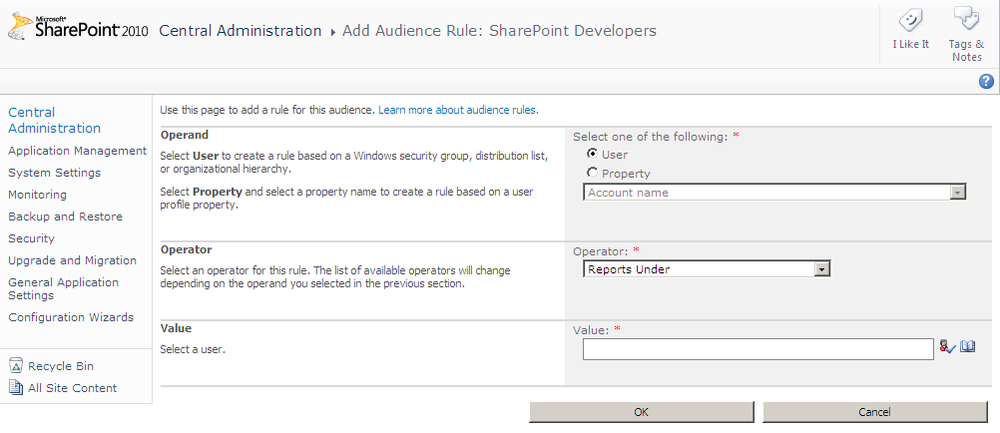
When you click OK, you are taken to the Add Audience Rule page for your audience. Rules are based on the user, such as being a member of a Windows security group, or based on a property, such as a field within the user profile. Figure 9-3 shows the option to configure the user membership based on the user reporting to another user or being a member of a security group.
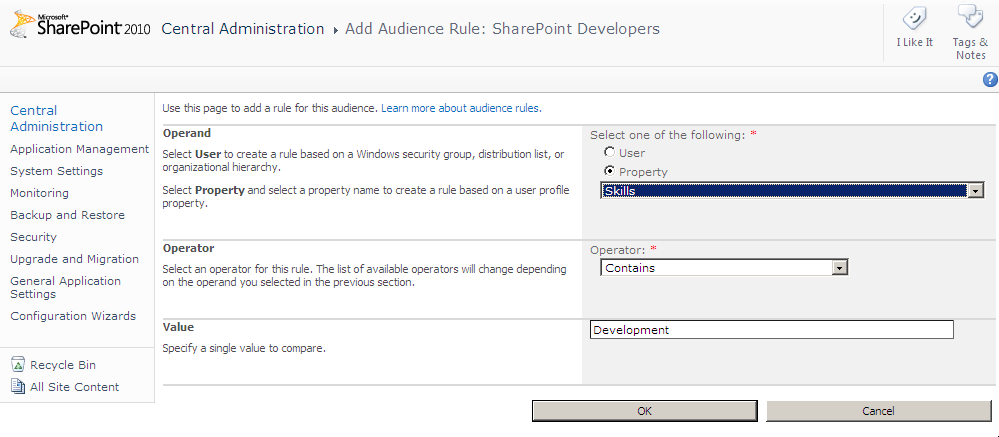
You may also configure the membership based on a user profile property. Figure 9-4 shows how the audience can be configured for users who have a particular skill listed in their profiles.
Once you’ve created an audience, you’ll need to compile it. Compiling the audience ensures that users who match the rule(s) you defined for the audience become members of the audience. Compilation settings enable you to define a schedule when new the compilation will run again. Because users may modify their profiles regularly to ensure that they become members of appropriate audiences, you should regularly run compilations.
Now that you have defined your audience, you can enable SharePoint lists or libraries to allow audience targeting. Enabling audience targeting creates another column in the list, allowing the audience to be targeted. You can enable audience targeting by navigating to each list, choosing List Settings from the ribbon, and then selecting the Enable Audience Targeting check box, as shown in Figure 9-5.

Once you have enabled this setting, as a user, you may target the list item to a specific audience or audiences. All users with permissions to the list will see the list item within the list, but when aggregating the list item using the CQWP, the list item may show up only if a user is a member of the particular audience. Figure 9-6 displays the Target Audiences field in a new announcement.

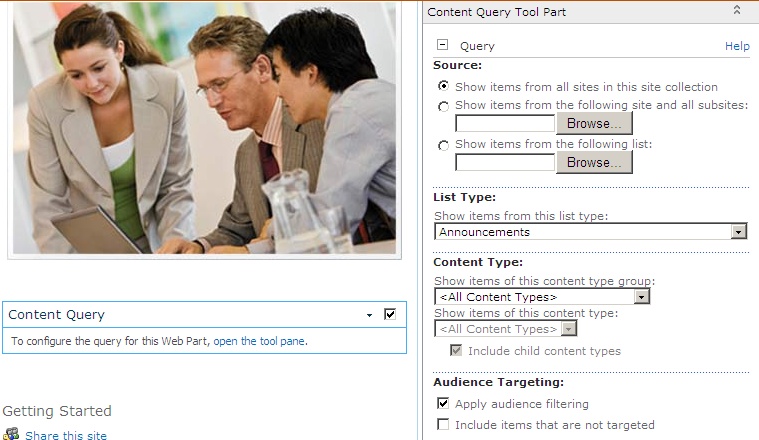
The CQWP can roll up SharePoint list items or documents from sites within the current site collection. Items can be filtered based on a content type, Site Column value, or audience. To show aggregated content that is relevant to the logged-on user, you can configure the Web Part to roll up list items and then apply audience filtering. You do not need to specify which audience you would like to apply—you simply apply audience filtering. The logged-on user’s profile will be cross-checked against the audiences listed in the aggregated results. Figure 9-7 shows a CQWP configured to roll up announcements from the current site collection and apply audience filtering.
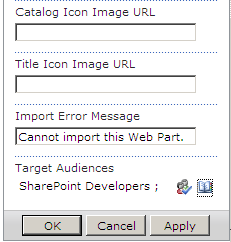
Aggregated content can be audience targeted, as can entire Web Parts. The Advanced section of SharePoint Web Parts contains an Audience Targeting field. In the Target Audiences section, you can list all of the audiences that should be able to view the entire Web Part. All other users will not see the Web Part on the page. Figure 9-8 shows a Web Part configured to display only to the SharePoint Developers audience.
People Search
If the user profiles in your organization are populated, you’re able to search for other users using keywords that match information stored in their SharePoint user profiles. Often, you’ll want to search for users by a skill or interest documented in their profiles, rather than by first or last name. This type of search is successful only if users have taken the time to complete their user profile information. To perform a search, you can either navigate to your search center or search from within your own My Site. Figure 9-9 shows how to perform a search within My Site.

The Enterprise search center by default contains a People tab as well as an All Sites tab. The People tab returns only users, whereas the All Sites tab returns content, including people from all content sources. Figure 9-10 displays the People search in a search center.

Note
See Also Content sources are discussed in detail in Chapter 8.
The search results for a person returns their profile picture, About Me property, and Ask Me About property. The keyword that you searched on is highlighted, as shown in Figure 9-11.
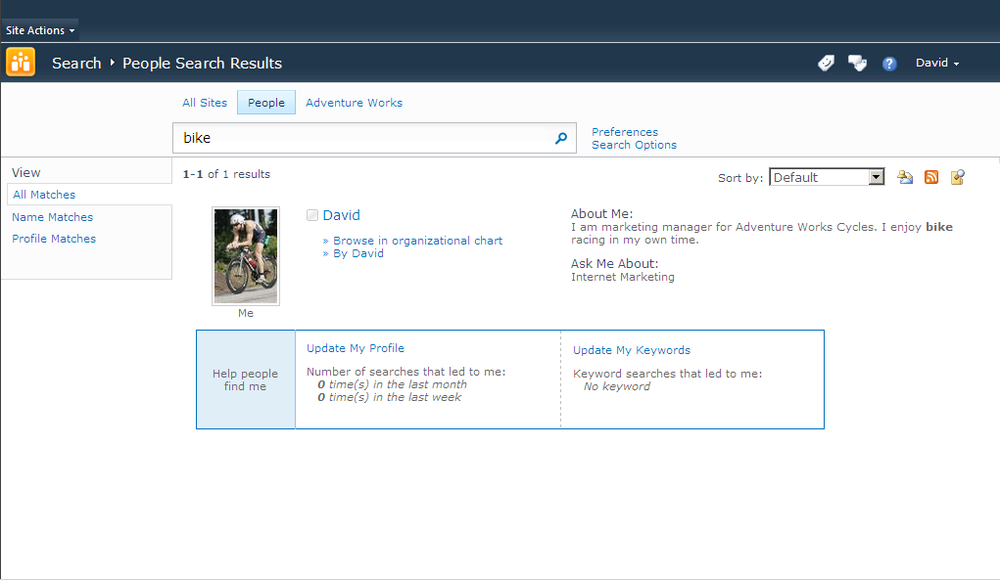
People searches can be refined by Name Matches or Profile Matches, enabling you to reduce the number of people profiles returned by your search keyword. If you perform a search on yourself, you will see the Help People Find Me section, which allows you to view how many times you have been searched in the last week or month. It also shows the keywords used to find you, which is helpful information for improving your profile so that it may be found more easily.
Populating your user profile in SharePoint and keeping it up to date is a time-consuming process that is often not carried out. However, if you do take the time to populate your user profile, you will be able to see better results and receive targeted information when navigating SharePoint. You can create user profile properties in addition to the default ones for employees to complete, or you can import them from an external data source. The next section discusses how to configure the user profile import.
Introducing User Profile Service Applications
Service applications are new to SharePoint 2010 and provide a way of sharing services across web applications or farms. Each service application can provide a set of services to SharePoint packaged as a service application. This model allows for an improved SharePoint architecture, as services can be configured to run on the appropriate server within the farm.
Note
See Also Service applications are discussed in Chapter 3.
A service application can be configured to run on the most appropriate server within the farm. A processor-intensive service, such as Search, for example, may be configured to run on its own server within a large organization. The Business Data Connectivity Service and the User Profile Service can also be configured to be shared across farms.
The User Profile service application is not available in Microsoft SharePoint Foundation 2010, but it is available in Microsoft SharePoint Server 2010 Standard and Enterprise. The User Profile service application is responsible for My Sites, profile pages, social tagging, and audience targeting. You can start the User Profile Service by clicking the Manage Services on Server link. You then select the server on which you would like to start the service.
Active Directory (AD) contains user profile information that can be supplemented by an external data source, such as a human resources application. To configure an external data user profile synchronization connection, you must first have a successfully configured AD profile import.
Note
See Also Configuring the User Profile service application is a big task that is sometimes not performed correctly. TechNet provides a good step-by-step article on configuring the User Profile service application at http://technet.microsoft.com/en-us/library/ee721050.aspx as does many of the blog posts on Spence Harber’s website, www.harbar.net.
The Manage User Profile Service page on the SharePoint 2010 Central Administration website enables you to configure the connections to AD and external data sources as well as configure user properties, user profiles, organization profiles, audiences, and much more. You configure a connection to AD by clicking Configure Synchronization Connections. You can configure the Synchronization timer job to run periodically to synchronize the SharePoint user profile with AD and external data user profiles. Figure 9-1 displays the User Profile Service Application settings page.
Once you have configured the AD user profile import correctly and the import was successful, you can configure the import from Business Connectivity Services (BCS). Follow these steps to import user profile information using BCS:
Configure an external content type (ECT) for your user profile information from the external data source.
Note
See Also For more information about configuring an ECT, see Chapter 4.
Create a profile page for the ECT.
Note
See Also For more information about creating a profile page, see Chapter 4.
Create a Managed User Property field that maps the AD account information with the user profile information in your external data source.
Create a Business Data Connectivity (BDC) synchronization connection in the User Profile service application.
Create other managed user properties for any other column that you want to import.
Run a full synchronization on your external data synchronization connection.
Mapping External Data to User Profile Properties
You must create a managed user property so that the AD user profile can be related to the BDC user profile information. You may have within your ECT a column that is already related to each AD user profile, such as Employee ID or Social Security Number. However, if this is not the case, you can create either an attribute in AD or a new column in your database table. Often, applications such as Microsoft Dynamix CRM cannot be modified at the table level without compromising the product support agreement or risk of breaking product functionality. If this is the case, it may be easier to create an attribute in AD that will relate the data. In the Adventure Works HumanResources.Employee table, you will find a LoginID column that can be mapped to the sAMAccountName property in AD. For this mapping to work successfully, you will need to make sure that the LoginID column is marked as an identifier in your ECT.
Note
Any column in an ECT that you want to use to map to AD should be of the same type. The sAMAccountName property is of type string.
To create a new managed property, follow these steps:
On the SharePoint 2010 Central Administration website, click Manage Service Applications.
Click the link to open the User Profile service application.
Click Manage User Properties.
Click New Property to create a new managed user property.
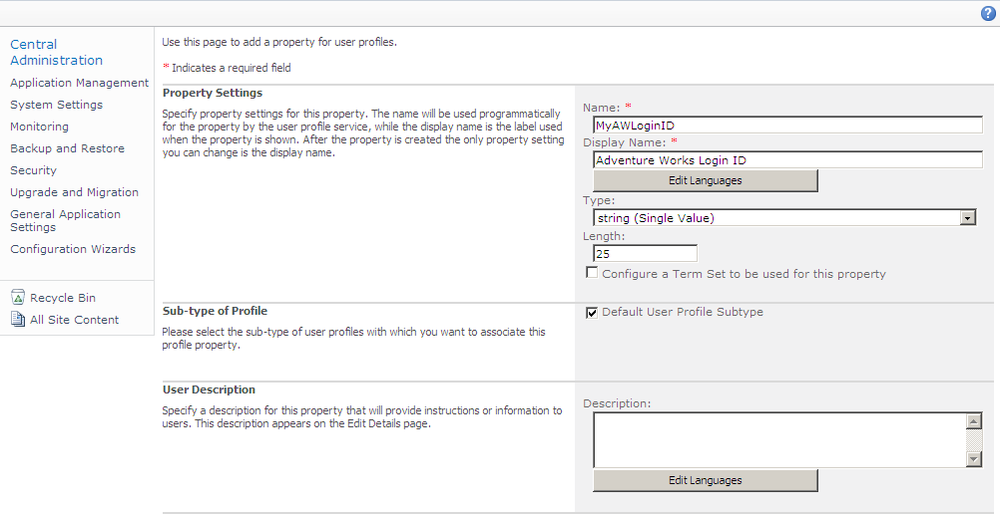
Type a name such as MyAWLoginID.
Type a display name such as Adventure Works Login ID, as shown in Figure 9-12.
Set the Source Data Connection to the Active Directory synchronization connection (Adventure Works Domain, in this example).
Select sAMAccountName as the Attribute.
Click OK to complete the mapping, as shown in Figure 9-13.

You have now created a new user profile property called MyAWLoginID and set it to be populated by the user sAMAccountName from AD. You can map multiple properties from the ECT. Before you can do so, however, you need to configure the BDC synchronization connection so that you can select the columns from the ECT to map.
Business Data Connectivity Synchronization Connection
The BDC synchronization connection provides the User Profile service application with the connection settings it requires to import the user profile information from the external data source. By now, you have created an ECT that maps to the database table containing your user profile information. To create the BDC synchronization connection, follow these steps:
On the SharePoint 2010 Central Administration website, click Manage Service Applications.
Click the link to open the User Profile service application.
Click Create New Connection.
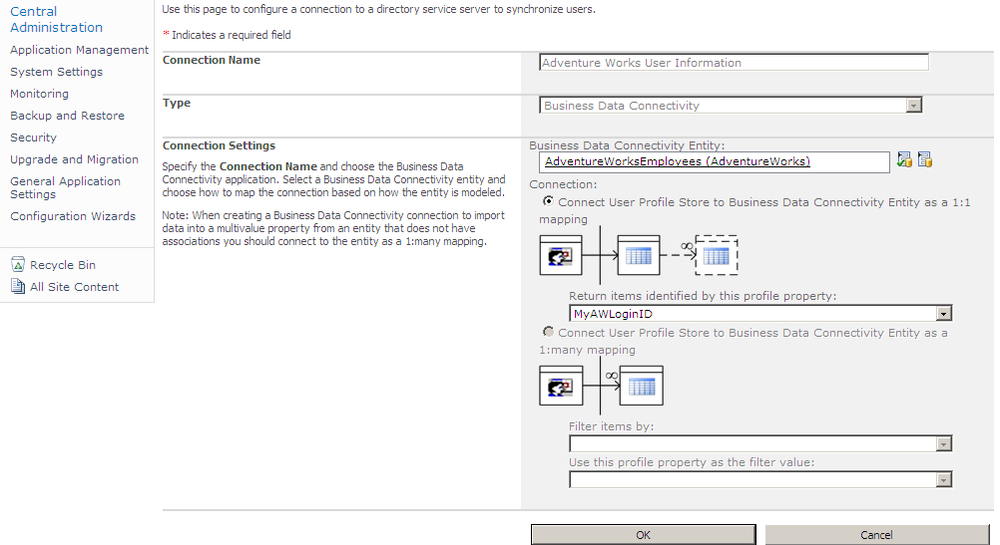
Type a Connection Name, such as Adventure Works User Information.
In the Type section, select Business Data Connectivity.
Select an ECT using the lookup icon next to the Business Data Connectivity Entity field.
In the Return Item Property select MyAWLoginID, as shown in Figure 9-14.
Click OK.
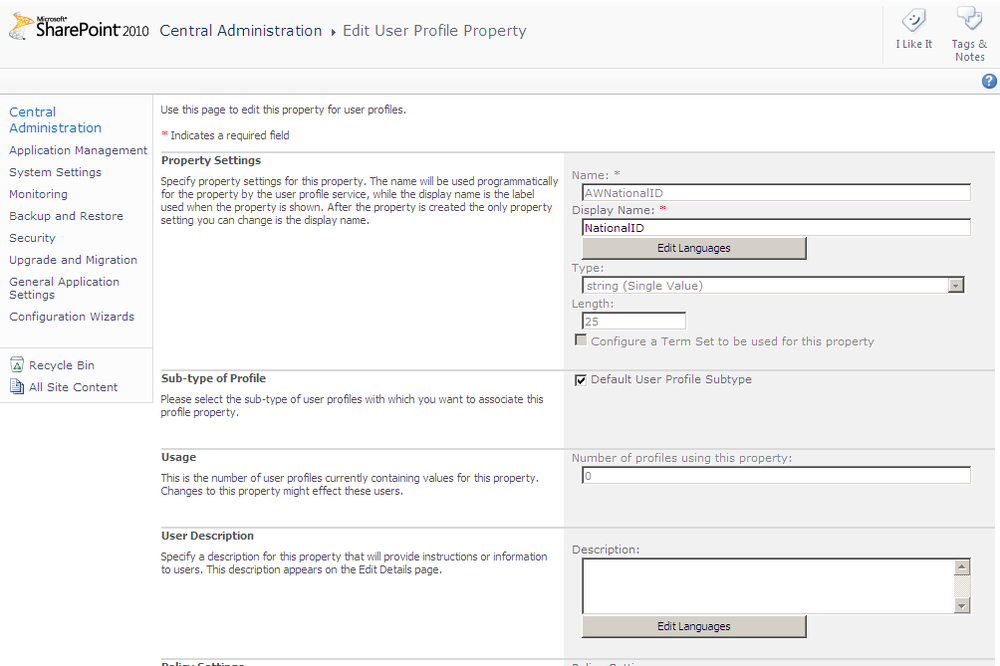
You can repeat this process for each property that you want to map to the user profile. For example, the Adventure Works Employees table contains a column (National ID) that contains an identification number similar to a Social Security number. The National ID would be a useful addition to the user profile information within SharePoint. You can create a new managed user profile property as shown in Figure 9-15.
Once you have provided a name, display name, and type for your new managed user property, you can refine the property by setting options such as whether the user is allowed to edit the property and whether the property will show on the Edit Details page. Finally, set the mapping to the BDC connection and the NationalIDNumber attribute. Repeat these steps for each column you want to import. Figure 9-16 shows the user property mapping to an ECT.

You can check that the managed user property was created successfully by navigating to the Manage User Profiles link in the User Profile service application settings and conducting a user profile search, as shown in Figure 9-17.
Perform a search for a user, such as David, from the Adventure Works database. From the search results, click the drop-down menu for the user, and then click Edit My Profile (shown in Figure 9-17). You will be able to see the NationalID managed user property, as shown in Figure 9-18.
Importing User Profile Properties from External Systems
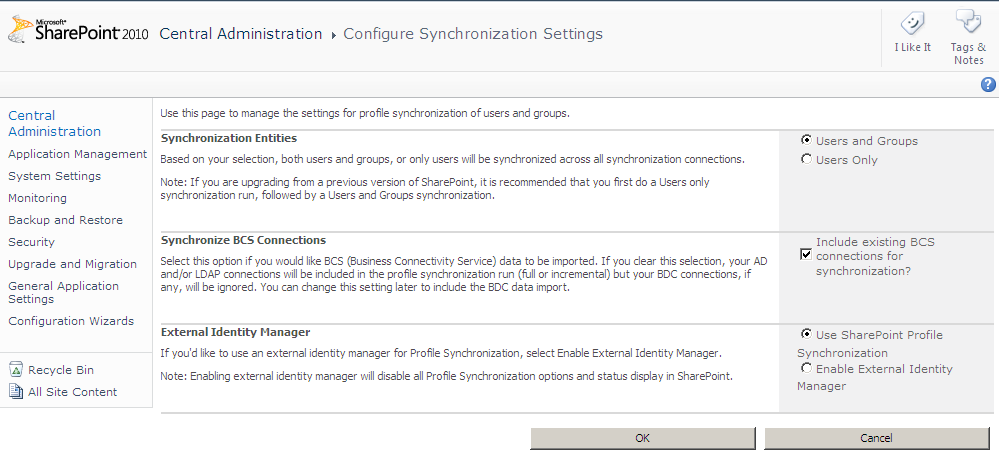
Now that you have configured the synchronization connection and the managed user properties, you can import the user profile information. It is worth noting that you can include or exclude BCS connections through the Configure Synchronization Settings page in the User Profile service application, as shown in Figure 9-19.
To start the import of the data, click the Start Profile Synchronization link. You are prompted to choose between an Incremental synchronization and a Full synchronization, as shown in Figure 9-20. The Incremental synchronization will usually suffice, unless you are performing the operation for the first time or you want to reset the data store.


When you click OK, the synchronization starts. It may take several minutes for the synchronization to complete. Once it has completed, you should find that the profiles have been populated with the information from the external system described by your ECT.
The synchronization itself doesn’t provide great detail as to whether or not the synchronization was successful. For more detailed synchronization information, you can use Synchronization Service Manager 2010, which is part of Microsoft Forefront Identity Manager 2010, available from www.microsoft.com/en-us/server-cloud/forefront/identity-manager.aspx.
Warning
Important Making changes to the Forefront configuration using the Forefront Identity Manager (FIM) is completely unsupported and may actually break the relationship between SharePoint and FIM.
Figure 9-21 shows the Synchronization Service Manager of Forefront Identity Manager monitoring the synchronization of the user profile imports.

Using Duet Enterprise for Microsoft SharePoint and SAP
Business Connectivity Services (BCS) can connect to just about any external data source, whether you are connecting directly using providers for SQL, Oracle, ODBC, or web services. Often, some external data sources such as SAP require much work to provide the connectivity that may include authoring web services or custom connectors.
SAP is an enterprise resource planning application designed for enterprise organizations. It is broken into modules such as Customer Relationship Management, Materials Management, and Sales & Distribution. SAP is developed in a language called Advanced Business Application Programming (ABAP), which is similar to COBOL.
As SAP was among one of the most difficult data sources to connect to, Microsoft and SAP joined forces to develop Duet Enterprise. If you have the Enterprise edition of SharePoint Server 2010 and SAP NetWeaver 7.02 or higher, you can use Duet Enterprise to connect with SAP. Figure 9-22 displays a diagram of the services provided by Duet Enterprise.
Connecting to SAP manually via BCS requires a lot of hard work. SAP provides a communication interface called Remote Function Call (RFC), which can be accessed via web services. The web services need to call the RFC to expose the SAP data via web methods that BCS can use. With Duet Enterprise, however, organizations that use SAP and the Enterprise edition of SharePoint Server 2010 can interact with SharePoint through SAP and SAP through SharePoint. The following tools are available with Duet Enterprise:
Collaboration workspaces
Contextual workflows
Duet Enterprise sites
Duet Enterprise Profile
Duet Enterprise Reporting
Collaboration workspaces are templates allowing SharePoint Server 2010 users to create a SharePoint workspace around a particular topic such as an employee. Information about that employee can be accessed via connected Business Data Web Parts. Social information such as user profiles can be shown, and documents can be managed through document libraries.
Contextual workflows provide SharePoint Server 2010 and Office 2010 users with the ability to interact with SAP data via SharePoint workflows. Through Microsoft Outlook 2010 or SharePoint Server 2010, you are able to access rich contextual information, and approve workflows via email or SharePoint tasks. SAP workflows may also be extended through Microsoft SharePoint Designer 2010.
Duet Enterprise sites provide site templates including Customer, Employee, Product, Customer Quote, and Customer Inquiry. These templates are perhaps the most useful feature of Duet Enterprise. Security trimming through roles allows the content available to you as a user to be made available through external lists and libraries within a SharePoint site.
Duet Enterprise Profile enables you to extend the SharePoint Server user profile with SAP Enterprise Resource Planning (ERP) Human Capital Management (HCM) modules. Alerts on SAP data can be delivered through SharePoint, while SAP Person provides Education, Geography, Tenure, and Employment. My Timesheets is an example of an HCM module. Such information can be made available to SharePoint My Sites using the Duet Enterprise Profile service. Figure 9-23 shows a sample SAP ERP HCM Timesheet module.

Duet Enterprise Reporting provides SharePoint users with the ability to schedule and personalize SAP reports. The reports are provided by SAP ERP but scheduled and delivered through SharePoint libraries. The reports can be taken offline through Microsoft SharePoint Workspace.
It is worth noting that Duet Enterprise does not just make SAP data available to SharePoint Server 2010 and Office 2010. Duet Enterprise also provides SharePoint functionality within SAP.
Displaying HR Information from SAP Applications in My Site
Earlier in this chapter, you learned how to create managed user profile properties when connecting to an external data source to provide an extended user profile. The extended user profile provides additional columns that can be made available through the user’s My Site. The user can then view, search, and discover other users’ profiles as well as modify their own profile. The SAP Employee module contains some columns that we recommend you map to the user profile managed properties. Table 9-1 lists these column mappings.
SharePoint user property column name | SAP attribute | Description |
SAP Employee ID | Unique ID for the employee | |
SAP Position ID | Position ID for the employee | |
SAP Position Description | Employee’s position or title | |
Hire Date | Employee’s date of hire | |
Birth Date | Employee’s date of birth |
Note
See Also To learn more about Duet Enterprise, visit www.microsoft.com/duet, where you can watch videos and obtain purchase information.
Summary
In this chapter, you learned the benefits of using user profile information within SharePoint Server 2010. You initially explored audience targeting and how to configure this feature in the User Profile service application. You then examined the people search and how you can search on user profile properties beyond a user’s first and last name.
This chapter’s focus was configuring managed user properties and using the Business Data Connectivity (BDC) synchronization settings. You create managed user properties as a mapping between the Active Directory (AD) user profile and the external data user profile.
Finally, you explored how you can connect to SAP as an external data source using Duet Enterprise and how you can configure SAP to populate SharePoint Server user profiles.