
After completing this chapter, you will be able to
EVENTS ARE THINGS YOU REACT TO (or sometimes ignore intentionally). Consider what happens when the temperature in your house or dwelling falls below a certain value—for example, 69 degrees Fahrenheit in my house. The event occurs when the temperature falls below 69; the handling of that event is done by a thermostat. The thermostat reacts or handles the event by starting the furnace. When the temperature falls from 71 to 70, the thermostat doesn’t care; it ignores such events.
For webpages, events include such things as mouse clicks, moving the mouse over an element, clicking on a form element, submitting a form, or even entering an individual keystroke. When programming JavaScript web applications, you react to user clicks and other user-initiated actions through events. Event handling is simply the term used to describe how you programmatically react to those events.
This chapter looks at events in the context of the web browser, focusing specifically on areas where JavaScript is frequently used, such as validating web form data.
Interacting with a webpage in just about any way results in several events. Even simply loading the page results in the load() event, which was discussed in the previous chapter. Moving the mouse around the page, clicking on elements, filling out a form, submitting the form—all these actions also result in one or more events. There is a fairly complex system in place to both handle events and make them available to the JavaScript programmer. The result of this complexity is that you can react to the events and do something with them, or you can ignore them.
Note
Read more about event-handling history and complexity at http://www.quirksmode.org/js/introevents.html.
Table 5-1 lists some common events.
Table 5-1. Select events available to JavaScript
Event | Description |
|---|---|
mouseover | Generated when the mouse cursor moves over an element. |
mouseout | Generated when the mouse cursor leaves an element. |
mousedown | Generated when the mouse button is clicked; the first half of a mouse click, when the button is depressed. |
mouseup | Generated when the mouse button is released; the second half of a mouse click. |
click | Generated when the mouse button is pressed and released. |
dblclick | Generated when the mouse button is clicked twice. |
mousemove | Generated as the mouse moves. This event is useful for tracking where the mouse is on the page. |
scroll | Generated when the user scrolls within the document. |
focus | This event fires when a given form field gains focus, whether through a mouse click or by tabbing into the field. |
blur | This event is related to the focus event. When a given form field loses focus, the blur event fires. |
submit | Generated when a form is submitted. |
keypress | This event is generated when a key is pressed. |
keydown | Generated when a key is pressed, just prior to the keypress event. |
keyup | Generated when a key is released. |
The rest of the chapter will show examples of how you can use JavaScript to react to events.
The browser generates mouse events in reaction to users working with a mouse or a pointing device such as a trackpad or a finger touch. For example, when a user moves the mouse cursor over an element, you can use JavaScript to change that element or to do something else entirely, such as add a new element.
Note
As you’ll see later in this book, you can now also handle some of these events with the help of the CSS :hover selector.
jQuery includes functions for handling mouse events such as mouseover, mouseup, mousedown, and so on. When using mouse events, you typically use them in tandem—for example, capturing a mouseover to change the look of an element, and capturing the mouseout event to restore it to its initial appearance. jQuery also includes functions that handle such tandem events, thus saving you even more work. Here’s a simple exercise that creates a hover effect using jQuery. You can find this example in the Chapter 5 sample code in the files moveit.html and moveit.js. To create this example, follow these steps:
Begin by opening the StartHere project if it’s not already open.
Open index.html and place the following HTML within the file:
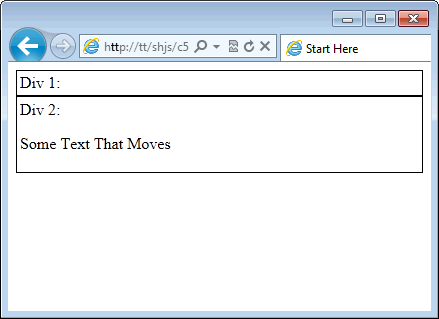
<!doctype html>
<html>
<head>
<title>Start Here</title>
<script type="text/javascript" src="js/jquery-1.7.1.min.js"></script>
<script type="text/javascript" src="js/external.js"></script>
<style type="text/css">
    #mover, #movedest { border: 1px solid black; padding: 3px; }
</style>
</head>
<body>
    <div id="mover">
        Div 1: <p class="moveit">Some Text That Moves</p>
    </div>
    <div id="movedest">
        Div 2:
    </div>
</body>
</html>
The preceding HTML creates two <div> elements, one with a <p> element in it. Both <div> elements have borders thanks to the Cascading Style Sheets (CSS) included within the file. This CSS helps you to see the effects that you’ll create with jQuery in this exercise.
Save index.html.
Open external.js, and delete any existing code in that file, replacing it with the following JavaScript:
$(document).ready(function() {
    $('#mover').hover(function() {
         $('.moveit').appendTo("#movedest");
    });
});
This code again uses the ready() function and places a hover function on the element with the id of mover. Within the hover() function, any element with the moveit class is appended to the element with the id of movedest. This code uses the jQuery appendTo function, which adds the selected element to the end of the element specified in the parameter—in this case, the movedest <div>.
Save external.js.
Load index.html into your browser—typically, you do this by pressing F5. You’ll be presented with a page like that shown in Figure 5-1.
Move your mouse cursor anywhere within the box for Div 1 and the text will shift into Div 2, as shown in Figure 5-2.

This exercise used the jQuery hover function, which provides much of the same functionality you typically use when building mouse-related behaviors. You can find other related functions in the jQuery manual at http://api.jquery.com/category/events/mouse-events. The manual includes a discussion of mouseover, mouseout, and other events.
You can also react to click events. A useful jQuery function for doing so is the toggle() function. Using toggle() on an element creates a switch-like experience, where the first click performs one action and a second click restores the original state—much like turning a switch on and then turning it back off again. The following exercise uses the toggle() function.
Begin with the HTML from the previous exercise. The required HTML should already be present in index.html; if it’s not, refer back to the previous exercise. If necessary, save index.html. You can also find this code in the files toggle.html and toggle.js in the companion content.
Open external.js, and delete any existing code in the file.
Enter the following code into external.js:
$(document).ready(function() {
        $('#mover').toggle(function() {
                 $('.moveit').appendTo("#movedest");
        }, function() {
                $('.moveit').appendTo("#mover");
        });
});
Save external.js.
View index.html in a browser. You’ll see a page similar to that from Figure 5-1.
Click inside Div 1. The text moves into Div 2, just as you saw in the previous exercise and as was shown in Figure 5-2.
Now, click inside Div 1 again. The text moves back into Div 1. If you keep clicking in Div 1, the text will flip back and forth between the two div elements.
The code for this exercise used the toggle() function. The toggle() function accepts two function arguments, which are essentially the thing you want toggle() to do. In this case, the first click caused the element with the class moveit to be appended to the div with the id movedest. The second function appended that same element back to the div with the id mover, causing the toggling action you can see in the browser as you click.
The toggle() function essentially captures mouse click events. jQuery also includes a function for capturing click events, aptly titled click(). The click() function is often used when you don’t need to toggle the on/off type of action of the toggle() function, but rather you just want to do something when the mouse is clicked on an element.
To see click() in action, borrow the code from the previous exercise. Specifically, keep the same HTML and change the call to toggle() in external.js to click() instead. The external.js file should look like this:
$(document).ready(function() {
    $('#mover').click(function() {
         $('.moveit').appendTo("#movedest");
    });
});
You can also find this code in clickmove.js in the Chapter 5 companion content. Now load index.html again. This time you need to click inside Div 1 to make the text move into Div 2.
When you click a link in a browser, the default action is to load whatever document or URL is contained in the link. However, there are certain times when you want to prevent that default action from occurring. For example, if a user is in the middle of a long process, you might not want him navigating away before he gets a chance to save his work. This exercise uses the click() function—and it also shows how to prevent the default action from occurring. You can find the code for this example in click.html and click.js in the companion content.
Open your StartHere project, if it’s not already open.
Within the StartHere project, open external.js and delete any code within the file.
Place the following JavaScript in external.js, replacing any code in there already:
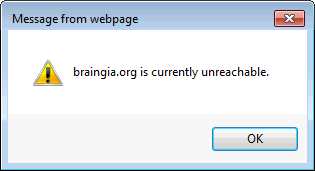
$(document).ready(function() {
        $('#myLink').click(function() {
                alert($('#myLink').text() + " is currently unreachable.");
        });
});
Save external.js.
Open index.html within the project, and delete any existing HTML from the file.
Place the following markup in index.html:
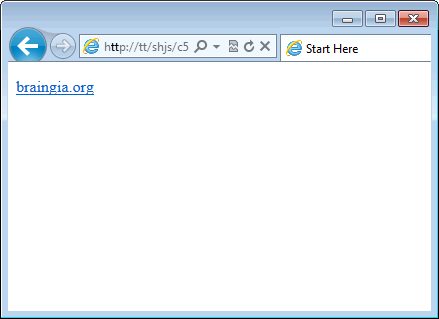
<!doctype html>
<html>
<head>
<title>Start Here</title>
<script type="text/javascript" src="js/jquery-1.7.1.min.js"></script>
<script type="text/javascript" src="external.js"></script>
</head>
<body>
<p><a href="http://www.braingia.org" id="myLink">braingia.org</a></p>
</body>
</html>
Save index.html.
Run the project, or view index.html. You’ll see a page similar to Figure 5-3.
Click the link. You get an alert like that shown in Figure 5-4.
Click OK to dismiss the alert dialog. You’ll immediately notice that the browser is actually following the link from the <a> element. However, in reality, based on the message shown in the alert, I wanted to prevent the browser from following the link.
Next you add code to prevent the browser from taking its default action and following the link. There are two ways to do that. The first way is to use the preventDefault() method, which is a JavaScript-standard way to prevent a default action from occurring. The second way is to return false. The return false statement prevents the default action from occurring because you’re inside a function that handles the event. Here’s the code for each method. You can modify external.js to return false by adding a single line of code, shown in bold here:
$(document).ready(function() { $('#myLink').click(function() { alert($('#myLink').text() + " is currently unreachable.");return false;}); });Add return false in that location within external.js, save the file, and then view index.html in a browser. When you click the link, you’ll notice that the alert dialog still shows up but clicking OK to clear that dialog doesn’t result in the browser continuing on to the site.
The second method, using preventDefault() requires adding the calling event within the function declaration. Notice the two bolded lines in this code (also found in the companion content as preventdefault.js in the Chapter 5 js folder):
$(document).ready(function() {$('#myLink').click(function(e) {alert($('#myLink').text() + " is currently unreachable.");se.preventDefault();}); });
Which method to use? The answer is: it depends. The preventDefault() method prevents only the default action and doesn’t prevent the actual event from continuing. In contrast, return false does both. For many actions, such as the one you saw in this example, preventDefault() is enough to do what you want. Additionally, if you’re not inside a function, as in this example, return false might not work as you expect—meaning it might not work at all or might stop the entire program from continuing.
Note
See Also For more information on event handling and jQuery, see http://api.jquery.com/event.preventDefault and http://api.jquery.com/event.stopPropagation.
The click event handler and other event handlers in jQuery work quite well for most uses. There are times, however, when you might need to attach an event handler to something that doesn’t yet exist on the page. For example, if part of your application adds or creates new elements on the page, you can’t connect the click event or anything else to those elements (easily). Fortunately, jQuery has a function called on() that binds an event to elements on the page. In the next section, you’ll see the on() function used to prevent a form submission.
One of JavaScript’s earliest uses was providing validation on forms that visitors filled out on the web. Because JavaScript runs in the user’s browser, any invalid form elements or fields that were required to be filled in could be checked locally on the user’s computer, without having to send the form’s contents all the way back to the server. This was especially important in the days of dial-up modems, where transferring that data back and forth took a noticeable amount of time. This section examines some of the ways to validate user input in a web form.
What exactly makes a web form or its contents valid depends entirely on what you define as valid. For example, you could require that to be valid, the contents of an email address field must contain an @ symbol, or that a phone number field must contain a certain number of digits or even a specific format. You can also check to make sure that required fields contain a value.
jQuery has a number of selectors related to forms. Some of these are shown in Table 5-2.
Table 5-2. Common jQuery form selectors
Selector | Syntax Example | Description |
|---|---|---|
:button | $(‘:button’) | Selects all buttons |
:checkbox | $(‘:checkbox’) | Selects all check boxes |
:hidden | $(‘:hidden’) | Selects hidden input fields |
:image | $(‘:image’) | Selects images that are buttons |
:input | $(‘:input’) | Selects all form elements |
:password | $(‘:password’) | Selects password input types |
:radio | $(‘:radio’) | Selects all radio buttons |
:reset | $(‘:reset’) | Selects reset buttons |
:submit | $(‘:submit’) | Selects submit buttons |
:text | $(‘:text’) | Selects all text input fields |
In addition to these selectors, there are also filters, which find form fields that are checked or selected, as is the case with radio buttons or check boxes. These filters are :checked and :selected, and you’ll see their use demonstrated later in this chapter.
The simplest way to validate a web form is to check the form’s contents when the user clicks on the submit button. The process essentially involves validating each field that requires validation, and stopping the default action (submit) from occurring if there are fields within the form that contain invalid or missing required data. Here’s an exercise that will help illustrate simple form validation. You can find this code in the files validsubmit.html and validsubmit.js in the companion code.
Open your StartHere project if it’s not already open.
Open index.html, delete any contents in the file, and then replace them with this code:
<!doctype html>
<html>
<head>
<title>Start Here</title>
<script type="text/javascript" src="js/jquery-1.7.1.min.js"></script>
<script type="text/javascript" src="external.js"></script>
</head>
<body>
<form id="myForm" name="myForm" action="#" method="POST">
<fieldset>
        <label for="customerName">Name:* </label>
        <input type="text" name="customerName" id="customerName">
        <br />
        <label for="emailAddress">E-mail:* </label>
        <input type="text" name="emailAddress" id="emailAddress">
        <br />
        <hr>
        <label for="musicFormat">Order Type: </label><br />
        Carryout: <input type="radio" name="orderType" value="carryout"><br />
        Delivery: <input type="radio" name="orderType" value="delivery">
        <br />
        <br />
        <label for="pizzaToppings">Pizza Toppings: </label><br />
        The Works! <input type="checkbox" name="toppings" id="works"
                    value="works"><br />
        Mushrooms: <input type="checkbox" name="toppings" id="mush"
                    value="mush"><br />
        Peppers: <input type="checkbox" name="toppings" id="peppers"
                  value="peppers"><br />
        Sausage: <input type="checkbox" name="toppings" id="sausage"
                  value="sausage"><br />
        <br />
        <br />
        <label for="crust">Crust Type: </label>
        <select name="crust">
        <option value="">Please choose...</option>

        <option value="thin">Thin</option>
        <option value="deepdish">Deep Dish</option>
        </select>
        <br />
        <hr>
        <input type="submit" name="submitForm">
        <p>* - Indicates required field</p>
</fieldset>
</form>
</body>
</html>
Save index.html.
Open external.js, delete any contents, and place the following JavaScript into the file:
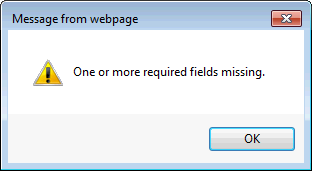
$(document).ready(function() {
    $('#myForm').submit(function() {
        var formError = false;
        if ($('#customerName').val() == "") {
            formError = true;
        }
        else if ($('#emailAddress').val() == "") {
            formError = true;
        }

        if (formError) {
            alert("One or more required fields missing.");
            return false;
        } else {
            alert("Form valid, submitting to server.");
            return true;
        }
    });
});
Save external.js.
Now run the project or view index.html in a browser. You’ll see a form like the one shown in Figure 5-5.
Without filling in any form details, click the Submit Query button. You’ll be presented with an alert indicating that the form is missing required fields, as depicted in Figure 5-6.
Fill something into both of the text fields (Name and E-mail) and click submit. You’ll be shown an alert indicating that the form has been successfully validated and will be submitted to the server. This is shown in Figure 5-7, but because there’s no action on the form, the form’s data won’t go anywhere.
Take some time and work with this validation exercise, clearing out the form and just using spaces instead of words, for example.


Although this code doesn’t introduce much new material, you’ll find it useful to work through the JavaScript so that you can gain experience with how this example is structured. The entire example is shown within the ready() function, which you already saw.
First, a function is attached to the submit() event. The submit() event is just like other events you’ve seen in this chapter except that it’s attached to a form (because it doesn’t make sense anywhere else):
$('#myForm').submit(function() {Within the submit() function, a variable is created to store the state of the validation. This variable, called formError, is set to false:
var formError = false;
Next, the submit() event’s function performs a simple check to test whether the user entered values into the text box elements. This is accomplished through an if conditional that uses the jQuery val() function. The val() function retrieves the filled-in value for a form field. In this case, if either of the form elements is blank (empty), the code sets the formError variable to true.
if ($('#customerName').val() == "") {
    formError = true;
}
else if ($('#emailAddress').val() == "") {
    formError = true;
}
At the end of the submit() function, the formError variable is evaluated. If formError is found to be true, the page shows an alert indicating that one or more required fields haven’t been filled in. Additionally, and more importantly, the function returns false, which—as you already saw—means that the default action for the form will be cancelled, and it won’t be submitted until the user corrects the error and submits the form again for validation.
if (formError) {
    alert("One or more required fields missing.");
    return false;
} else {
    alert("Form valid, submitting to server.");
    return true;
}
With this code explained, you’re probably already counting the ways in which invalid data could still get back to the server. Luckily, the server program is always required to validate input data as well! Right now, a simple empty space will suffice to make the fields valid, which is probably not what you want for either a Customer Name or E-mail Address form field. There’s also no validation on the E-mail Address field itself. Making sure there’s at least an @ symbol in the email address would be a good start. Therefore, I’ll show some examples to improve on the validation.
Being new to programming, you might have never heard of the term regular expression. It’s a term used to describe text processing and matching by using symbols to represent characters. Regular expressions make it possible to validate that an email address contains an @ symbol, that a phone number field contains only numbers (and maybe dashes or parentheses), that date fields are valid, and much, much more.
Entire books have been written on regular expressions, and a lot of information is available on the Internet about them as well. This section (and indeed this book) won’t try to introduce regular expressions beyond the cursory glance you get here. What this section does, however, is show you that there are advanced validation techniques available. It’s good to have these techniques in mind for further research and learning.
Regular expressions are particularly helpful for form validation, and it’s that limited focus that you’ll see here. In JavaScript, regular expressions are objects you can define in two ways:
var myRegex = new RegExp(pattern,modifiers);
or
var myRegex = /pattern/modifiers;
Regular expression objects have several methods for processing text, one of which is of particular interest when validating forms: the test() method. Rewriting the previous validation code to use regular expressions calls for two primary changes. First, the regular expressions themselves need to be defined and then the test() method needs to be implemented within the conditionals.
You can find this code in the file regex.js in the js folder of the Chapter 5 companion content. This code will define two regular expressions, one for each text field. The first regular expression is used for the Customer Name text box on the form:
var customerRegex = /[ws]+/;
This regular expression creates something called a character class, which is a special character set to represent matching characters. Character classes are defined with brackets, [ and ]. The w in the regular expression represents any valid letter or number (alphanumeric) and the underscore character. The s represents a space character.
By placing these special characters into the character class, this regular expression will match any alphanumeric characters (and the underscore) as well as any number of spaces. The minimum number of letters or numbers is one, and there also must be one space somewhere in the string in order for this regular expression to match. So this regular expression would match even if the user entered “b ” into the text field. However, even with this flaw, this regular expression validation is still a large improvement over the previous example, which simply checked to make sure that something was filled in.
Likewise, the regular expression used here to check an email address is also a bit crude:
var emailRegex = /@/;
The email regular expression merely looks for the presence of an @ symbol. It’s tempting to try to get fancier with the email address regular expression and begin requiring one or more letters followed by an @ symbol, followed by one or more letters and then a dot, followed by more letters, as in a real email address like [email protected]. However, this quickly fails when considering email addresses with multiple dots in them or domain name structures that aren’t common.
With the regular expressions defined, the next task is to change the conditionals that already exist in the program to use the test() method instead of the standard equality test used previously. The two conditionals now look like this:
if (!customerRegex.test($('#customerName').val())) {
}


else if (!emailRegex.test($('#emailAddress').val())) {
}
Essentially, the value of each field is given as the argument to the test() method of each regular expression. When the regular expressions match, it means someone filled in that field correctly, therefore the conditionals are negated with the exclamation point (!). In plain language, the conditionals now read, “If the customer name field doesn’t contain at least one letter or number and one space, do this” and “Otherwise, if the email address field doesn’t at least have an @ symbol, do this.”
The final code looks like this:
$(document).ready(function() {
    var customerRegex = /[ws]+/;
    var emailRegex = /@/;
    $('#myForm').submit(function() {
           var formError = false;
        if (!customerRegex.test($('#customerName').val())) {
            formError = true;
        }
        else if (!emailRegex.test($('#emailAddress').val())) {
            formError = true;
        }

        if (formError) {
            alert("One or more required fields missing.");
            return false;
        } else {
            alert("Form valid, submitting to server.");
            return true;
        }
    });
});
Table 5-3 shows some recipes for other common matches you might find useful.
Table 5-3. Other common matches
Regex | Type | Description |
|---|---|---|
var zipRegex = /[0-9]/; | Digits for ZIP code | |
var zipRegex = /^[0-9]$/; | Positional digits for ZIP code | Use special positional characters to make sure that the match works only if the ZIP contains only digits—that is, there’s nothing before or after the digits. |
var zip5Regex = /^[0-9]{5}$/; | Positional counts of digits for ZIP Code | Make sure that there are at least 5 digits, as in a 5 digit zip code. |
var zipRegex = /^[0-9]{5}-[0-9]{4}$/; | Positional counts of digits for ZIP+4 digits | Match a ZIP code plus 4 digits, which is a 5-digit ZIP followed by a dash and then 4 more digits. |
var dateRegex = /^[0-9]{4}/[0-9]{2}/[0-9]{2}$/; | Positional counts of digits for the date | Match a date formatted like YYYY/MM/DD. |
var dateRegex = /^[0-9]{2}/[0-9]{2}/[0-9]{4}$/; | Positional counts of digits for the date | Match a date formatted like MM/DD/YYYY. |
var urlRegex = /https?:///; | Match a URL, either http or, optionally, https. |
Note
These date examples don’t validate that the month is less than 12 or the number of days in a given month. This regular expression happily matches a correctly formatted invalid date such as 99/99/9281 just as it would a valid date such as 01/01/2014. Also, as you can see, the forward-slash (/) character needs to be escaped, using the backslash () character; otherwise, it will be interpreted as the end of the regular expression.
You can plug the regular expressions from Table 5-3 into external.js in place of the customerRegex and experiment with them by filling out the Customer Name text box in the form (after reloading the page, of course).
Now you’ve seen the basics of how to validate required fields in a form. Next you’ll see how to work with other common form elements.
Radio buttons, such as those shown on the form for choosing Delivery or Carryout, are useful when you want the visitor to be able to select one, and only one, choice from a set of options. In this example, visitors can have their pizza delivered, or they can come pick it up—but they can’t do both. In contrast, you use check boxes when you want users to be able to select multiple values from a list, such as with pizza toppings.
As mentioned earlier, jQuery includes a :checked filter for determining whether an element is checked or unchecked. You use the :checked filter in combination with a selector, and typically along with an additional filter, called name.
In the examples already shown, each text field had its own id assigned to it. However, elements such as radio buttons and check boxes all share the same name, and it can be cumbersome to assign a unique id value to each one. But by using a combination of selectors and filters correctly, you can drill down to any form element without having to give each element an id or class. Recall that this is the radio button structure in the HTML you already saw:
Carryout: <input type="radio" name="orderType" value="carryout"><br />
Delivery: <input type="radio" name="orderType" value="delivery"><br />
The code for retrieving the checked value from the orderType radio buttons looks like this:
$(':input[name="orderType"]:checked').val()That single line of jQuery code retrieves the value of whichever radio button element is selected—in this case, either Carryout or Delivery. The code uses the :input selector, which retrieves all the form elements and then applies another selector to narrow down the results to the specific element named orderType. Finally, it applies the filter to retrieve only the selected element. If no element is selected, jQuery returns undefined.
With check boxes, multiple values can be selected. Getting the selected values means looping through the selected elements and testing each one to see if it’s selected. In jQuery, you can do that in one simple call; in fact, the basic syntax for selecting selected (“checked”) elements looks the same as that for determining which radio button is selected:
$(':input[name="toppings"]:checked')However, because several elements might be selected, instead of merely using val() to retrieve the value as you can with the radio buttons, you use the jQuery each() function to loop through each selected element. The each() function is similar to a for loop. Within the each() function, you can then process the value of the current element by using the this keyword. Here’s some sample code that creates an alert dialog for each selected element:
$(':input[name="toppings"]:checked').each(function() {
    alert($(this).val());
});Performing extended validation of values with regular expressions is done the same way for the values returned from radio buttons and check boxes as it is for text fields. However, it’s possible to argue that extended validation of values isn’t really required within JavaScript because the user doesn’t need to enter those values. With that said, it’s still a requirement that you validate those elements on the server because users still have the ability to change those values (and sometimes do so, just to see what will happen).
If no elements of a check box or radio button group are selected, their value is set to undefined. This makes it easy to test whether a user has selected any check boxes or radio buttons from a group. Here’s an example for the radio buttons shown in this section that incorporates the formError logic from the earlier exercise:
if ($(':input[name="orderType"]:checked').val() == undefined) {
        formError = true;
    }
The process for validating check boxes is exactly the same. Note that you don’t need to do this inside of an each() loop; in fact, you want to perform this validation before you bother looping through the values with each().
if ($(':input[name="toppings"]:checked').val() == undefined) {
        formError = true;
    }
With radio buttons and check boxes done, next you’ll see how to work with select or drop-down boxes.
Another common form element is a drop-down box, known as a <select> in HTML terms. The example form uses a drop-down box so that users can select the crust type for their pizza. The crust can be one of multiple options, but it can’t be more than one. Generally, radio buttons are good when there are only a few options that can be shown on the page easily, while drop-down lists are better when there are many options, such as when choosing a U.S. state (such as Wisconsin, California, or Hawaii) from among all the states.
The example HTML shown used a <select> element that presented two options for the type of pizza crust:
<select name="crust">
<option value="">Please choose...</option>
<option value="thin">Thin</option>
<option value="deepdish">Deep Dish</option>
</select>
You can determine which drop-down element the user selected with the :selected filter. The syntax is the same as that for determining the status of check boxes and radio buttons:
$(':input[name="crust"] :selected').val()The obvious difference is that the preceding code uses the :selected filter rather than the :checked filter, but a not-so-obvious change is that you must include a space between the selector :input[name=“crust”] and the filter :selected because the filter needs to apply to the elements below the selector (the <option> elements) rather than the <select> element itself.
Note
This type of select box can have only one value selected at a time, but a multiselect list can return multiple values, as in the check-box example shown earlier in this section. Therefore, you need to use each() to get all the possible values.
Validating <select> elements is different than validating the other element types you’ve seen. Although the concepts are the same, the implementation is different. Unlike radio buttons and check boxes, there is no undefined state for <select> elements. In the example shown, the first element, labeled Please Choose, has an empty value attribute. Therefore, the validation process can simply check to see whether the value is not empty. This is similar to the first example of validation you saw in this chapter, and the code looks like this:
if ($(':input[name="crust"] :selected').val() == "") {
    formError = true;
}You’ve now seen how to obtain values from various types of form elements and how to validate them as well. Here is the code from external.js so far, which provides full validation for the form from the exercise earlier in this chapter. If you want to experiment with this code, remove any code in your copy of external.js and replace it with the code shown here. You can also find this code in the files allbasicvalidation.html and allbasicvalidation.js in the companion content.
$(document).ready(function() {
    var customerRegex = /[ws]+/;
    var emailRegex = /@/;
    $('#myForm').submit(function() {
        var formError = false;
        if ($(':input[name="orderType"]:checked').val() == undefined) {
            formError = true;
        }
        else if (!customerRegex.test($('#customerName').val())) {
            formError = true;
        }
        else if (!emailRegex.test($('#emailAddress').val())) {
            formError = true;
        }
        else if ($(':input[name="crust"] :selected').val() == "") {
            formError = true;
        }
        else if ($(':input[name="toppings"]:checked').val() == undefined) {
            formError = true;
        }
        else {
            // Here's the first place that you know the form is valid.
            // So you can do fun things like enumerate through checkboxes.
            // $(':input[name="toppings"]:checked').each(function() {
            //  alert($(this).val());
            // });
        }

        if (formError) {
            alert("One or more required fields missing.");
            return false;
        } else {
            alert("Form valid, submitting to server.");
            return true;
        }
    });
});
The next section revisits the click() event to show another common form enhancement.
One feature found on many forms is the ability to react to the click event. In the example form used in this chapter, when the visitor selects The Works! as a pizza topping, all the related check boxes for toppings should become selected. Conversely, if a user clears any individual toppings, The Works! option should be cleared. You can perform this task in multiple ways. The method I’ll show uses the jQuery prop() function.
The prop() function sets a property of an element. In this case, you want to set the checked property of several check boxes. Alternatively, if one of the other elements is left clear, you want to remove the checked property from the The Works! check box. You can accomplish this using the removeProp() function.
The other piece of this puzzle is to add a handler to the click event for each of the check boxes. You accomplish this with the on() function that you’ve already seen. Here’s an exercise that implements this functionality. You can find this code in the companion content in the files click-on.html and click-on.js.
Open your StartHere project if it’s not already open.
Open external.js, and clear any existing code from that file. Alternatively, you can add the code shown in bold to your existing external.js.
Within external.js, place the following code:
$(document).ready(function() {function theWorks(elm) {if (elm.val() == "works") {$('#mush').prop("checked","checked");$('#peppers').prop("checked","checked");$('#sausage').prop("checked","checked");} else {$('#works').removeProp("checked");}} //end function theWorks$(':input[name="toppings"]').on("click", function() {theWorks($(this));});// Validation Code var customerRegex = /[ws]+/; var emailRegex = /@/; $('#myForm').submit(function() { var formError = false; if ($(':input[name="orderType"]:checked').val() == undefined) { formError = true; } else if (!customerRegex.test($('#customerName').val())) { formError = true; } else if (!emailRegex.test($('#emailAddress').val())) { formError = true; } else if ($(':input[name="crust"] :selected').val() == "") { formError = true; } else if ($(':input[name="toppings"]:checked').val() == undefined) { formError = true; } else { // Here's the first place that you know the form is valid. // So you can do fun things like enumerate through checkboxes. // $(':input[name="toppings"]:checked').each(function() { // alert($(this).val()); // }); } if (formError) { alert("One or more required fields missing."); return false; } else { alert("Form valid, submitting to server."); return true; } }); });View index.html in a browser. You’re presented with the same form you saw back in Figure 5-5.
Within the Pizza Toppings section, select The Works! All the check boxes should now automatically be selected, as illustrated in Figure 5-8.
Clear the check boxes for Mushrooms (or Peppers or Sausage). Notice that the check box for The Works! also is cleared automatically, as shown in Figure 5-9.
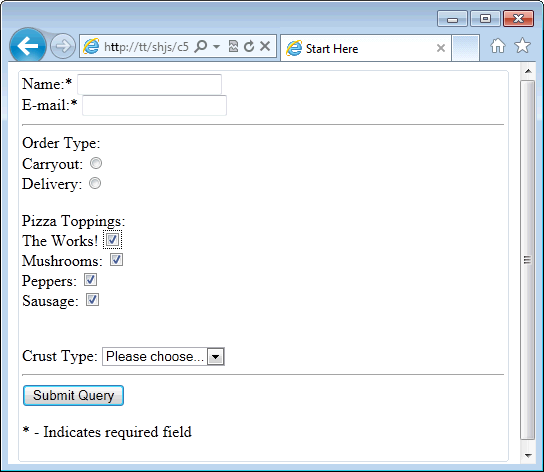
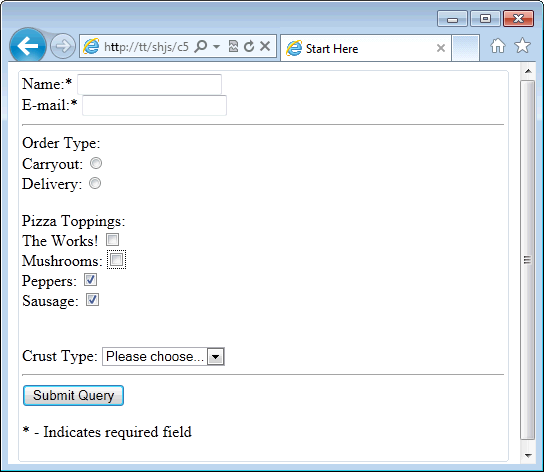
Figure 5-9. Clearing any of the other toppings also clears The Works! because this pizza no longer has everything on it.
This exercise added to the previously explained validation code by adding a new function and a click event handler that uses the jQuery on() function that was explained previously in this chapter. Here’s an explanation of this code:
function theWorks(elm) {if (elm.val() == "works") {$('#mush').prop("checked","checked");$('#peppers').prop("checked","checked");$('#sausage').prop("checked","checked");} else {$('#works').removeProp("checked");}} //end function theWorks
The code creates a function called theWorks, which accepts one argument, elm—the element that was selected. Inside this function, if the value (val()) of the element is works (from the form’s value), the checked property is enabled on each of the other toppings using the jQuery prop() function.
On the other hand, if the element’s value is not works—in other words, if one of the other toppings was selected—The Works should be cleared. The code accomplishes with the removeProp() function, which removes the checked property from the element with the id works.
Note
There are multiple ways to accomplish this same task, the one shown here is straight-forward, easy to explain, and hopefully easy to understand.
Next the code adds a click event handler using the jQuery on() function. This is applied to all input elements with the name toppings. The click event handler does only one thing: it calls the function called theWorks and sends along the selected element to that function.
$(':input[name="toppings"]').on("click", function() {theWorks($(this));});
You’ve now seen how to validate several types of form elements, and you’ve also seen an extended example of the click() event. The final section in this chapter briefly illustrates the keypress event.
You can access and handle several keyboard-related events with JavaScript. The keypress event is triggered when a key on the keyboard is pressed and a character is inserted. You can use related events, called keydown events, to detect when a key has been depressed, and you can use keyup events to detect when the key has been released. Keyboard events are used in various places in forms, such as for a type-ahead search box or to count characters in a text field.
This section shows you how to create a new form with a text area in it. Text areas are frequently used on message boards, forums, and other places where users can enter text and a character or length limit is imposed. On these forms, you sometimes see a Characters Remaining counter that counts down as you type. Twitter provides an example of this behavior. When entering a tweet, the characters remaining are counted down. Here’s an exercise for building the similar behavior. This code can be found in the companion content as char.html and char.js.
Open your StartHere project if it’s not already open.
Open index.html, and remove any existing HTML within the file.
Place the following HTML in index.html:
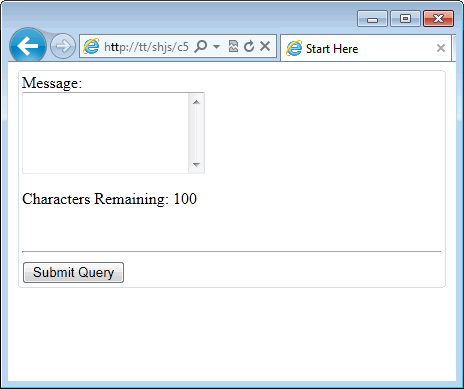
<!doctype html>
<html>
<head>
<title>Start Here</title>
<script type="text/javascript" src="js/jquery-1.7.1.min.js"></script>
<script type="text/javascript" src="external.js"></script>
</head>
<body>
<form id="myForm" name="myForm" action="#" method="POST">
<fieldset>
        <label for="messageText">Message: </label><br />
        <textarea rows="5" cols="20" name="messageText" id="messageText">
        </textarea>
        <br />
        <p>Characters Remaining: <span id="charRemain">100</span></p>
        <br />
        <hr>
        <input type="submit" name="submitForm">
</fieldset>
</form>
</body>
</html>
Save index.html.
Open external.js, and delete any code in the file.
Place the following JavaScript in external.js:
$(document).ready(function() {
        var charTotal = 100;
        $(':input[name="messageText"]').on("keyup",function() {
                var curLength = $(':input[name="messageText"]').val().length;
                var charRemaining = charTotal - curLength;
                $('#charRemain').text(charRemaining);
        });
});
Save external.js.
View index.html in a browser. You’ll see a page like the one in Figure 5-10.
Begin typing into the Message text area. As you release each key, the counter will decrement, showing the number of characters remaining that you can type.
The code in this example, located inside the jQuery ready() function, uses a combination of jQuery and JavaScript to accomplish the task:
var charTotal = 100;
$(':input[name="messageText"]').on("keyup",function() {
        var curLength = $(':input[name="messageText"]').val().length;
        var charRemaining = charTotal - curLength;
        $('#charRemain').text(charRemaining);
});
First, the total number of allowed characters is assigned to a variable named charTotal. Next, the keyup event is bound to the text area with the name messageText. The messageText element is retrieved using the :input and name selectors you saw earlier in the chapter, and the keyup event is tied to that element with the jQuery on() function you already saw as well.
For the keyup event handler, a function is defined that first obtains the current length of that same text area’s value (the text entered by the user). The value is retrieved with the val() function you also already saw. Then the code obtains the length of that value using the length property. This length is placed in a variable named curLength.
The curLength variable is then subtracted from the charTotal variable and placed in the variable called charRemaining. Finally, the charRemain element from the HTML form is retrieved using its id (charRemain), and the value in the charRemaining variable is placed on the HTML form by using the jQuery text() function.
Like the end of previous chapters, this final example uses a more complex example you can use in the real world. As you continue learning JavaScript, this example and its explanation can be used as a reference.
This chapter looked at form validation and events, which are things that happen and that you can react to in order to perform actions (or sometimes intentionally ignore). Mouse movements, clicks, and keypresses are common events, as are form submissions.
You can react to events in any number of ways, and in the chapter you saw how to change HTML elements when the mouse moved over them and how to react to mouse clicks. After that, the chapter looked at form validation, adding basic validation when the form was submitted. This basic validation was expanded upon with the help of simple regular expressions. Next the chapter showed how to obtain values from form fields using the val() function and how to validate other types of form elements, such as radio buttons, drop-down lists, and check boxes.
An extended example was shown of the click event, which detailed how to set the checked property on check boxes as a reaction to a different check box being selected. This was accomplished with the prop() and removeProp() functions. Finally, keyboard events were discussed with an exercise that showed how to count down the number of characters remaining as characters were typed into a text area that had a limit on the number of characters it could accept.