
After completing this chapter, you will be able to
Understand the different ways to talk to servers
See how to retrieve information from a server
Use a JavaScript program to parse information in different formats
Use JavaScript and jQuery to send data to a server
YOU CAN LOOK JUST ABOUT ANYWHERE ON THE WEB to find examples of sites that marry data with JavaScript. Sites like Google Maps, Twitter, Bing, and others all use JavaScript to fetch results, help you search, and help you click and drag a map. The data itself isn’t stored in JavaScript; rather, it’s retrieved using a combination of JavaScript and one or more programs on a server. In this way, web applications obtain data from the server without ever having to refresh the page. From the visitor’s perspective, the web application operates much like a traditional desktop application, providing real-time feedback as the visitor interacts with the webpage.
All of this is accomplished with the help of a concept called AJAX. AJAX is an acronym for Asynchronous JavaScript and XML (Extensible Markup Language), and when it came about around 2005, it revolutionized the web experience.
This chapter looks at data retrieval with JavaScript using AJAX.
AJAX enables retrieval of data and content using only JavaScript. Prior to the advent of AJAX, when data needed to be retrieved from a server, the user typically needed to click a button to initiate the transfer. AJAX did away with that interaction, instead using a special function to send the request to the server in the background. Unlike HTML, CSS, and JavaScript, AJAX isn’t a specification or standard; rather, it’s a concept or technique for data retrieval using JavaScript.
Though the X in AJAX indicates XML, there is no requirement that data needs to be formatted in XML, and this is a good thing. XML is very heavy, meaning that it requires a great deal of verbose and unnecessary syntax just to transfer simple data. Luckily, there are other ways to transfer data that are lightweight and more appropriate for transfer between the user and the server and back again. Later in the chapter, you’ll see another way: JavaScript Object Notation (JSON).
In a typical AJAX scenario, the client’s web browser uses JavaScript to send a request to a server using a JavaScript object called XMLHttpRequest. The server then returns the appropriate data, and the JavaScript program parses the response to do whatever action is required, such as move a map in response to a user zooming in or out, loading mail, or whatever is appropriate for that web application.
AJAX retrieves data from a server-side program. The program on the server responds when your JavaScript program calls it. The server-side program can do whatever it is that server-side programs do—retrieve data from a database, return content, perform math, or do whatever is required. For AJAX to work, the server program needs to exist in the same domain as the JavaScript that calls it. This means that, from the JavaScript program written for this chapter, you can’t call a server program on my website using an AJAX method.
The web operates using a protocol named Hypertext Transfer Protocol (HTTP), which is defined primarily by Request for Comments (RFC) number 2616 (http://www.rfc-editor.org/rfc/rfc2616.txt). The HTTP standard defines several methods for interacting with a server. These methods are used to send and retrieve data between the client (typically, the web browser) and the server (typically, Apache but also Microsoft Internet Information Services and others).
Two methods you see (and use) every day are the GET method and the POST method. When you request a webpage in your browser, the browser sends a GET request to the server in your browser’s address bar. For most webpages, many more additional GET requests are sent to the server for each additional resource like images, JavaScript, and CSS. The server responds to each and every one of these GET requests with a status code and the result of the request, such as the JavaScript or image file itself.
The POST method is frequently used when working with web forms. The POST method sends the data from the web form back inside of the request itself rather than as part of the URL, as would be the case with a form that uses the GET method.
All of this information ties directly into programming JavaScript and AJAX. When programming AJAX, you need to create an HTTP connection using JavaScript and then send a request using either GET or POST to interact with a server program. It might sound complex, but the difficulty has largely been solved with jQuery. The next section shows how to create an AJAX request with JavaScript. Later in the chapter, you’ll see more complex examples using jQuery.
As part of this chapter, I’ll show a simple server-side program in both Microsoft Visual Basic .NET for those running Microsoft Visual Studio and in PHP as well. You’ll be able to use that program for the examples in this chapter. Setting up a web server is beyond the scope of this book. However, Visual Studio includes a development server that will be used for the examples in this chapter and throughout the book. If you don’t have Visual Studio, I recommend obtaining an Apache installation, which can run on Windows, Linux, or Mac. Another option is to use a hosting provider that offers PHP. These providers usually offer free setup and cost less than $5 a month.
This section shows how to build a simple server program. A server program is necessary when working with AJAX. This program will be used for the initial example in this chapter, and you’ll change it as you follow other exercises in this chapter. This program is an ASP.NET page that simply echoes a few values back and can be found as WebForm1.aspx in the companion code. I’ll also show an example of the same code in PHP.
To begin this exercise, open your StartHere project in Visual Studio.
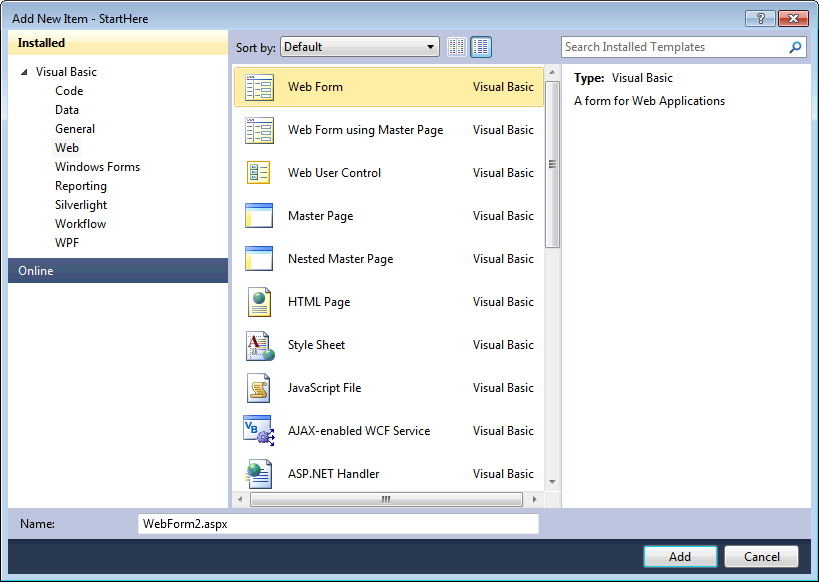
Within the StartHere project, right-click the StartHere project within Solution Explorer, click Add, and then click New Item. The Add New Item dialog will be shown, as shown in Figure 6-1.
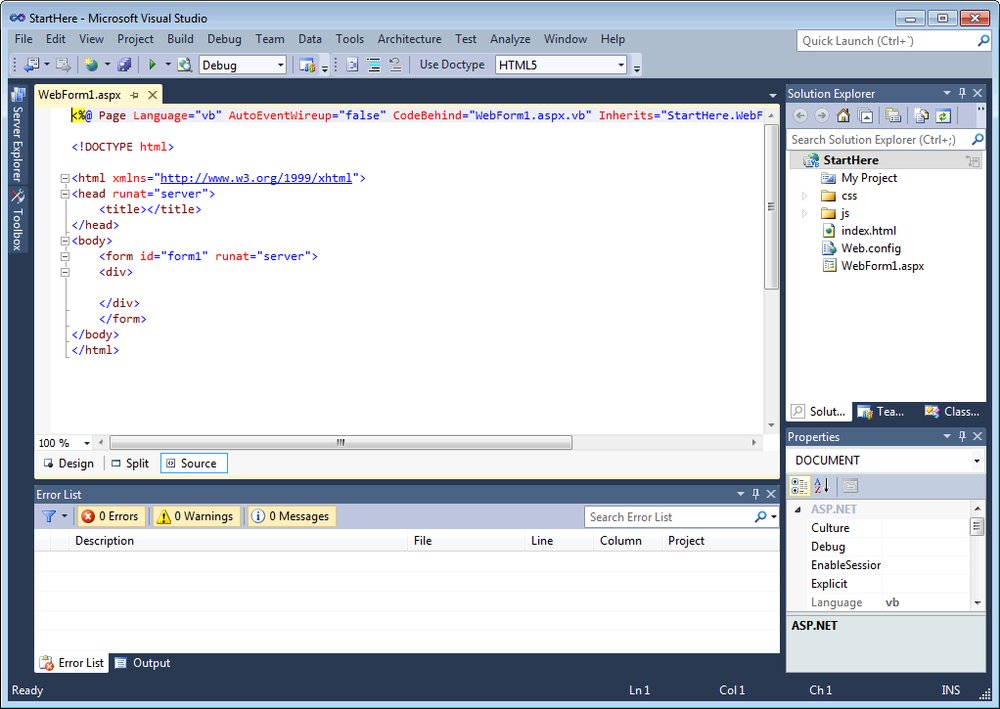
In the Add New Item dialog, select Web Form from the Web templates and click Add. A new web form will be created, similar to the one in Figure 6-2.
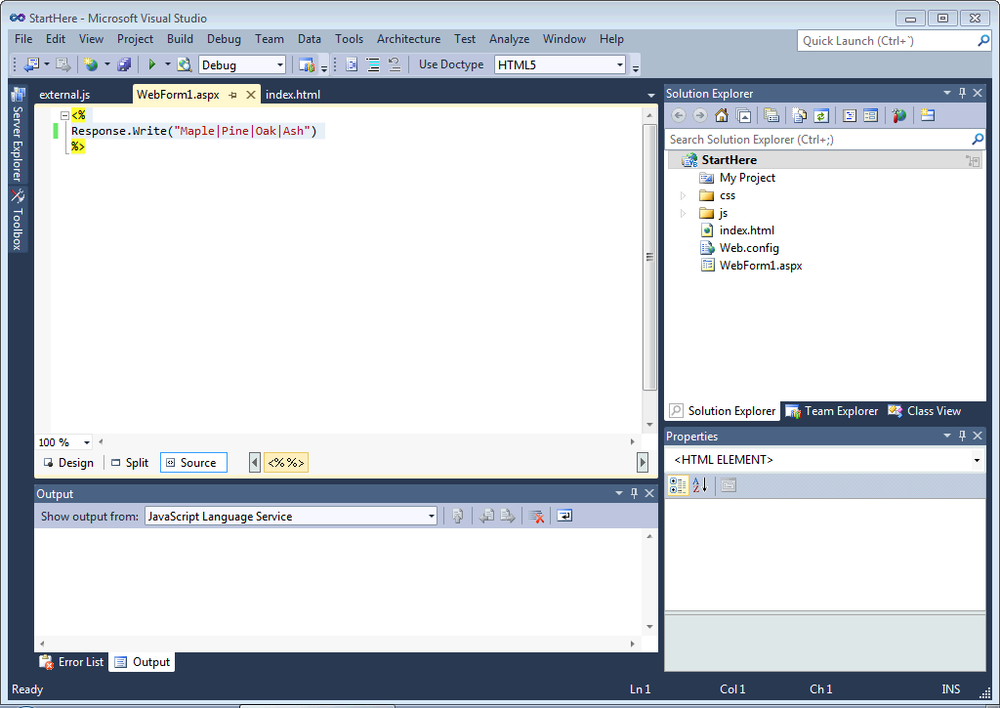
Inside of the new web form, delete everything, and replace it with the following code:
<%
Response.Write("Maple|Pine|Oak|Ash")
%>
The result should look like that shown in Figure 6-3.
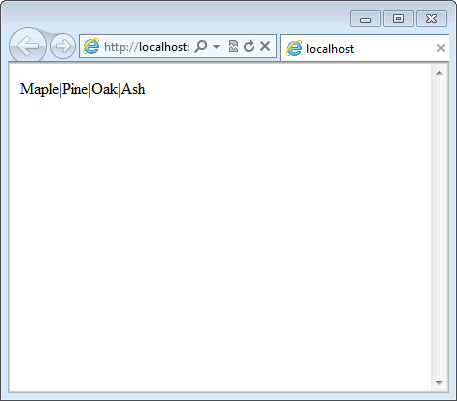
Within Solution Explorer, right-click WebForm1.aspx and select View In Browser from the context menu. You’ll be presented with a page like the one in Figure 6-4.
With this code built, you now can create an AJAX implementation that runs on your local development computer.
If you are using PHP, here’s the source file to create a similar server program using PHP. This code can be found as webform1.php in the companion code:
<?php

echo "Maple|Pine|Oak|Ash";

?>
Determine Your Development Server Port
Visual Studio creates a local development server that you use seamlessly when developing and running your applications locally. Visual Studio chooses a port for the server to run on, aside from the standard HTTP port 80. For the examples in the book, you need to find out what port your local server is using. To do so, open your StartHere project and select the StartHere project within Solution Explorer. The Project Properties pane is displayed in the lower right corner. Within that Project Properties pane, shown in Figure 6-5, there is a property called URL.
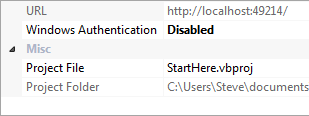
Figure 6-5. The port chosen by Visual Studio on my computer is 49214, but yours will likely be different.
Copy that URL, especially noting the port. In the example, my local server is using port 49214 and therefore that’s the URL I’ll use throughout the examples in this chapter. However, there’s only a 1 in 65,536 chance that you’ll share that same port. Therefore, you need to change the URL in any examples to match your value.
Also, if you’re running a regular web server, such as Apache, you’ll likely be using the standard port 80 for communication. Either way, you need to update the URLs to match yours, unless you happen to be using port 49214.
Developing AJAX with JavaScript uses a special object called the XMLHttpRequest object. This object, used with its own methods and syntax, is responsible for sending requests to web servers to retrieve data.
Some slight differences between web browsers can make the XMLHttpRequest object challenging to use in the real world. This is largely solved by using jQuery, and in the next section you’ll see how to use jQuery to make AJAX requests. The XMLHttpRequest object is instantiated like most other JavaScript objects, with the new keyword:
var myXHR = new XMLHttpRequest;
With the object created, you next create the connection, which involves calling the open() method, specifying the HTTP method (such as GET or POST), and specifying the URL. For example:
myXHR.open("GET","http://localhost:49214/WebForm1.aspx");For GET methods, the next thing to do is send the data to the server, which is done with the aptly titled send() method:
myXHR.send();
The send() method can accept additional data, as might be the case when you use a POST method. With the request sent, the next step is to parse the response. As is the case with the example server program you created earlier in this chapter, you receive a text-based response.
As previously stated, this can get somewhat cumbersome, which is why it’s almost always preferable to use jQuery for working with AJAX. However, if you’d like more information on using JavaScript for AJAX, I recommend my intermediate-level book, JavaScript Step by Step (Microsoft Press, 2011).
If you haven’t figured it out already, I’ll state it again: jQuery makes AJAX easier. Well, jQuery makes a lot of JavaScript programming easier, but it really shines in the area of AJAX. jQuery’s methods for working with server-side data have evolved over the years. This section examines some of the primary methods for working with data from a server using jQuery. See http://api.jquery.com/category/ajax for a full list of methods related to AJAX.
jQuery defines specific methods for exchanging data with a server. This means you don’t need to set up and configure an XMLHttpRequest object or worry about the method used and so on. The two methods examined in this section are get() and post(). Both get() and post() are shortcut functions to the overall ajax() function in jQuery.
The get() and post() functions accept several arguments, including the URL to use, any data to be passed to the server program, what to do with the returned data, and the type of data to be returned. Here’s a simple example using get(). This code can be found as basicindex.html and basicjs.js in the Chapter 6 companion content.
$.get('/WebForm1.aspx', function(resp) {
    alert("Response was " + resp);
});
This get() function calls a file named WebForm1.aspx, retrieves the data, and then sends that response to the screen through an alert, shown in Figure 6-6.

Here’s a simple example using post():
$.post('/WebForm1.aspx', function(resp) {
    alert("Response was " + resp);
});
The magic happens when you start sending data into the server programs and then do complex JavaScript operations with that returned data.
Both GET and POST methods can send data to the server. The server then processes this data. For example, you might send in a postal code, and the server program looks up and returns the city to which the postal code belongs. You see examples of GET requests with additional data. This is called the query string. Here’s an example:
http://www.contoso.com?zipCode=54481
Note
contoso.com is a sample, nonfunctional domain. If you try this example, it won’t actually do anything!
When data is sent in a POST, it doesn’t get sent as part of the URL but as part of the HTTP request. There are two primary advantages of using POST. First, there is no limit on the length of the data that can be sent in a POST request. With GET requests, there are limitations on the length of the URL, and those limits differ by browser and browser version. The second advantage to POST requests is that it provides a tiny amount of additional security. With a GET request, a user can easily see the variable names and values being sent to the server and might be inclined to see what happens if those variables are changed. With a POST request, the values don’t appear in the user’s address bar, though the user still controls the values and can therefore change them.
This exercise shows how to build elements of a web form using AJAX. It uses a server-based program to retrieve data and display it back on the page. This exercise assumes that you’ve completed the previous exercise for a server program to display four names of trees found in my yard. This code can be found as inter.html and inter.js in the companion content.
To begin the exercise, open the StartHere project.
Open the index.html file, delete any existing code in the file, and replace it with the following:
<!doctype html>
<html>
<head>
<title>Start Here</title>
<script type="text/javascript" src="js/jquery-1.7.1.min.js"></script>

<script type="text/javascript" src="js/external.js"></script>
</head>
<body>
    <form name="myForm" id="myForm" method="get">
        <label id="treeNameLabel" for="treeName">
        </label>
    </form>
</body>
</html>
Save index.html.
Open external.js, deleting any code in the file. Replace it with the following code, noting the name and URL used for the WebForm1.aspx. This might need to change based on the name you’re using for the server program in your environment.
$(document).ready(function () {
    $.get('/WebForm1.aspx', function (resp) {
        var splitResp = resp.split("|");
        var splitRespLength = splitResp.length;
        for (var i = 0; i < splitRespLength; i++) {
            $("#treeNameLabel").append('<input type="checkbox"' +
                    'name="treeName" value="' + splitResp[i] +
                    '">' + splitResp[i] + '<br />'),
        }

    });
});
Save external.js.
Run this project, or view index.html in a web browser. You’ll get a page like the one shown in Figure 6-7.
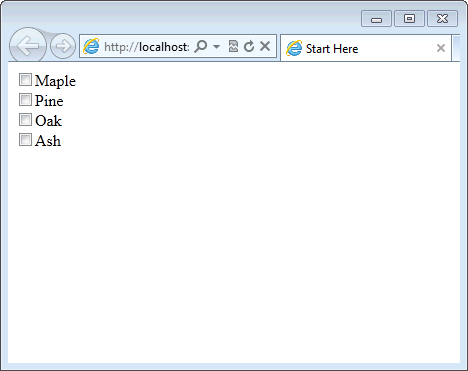
This exercise retrieved the names of trees from a server program and used that data to build check boxes on a form. I’ll examine the JavaScript and jQuery used.
The first thing in external.js is a call to the ready() function, as shown in the following code block, so that the code will be executed after the DOM is available. If this isn’t wrapped inside of the ready() function, there’s a good chance that the JavaScript will execute prior to all of the necessary form elements being available, which results in a mess indeed.
$(document).ready(function () {The get() function, shown next, is called to create a GET request to the server with the URL /WebForm1.aspx. The response is then fed into an anonymous function that I defined.
$.get('/WebForm1.aspx', function (resp) {First the function splits the response, where it finds the pipe (|) character. Delimiting my source data with the pipe character makes it easy to split it like this. The results of that split are placed in a variable called splitResp:
var splitResp = resp.split("|");Because the splitResp variable will be used in a loop, the length of the splitResp array is set next into a variable called splitRespLength. Note that this isn’t strictly necessary, but it does provide an ever-so-slight performance improvement:
var splitRespLength = splitResp.length;
Next, a for loop is created. This is the heart of the code and where each form element is created:
for (var i = 0; i < splitRespLength; i++) {This line, split up over three lines, appends an <input> element to the label with id treeNameLabel. The for loop structure seen here is the same as previously seen throughout the book. The addition here is the jQuery append() function, which builds and places HTML inside of the selected element:
    $("#treeNameLabel").append('<input type="checkbox"' +
            'name="treeName" value="' + splitResp[i] +
            '">' + splitResp[i] + '<br />'),
}
Finally, the functions are closed:
    });
});
Later in this chapter, you’ll see how to send data into a server program and retrieve the results using AJAX.
So far, you’ve seen what happens when an AJAX call works. Unfortunately, calls to server programs don’t always work. This is especially true when you send data into the program, but also it could be a problem created by something as simple as the URL being incorrect or a bad Internet connection. This section looks at the simple and easy error handling available as part of the get() and post() functions in jQuery.
As previously stated, the get() and post() functions are shortcuts to the ajax() function. The ajax() function defines several additional parameters that aren’t defined in the shortcut get() and post() functions. Of note is an error-handler option. However, that option is also accessible by both get() and post() as well, through the use of the error() function. The error() function is chained as part of the call to get() or post() and defines what to do when an error is encountered. Example time!
In this section, you’ll add an error handler and then create an error condition to check your work. This code can be found as errorhandler.html and errorhandler.js in the companion content.
Open your StartHere project, and begin with the code from the previous exercise.
Within external.js, add a call to the error() function. This error() function will be called whenever there’s a problem retrieving data from the AJAX server program. For this instance, you’ll put a placeholder tree type (Birch) in the form that will be shown whenever there’s an error. It’s just as valid to place an error message indicating that the tree types couldn’t be found instead of using this approach. Which one you choose depends on your needs. The error handling code to add looks like this:
.error(function () {
        $("#treeNameLabel").append('<input type="checkbox"' +
                    'name="treeName" value="Birch"' +
                    '>Birch<br />'),
    });
That code should be appended, or chained, to the get() function. The final version of external.js should look like this:
$(document).ready(function () {
    $.get('/WebForm1.aspx', function (resp) {
        var splitResp = resp.split("|");
        var splitRespLength = splitResp.length;
        for (var i = 0; i < splitRespLength; i++) {
            $("#treeNameLabel").append('<input type="checkbox"' +
                    'name="treeName" value="' + splitResp[i] +
                    '">' + splitResp[i] + '<br />'),
        }
    }).error(function () {
        $("#treeNameLabel").append('<input type="checkbox"' +
                    'name="treeName" value="Birch"' +
                    '>Birch<br />'),
   });
});
With that code in place and external.js saved, run the project or view index.html. You shouldn’t notice anything different, the get() function should still work as it did before, and the browser should show a page like the one shown in Figure 6-7. If this doesn’t work, be sure you added the error() function in the right place, noting specifically that there’s a single dot (.) used to chain the get() and error() functions together. Next you’ll intentionally create an error condition in order to test the error hander.
Close the browser or stop the project.
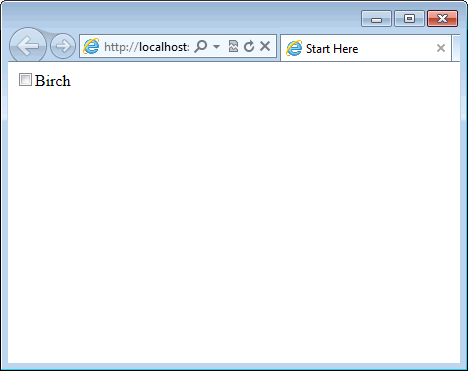
In external.js, change the URL within the get() function to a file that you know doesn’t exist. For example, in the code shown, the URL is /WebForm1.aspx. By changing that to WebForm67.aspx, an error condition will be created because WebForm67.aspx doesn’t exist. That new line of code looks like this:
$.get('/WebForm67.aspx', function (resp) {Save external.js.
Now run the project or view index.html again. This time you’ll be presented with a browser window with only one check box, for Birch, as depicted in Figure 6-8.
Close your browser or stop the project.
Change WebForm67.aspx back to WebForm1.aspx, and rerun the project or view index.html. You’ll be presented with a page like the one shown in Figure 6-7, with all of the options.
In this exercise, you added a backup plan, something to show the user when an error occurs with the AJAX call.
The examples you’ve seen so far use a simple data structure, one that can easily be represented and separated by a pipe character. However, you’ll frequently need to represent more complex data structures and then consume them through AJAX. One way to pass this data back and forth is by using XML, the X in AJAX. However, XML requires a lot of extraneous data just to open and close data elements. For example, consider this XML to represent a person:
<person>
    <firstname>Steve</firstname>
    <lastname>Suehring</lastname>
    <emailAddresses>
        <primaryEmail>[email protected]</primaryEmail>
        <secondaryEmail>[email protected]</secondaryEmail>
    </emailAddresses>
    <username>suehring</username>
    <lastSignon>10/19/2007</lastSignon>
</person>
All of the opening and closing tags for each element need to be passed from the server program to the client and then parsed. This can add up quickly, especially when considering data exchanged over slower mobile networks, not to mention the overhead to parse it on the client. Luckily, there’s a better data exchange format available, known as JavaScript Object Notation (JSON). That same person structure shown with XML looks like this:
{
    "person": {
        "firstname": "Steve",
        "lastname": "Suehring",
        "emailAddresses": {
            "primaryEmail": "[email protected]",
            "secondaryEmail": "[email protected]"
        },
        "username": "suehring",
        "lastSignon": "10/19/2007"
    }
}
The JSON-formatted data is much less verbose, but you don’t lose any readability—you can easily still see which fields are which. Note that JSON and XML are not equivalent, though. See http://www.json.org/fatfree.html for more information on the two formats.
jQuery includes functions to retrieve JSON from a server as well as functions to parse and work with JSON, thus making it the preferred data-exchange format for nearly all AJAX interactions.
The next exercise converts the previous exercise’s code into JSON format, both on the server side and the JavaScript client side. This code can be found as getjson.html and getjson.js in the companion content, and the code ties to the server program getjson.aspx in the companion content.
Open your StartHere Project if it’s not already open.
You’ll first change the server program to return JSON-formatted data. Open WebForm1.aspx, removing any code that’s there and replacing it with the following (also found as getjson.aspx in the companion content):
<%
    Dim str = "{ ""Trees"": { " & _
        " ""0"": ""Maple""," & _
        " ""1"": ""Pine""," & _
        " ""2"": ""Oak""," & _
        " ""3"": ""Ash""" & _
        "} }"
    Response.Write(str)
%>
Save WebForm1.aspx.
Open external.js, and delete any code within that file.
Place the following code in external.js:
$(document).ready(function () {
    $.getJSON('/WebForm1.aspx', function (resp) {
        $.each(resp["Trees"], function(element,tree) {
            $("#treeNameLabel").append('<input type="checkbox"' +
            'name="treeName" value="' + tree +
            '">' + tree + '<br />'),
        })
    }).error(function () {
        $("#treeNameLabel").append('<input type="checkbox"' +
                    'name="treeName" value="Birch"' +
                    '>Birch<br />'),
    });
});
Save external.js.
Run the project, or view index.html in your browser. You shouldn’t notice any changes from the earlier exercise, and the page should look like the one shown in Figure 6-7.
Aside from the server-side program changes to send JSON-formatted data, the only substantive changes are within external.js. In that file, the get() function is changed to getJSON(), and the next change removes the code to split the response and loop using a for loop. Instead, the jQuery each() function is used to iterate through each of the results:
$.each(resp["Trees"], function(element,tree) {Within the each() function, the same HTML code is built, with the change being that instead of the for loop variable, the variable is now named tree:):
    $("#treeNameLabel").append('<input type="checkbox"' +
    'name="treeName" value="' + tree +
    '">' + tree + '<br />'),
})
Other than those changes, external.js remains the same, as does index.html.
So far, you’ve seen examples of both get() and post() requests, and now you’ve seen getJSON(). However, you’re still missing a piece of the puzzle: how to send data to the server with AJAX.
Many forms and user interactivity elements are built with the help of AJAX. Doing so frequently requires sending data to the server for processing. The server program then sends some response data back. All of the methods shown in this chapter so far (get, post, and getJSON) can send data to the server. This section examines how to send data to the server using getJSON() and post(). You might be asking where the example is with the get() method. It’s exactly the same as the getJSON() function, so seeing getJSON() provides the functionality you need for both.
While getJSON() is fresh in your mind (and mine too hopefully), I’ll show an example using that function. jQuery enables you to send data as an extra parameter, which is how you’ll see it here. However, you can also append the data to the URL itself. Data is passed as the second parameter to the getJSON() function, and the getJSON() function automatically appends it to the URL as the first argument. For example, if you assume that a server program named convertTemp.aspx expects input data indicating the current temperature, the getJSON() call looks like this:
$.getJSON('convertTemp.aspx','curTemp=73',function(resp) {Data can be sent as a string, as you see here, or as a map, like so:
$.getJSON('convertTemp.aspx', { curTemp: 73 }, function(resp) {Both this and the next example with post() use a new server program. You’ll use this program to build a web application to convert temperature between Fahrenheit and Celsius. Note you need to make a slight change to this program to use it with post(), and that will be shown later. This particular code is found as tempconvert.html and tempconvert.js in the companion content, and the server program is called tempconvert.aspx.
To begin this exercise, open your StartHere project.
Open WebForm1.aspx, and remove any existing code in the file.
Place the following code into WebForm1.aspx:
<%
    Dim inputTemp As String
    Dim inputTempType As String
    Dim outputTemp As Integer
    Dim outputTempType As String
    If IsNothing(Request.QueryString("temp")) Then
        inputTemp = ""
    Else
        inputTemp = CInt(Request.QueryString("temp"))
    End If
    If IsNothing(Request.QueryString("tempType")) Then
        inputTempType = ""
    Else
        inputTempType = Request.QueryString("tempType")
    End If
    If inputTempType = "f2c" Then

      outputTemp = (inputTemp - 32) * (5 / 9)
        outputTempType = "C"
    End If
    If inputTempType = "c2f" Then
        outputTemp = inputTemp * (9 / 5) + 32
        outputTempType = "F"
    End If
    Dim str = "{ ""Temp"": """ & outputTemp & """ " & _
        " ""TempType"": """ & outputTempType & """ " & _
        "}"
    Response.Write(str)
%>
This server-side program looks for input variables as part of a GET request. The variables are called temp and tempType, and you’ll create a form with those variables next.
Save WebForm1.aspx.
Open index.html, and remove any existing HTML from the file.
Place the following HTML into index.html:
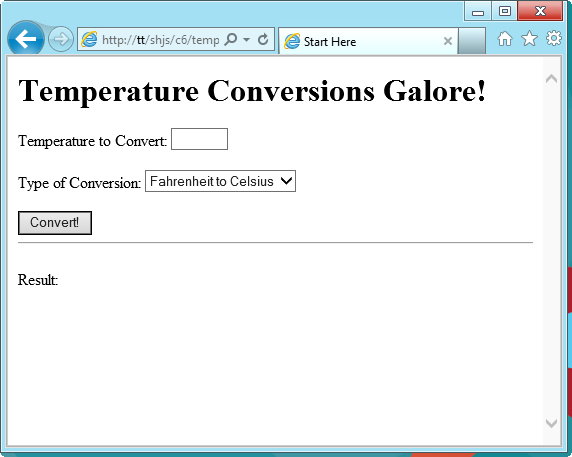
<!doctype html>
<html>
<head>
<title>Start Here</title>
<script type="text/javascript" src="js/jquery-1.7.1.min.js"></script>
<script type="text/javascript" src="js/external.js"></script>
</head>
<body>
    <h1>Temperature Conversions Galore!</h1>
    <form name="myForm" id="myForm" method="get">
        <label id="tempLabel" for="temp">
            Temperature to Convert:
            <input type="text" size="5" name="temp" id="temp" />
        </label>
        <br />
        <br />
        <label id="tempTypeLabel" for="tempType">
            Type of Conversion:
            <select name="tempType" id="tempType">
                <option value="f2c">Fahrenheit to Celsius</option>
                <option value="c2f">Celsius to Fahrenheit</option>
            </select>
        </label>
        <br />
        <br />
        <input type="submit" value="Convert!" name="submit" id="submit" />
        <br />
        <hr />
        <br />
        <span id="resultText">Result: <span id="result"></span></span>
    </form>
</body>
</html>
Save index.html.
Open external.js, and remove any existing code from that file.
Place the following code into external.js:
$(document).ready(function () {
    $('#myForm').on('submit', function () {
        var inputTemp = $('#temp').val();
        var inputTempType = $('#tempType').val();
        $.getJSON('/WebForm1.aspx',
        { "temp": inputTemp, "tempType": inputTempType },
            function (resp) {
            $("#result").text(resp["Temp"] + " " + resp["TempType"]);
        }).error(function () {
            $("#result").text('An unknown error has occurred.'),
        });
        return false;
    });
});
Save external.js.
Now view index.html in a web browser. You’ll see a page like the one in Figure 6-9.
Enter a number such as 50 into the Temperature To Convert text field, and click Convert! button.
You’ll see the result in the Result area on the page, as shown in Figure 6-10.
Use the drop-down list, and enter in other temperatures to test your new temperature-conversion web application.

The JavaScript for this exercise looked like this:
$(document).ready(function () {
    $('#myForm').on('submit', function () {
        var inputTemp = $('#temp').val();
        var inputTempType = $('#tempType').val();
        $.getJSON('/WebForm1.aspx',
        { "temp": inputTemp, "tempType": inputTempType },
            function (resp) {
            $("#result").text(resp["Temp"] + " " + resp["TempType"]);
        }).error(function () {
            $("#result").text('An unknown error has occurred.'),
        });
        return false;
    });
});
The first portion of this JavaScript attached a function to the submit event of the HTML form. This was explained in Chapter 5, as were the next two lines, which gather the values of the form elements temp and tempType.
Next, the getJSON() function was called.
$.getJSON('/WebForm1.aspx',The main difference here is that two data parameters were sent in as part of the getJSON() function call:
{ "temp": inputTemp, "tempType": inputTempType },Next, the response was parsed and an error handler also was used:
function (resp) {
    $("#result").text(resp["Temp"] + " " + resp["TempType"]);
}).error(function () {
    $("#result").text('An unknown error has occurred.'),
});
And finally, the default form submission behavior was prevented by returning false within the submit event:
return false;
Using post() is sometimes preferred to send larger amounts of data than can be handled using the query string GET method. This section shows an example of using post() to send data to a server program and, just as importantly, how to inform the post() method what type of data will be returned. In this case, JSON data will be returned and post() needs to be told that explicitly, as you’ll see. You can find the code as tempconvert-post.html and tempconvert-post.js in the companion content, and the server program is tempconvert-post.aspx.
Open your StartHere project if it’s not already open.
If you followed the previous example, open WebForm1.aspx and change each of the Request.QueryString parameters to simply Request, like so:
Request("temp")Here’s the full code for the post() version of the temperature converter, noting that the only changes are to how the data is retrieved by the server program:
<%
    Dim inputTemp As String
    Dim inputTempType As String
    Dim outputTemp As Integer
    Dim outputTempType As String
    If IsNothing(Request("temp")) Then
        inputTemp = ""
    Else
        inputTemp = CInt(Request("temp"))
    End If
    If IsNothing(Request("tempType")) Then
        inputTempType = ""
    Else
        inputTempType = Request("tempType")
    End If
    If inputTempType = "f2c" Then
        outputTemp = (inputTemp - 32) * (5 / 9)
        outputTempType = "C"
    End If
    If inputTempType = "c2f" Then
        outputTemp = inputTemp * (9 / 5) + 32
        outputTempType = "F"
    End If
    Dim str = "{ ""Temp"": """ & outputTemp & """, " & _
        " ""TempType"": """ & outputTempType & """ " & _
        "}"
    Response.Write(str)
%>
Save WebForm1.aspx.
Open index.html, and change the form’s method to POST, as shown here:
<form name="myForm" id="myForm" method="POST">
Save index.html.
Open external.js, and remove any code in that file.
Inside of external.js, place the following code:
$(document).ready(function () {
    $('#myForm').live('submit', function () {
        var inputTemp = $('#temp').val();
        var inputTempType = $('#tempType').val();
        $.post('/WebForm1.aspx',
            { "temp": inputTemp, "tempType": inputTempType },
            function (resp) {
                $("#result").text(resp["Temp"] + " " + resp["TempType"]);
            },
            "json"
        ).error(function () {
          $("#result").text('An unknown error has occurred.'),
        });
        return false;
    });
});
Save external.js.
View index.html in a web browser. You should be presented with the same page as in the previous exercise. (See Figure 6-9.) And if you enter the same temperature, 50, you should receive the same result.
This exercise showed how to use the post() function to send data to a server and retrieve JSON-formatted results. The first of two substantive changes to the JavaScript used here was to change from getJSON to post:
$.post('/WebForm1.aspx',The second change, and the one that’s sometimes more difficult to place correctly, is the addition of the dataType parameter. That was accomplished with the string json, but that string needed to be placed after the success function, as you saw in the code. Getting all of the parentheses and braces placed correctly takes some practice and trial and error as well.
This chapter looked at interacting with servers using JavaScript. In the chapter, you saw the difference between the HTTP GET and POST methods and saw how to build an AJAX request for interacting with a program on a server.
You built several server-based programs in this chapter, including one to convert temperatures. The server-side programs were used by JavaScript programs that you wrote. Those programs used a combination of JavaScript and jQuery to retrieve and work with the data from the server.
The temperature conversion program built in this chapter isn’t very nice-looking, but it gets the job done. In the next chapter, you’ll look at how to style webpages with Cascading Style Sheets (CSS) and JavaScript to make pages look better and provide a better overall user experience.