Chapter 1
Azure Blob Storage
Overview
Microsoft Azure provides an object storage solution called Blob Storage that enables organizations to store large volumes of unstructured data in the cloud. The unstructured data can consist of text data such as log files, XML files, or binary data, such as images, audio, and video files.
The storage allows you to access the unstructured data in many ways, such as the following:
Applications can connect using REST APIs over HTTP/HTTPS.
Users and clients can connect and access the blobs using Azure portal, Azure PowerShell, Azure CLI, or Azure Storage client libraries.
Azure Blob Storage supports various programming languages, including .NET, Python, Node.js, PHP, Java, and Ruby. This enables developers to integrate Azure Blob Storage to meet the needs of various applications to extend or replace the existing underlying storage.
Key concepts
This section explains each of the components that make up the Azure Blob Storage service and the various redundancy types supported for blob storage. It also provides a better understanding of how you can connect to and access a blob storage account using blob endpoints, and of how to manage blob storage encryption and data integrity.
Storage components
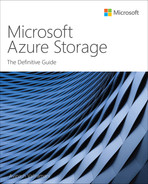
Azure Blob Storage has three main components:
Storage account Every storage account in Azure has a unique namespace that helps construct the unique base address for every blob stored in that storage account. The unique base address is a combination of the storage account name and the Azure Blob Storage endpoint address.
Containers Containers are like folders in a Windows directory structure, and similar to folders, containers store blobs that are the text and binary data files.
Blobs Blobs are text or binary data, such as audio, video, log, image, csv, and other such file types. They contain the data that you want to store in that storage account. There are three blob types supported by Azure Blob Storage: Block blobs, Append blobs, and Page blobs. We will review these in more detail in the subsequent sections.
Blobs are stored in containers. Storage accounts can hold a number of containers, making it possible to host numerous blobs in a single storage account. (See Figure 1-1.) You also can create multiple storage accounts in a single Azure subscription spread across different Azure regions, depending on your needs.
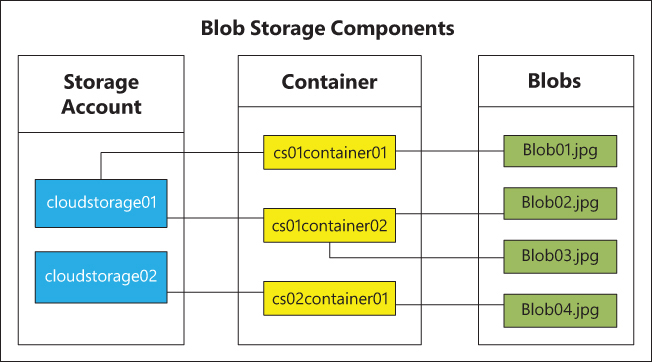
FIGURE 1-1 Account, container, and blob structure.
Storage accounts
A storage account is a unique namespace that contains containers and blobs. Every blob stored in a storage account has a unique address, which is a combination of the namespace and the Azure Blob Storage endpoint. For example, for a storage account named azureblobstorageaccount, the blob endpoint address would be https://azureblobstorageaccount.blob.core.windows.net. In turn, for a blob stored in this storage account in a container named blobcontainer, the URL address would be https://azureblobstorageaccount.blob.core.windows.net/blobcontainer/blobname.extension.
Data in a storage account is accessible from anywhere in the world over HTTP or HTTPS. Data is stored in a redundant manner and is massively scalable to accommodate your organization’s expanding needs. You can create multiple storage accounts in a single Azure subscription to meet your organization’s various redundancy, latency, and usage needs.
There are three storage account types that support blobs:
Standard general purpose v2 These storage accounts support various storage types, such as blob, files, queue storage, and table storage. This is the most commonly used storage account type for Azure Blob Storage because it provides a good balance of price, speed, redundancy, and reliability to meet general storage requirements.
Premium block blobs These storage accounts support both block and append blob types. They use solid-state disks (SSDs) to provide low latency and high input/output operations per second (IOPS). This makes them ideal for applications that require high IOPS, low latency, or the storage of large volumes of small files. For example:
Data analytics and data querying across large datasets
Real-time streaming analytics
Artificial intelligence (AI)/machine learning (ML) workloads
Internet of Things (IoT) data processing and analytics
High-volume e-commerce businesses
Premium page blobs These storage accounts support page blobs only. Like premium block blobs storage, they use SSDs for low latency and high IOPS. They are ideal for storing virtual machine hard disks (VHDs) that require high transaction volume or need to support low-latency workloads.
Standard general purpose v2 storage accounts support the following types of storage:
Local-redundant storage (LRS)
Zone-redundant storage (ZRS)
Geo-redundant storage (GRS)
Read-access geo-redundant storage (RA-GRS)
Geo-zone-redundant storage (GZRS)
Read-access geo-zone-redundant storage (RA-GZRS)
In contrast, premium page blobs provide only locally redundant storage (LRS), and premium block blobs provide LRS and ZRS.
Storage costs for premium data storage are higher than for standard general v2 storage. However, transaction costs are lower. If you are storing a large volume of data, but interactions with that data would be limited or would not require fast response times, then a standard general purpose v2 storage account might be the right choice. However, if you need high IOPS and low latency, then the added costs of premium storage could be justified.
Containers
Containers help organize the block, page, or append blobs in a storage account. They provide a structure to the storage account similar to folders. So, you can organize related blobs together in a container or a set of containers.
Each storage account can hold an unlimited number of containers, and each container can hold an unlimited number of blobs, as long as the total size of these assets do not exceed the storage account’s overall size limits.
Container names must meet the following requirements:
Names must be between 3 and 63 characters long.
Names must start with either a number or a lowercase character.
Names can contain only numbers, lowercase characters, and dashes (-). No other special characters can be used.
Names cannot contain two or more consecutive dashes (--).
The name of every container within a storage account must be unique.
Blobs
Azure Blob Storage accounts support three types of blobs:
Block blobs These contain text and binary data files (referred to as blocks) that can be individually managed. File types include TXT, HTML, XML, JPG, WAV, MP3, MP4, AVI, PNG, and other similar text, image, audio, and video file formats. Each block blob contains multiple blocks indicated by a block ID. A single block blob can contain 50,000 blocks. At the time of this writing, the maximum block blob size is 190.7 tebibytes (TiB), assuming the latest service APIs for put operations are used. Block blobs are optimized to support efficient uploading of large amounts of data with multiple parallel data streams.
Append blobs These are block blobs optimized for append operations. They are ideal for log files. Append blob operations add blocks only to the end of a blob, ensuring no tampering can occur in the log file. Like block blobs, a single append blob can contain 50,000 blocks, but the current maximum append blob size is 195 gibibytes (GiB).
Page blobs These are optimized for random read and write operations. This makes them ideal for use as VMD files or as storage for platform as a service (PaaS) offerings, such as Azure SQL DB. Each page blob is a collection of 512-byte pages that provide the ability to read/write arbitrary ranges of bytes. The current maximum page blob size is 8 TiB. You can create both premium and standard page blobs based on your storage account type. Page blobs provide REST APIs to access and interact with the blobs. The underlying storage is extremely durable, making page blobs ideal for storing index-based and sparse data structures like disks for Azure VMs and Azure SQL DB storage.
Storage tiers
Blob Storage also provides multiple storage tiers, such as Hot, Cool, and Archive tiers. This enables data to be stored and accessed at different costs based on your differing user or application needs. This helps organizations use Azure Blob Storage to address various scenarios such as the following:
Audio and video streaming
Storing logs that require to be appended on an ongoing basis
Preserving data for backup or archival purposes
Storing and serving static content websites directly to the storage
Hosting Azure VM disks
Now that we have a brief understanding of the components, structure, and some of the use cases of Azure Blobs, let’s dive in to learn in more detail.
Storage redundancy types
Storage redundancy helps ensure that in the event of an outage, your data can be brought online and accessed within the specific period stated in your service level agreement (SLA). Outages can be planned or unplanned. An unplanned outage might occur due to a natural disaster, power outage, fire, cooling, network issues in the Azure datacenter, or storage hardware failures.
As mentioned in the “Storage accounts” section earlier in this chapter, Azure Blob Storage provides various levels of storage redundancy, depending on which storage account type you select for your Azure Blob Storage. These levels of redundancy (from least redundancy to most redundancy) are LRS, ZRS, GRS, RA-GRS, GZRS, and RA-GZRS. We’ll talk more about each of these levels in the sections that follow.
As the level of redundancy increases, the availability of your data increases, too—but so does the cost of storage. It is therefore important for you to consider your organization’s and application’s requirements, with respect to data availability and redundancy, along with the overall budget available for the storage, to select the storage account that’s best for your needs.
You can split your data across different storage accounts, providing different levels of redundancy based on the requirements of individual applications or application components. Some storage options also maintain an active read-only copy of your data in a secondary region. Before selecting this storage option, be sure your application is capable of using such read-only storage in the event of an outage. Also ensure that in the event of an outage in the primary region, your application will be available or recoverable in the secondary region by using the storage in that secondary region.
Locally redundant storage (LRS)
LRS is the cheapest redundancy option in Azure Blob Storage. With LRS storage, Azure maintains three replicas of your data in a single datacenter within your primary Azure region. Data is synchronously committed to each replica to ensure there is no data loss in the event of an outage. (See Figure 1-2.)

FIGURE 1-2 Locally redundant storage.
Synchronously committing and maintaining three copies of your data protects against local storage hardware, server rack, or network component failures. However, because all three replicas are stored in the same datacenter, if that datacenter experiences some type of disaster, all three copies of your data could be lost. Therefore, depending on your application, redundancy, and compliance requirements, LRS might not be the best option for you.
Zone-redundant storage (ZRS)
Like LRS, ZRS synchronously commits and maintains three replicas of your data in your primary Azure region. However, instead of storing each replica in a single datacenter, they are spread across three availability zones. (See Figure 1-3.) An availability zone is an independent datacenter in your Azure primary region with its own power, cooling, and networking components. So, if a disaster occurs in one availability zone, your data will still be accessible (unless the disaster also affects the other availability zones in that region).

FIGURE 1-3 Zone-redundant storage.
If an outage occurs in one availability zone, ZRS relies on automated network changes on the Microsoft back end to divert DNS endpoints from one zone to another, which could involve a small gap in availability. This could affect your application’s performance if it is not configured to retry connections in the event one attempt to connect fails. Still, if your organization has data governance requirements that limit the storage of data within specific geographical regions, then ZRS might not be the most appropriate option for your environment.
Geo-redundant storage (GRS)
With GRS, Azure synchronously commits and maintains three replicas of your data in your primary Azure region in LRS. Then, three more replicas of your data in a secondary Azure region (selected automatically by Microsoft) are updated to match the three replicas in the primary Azure region, again using LRS. So, you have six copies of your data spread across two geographical regions that are hundreds of miles apart. (See Figure 1-4.)

FIGURE 1-4 Geo-redundant storage.
If the datacenter in your primary region experiences an outage or disaster, then your data will be available in the datacenter in the secondary region. However, the data in the secondary region might not be available for read or write operations until the storage has failed over to the secondary region. Azure Blob Storage has a Recovery Point Objective (RPO) of less than 15 minutes for geo-replication, but there is currently no SLA on how long it takes to replicate data to the secondary region. Also, in the event of a disaster, there is a chance of some data loss if not all write operations have been replicated over to the secondary region.
Geo-zone-redundant storage (GZRS)
GZRS is just like GRS, but the three replicas of your data in the primary region use ZRS, while the replicas in the secondary region use LRS. So, there is additional redundancy in the primary region. (See Figure 1-5.) The SLA for GZRS is similar to GRS.
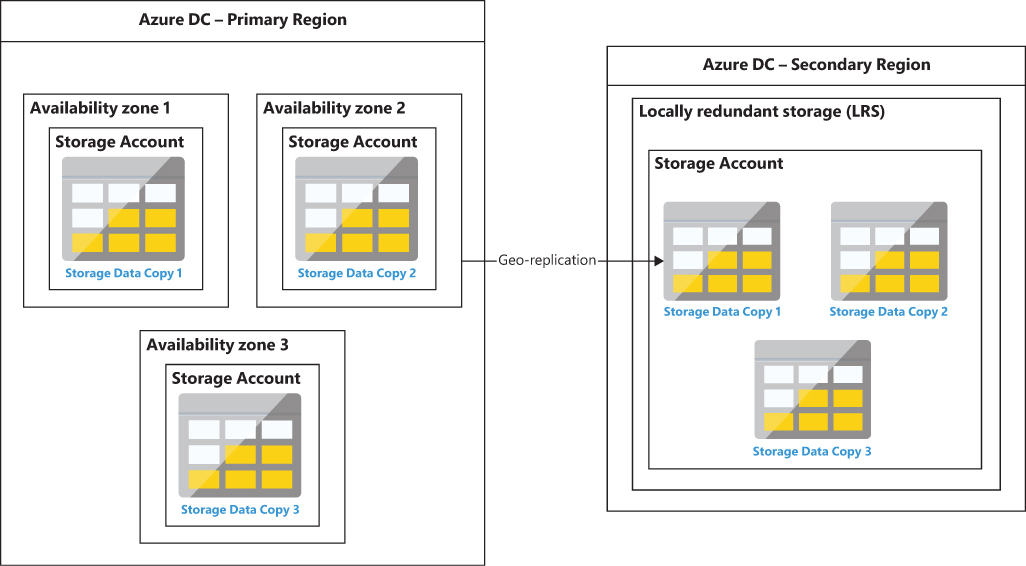
FIGURE 1-5 Geo-zone-redundant storage.
Read-only geo-redundant storage (RA-GRS) and read-only geo-zone-redundant storage (RA-GZRS)
RA-GRS and RA-GZRS function in the same manner as GRS and GZRS, respectively. The only difference is that RA-GRS and RA-GZRS provide the ability to perform read operations on the secondary region in case of an outage in the primary region. (See Figure 1-6.) This allows your application to function partially while the storage is failed over to the secondary site. Also, while Microsoft manages the failover of the geo-redundant storage in the event of a disaster in the primary Azure region, you can perform a manual failover to the secondary region if you are using a standard general purpose v2 storage account.

FIGURE 1-6 Read-only geo-redundant storage and read-only geo-zone-redundant storage.
Storage endpoints
Every Azure Blob Storage account has a storage endpoint, accessible from an HTTP/HTTPS connection, that provides access to blobs stored in that account. The URL for the storage endpoint is a combination of the storage account namespace and a static predefined suffix. For Azure Blob Storage accounts, this is https://<storage-account-name>.blob.core.windows.net. (This is why, when you define a name for your storage account, it is validated against all existing storage accounts globally in Azure to ensure it is unique.)
The URL for a particular blob simply appends the container and blob name to the storage endpoint URL. For example, a blob named blob01 stored in a container named blobcontainer in a storage account named myblobstorageaccount would have the URL https://myblobstorageaccount.blob.core.windows.net/blobcontainer/blob01.
Storage encryption for at-rest data
Azure Blob Storage accounts use AES 256-bit encryption to transparently encrypt and decrypt data. Encryption is applied on the underlying disks, similar to BitLocker encryption on Windows. As a result, the end client does not require access to the key to read or write from the storage account. This ensures that the underlying disks cannot be read when removed from the storage in the Azure storage cluster without access to the encryption key.
Azure Storage encryption is enabled by default on all Azure Blob Storage accounts and cannot be disabled. This applies regardless of the storage redundancy selected and the storage tier selected. This encryption extends even to the object metadata. This is offered at no additional charge.
The keys used for encryption can be Microsoft-managed, customer-managed, or customer-provided. Customers can select which type to use based on their organizational requirements for handling data within each storage account. Customer-managed keys must be stored in Azure Key Vault or Azure Key Vault Managed Hardware Security Model (HSM). With customer-provided keys, the client connecting to the blob for a read or write operation can provide the key along with the access request to allow the data to be encrypted and decrypted at that time.
Azure Blob Storage also offers infrastructure encryption, which offers encryption on the infrastructure level and on the storage service level. This uses 256-bit AES encryption. With infrastructure encryption, the encryption keys are different from the ones used for service-level encryption, even if Microsoft is managing them both. This ensures that a breach in one level does not compromise the other level. You cannot use customer-managed keys for infrastructure encryption.
Depending on which option you choose, as a best practice, you might need to devise a key-hosting and rotation strategy to ensure keys are rotated on a regular basis but can still be accessed by the blob storage service for read/write operations. If you choose Microsoft-managed encryption keys, then Microsoft ensures those keys are available to the service for operational use and rotates the keys on a regular basis. (You cannot change the frequency at which this occurs.)
Storage data integrity
Azure regularly verifies data stored in an Azure Blob Storage account using cyclic redundancy checks (CRCs). These check for data corruption or integrity issues. If any such issues are detected, repairs are performed using the redundant data copies.
Storage account walkthrough
The following sections step you through the process of setting up an Azure Blob Storage account using the Azure portal, Azure PowerShell, and Azure CLI.
Using Azure portal
To set up an Azure Blob Storage account using the Azure portal, follow these steps:
Log in to the Azure portal, type storage in the search box, and select storage accounts from the list that appears. (See Figure 1-7.)
FIGURE 1-7 Search for storage accounts in the Azure portal.
On the Storage Accounts page (see Figure 1-8), click the Create Storage Account button.

FIGURE 1-8 Create a storage account.
In the Basics tab of the Create a Storage Account wizard (see Figure 1-9), enter the following information and click Next:
Subscription Select the subscription in which you want to create the Azure Blob Storage account.
Resource Group Select an existing resource group or create a new one in which to create the Azure Blob Storage account.
Storage Name Enter a unique name for the storage account.
Region Select the Azure region you want to host the storage account.
Performance Select the Standard or Premium option button, depending on your needs.
Redundancy Select the redundancy type you want to use for the storage.
Make Read Access to Data Available in the Event of Regional Unavailability Select this check box.

FIGURE 1-9 The Basics tab of the Create a Storage Account wizard.
In the Advanced tab (see Figure 1-10), select the Default to Azure Active Directory Authorization in the Azure Portal check box, leave the other options set to their default values, and click Next.

FIGURE 1-10 The Advanced tab of the Create a Storage Account wizard.
In the Networking tab of the Create a Storage Account wizard (see Figure 1-11), for the sake of example, leave the Network Connectivity and Network Routing options set to their default values (Enable Public Access from All Networks and Microsoft Network Routing, respectively) and click Next.

FIGURE 1-11 The Networking tab of the Create a Storage Account wizard.
In the Data Protection tab (see Figure 1-12), leave the options set to their default values (unless your organization data-protection requirements dictate otherwise) and click Next.

FIGURE 1-12 The Data Protection tab of the Create a Storage Account wizard.
In the Encryption tab (see Figure 1-13), select the Enable Infrastructure Encryption check box, leave the other options set to their default values, and click Next:

FIGURE 1-13 The Encryption tab of the Create a Storage Account wizard.
In the Tags tab (see Figure 1-14), enter any tags you want to associate with the Azure Blob Storage account and click Next.

FIGURE 1-14 The Tags tab of the Create a Storage Account wizard.
In the Review tab (see Figure 1-15), review your settings. Then click Create to create the Azure Blob Storage account.

FIGURE 1-15 The Review tab of the Create a Storage Account wizard.
After the account is created, click Go to Resource to access the new account’s page. (See Figure 1-16.)

FIGURE 1-16 Storage deployment completion.
Your next step is to create a container inside the new storage account.
In the left pane of the Azure Blob Storage account page, click Containers. Then click the Container button in the pane that opens on the right. (See Figure 1-17.)

FIGURE 1-17 The Containers page for the new storage account.
On the New Container page, enter the following details and click Create. (See Figure 1-18.)
Name Enter a unique name for the container.
Public Access Level Select Private.
Encryption Scope Leave these options set to their default values.

FIGURE 1-18 Create a new container.
The new container appears in the account’s Container page. (See Figure 1-19.) Now you’re ready to upload a blob (files) to the new container.
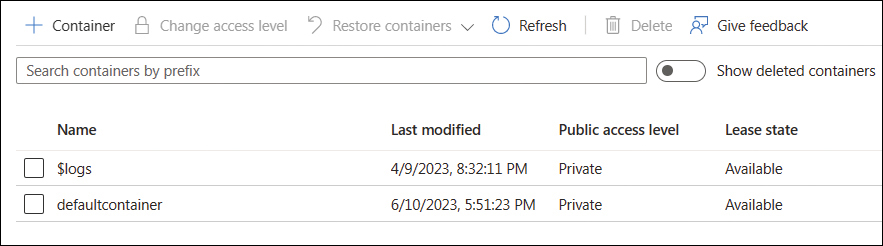
FIGURE 1-19 The new container appears in the Container page.
Click the container.
In the right pane of the container’s Overview page (see Figure 1-20), click the Upload button.

FIGURE 1-20 Start the blob upload.
In the Upload Blob dialog box (see Figure 1-21), enter the following information (leave the rest of the options set to their default values) and click Upload:
Files Select the files to upload. You can select a single or multiple files.
Overwrite If Files Already Exist Since this is the first upload, leave this unchecked.
Authentication Type Select Account Key.

FIGURE 1-21 Upload Blob dialog box.
When the upload is complete, the file(s) you selected will appear in the container’s Overview page. (See Figure 1-22.)

FIGURE 1-22 The files are uploaded to the container.
Using Azure PowerShell
Use the following Azure PowerShell code to create an Azure Blob Storage account and container and add a blob to it:
#Define required variables
$resourceGroup = "RG01"
$region = "eastus"
$storageaccname = "mbspblobstorage01"
$container = "container"
$vnet = "vNET01"
$subnet = "default"
$endpointname = "PrivateEndpoint"
$vaultname = "RecoveryServicesVault01"

#Create Azure Blob storage account
New-AzResourceGroup -Name $resourceGroup -Location $region

$storageAccount = New-AzStorageAccount `
    -ResourceGroupName $resourceGroup `
    -Name $storageAccName `
    -Location $region `
    -Kind StorageV2 `
    -AllowBlobPublicAccess $true `
    -SkuName Standard_RAGRS `
    -MinimumTlsVersion TLS1_2

#Create container
New-AzStorageContainer `
                       -Name $Container `
                       -Context $storageAccount.Context `
                       -Permission Blob

#Upload data to  Blob storage
cd "~/CloudDrive/"
Get-Date | Out-File -FilePath "TextFile01.txt" -Force

Set-AzStorageBlobContent `
   -Context $storageAccount.Context `
   -container $container `
   -File "TextFile01.txt" `
   -Blob "TextFile01.txt"

#Verify data in  Blob Storage
Get-AzStorageBlob  `
   -Context $storageAccount.Context `
   -container $container `  |
  Select-Object -Property Name

# Download file from  Blob Storage
Get-AzStorageBlobContent  `
    -Context $storageAccount.Context `
    -container $container `
    -Blob "TextFile01.txt" `
    -Destination ".TextFile01.txt" `
    -Force
Using Azure CLI
Use the following code to create an Azure Blob Storage account and container and add a blob to it in the Azure CLI:
#Define required variables
resourceGroup="RG01"
region="eastus"
storageaccname="mbspblobstorage01"
container="container"
directory="directory"
vnet="vNET01"
subnet="default"
endpointname="PrivateEndpoint"
vaultname="RecoveryServicesVault01"

#Create Azure Blob Storage account
az group create
    --name $resourceGroup
    --location $region

az storage account create
    --name $storageaccname
    --resource-group $resourceGroup
    --location $region
    --kind StorageV2
    --sku Standard_ZRS
    --encryption-services blob
    --output none
    --min-tls-version TLS1_2
    --allow-blob-public-access true

#Create container
az storage container create
    --account-name $storageaccname
    --name $container

#Upload data to Blob container
cd ~/clouddrive/
date > TextFile01.txt

az storage blob upload
    --account-name $storageaccname
    --container-name $container
    --name TextFile01.txt
    --file TextFile01.txt

#Verify data in container
az storage blob list
    --account-name $storageaccname
    --container-name $container
    --output table

# Download file from container
az storage blob download
    --account-name $storageaccname
    --container-name $container
    --name TextFile01.txt
    --file "./TextFile01.txt"
Data access authorization
To access data in Azure Blob Storage, the client application you use for the access request must be authorized. Azure supports three main authorization methods:
Azure Active Directory (Azure AD)
Shared Key authorization
Shared access signature (SAS) key
In addition to these methods, Azure supports the following less-secure methods:
Anonymous public read access This method allows anyone to connect to the blob storage to read data without authorization. This is not recommended for use and can be disabled on the storage account level. Disabling this prevents containers within the storage account from being used to share blobs with anonymous access.
Storage local users This approach can be used to authorize access to blob storage only when accessing the storage via Secure File Transfer Protocol (SFTP). Permissions are defined on the storage container level for the storage local user. You can then provide the credentials to the connecting party, who can use the password or the public SSH key in a public-private key pair to access the storage over SFTP.
Azure Active Directory (Azure AD)
Integrating Azure Blob Storage with Azure AD is the recommended data-authorization approach (as long as your application supports it). It uses built-in Azure role-based access control (RBAC) to perform identity-based authorization and grant access permissions to users, groups, or an application service principal. (These are called security principals.) Azure AD also enables you to leverage Azure attribute-based access control (ABAC) to add conditions to Azure role assignments for more granular access to resources in Azure Blob Storage.
When you use this method to authenticate access to an Azure Blob Storage account, the security principal first authenticates against Azure AD. When this occurs, Azure AD generates an OAuth 2.0 token, which the security principal can then use to gain authorization to the Azure Blob Storage service.
Azure ABAC
If you require fine-grained access to the Azure Blob Storage resources, you can use Azure ABAC to configure conditions for role assignments. With Azure ABAC, you can limit access on a more granular basis and to specific resources within the Azure Blob Storage account. Azure ABAC defines access levels based on attributes associated with security principals, resources, and requests. Conditions can be based on the following attributes:
Account name
Blob index tags
Blob path
Blob prefix
Container name
Encryption scope name
Is current version
Is hierarchical namespace enabled
Snapshot
Version ID
Resource scope
When planning the RBAC strategy for your environment, it is a good practice to first define the scope of the access that you would like each security principal to have. This helps ensure that access is limited to a specific set of resources in an Azure subscription. The levels at which you can scope access include the following:
Azure management group A management group is a combination of multiple subscriptions. This scope allows access to all storage accounts in all resource groups within all subscriptions in that management group. This is the widest scope for which you can provide access. Microsoft recommends against allowing this scope for client applications that require access only to specific Azure Blob Storage resources.
Azure subscription Access is granted to all resource groups and to all Azure Blob Storage accounts and containers within those resource groups.
Azure resource group Access is granted to all Azure Blob Storage accounts and all storage containers within that resource group.
Azure storage account Access is granted to all Azure Blob Storage containers within that storage account.
A single Blob Storage container Access is granted to a specific container and all objects and metadata in that container. This is the narrowest scope of access and is generally the recommended approach.
Built-in roles for RBAC
Azure provides multiple built-in RBAC roles to authorize access to blob data using Azure AD and OAuth. These include the following:
Storage Blob Data Contributor Grants read/write/delete permissions to the Azure Blob Storage resources.
Storage Blob Data Reader Grants read-only access permissions to the Azure Blob Storage resources.
Storage Blob Delegator Grants access to obtain a user delegation key to then create a SAS URL signed with Azure AD credentials for a container or blob (more on signed URLs in a moment).
Shared Key
This authorization approach uses the storage account key to authorize access to the Azure Blob Storage account. The client application signs every request using the storage account key, which provides root access to the entire storage account and all containers and blobs stored within it.
Azure Blob Storage supports the following Shared Key authorization schemes for version 2009-09-19 and later:
Shared Key for blob, queue, and file services This authorization scheme is used to make requests against the blob, queue, and file services. Shared Key authorization in version 2009-09-19 and later supports an augmented signature string for enhanced security. (You must update your service to authorize the use of this augmented signature.)
Shared Key Lite This authorization scheme is used to make requests against the blob, queue, table, and file services. For version 2009-09-19 and later of the blob and queue services, Shared Key Lite authorization supports using a signature string identical to what was supported against Shared Key in previous versions of the blob and queue services. You can therefore use Shared Key Lite to make requests against the blob and queue services without updating your signature string.
Shared Key authorization requires you to store your storage account keys in your application. Any breach or misconfiguration in the application code that results in the key being exposed can result in data exfiltration. It is, therefore, advised to use this method only in testing or staging environments, and to leverage Azure AD or SAS keys (discussed next) for production deployments.
Shared Keys walkthrough
The following section walks you through the process of creating Shared Keys using the Azure portal.
Using Azure portal
To set up Shared Keys using the Azure portal, follow these steps:
In the left pane of the Azure Blob Storage account page, click Access Keys.
The Access Keys page opens, with two keys displayed. (See Figure 1-23.) You can use the keys in the application configuration as needed.
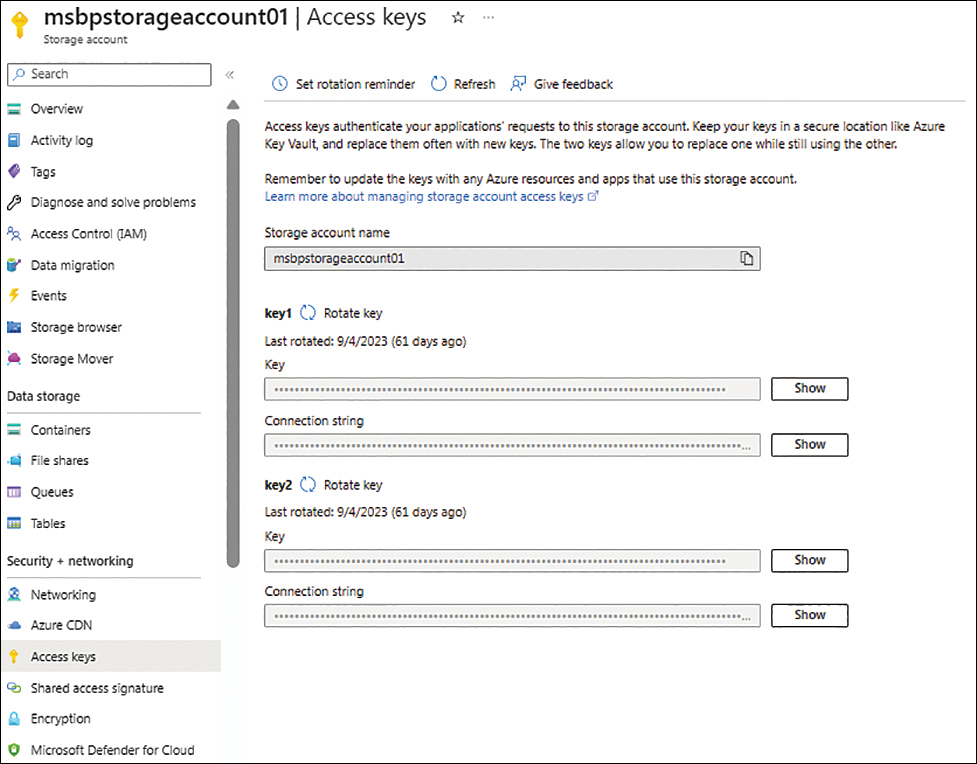
FIGURE 1-23 The Access Keys page for the storage account.
To see a key’s value, click the Show button next to the Key box.
To see a key’s connection string, click the Show button next to the Connection String box.
To set a reminder to rotate the keys on a regular basis, click Set Rotation Reminder near the top of the Access Keys page.
In the Set a Reminder to Rotate Access Keys dialog box (see Figure 1-24), enter the following information and click Save:
Enable Key Rotation Reminders Select this check box.
Send Reminders Choose an option from this drop-down list. (I chose Custom.)
Remind Me Every Enter a value and a unit (in this case, 60 and Days) to indicate how frequently you want to be reminded to rotate access keys.

FIGURE 1-24 The Set a Reminder to Rotate Access Keys dialog box.
When you set up a reminder to rotate the access key, Azure does not automatically generate a new access key at that time. The key rotation has to be performed manually.
Click Yes to confirm that you want to generate a new access key. (See Figure 1-25.)

FIGURE 1-25 Generating a new access key.
Shared access signature (SAS)
If you are unable to employ Azure AD for blob authorization, you can provide access using a shared access signature (SAS) for authorization. This involves generating a SAS uniform resource locator (URL) to define access to storage resources based on permission levels, object types (blob, file, queue, or table), allowed IP ranges, and allowed protocols (HTTP or HTTPS), for a period that you specify. Client applications can then use the SAS URL to gain access to the defined storage resources in a time-bound manner without sharing the storage account key or exposing the storage resource to unauthorized security principals.
There are three types of shared access signatures:
Account-level SAS When you create an account-level SAS, it delegates access to resources in one or more storage services. This allows you to provide access to resources in a blob, queue, file, and table at the same time using a single account-level SAS URL. An account-level SAS also allows you to grant access to service-level operations that are currently not supported using a service-level SAS (discussed next). These include write and delete operations for Azure Blob Storage containers.
Service-level SAS With a service-level SAS, access is delegated to a single service and the resources within that service. You can define the level of access to provide, and client application operations will be limited accordingly. With this approach, a SAS token is generated that contains a query string with the permission, protocol, IP ranges, and validity parameters, and is signed using the storage account keys. The URL for a service-level SAS consists of the URL to the resource to which the SAS grants access, followed by the SAS token. A service-level SAS can also reference a stored access policy, which provides an added layer of control over a set of signatures. This includes the ability to modify or revoke access to the resource if necessary.
User-delegation SAS This is a SAS URL signed using Azure AD user credentials. If you must use SAS rather than Azure AD, this is the recommended approach. With user-delegation SAS, you first request a user delegation key and then generate the SAS URL. So, there are two layers of authorization checks: one based on the Azure AD user’s RBAC permissions and another on the additional restrictions defined in the SAS URL itself. With this approach, there is no storage key stored in your application code, making it highly secure.
Shared access signature (SAS) walkthrough
The following sections step you through the process of setting up SAS authorization by first creating a shared access token, URL, and a stored access policy using the Azure portal, Azure PowerShell, and Azure CLI.
Using Azure portal
To set up SAS authorization using the Azure portal, follow these steps:
Navigate to the page for the container in your storage account for which you want to set up SAS authorization.
In the left pane of the container page, click Shared Access Token.
On the Shared Access Tokens page (see Figure 1-26), enter the following information, and click the Generate SAS Token and URL button:
Signing Method Select the Account Key option button (the default).
Signing Key Select the storage account key to use.
Stored Access Policy For now, select None. You will create and apply a new stored access policy momentarily.
Permissions Select a permission level and leave this set to Read.
Start Select the start date, time, and time zone for the SAS token to indicate when the token should become active.
Expiry Select an expiration date, time, and time zone to indicate when the SAS token should expire.
Allowed IP Addresses To allow access using the access token via specific IP addresses only, enter those addresses here.
Allowed Protocols Choose which protocols to allow.
You can now select and use the SAS URL to access the storage account and container from your application. Next, you’ll add a stored access policy.

FIGURE 1-26 Generating a SAS token and URL.
In the left pane of the container page, click Access Policy.
On the Access Policy page, under Stored Access Policies, click Add Policy. (See Figure 1-27.)

FIGURE 1-27 The container’s Access Policy page.
In the Add Policy dialog box (see Figure 1-28), enter the following information and click OK:
Identifier Enter a unique name for the storage access policy.
Permissions Specify which permissions you want to assign.
Start Time Select a start date, time, and time zone to indicate when the stored access policy should become active.
Expiry Time Select an expiration date, time, and time zone to indicate when the stored access policy should expire.

FIGURE 1-28 Add a stored access policy.
In the Access Policy page, click the Save button above the Stored Access Policy section. (See Figure 1-29.)

FIGURE 1-29 Saving the new stored access policy.
Using Azure PowerShell
#Define required variables
$resourceGroup = "RG01"
$region = "eastus"
$storageaccname = "mbspblobstorage01"
$container = "container"
$vaultname = "RecoveryServicesVault01"
$blob = "TextFile01.txt"

#Generate SAS Access URL
Set-AzCurrentStorageAccount -ResourceGroupName $resourcegroup -Name $storageaccname
New-AzStorageAccountSASToken -Service Blob -ResourceType Service,Container,Object -Permis-
sion "racwdlup" -Protocol HTTPSOnly -ExpiryTime (Get-Date).AddDays(5)
Using Azure CLI
#Define required variables
resourceGroup="RG01"
region="eastus"
storageaccname="mbspblobstorage01"
container="container"
directory="directory"
#Generate SAS Access URL
az storage account  generate-sas
                       --account-name $storageaccname
                       --account-key 00000000
                       --expiry 2024-12-31
                       --https-only
                       --permissions acuw
                       --resource-types sco
                       --services b
Networking
Azure Blob Storage supports the use of various network routing components, networking protocols, and network security features. You can use these to access and secure each individual storage account in your environment based on the needs of your application workload or end client. You can set these options either when you create the storage account or at a later time as your needs evolve.
Network routing
Azure provides two routing methods for Azure Blob Storage service endpoints. You can select which method you want to use. The options are as follows:
Microsoft routing With Microsoft routing, traffic is routed from your endpoint to the closest Microsoft edge point of presence (POP), at which point it traverses the Microsoft global fiber backbone to the Azure Blob Storage endpoint. (See Figure 1-30.) This generally results in lower latency and better network performance, and this is the default option for most Azure services. This routing type also supports all methods of authentication covered in the previous section.

FIGURE 1-30 Microsoft routing.
Internet routing With internet routing, most traffic is routed from the customer over the public internet until it reaches the Microsoft POP that is closest to the Azure Blob Storage endpoint. (See Figure 1-31.) This can result in higher latency and performance issues, depending on your ISP. However, this routing method does help lower networking costs.

FIGURE 1-31 Internet routing.
Network routing walkthrough
The following sections step you through the process of selecting network routing options using the Azure portal, Azure PowerShell, and Azure CLI.
Using Azure portal
To select network routing options using the Azure portal (in this example, internet routing), follow these steps:
In the left pane of the Azure Blob Storage account page, under Security + Networking, click Networking.
In the Firewalls and Virtual Networks tab on the Networking page (see Figure 1-32), under Network Routing, enter the following information. Then click the Save button near the top of the page:
Routing preference Select the Internet Routing option button.
Publish Route-Specific Endpoints Select the Internet Routing check box.

FIGURE 1-32 Setting up internet routing.
Using Azure PowerShell
Use the following Azure PowerShell code to set up network routing:
#Define required variables
$resourceGroup = "RG01"
$region = "eastus"
$storageaccname = "mbspblobstorage01"
$container = "container"

#Configure network routing options
Set-AzStorageAccount -ResourceGroupName $resourcegroup `
 -AccountName $storageaccname `
 -RoutingChoice InternetRouting `
 -PublishInternetEndpoint $true
Using Azure CLI
Use the following code to set up network routing from the Azure CLI:
#Define required variables
resourceGroup="RG01"
region="eastus"
storageaccname="mbspblobstorage01"
container="container"
directory="directory"
vnet="vNET01"
subnet="default"
endpointname="PrivateEndpoint"
vaultname="RecoveryServicesVault01"
#Configure network routing options
az storage account update
                       --name $storageaccname
                       --routing-choice InternetRouting
                       --publish-internet-endpoints true
Network File System (NFS) 3.0 protocol
Azure Blob Storage supports the use of Linux clients hosted in an Azure VM or in an on-premises datacenter to mount Azure Blob Storage containers using the Network File System (NFS) 3.0 protocol.
NFS 3.0 support also enables legacy application workloads, such as high-performance computing (HPC), to run in the cloud. HPC workloads generally require the use of NFS or SMB protocols to access data and enable hierarchical namespaces. This was generally not offered by cloud storage services, causing HPC clients to resist migration to the cloud. Azure Blob Storage introduced the ability to enable hierarchical namespaces in September 2021. This, combined with NFS protocol support, allows these legacy applications to run in the cloud.
SSH File Transfer (SFTP) protocol
Azure Blob Storage has introduced support for SSH File Transfer (SFTP) protocol, to connect to an Azure Blob Storage endpoint using an SFTP endpoint. This allows you to easily and securely share data with others, without requiring a server to host the SFTP service or integrating a third-party SFTP service on top of the Azure Blob Storage.
You can create local user accounts on the storage to provide access over port 22. SFTP does require the storage account to use a hierarchical namespace. This enables you to create a structure of directories and subdirectories, similar to a file system on a Windows or Linux VM. You must define a home directory for each local user. This serves as their default folder when they connect. Then, depending on the container-level permissions you define, they will be able to navigate to the containers and access the data within.
Currently, there is no support for Azure Active Directory (Azure AD), Azure Active Directory Domain Services (Azure AD DS), or on-premises Active Directory with SFTP. The only method to set up access to storage over SFTP is to create local users with either a password or a Secure Shell (SSH) private key to connect and access the data. Passwords are auto-generated by Microsoft. Currently, custom user-provided passwords are not supported. You can enable both password and SSH public-private key options, and users can choose their preferred method to connect.
Storage account firewall and virtual networks
You can configure an Azure storage account to restrict access to the public endpoint using a storage account firewall. The storage account firewall is effectively a network policy on the storage account that restricts access based on your defined access list. Using a storage account firewall, you can restrict access from a public endpoint to specific public IP addresses, specific public IP address ranges, an Azure virtual network, or a private endpoint.
Storage account firewall and virtual networks walkthrough
The following sections step you through the process of setting up a storage account firewall and virtual network restrictions using the Azure portal, Azure PowerShell, and Azure CLI.
Using Azure portal
To configure the storage account firewall using the Azure portal, follow these steps. You’ll first learn how to allow access to the storage account only to connections that originate from specific virtual networks and IP addresses. Then you’ll learn how to allow access to the storage account only to connections from a specific private endpoint:
In the left pane of the Azure Blob Storage account page, under Security + Networking, click Networking.
In the Firewalls and Virtual Networks tab on the Networking page (see Figure 1-33), under Public Network Access, select the Enabled from Selected Virtual Networks and IP Addresses option button.

FIGURE 1-33 Setting up a storage account firewall.
Under Virtual Networks, click Add Existing Virtual Network.
In the Add Networks dialog box (see Figure 1-34), enter the following information and click OK:
Subscription Select the subscription that contains the virtual network subnets you want to add.
Virtual Networks Select the virtual network(s) you want to add.
Subnets Select the subnet(s) you want to add.

FIGURE 1-34 The Add Networks dialog box.
Back in the Firewalls and Virtual Networks tab on the Networking page (refer to Figure 1-33), enter the following information. Then click Save near the top of the page:
Firewall Select the Add Your Client IP address check box to allow your public IP address access to the storage.
Resource Instances To allow access by specific resource instances, select the instance type in the Resource Type list and the specific instance in the Instance Name list. (For this example, leave these blank.)
Exceptions Select any of the check boxes in this section if you want to allow access to the storage in certain cases. In this example, select Allow Azure Services on the Trusted Services List to Access This Storage Account.
Network Routing Preference Choose Microsoft Network Routing or Internet Routing. (Refer to the section “Network routing walkthrough” earlier in this chapter for more information.)
Public Route-Specific Endpoints Optionally, specify whether route-specific endpoints should be published by selecting the Microsoft Network Routing and/or Internet Routing check box. (For this example, leave these unchecked.)
After you click Save, you’ll see the virtual network you added in the Virtual Networks section. (See Figure 1-35.) You can test access to the storage account from the selected virtual network. (You will have to provision a VM in that network and then connect to the storage from that VM.)

FIGURE 1-35 The virtual network you added appears on the list.
Using Azure PowerShell
Use the following Azure PowerShell code to set up a storage account firewall:
#Define required variables
$resourceGroup = "RG01"
$region = "eastus"
$storageaccname = "mbspblobstorage01"
$container = "container"
$vnet = "vNET01"
$subnet = "default"
#Setting up Storage account firewall
#Setup access from Subnet
Update-AzStorageAccountNetworkRuleSet -ResourceGroupName $resourcegroup -Name $storage-
account -DefaultAction Deny
Get-AzVirtualNetwork -ResourceGroupName $resourcegroup -Name $vnet | Set-AzVirtualNet-
workSubnetConfig -Name $subnet -AddressPrefix "10.0.0.0/24" -ServiceEndpoint "Microsoft.
Storage" | Set-AzVirtualNetwork

$subnet = Get-AzVirtualNetwork -ResourceGroupName $resourcegroup -Name $vnet | Get-AzVir-
tualNetworkSubnetConfig -Name $subnet
Add-AzStorageAccountNetworkRule -ResourceGroupName $resourcegroup -Name $storageaccount
-VirtualNetworkResourceId $subnet.Id

#Block Public access
Set-AzStorageAccount -ResourceGroupName $resourceGroup -Name $storageAccount -PublicNet-
workAccess Disabled

# Create a private link service connection to the storage account.
$privateEndpointConnection = New-AzPrivateLinkServiceConnection `
        -Name "$storageAccount-Connection" `
        -PrivateLinkServiceId $storageAccount.Id `
        -GroupId "blob" `
        -ErrorAction Stop

#Configure the private endpoint
$privateEndpoint = New-AzPrivateEndpoint -Name $endpointname `
-ResourceGroupName $resourcegroup `
-Location $region `
-Subnet $subnet `
-PrivateLinkServiceConnection $privateEndpointConnection
Using the Azure CLI
Use the following code to set up a storage account firewall from the Azure CLI:
#Define required variables
resourceGroup="RG01"
region="eastus"
storageaccname="mbspblobstorage01"
container="container"
directory="directory"
vnet="vNET01"
subnet="default"
endpointname="PrivateEndpoint"
#Setting up Storage account firewall for traffic from specific subnets
#Setup access from Subnet
subnetid=$(az network vnet subnet show
        --resource-group $resourceGroup
        --vnet-name $vnet
        --name $subnet
        --query "id" |
    tr -d '"')

az network vnet subnet update
    --ids $subnetid
    --service-endpoints Microsoft.Storage
    --output none

az storage account network-rule add
                       --resource-group $resourceGroup
                       --account-name $storageaccname
                       --vnet-name $vnet
                       --subnet $subnet

az storage account update
      --resource-group $resourceGroup
      --name $storageaccname
      --bypass "AzureServices"
      --default-action "Deny"
      --output none

#Block Public access
az storage account update
    --resource-group $resourceGroup
    --name $storageaccname
    --bypass "AzureServices"
    --default-action "Deny"
    --public-network-access Disabled
    --output none

# Create a private link service connection to the storage account
storageAccount=$(az storage account show
        --resource-group $resourceGroup
        --name $storageaccname
        --query "id" |
    tr -d '"')

privateEndpoint=$(az network private-endpoint create
        --resource-group $resourceGroup
        --name "$storageaccname-PrivateEndpoint"
        --location $region
        --vnet-name $vnet
        --subnet $subnet
        --private-connection-resource-id $storageAccount
        --group-id "file"
        --connection-name "$storageaccname-Connection"
        --query "id" |
    tr -d '"')
Networking endpoints
Azure Blob Storage can be accessed over either the public internet or a private connection such as Azure ExpressRoute or VPN. Depending on your organization’s security and access requirements, your approach might involve the use of one or both methods.
Public endpoints
By default, Azure Blob Storage assets are accessible over the internet by way of a public endpoint using the SMB protocol. This makes it convenient to access the storage if you have an active internet connection. The public endpoint is in the format https://<storage-account-name>.file.core.windows.net.
Many internet service providers (ISPs) and most organizations block SMB port 445 over the internet. So, to allow access, you will have to either contact your ISP to unblock the port or unblock it on your organization’s firewalls. This is the easiest method for accessing the storage. However, some organizations consider this to be insecure because the storage is accessible over a public endpoint. In such scenarios, organizations can use private endpoints, discussed next.
Private endpoints
In brief, private endpoints provide the ability to assign a private or internal IP to the Azure Blob Storage asset and make it accessible over an Azure ExpressRoute, Azure peering, or Azure VPN connection. The private endpoint is in the format https://<privateendpoint-name>.privatelink.file.core.windows.net.
Private endpoints walkthrough
The following sections step you through the process of creating a private endpoint using the Azure portal, Azure PowerShell, and the Azure CLI.
Using Azure portal
To configure the private endpoint using the Azure portal, you must first disallow access to the storage account from the public network. Then you create a private endpoint and allow connections only from that specific private endpoint. Follow these steps:
In the Firewalls and Virtual Networks tab on the Networking page, under Public Network Access, select the Disabled option button. Then click Save. (See Figure 1-36.)

FIGURE 1-36 Disabling public network access.
Click the Private Endpoint Connections tab. Then click Private Endpoint near the top of the page. (See Figure 1-37.)
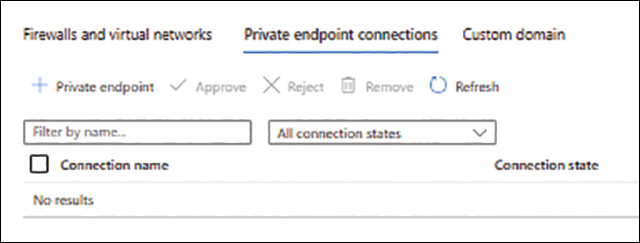
FIGURE 1-37 Setting up a private endpoint.
In the Basics tab of the Create a Private Endpoint wizard (see Figure 1-38), enter the following information and click Next:
Subscription Select the subscription in which you want to create the private endpoint.
Resource group Select an existing resource group or create a new one in which to create the private endpoint.
Name Enter a unique name for the private endpoint.
Network Interface Name Enter a unique name for the private endpoint network interface.
Region Select the Azure region where you want to host the private endpoint. This should be the same region as the Azure Blob Storage account.

FIGURE 1-38 The Basics tab of the Create a Private Endpoint wizard.
On the Resource tab (see Figure 1-39), in the Target Sub-Resource drop-down list, select the storage account type—in this case, Blob. Then click Next.
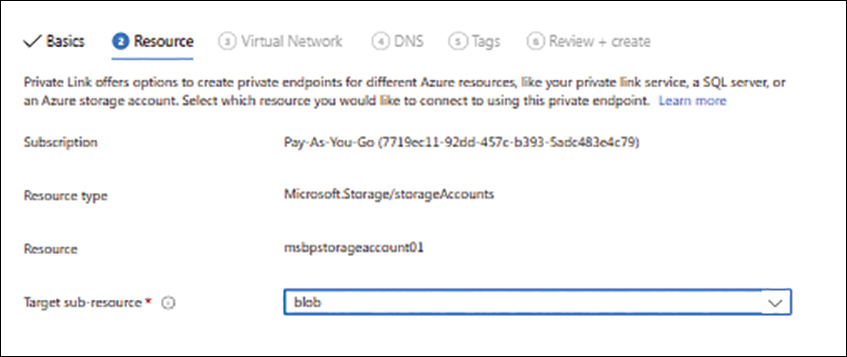
FIGURE 1-39 The Resource tab of the Create a Private Endpoint wizard.
On the Virtual Network tab (see Figure 1-40), enter the following information and click Next:
Virtual Network Select the virtual network on which you want to create the private endpoint.
Subnet Select the subnet on which you want to create the private endpoint.
Private IP Configuration Select the Dynamically Allocate IP Address or Statically Allocate IP Address option button, depending on your needs.
Name Enter a unique name for the private endpoint.
Private IP Enter an IP address for the private endpoint.
Application Security Group Leave this blank (the default).
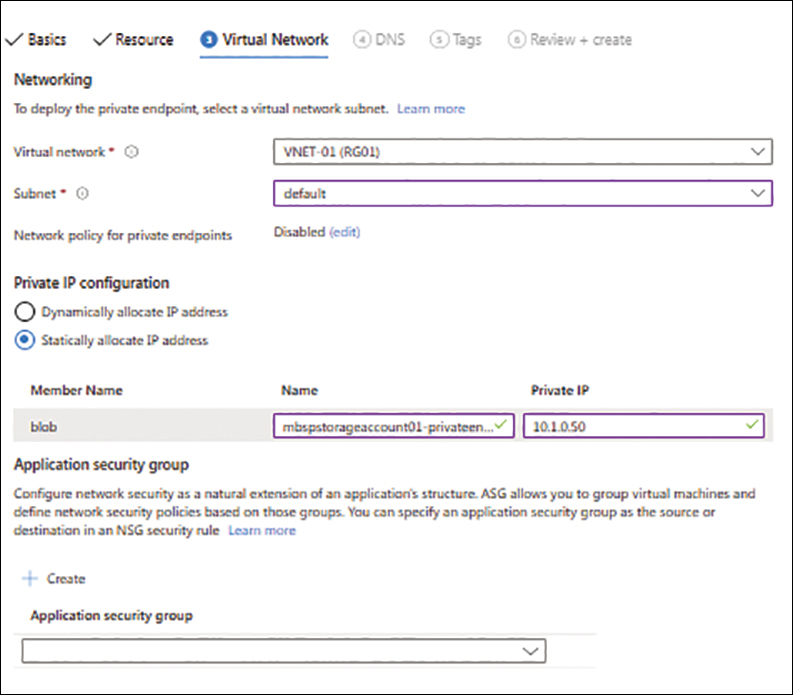
FIGURE 1-40 The Virtual Network tab of the Create a Private Endpoint wizard.
On the DNS tab (see Figure 1-41), enter the following information and click Next:
Integrate with Private DNS Zone Select the Yes option button.
Subscription Select the subscription to use for the private DNS zone.
Resource Group Select the resource group to use to create the private DNS zone.

FIGURE 1-41 The DNS tab of the Create a Private Endpoint wizard.
In the Tags tab (see Figure 1-42), add any tags you want to associate with the private endpoint, and click Next.

FIGURE 1-42 The Tags tab of the Create a Private Endpoint wizard.
In the Review + Create tab (see Figure 1-43), review your settings. Then click Create to create the private endpoint.

FIGURE 1-43 The Review + Create tab of the Create a Private Endpoint wizard.
After the private endpoint is created, click Go to Resource to access it. (See Figure 1-44.)

FIGURE 1-44 Accessing the new private endpoint.
The new private endpoint appears in the Networking page’s Private Endpoint Connections tab with its Connection State listed as Approved. (See Figure 1-45.)

FIGURE 1-45 The new private endpoint appears in the Private Endpoint Connections tab of the Networking page.
Click the private endpoint to open its Overview page.
On the right side of the pane, click the Network Interface link. (See Figure 1-46.)

FIGURE 1-46 The private endpoint’s Overview page.
The network interface’s page (see Figure 1-47) contains the private IP address that you assigned earlier to the network interface. You can now use the private IP address to connect to the storage from a network connected to that subnet.

FIGURE 1-47 The private endpoint’s network interface page.
Using Azure PowerShell
Use the following Azure PowerShell code to create a private endpoint:
#Define required variables
$resourceGroup = "RG01"
$region = "eastus"
$storageaccname = "mbspblobstorage01"
$container = "container"
$vnet = "vNET01"
$subnet = "default"

#Block Public access
Set-AzStorageAccount -ResourceGroupName $resourceGroup -Name $storageAccount -PublicNet-
workAccess Disabled

# Create a private link service connection to the storage account.
$privateEndpointConnection = New-AzPrivateLinkServiceConnection `
        -Name "$storageAccount-Connection" `
        -PrivateLinkServiceId $storageAccount.Id `
        -GroupId "blob" `
        -ErrorAction Stop

#Configure the private endpoint
$privateEndpoint = New-AzPrivateEndpoint -Name $endpointname `
-ResourceGroupName $resourcegroup `
-Location $region `
-Subnet $subnet `
-PrivateLinkServiceConnection $privateEndpointConnection
Using Azure CLI
Use the following code to create a private endpoint in the Azure CLI:
#Define required variables
resourceGroup="RG01"
region="eastus"
storageaccname="mbspblobstorage01"
container="container"
directory="directory"
vnet="vNET01"
subnet="default"
endpointname="PrivateEndpoint"

#Block Public access
az storage account update
    --resource-group $resourceGroup
    --name $storageaccname
    --bypass "AzureServices"
    --default-action "Deny"
    --public-network-access Disabled
    --output none

# Create a private link service connection to the storage account
storageAccount=$(az storage account show
        --resource-group $resourceGroup
        --name $storageaccname
        --query "id" |
    tr -d '"')

privateEndpoint=$(az network private-endpoint create
        --resource-group $resourceGroup
        --name "$storageaccname-PrivateEndpoint"
        --location $region
        --vnet-name $vnet
        --subnet $subnet
        --private-connection-resource-id $storageAccount
        --group-id "file"
        --connection-name "$storageaccname-Connection"
        --query "id" |
    tr -d '"')
Storage access tiers
Azure Blob Storage provides three storage tiers to help you structure your data storage to achieve an optimal balance between use and cost. Each tier has different data storage costs, transaction costs, and data access costs. The tiers are as follows:
Hot In this tier, data is available online at all times. This tier is optimal for data that must be frequently accessed and modified. It has the highest data storage costs but the lowest data access costs. It is optimized for high numbers of transactions, making it ideal for active applications, active logs, data processing, and so on. All storage redundancy options support hot tiers, as do block, append, and page blobs.
Cool Data on the cool tier is online at all times but slightly less available than data on the hot tier. However, durability, retrieval latency, and throughput on the cool tier are the same as on the hot tier. This tier is ideal for storing processed data that will be accessed infrequently after processing, short-term backups that must be restored in a timely manner, data stored for disaster recovery purposes, and so on. Data storage costs are lower than with the hot tier, but access costs are higher. Data in the cool tier must be stored for a minimum of 30 days. All storage redundancy options support cool tiers. Block and append blobs support cool tiers, but page blobs do not.
Archive This is an offline tier optimized to store data that is rarely accessed. Compared to the hot and cool tiers, it has the lowest storage costs but the highest data access costs. It is ideal for long-term backups and for preserving data for compliance or historical reference purposes, or other data that does not require immediate access. You must store data in the archive tier for a minimum of 180 days; otherwise, you will be charged early deletion fees. Archive tiers are supported only on storage accounts configured for LRS, GRS, and RA-GRS. There is currently no support for this tier when using ZRS, GZRS, or RA-GZRS. Block and append blobs support archive tiers, but page blobs do not.
Although these are three distinct access tiers, you can store data in a storage account across these three tiers without any limits for each individual tier. Storage capacity is defined at the storage account level, and the tiers within can be used in any combination, as long as they are within the overall limits available for the storage account.
Early deletion fees
If you remove data from the cool or archive tier before its minimum period has elapsed—30 days for the cool tier and 180 days for the archive tier—you will be charged early deletion fees for the remaining period. For example, if you remove a blob stored in the archive tier after just 30 days, you will be charged an early deletion fee for the remaining 150 days. Early deletion fees are equivalent to the fees you would have paid to store the blob in that tier for the remaining 150 days. You must carefully plan your storage strategy before moving data into these tiers to avoid these charges.
Default access tier configuration
If you upload a blob to a storage account without specifying which tier that blob should use, a tier will be applied to it automatically. By default, the default tier for any new standard general purpose v2 storage accounts is hot. However, you can change this to cool when you create the storage account or at some later point in time.
If you change the default access tier for a storage account after you have already uploaded blobs into that account, the new tier will be applied to those existing blobs. This can result in significant transaction charges. So again, it is important to plan this configuration in advance if you can.
Storage access tier walkthrough
The following sections step you through the process of setting up a default access tier or changing the access tier using the Azure portal, Azure PowerShell, and Azure CLI.
Using Azure portal
To set up a default blob access tier or change the access tier of an existing blob using the Azure portal, follow these steps:
In the left pane of the Azure Blob Storage account page, under Settings, click Configuration.
Near the bottom of the Configuration page, under Blob Access Tier (Default), select the Cool or Hot option button. (See Figure 1-48.) Then click Save near the top of the page.

FIGURE 1-48 Setting up the default access tier.
The next steps show you how to change an existing blob’s access tier.
Navigate to the page for the container in which the blob whose tier you want to change is stored.
Select the check box next to the name of the blob whose access tier you want to change. Then click Change Access Tier. (See Figure 1-49.)

FIGURE 1-49 Changing an individual blob’s access tier.
In the Change Tier dialog box (see Figure 1-50), click the Access Tier drop-down list and choose a different access tier. Then click Save.

FIGURE 1-50 The Change Tier dialog box.
The blob’s entry in the container page reflects the change. (See Figure 1-51.)

FIGURE 1-51 The blob’s access tier has been changed.
Using Azure PowerShell
Use the following Azure PowerShell code to assign a storage access tier:
#Define required variables
$resourceGroup = "RG01"
$region = "eastus"
$storageaccname = "mbspblobstorage01"
$container = "container"
$blob = "TextFile01.txt"

#Set Default access tier
Set-AzStorageAccount `
-ResourceGroupName $resourcegroup `
                       -Name $storageaccname `
                       -AccessTier Cool
#Change blob access tier
$storagectx = (Get-AzStorageAccount `
        -ResourceGroupName $resourceGroup `
        -Name $ storageaccname).Context

$blobtochange = Get-AzStorageBlob -Container $container -Blob $blob -Context $storagectx
$blobtochange.BlobClient.SetAccessTier("Archive", $null, "Standard")
Using Azure CLI
Use the following code to assign a storage access tier from the Azure CLI:
#Define required variables
resourceGroup="RG01"
region="eastus"
storageaccname="mbspblobstorage01"
container="container"
directory="directory"

#Set Default access tier
az storage account update
    --resource-group $resourceGroup
    --name $storageaccname
    --access-tier Cool

#Change blob access tier
az storage blob set-tier
    --account-name $storageaccname
    --container-name $container
    --name TextFile01.txt
    --tier Archive
Blob lifecycle management
Azure Blob Storage introduced blob lifecycle management, or the ability to define rule-based policies to move data between different access tiers based on certain conditions. Conditions can include the time of last modification, time of last access, and date of creation. Once your defined conditions are met, you can set up the storage account to do one of the following:
Move the blob to the cool tier.
Move the blob to the archive tier.
Delete the blob.
Move the blob to the cool tier, but move it back to the hot tier if it is accessed.
With these policies, you can automatically store data for long-term retention based on your organization’s compliance requirements across the different tiers, and to remove data that the organization no longer needs.
You can also define these policies using filters to identify data based on the first few characters of a blob name, a specific blob container, or a combination of the two. You can also define whether to target block blobs, append blobs, or both, and whether to include blob snapshots and versions in the targets or limit the rule to just the base blob.
When moving a blob between the cool and archive tiers, keep these points in mind:
In a storage account whose default tier is cool, any blob that inherits this tier when it is uploaded will be automatically moved to the archive tier according to the lifecycle management policy, and it will not be subjected to any early deletion charge.
A blob whose access tier has been explicitly set to cool (either upon upload or at some later time) will be subject to early deletion charges if it is moved to the archive tier according to the lifecycle management policy before its minimum period has elapsed.
Blob lifecycle management walkthrough
The following sections step you through the process of setting up blob lifecycle management policies using the Azure portal and Azure PowerShell.
Using Azure portal
To set up a blob lifecycle management policy using the Azure portal, follow these steps:
In the left pane of the Azure Blob Storage account page, under Data Management, click Lifecycle Management.
In the Lifecycle Management page, click Add a Rule. (See Figure 1-52.)

FIGURE 1-52 Setting up blob data lifecycle management.
In the Details tab of the Add a Rule wizard (see Figure 1-53), enter the following information and click Next:
Rule Name Enter a unique name for the lifecycle management policy.
Rule Scope Specify whether the new policy applies to all blobs in this storage account or to a subset of blobs based on criteria you select. For the sake of example, select Apply Rule to All Blobs in Your Storage Account.
Blob Type Specify the blob types to which the policy should apply. In this case, select Block Blobs.
Blob Subtype Specify the blob subtypes to which the policy should apply. In this example, choose Base Blobs.
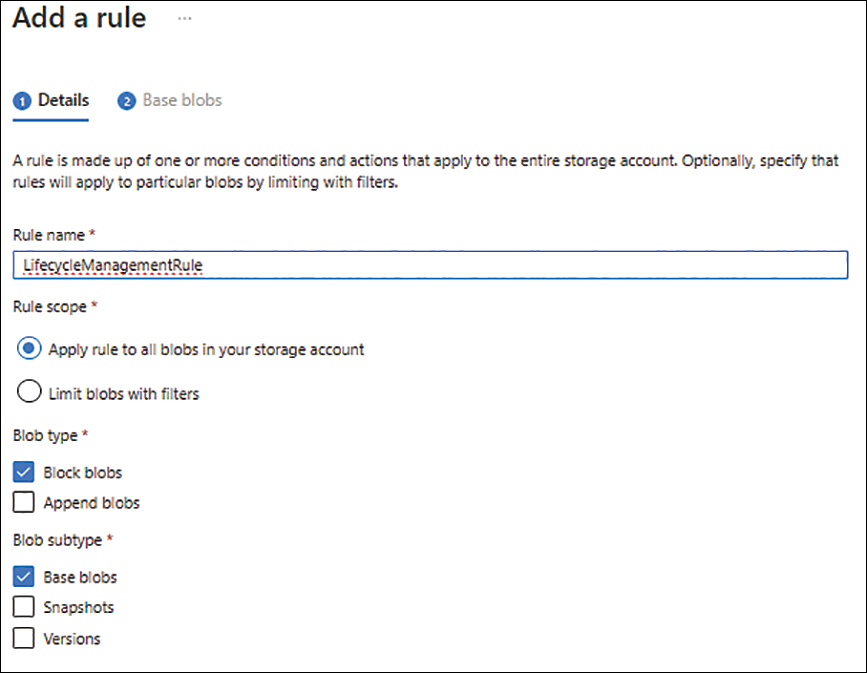
FIGURE 1-53 The Details tab of the Add a Rule wizard.
In the Base Blobs tab of the Add a Rule wizard (see Figure 1-54), enter the following information and click Add:
Base Blobs Were Select the Last Modified or Created option button.
More Than (Days Ago) Enter the number of days after which you want the policy to apply.
Then Select the action to perform when the criteria have been met.

FIGURE 1-54 The Base Blobs tab of the Add a Rule wizard.
Using Azure PowerShell
Use the following Azure PowerShell code to set up a blob lifecycle management policy:
#Define required variables
$resourceGroup = "RG01"
$storageaccname = "mbspblobstorage01"

# Create a new action object.
$lcaction = Add-AzStorageAccountManagementPolicyAction -InputObject $lcaction `
    -BaseBlobAction TierToArchive `
    -daysAfterModificationGreaterThan 90

# Create a new rule object.
$lifecyclerule1 = New-AzStorageAccountManagementPolicyRule -Name sample-rule `
    -Action $lcaction

# Create the policy.
Set-AzStorageAccountManagementPolicy -ResourceGroupName $resourcegroup `
    -StorageAccountName $storageaccname `
    -Rule $lifecyclerule1
Storage reservations
In the same way you can reserve Azure VMs, you can reserve storage capacity at a discounted rate to optimize your storage accounts. This can bring significant cost savings. You can reserve storage either one year in advance or three years in advance. You can purchase reservations in units of either 100 TiB or 1 PiB per month, for the selected one- or three-year periods. The reservation applies to a fixed amount of storage capacity; any data stored beyond that capacity is charged at the normal rate.
You can exchange or cancel a reservation if your needs change. Microsoft reserves the right to charge an early deletion penalty if you cancel your reservation before its end date, but it will refund at least some portion of your money (currently up to USD 50,000 per year). In case of an exchange, Microsoft issues a prorated refund as a credit, which you must apply to another storage reservation of an equal or higher value. For cancellations, the prorated refund is issued in whatever form of payment you used to purchase the reservation.
Static website hosting
You can leverage Azure Blob Storage to host a static content website that contains HTML, CSS, JavaScript, and image files, without additional web server infrastructure. When you enable the static website hosting feature on an Azure Blob Storage account, Azure creates a $web container in the storage account to host all the web server content. You can then use tools such as Visual Studio, the Azure portal, Azure PowerShell, or Azure CLI to upload your web content files to the $web container and render your site.
Although this is a great way to start hosting a static website, there are limitations to this approach. You cannot configure host headers for your website, and neither authentication nor authorization is supported. Keep this in mind before you use this feature.
Data protection
In addition to the storage account redundancy options covered earlier in this chapter to help you to maintain or recover access to an Azure Blob Storage account in case of a local, regional, or geographical outage, Microsoft provides other features to help you quickly recover individual containers or blobs. These features include soft delete for containers and blobs and blob versioning. Other related tools and techniques include the blob change feed, point-in-time restores, integration with Azure Backup, and blob snapshots. These features can help you quickly identify, react to, and recover from malicious or accidental deletion or corruption of data. It is critical that you understand and use each of these features in your environment, as they offer an extremely cost-effective method of data protection.
Soft delete for containers and blobs
Soft delete protects your containers and blobs by allowing you to recover them quickly if they are accidentally or maliciously deleted. It works by maintaining the deleted data in the system for the period of time that you specify. This retention period can range from 1 to 365 days. You can define this period for containers and blobs independently of each other to align with your overall data recovery strategy. Within the retention period, you can recover containers and blobs using the Azure portal, Azure PowerShell, Azure CLI, or REST APIs. After the retention period elapses, the data is permanently deleted and cannot be restored unless it has been stored on a separate backup.
When you restore a container, all blobs, snapshots, and versions associated with that container are also restored. However, you cannot restore individual blobs if the parent container was not deleted, too. To be able to restore individual blobs, blob snapshots, or versions when the parent container hasn’t been deleted, you must also configure soft delete. You can also soft delete just a blob snapshot without deleting the base blob.
Blob versioning
You can enable blob versioning to automatically maintain previous versions of a blob. With blob versioning, a new version of the blob is created each time a write operation occurs on the blob. Each version is maintained with a version ID, which identifies the point-in-time state of that blob.
When blob versioning is enabled, you can access earlier versions of a blob to recover your data if it is modified or deleted. You can read and delete a specific version of the blob by providing the version ID associated with that version. However, blob versions cannot be modified. They are unique. The value of each version is based on the timestamp that the change occurred.
Blob change feed
The blob change feed was brought into preview by Microsoft in November 2019 and became generally available in September 2020. This feature tracks blob changes in a guaranteed, ordered, and durable manner.
The blob change feed details every change taking place on the blob or metadata in that storage account in order. The feed is written to the storage account under a special $blobchangefeed container and ensures that the data is durable, immutable, and read-only. This makes it reliable for compliance and auditing purposes. (See Figure 1-55.)

FIGURE 1-55 Blob change feed events.
You can read the blob change feed as a stream or in batch mode. To do this, you develop client applications to use the blob change feed processor library provided with the change feed processor SDK. In this way, you can build low-cost, scalable solutions to process and manage change events.
Logs from the blob change feed are retained for a retention period that you define, so you can maintain them as long as necessary. The logs are charged at standard Azure Blob Storage rates. Because all the logs are maintained in the storage container, you can consume the logs in a synchronous or asynchronous manner, in single or multiple parallel streams from different applications. This enables you to integrate the logs with monitoring as well as compliance and analytical applications at the same time. You can monitor the logs for specific events that trigger automated actions or workflows.
Point-in-time restore
Point-in-time restore allows you to recover block blob data going back to a specific date in the event of the accidental or malicious deletion or corruption of data due to application error or other means. In other words, you can restore all data in a container to a specific point-in-time before the deletion or corruption event. You can use this feature even in testing scenarios, where the impact of certain application changes must be tested on the storage to correct issues caused during testing.
At this time, point-in-time restore is supported only on standard general purpose v2 storage accounts. In addition, you cannot use point-in-time restore for data in the archive tier; only data in hot and cool tiers can be recovered in this way.
When you set up point-in-time restore, you configure a retention period measured in days. For point-in-time restore to work, blob soft delete, blob versioning, and the blob change feed must also be enabled and configured with a retention period that is higher than the point-in-time restore threshold. After you have configured all these features, any blobs existing within their defined scope are subject to these restoration features. You cannot restore blobs to a point-in-time prior to the configuration of these features.
When performing a restore, you have one of two choices:
Define no specific ranges of containers or blob names, in which case everything will be restored.
Specify lexicographical ranges of container and blob names to target for the restoration. You can define up to 10 such ranges in a single restore operation. You can perform multiple restore operations one at a time.
When you initiate a point-in-time restore, not all data is necessarily restored. Based on restoration criteria that you select, only data that has changed since the point-in-time selected for the restore operation will be restored. This analysis is performed by the restoration operation. In addition, any blob that fails the restoration operation will result in the entire restoration operation failing.
All read and write operations are temporarily paused for any storage container that is within the scope of the restore operation. Once the restoration operation completes or fails, read and write operations automatically resume.
Data protection walkthrough
The following sections step you through the process of setting up data protection options using the Azure portal, Azure PowerShell, and Azure CLI.
Using Azure portal
To set up data protection options using the Azure portal, follow these steps:
In the left pane of the Azure Blob Storage account page, under Data Management, click Data Protection.
On the Data Protection page (see Figure 1-56), enter the following information and click Save:
Enable Point-in-Time Restore for Containers Select this check box.
Maximum Restore Point (Days Ago) Enter the number of days to retain point-in-time restore snapshots.
Enable Soft Delete for Blobs Select this check box.
Keep Deleted Blobs for (in Days) Enter the number of days to retain deleted blobs.
Enable Soft Delete for Containers Select this check box.
Keep Deleted Containers for (in Days) Enter the number of days to retain deleted containers.
Enable Blob Change Feed Leave this set at Keep All Logs (the default).

FIGURE 1-56 Data protection configuration options.
In the left pane of the Azure Blob Storage account page, under Data Storage, click Containers.
The Containers page now contains an entry for a $blobchangefeed container. (See Figure 1-57.) This container contains the logs for the blob change feed.

FIGURE 1-57 Notice the $blobchangefeed container.
To view blob versions, click a blob in the Containers page.
The blob’s page opens. If versions of this blob have been saved, you will see them here. (See Figure 1-58.) You can select a version to download, restore, or delete.

FIGURE 1-58 Blob versions.
Using Azure PowerShell
Use the following Azure PowerShell code to set up data protection options:
#Define required variables
$resourceGroup = "RG01"
$region = "eastus"
$storageaccname = "mbspblobstorage01"
$container = "container"

#Enable soft delete for containers
Enable-AzStorageContainerDeleteRetentionPolicy `
    -ResourceGroupName $resourcegroup `
    -StorageAccountName $storageaccname `
    -RetentionDays 30

#Enable soft delete for blobs
Enable-AzStorageBlobDeleteRetentionPolicy `
    -ResourceGroupName $resourcegroup `
    -StorageAccountName $storageaccname `
    -RetentionDays 30

#Enable blob versioning
Update-AzStorageBlobServiceProperty `
    -ResourceGroupName $resourcegroup `
    -StorageAccountName $storageaccname `
    -IsVersioningEnabled $true


#Enable change feed and versioning.
Update-AzStorageBlobServiceProperty `
    -ResourceGroupName $resourcegroup `
    -StorageAccountName $storageaccname `
    -EnableChangeFeed $true `
    -IsVersioningEnabled $true

#Enable point-in-time restore
Enable-AzStorageBlobRestorePolicy `
    -ResourceGroupName $resourcegroup `
    -StorageAccountName $storageaccname `
    -RestoreDays 29
Using Azure CLI
Use the following code to set up data protection from the Azure CLI:
#Define required variables
resourceGroup="RG01"
region="eastus"
storageaccname="mbspblobstorage01"
container="container"
directory="directory"
vnet="vNET01"
subnet="default"
endpointname="PrivateEndpoint"
vaultname="RecoveryServicesVault01"
#Enable soft delete for containers
az storage account blob-service-properties update
    --account-name $storageaccname
    --resource-group $resourceGroup
    --enable-container-delete-retention true
    --container-delete-retention-days 30

#Enable soft delete for blobs
az storage account blob-service-properties update
    --account-name $storageaccname
    --resource-group $resourceGroup
    --enable-delete-retention true
    --delete-retention-days 30

#Enable blob versioning
az storage account blob-service-properties update
    --resource-group $resourceGroup
    --account-name $storageaccname
    --enable-versioning true

#Enable point-in-time restore
az storage account blob-service-properties update
    --resource-group $resourceGroup
    --account-name $storageaccname
    --enable-change-feed true
    --enable-restore-policy true
    --restore-days 29
Azure Backup integration
You can use the cloud-native Azure Backup service to perform short-term and long-term backups of your Azure storage containers. You can define custom retention policies for different containers based on the requirements of each container. The Azure Backup service allows for seamless backup integration. You can create backup retention policies that control how long the backups are retained. Azure Backup integration also provides backup monitoring, alerting, and reporting capabilities, making it easier for administrators to manage all blob storage backups in one single location.
The primary backup method available for production use at this time is continuous backup, which performs backups as changes are made. All backups are stored in the source storage account and do not require transfer to a backup vault. Because the backups are continuous, there is no need to define a backup schedule.
Continuous backup uses a feature called operational backup. Operational backup provides point-in-time restore capability by leveraging soft delete, change feed, and versioning features to store data based on a retention policy that you define. In addition, a lock is placed on the storage account to prevent the account’s accidental or unauthorized deletion. All these features are automatically configured when you set up this feature.
This backup can protect blobs only—not containers themselves. If you delete an entire container, the backup will not be able to restore that container. It is therefore recommended that you set up soft delete for containers you want to protect in addition to this operational backup.
When performing data restores, you can restore all the block blobs, individual blobs, or a subset of blobs (using a prefix) to the source storage account. Microsoft centralizes backup management through the Backup Center. There, you can manage backups and restores for all storage accounts from a single location.
Azure Backup integration walkthrough
The following sections step you through the process of integrating Azure Backup with an Azure Blob Storage account using the Azure portal, Azure PowerShell, and Azure CLI.
Using Azure portal
To set up Azure Blob Storage to use Azure Backup using the Azure portal, follow these steps:
In the left pane of the Azure Blob Storage account page, under Data Management, click Data Protection.
Near the top of the Data Protection page (see Figure 1-59), under Recovery, select the Enable Operational Backup with Azure Backup check box.
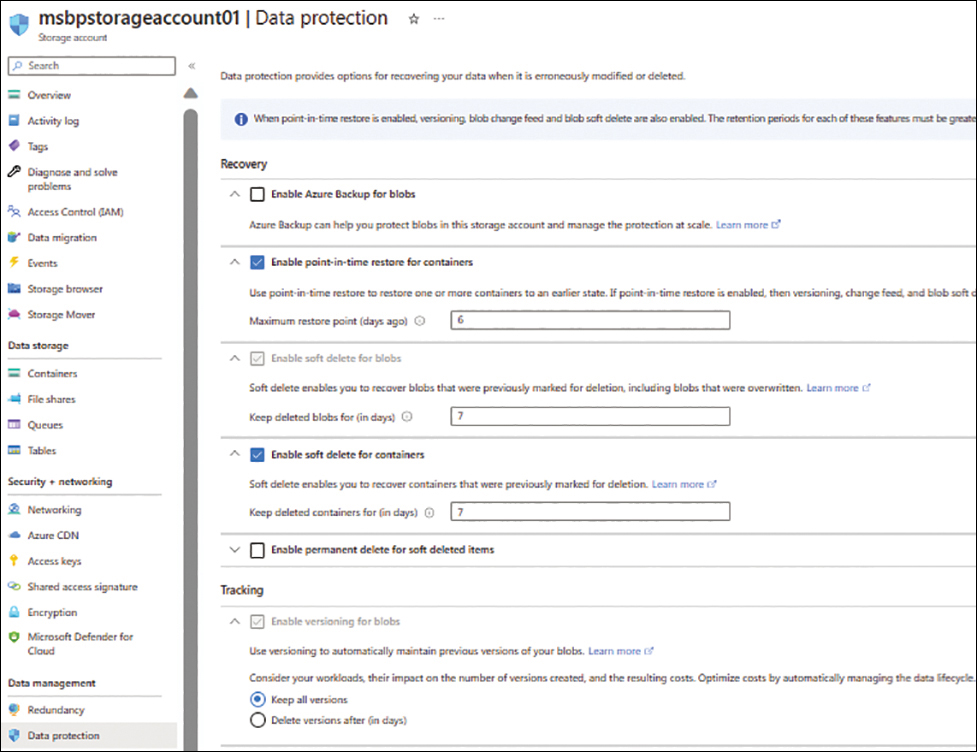
FIGURE 1-59 Integrating Azure Backup with your Azure Blob Storage account.
Click the Backup Vault drop-down list and select an existing backup vault—or, as in this example, the Add New link under the Backup Vault box. (See Figure 1-60.)
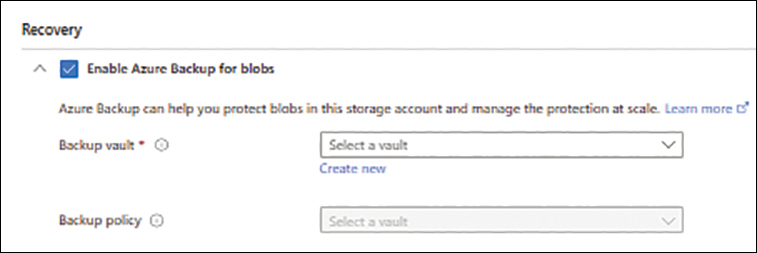
FIGURE 1-60 Enable operational backup with Azure Backup.
In the Create a New Backup Vault dialog box (see Figure 1-61), enter the following information and click Create:
Vault Name Enter a unique name for the backup vault.
Resource Group Select an existing resource group or create a new one in which to create the backup vault.
Backup Storage Redundancy Select the redundancy level of backup storage. (Note that you cannot change the redundancy level after you create a backup, so choose carefully.)

FIGURE 1-61 Creating a new backup vault.
Back on the Data Protection page, click the Backup Policy drop-down list and select an existing backup policy. Or, as in this example, click the Add New link under the Backup Policy box. (See Figure 1-62.)

FIGURE 1-62 Creating a new backup policy.
In the Create a New Backup Policy dialog box (see Figure 1-63), enter the following information and click Create:
Policy Name Enter a unique name for the backup policy.
Retention (in Days) Indicate how long backups should be retained.

FIGURE 1-63 The Create a New Backup Policy dialog box.
Back on the Data Protection page, click Save.
Using Azure PowerShell
Use the following Azure PowerShell code to set up a storage backup:
#Define required variables
$resourceGroup = “RG01”
$region = “eastus”
$storageaccname = “mbspblobstorage01”
$container = “container”
$vnet = “vNET01”
$subnet = “default”
$endpointname = “PrivateEndpoint”
$vaultname = “RecoveryServicesVault01”
#Setting up Azure Backup Integration
#Creating Backup Vault
$bkpvaultstorage = New-AzDataProtectionBackupVaultStorageSettingObject -Type GeoRedundant
-DataStoreType VaultStore
New-AzDataProtectionBackupVault -ResourceGroupName $resourcegroup -vaultName $vaultname
-Location $region -storagesetting $bkpvaultstorage

#Create Backup policy
$policyDefinition = Get-AzDataProtectionPolicyTemplate -DatasourceType AzureBlob
$BkpPolicy=New-AzDataProtectionBackupPolicy `
                       -ResourceGroupName $resourcegroup `
                       -VaultName $vaultname `
                       -Name “DefaultBlobBackupPolicy” `
                       -Policy $policyDefinition

#Enable Backup
$bkp = Initialize-AzDataProtectionBackupInstance -DatasourceType AzureBlob -DatasourceLo-
cation $region -PolicyId $BkpPolicy[0].Id -DatasourceId $storageaccount.Id
New-AzDataProtectionBackupInstance -ResourceGroupName $resourcegroup -VaultName $Vault-
Name -BackupInstance $bkp
Using Azure CLI
Use the following code to set up a storage backup from the Azure CLI:
#Define required variables
resourceGroup=”RG01”
region=”eastus”
storageaccname=”mbspblobstorage01”
container=”container”
directory=”directory”
vnet=”vNET01”
subnet=”default”
endpointname=”PrivateEndpoint”
vaultname=”RecoveryServicesVault01”

#Setting up Azure Backup Integration
#Create Backup vault
az backup vault create –resource-group $resourceGroup
    --name $vaultname
    --location $region

#Set the storage redundancy and cross region restore config
az backup vault backup-properties set –name $vaultname
    --resource-group $resourceGroup
    --backup-storage-redundancy “GeoRedundant”
    --cross-region-restore-flag “True”
#Create Backup Policy
az dataprotection backup-policy get-default-policy-template –datasource-type AzureBlob

{
  “datasourceTypes”: [
    “Microsoft.Storage/storageAccounts/blobServices”
  ],
  “name”: “DefaultBlobPolicy”,
  “objectType”: “BackupPolicy”,
  “policyRules”: [
    {
      “isDefault”: true,
      “lifecycles”: [
        {
          “deleteAfter”: {
            “duration”: “P30D”,
            “objectType”: “AbsoluteDeleteOption”
          },
          “sourceDataStore”: {
            “dataStoreType”: “OperationalStore”,
            “objectType”: “DataStoreInfoBase”
          }
        }
      ],
      “name”: “Default”,
      “objectType”: “AzureRetentionRule”
    }
  ]
}

#Create Backup json – Replace all the resource groups and resource values in the command
before proceeding
az dataprotection backup-instance initialize –datasource-type AzureBlob  -location
$region –policy-id “/subscriptions/xxxxxxxx-xxxx-xxxx-xxxx-xxxxxxxxxxxx/resourceGroups/
RG-01/providers/Microsoft.DataProtection/backupVaults/BackupVault01/backupPolicies/Default-
BlobBackupPolicy” –datasource-id “/subscriptions/xxxxxxxx-xxxx-xxxx-xxxx/resourcegroups/
RG-01/providers/Microsoft.Storage/storageAccounts/mbspblobstorage01” > backup_instance.
json
#Enable Backup
az dataprotection backup-instance create –resource-group $resourceGroup –vault-name
$vaultname –backup-instance backup_instance.json
Blob snapshots
A blob snapshot is a point-in-time read-only copy of a blob that you create and store in the hot or cool tier. The snapshot is identical to the base blob, except it is a point-in-time copy, allowing you to access that version of the blob. A snapshot copies all the system properties and metadata from the base blob (unless explicitly configured otherwise). You can have any number of snapshots of a blob, and each snapshot will persist until you either delete the snapshot or delete the base blob itself.
The URL for a snapshot is the same as the base blob, except the snapshot date and time value are appended to the end of the URL. For example, if the URL for a base blob is http://blockblobstorageaccount.blob.windows.net/blobcontainer/blob01, a snapshot for that blob taken on January 3, 2022, at 11 p.m. would have a URL similar to http://blockblobstorageaccount.blob.windows.net/blobcontainer/blob01?snapshot=2022-03-01T23:00:00.938291Z.
You can store snapshots on different storage tiers from base blobs. This can help reduce the cost of the snapshots. If you do not specify the storage tier to use, the snapshot is stored in the same tier as the base blob, and you will be charged for it at the same rate as for the base blob after the base blob changes and no longer matches the snapshot. If you store the snapshot in a different access tier, then you are charged for the entire blob based on the access tier rates. You should take this into account when planning your storage protection strategy.
Blob snapshots walkthrough
The following sections step you through the process of creating and managing blob snapshots using the Azure portal, Azure PowerShell, and Azure CLI.
Using Azure portal
To create and manage blob snapshots using the Azure portal, follow these steps:
Locate the page for the container for the blob for which you want to create a snapshot, select the check box for that blob and click Create Snapshot. (See Figure 1-64.)

FIGURE 1-64 Create a blob snapshot.
To view the snapshot (and any other snapshots associated with the same blob), select the file and click View Snapshots (refer to Figure 1-64).
The snapshot is listed in the Snapshots tab. (See Figure 1-65.)

FIGURE 1-65 View snapshots.
Optionally, to change the snapshot’s access tier, select the snapshot in the Snapshots tab and click Change Tier. Then open the Access Tier drop-down list in the Change Tier dialog box to choose a different tier and click Save. (See Figure 1-66.)

FIGURE 1-66 Changing the snapshot’s access tier.
Using Azure PowerShell
Use the following Azure PowerShell code to take a blob snapshot:
#Define required variables
$resourceGroup = "RG01"
$region = "eastus"
$storageaccname = "mbspblobstorage01"
$container = "container"
$vaultname = "RecoveryServicesVault01"
$blob = "TextFile01.txt"

#Generate Blob snapshot
$blob = Get-AzStorageBlob -Container $container -Blob $blob -Context $storageaccount.context
$blob.BlobClient.CreateSnapshot()
Using Azure CLI
Use the following code to take a blob snapshot from the Azure CLI:
#Define required variables
resourceGroup="RG01"
region="eastus"
storageaccname="mbspblobstorage01"
container="container"
directory="directory"
#Generate Blob snapshot
az storage blob snapshot
    --container-name $container
    --name TextFile01.txt
    --account-name $storageAccount
Disaster recovery
Disaster recovery is a critical component of any application architecture. The higher the criticality of the application, the more redundancy is required to ensure minimal to no downtime or data loss.
While setting up the data redundancy for the storage account and taking regular backups does ensure that you are able to recover from an outage, you must take into account other application components in your disaster recovery planning, too. This includes components such as the web application firewall or application gateway, web applications or application servers, connected API services, and so on. This ensures that in a disaster scenario, once the blob storage is online, all other related components can also be recovered and can read the storage with minimal interruption and data loss.
We’ve covered earlier how storage redundancy options such as GRS, GZRS, RA-GRS, and RA-GZRS can replicate your data asynchronously to a secondary Azure region.
One caveat to note: If the primary region becomes unavailable, you can set up your applications to automatically switch to the secondary region to perform read operations in case you are using either RA-GRS or RA-GZRS storage accounts. This will ensure that the application is online in some form while a full storage failover is performed, either by you or by Microsoft. Once the storage has failed over completely, write operations to the storage account in the secondary region are also allowed, and your application can then start to commit changes to the storage as earlier. In case of GRS or GZRS storage, the read and write operations can only be performed once the storage has been failed over to the secondary region.
You saw earlier that the primary blob storage endpoint points to https://<storage-account-name>.blob.core.windows.net/<container-name. Similarly, the secondary storage endpoint would be reachable at https://<storage-account-name>-secondary.blob.core.windows.net/<container-name>. (The -secondary suffix is appended automatically by the secondary endpoint.) You can use this endpoint to connect to the secondary storage. The storage account access keys would remain the same in both the primary and secondary endpoints.
Storage account failover
There are two ways you can fail over a storage account to the secondary region:
Microsoft-managed failover In the event of a region-wide outage, Microsoft performs a full region failover to the secondary region. In such cases, you need not perform manual failover operations on your storage accounts. You would only have to ensure that when the DNS entries for the storage are updated, your applications are ready to resume normal operations.
Customer-managed failover In addition, you are able to perform a manual failover on your own, in case of an outage. When an outage occurs, Microsoft will initially actively work toward restoring the data and operations in the primary region, if possible. If they are unable to do so, they will declare that region as unrecoverable and initiate the failover to the secondary region. In case you are unable to wait until such time, you can perform a manual failover from your storage account properties to bring your storage account online and make it accessible to your applications.
In either scenario, DNS entries must be updated automatically or manually before write operations to the storage can begin. Also take into account any private endpoints you may have created in the primary region; you need to make sure the same endpoints are set up in the secondary region, too.
Last Sync Time
Data synchronized using GRS is often behind data in the primary region. The data sync is asynchronous to avoid affecting write operations and storage performance in the primary region. This allows write operations to be committed on the primary storage without waiting for the same operations to be written and acknowledged by the secondary storage. However, at the time of a disaster, some data written and committed to the primary storage might not yet have been committed to the secondary storage—in which case, that data would be lost.
You can determine whether this has happened by checking the Last Sync Time property for your storage account. This value is a GMT date/time value that you can query using Azure PowerShell, Azure CLI, or one of the Azure Storage client libraries. Any write operations performed after this Last Sync Time property value are most likely missing in the secondary region and might not be available for read operations. Incorporating this into your application logic can allow you to plan in advance how to handle such contingencies.
Last Sync Time walkthrough
The following sections step you through the process of checking the Last Sync Time on a storage account using Azure PowerShell and Azure CLI.
Using Azure PowerShell
Use the following Azure PowerShell code to retrieve the Last Sync Time on a storage account:
#Define variables

$rg = "RG01"
$storageaccname = "mbspblobstorage01"

#Retrieve the last sync time
$LastSyncTime = $(Get-AzStorageAccount -ResourceGroupName $rg `
    -Name $storageaccname `
    -IncludeGeoReplicationStats).GeoReplicationStats.LastSyncTime
Using the Azure CLI
Use the following Azure CLI code to retrieve the Last Sync Time on a storage account:
#Define required variables

rg="RG01"
storageaccname="mbspblobstorage01"

#Retrieve the last sync time
$LastSyncTime=$(az storage account show
    --name $storageaccname
    --resource-group $rg
    --expand geoReplicationStats
    --query geoReplicationStats.lastSyncTime
    --output tsv)
Best practices
Following are some general best practices regarding setting up and using Azure Blob Storage accounts:
Protect your access keys Storage account access keys provide root access to the storage account, bypassing any permissions or authorization restrictions you have put in place. It is therefore of utmost importance that you limit the use of and protect access to the storage account access keys. Instead, use Azure Active Directory (Azure AD) to authorize access requests to the Azure Blob Storage account. You can use Azure Key Vault to automate the rotation of the access keys or manually rotate the keys if you suspect a compromise has taken place.
Plan your redundancy strategy Plan your storage redundancy strategy in advance so you select the correct storage redundancy options when creating the Azure Blob Storage account. If you decide to change the redundancy level at a later stage, you may have to migrate all data from one storage account to another, which can result in extensive transaction costs (depending on the amount of data you have stored).
Document recovery procedures and review regularly Once you have your redundancy strategy in place, document any recovery procedures, such as manual storage failover for geo-redundant storage, and review them regularly with your team. You may have to include the failover of other related components as well, along with the storage endpoint, to ensure that all interconnected components are online in case of a disaster. Regular reviews will help ensure that any changes to the Azure Blob Storage capabilities or feature set are incorporated in your design and you can optimize the recovery further if possible.
Limit mixing of storage account types When using general purpose v2 storage accounts, you can deploy a mix of blob, file, table, and queue storage in the same account. However, it is highly recommended to only deploy Azure Blob Storage containers together in the same storage account. This ensures that you can consider performance requirements related to Azure Blob Storage independently of any other file services. In a mixed storage account, it can get difficult to manage performance issues, as different storage account types using different protocols access the storage from a varied set of clients and share the same limits associated with the storage account.
Enable soft delete on all important containers Soft delete is a great feature to help you quickly recover your containers in the event of accidental or malicious deletion. As far as possible, enable soft delete on all your containers, and set up a retention period longer than the minimum time it will take your team to respond and to perform a restore, if necessary.
Enable soft delete on blobs Enabling soft delete for blobs allows you to easily restore blobs in case of accidental or malicious deletion. Select the time range for data retention based on your organization’s compliance, auditory, and data restoration RPO requirements to ensure you are able to restore blobs as quickly as possible.
Enable blob versioning to maintain previous versions Enabling blob versioning for all critical containers makes it easy to restore blobs in the event of unwanted modifications, data corruption, or malware attacks, without having to restore backups.
Use private endpoints for storage access Private endpoints enable you to access the Azure Blob Storage endpoint over a secure internal network connection via VPN or ExpressRoute. This allows you to control which network subnets are allowed to access the endpoint and limit access as necessary. This also allows you to closely monitor the connections to the blob endpoint over your internal firewall and detect any anomalies. It is highly recommended to use private endpoints if your environment and application access requirements allow for it.
Limit use of public endpoints While public endpoints can be secured with encryption in transit and firewall restrictions, it is highly recommended to turn them off unless allowing them is absolutely necessary. Instead, use private endpoints, as they are much more secure. Private endpoints allow you to control access more granularly from your internal networks to the internal storage endpoint.
Setup storage firewall restrictions Unless you completely disable the public endpoint, be sure you set up storage firewall restrictions to allow access over the public endpoint only from administrative or known IP addresses. This will help limit the exposure of that public endpoint and prevent malicious actors from attacking and accessing the storage.
Force secure transfers only While Azure Blob Storage supports connections over both HTTP and HTTPS, it is highly recommended to force secure transfer only, so that all connections are secured. You can configure this setting using the Azure portal, Azure PowerShell, Azure CLI, and REST APIs. If you set up the storage using the Azure portal, this setting is enabled by default. If you use any other methods, you must enable this setting manually.
Integrate with Azure Monitor Azure Monitor can closely monitor storage capacity and performance metrics to provide you with a comprehensive view of the storage IOPS and space utilization. This can help you in planning any changes to address capacity or IOPS issues before they affect your clients. You can build custom dashboards to monitor the metrics that are most important to your organization and share them with all administrators to ensure a consistent view across the monitoring environment. You can also set up alerting to highlight anomalous performance behavior to be able to respond to such events in a more time-effective manner.
Ensure regular backups using Azure Backup Azure Backup has a built-in integration with Azure Blob Storage to provide a seamless backup experience. You can configure backup policies to define how long to store operational backup data. You can configure different backup jobs with different backup policies based on your Azure Blob Storage requirements. Make sure you set up backups in line with your organization's data recovery and retention requirements.