Chapter 5
Azure Data Box
Overview
The Azure Data Box family of appliances helps customers export and import large volumes of data to and from different Azure storage services. Microsoft introduced the Azure Data Box family of appliances in stages, starting with the Azure Data Box in September 2018, followed by the Azure Data Disk in January 2019, and finally the Azure Data Box Heavy in July 2019. Each appliance increased the data capacity that could be transferred offline to Azure:
Azure Data Box 80 terabytes (TB) usable capacity.
Azure Data Box Disk 35 TB usable capacity.
Azure Data Box Heavy 800 TB usable capacity.
Which of these services for data ingestion to and from Azure is right for you will depend on your specific requirements.
Key features
Ability to transfer large amounts of data offline You can use the Data Box appliances or disks to transfer large amounts of data offline to Azure Storage. You can transfer data on local devices over your local network or over USB, depending on the data box that you choose, and ship it to a Microsoft datacenter to have it uploaded directly into whichever Azure Storage account you choose.
Faster migration of data to Azure Transferring up to 1 petabyte (PB) of data over the internet can be difficult, depending on where your data is stored and available internet capacity. If you must perform such a data transfer once, or more than once but on an irregular basis or with large gaps of time in between, it might not be financially viable to provision large internet lines for this purpose. Data Box appliances help overcome these challenges, as the transfer process is much shorter than transferring over the internet.
Secure and encrypted data transfer The entire data-transfer process is secure and encrypted using keys that only the customer can access.
Support for various Azure storage services You can use Data Box appliances to transfer data to and from different Azure services, such as Azure Blob Storage, Azure File Storage, Azure Managed Disks, and Azure Data Lake Storage (ADSL) Gen 2.
Flexibility to address changing needs You can select the appliance option based on your data-transfer needs. For example, you can request an appliance on an ongoing basis or when needed. This can help in scenarios where large volumes of data are generated offshore or in remote areas where connectivity is an issue—for example, offshore oil or drilling rigs or windmill farms.
Key concepts
The following sections describe key concepts behind the Data Box appliances to help you identify which device is the right one for your needs.
Data Box components
Each of the Data Box products has different components:
Azure Data Box
Azure Data Box Disk
Azure Data Box Heavy
Azure Data Box
This product consists of multiple components:
Data Box appliance This appliance contains 100 TB of encrypted disks, with a usable capacity of 80 TB. Each device supports data transfer using network interfaces. There are four interfaces: one 1 gigabit ethernet (GbE) interface for management, one 1 GbE interface for data transfers, and two 10 GbE interfaces for data transfers. You can reconfigure both 1 GbE interfaces to function in 10 GbE mode, depending on your network setup requirements.
Azure Data Box service You use this service, which you access from the Azure portal, to order and manage the data-transfer process to and from Azure.
Local web user interface (UI) You use this local web UI to connect to the local device within your network to set up, configure, and manage the appliance.
Azure Data Box Disk
This product consists of two components:
Data Box Disk appliance This appliance contains 40 TB of encrypted SSD disks with a usable capacity of 35 TB. Data transfer is supported using USB 3.0. Based on your data-transfer requirements, Microsoft will send you the appropriate number of 8 TB disks.
Azure Data Box service You use this service, which you access from the Azure portal, to order and manage the data-transfer process to and from Azure.
Azure Data Box Heavy
Like the Azure Data Box product, this product contains multiple components:
Data Box appliance This appliance contains 1 PB of encrypted disks with a usable capacity of 770 TB. Each device supports data transfer using network interfaces. There are four interfaces: one 1 GbE interface for management, one 1 GbE interface for data transfers, and two 40 GbE interfaces for data transfers.
Azure Data Box service You use this service, which you access from the Azure portal, to order and manage the data-transfer process to and from Azure.
Local web UI You use this local web UI to connect to the local device within your network to set up, configure, and manage the appliance.
Import/export workflow
Following is a standard workflow for importing data to Azure using the Data Box service:
Place the Data Box order. This involves the following steps:
Selecting which Data Box appliance you want to order.
Setting up the required encryption (Microsoft-managed or customer-managed).
Specifying where the data must be uploaded when Microsoft receives it.
Confirming the associated charges (if any).
After you receive the Data Box appliance, you must set it up using one of the following procedures (depending on which type of appliance it is):
Data Box Disk Connect the disks to the required client using USB 3.0 and unlock the disks using the key provided in your Data Box order in the Azure portal.
Data Box or Data Box Heavy Set up the appliance on your network for SMB or NFS transfer and unlock the disks using the key provided in your Data Box order in the Azure Portal.
Copy the required data to the appliance using one of the following procedures (depending on which type of appliance it is):
Data Box Disk Use robocopy to perform the data transfer to disk over SMB or supported Linux tools such as rsync, smbcacls, or cifsacl. (More on supported Linux tools in the section “Preserving ACLs, file attributes, and timestamps” later in this chapter.)
Data Box or Data Box Heavy After you set up and connect your appliance, you can select which protocol to use for data transfer, and the local web UI will guide you through the copy process. Use the supported client tools if you want to preserve ACLs, file attributes, and timestamps during the copy process. (For more on these, see the section “Preserving ACLs, file attributes, and timestamps” later in this chapter.) Complete the copy process within the stipulated timeframe to avoid additional charges from Microsoft (as detailed with your order).
When the data copy operation is complete, return the appliance to Microsoft using the instructions provided with the appliance. Be sure to return the appliance in the same condition as received to avoid rejection or failure.
When Microsoft receives the appliance, the data is automatically uploaded to the service based on your order request.
After the import is successful, Microsoft erases all data on the appliance in line with NIST 800-88 Revision 1 standards.
Following is a standard workflow for exporting data from Azure using the Data Box service:
Place the Data Box order. This involves the following steps:
Selecting which Data Box appliance you want to order.
Providing details regarding the source data in Azure that you want to export.
Setting up the required encryption (Microsoft-managed or customer-managed).
Providing destination details.
Confirming the associated charges (if any).
Microsoft processes the order, transfers the required data to the Data Box appliance according to your order specifications, and ships the appliance to you.
When you receive the appliance from Microsoft, set up the appliance per the instructions provided in the entry for the order in the Azure Portal, unlock the disks, and copy the data on the appliance to your storage. Complete the copy process within the stipulated timeframe to avoid additional charges from Microsoft (as detailed with your order).
After the data export operation is complete, return the appliance to Microsoft using the instructions provided with the appliance. Be sure to return the appliance in the same condition as received to avoid charges for damage.
When Microsoft receives the appliance, it erases all data on the appliance in line with NIST 800-88 Revision 1 standards.
Data security
Each type of Data Box appliance is secured in different ways to protect both the appliance and customer data. Data Box appliances offer the following safety measures:
Azure Data Box This appliance has a rugged casing with tamper-proof screws. In addition, stickers are placed at the bottom of the device to alert you and the Microsoft team of any physical tampering.
Azure Data Box Disk The disks in this appliance are tamper-resistant and support secure update capabilities.
Azure Data Box Heavy This appliance has a rugged casing protected with tamper-proof screws. In addition, stickers are placed at the bottom of the device to alert you and the Microsoft team of any physical tampering.
In addition, these appliances include various data-security measures:
Azure Data Box This appliance comes with disks that are secured using BitLocker AES 256-bit encryption.
Azure Data Box Disk This appliance has SSD disks that are secured using BitLocker AES 128-bit encryption.
Azure Data Box Heavy This appliance comes with disks that are secured using BitLocker AES 256-bit encryption.
In each of these cases, the password to unlock the disks is available in the Azure portal. By default, the password is generated and managed by Microsoft. However, you can create your own customer-managed key by using the Azure Key Vault service when you order the Data Box appliance.
Data-transfer speeds
Each type of appliance supports different data-transfer speeds:
Azure Data Box This appliance supports a data-transfer rate of up to 80 TB per day over the 10 GbE network interface. If using the 1 GbE interface for data transfers, this would significantly slow down the transfer.
Azure Data Box Disk This appliance supports a data-transfer rate of up to 430 megabytes per second (MBps).
Azure Data Box Heavy This appliance supports data transfer using either the 40 GbE network interfaces or downgrading them to 10 GbE network interfaces. The exact data-transfer rates for this service have not been released at this time; however, depending on your interface, speeds would be close to or much higher than those of the Data Box appliance.
Supported Azure services
The Azure Data Box appliances support data import and export to various Azure storage services:
Azure Blob Storage
Azure File Storage
Azure Managed Disks
ADLS Gen 1 or Gen 2 (for imports only)
Depending on the type of data and its purpose, you can select the appropriate storage type in Azure. Different types of Data Box appliances may have limitations with regard to the various storage account types, such as support for hot/cool or standard/premium storage.
Supported client operating systems
The data copy operation must be performed using one of the following operating systems supported by the Azure Data Box service:
Windows Server 2016 RS1 and above
Windows 7, 8, 10, and 11
Linux OS Ubuntu, Debian, CentOS, and Red Hat Enterprise
Availability
Azure Data Box services are available in most Azure regions. However, not all Data Box appliances are available everywhere at this time. Use the following link to verify the availability of your required appliance before planning your next steps: https://azure.microsoft.com/en-us/global-infrastructure/services/?products=databox®ions=all.
Data resiliency
You can have only one instance of the Data Box service running in one geographical Azure region. All your requests within a region are tracked by the same service. However, a passive replica of the service also runs in the Azure region paired with your primary region. Microsoft maintains this replica in the paired region and activates it if your primary region goes offline.
The paired region may or may not be within the same country or commerce boundary. This can affect the steps required from your end after the replica is activated as follows:
If the paired region is within the same country or commerce boundary (for example, the European Union), Microsoft is responsible for recovering the service within 72 hours, and no action is needed from the customer end.
If the paired region is not within the same country or commerce boundary, Microsoft will contact you to ask you to create the Data Box order from an available region.
Partner integrations
The Azure Data Box service integrates with numerous partner solutions, and the list keeps growing. This integration helps you perform the initial data upload of large volumes of data to Azure for use by these partner solutions. There are different scenarios for which you would perform such transfers, including the following:
Backup or archival data
Disaster recovery data
Big data
Media or entertainment content (such as video and audio files)
Data management services content for analytical or content-management purposes
Preserving ACLs, file attributes, and timestamps
You can preserve all your access control lists (ACLs), file attributes, and timestamps during the data copy process, and the Azure Data Box service will retain these upon import into the Azure storage. However, to do so, you must use the correct tools and procedures for the copy process:
For Windows clients Use robocopy to perform an SMB data transfer. Include the
/copyallor/dcopy:DAToptions in yourcopycommand to ensure that all the required metadata is copied.For Linux clients The copy process for Linux clients involves two steps. First, you copy all the data, without metadata, to the Data Box appliance using a tool such as rsync. Then, using tools like smbcacls or cifsacl, you copy the metadata for the copied data.
Limitations
The Azure Data Box service and appliances have various limitations in terms of the following:
Azure container and migrated data file and folder naming conventions
Supported Azure storage types
Total number of files
Transfer speeds
Supported protocols
There are many others, too.
Microsoft is working on addressing these limitations where possible. I expect that some or all of these limitations will either be resolved or reduced over time. After you identify the right Data Box appliance for your needs, review the list of limitations published online to ensure you do not run into issues during import or export operations.
Azure Data Box walkthrough
The following section steps you through the process of ordering, installing, and unlocking an Azure Data Box appliance; transferring data to the appliance; and scheduling a pickup using the Azure portal.
Using Azure Portal
To order, install, and unlock an Azure Data Box appliance; transfer data to the appliance; and schedule a pickup using the Azure portal, follow these steps:
Log in to the Azure portal, type data box in the search box, and select Azure Data Box from the list that appears. (See Figure 5-1.)
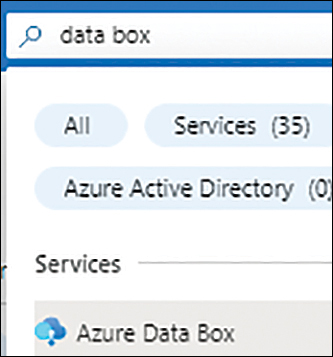
FIGURE 5-1 Search for the Data Box service.
On the Azure Data Box page, click Create Azure Data Box. (See Figure 5-2.)

FIGURE 5-2 Create the Create Azure Data Box button.
On the Select Your Azure Data Box page (see Figure 5-3), enter the following information and click Apply:
Transfer Type Select the Import to Azure (to import data to Azure from an external environment, such as your company datacenter) or Export from Azure (to export data out of Azure to an external environment) option button. For this example, choose Import to Azure.
Subscription Open the Subscription drop-down list and choose the subscription you want to use to place the Data Box order.
Resource Group Select an existing resource group or create a new one in which to create the Data Box order.
Source Country/Region Open the Source Country/Region drop-down list and specify where the source data to copy to the Data Box is located.
Destination Azure Region Open the Destination Azure Region drop-down list to specify the Azure region where you want to transfer the data.

FIGURE 5-3 Starting your Data Box order.
Select the type of Data Box you want to order—Data Box Disk, Data Box, or Data Box Heavy—and click Next. (See Figure 5-4.) For this example, choose Data Box Disk.

FIGURE 5-4 Data Box types.
On the Basics tab of the Order Data Box Disk (Import to Azure) wizard (see Figure 5-5), enter the following information and click Next:
Import Order Name Enter a unique name for the order.
Estimated Data Size in TB Specify how much data (in TB) you expect to transfer to the Data Box.
Use Custom Key Instead of Azure Generated Passkey Specify whether you want to use a custom key to encrypt the data on the Data Box appliance. If you select the Yes option button, the tab expands to display additional fields to capture your custom key information. For this example, select the No option button (the default).

FIGURE 5-5 The Basics tab of the Order Data Box Disk (Import to Azure) wizard.
On the Data Destination tab (see Figure 5-6), enter the following information and click Next:
Data Destination Specify where the data from the Data Box will be stored. In this case, choose Storage Account(s).
Destination Azure Region Select the Azure region where you want to send the data after it has been transferred to the Azure Data Box. Choose the one that is closest to your location—especially if you plan to test the service.
Storage Account(s) Select the storage account you want to use or click the Create a New Storage Account link to create a new one.
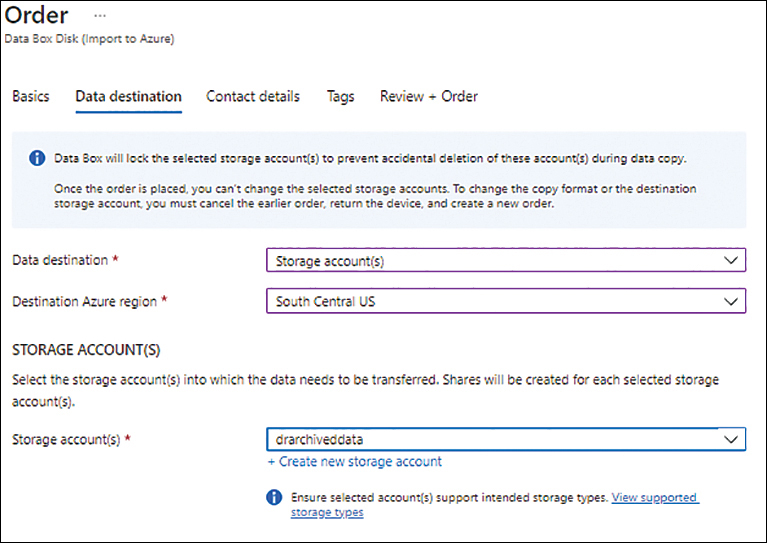
FIGURE 5-6 The Data Destination tab of the Order Data Box Disk (Import to Azure) wizard.
On the Contact Details tab (see Figure 5-7), enter the following information and click Next:
Address Click the Modify Address link and enter the address where the Data Box appliance should be delivered.
Email Enter one or more email addresses to receive notifications regarding the Data Box order, delivery, and pickup.

FIGURE 5-7 The Contact Details tab of the Order Data Box Disk (Import to Azure) wizard.
In the Tags tab (see Figure 5-8), enter the tags you want to associate with the Azure Data Box order and click Next.

FIGURE 5-8 The Tags tab of the Order Data Box Disk (Import to Azure) wizard.
On the Review + Order tab (see Figure 5-9), review your settings. Then click Submit to submit the order request.

FIGURE 5-9 The Review + Order tab of the Order Data Box Disk (Import to Azure) wizard.
After you place the order, you must wait to receive the Data Box Disk appliance from Microsoft. You can open the order details, monitor the status of the order, and track delivery timelines from the Azure portal.
When you receive the Azure Data Box Disk appliance from Microsoft, connect the appliance over USB either directly to the storage containing the data that needs to be copied to the Data Box Disk appliance or to an intermediary appliance/device that allows you to perform the data transfer.
Next, you must unlock each of the disks in the Data Box Disk appliance.
In the Azure portal, browse to the page for the Data Box order. Then, in the left pane, under General, click Device Details.
On the Device Details page (see Figure 5-10), perform the following steps:
Data Box Disk Toolset Click the link next to the appropriate operating system to download the toolset needed to unlock the Data Box. Then extract the toolset.
Passkey Copy the passkey and paste it somewhere handy. You’ll need it to unlock the disks in the Data Box Disk appliance in the steps that follow.
FIGURE 5-10 Data Box Device Details page.
Switch to the client or server where the Azure Data Box Disk is connected, open File Explorer, and locate the disk. As shown in Figure 5-11, the Azure Data Box Disk (Local Disk D:) is locked.

FIGURE 5-11 Local Windows disks.
Locate the folder where you extracted the Data Box Disk toolset and double-click the DataBoxDiskUnlock application to run it. (See Figure 5-12.)

FIGURE 5-12 DataBoxDiskUnlock tool.
In the command prompt window that opens (see Figure 5-13), paste the passkey you copied earlier.
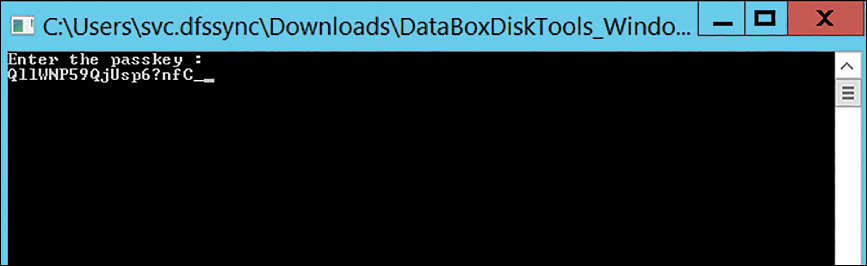
FIGURE 5-13 Copy the passkey to unlock the Data Box Disk appliance.
Microsoft verifies the key, unlocks the Data Box Disk appliance, and notifies you that the appliance’s disks are ready to use. (See Figure 5-14.)
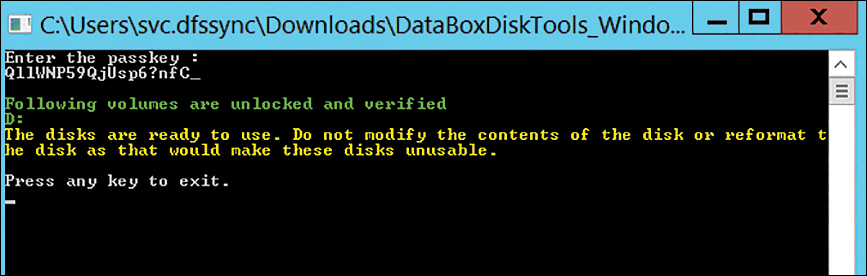
FIGURE 5-14 The Data Box is unlocked.
Switch back to File Explorer. As shown in Figure 5-15, the Azure Data Box Disk appliance is unlocked.

FIGURE 5-15 The unlocked Data Box Disk appliance in File Explorer.
Double-click the drive for the Data Box Disk appliance. As shown in Figure 5-16, the appliance contains a pre-built folder structure based on the destination type you selected when you placed the Data Box Disk order.
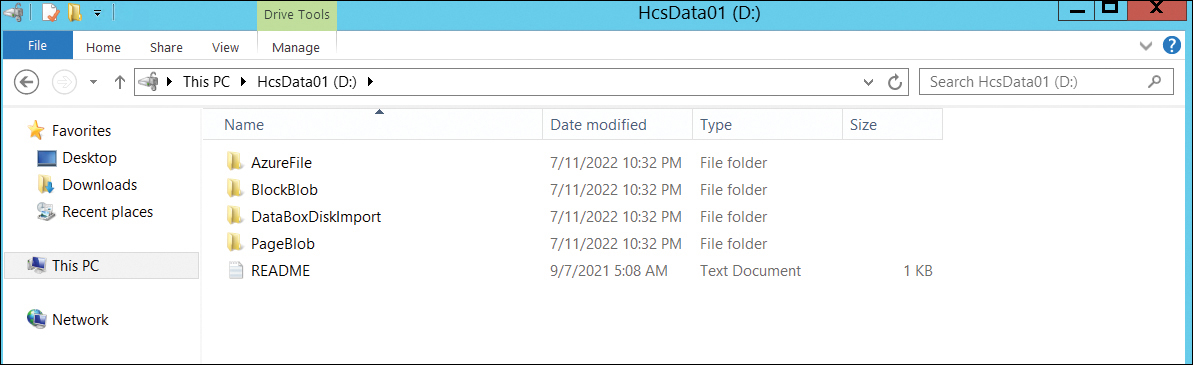
FIGURE 5-16 Data Box Disk appliance: default folder structure.
After you unlock the Data Box Disk appliance, transfer your data using any data-transfer tool (such as robocopy) or by copying and pasting the required data to the Data Box Disk appliance’s folders.
When you transfer data, keep these points in mind:
Because you selected to copy data to a storage account during the order process, you must copy the data to the AzureFile, BlockBlob, or PageBlob folder, depending on the storage container created in the destination Azure storage account.
Because each disk has limited storage, you must plan the data transfer to ensure you transfer unique data to each disk.
You can perform transfers to multiple disks at a time, provided your data source and any intermediary used for the data transfer can handle the read-and-write IO loads.
After all the data has been transferred, you schedule a pickup to ship the Azure Data Box Disk appliance back to the Azure region you selected during the order process. Do not initiate this process until after all the data is transferred.
To schedule a pickup, browse to the page for the Data Box order in the Azure portal. Then, near the top of the Overview page, click Schedule Pickup. (See Figure 5-17.)

FIGURE 5-17 The Overview page for the Azure Data Box order.
A Schedule Pickup pane opens. (See Figure 5-18.) It details how you should prepare the package and request a pickup.

FIGURE 5-18 Azure Data Box - Schedule Pickup information
Follow the directions in the Schedule Pickup pane to prepare the Data Box for shipment.
In the Data Box order’s Overview pane, near the top, click View Ship Instructions to download a PDF file to your PC containing the shipping label and detailed instructions on how to print and apply it to the package. The PDF file also outlines the steps to ship the disks back to Microsoft.
After the package arrives at the Azure region datacenter you specified, the Microsoft team connects the disks in the Azure Data Box Disk appliance to the Azure datacenter network. The data on the disks is then automatically uploaded to the storage account you specified during the order process. Depending on the outcome of the transfer job, you might experience the following:
If the job completes successfully, the Microsoft engineering team will send a message to each email address you specified during the order process. Microsoft will permanently wipe the disks in the order and confirm when this is done via email.
If the storage account is unavailable, the transfer job will fail, and the Microsoft engineering team will send a notification message to each email address you specified during the order process and work with you to rectify the storage account issue and copy the data over.
If the transfer job completes with errors, the Microsoft engineering team will send a message to each email address you specified during the order process to ask you to analyze and address those errors. Once rectified, the remaining files will be transferred, and Microsoft will proceed to erase the disks.
In case of any other issues, the Microsoft engineering team will send a notification message to each email address you specified during the order process to engage with you to resolve them.
Data Box use cases
Now that you have a better understanding of the Data Box service and appliances, you can see that many different use cases apply. Following are a few scenarios where this service is used on a regular basis:
Azure Backup Using the Data Box service and appliances can significantly increase the initial upload of large volumes of backup data. Thereafter, incremental uploads can be managed by the Azure Backup service itself.
SharePoint Online You can use the Data Box service to upload large amounts of data to Azure Storage. Then, using the SharePoint Migration Tool, this data can be transferred to the SharePoint Online service in a much faster manner.
Migration to Azure You can use the Data Box service to upload VM disks, SQL backups, and large volumes of application data to Azure to perform faster builds and the migration of your on-premises datacenter.
Migration from Azure You can use the Data Box service to export your Azure data for migration back to on-premises datacenters or other cloud service providers.
HDInsight Data Upload You can upload large volumes of historical data for analysis using HDInsight.
Migrate Hadoop Data to Azure Blob or Data Lake Storage You can migrate data from your on-premises Hadoop cluster to Azure Blob or Data Lake Gen 2 storage using the Data Box or Data Box Heavy appliance.
Seeding File Server Data for Use with Azure File Sync You can perform initial seeding of your on-premises file server to Azure File Storage using the Data Box service, and set up Azure File Sync to perform incremental syncs thereafter.
This list should give you a good idea of the various possibilities for leveraging this service. It is not an exhaustive list, but it does give you an indication of what is possible.
Best practices
Following are some general best practices related to the Azure Data Box service:
Review limitations carefully Azure Data Box has numerous limitations related to naming conventions, data sources, and supported destinations for each of the different Data Box appliances. Be sure you review these carefully before placing your order.
Prepare your environment before placing your order When you receive the Data Box device, you must perform the copy operation and ship the device back to Microsoft within a limited timeframe or incur additional costs. It is a good practice to review the documentation related to the Data Box appliance that you are planning to order and to complete all the prerequisites for your network, client OS, Azure services, etc. before you place the order. This way, you can initiate the data copy soon after you receive the Data Box device and avoid charges for delayed returns.
Use customer-managed keys when possible You have two options for encrypting the Data Box device: a Microsoft-managed encryption key or a customer-managed encryption key. While the key generated by Microsoft is automatic and only available in your Azure subscription, if security is of paramount importance in your environment, it is a good practice to use customer-managed keys instead. That way, you can define your own key for the encryption.