Chapter 2
Azure Files
Overview
Microsoft introduced the Azure Files service in September 2015. It provides support for the Server Message Block (SMB) protocol and a whole host of features to enable organizations to migrate from on-premises file storage hosted on Windows Servers to the Azure Cloud. Over the years, several features have been added to Azure Files, including the following:
Support for Network File System (NFS) protocol for access using Linux and MacOS clients
Storage encryption for secure data hosting
Integration with Azure Backup for seamless backups and restores
Low latency data access through caching features of Azure File Sync with on-premises file servers using SMB and various other features
Organizations leverage Azure Files to address various use cases, such as the following:
Common file storage between on-premises and cloud-hosted applications and servers for data exchange and sharing.
Replacement of on-premises server-based file shares with serverless file shares that provide built-in high availability (HA) and disaster recovery (DR).
Migration of legacy applications relying on file storage services to the cloud.
Creation of modern applications that use REST APIs to access Azure Files as storage for application containerization or data access and exchange.
Replacement of User Profile Disks (UPDs) in Windows Virtual Desktop with FSLogix profile containers hosted on Azure Files.
Low latency file storage for users through Azure File Sync.
Key features
Some key features and benefits of Azure Files are as follows:
Microsoft-managed service Azure Files is a fully managed service provided by Microsoft. The end user does not manage the back-end hardware infrastructure or any underlying operating system (OS). This significantly reduces the workload of the IT management team in managing the hardware.
High-availability and disaster recovery Azure Files provides built-in high availability (HA) and disaster recovery (DR) features. This relieves the IT department of the overhead involved with building and managing these capabilities to increase the redundancy and reliability of the file storage services.
Support for different storage disk types Azure Files supports the creation of standard or premium file shares, based on your scalability and performance needs. Storage accounts for standard file shares can scale up to 5 petabytes (PB), while storage accounts for premium file shares can scale up to 100 terabytes (TB). Similarly, the maximum input/output operations per second (IOPS) supported by storage accounts for standard file shares is 20,000 IOPS and 100,000 IOPS for premium file shares.
Cost-effective storage Azure Files is extremely cost-effective compared to traditional file shares, especially when you consider overall costs, such as for hardware, networking infrastructure, backup infrastructure, OS licensing, and infrastructure upkeep and management.
Scalability Azure Files supports easy scaling of storage capacity over time. You can provision storage based on your current requirements, and scale it with just a few clicks as your requirements increase. This eliminates the need to procure and provision large amounts of storage capacity in advance in both primary and secondary locations.
Support for SMB and NFS protocols Azure Files supports both SMB and NFS protocols, making it accessible using Windows, Linux, and MacOS clients.
Support for Azure portal and Azure Storage Explorer You can manage Azure Files using the Azure portal, which provides a GUI-based experience. You can also manage Azure Files using Azure Storage Explorer, which enables you to easily build, manage, and upload/download content from the file storage.
Support for PowerShell and Azure CLI Azure Files supports the use of Azure PowerShell and Azure CLI commands to build and manage the shares and to automate activities.
Support for application integration using REST APIs Azure Files supports application integration using file system I/O APIs and existing application code to read and write from the file storage. You can also use Azure Storage REST APIs and Azure Storage Client Libraries for application integrations.
Integration with Active Directory Domain Services and Azure Active Directory Domain Services Azure Files supports using both Active Directory Domain Services (AD DS) and Azure Active Directory Domain Services (AAD DS) for seamless identity authentication. This can help organizations leverage their existing authentication and authorization models to provide access to their users.
Data encryption at rest and in transit Azure Files supports data encryption in transit by default over both SMB and NFS protocols. In addition, Azure Files supports data encryption at rest using either Microsoft-managed or customer-managed encryption keys.
Access over private and public networks You can access Azure Files storage over private networks using Azure private endpoints over a VPN or ExpressRoute. This ensures that all communication between your clients and the storage service is over a private network only. You can also access the file storage over a public network if required.
Sync with on-premises SMB file servers for local latency You can integrate Azure Files with on-premises file servers that support the SMB protocol using the Azure File Sync service. This provides low-latency storage closer to your end clients, while also offering redundancy and cloud-based recoverability in the case of a loss of network or hardware in your on-premises environment.
Key concepts
Now that you have an initial understanding of Azure Files, let’s dive deeper into the different deployment models, features, and management concepts to get you ready to deploy your first file storage.
Deployment models
Azure Files can be deployed in one of two ways:
On serverless cloud-hosted storage In this model, you can mount the Azure Files storage using SMB or NFS protocols or directly access the storage using REST APIs or file system I/O APIs. This eliminates the overhead associated with the ongoing maintenance and management of on-premises file servers, including OS patching, hardware replacement, and workload protection. It also simplifies the file storage redundancy options, as you can easily set up geo-redundant storage.
Cached in on-premises storage using Azure File Sync In this model, you synchronize your on-premises file share to Azure Files using Azure File Sync to enhance redundancy and resiliency. This allows you to maintain your on-premises file storage, which is presumably closer to your end users, to support lower latency. It also maintains a redundant copy of the data in the cloud, providing resiliency in case of a disaster in the on-premises environment.
Storage accounts
As discussed in Chapter 1, storage accounts form the backbone of Azure’s storage service options. Storage accounts are a pool of storage disks that constitute the top-level object under which different storage account types, such as blobs, files, queues, and tables, can be created.
Two types of storage accounts support file shares, as follows:
General purpose v2 storage accounts This type of account supports the deployment of file shares along with storage options such as blob containers, tables, and queues. General purpose storage accounts use standard HDD disks for back-end storage. They are suitable for high volumes of storage that are not sensitive to latency. General purpose v2 storage accounts support only the SMB protocol for data access.
FileStorage storage accounts These are storage accounts backed up by premium solid-state SSD disks, providing high IOPS. FileStorage storage accounts support both the SMB and NFS protocols.
Depending on your Azure subscription, you might still be able to create general purpose v1 and classic storage accounts. Both also support file storage. However, Microsoft does not recommend using either option to create new Azure Files storage accounts. Most new features of Azure Files are not available in these two storage account types. If you have an existing storage account on either storage type, it is highly recommended to migrate to either of the other two storage options as soon as possible.
Storage accounts walkthrough
The following sections step you through the process of creating an Azure Files storage account using the Azure portal, Azure PowerShell, and the Azure CLI.
Using Azure Portal
To create an Azure Files storage account using the Azure portal, follow these steps:
Log in to the Azure portal, type storage in the search box, and select the Storage Accounts option from the list that appears. (See Figure 2-1.)

FIGURE 2-1 Searching for storage services in the Azure portal.
On the Storage Account page, click the Create Storage Account button. (See Figure 2-2.)
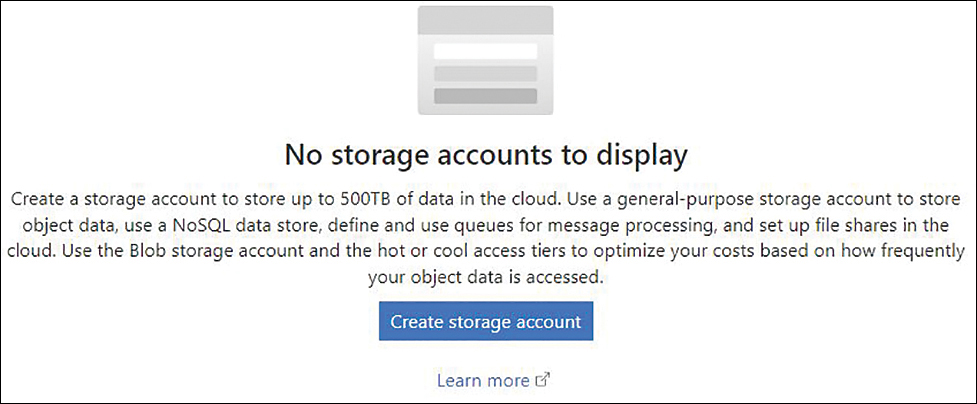
FIGURE 2-2 Creating a storage account.
In the Basics tab of the Create a Storage Account wizard (see Figure 2-3), enter the following information and click Next:
Subscription Select the subscription in which you want to create the Azure Files storage account.
Resource Group Select an existing resource group or create a new one in which to create the Azure Files storage account.
Storage Name Enter a unique name for the storage account.
Region Select the Azure region where you want to host the storage account.
Performance Select a performance type—in this case, choose Premium.
Premium Account Type Choose File Shares.
Redundancy Select a redundancy type for the file share—in this example, Locally-Redundant Storage (LRS).

FIGURE 2-3 The Basics tab of the Create a Storage Account wizard.
In the Advanced tab of the Create a Storage Account wizard (see Figure 2-4), select the Default to Azure Active Directory Authorization in the Azure Portal check box but leave all the options set to their default value. Then click Next.
FIGURE 2-4 The Advanced tab of the Create a Storage Account wizard.
In the Networking tab of the Create a Storage Account wizard (see Figure 2-5), leave the Network Connectivity and Network Routing options set to their default values (Enable Public Access from All Networks and Microsoft Network Routing, respectively) and click Next.

FIGURE 2-5 The Networking tab of the Create a Storage Account wizard.
In the Data Protection tab of the Create a Storage Account wizard (see Figure 2-6), leave the Enable Soft Delete for File Shares check box checked and type 14 in the Days to Retain Deleted File Shares box. Then click Next.

FIGURE 2-6 The Data Protection tab of the Create a Storage Account wizard.
In the Encryption tab of the Create a Storage Account wizard (see Figure 2-7), select the Enable Infrastructure Encryption check box, leave the other options set to their default values, and click Next.

FIGURE 2-7 The Encryption tab of the Create a Storage Account wizard.
In the Tags tab (see Figure 2-8), enter a name and value for any tags you want to associate with the storage account, and click Next.

FIGURE 2-8 The Tags tab of the Create a Storage Account wizard.
In the Review + Create tab of the Create a Storage Account wizard (see Figure 2-9), review your settings, and click Create to create the Azure Files storage account.

FIGURE 2-9 The Review tab of the Create a Storage Account wizard.
After the account is created, click Go to Resource to access the new account’s page. (See Figure 2-10.)

FIGURE 2-10 Storage deployment completion.
Using Azure PowerShell
Use the following Azure PowerShell code to create an Azure Files storage account:
#Define required variables
$resourceGroup = "RG01"
$region = "eastus"
$storageaccname = "mbspfilesharestorage02"
$share = "fileshare"
$directory = "directory"
$vnet = "vNET01"
$subnet = "default"
$endpointname = "PrivateEndpoint"
$vaultname = "RecoveryServicesVault01"

#Create Azure File Share storage account
New-AzResourceGroup -Name $resourceGroup -Location $region

$storageAccount = New-AzStorageAccount `
    -ResourceGroupName $resourceGroup `
    -Name $storageAccName `
    -Location $region `
    -Kind FileStorage `
    -AllowBlobPublicAccess $true `
    -SkuName Premium_LRS `
    -MinimumTlsVersion TLS1_2

# Set up Soft Delete Configuration
Update-AzStorageFileServiceProperty `
    -ResourceGroupName $resourcegroup `
    -StorageAccountName $storageaccount `
    -EnableShareDeleteRetentionPolicy $true `
    -ShareRetentionDays 14
Using Azure CLI
Use the following code to create an Azure Files storage account in the Azure CLI:
#Define required variables
resourceGroup="RG01"
region="eastus"
storageaccname="mbspfilesharestorage01"
share="fileshare"
directory="directory"
vnet="vNET01"
subnet="default"
endpointname="PrivateEndpoint"
vaultname="RecoveryServicesVault01"

#Create Azure File Share storage account
az group create
    --name $resourceGroup
    --location $region
az storage account create
    --resource-group $resourceGroup
    --name $storageaccname
    --location $region
    --kind FileStorage
    --sku Premium_LRS
    --output none
    --min-tls-version TLS1_2
    --allow-blob-public-access true

# Set up Soft Delete Configuration
az storage account file-service-properties update
    --resource-group $resourceGroup
    --account-name $storageaccname
    --enable-delete-retention true
    --delete-retention-days 14
File shares
A file share is a shared location that can be used to store data for collaboration purposes or by application or services to perform read and write operations via the SMB or NFS protocols. As mentioned, Azure Files supports the creation of standard or premium file shares, based on your scalability and performance needs.
You can create an unlimited number of file shares in a storage account as long as the overall storage account size limits are maintained. While file shares on standard GPv2 storage accounts do not have a minimum size requirement, file shares hosted on premium storage have a minimum size of 100 GB per share.
The maximum size of a single file share supported on both standard GPv2 and premium accounts is 100 TiB. However, the standard on GPv2 is 5 TiB. Support for 100 TB on GPv2 is available only if you enable the large file share feature.
File shares walkthrough
The following sections step you through the process of creating a file share, uploading data to that file share, connecting to the file share, and changing the size and performance characteristics of file share using the Azure portal, Azure PowerShell, and the Azure CLI.
Using Azure Portal
To create a file share, create a directory within that file share, upload data to that file share, connect to the file share, and change the size and performance characteristics of the file share using the Azure portal, follow these steps:
In the left pane of the Azure Files storage account page, under Data Storage, click File Shares.
On the File Shares page, click File Share. (See Figure 2-11.)

FIGURE 2-11 Creating a file share.
In the New File Share dialog box (see Figure 2-12), enter the following information and click Create:
Name Enter a name for the file share that is unique within this storage account. The share name must contain at least three characters.
Provisioned Capacity Select the file share’s starting capacity.
Protocol In this example, select the SMB option button.

FIGURE 2-12 The New File Share dialog box.
The new file share appears in the storage account window.
Click the file share to select it. Then, on the file share’s Overview page (see Figure 2-13), click Add Directory.

FIGURE 2-13 Creating a new directory.
In the New Directory dialog box (see Figure 2-14), enter a name that is unique within this file share, and click OK.

FIGURE 2-14 Enter a unique name for the new directory.
The directory appears on the file share’s Overview page. (See Figure 2-15.)

FIGURE 2-15 The new directory appears.
On the file share’s Overview page (refer to Figure 2-13), click Add Directory to create a new directory in the file share.
Click Upload.
In the Upload Files dialog box (see Figure 2-16), click the Browse button to locate and select the file(s) you want to upload to the new directory. Then click Upload.

FIGURE 2-16 Uploading files to file share directory.
The file(s) you selected are listed beneath the directory on the file share’s Overview page when the upload is complete. (See Figure 2-17.)
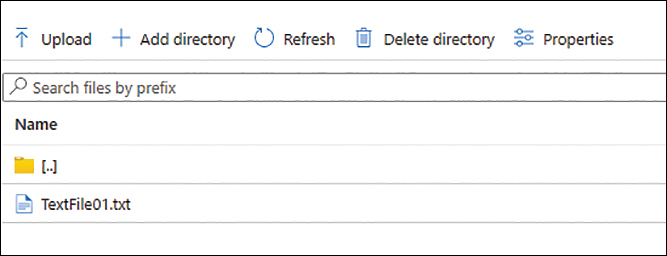
FIGURE 2-17 Upload completed.
Now you’re ready to access the file share using a Windows, Linux, or MacOS client. In this example, we’ll set up a Windows client.
On the file share’s Overview page, click Connect.
In the Connect dialog box (see Figure 2-18), perform the following actions. Then click Done.
Drive Letter Select a drive letter to use for the file share mapping.
Authentication Method For this example, select the Storage Account Key option button, because we haven’t yet configured Active Directory.
Show Script Click this button to reveal the script for the mapping. Then copy the script shown. You’ll use this script to map the file share drive to a Windows client.
To map the drive to a Windows client, log into the client, open its PowerShell window, paste the script you just copied, and run the script. (See Figure 2-19.)
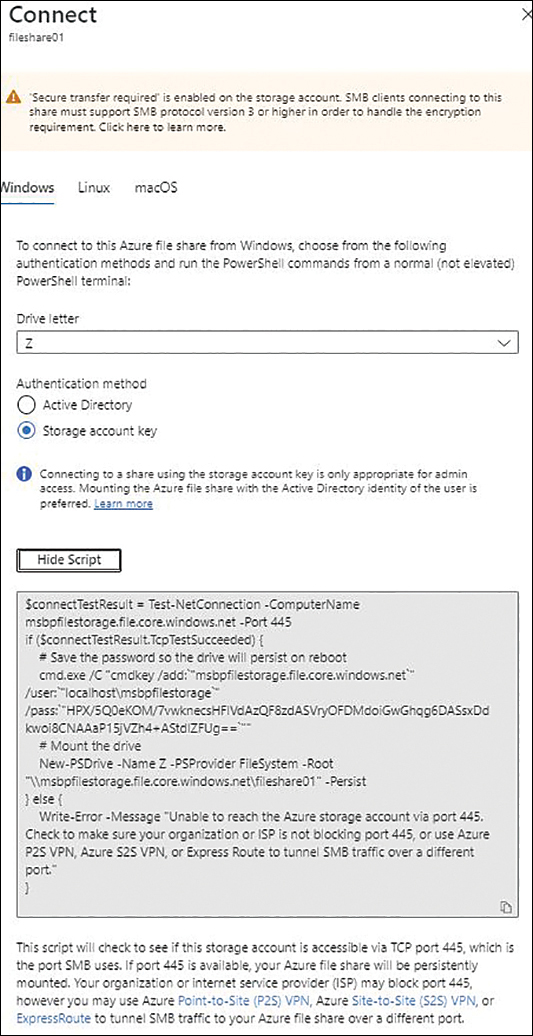
FIGURE 2-18 Connecting to the file share.

FIGURE 2-19 Running a script to map the file share on a Windows client.
On the Windows client, use Windows Explorer to browse to the file share. You should be able to access it as you would any other storage, and to add, delete, and manage files and directories within the share.
Next, you’ll change the size and performance of the file share.
On the file share’s Overview page (refer to Figure 2-13), click Change Size and Performance.
In the Size and Performance dialog box (see Figure 2-20), enter a new value in the Provisioned Capacity box and click Save.
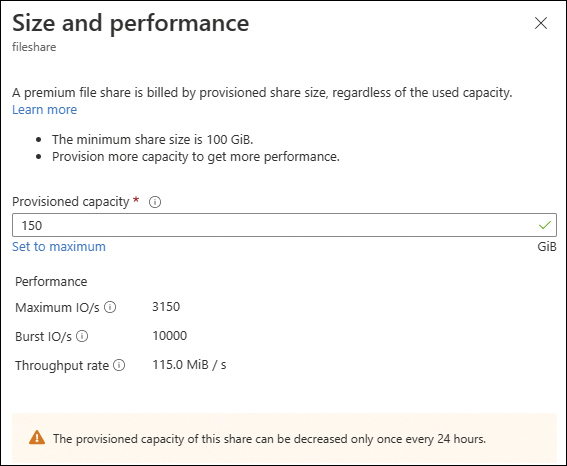
FIGURE 2-20 Changing the file share size.
The file share is resized within a few seconds—in this case, from 100 GB to 150 GB. (See Figure 2-21.)

FIGURE 2-21 The file share size has changed.
Using Azure PowerShell
Use the following Azure PowerShell code to create a file share, create a directory within that file share, upload data to that file share, connect to the file share, and change the size and performance characteristics of the file share:
#Define required variables
$resourceGroup = "RG01"
$region = "eastus"
$storageaccname = "mbspfilesharestorage02"
$share = "fileshare"
$directory = "directory"
$vnet = "vNET01"
$subnet = "default"
$endpointname = "PrivateEndpoint"


#Create file share
New-AzRmStorageShare `
    -StorageAccount $storageAccount `
    -Name $share `
    -EnabledProtocol SMB `
    -QuotaGiB 100

New-AzStorageDirectory `
   -Context $storageAccount.Context `
   -ShareName $share `
   -Path $directory

#Upload data to File Share
cd "~/CloudDrive/"
Get-Date | Out-File -FilePath "TextFile01.txt" -Force

Set-AzStorageFileContent `
   -Context $storageAccount.Context `
   -ShareName $share `
   -Source "TextFile01.txt" `
   -Path "DirectoryTextFile01.txt"

#Verify data in File Share
Get-AzStorageFile `
    -Context $storageAccount.Context `
    -ShareName $share `
    -Path "Directory" | Get-AzStorageFile

# Download file from File Share
Get-AzStorageFileContent `
    -Context $storageAccount.Context `
    -ShareName $share `
    -Path "DirectoryTextFile01.txt" `
    -Destination "TextFile01.txt" `
    -Force
#Enable SMB Multichannel
Update-AzStorageFileServiceProperty `
-ResourceGroupName $resourceGroup `
-AccountName $storageAccName `
-EnableSmbMultichannel $true

# Changing Size and Performance
Update-AzRmStorageShare `
    -ResourceGroupName $resourceGroup `
    -StorageAccountName $storageAccount `
    -Name $share `
    -QuotaGiB 150
Using Azure CLI
Use the following code to create a file share, create a directory within that file share, upload data to that file share, connect to the file share, and change the size and performance characteristics of the file share in the Azure CLI:
#Define required variables
resourceGroup="RG01"
region="eastus"
storageaccname="mbspfilesharestorage01"
share="fileshare"
directory="directory"
vnet="vNET01"
subnet="default"
endpointname="PrivateEndpoint"
vaultname="RecoveryServicesVault01"


#Create file share
az storage share-rm create
    --resource-group $resourceGroup
    --storage-account $storageaccname
    --name $share
    --quota 100
    --enabled-protocols SMB
    --output none

az storage directory create
                       --name $directory
                       --share-name $share
                       --account-name $storageaccname

#Upload data to File Share
cd ~/clouddrive/
date > TextFile01.txt

az storage file upload
    --account-name $storageaccname
    --share-name $share
    --source "TextFile01.txt"
    --path $directory/TextFile01.txt

#Verify data in File Share
az storage file list
    --account-name $storageaccname
    --share-name $share
    --path "$directory"
    --output table

# Download file from File Share
az storage file download
    --account-name $storageaccname
    --share-name $share
    --path "$directory/TextFile01.txt"
    --dest "./TextFile01.txt"
    --output none

# Changing Size and Performance
az storage share-rm update
    --resource-group $resourceGroup
    --storage-account $storageaccname
    --name $share
    --quota 150
Storage tiers for file shares
To accommodate the needs of different organizations, such as workload types, performance requirements, and storage price, Microsoft offers four tiers for the Azure Files service:
Premium
Transaction-optimized
Hot
Cool
Each of these offers varying levels of performance, costs, and billing models. Let’s examine each in more detail to help you in your storage tier selection:
Premium file shares
Premium file shares provide the highest level of performance and lowest latency among all the storage tiers offered by the Azure Files service. They use Solid-State Drives (SSDs) in the back end and are great for IO-intensive workloads such as databases and high-traffic web services. Premium file shares support both SMB and NFS protocols, making them accessible over Windows, Mac, and UNIX operating systems to meet varying client bases of an organization.
Premium file shares are deployed on the FileStorage account type and work on the provisioned billing model, which means that the storage is billed based on the amount of storage and required IOPS defined at the time of provisioning the storage. You can scale up the provisioned storage at any time to get more capacity or IOPS, and the changes would take effect within a few minutes. You can also scale down the storage once every 24 hours to reduce the capacity or the IOPS provisioned for the storage. Although you can scale down below your current storage usage, you will still be billed based on your actual usage in this scenario while keeping your storage IOPS at the threshold specified for the storage capacity.
Transaction-optimized file shares
Transaction-optimized file shares are ideal for workloads that perform a large volume of transactions but do not require the low latency offered by Premium file shares. They are a good mix of performance and price, making them ideal for organizations that would like a better performance than those offered by Hot file shares while not incurring the higher costs of Premium file shares. Transaction-optimized file shares are hosted on standard storage hardware backed by hard-disk drives (HDDs).
Transaction-optimized file shares are deployed in a General Purpose v2 (GPv2) storage account type and charged in a pay-as-you-go model. They are optimized to charge the lowest transaction prices but have higher data at-rest storage prices when compared to Hot and Cool file shares.
Hot file shares
Like Transaction-optimized file shares, Hot file shares use standard storage hardware backed by hard-disk drives (HDDs) in the back end, making them ideal for general-purpose file share scenarios such as a replacement for an on-premises file server, where the transaction volume is not high.
Hot file shares are deployed in a General Purpose v2 (GPv2) storage account type and charged in a pay-as-you-go model. They have lower data at-rest prices but higher transaction prices when compared to Transaction-optimized file shares.
Cool file shares
Cool file shares are the most cost-efficient of all four storage tiers when comparing data at-rest prices. In comparison, they are the highest of all four storage tiers when comparing transaction fees. They are ideal for online archiving or backup scenarios where data is stored for a long period of time with minimal data access transactions.
Cool file shares are also deployed in a General Purpose v2 (GPv2) storage account type and charged in a pay-as-you-go model.
Networking considerations
When designing and deploying an Azure Files file share service, you must take multiple networking considerations into account. These range from selecting the network protocol, the type of access endpoint, networking routing options, and whether to use encryption-in-transit. Each of these considerations can affect the security, latency, and performance of the file share service.
Network protocols
Azure Files supports two file system protocols for mounting file shares: Server Message Block (SMB) and Network File System (NFS). Both protocols are industry-standard file system protocols used in different operating environments, enabling organizations to choose the protocol that meets their needs. Azure Files also provides a REST API (called FileREST API) to access data hosted in Azure file shares.
Server Message Block (SMB)
SMB, also known as Common Internet File System (CIFS) protocol, is an industry-standard network file sharing protocol used extensively in Microsoft Windows server and client operating systems. It is supported by MacOS and various Linux distributions as well.
SMB file shares support most Azure Files features, including the following:
Accessibility over the public internet using SMB 3.x
Support for on-premises caching using Azure File Sync
User-based identity authorization using AD domain join and access control lists (ACLs)
Integrated backups with Azure Backup
Support for Azure private endpoints
Protection from accidental deletion using the soft-delete feature
Support for SMB Multichannel on premium file shares to increase network throughput
Support for integrated snapshots using Volume Shadow Copy Service (VSS)
Support for these features makes SMB file shares ideal for replacing or complementing on-premises file servers and for serving as back-end storage for Windows-based applications and databases. The following sections dive further into each of these features.
Network File System (NFS)
NFS is an industry-standard network distributed file system protocol used predominantly in Unix-based operating systems. While it is also supported by Microsoft Windows–based operating systems and MacOS, there are feature limitations when compared to SMB-based file shares.
NFS file shares are characterized as follows:
Supported only on premium file shares that use solid-state drives (SSDs)
Not supported for use by Windows clients
Used primarily for UNIX clients
Fully POSIX-compliant file system
Supports both hard links and symbolic links
Does not support Kerberos authentication (AD domain join authentication scenarios require Kerberos authentication support)
Does not support encryption-in-transit, requiring the use of private endpoints for access over internal networks or restricted public endpoints
Does not support delegation or callbacks
FileREST API
Azure Files also provides a REST API to access data hosted in Azure file shares, called FireREST. The FireREST API works over HTTPS endpoints, ensuring all communication is secure. It is ideal for the development of new applications or for existing application redevelopment projects that leverage new APIs instead of the native file system APIs used by the SMB and NFS protocols. The main way to use this API is to use the Azure SDKs to write code in any popular programming language, such as Python, Java, C#, JavaScript, or Go.
The primary benefits of using the FileREST API include the following:
It supports all Azure Files features.
It is used by the Azure portal, Azure PowerShell, and the Azure CLI.
It provides more efficient data transfer between Azure Files storage than the SMB and NFS protocols.
Networking endpoints
Azure Files supports access over SMB or NFS to the file share service. You can access the storage over either the public internet or a private connection such as Azure ExpressRoute or VPN. Depending on your organization’s security and access requirements, your approach might involve the use of one or both methods.
Public endpoints
By default, Azure Files file shares are accessible over the internet by way of a public endpoint using the SMB protocol. This makes it convenient to access the storage if you have an active internet connection. The public endpoint is in the format https://<storage-account-name>.file.core.windows.net.
However, many internet service providers (ISPs) and most organizations block SMB port 445 over the internet. So, to allow access, you will have to either contact your ISP to unblock the port or unblock it on your organization’s firewalls. This is the easiest method for accessing the storage. However, some organizations consider this to be insecure because the storage is accessible over a public endpoint. In such scenarios, organizations can use private endpoints, discussed next.
Private endpoints
In brief, private endpoints provide the ability to assign a private or internal IP to the Azure Files share and make it accessible over an Azure ExpressRoute, Azure peering, or Azure VPN connection. The private endpoint is in the format https://<privateendpoint-name>.privatelink.file.core.windows.net.
Private endpoints walkthrough
The following sections step you through the process of creating a private endpoint using the Azure portal, Azure PowerShell, and the Azure CLI.
Using Azure Portal
To create a private endpoint using the Azure portal, follow these steps:
In the left pane of the Azure Files storage account page, under Security + Networking, click Networking.
In the Firewalls and Virtual Networks tab on the Networking page (see Figure 2-22), under Public Network Access, select the Disabled option button. Then click Save.

FIGURE 2-22 Disabling public network access.
Click the Private Endpoint Connections tab. Then click Private Endpoint near the top of the page. (See Figure 2-23.)

FIGURE 2-23 Setting up a private endpoint.
In the Basics tab of the Create a Private Endpoint wizard (see Figure 2-24), enter the following information and click Next:
Subscription Select the subscription in which you want to create the private endpoint.
Resource group Select an existing resource group or create a new one in which to create the private endpoint.
Name Enter a unique name for the private endpoint.
Network Interface Name Enter a unique name for the private endpoint network interface.
Region Select the Azure region where you want to host the private endpoint. This should be the same region as the file share.

FIGURE 2-24 The Basics tab of the Create a Private Endpoint wizard.
On the Resource tab (see Figure 2-25), in the Target Sub-Resource box, select the storage account type—in this case, File. Then click Next.
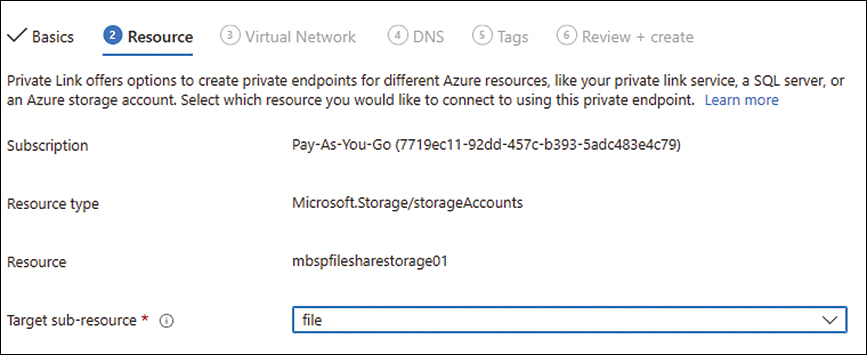
FIGURE 2-25 The Resource tab of the Create a Private Endpoint wizard.
On the Virtual Network tab (see Figure 2-26), enter the following information and click Next:
Virtual Network Select the virtual network on which you want to create the private endpoint.
Subnet Select the subnet on which you want to create the private endpoint.
Private IP Configuration For this example, select the Dynamically Allocate IP Address option button.
Application Security Group Leave this blank (the default).
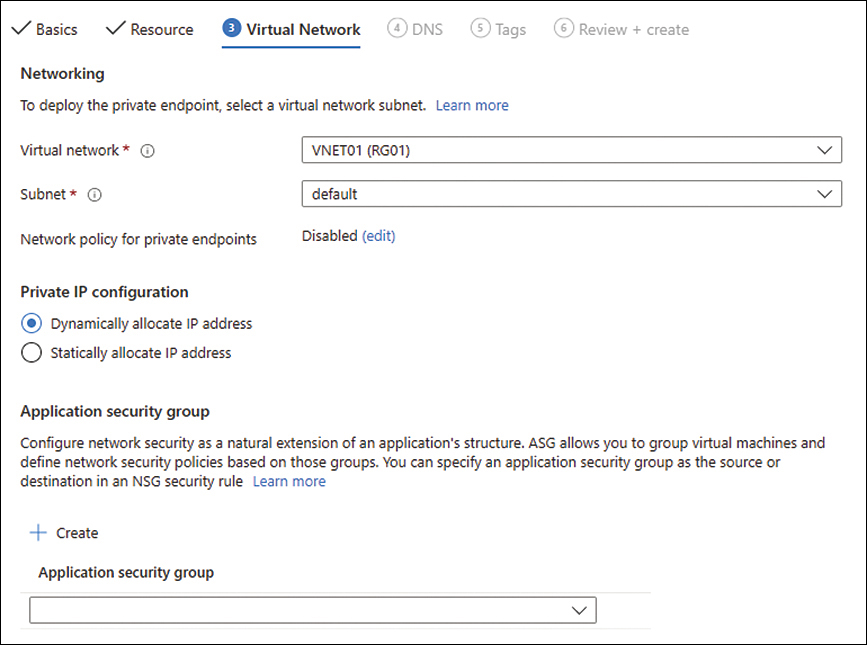
FIGURE 2-26 The Virtual Network tab of the Create a Private Endpoint wizard.
On the DNS tab (see Figure 2-27), enter the following information and click Next:
Integrate with Private DNS Zone Select the Yes option button.
Subscription Select the subscription to use for the private DNS zone.
Resource Group Select the resource group to use to create the private DNS zone.
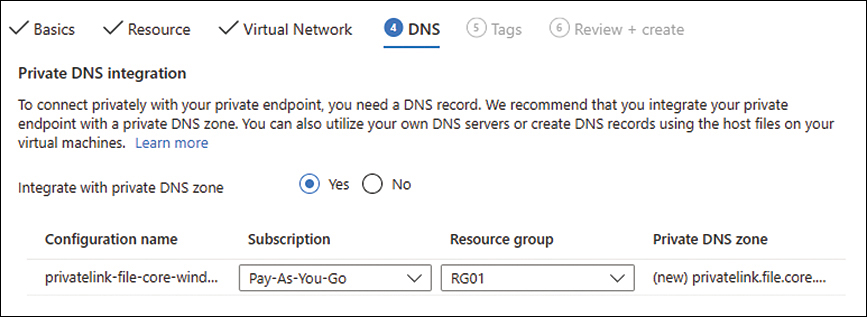
FIGURE 2-27 The DNS tab of the Create a Private Endpoint wizard.
In the Tags tab (see Figure 2-28), add any tags you want to associate with the private endpoint, and click Next.
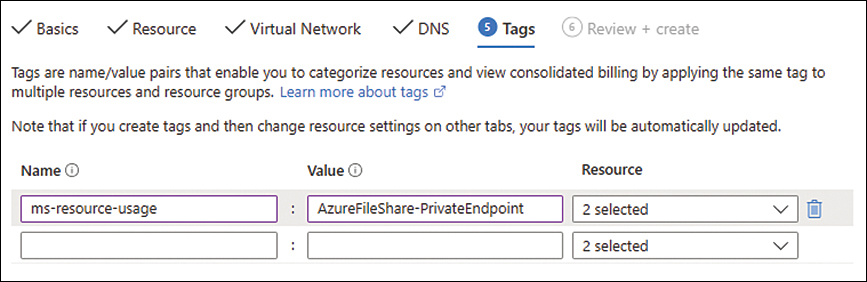
FIGURE 2-28 The Tags tab of the Create a Private Endpoint wizard.
In the Review + Create tab (see Figure 2-29), review your settings. Then click Create to create the private endpoint.
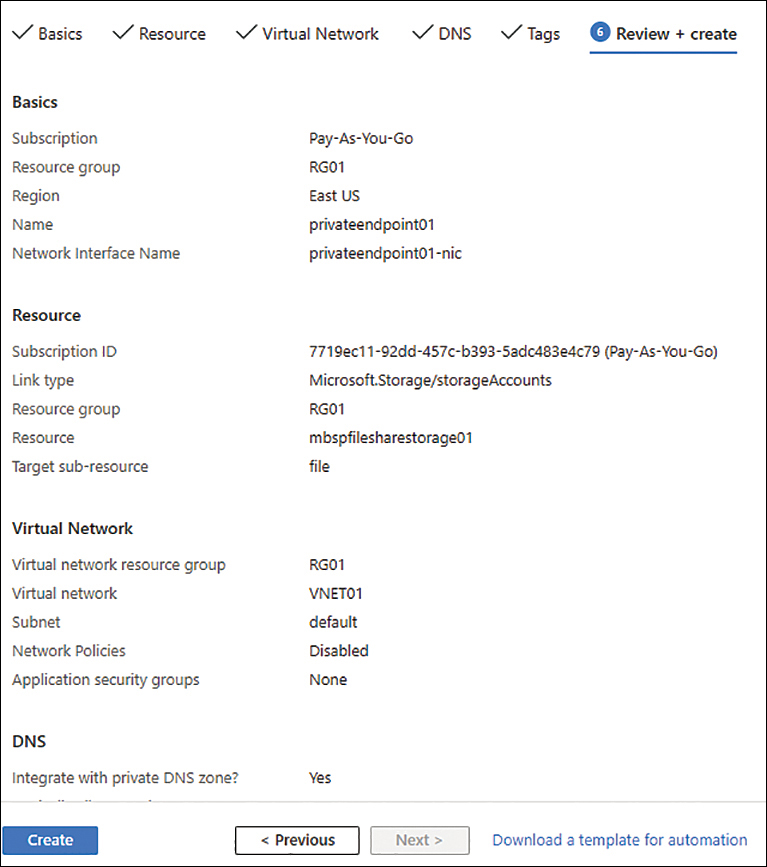
FIGURE 2-29 The Review + Create tab of the Create a Private Endpoint wizard.
After the private endpoint is created, click Go to Resource to access it. (See Figure 2-30.)
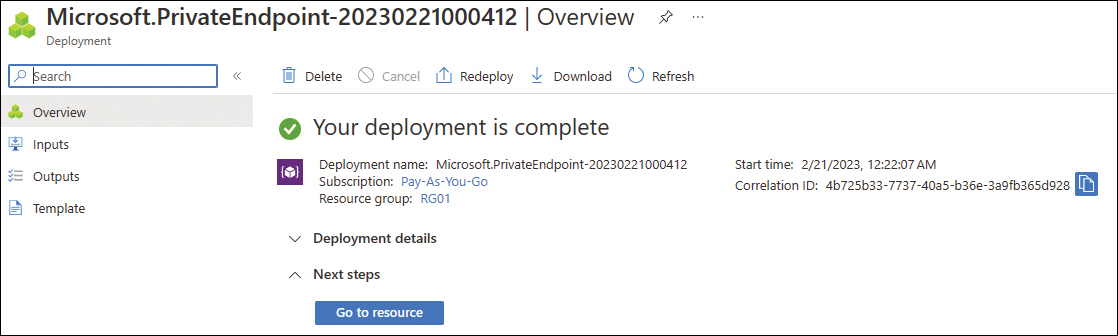
FIGURE 2-30 Create a private endpoint wizard: Completion.
Using Azure PowerShell
Use the following Azure PowerShell code to create a private endpoint:
#Define required variables
$resourceGroup = "RG01"
$region = "eastus"
$storageaccname = "mbspfilesharestorage02"
$share = "fileshare"
$directory = "directory"
$vnet = "vNET01"
$subnet = "default"
$endpointname = "PrivateEndpoint"


#Block Public access
Set-AzStorageAccount -ResourceGroupName $resourceGroup -Name $storageAccount -PublicNet-
workAccess Disabled

# Create a private link service connection to the storage account.
$privateEndpointConnection = New-AzPrivateLinkServiceConnection `
        -Name "$storageAccount-Connection" `
        -PrivateLinkServiceId $storageAccount.Id `
        -GroupId "file" `
        -ErrorAction Stop

#Configure the private endpoint
$privateEndpoint = New-AzPrivateEndpoint -Name $endpointname `
-ResourceGroupName $resourcegroup `
-Location $region `
-Subnet $subnet `
-PrivateLinkServiceConnection $privateEndpointConnection
Using Azure CLI
Use the following code to create a private endpoint in the Azure CLI:
#Define required variables
resourceGroup="RG01"
region="eastus"
storageaccname="mbspfilesharestorage01"
share="fileshare"
directory="directory"
vnet="vNET01"
subnet="default"
endpointname="PrivateEndpoint"
vaultname="RecoveryServicesVault01"


#Block Public access
az storage account update
    --resource-group $resourceGroup
    --name $storageaccname
    --bypass "AzureServices"
    --default-action "Deny"
    --public-network-access Disabled
    --output none

# Create a private link service connection to the storage account
storageAccount=$(az storage account show
        --resource-group $resourceGroup
        --name $storageaccname
        --query "id" |
    tr -d '"')

privateEndpoint=$(az network private-endpoint create
        --resource-group $resourceGroup
        --name "$storageaccname-PrivateEndpoint"
        --location $region
        --vnet-name $vnet
        --subnet $subnet
        --private-connection-resource-id $storageAccount
        --group-id "file"
        --connection-name "$storageaccname-Connection"
        --query "id" |
    tr -d '"')
Network routing
You must specify which routing method the file share should use. Azure provides two options:
Microsoft routing With Microsoft routing, traffic is routed from the end client to the closest Microsoft edge point of presence (POP), at which point it traverses the Microsoft global fiber backbone to the Azure file share service endpoint. (See Figure 2-31.) This generally results in lower latency and better network performance, and is the default option for most Azure services. This routing type also supports all methods of authentication (covered later in this chapter in the section “Identity and access considerations”).

FIGURE 2-31 Routing via the Microsoft global network.
Internet routing With internet routing, most traffic is routed from the end client over the public internet until it reaches the Microsoft POP that is closest to your file share service. (See Figure 2-32.) This can result in higher latency and performance issues, depending on your ISP. Internet routing only supports the use of the Azure storage account key for storage access. AD domain join options are not supported. (You will learn more about these later in this chapter in the section, “Identity and access considerations.”)

FIGURE 2-32 Routing via internet routing.
Encryption in transit
Encryption in transit refers to the encryption of data while it traverses a network between the Azure file share and the customer endpoint to prevent an attacker from intercepting and reading this data. By default, all Azure storage account types encrypt data in transit if you access them using the SMB protocol or the FileREST API. However, NFS file shares do not support the use of this feature.
Even when using the SMB protocol, encryption in transit is supported only by clients using the SMB 3.x protocol. If you are using SMB 3.x, but your application does not support SMB encryption or is using an older version of SMB, you can disable encryption in transit. However, the preferred and recommended approach is to upgrade or modify your application to support SMB 3.x with encryption for maximum protection of your Azure file share data.
Storage account firewall
The storage account firewall feature is a network policy on the storage account that restricts access based on an access list that you define.
You can configure an Azure Files storage account for restricted access over the public endpoint using the storage account firewall feature. This allows you to restrict accessibility to the public endpoint to specific public IP addresses, specific public IP address ranges, or a virtual network. When restricting access to one or more virtual networks, the virtual network feature of service endpoints is used to control the access.
Storage account firewall walkthrough
The following sections step you through the process of creating a storage account firewall using the Azure portal, Azure PowerShell, and the Azure CLI.
Using Azure Portal
To create a storage account firewall using the Azure portal, follow these steps:
In the left pane of the Azure Files storage account page, under Security + Networking, click Networking.
In the Firewalls and Virtual Networks tab on the Networking page (see Figure 2-33), under Public Network Access, select the Enabled from Selected Virtual Networks and IP Addresses option button.

FIGURE 2-33 Setting up a storage account firewall.
Under Virtual Networks, click Add Existing Virtual Network.
In the Add Networks dialog box (see Figure 2-34), enter the following information and click OK:
Subscription Select the subscription that contains the virtual network subnets you want to add.
Virtual Networks Select the virtual network(s) you want to add.
Subnets Select the subnet(s) you want to add.

FIGURE 2-34 The Add Networks dialog box.
Back in the Firewalls and Virtual Networks tab on the Networking page (refer to Figure 2-33), enter the following information. Then click Save near the top of the page.
Firewall Select the Add Your Client IP Address check box to allow your public IP address access to the storage.
Resource Instances To allow access by specific resource instances, select the instance type in the Resource Type list and the specific instance in the Instance Name list. (For this example, leave these blank.)
Exceptions Select any of the check boxes in this section if you want to allow access to the storage in certain cases. In this example, select Allow Azure Services on the Trusted Services List to Access This Storage Account.
Network Routing Preference Choose Microsoft Network Routing or Internet Routing.
Public Route-Specific Endpoints Optionally, specify whether route-specific endpoints should be published by selecting the Microsoft Network Routing and/or Internet Routing check box. (For this example, leave these unchecked.)
After you click Save, you’ll see the virtual network you added in the Virtual Networks section. (See Figure 2-35.) You can test access to the storage account from the selected virtual network. (You will have to provision a VM in that network and then connect to the storage from that VM.)

FIGURE 2-35 The virtual network you added appears on the list.
Using Azure PowerShell
Use the following Azure PowerShell code to set up a storage account firewall:
#Define required variables
$resourceGroup = "RG01"
$region = "eastus"
$storageaccname = "mbspfilesharestorage02"
$share = "fileshare"
$directory = "directory"
$vnet = "vNET01"
$subnet = "default"
$endpointname = "PrivateEndpoint"
$vaultname = "RecoveryServicesVault01"


#Setting up Storage account firewall
#Set up access from Subnet
Update-AzStorageAccountNetworkRuleSet -ResourceGroupName $resourcegroup -Name $storage-
account -DefaultAction Deny
Get-AzVirtualNetwork -ResourceGroupName $resourcegroup -Name $vnet | Set-AzVirtualNet-
workSubnetConfig -Name $subnet -AddressPrefix "10.0.0.0/24" -ServiceEndpoint "Microsoft.
Storage" | Set-AzVirtualNetwork

$subnet = Get-AzVirtualNetwork -ResourceGroupName $resourcegroup -Name $vnet | Get-AzVir-
tualNetworkSubnetConfig -Name $subnet
Add-AzStorageAccountNetworkRule -ResourceGroupName $resourcegroup -Name $storageaccount
-VirtualNetworkResourceId $subnet.Id
Using Azure CLI
Use the following code to set up a storage account firewall in the Azure CLI:
#Define required variables
resourceGroup="RG01"
region="eastus"
storageaccname="mbspfilesharestorage01"
share="fileshare"
directory="directory"
vnet="vNET01"
subnet="default"
endpointname="PrivateEndpoint"
vaultname="RecoveryServicesVault01"


#Setting up Storage account firewall
#Set up access from Subnet
subnetid=$(az network vnet subnet show
        --resource-group $resourceGroup
        --vnet-name $vnet
        --name $subnet
        --query "id" |
    tr -d '"')

az network vnet subnet update
    --ids $subnetid
    --service-endpoints Microsoft.Storage
    --output none

az storage account network-rule add
                       --resource-group $resourceGroup
                       --account-name $storageaccname
                       --vnet-name $vnet
                       --subnet $subnet

az storage account update
      --resource-group $resourceGroup
      --name $storageaccname
      --bypass "AzureServices"
      --default-action "Deny"
      --output none
SMB Multichannel
When using premium file shares with the SMB protocol, SMB 3.x clients can benefit from the SMB Multichannel feature. This feature aggregates bandwidth over multiple NICs, allowing SMB 3.x clients to connect to the Azure file share using as many as four channels simultaneously. It uses receive side scaling (RSS) on NICs to distribute the IO load across multiple CPUs, thereby providing more throughput and IOPS for every storage client. It also provides network fault tolerance; if one channel fails, the connections over the other channels can continue to function.
SMB Multichannel requires both sides of the connection (including the client-side) to support the feature. SMB Multichannel uses dynamic discovery to determine whether a client supports the multichannel capability, and if necessary, creates additional network connection paths. Currently, Windows and Linux clients that support SMB 3.1.1 support SMB Multichannel.
SMB Multichannel is disabled by default. However, there are no additional charges for using this feature. Hence, in environments with SMB 3.x clients connecting to a premium file share, it is highly recommended to turn on this feature.
SMB Multichannel walkthrough
The following section steps you through the process of enabling the SMB Multichannel feature using the Azure portal.
Using Azure portal
To enable the SMB Multichannel feature, follow these steps:
In the left pane of the Azure Files storage account page, under Data Storage, click File Shares.
On the File Shares page, click the Disabled link next to the SMB Multichannel option along the top. (See Figure 2-36.)
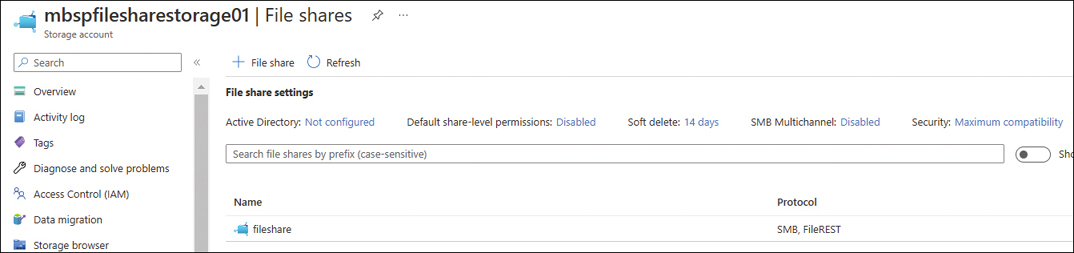
FIGURE 2-36 Setting up SMB Multichannel support.
In the SMB Multichannel dialog box (see Figure 2-37), toggle the SMB Multichannel option to the on position, and click Save.

FIGURE 2-37 Enabling the SMB Multichannel option.
Using Azure PowerShell
Use the following Azure PowerShell code to enable the SMB Multichannel feature:
#Define required variables
$resourceGroup = "RG01"
$region = "eastus"
$storageaccname = "mbspfilesharestorage02"
$share = "fileshare"
$directory = "directory"
$vnet = "vNET01"
$subnet = "default"
$endpointname = "PrivateEndpoint"
$vaultname = "RecoveryServicesVault01"


#Enable SMB Multichannel
Update-AzStorageFileServiceProperty `
-ResourceGroupName $resourceGroup `
-AccountName $storageAccName `
-EnableSmbMultichannel $true
Using Azure CLI
Use the following code to enable the SMB Multichannel feature in the Azure CLI:
#Define required variables
resourceGroup="RG01"
region="eastus"
storageaccname="mbspfilesharestorage01"
share="fileshare"
directory="directory"
vnet="vNET01"
subnet="default"
endpointname="PrivateEndpoint"
vaultname="RecoveryServicesVault01"


#Enable SMB Multichannel
az storage account file-service-properties update
    --enable-smb-multichannel
    --storage-account $storageaccname
    --resource-group $resourceGroup
Identity and access considerations
To allow access to data stored on a file share when using the SMB protocol, the Azure Files service supports three primary authentication methods to confirm the user’s identity and to validate their permission to access the data in that file share. The methods are as follows:
On-premises Active Directory Domain Services (on-premises AD DS) You can integrate an Azure Files file share with your on-premises AD DS services, similar to other Windows clients or servers. Users can then access the storage using their existing AD DS credentials. You can use AD DS–based groups to set up NTFS permissions for the share to validate the authorization level to the share data. This authentication provider uses the Kerberos authentication protocol. You can integrate with a domain controller hosted in Azure or in your on-premises or other cloud environments as long as there is connectivity to the domain controller over a private network for the Kerberos communication to occur. Figure 2-38 shows the authentication flow for on-premises AD DS.
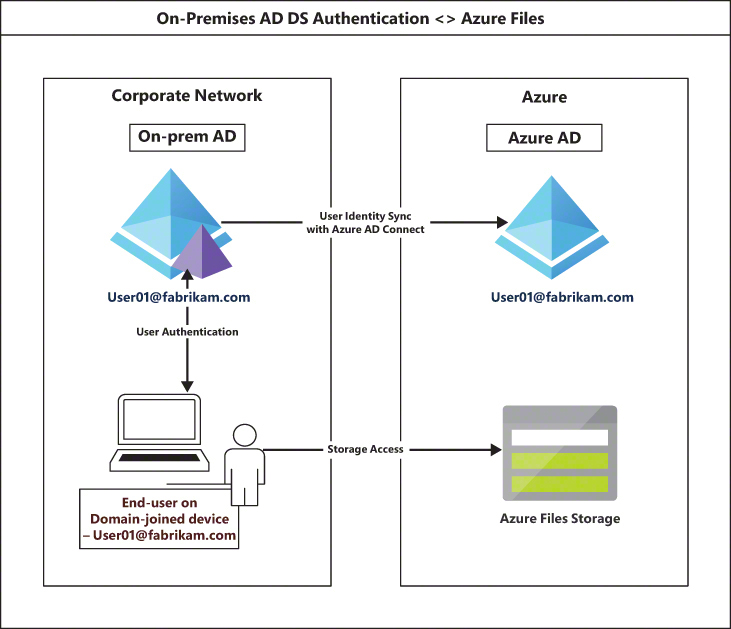
FIGURE 2-38 On-premises AD DS authentication flow.
Azure Active Directory Domain Services (Azure AD DS) As with on-premises AD DS, you can integrate Azure Files with Azure AD DS, which is a Microsoft-managed domain controller hosted in Azure. Azure AD DS also uses the Kerberos authentication protocol. Azure AD DS allows customers to set up their user accounts similar to on-premises AD DS for authentication and authorization. Figure 2-39 shows the authentication flow for Azure AD DS.
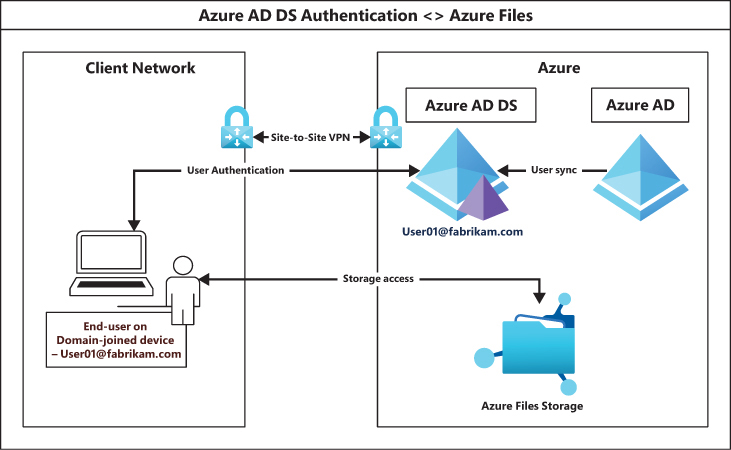
FIGURE 2-39 Azure AD DS authentication flow.
Shared Account Signature (SAS) This option provides administrative access, based on the permissions defined when the SAS token was created, to the file share over SMB via a Shared Account Signature (SAS) token and connection string, bypassing any access control lists set up on individual files and folders within the share. The SAS uses the NTLMv2 authentication protocol over SMB.
Identity and access considerations walkthrough
The following sections step you through the process of generating an SAS token and connection string using the Azure portal, Azure PowerShell, and the Azure CLI.
Using Azure Portal
To generate a SAS token and connection string using the Azure portal, follow these steps:
In the left pane of the Azure Files storage account page, under Security + Networking, click Shared Access Signature.
In the Shared Access Signature page (see Figure 2-40), enter the following information. Then click the Generate SAS and Connection String button.
Allowed Services Leave this set to File (the default).
Allowed Resource Types Select the Service check box.
Allowed Permissions Select the permissions you want to assign.
Start and Expiry Date/Time Select the start and expiration date, time, and time zone for the SAS token.
Allowed IP Addresses To apply the access token to specific IP addresses, enter them here.
Allowed Protocols Choose which protocols to allow.
Signing Key Select the storage account key you want to use.

FIGURE 2-40 Generating a SAS token and connection string.
Using Azure PowerShell
Use the following Azure PowerShell code to generate a SAS token and connection string:
#Define required variables
$resourceGroup = "RG01"
$region = "eastus"
$storageaccname = "mbspfilesharestorage02"
$share = "fileshare"
$directory = "directory"
$vnet = "vNET01"
$subnet = "default"
$endpointname = "PrivateEndpoint"
$vaultname = "RecoveryServicesVault01"


#Generate SAS Access URL
Set-AzCurrentStorageAccount -ResourceGroupName $resourcegroup -Name $storageaccname
New-AzStorageAccountSASToken -Service File -ResourceType Service,Container,Object -Permis-
sion "racwdlup" -Protocol HTTPSOnly -ExpiryTime (Get-Date).AddDays(5)
Using Azure CLI
Use the following code to generate a SAS token and connection string in the Azure CLI:
#Define required variables
resourceGroup="RG01"
region="eastus"
storageaccname="mbspfilesharestorage01"
share="fileshare"
directory="directory"
vnet="vNET01"
subnet="default"
endpointname="PrivateEndpoint"
vaultname="RecoveryServicesVault01"


#Generate SAS Access URL
az storage account  generate-sas
                       --account-name $storageaccname
                       --account-key 00000000
                       --expiry 2024-12-31
                       --https-only
                       --permissions acuw
                       --resource-types sco
                       --services f
Data redundancy
As organizations move their critical information to the cloud, they must consider how to enhance data redundancy to make it easy to recover data in a timely manner while minimizing business impact in the event of an outage.
Azure Files provides various degrees of redundancy to account for local, zonal, and geographical failures, so organizations can choose their level of redundancy based on their requirements. You specify the level of data redundancy when you create your Azure Files storage account, but you can migrate your account to a different level of redundancy later if the need arises. (The migration process differs depending on the storage account type and current redundancy options.)
Chapter 1 discussed the various data redundancy options for Azure Blob Storage. Most of the same redundancy options apply for Azure Files. To review, they are the following:
Locally redundant storage (LRS) With LRS storage, Azure maintains three replicas of your data in a single datacenter within your primary Azure region. This protects against local storage hardware, server rack, or network component failures. However, because all three replicas are stored in the same datacenter, if that datacenter experiences some type of disaster, all three copies of your data could be lost.
Zone-redundant storage (ZRS) Like LRS, ZRS synchronously commits and maintains three replicas of your data in your primary Azure region. However, instead of storing each replica in a single datacenter, they are spread across three availability zones. An availability zone is an independent datacenter in your primary Azure region with its own power, cooling, and networking components. So, if a disaster occurs in one availability zone, your data will still be accessible (unless the disaster also affects the other availability zones within that Azure region).
Geo-redundant storage (GRS) With GRS, Azure synchronously commits and maintains three replicas of your data in your primary Azure region in LRS. Then, three more replicas of your data in a secondary Azure region (selected automatically by Microsoft) are updated to match the three replicas in the primary Azure region, again using LRS. So, you have six copies of your data spread across two geographical regions that are hundreds of miles apart. If the datacenter in your primary region experiences an outage or disaster, then your data will be available in the datacenter in the secondary region. (This assumes all updates to secondary region were complete before the outage in the primary occurred region. If not, there could be some amount of data loss based on the replication lag.)
Geo-zone-redundant storage (GZRS) GZRS is just like GRS, but the three replicas of your data in the primary region use ZRS, while the replicas in the secondary region use LRS. So, there is additional redundancy in the primary region.
As discussed, you can provision Azure Files in different storage accounts. Currently, each type of storage account supports all or a subset of these data-redundancy options, as follows:
General-purpose v2 storage accounts support all four redundancy options (LRS, ZRS, GRS, and GZRS).
Premium file shares currently support only LRS and ZRS, although this might change in the future. Review updated Microsoft guidance at the time of your storage build.
Standard file shares that support a maximum of 5 tebibytes (TiB) can use all four redundancy options (LRS, ZRS, GRS, and GZRS).
Standard file shares that support more than 5 TiB use only LRS and ZRS, although this might change in the future. Review updated Microsoft guidance at the time of your storage build.
Data protection
The following sections discuss various features provided by Microsoft to protect the data in your Azure Files storage, including encryption for at-rest data, soft delete, Azure Backup integration, the ability to restore shares or files, share snapshots, and Microsoft Defender for Storage integration.
Encryption for at-rest data
Azure Files accounts use the same encryption scheme as Azure Blob Storage accounts, covered in Chapter 1. Encryption is applied on the underlying disks, similar to BitLocker encryption on Windows. This ensures that the client does not require access to the key to read or write from the file share. It ensures that the underlying disks cannot be read when removed from the storage in the Azure storage cluster without access to the encryption key.
The keys used for encryption can be Microsoft-managed or customer-managed. Customers can select which type to use based on their organizational requirements for handling data within each file share. You can select different encryption key management strategies in a single Azure subscription.
Azure Files also offers infrastructure encryption, which supports encryption on the infrastructure level and on the storage service level. This uses 256-bit AES encryption and ensures the encryption keys are different from the ones used for the service-level encryption, even if Microsoft is managing them both. This ensures that a breach in one level does not compromise the other level. You cannot use customer-managed keys for infrastructure encryption.
Depending on which type of key you choose, as a best practice, you might need to develop a key-hosting and rotation to ensure keys are rotated on a regular basis but can still be accessed by the file share service for read/write operations. If you choose Microsoft-managed encryption keys, then Microsoft ensures those keys are available to the service for operational use and rotates the keys on a regular basis.
Soft delete
Azure Files introduced a feature called soft delete to enable customers to easily recover any file shares that might have been deleted accidentally. You define how long the file share should be held in a soft-deleted state before the Azure Files service deletes the file share data permanently. Depending on your environment and the criticality of the file shares, it is highly recommended that you enable this feature and you set a retention period that is long enough to allow for such a recovery to be performed.
Share snapshots
A share snapshot is a point-in-time read-only replica of your file share. Because snapshots are incremental, each snapshot contains only the changes since the last snapshot.
Share snapshots provide protection against various scenarios, such as the following:
Data corruption due to malware or application overwrites
Malicious or accidental data deletion
Data deletion due to application misconfiguration
Accidental data overwrite by end users
Each file share supports a maximum of 200 snapshots, with a maximum retention period of 10 years. There are no limits on the amount of space each snapshot can consume, as long as the total space occupied by the share and its snapshots is within the limits supported by the storage account.
Snapshots are stored within the file share itself, so if the file share is deleted, all associated snapshots are also deleted, making a recovery impossible. You will therefore want to use either the soft delete feature to ensure you can recover from any accidental deletion events or Azure Backup to store backup data in a separate service and storage.
When you delete an old snapshot, only files unique to that snapshot will be deleted. This ensures that any subsequent snapshots that rely on the source snapshot can still rely on that snapshot for data recovery. When attempting to delete a file share, you will first be required to delete all associated share snapshots.
You can trigger snapshots using the Azure portal, Azure PowerShell, Azure CLI, REST APIs, and Azure Backup. While snapshots can be taken only on the file share level, data recovery is supported on the individual item level using SMB or REST APIs. Entire file share recovery can also be performed using SMB, REST APIs, Azure portal, Azure PowerShell, or Azure CLI.
You can mount a snapshot to a Windows-based client to view the contents of a snapshot for individual item recovery. This facility is currently not available for Linux clients. However, check Microsoft’s updated guidance to verify whether this is still the case when you plan your solution.
Share snapshots walkthrough
The following sections step you through the process of creating and restoring from a share snapshot using the Azure portal and Azure PowerShell.
Using Azure Portal
To create and restore from a share snapshot using the Azure portal, follow these steps:
In the left pane of the page for the file share for which you want to create a snapshot, under Operations, click Snapshots.
On the Snapshots page (see Figure 2-41), click Add Snapshot.
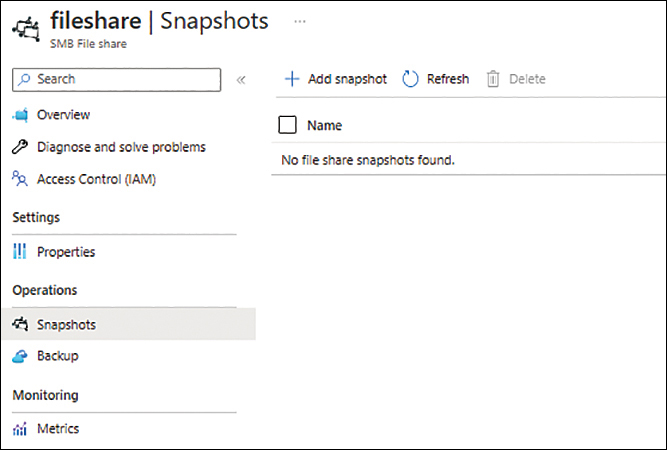
FIGURE 2-41 Creating a file share snapshot.
In the Add Snapshot dialog box (see Figure 2-42), enter a name for the snapshot that is unique within the file share and click OK.

FIGURE 2-42 Adding a snapshot.
After you create a snapshot, you can download it for review or use it to perform a restore.
To access the snapshot, open the file share’s Snapshots page. Then click the entry for the snapshot to open it. (See Figure 2-43.)

FIGURE 2-43 Selecting a snapshot.
Locate the file in the snapshot that you want to download or restore from. Then click the right side of the file entry and choose Download or Restore from the menu that appears. (See Figure 2-44.)

FIGURE 2-44 Restoring from or downloading a snapshot.
Using Azure PowerShell
Use the following Azure PowerShell code to create a share snapshot:
#Define required variables
$resourceGroup = "RG01"
$region = "eastus"
$storageaccname = "mbspfilesharestorage02"
$share = "fileshare"
$directory = "directory"
$vnet = "vNET01"
$subnet = "default"
$endpointname = "PrivateEndpoint"
$vaultname = "RecoveryServicesVault01"


#Create and manage snapshots
New-AzRmStorageShare -ResourceGroupName $resourcegroup -StorageAccountName $storage-
accname -Name $share -Snapshot
Azure Backup integration
You can use the cloud-native Azure backup service to perform short-term and long-term backups of your Azure file shares. You can define custom retention policies using retention periods of days, weeks, months, years, or a combination of these, for different file shares. The Azure Backup service allows for seamless backup integration. You can create backup schedules and retention policies without deploying any additional infrastructure. Azure Backup also provides backup monitoring, alerting, and reporting capabilities, making it easier for administrators to manage all file share backups in one single location. Figure 2-45 shows how Azure Backup integrates with Azure Files.

FIGURE 2-45 Azure Backup integration with Azure Files.
Azure Backup creates an incremental snapshot of the file storage each time a backup is triggered. If needed, you can perform an instant data restore from any of these snapshots. The snapshot is leased by the backup service. It is also locked. This prevents the snapshot’s deletion except by the backup service itself, based on the defined retention schedule. This lock also prevents any accidental deletion of the file share itself until all the associated backup snapshots are deleted and the lock is removed. Once the retention period for a snapshot expires, Azure Backup releases the lease on the snapshot and deletes it.
Along with share-level recovery, Azure Backup also supports item-level recovery. This makes it possible to restore individual files and folders to the original or an alternate location if needed. Administrators might recover files or folders in an alternate location to compare them before overwriting the original files.
Using Azure Backup does incur a cost based on the amount of snapshot storage consumed and the total size of the protected file shares in a storage account. For an estimate, see Microsoft’s Azure Calculator online.
Azure Backup integration walkthrough
The following sections step you through the process of integrating Azure Backup with an Azure Files file share using the Azure portal, Azure PowerShell, and Azure CLI.
Using Azure portal
To integrate Azure Backup with an Azure Files file share and restore from a backup using the Azure portal, follow these steps:
In the left pane of the page for the file share for which you want to set up a backup, under Operations, click Backup.
On the Backup page (see Figure 2-46), next to Recovery Services Vault, you can select an existing backup or create a new one. In this case, select the Create New option button to create a new one.
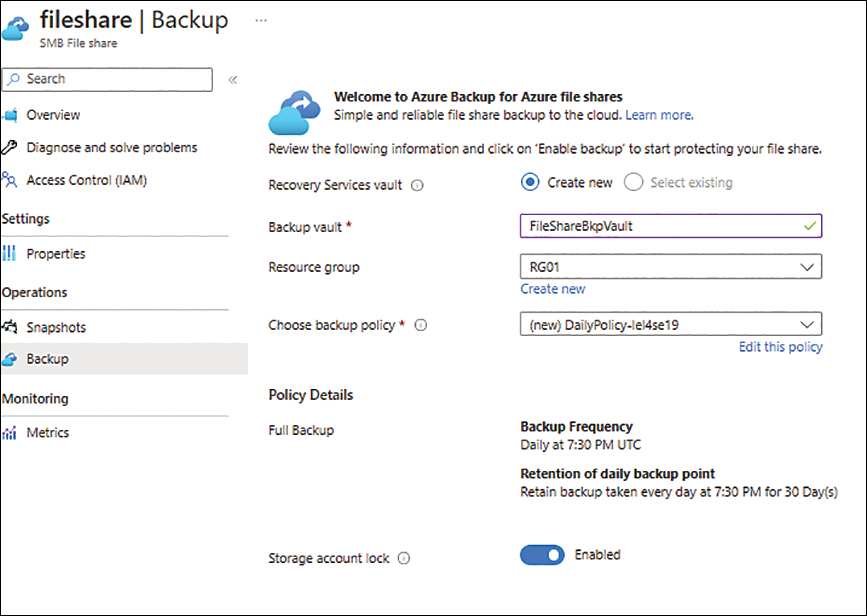
FIGURE 2-46 Integrating Azure Backup with a file share.
In the Backup Vault box, type a unique name for the new backup vault.
Open the Resource Group drop-down list and select an existing resource group in which to create the new backup vault. Alternatively, click the Create New link and follow the prompts to create a new resource group.
Click the Edit This Policy link under the Choose Backup Policy drop-down list.
In the Create Policy dialog box (see Figure 2-47), enter the following information and click Create:
Policy Name Enter a unique descriptive name for the backup policy.
Backup Schedule Select the backup frequency, time, and time zone.
Retention Range Specify the retention range for daily, weekly, monthly, and yearly backups.

FIGURE 2-47 Creating the file share backup policy.
The new policy appears in the file share’s Backup page. (See Figure 2-48.)
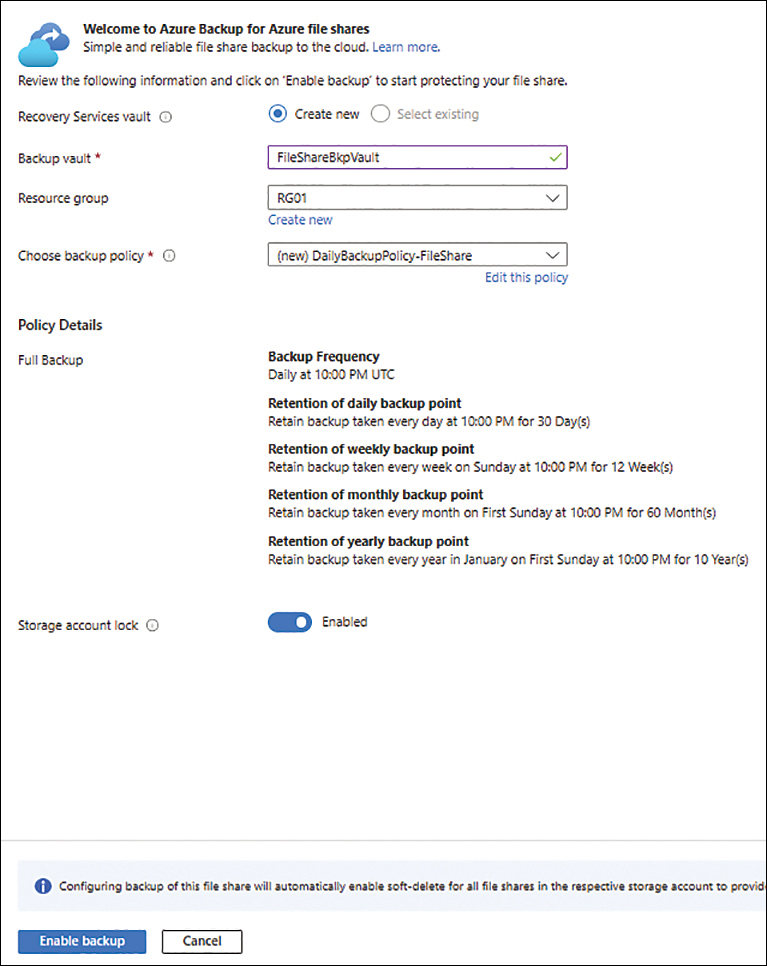
FIGURE 2-48 Use new backup policy.
Leave the Storage Account Lock option toggled to the Enabled position. Then click Enable Backup.
After the backup vault is created, click Go to Resource to access its page. (See Figure 2-49.)

FIGURE 2-49 Backup configuration is complete.
The next steps show you how to restore from a backup.
In the left pane of the backup vault’s page, under Protected Items, click Backup Items.
On the Backup Items page (see Figure 2-50), click the Azure Storage (Azure Files) link.
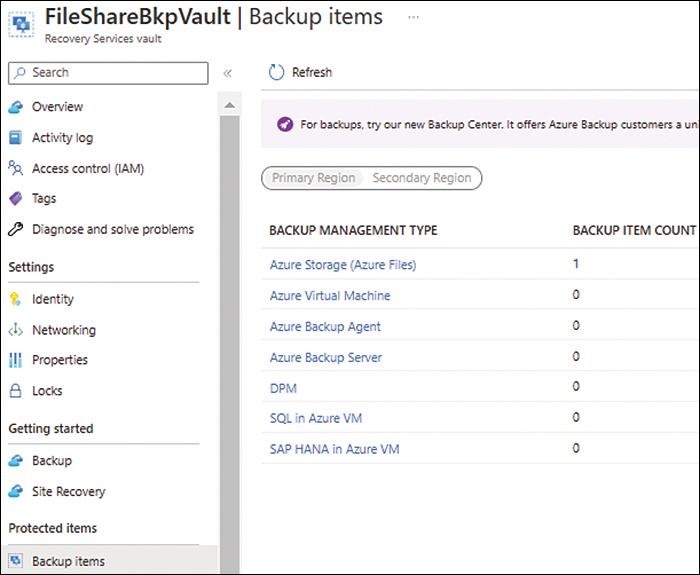
FIGURE 2-50 The Backup Items page.
The page that opens (see Figure 2-51) lists any backups in the selected backup vault. Any backup with Success listed in its Last Backup Status column can be used for a restore.

FIGURE 2-51 Manage backup.
Click the backup’s View Details link.
In the page that opens (see Figure 2-52), do one of the following:

FIGURE 2-52 Backup management options.
To restore the entire file share, click Restore Share. Then, in the Restore dialog box (see Figure 2-53), open the Restore Point drop-down list and choose a restore point; choose the Original Location or Alternate Location option button; and open the In Case of Conflicts drop-down list and choose an option for handling file conflicts. Then click Restore.

FIGURE 2-53 Restoring an entire file share.
To restore individual files, click File Recovery. Then, in the Restore dialog box (see Figure 2-54), select the restore point and restore destination and click Add File to locate and select the file(s) you want to restore. Then click Restore.

FIGURE 2-54 Restoring files in a file share.
After the restore operation is complete, browse to the restore location to verify your data has been restored successfully.
Using Azure PowerShell
Use the following Azure PowerShell code to integrate Azure Backup with a file share and restore from a backup:
#Define required variables
$resourceGroup = "RG01"
$region = "eastus"
$storageaccname = "mbspfilesharestorage02"
$share = "fileshare"
$directory = "directory"
$vnet = "vNET01"
$subnet = "default"
$endpointname = "PrivateEndpoint"
$vaultname = "RecoveryServicesVault01"


#Setting up Azure Backup Integration
New-AzRecoveryServicesVault -ResourceGroupName $resourcegroup -Name $vaultname -Location
$region


#Set the storage redundancy and cross region restore config
Get-AzRecoveryServicesVault -Name $vaultname | Set-AzRecoveryServicesVaultContext
Get-AzRecoveryServicesVault -Name $vaultname | Set-AzRecoveryServicesBackupProperty
-BackupStorageRedundancy GeoRedundant –EnableCrossRegionRestore


#Create Backup policy
$SchedulePolicy = Get-AzRecoveryServicesBackupSchedulePolicyObject -WorkloadType
"AzureStorage"
$Date = Get-Date
$SchedulePolicy.ScheduleRunTimes.Add($Date.ToUniversalTime())
$Retention = Get-AzRecoveryServicesBackupRetentionPolicyObject -WorkloadType
"AzureStorage"
$Retention.DailySchedule.DurationCountInDays = 30
$bkppolicy = New-AzRecoveryServicesBackupProtectionPolicy -Name CustomBackupPolicy01
-RetentionPolicy $Retention -SchedulePolicy $SchedulePolicy -VaultId $vaultname.ID -Work-
loadType AzureStorage

#Enable Azure Files Backup
Enable-AzRecoveryServicesBackupProtection -StorageAccountName $storageaccname -Name
$storageaccname-dailybackup -Policy $bkppolicy

#Trigger Backup Now
$bkpContainer = Get-AzRecoveryServicesBackupContainer -FriendlyName $StorageAcctname
-ContainerType AzureStorage
$BkpItem = Get-AzRecoveryServicesBackupItem -Container $bkpContainer -WorkloadType "Azur-
eFiles" -FriendlyName StorageAcctname-ManualBkp
$job =  Backup-AzRecoveryServicesBackupItem -Item $BkpItem

#Restore share or files
$startDate = (Get-Date).AddDays(-7)
$endDate = Get-Date
$recovery = Get-AzRecoveryServicesBackupRecoveryPoint -Item $BkpItem -VaultId $vaultname.
ID -StartDate $startdate.ToUniversalTime() -EndDate $enddate.ToUniversalTime()
$recovery[0] | fl
Restore-AzRecoveryServicesBackupItem -RecoveryPoint $recovery[0] -TargetStorageAccount-
Name $StorageAccname -TargetFileShareName $share -TargetFolder $directory -ResolveConflict
Overwrite
Using Azure CLI
Use the following code to integrate Azure Backup with a file share and restore from a backup in the Azure CLI:
#Define required variables
resourceGroup="RG01"
region="eastus"
storageaccname="mbspfilesharestorage01"
share="fileshare"
directory="directory"
vnet="vNET01"
subnet="default"
endpointname="PrivateEndpoint"
vaultname="RecoveryServicesVault01"


#Setting up Azure Backup Integration
az backup vault create --resource-group $resourceGroup
    --name $vaultname
    --location $region

#Set the storage redundancy and cross region restore config
az backup vault backup-properties set --name $vaultname
    --resource-group $resourceGroup
    --backup-storage-redundancy "GeoRedundant"
    --cross-region-restore-flag "True"

#Create Backup policy

#Enable Azure Files Backup
az backup protection enable-for-azurefileshare --vault-name $vaultname --resource-group
$resourceGroup --policy-name DefaultFileShareBackupPolicy --storage-account $storage-
accname --azure-file-share $share  --output table

#Trigger Backup Now
az backup protection backup-now --vault-name $vaultname --resource-group $resourceGroup
--container-name $storageaccname --item-name $share --retain-until 20-01-2024 --output
table

#Restore share or files
#Generate list of all recovery points
az backup recoverypoint list --vault-name $vaultname
                       --resource-group $resourceGroup
                       --container-name $storageaccname
                       --backup-management-type azurestorage
                       --item-name $share
                       --workload-type azurefileshare
                       --out table

#Replace rp-name below the name of one of the recovery points generated with the above
command
az backup restore restore-azurefileshare
                       --vault-name $vaultname
                       --resource-group $resourceGroup
                       --rp-name 9019188188828211
                       --container-name $storageaccname
                       --item-name $share
                   --restore-mode originallocation
                   --resolve-conflict overwrite
                   --out table
Best practices
Following are some general best practices regarding setting up and using Azure File Shares:
Plan redundancy strategy You must plan your storage redundancy strategy in advance to ensure you select the correct storage redundancy options when you create the file share. If you want to switch to a different redundancy level later, you will have to migrate from one storage account type to another.
Document recovery procedures and review them regularly Once you have your redundancy strategy in place, document any recovery procedures, such as manual storage failover for geo-redundant storage, and review them regularly with your team. You might also need to include the failover of other related components, along with the file share endpoint, to ensure that all interconnected components are online in the event of a disaster. Regular reviews will help ensure that any changes to the file share capabilities or feature sets are incorporated into your design, and so you can optimize the recovery further if possible.
Deploy Azure Files file shares with other Azure file shares only When using general purpose v2 storage accounts, you can deploy a mix of a blob, file, table, and queue storage in the same storage account. But with Azure Files, it is highly recommended to deploy only file shares together in the same storage account. This ensures you can take into account performance requirements related to file shares when planning the storage account mapping. In a mixed storage account, it can become difficult to manage performance issues as different storage account types using different protocols will be accessing the storage from a varied set of clients and sharing the same limits associated with the storage account.
Host a single file share in a storage account as much as possible It is highly recommended to host a single file share in a storage account. This ensures all the storage IOPS limits will be available to the single file share. However, if you are running into issues—due to an organizational issue or Azure restrictions—then plan the file share hosting to ensure that the most active file shares are not placed together in the same storage account.
Enable soft delete on all file shares Soft delete is a great feature to help you quickly recover your file share in the event of accidental or malicious deletion. If possible, enable soft delete on all your file shares and set up a retention period longer than the minimum time it will take your team to respond and to perform a restore, if necessary.
Use private endpoints for storage access Private endpoints enable you to access file share resources over a secure internal network connection over VPN or ExpressRoute. This allows you to control which network subnets are permitted to access the endpoint and to limit access as necessary. It also allows you to closely monitor the connections to the file share endpoint over your internal firewall and detect any anomalies. It is highly recommended to use private endpoints if your environment and application access requirements allow for it.
Limit use of public endpoints It is highly recommended that you use private endpoints to access file shares instead of public endpoints. Although you can secure public endpoints with encryption in transit and firewall restrictions, it is preferable to use private endpoints unless using public endpoints is absolutely necessary. Private endpoints allow you to control access more granularly from your internal networks to the storage as necessary.
Set up storage firewall restrictions Unless you completely disable public endpoints, set up storage firewall restrictions to allow access over public endpoints only from administrative or known IP addresses. This will limit the exposure of that endpoint and prevent malicious actors from attacking and accessing the storage.
Disable unwanted protocols Disable all unwanted protocol versions to limit access to the storage over older protocols such as SMB 1.1 and SMB 2.x. This will force all client connections to work over SMB 3.x protocols, ensuring that data encryption in transit, SMB Multichannel, and other advanced features are enabled for all connections.
Enable Active Directory or Azure AD DS authentication over SMB It is highly recommended that you integrate the file share with Active Directory or Azure AD DS to manage client authentication and authorization. This will allow you to use existing user accounts to provision access to the file share and manage permission levels in line with your on-premises setup. If you are migrating your on-premises file share to Azure, performing this integration before the migration will help ensure that you are able to copy over the existing permissions to the file share automatically using tools such as robocopy.
Force secure transfers only Although Azure Files supports connections over both HTTP and HTTPS, it is highly recommended to force secure transfer only so that all connections are secured. You can configure this setting using the Azure portal, Azure PowerShell, Azure CLI, and REST APIs. If you set up the storage using the Azure portal, this setting is enabled by default. If you used any of the other methods, you must enable this setting manually.
Integrate with Azure Monitor Azure Monitor can closely monitor storage capacity and performance metrics to provide you with a comprehensive view of the storage IOPS and space utilization. This can help you in planning any file share changes to address capacity or IOPS issues before they affect your clients. You can build custom dashboards to monitor the metrics that are most important for your organization and share them with all administrators to ensure a consistent view across the monitoring environment. You can also set up alerting to highlight any anomalous performance behavior so you can respond to such events in a timelier manner.
Ensure regular backups using Azure Backup Azure Files includes built-in integration with Azure Backup to provide a seamless backup experience. Be sure to set up backups for all your file shares according to your organization’s data recovery and retention requirements. Backups are stored in an Azure storage using LRS or GRS, depending on your redundancy requirements. Take this into account when planning for the overall redundancy of the file share environment.