
Chapter 7: Microsoft Defender for Cloud Workload Protection
Microsoft Defender for Cloud is enabled on all Azure subscriptions by default, while enhanced security features are only available as part of Microsoft Defender for Cloud plans. In this chapter, you will learn how to manage enhanced security and cloud workload protection features available in Defender for Cloud plans, such as vulnerability assessments, Just-in-Time (JIT) access, adaptive application control, file integrity monitoring, and adaptive network hardening. These workload protection features further extend the protection of Microsoft Defender for Cloud to include important infrastructure and workload security standards, significantly raising the security posture not only of monitored resources but also of the entire cloud environment.
We will cover the following recipes in this chapter:
- Enabling a vulnerability assessment solution
- Enabling and configuring JIT access on a virtual machine
- Requesting access to a JIT-enabled virtual machine
- Configuring the adaptive application control group
- Managing adaptive network hardening
- Remediating vulnerabilities in Azure Container Registry images
- Managing a SQL vulnerability assessment
- Managing file integrity monitoring
Technical requirements
To successfully complete the recipes in this chapter, the following are required:
- An Azure subscription.
- A web browser, preferably Microsoft Edge.
- Microsoft Defender for Cloud plans.
- Resources in an Azure subscription, such as virtual machines, storage, SQL Server, and Logic Apps. Microsoft Defender for Cloud will create resource recommendations based on the resources available.
The code samples can be found at https://github.com/PacktPublishing/Microsoft-Defender-for-Cloud-Cookbook.
Enabling a vulnerability assessment solution
Before Microsoft Defender for Cloud can receive vulnerability assessment findings from virtual machines, you must first enable a vulnerability assessment solution on target resources. Once a vulnerability assessment solution has been enabled on a resource, it reports vulnerabilities to Microsoft Defender for Cloud.
In this recipe, you will learn how to automatically enable a vulnerability solution at a subscription level, and how to enable a vulnerability solution on a virtual machine using a recommendation.
Getting ready
Open a web browser and navigate to https://portal.azure.com.
How to do it…
First, you will enable automatic deployment of the vulnerability assessment tool and then remediate a recommendation to install a vulnerability assessment solution on a virtual machine. To perform these tasks, complete the following steps:
- In the Azure portal, open Microsoft Defender for Cloud.
- On the left-hand menu, click Environment settings.
- Click on an arrow next to a management group to display a list of associated subscriptions. Select the desired subscription.
- From the left-hand menu, click Auto provisioning.
- Set the status of Vulnerability assessment for machines to On.
- Click on Edit configuration for Vulnerability assessment for machines.

Figure 7.1 – Extension deployment configuration
- Select the desired vulnerability assessment solution: the Microsoft threat and vulnerability management tool or Microsoft Defender for Cloud integrated Qualys scanner.
- Click Apply to save the selection.
- Close the Auto provisioning - Extensions page.
You have enabled the automatic deployment of a vulnerability assessment solution. You will now remediate a recommendation to install a vulnerability assessment solution on a virtual machine or, in other words, manually install a vulnerability tool on a virtual machine.
- On the menu, select Recommendations.
- On the list of recommendations, expand the Remediate vulnerabilities control.
- Select Machines should have a vulnerability assessment solution.

Figure 7.2 – Vulnerability remediation
- Under the Affected resources section, you will see a list of virtual machines that have been identified as Unhealthy resources. Click the checkbox next to a virtual machine to install a vulnerability assessment tool.
- There are three buttons available. Click Exempt to exclude the selected virtual machine from future recommendations. Click Trigger logic app to run and execute a logic app.
Then, click Fix.
Tip
See the Automating security center recommendations responses recipe in Chapter 3, Workflow Automation and Continuous Export, and the Creating a recommendation exemption rule recipe in Chapter 4, Secure Score and Recommendations.

Figure 7.3 – Choosing a vulnerability assessment solution
- Select Threat and vulnerability management by Microsoft Defender for Endpoint (included with Microsoft Defender for servers).
Optionally, you can select any of the three other available options to install a third-party, or non-Microsoft, vulnerability assessment solution.
- Click Proceed.
- On the Fixing resources blade, review the list of resources that will be onboarded to Microsoft threat and vulnerability management. Click Fix 1 resource.
If you selected more than one resource to fix, the button text will change accordingly.
How it works…
Managing endpoint security in a large and dynamic environment can be a difficult task – not all endpoints, that is, physical or virtual machines, might have an endpoint security solution installed or enabled by default. Microsoft Defender for Cloud plans include Microsoft Defender for Endpoint licenses, enabling native protection of Windows and Linux machines hosted in Azure, AWS, and on-premises locations. Microsoft Defender for Cloud endpoint protection includes vulnerability assessment, post-breach detection, threat intelligence, and, what is most important, automatic Defender for Endpoint onboarding on all protected and supported workloads.
Enabling and configuring JIT access on a virtual machine
Operating systems, in our case virtual machines, use networks and ports to communicate. To establish communication, ports need to be accessible. Open, accessible ports are a serious security problem, while closed ports make communication impossible. The problem is, how do we enable communication while staying secure? To solve the problem and to have the best of both solutions, JIT virtual machine access makes ports accessible per request, for a predefined time range.
In this recipe, you will learn how to enable and configure JIT virtual machine access.
Getting ready
Open a web browser and navigate to https://portal.azure.com.
How to do it…
To enable and configure JIT virtual machine access, complete the following steps:
- In the Azure portal, open Microsoft Defender for Cloud.
- On the left-hand menu, click Workload protections.
- Under the Advanced protection section, click on the Just-in-time VM access box:

Figure 7.4 – Defender for Cloud coverage
- The Just-in-time VM access blade contains three tabs, displaying a list of virtual machines for which JIT is already configured, a list of virtual machines not configured with JIT access, and a list of virtual machines that do not support JIT (unsupported).
Click on the Not Configured tab.
- Virtual machines that have no public IP address or are protected by a Network Security Group (NSG) that blocks access to management ports show a Healthy status under the Severity column, while virtual machines that are configured with an NSG that allows access to management ports show a High risk severity status.
Select the checkbox next to a virtual machine for which you want to enable JIT access.

Figure 7.5 – Just-in-time VM access
Note that you can select multiple virtual machines and configure JIT on multiple virtual machines simultaneously. Click the Enable JIT on 1 VM button.
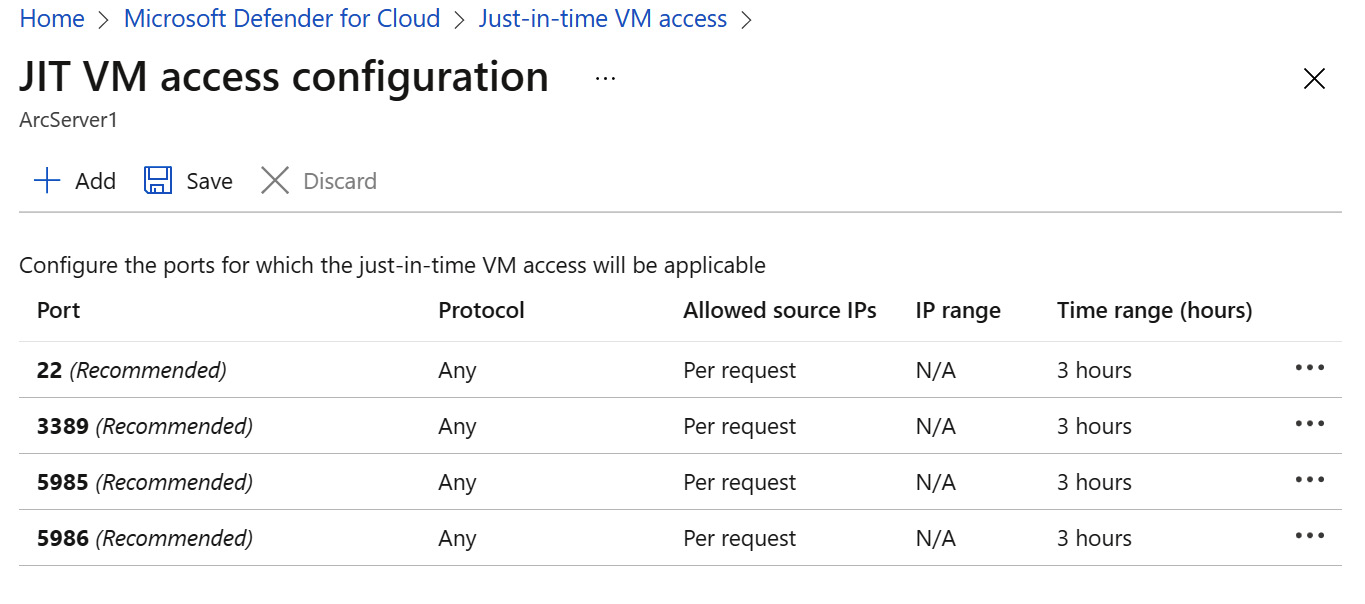
Figure 7.6 – JIT VM access configuration
- The JIT VM access configuration blade contains a list of predefined, recommended ports to which JIT VM access will apply: 22, 3389, 5985, and 5986.
Note
By default, JIT VM access configuration includes port 22 (the Secure Shell protocol, or SSH), port 3389 (ms-wbt-server or Remote Desktop Protocol (RDP)), and ports 5585 and 5586 (Windows Remote Management service WinRM-HTTP and WinRM-HTTPS or Windows PowerShell default ports).
To change the configured ports' settings, click on a port entry, make the desired changes, and then click the OK button.
- To add a port configuration, click + Add.
- In the Port field, enter the port number.
- Port configuration can apply to TCP, UDP, or both protocols. Leave the default setting – Any.
- Allowed source IPs allows you to configure which source IP addresses or address ranges the JIT settings will apply to. You can choose to allow an IP address allocated at the time of the request, or you can allow multiple IP addresses and IP address blocks, written in a CIDR notation and separated by commas.

Figure 7.7 – Add port configuration
- Move the slider or enter a number to allow access at the requested time, between 1 and 24 hours.
- Click OK. The port you configured for JIT VM access is added to the list of configured ports, and the virtual machine you configured for JIT access is listed on the Configured tab.
How it works…
Obviously, to be able to access virtual machines hosted in Azure and AWS, virtual machines' NSGs must allow traffic to these resources. Without a JIT access feature, administrators would have to spend a tremendous amount of time accommodating access requests – allowing access first, and then denying access once access is no longer needed. The JIT access feature ensures that all these actions are done automatically, in a timely manner, and ensures that no ports are left open, thereby increasing the security of protected workloads.
Requesting access to a JIT-enabled virtual machine
After you have enabled and configured JIT virtual machine access, you can request access to a JIT-enabled virtual machine in multiple ways.
In this recipe, you will learn how to request access to a JIT-enabled virtual machine from Microsoft Defender for Cloud and Azure Virtual Machines.
Getting ready
Open a web browser and navigate to https://portal.azure.com.
How to do it…
To request access to a JIT-enabled virtual machine, complete the following steps:
- In the Azure portal, open Microsoft Defender for Cloud.
- On the left-hand menu, click Workload protections.
- Under the Advanced protection section, click on the Just-in-time VM access box.
- Click the Configured tab to display a list of virtual machines for which JIT access is configured.
- Select the checkboxes for the virtual machines for which you want to request JIT access.
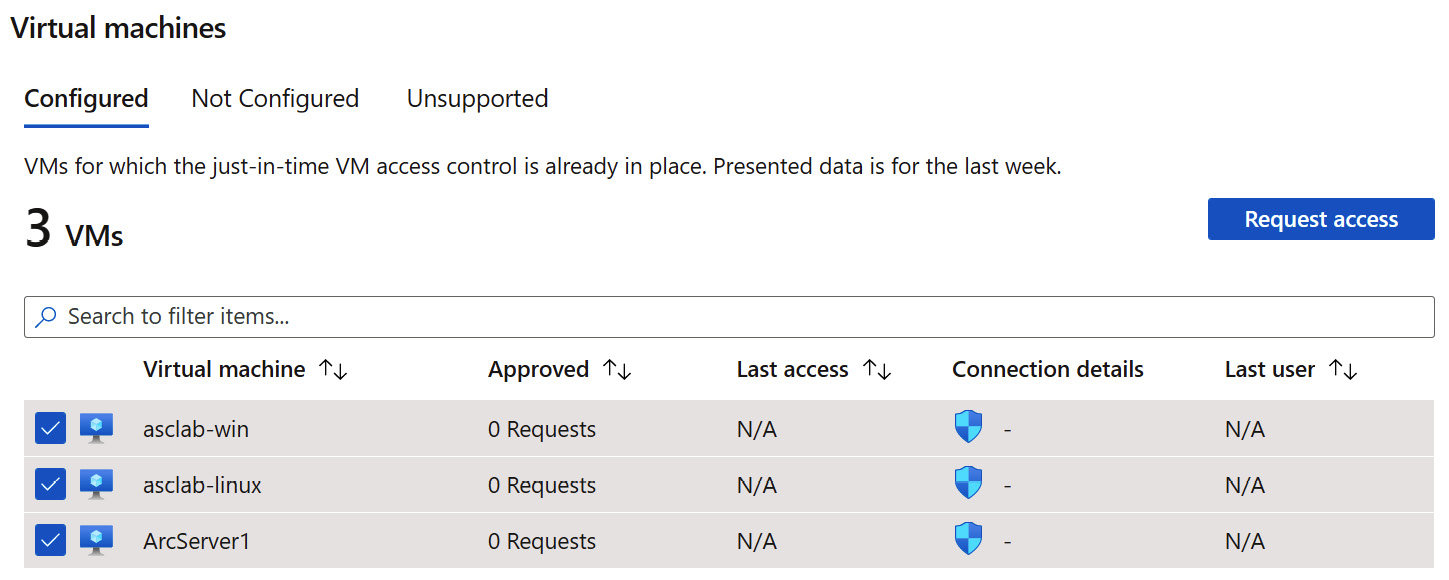
Figure 7.8 – JIT on virtual machines
- Click Request access.
- The Request access blade opens, containing a list of preconfigured JIT settings for each virtual machine you selected.

Figure 7.9 – Requesting JIT access
- Toggle the switches for the ports you want to open, adjusting the time range and allowed source IP addresses.
- Optionally, type request justification and click Open ports.
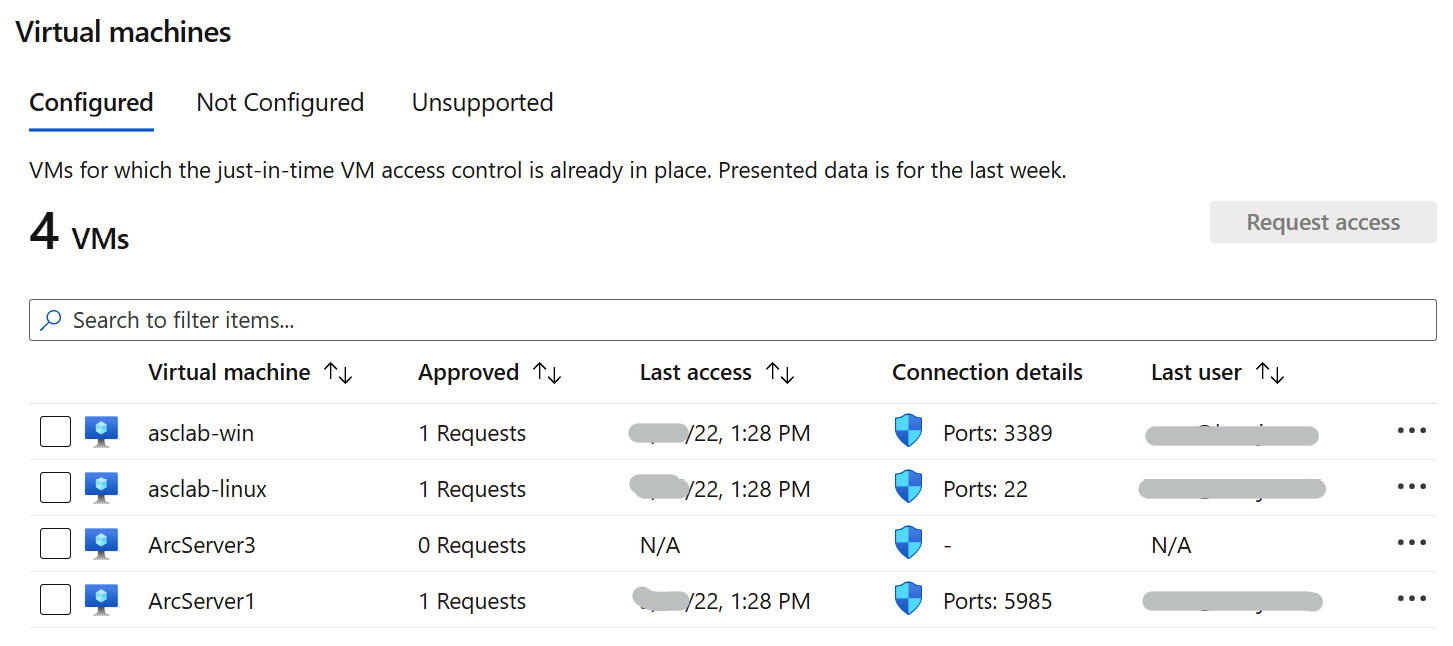
Figure 7.10 – JIT-configured virtual machines
- The Configured tab shows virtual machines configured for JIT access and detailed information: the number of approved requests, the most recent access time, and the user, as well as the currently opened ports. Select the Not Configured tab to display a list of virtual machines that are not configured with JIT access.
Alternatively, you can request access to a JIT-enabled virtual machine from the Azure virtual machine blade. From the Not Configured tab, take note of the name of a virtual machine that is not configured with JIT access. In the top-right corner, click Home.
- Open the Virtual machines blade.
- Select the virtual machine you took note of in step 10, the one that is not configured with JIT access.
- On the left-hand menu, under the Settings section, click on Configuration:
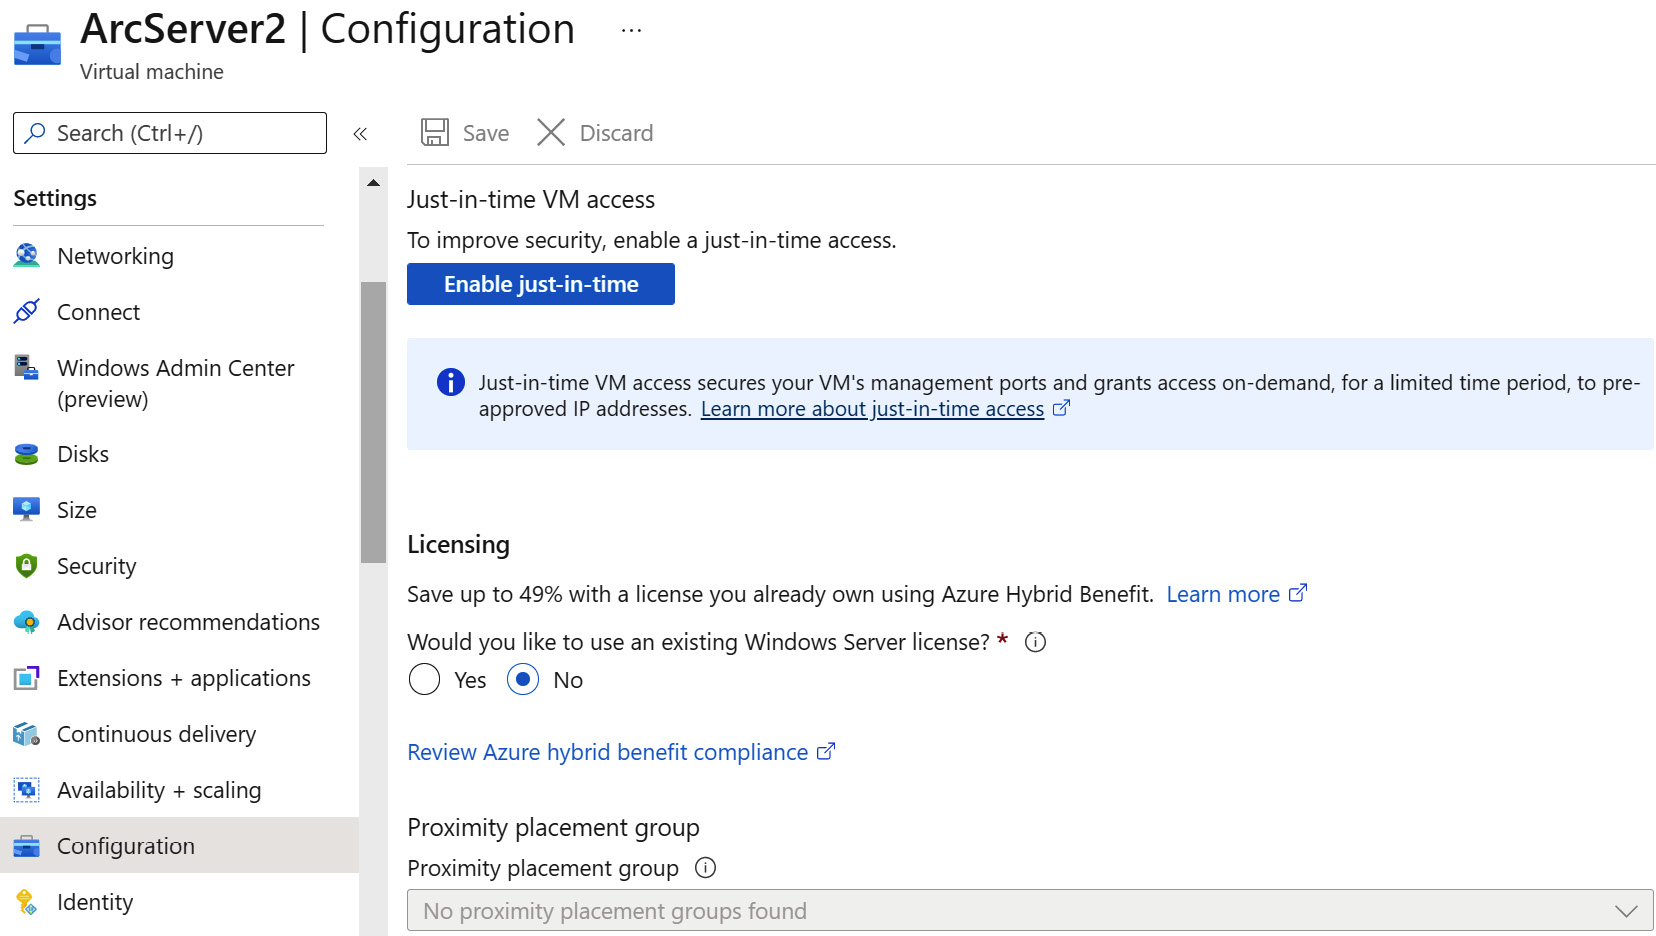
Figure 7.11 – Machine configuration
- Click on the Enable just-in-time button. You have enabled JIT access on a virtual machine using a virtual machine portal.
How it works…
To further increase the security of protected virtual machines, when requesting JIT access, security administrators can specify which ports are going to be opened, and for how long, specifying ports, allowed source IP addresses and IP ranges, and time ranges more granularly, on each virtual machine individually. Having these ad hoc adjustment capabilities, the security of protected workloads is greatly increased.
Configuring the adaptive application control group
Virtual machines characteristically run similar processes and, after the workloads on virtual machines have been set up, these processes do not change or, at least, no processes other than the intended ones are usually active.
Adaptive application control intelligently tracks and analyzes active and running processes on virtual machines, whitelists these applications, and generates alerts if any other unapproved application is executed.
In this recipe, in the first example, you will configure a recommended adaptive application control group. The second example task will describe how to create a custom adaptive application controls group.
Getting ready
Open a web browser and navigate to https://portal.azure.com.
How to do it…
To configure a Microsoft Defender for Cloud adaptive application control group, complete the following steps:
- In the Azure portal, open Microsoft Defender for Cloud.
- On the left-hand menu, click Workload protections.
- Under the Advanced protection section, click on the Adaptive application control box.
- The Adaptive application controls blade contains three tabs, each grouping virtual machines according to their status: Configured, Recommended, and No recommendation. The Configured tab contains a list of virtual machines that have a whitelist already applied. The Recommended tab contains a list of virtual machines for which Microsoft Defender for Cloud has a whitelist recommendation, while the Not recommended tab has a list of virtual machines that do not have a whitelist applied or do not support whitelisting and placement under the adaptive application control group.
There are two ways in which you can create an adaptive application control group: either by clicking on the + Add custom group menu button or by configuring a recommended adaptive application control group.
In this example, you will configure a recommended adaptive application control group. Click on the Recommended tab.
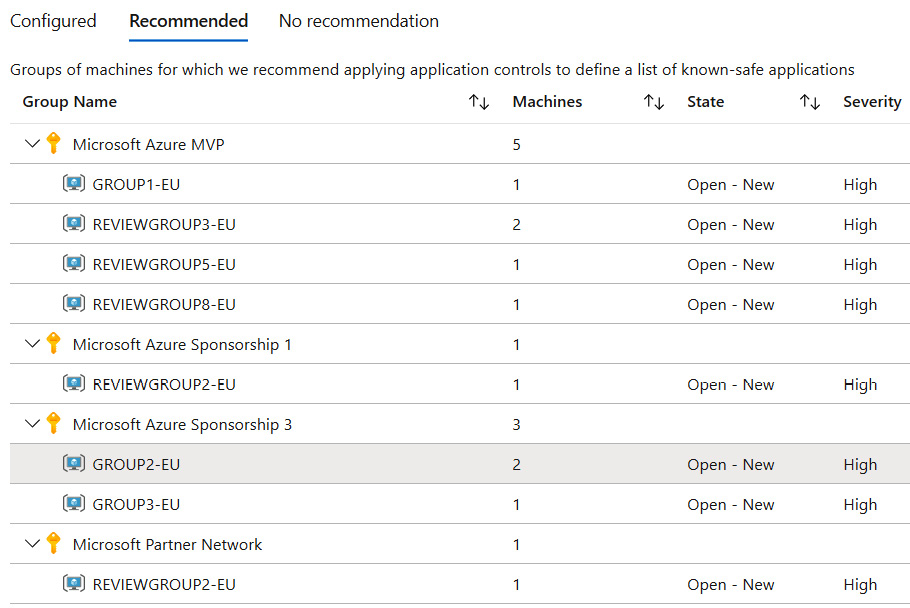
Figure 7.12 – Adaptive application controls
- Virtual machines for which recommendations are created are grouped by subscriptions. Click on a group name to configure application control rules. The Configure application control rules blade opens.
- You can review and change the selection of virtual machines in the configuration: applications that are frequent on the selected virtual machines and are highly recommended for defining allowlist rules, and applications that are present on the selected virtual machines but are not critical for including them in an allowlist, but require your attention. Make the necessary adjustments by unchecking unwanted or unnecessary virtual machines and applications and then clicking Audit:

Figure 7.13 – Configure application control rules
- A message, AAC group configuration request succeeded, will confirm the configuration. The configured group name will be displayed on the Adaptive application controls blade, under the Configured tab. If not, refresh the page.
- The second example task will describe how to create a custom adaptive application controls group. If not already on the Adaptive application controls blade, complete steps 1-3 in this recipe to open it.
- Click + Add custom group. The Group settings window for a new machine group opens on the right-hand side.
- Choose a subscription. The subscription choice determines the virtual machines you will be able to choose from.

Figure 7.14 – Adaptive application control group settings
- Select the location, Global or Europe, or any other location that is relevant and available for your subscription.
- Type a name for a group (uppercase letters and numbers are allowed), and then choose the operating system type and the workload environment type.
- Choose the file type protection mode: EXE (executable or application), MSI (Microsoft Installer), or SCRIPT.
- You can check configured and unconfigured virtual machines to add them to a group.
- Click Audit to finish creating the group.
How it works…
Adaptive application controls are used to define which applications are trusted and safe to run – you use them to make allowlists of applications that are authorized to run on specific workloads. If an application is executed but is not allowed to run, adaptive application control will generate an alert, thereby notifying you of suspicious behavior, and potential malware presence.
Additionally, adaptive application controls help you stay compliant, ensuring only approved, licensed, and current software is used
If you added previously configured virtual machines to the new group, machines will be reconfigured with the rules that are inherited from the new group.
At this time, adaptive application controls provide alerts only, while the option to enforce rules is not available.
Managing adaptive network hardening
Adaptive network hardening does not need any configuration to work – it is an agentless protection feature. Assisted by machine learning algorithms, it monitors virtual network traffic flow to and from resources, considers NSG inbound and outbound rules, analyzes, and makes recommendations to further strengthen NSG rules.
In this recipe, you will learn how to manage adaptive network hardening recommendations in Microsoft Defender for Cloud.
Getting ready
Open a web browser and navigate to https://portal.azure.com.
How to do it…
To manage a Microsoft Defender for Cloud default security policy, complete the following steps:
- In the Azure portal, open Microsoft Defender for Cloud.
- On the left-hand menu, click Workload protections.
- Under the Advanced protection section, click on the Adaptive network hardening box.

Figure 7.15 – Adaptive network hardening recommendations
- Unhealthy resources: Virtual machines that have alerts and recommendations to restrict network traffic
- Healthy resources: Virtual machines that have no alerts and network restriction recommendations
- Not applicable resources: Virtual machines for which adaptive network hardening algorithms could not be applied because virtual machines are not protected by Microsoft Defender for Servers. There is not enough data (you will need at least 30 days of traffic data) or virtual machines are classic virtual machines (not supported).
Select the Unhealthy resources tab. From the list of unhealthy virtual machines, click on a virtual machine name.
5. The Manage adaptive network hardening recommendations blade opens.

Figure 7.16 – Manage adaptive network hardening recommendations
The Rules tab displays the rules that are recommended by adaptive network hardening algorithms, while the Alerts tab lists alerts generated on the observed resources, that is, virtual machines, such as Traffic detected from IP addresses recommended for blocking alerts. Optionally, to add a new rule, click the + Add rule button, where you need to specify a rule name, destination port, allowed source IP ranges or individual IP addresses, and a protocol.
To proceed, select all the rules and then click Enforce.
6. Adaptive network hardening modifies the NSG (or groups) by adding the rules defined and selected in step 5, thus strengthening virtual machine security by restricting network traffic.
How it works…
Based on several aspects that are considered, such as various indicators of compromise, NSG rules, threat intelligence information, virtual network traffic characteristics, and others, adaptive network hardening offers recommendations to further reinforce virtual network traffic rules.
For example, if NSG rules are configured to allow inbound traffic on a specific IP address range – for example, /24 subnet, and on 10 different ports, while actual traffic always uses only a portion of a subnet and only 4 ports – adaptive network hardening suggests restricting traffic to IP addresses and ports that are actually used.
The inbound port rules list before enforcing adaptive network hardening changes shows that RDP and SQL ports (3389 and 1433) are allowed from any source to any destination, as shown in the following screenshot:
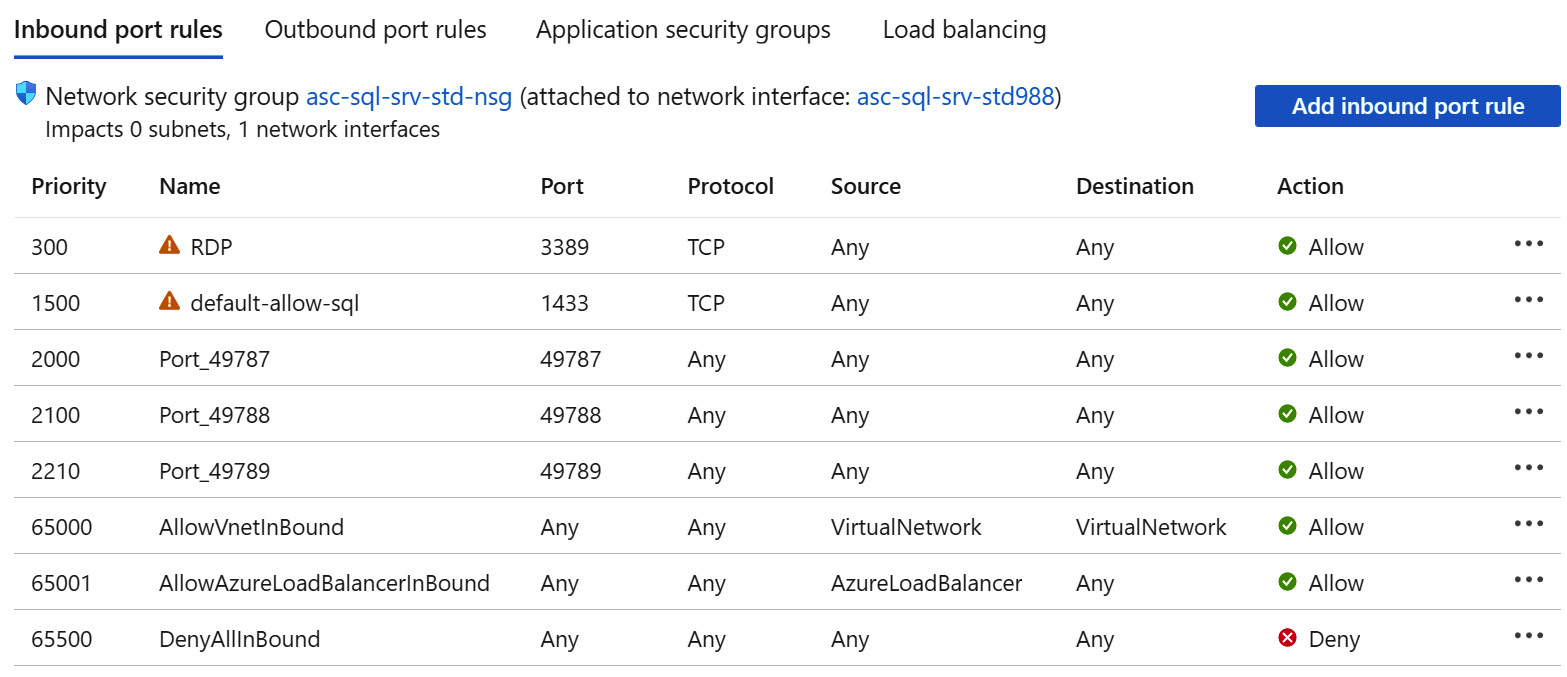
Figure 7.17 – Inbound port rules before enforcing adaptive network hardening rules
After enforcing adaptive network hardening rules on the NSG attached to the virtual machine network interface card affected, adaptive network hardening modifies NSG rules and restricts network traffic to include only the allowed ports, protocols, sources, and destinations.
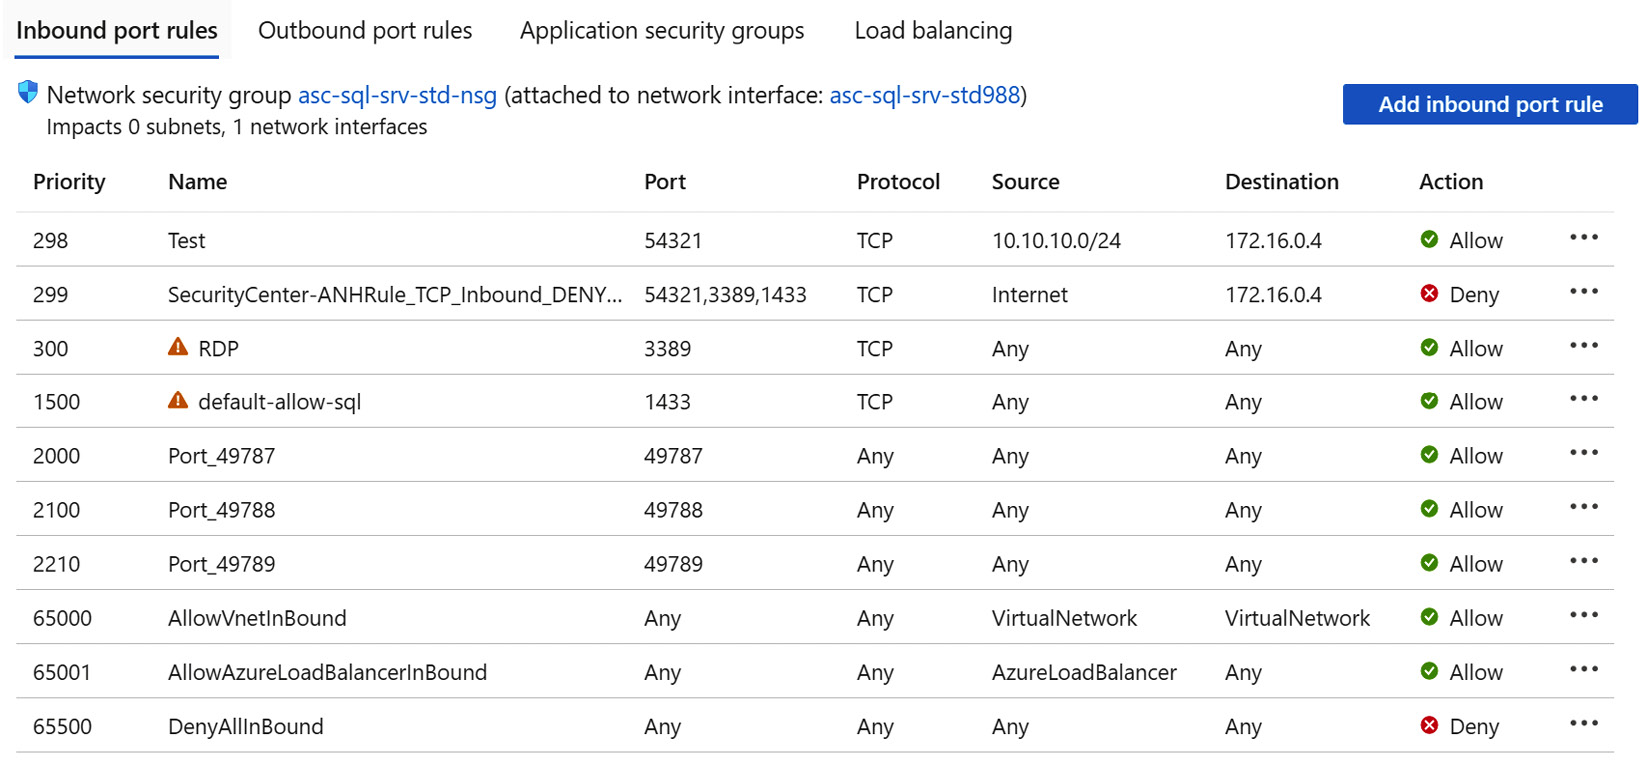
Figure 7.18 – Inbound port rules after enforcing adaptive network hardening rules
There's more…
On the Adaptive network hardening recommendations blade, if you select a checkbox next to the name of the virtual machine, you can Trigger logic app or Exempt a virtual machine or machines from being recommended to restrict network traffic and appearing under the Unhealthy resources tab.
Remediating vulnerabilities in Azure Container Registry images
The Microsoft Defender for Containers plan is a part of Microsoft Defender for Cloud responsible for protecting containers. Its container protection includes Kubernetes services in Azure (Azure Kubernetes Service, or AKS), Amazon Kubernetes services, and Azure Arc-enabled Kubernetes clusters.
In this recipe, you will learn how to remediate vulnerabilities in Azure Container Registry images, using Microsoft Defender for Containers vulnerability assessments.
Getting ready
Open a web browser and navigate to https://portal.azure.com.
How to do it…
To remediate vulnerabilities in Azure Container Registry images, using Microsoft Defender for Containers vulnerability assessments, complete the following steps:
- In the Azure portal, open Microsoft Defender for Cloud.
- On the left-hand menu, click Workload protections.
- Under the Advanced protection section, click on the Container image scanning box.

Figure 7.19 – Container image scanning
- The Affected resources section contains the Unhealthy registries tab and a list of container registries containing vulnerable images. Other tabs include Healthy registries, Unverified registries, and Not applicable registries. The Security Checks section contains a list of all security vulnerability findings.
To open a container registry health page, under the Affected resources section, click on a registry name.

Figure 7.20 – Registry security health
- The Registry security health page covers the health of registry repositories: vulnerable images by severity, unhealthy repositories, healthy repositories, and unverified repositories. Select the Unhealthy repositories tab and click on a repository name.

Figure 7.21 – Repository security health
- Similarly, the Repository security health blade gathers images' health information, such as the last scan time, operating system type, and registry-level vulnerability findings. Select the Unhealthy images tab and click on an image name.

Figure 7.22 – Image security health
- On the Image security health blade, the Findings tab lists security vulnerability findings, their severity level, and information on whether a patch is available. Click on a security vulnerability check to open a blade containing detailed information about the security vulnerability: description, general information, remediation steps, and any additional information, as well as any other affected resources.

Figure 7.23 – Image security finding
- Under the Remediation or Additional information sections, click a link. A new page opens in a web browser containing information about a vulnerability and instructions on how to download an update package and update instructions to fix a vulnerability.
How it works…
The Microsoft Defender for Containers plan comprises a vulnerability assessment of images stored in Azure Container Registry and running in AKS, threat protection for nodes and clusters, and environment hardening, and provides misconfiguration information and threat mitigation guidelines.
Managing a SQL vulnerability assessment
Microsoft Defender plans include two Microsoft Defender for SQL protection options: Azure SQL Databases, which includes single databases and elastic pools, Azure SQL Managed Instance, and Azure Synapse Analytics, and Azure SQL server on machines, which applies to SQL on Azure Virtual Machines, SQL servers on-premises, and Azure Arc-enabled SQL servers.
In this recipe, you will learn how to manage SQL vulnerability assessments in Microsoft Defender for Cloud.
Getting ready
Open a web browser and navigate to https://portal.azure.com.
How to do it…
To manage SQL vulnerability assessments, complete the following steps:
- In the Azure portal, open Microsoft Defender for Cloud.
- On the left-hand menu, click Workload protections.
- Under the Advanced protection section, click on the SQL vulnerability assessment box.
- A SQL databases should have vulnerability findings resolved blade opens. The top menu contains standard buttons that allow you to exempt a recommendation from any scope so that it doesn't affect your secure score, disable a rule to disable one or more findings for this recommendation, view a policy definition, or open a query that will return affected resources or security findings.

Figure 7.24 – SQL vulnerability assessment
- The Security Checks section contains current security findings, as well security findings that have already passed and that are disabled. Click on the Findings tab and select a security finding.
- A security finding information blade opens, containing detailed information about a vulnerability, remediation steps, the security impact of the vulnerability, and affected and dismissed resources. After reviewing the information, close the blade.
- The Affected resources tab contains a list of unhealthy, healthy, and not applicable resources. Select the Unhealthy resources tab and click on a database.

Figure 7.25 – Vulnerabilities that should be remediated
- The Vulnerabilities on '<sqlservername>' should be remediated blade opens. The Unhealthy databases tab contains the list of databases that failed security checks, and the Security Checks tab lists applicable security vulnerability findings. Click on a database name to open the database security vulnerability findings blade.

Figure 7.26 – Database security vulnerability findings
- The database security vulnerability findings blade includes a summary of total vulnerabilities, vulnerabilities by severity, and the last scan time, as well as a list of security vulnerability findings that includes current and past findings, as well as an option to disable findings.
On the top menu, click Scan to execute a vulnerability scan, and Scan history to display the history of scans executed against the current database. Click on a vulnerability finding to see its details and to remediate it.
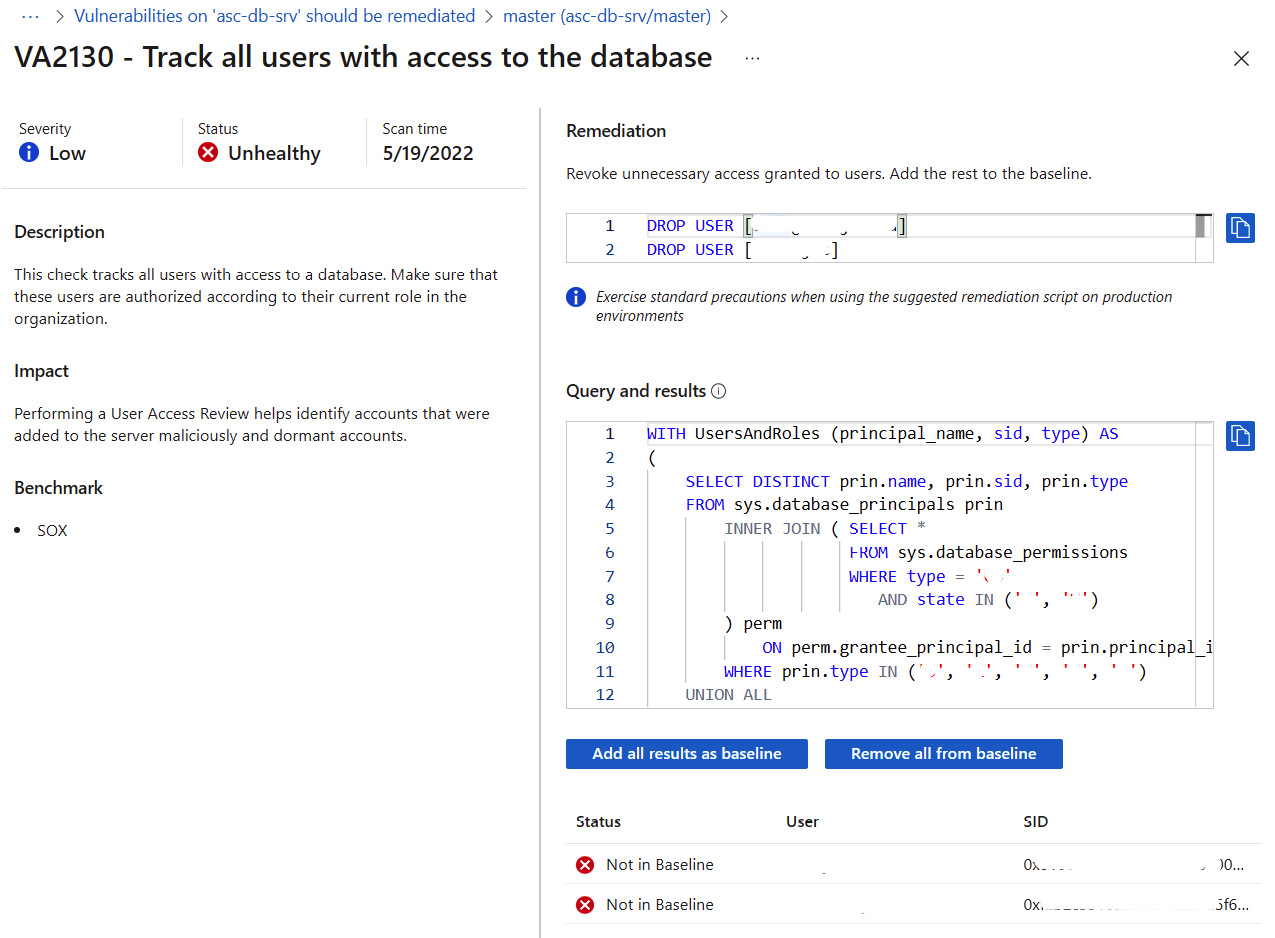
Figure 7.27 – SQL vulnerability finding remediation
- In this example, to remediate the VA2130 - Track all users with access to the database vulnerability assessment, you need to revoke unnecessary access to a database and add allowed access to the baseline. To accept the results as a baseline as being acceptable for this database or environment, click Add all results as baseline. At the Set baseline prompt, click Yes to approve the changes to the baseline. As the baseline changes, you need to run a new scan to see the updated results.
- Close the vulnerability assessment blade to return to the previous blade.
- On the database blade, on the top menu, click Scan to execute a new vulnerability scan.
- Wait for a scan to finish and click Scan History. You should see new, updated results.
- Close the scan history and click Refresh to refresh the database findings and passed results.
- Click on the Passed tab. Identify the Additional Info column for the vulnerability you have just remediated and change the baseline. Observe the Pass Per Baseline information, confirming the changes to the baseline.
How it works…
Microsoft Defender for Cloud offers a range of SQL protection capabilities, enabling safeguarding databases, detecting anomalous activities, and discovering and mitigating database vulnerabilities, in addition to advanced threat protection and SQL vulnerability assessment capabilities – all through a single pane of glass.
To get the advantage of SQL protection capabilities in Microsoft Defender for Cloud, you must enable Microsoft Defender database SQL protection plans.
Managing file integrity monitoring
Microsoft file integrity monitoring, or FIM, is a part of Microsoft Defender for Cloud that enables change monitoring of files, Linux system files, Windows registries, application software, operating system files, and other file-level changes that might signal an attack. In this recipe, you will learn how to manage FIM in Microsoft Defender for Cloud.
Getting ready
Open a web browser and navigate to https://portal.azure.com.
How to do it…
To manage FIM in Microsoft Defender for Cloud, complete the following steps:
- In the Azure portal, open Microsoft Defender for Cloud.
- On the left-hand menu, click Workload protections.
- Under the Advanced protection section, click on the File Integrity Monitoring box.

Figure 7.28 – File Integrity Monitoring
- FIM requires Microsoft Defender for Servers. Refer to Chapter 1, Getting Started with Microsoft Defender for Cloud, for more information on enabling Defender for Cloud plans. If a Log Analytics workspace does not have a Defender for Servers plan enabled, click Upgrade plan. Otherwise, click Enable. The Enable File Integrity Monitoring blade opens.

Figure 7.29 – Enable File Integrity Monitoring
- Recommended settings for monitoring include Windows files, Windows registry entries, and Linux files. You can make any changes to recommended settings now, or later. To enable FIM on all machines connected to the selected Log Analytics workspace, click Enable File Integrity Monitoring.
- Once deployment is completed, return to the File Integrity Monitoring blade, and select a workspace that has FIM enabled.
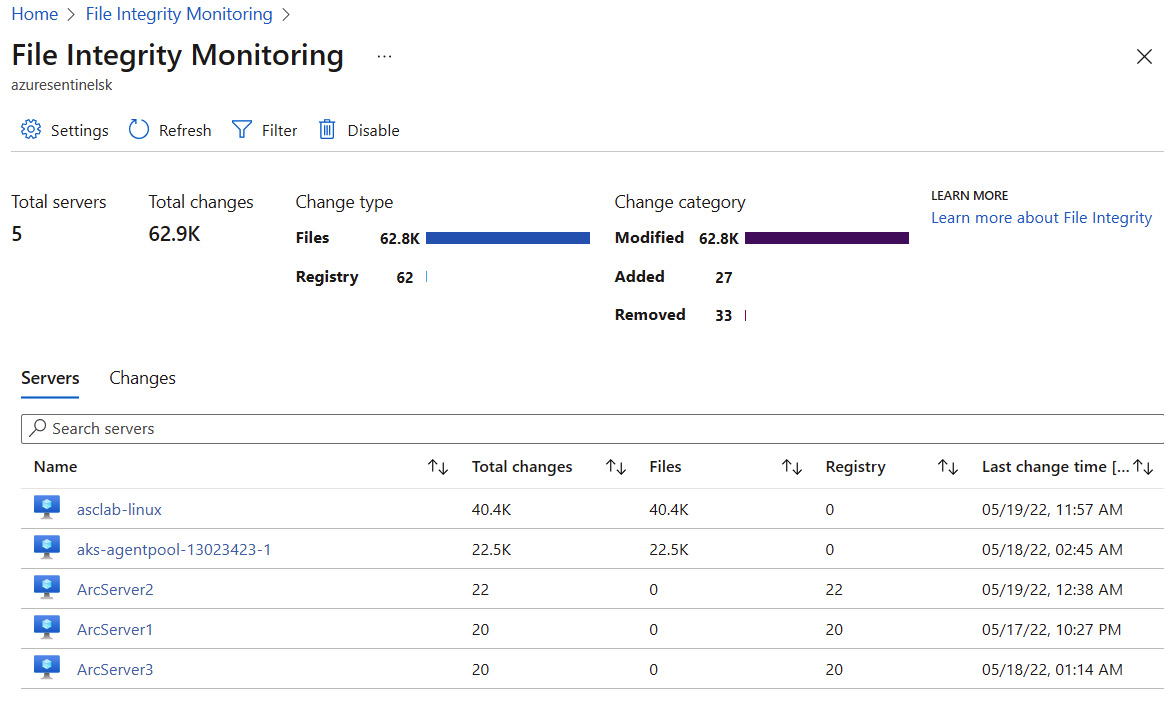
Figure 7.30 – File Integrity Monitoring on a selected Log Analytics workspace
- The FIM for a selected Log Analytics workspace displays a monitoring summary, such as total servers and total changes, change types, and category values. The tabs list displays monitored machines and changes that have been made to monitored entities. For additional FIM configuration, on the top menu, click Settings.
- The Workspace Configuration blade allows you to manage change tracking for the Windows registry, Windows files, and Linux files. You can enable or disable change tracking for listed files and registry keys, and specify your own files and registry keys to track changes. Click the File Content tab.
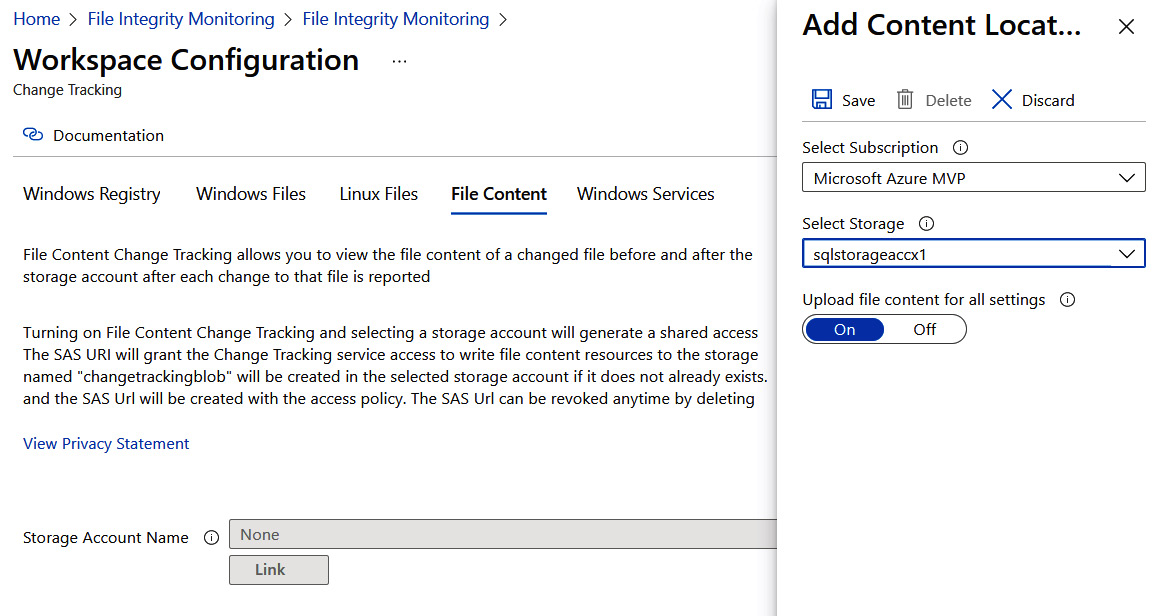
Figure 7.31 – Workspace Configuration
- Moreover, the File Content tab allows you to select and link a storage account that will store file content, to enable the viewing of file content before and after the change. Click the Link button.
- Select a subscription and a storage account. Ensure Upload file content for all settings is On to enable file content upload for all currently tracked files. Click Save.
- Click the Windows Services tab. Move the slider to adjust the collection frequency for Windows Services changes between the allowed values of 10 seconds and 30 minutes.
How it works…
File integrity monitoring uses the Log Analytics agent to upload data to a Log Analytics workspace. FIM compares the state of monitoring entities during a previous scan with the current state and signals whether any changes occurred between the two scans and whether any questionable changes were made.