
Chapter 1: Getting Started with Microsoft Defender for Cloud
In this first chapter, you will learn how to get started with Microsoft Defender for Cloud (MDC) I will also introduce to you the basic but fundamental Microsoft Defender for Cloud configuration and perform initial MDC configuration steps that will set a foundation for using the program's protection and monitoring capabilities.
The recipes in this chapter will explain the essential and foundational Microsoft Defender for Cloud configuration steps that influence MDC's security capabilities, infrastructure coverage, and behavior. It is vital to know which Log Analytics Workspace will be used, the level of data that's been collected, and how monitoring agents will be deployed. Although you can change these settings anytime, it is better to set foundational and basic settings first and then proceed with configuring other settings.
After all, your choices will have an impact not only on security but on cost as well.
We will cover the following recipes in this chapter:
- Enabling Microsoft Defender for Cloud Plans on Azure Subscriptions and Log Analytics workspaces
- Enabling an Microsoft Defender for Cloud Plans on an Azure Subscription
- Enabling an Microsoft Defender for Cloud Plans on a Log Analytics workspace
- Enabling an Microsoft Defender for Cloud Plans on multiple Azure Subscriptions and Log Analytics workspaces
- Configuring data collection on a Log Analytics workspace
- Configuring provisioning extensions automatically
- Enabling a Log Analytics agent for Azure VMs manually in the Log Analytics workspace settings
- Enabling the Log Analytics agent for Azure VMs manually in the virtual machine settings
- Configuring the Log Analytics agent for Azure VMs extension deployment
- Configuring email notifications
- Assigning Microsoft Defender for Cloud permissions
- Onboarding Microsoft Defender for Cloud using PowerShell
- Enabling Microsoft Defender for Cloud integration with other Microsoft security services
Technical requirements
To complete the recipes in this chapter, the following is required:
- An Azure subscription (for some of the recipes in this chapter)
- Two or more Azure subscriptions (for some of the recipes in this chapter)
- Azure PowerShell
- A web browser, preferably Microsoft Edge
The code samples for this chapter can be found at https://github.com/PacktPublishing/Microsoft-Defender-for-Cloud-Cookbook.
Enabling Microsoft Defender for Cloud Plans on Azure Subscriptions and Log Analytics Workspaces
Microsoft Defender for Cloud natively protects services in Azure –no steps must be followed to enable its native, basic functionality. However, you might need to protect multiple subscriptions at a more advanced level, using Microsoft Defender for Cloud Plans. In the end, you will enable Microsoft Defender for Cloud Plans on multiple Azure subscriptions and Log Analytics Workspaces at once.
Getting ready
Before you enable Microsoft Defender for Cloud Plans on multiple subscriptions, ensure you have at least two Azure subscriptions or workspaces. These should not have Microsoft Defender for Cloud Plans enabled already.
Open a web browser and navigate to https://portal.azure.com.
How to do it…
To enable Microsoft Defender for Cloud Plans on multiple subscriptions at once, complete the following steps:
- In the Azure portal, open Microsoft Defender for Cloud. You can open Microsoft Defender for Cloud in multiple ways: typing Microsoft Defender for Cloud in a search bar, clicking on a favorite link, or by going to All Services:
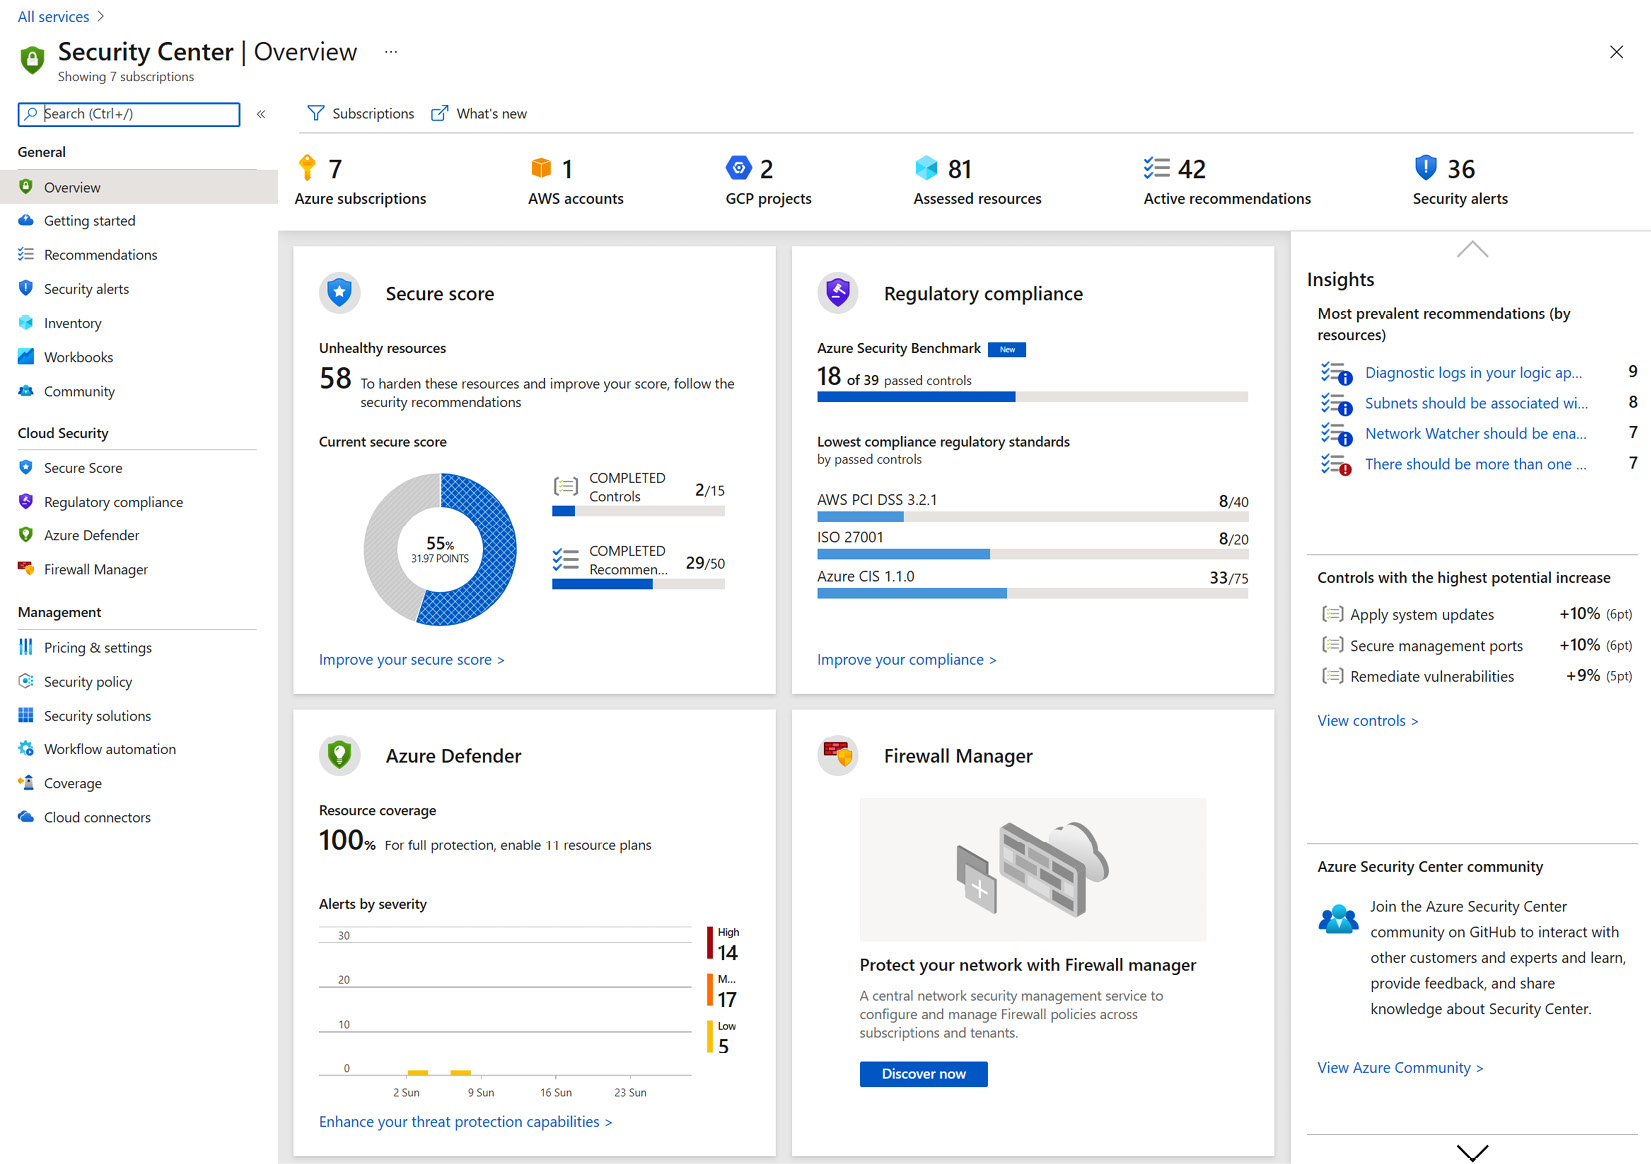
Figure 1.1 – Microsoft Defender for Cloud Overview page
- On the Microsoft Defender for Cloud menu, on the left-hand side, select Getting Started. The Getting Started page will have three tabs or pages available: Upgrade, Install Agents, and Get Started. Click on Upgrade to display a list of available subscriptions and workspaces to enable on Microsoft Defender for Cloud Plans. The following screenshot shows this:
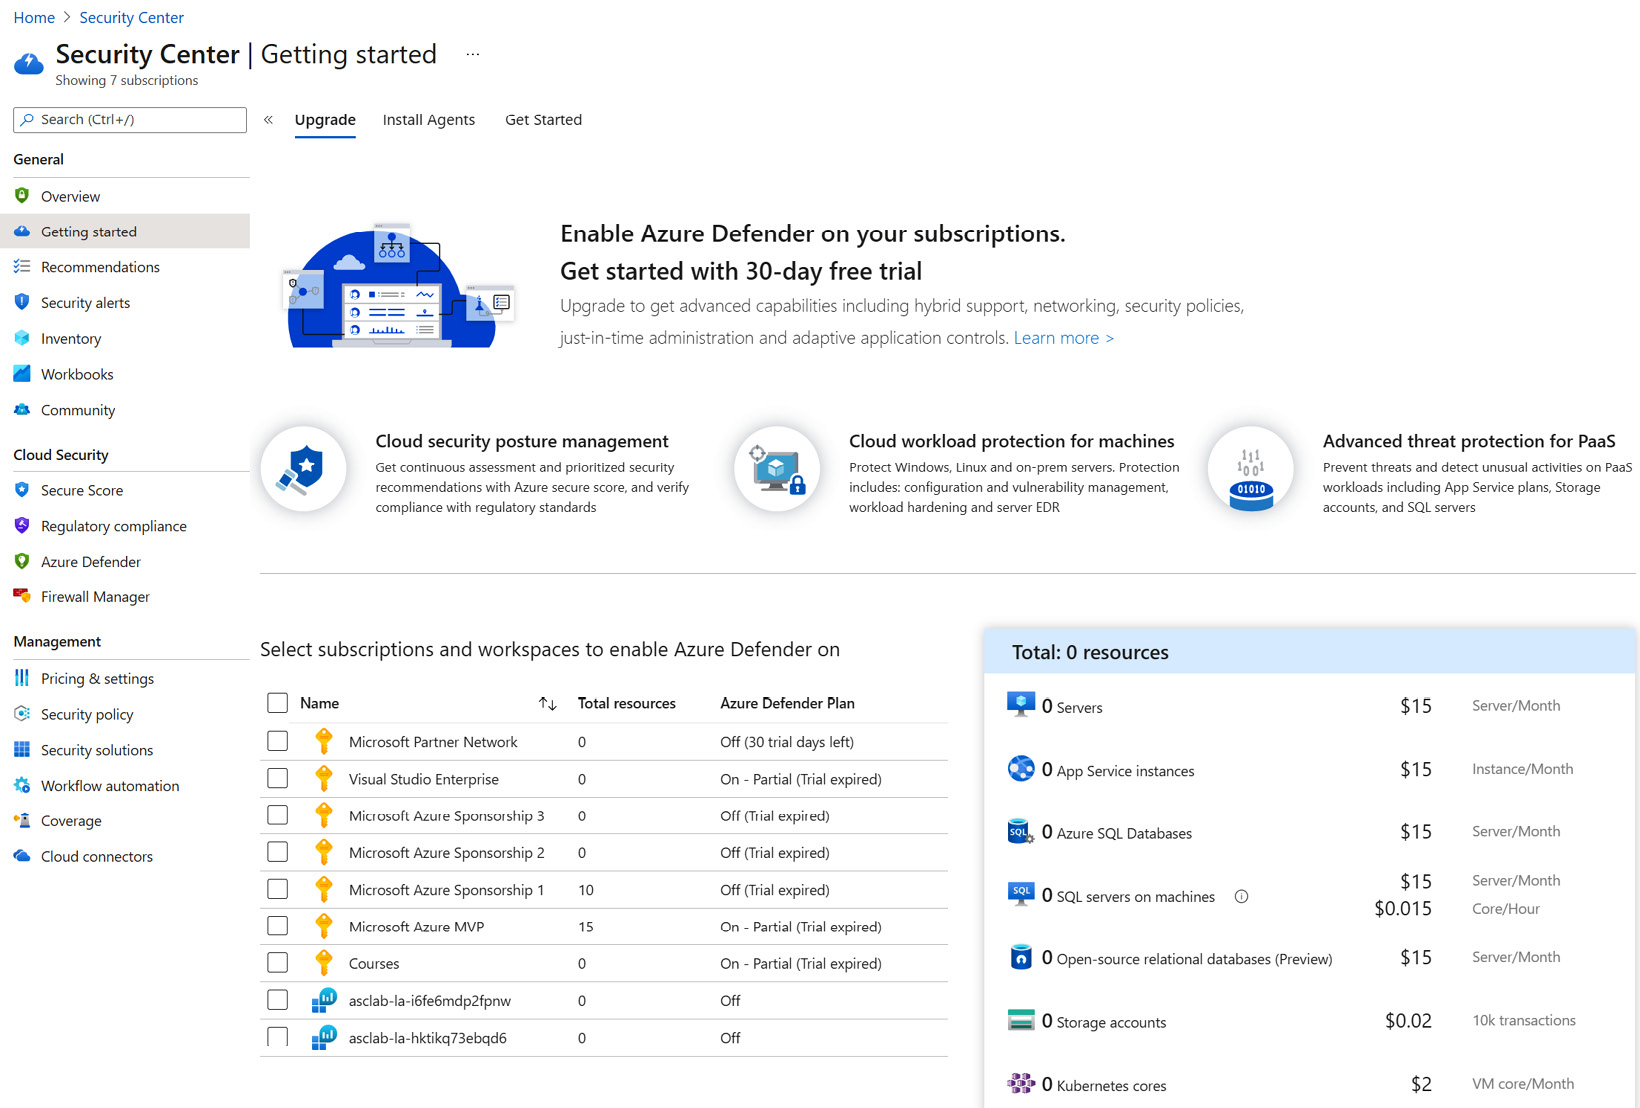
Figure 1.2 – Microsoft Defender for Cloud – Getting started page
- Select all the subscriptions and workspaces you want to enable Microsoft Defender for Cloud Plans on and scroll to the end of the Upgrade page until the Upgrade button is visible. The Upgrade button is gray and will be disabled until you select at least one subscription or workspace, after which it will turn blue. Let's see what all of this looks like:

Figure 1.3 – Enabling Azure Subscriptions on Azure Subscriptions and/or Log Analytics Workspaces
- Select Upgrade to enable Microsoft Defender for Cloud Plans on selected subscriptions and/or workspaces.
How it works…
As soon as you create an Azure Subscription, Microsoft Defender for Cloud gives you an overview of the resources that are monitored and assessed by Microsoft Defender for Cloud, as well as security recommendations for recognized resources.
To enable full coverage of Microsoft Defender for Cloud Plans on multiple Azure Subscriptions and workspaces, you can enable Microsoft Defender for Cloud Plans protection on more than one Subscription and Log Analytics workspace at once, reducing the risk of having unprotected resources and potential security issues.
Upgrading to and enabling full Microsoft Defender for Cloud Plans protection on multiple Azure Subscriptions and Log Analytics Workspaces applies to partially enabled Microsoft Defender for Cloud Plans as well.
Enabling an Microsoft Defender for Cloud Plans on an Azure Subscription
Microsoft Defender for Cloud covers two areas of cloud security: Cloud Security Posture Management (CSPM) and Cloud Workload Protection (CWP). Microsoft Defender for Cloud Plans is Microsoft Defender for Cloud's integrated protection platform that protects Azure and hybrid resources. If you want to enable Microsoft Defender for Cloud Plans on a particular Azure Subscription and you want to control what Microsoft Defender for Cloud Plans features are enabled or disabled on an Azure Subscription, you need to enable Microsoft Defender for Cloud Plans, as described in this recipe.
There are multiple ways to enable Microsoft Defender for Cloud Plans on a subscription, and we will show more than one way here.
After completing this recipe, you will be able to enable Microsoft Defender for Cloud Plans and Microsoft Defender for Cloud Plans's protection features on an Azure Subscription.
Getting ready
Before you enable Microsoft Defender for Cloud Plans on an Azure Subscription, you must have at least one Azure Subscription. You should not have Microsoft Defender for Cloud Plans already enabled.
Open a web browser and navigate to https://portal.azure.com.
How to do it…
To enable Microsoft Defender for Cloud Plans and Microsoft Defender for Cloud Plans's protection capabilities on different workloads more granularly, complete the following steps:
- In the Azure portal, open Microsoft Defender for Cloud. You can open Microsoft Defender for Cloud in multiple ways: by typing Microsoft Defender for Cloud in the search bar, clicking on a favorite link, or by going to All Services.
- On the Microsoft Defender for Cloud – Overview page, from the left menu, select Environment settings, as shown in the following screenshot.
- Expand Management groups until you see a desired Azure subscription
- Select the subscription that you want to enable Microsoft Defender for Cloud Plans on. The Settings – Defender Plans page will open:

Figure 1.4 – Microsoft Defender for Cloud Environmental settings page – Selecting an Azure Subscription
- While Microsoft Defender for Cloud Plans is disabled, all individual Microsoft Defender for Cloud Plans by resource types are grayed out and disabled. Click on Microsoft Defender for Cloud Plans on to enable Microsoft Defender for Cloud Plans, as shown in the following screenshot:
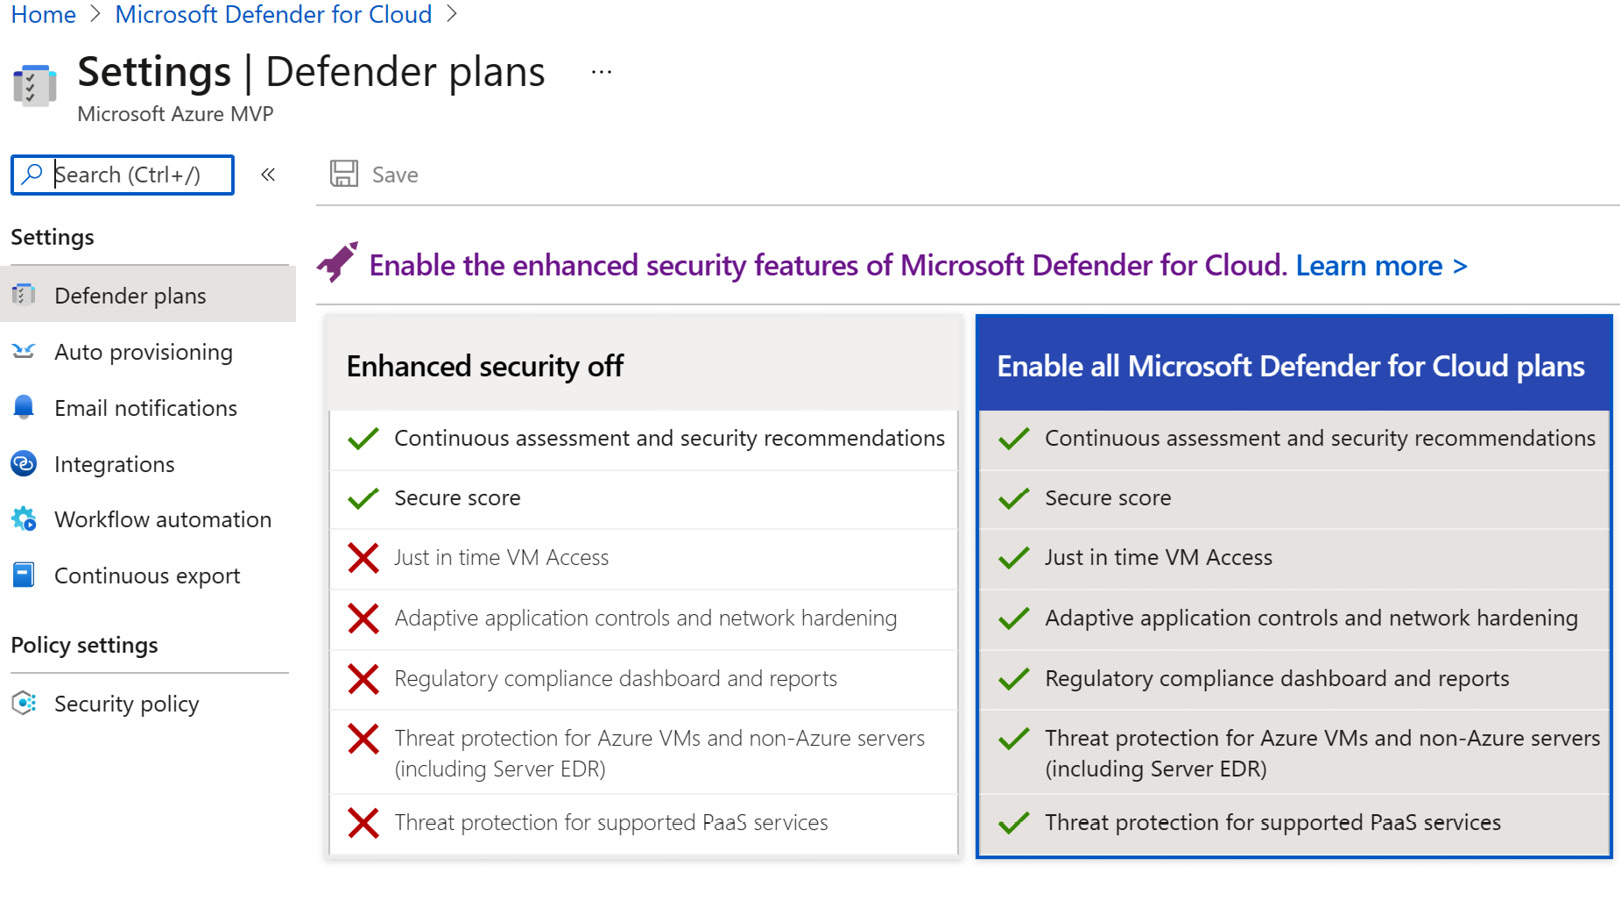
Figure 1.5 – Turning Microsoft Defender for Cloud Plans on
- After you select Enable all Microsoft Defender for Cloud Plans, you can select Microsoft Defender for Cloud Plans by resource type individually. Alternatively, if you select an Azure Subscription that already has Microsoft Defender for Cloud Plans turned on partially, you can enable all Microsoft Defender for Cloud Plans by clicking on the Enable all button, as shown in the following screenshot. A button or control that has changed and its current setting is not saved will be purple; otherwise, it will be blue, as shown in the following screenshot:

Figure 1.6 – Selecting Microsoft Defender for Cloud Plans by resource types
- Once you have selected the appropriate Microsoft Defender for Cloud Plans protection options, at the top of the window, click Save to apply your changes.
How it works…
The Microsoft Defender for Cloud Plans by resource type displays resource quantities in their respective categories, as well as pricing information. Enabling protection for an individual Microsoft Defender for Cloud Plans category applies to all the resources in that category. For example, if you enable Microsoft Defender for Cloud Plans protection for servers, the setting will apply for all Servers in a subscription.
There's more…
Once you enable Microsoft Defender for Cloud Plans on Azure Subscriptions, several Microsoft Defender for Cloud Plans become available:
- Microsoft Defender for Cloud Plans for Servers: This includes threat protection for Azure virtual machines and non-Azure servers, including server Endpoint Detection and Response (EDR).
- Microsoft Defender for Cloud Plans for App Service.
- Microsoft Defender for Cloud Plans for SQL Databases: This applies to Azure SQL Database's single databases and elastic pools, Azure SQL Managed Instances, and Azure Synapse Analytics.
- Microsoft Defender for Cloud Plans for SQL Servers on machines: This applies to SQL on Azure virtual machines, SQL servers on-premises, and Azure Arc-enabled SQL servers.
- Microsoft Defender for Cloud Plans for open source relational databases (at the time of writing, this feature is still in preview): This applies to non-Basic tier Azure Databases for a PostgreSQL single server, Azure Databases for a MySQL single server, and Azure Databases for a MariaDB single server.
- Microsoft Defender for Cloud Plans for Storage: This applies to blob containers, file shares, and DataLake Gen2.
- Microsoft Defender for Cloud Plans for Containers, which includes Policy Add-on for Kubernetes, Azure Kubernetes Service profile and Azure Arc-Enabled Kubernetes extension options.
- Microsoft Defender for Cloud Plans for Key Vault.
- Microsoft Defender for Cloud Plans for Resource Manager.
- Microsoft Defender for Cloud Plans for DNS: This applies to all Azure resources connected to the Azure default DNS.
Microsoft Defender for Cloud Plans's advanced protection capabilities include Just-in-Time virtual machine access, virtual machine vulnerability assessment, adaptive application control, adaptive network hardening, file integrity monitoring, SQL vulnerability assessment, container image scanning, Internet of things (IoT) security, regulatory compliance dashboards and reports, threat protection for supported PaaS services, and more.
Enabling an Microsoft Defender for Cloud Plans on a Log Analytics Workspace
Like enabling Microsoft Defender for Cloud Plans on an Azure Subscription, you can enable Microsoft Defender for Cloud Plans on a Log Analytics Workspace.
Getting ready
Before you enable Microsoft Defender for Cloud Plans on a Log Analytics Workspace, you must have at least one Log Analytics Workspace. You should not have Microsoft Defender for Cloud Plans already enabled.
Open a web browser and navigate to https://portal.azure.com.
How to do it…
To enable Microsoft Defender for Cloud Plans on a Log Analytics Workspace, complete the following steps:
- In the Azure portal, open Microsoft Defender for Cloud. You can open Microsoft Defender for Cloud in multiple ways: by typing Microsoft Defender for Cloud in a search bar, clicking on a favorite link, or by going to All Services.
- On the Microsoft Defender for Cloud – Overview page, from the left menu, select Environmental settings, as shown in the following screenshot.
- Select the Log Analytics Workspace that you want to enable Microsoft Defender for Cloud Plans on. The Settings – Defender Plans page will open:
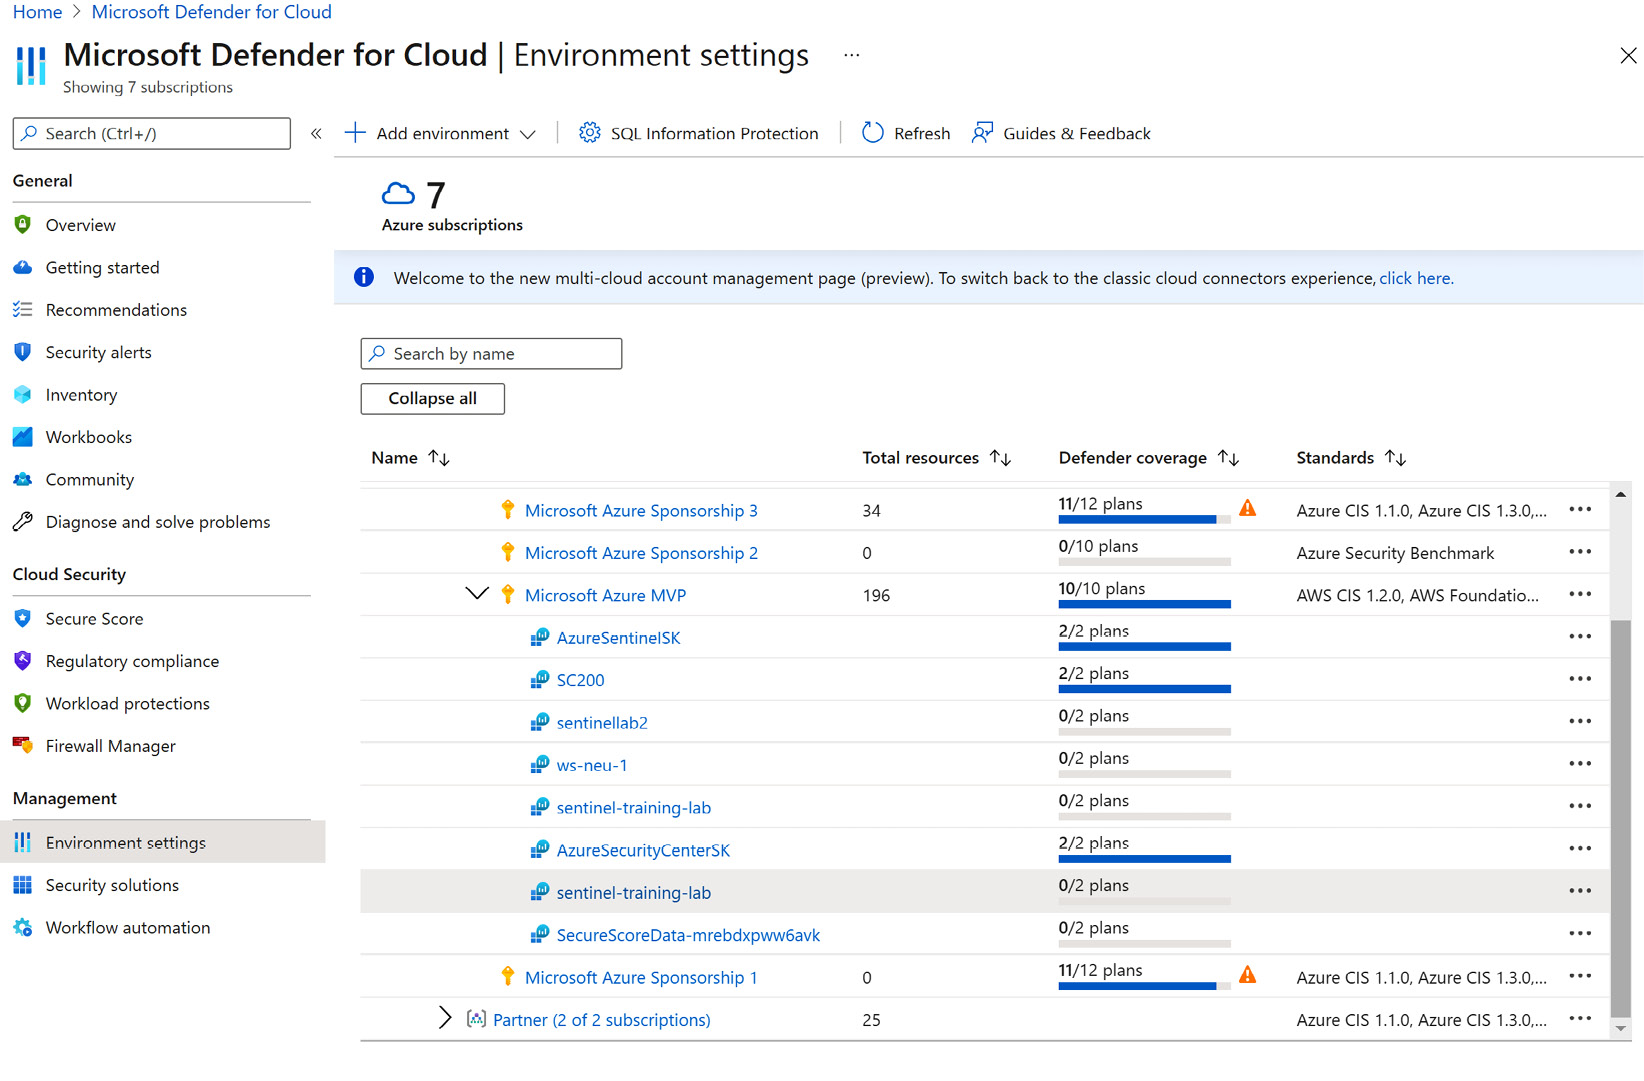
Figure 1.7 – Microsoft Defender for Cloud Getting started page – Selecting a Log Analytics Workspace
- While Microsoft Defender for Cloud Plans is disabled, all individual Microsoft Defender for Cloud Plans by resource type will be grayed out and disabled. Click on Microsoft Defender for Cloud Plans on, as shown in the following screenshot, to enable Microsoft Defender for Cloud Plans:

Figure 1.8 – Selecting and enabling Microsoft Defender for Cloud Plans on resource types reporting to a Log Analytics Workspace
- Once you have selected Microsoft Defender for Cloud Plans's protection options, at the top of the window, click on Save to apply these changes.
How it works…
When you enable an Microsoft Defender for Cloud Plans for a resource type on a subscription, all the resource types in that category will be protected by Microsoft Defender for Cloud Plans. On the other hand, when you enable Microsoft Defender for Cloud Plans on a Log Analytics Workspace, Microsoft Defender for Cloud Plans will protect only resources reporting to that workspace.
At the time of writing, Microsoft Defender for Cloud Plans for Log Analytics Workspace are not as comprehensive as Microsoft Defender for Cloud Plans for Azure Subscriptions and include the following:
- Microsoft Defender for Cloud Plans for Servers: This includes threat protection for Azure virtual machines and non-Azure servers, including server Endpoint Detection and Response (EDR).
- Microsoft Defender for Cloud Plans for SQL servers on machines: This applies to SQL on Azure virtual machines, SQL servers on-premises, and Azure Arc-enabled SQL servers. This includes threat protection for SQL servers running on machines.
Enabling an Microsoft Defender for Cloud Plans on multiple Azure Subscriptions and Log Analytics Workspaces
This recipe will show you how to enable Microsoft Defender for Cloud Plans and Microsoft Defender for Cloud Plans's protection capabilities on multiple Azure Subscriptions and Log Analytics Workspaces.
Getting ready
Before you enable Microsoft Defender for Cloud Plans on Azure Subscriptions and Log Analytics Workspaces, you must have at least one Azure subscription and at least one Log Analytics Workspace. You should not have Microsoft Defender for Cloud Plans already enabled on these subscriptions and workspaces.
Open a web browser and navigate to https://portal.azure.com.
How to do it…
To enable Microsoft Defender for Cloud Plans and Microsoft Defender for Cloud Plans's protection capabilities on multiple subscriptions and workspaces, complete the following steps:
- In the Azure portal, open Microsoft Defender for Cloud. You can open Microsoft Defender for Cloud in multiple ways: by typing Microsoft Defender for Cloud in a search bar, clicking on a favorite link, or by going to All Services.
- On the Microsoft Defender for Cloud – Overview page, from the left menu, select Getting Started, as shown in the following screenshot. A list of available Azure Subscriptions should be displayed. If not, select the Upgrade tab at the top of the page:
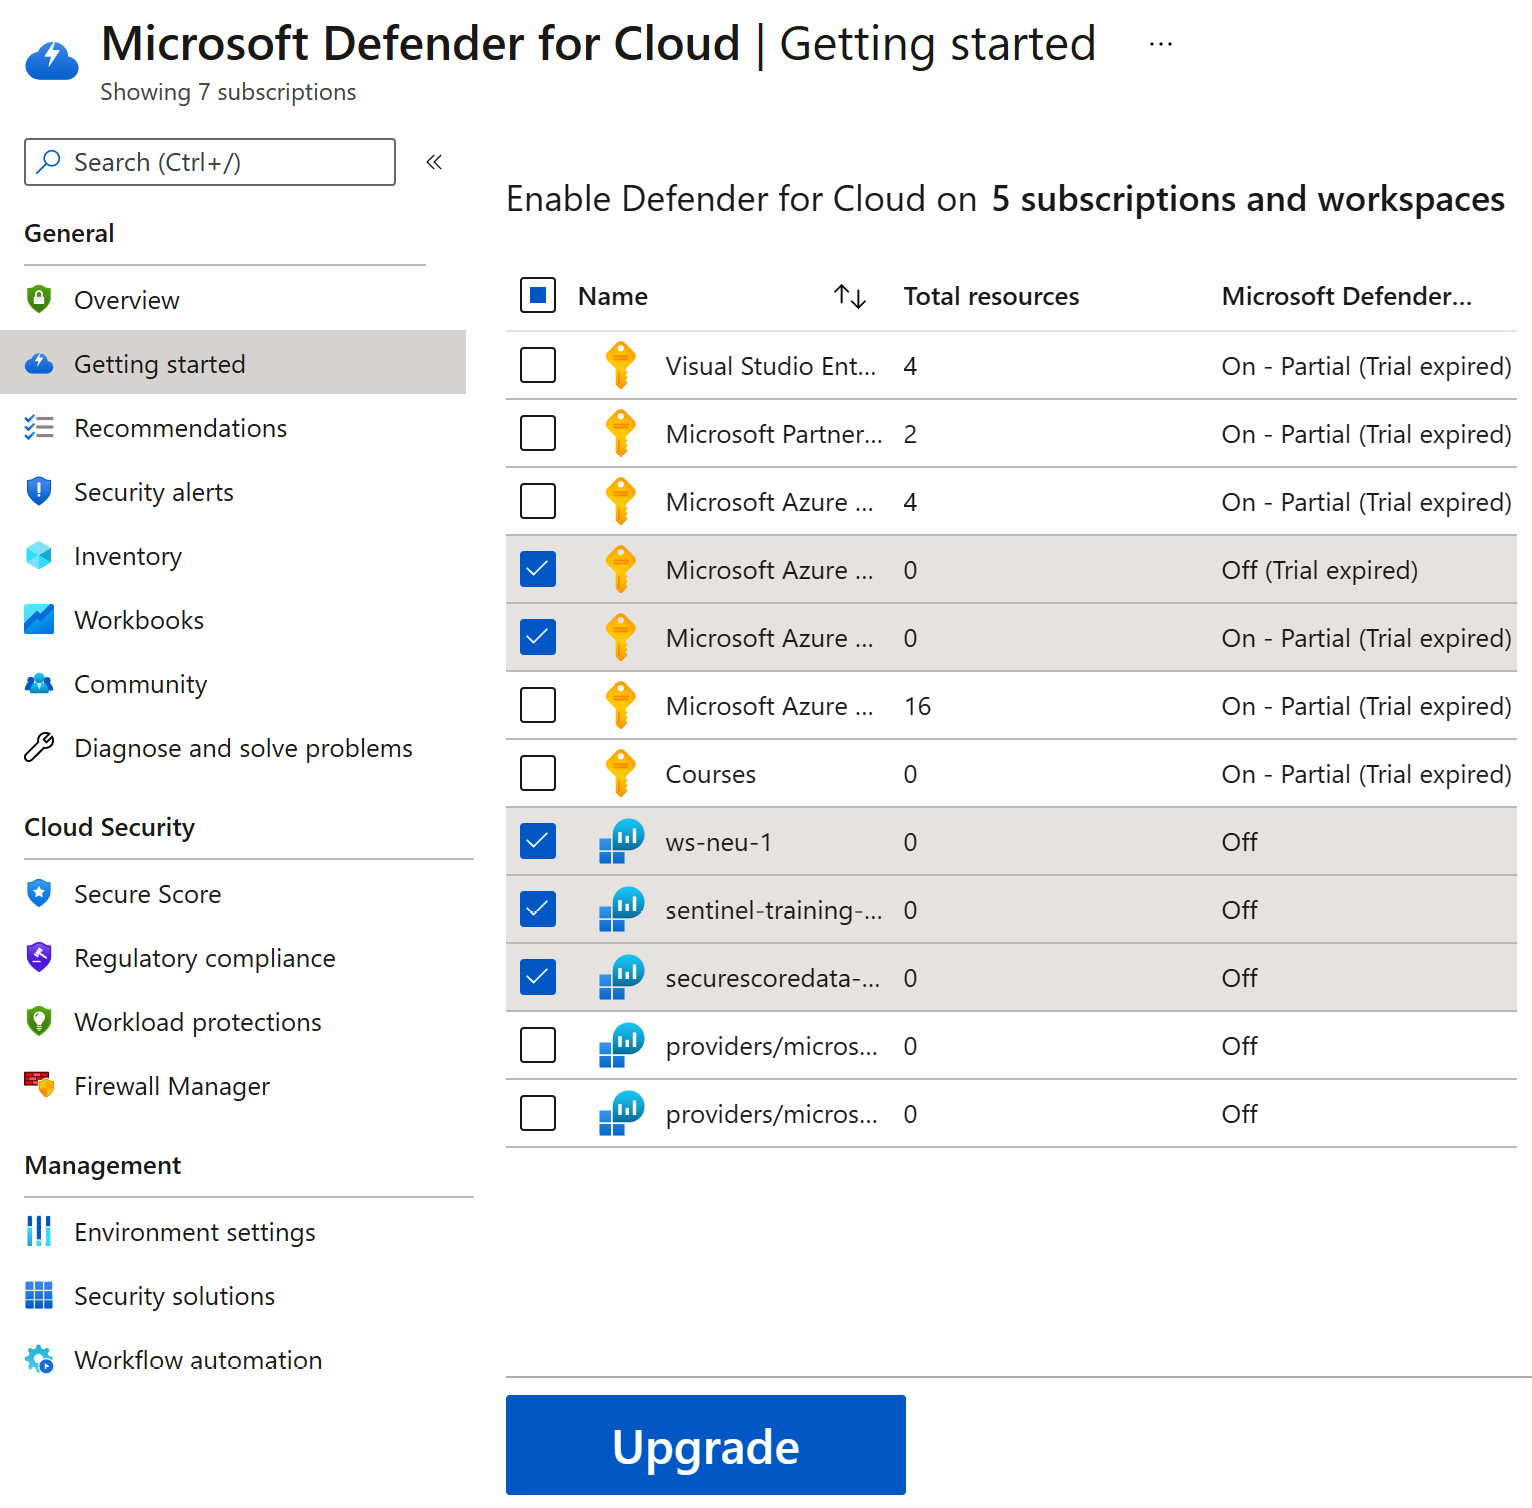
Figure 1.9 – Microsoft Defender for Cloud Getting started page – Selecting multiple Azure Subscriptions and Log Analytics Workspaces
- In the middle of the page, under Select subscriptions and workspaces to enable Microsoft Defender for Cloud Plans on, select the checkboxes next to the Azure Subscriptions and Log Analytics Workspaces you want to enable Microsoft Defender for Cloud Plans on.
- At the bottom of the page, click on Upgrade.
How it works…
After enabling Microsoft Defender for Cloud Plans on multiple Azure Subscriptions and Log Analytics Workspaces, you have the option to install Log Analytics Agent on recently enabled subscriptions and workspaces at the same time by selecting the Install button. Similar to the previous recipe, enabling protection for individual Microsoft Defender for Cloud Plans categories applies to all the resources in that category. For example, if you enable Microsoft Defender for Cloud Plans protection for servers, this setting will apply to all the servers in a subscription.
Configuring data collection in a Log Analytics Workspace
You can configure data collection tiers in a Log Analytics Workspace. This will affect the number and type of events stored in a Log Analytics Workspace. The data that's stored in a workspace allows you to search, audit, and investigate stored events.
Getting ready
Open a web browser and navigate to https://portal.azure.com.
How to do it…
To configure the level of data you wish to store in a Log Analytics Workspace, complete the following steps:
- In the Azure portal, open Microsoft Defender for Cloud. You can open Microsoft Defender for Cloud in multiple ways: by typing Microsoft Defender for Cloud in a search bar, clicking on a favorite link, or by going to All Services.
- On the Microsoft Defender for Cloud – Overview page, from the left menu, select Environmental settings.
- Select the Log Analytics Workspace that you want to configure the level of data to store for. The Settings – Defender Plans page will open.
- If Microsoft Defender for Cloud Plans, if the Log Analytics Workspace is turned off, you must turn Microsoft Defender for Cloud Plans on.
Please refer to the Enabling Microsoft Defender for Cloud Plans on a Log Analytics Workspace recipe for a complete procedure regarding how to enable Microsoft Defender for Cloud Plans on a Log Analytics Workspace.
- From the left menu, select Data collection, as shown in the following screenshot:

Figure 1.10 – Selecting the level of data to store for a selected Log Analytics Workspace
- By default, data collection is turned off. To choose the level of data to store in the selected workspace, select either Minimal, Common, or All Events.
- Click on Save to apply these changes.
How it works…
A Log Analytics Agent collects events required for Microsoft Defender for Cloud protection, regardless of the level of data stored in the Log Analytics Workspace. You can choose to collect various types of events in a Log Analytics Workspace, such as logs, raw events, and security data, by selecting the level of data to store for a workspace. Setting the option to something other than None enables you to search for, audit, and investigate collected events in Microsoft Defender for Cloud.
The Minimal setting includes collecting the following events:
- 1102, 4624, 4625, 4657, 4663, 4688, 4700, 4702, 4719, 4720, 4722, 4723, 4724, 4727, 4728, 4732, 4735, 4737, 4739, 4740, 4754, 4755, 4756, 4767, 4799, 4825, 4946, 4948, 4956, 5024, 5033, 8001, 8002, 8003, 8004, 8005, 8006, 8007, 8222.
The Common setting includes collecting the following events:
- 1, 299, 300, 324, 340, 403, 404, 410-413, 431, 500, 501, 1100, 1102, 1107, 1108, 4608, 4610, 4611, 4614, 4622, 4624, 4625, 4634, 4647-4649, 4657, 4661-4663, 4665-4667, 4688, 4670, 4672-4675, 4689, 4697, 4700, 4702, 4704, 4705, 4716-4720, 4722-4729, 4732, 4733, 4735, 4737- 4740, 4742, 4744-4746, 4750-4752, 4754-4757, 4760-4762, 4764, 4767, 4768, 4771, 4774, 4778, 4779, 4781, 4793, 4797-4803, 4825, 4826, 4870, 4886-4888, 4893, 4898, 4902 4904, 4905, 4907, 4931-4933, 4946, 4948, 4956, 4985, 5024, 5033, 5059, 5136, 5137, 5140, 5145, 5632, 6144, 6145, 6272, 6273, 6278, 6416, 6423, 6424, 8001-8007, 8222, 26401, 30004.
Configuring provisioning extensions automatically
Microsoft Defender for Cloud uses an agent or resource extension to collect the data that's required for analysis. You can choose to install agents manually, but for the best protection and less administrative burden, you may wish to automate installations of the monitoring agent and its extensions.
Getting ready
Open a web browser and navigate to https://portal.azure.com. Microsoft Defender for Cloud Plans must be enabled on the Azure Subscription you are configuring.
How to do it…
To ensure you have the required resource extensions or agents installed automatically, complete the following steps:
- In the Azure portal, open Microsoft Defender for Cloud. You can open Microsoft Defender for Cloud in multiple ways: by typing Microsoft Defender for Cloud in a search bar, clicking on a favorite link, or by going to All Services.
- On the Microsoft Defender for Cloud – Overview page, from the left menu, select Environmental settings.
- Select the Azure Subscription that you want to configure automatic provisioning of agents and extensions on. The Settings – Defender Plans page will open. Next, we'll be working with what's shown in the following screenshot:
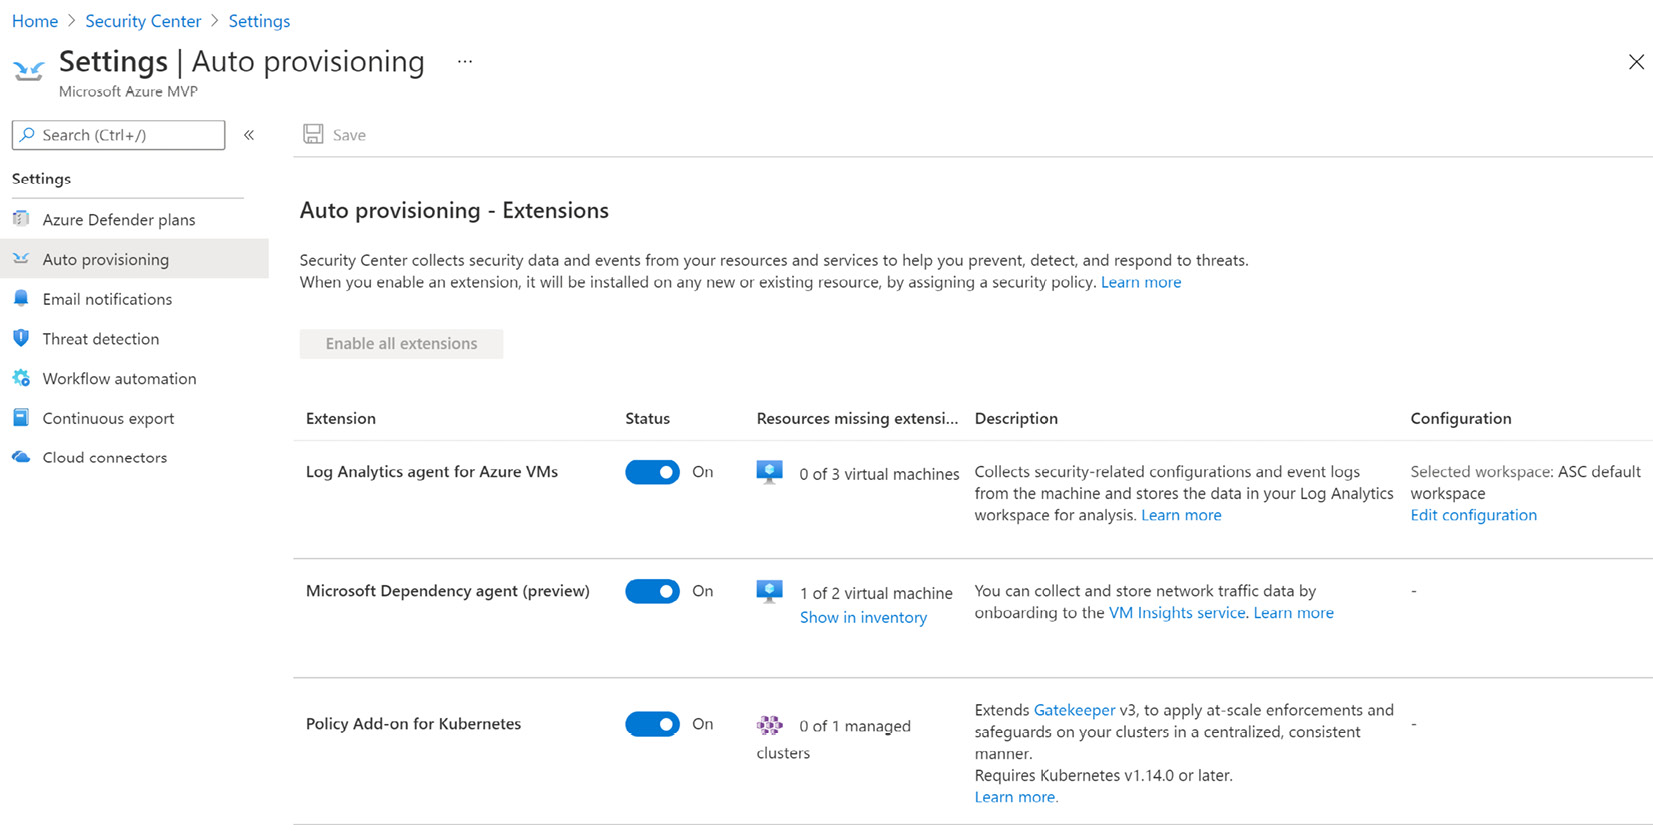
Figure 1.11 – Configuring auto provisioning
- From the left menu, select Auto provisioning. The Auto provisioning – Extensions page will open.
- Click on the Status button for the respective extension to enable an extension or to turn auto-provisioning on.
How it works…
When you enable an extension – that is, turn auto-provisioning on – any new or existing resources will have an extension or agent automatically installed. This can be achieved by assigning the proper Deploy if not exist policy that applies to all present and future resources.
Enabling a Log Analytics agent for Azure VMs manually in the Log Analytics Workspace settings
Let's say you want to enable Log Analytics Agent on an Azure virtual machine manually. This recipe will explain how to perform such an installation using the Log Analytics Workspace blade settings.
Getting ready
Assuming auto-provisioning is disabled and that the target Azure virtual machine does not have Log Analytics Agent already installed, you can perform the steps described in this recipe. You must have a Log Analytics Workspace provisioned to conduct this recipe. Open a web browser and navigate to https://portal.azure.com.
How to do it…
The following steps are to be performed:
- In the Azure portal, open the Log Analytics Workspaces blade where you want to enable Log Analytics Agent manually. You can open the Log Analytics workspaces blade in multiple ways: by typing Log Analytics workspaces in a search bar, clicking on a favorite link, or by going to All Services:

Figure 1.12 – Selecting a Log Analytics Workspace
- Click on a workspace to open the Workspace blade.
- From the left menu, under Workspace Data Sources, select Virtual Machines, as shown in the following screenshot:

Figure 1.13 – Selecting a virtual machine
- The list of virtual machines shows their respective connection status in the Log Analytics Connection column: Not connected, Connecting, This workspace, or Other workspace. Select a virtual machine that you want to install the Log Analytics Agent on manually and connect it to the selected Log Analytics Workspace.
- Click on Connect to begin installing the agent on the virtual machine and connect it to the workspace, as shown in the following screenshot:
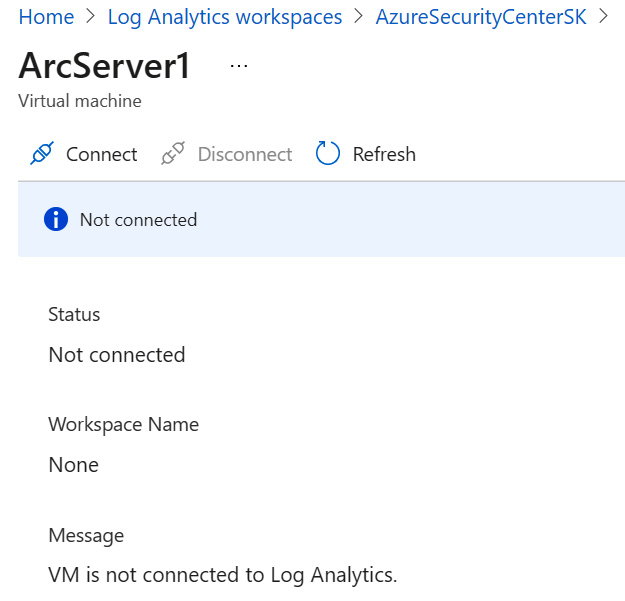
Figure 1.14 – Connecting a virtual machine to a workspace
- The status of the virtual machine changes to Connecting. You can click on the X in the top-right corner to close the blade and return to the list of virtual machines. The selected virtual machine shows a status of Connecting, indicating that the agent is being installed, as follows:

Figure 1.15 – Virtual machine showing "Connecting" connection status
- After a few moments, check the installation status. When the installation process is completed and the agent has been installed on the virtual machine, its status will change to This workspace, as follows:
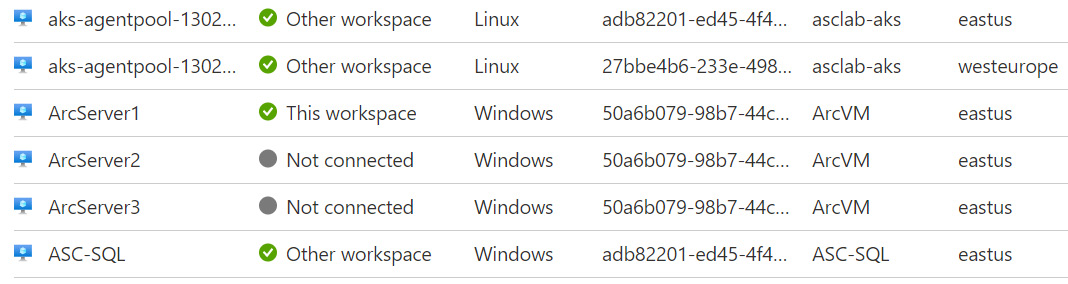
Figure 1.16 – Virtual machine showing "This Workspace" connection status
How it works…
There are several reasons why you would want to install Log Analytics Agent manually – perhaps you wanted to have greater control over software installations on your virtual machines and you disabled auto-provisioning. In that case, Microsoft Defender for Cloud does not install agents automatically and you must perform a manual installation on Azure virtual machines.
In this example, a Log Analytics Workspace has shown the list of virtual machines and their workspace connection statuses. From the list of available virtual machines, it is then easy to connect them to the selected workspace.
Enabling a Log Analytics agent for Azure VMs manually in the Virtual Machine settings
Let's say you want to enable Log Analytics Agent on an Azure virtual machine manually. This recipe will explain how to perform such an installation using the Virtual Machine blade settings.
Getting ready
Assuming auto-provisioning is disabled and the target Azure virtual machine does not have Log Analytics Agent already installed, you can perform the steps described in this recipe. You must have a Log Analytics Workspace provisioned if you do not have one. Open a web browser and navigate to https://portal.azure.com.
How to do it…
- In the Azure portal, open the Virtual Machine blade where you want to enable Log Analytics Agent manually. You can open the Virtual Machine blade in multiple ways: by typing Virtual Machine in a search bar, clicking on a favorite link, or by going to All Services.
- From the left menu, under Monitoring, select Logs:

Figure 1.17 – Enabling monitoring agent on the Virtual Machine Logs blade
- On the Logs page, click on the Enable button. This button will briefly change to Validating, after which the following menu will become available:

Figure 1.18 – Choosing a workspace subscription and a Log Analytics Workspace
- From the pull-down menus shown in the preceding screenshot, choose an Azure Subscription and a Log Analytics Workspace you want to connect the virtual machine to.
- Click Enable to begin installing Log Analytics Agent.
How it works…
There are several reasons why you would want to install Log Analytics Agent manually – perhaps you wanted to have greater control over software installations on your virtual machines and you disabled auto-provisioning. In that case, Microsoft Defender for Cloud does not install agents automatically and you must perform a manual installation on Azure virtual machines.
In this example, once monitoring has been enabled on a virtual machine, you can choose a workspace to connect to from a list of available workspaces.
There's more…
Optionally, you can check if Log Analytics Agent was installed successfully in several ways. One way would be to check the list of connected virtual machines on the Log Analytics Workspace's list of connected virtual machines, as follows:
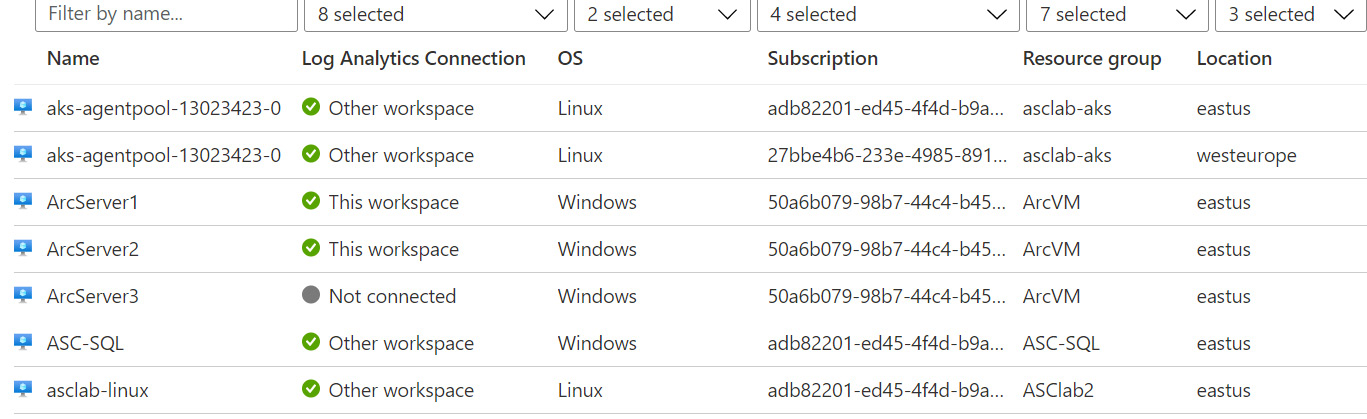
Figure 1.19 – Checking the virtual machine workspace's connection status
You can check the Logs blade on the connected virtual machine pages. If you installed this successfully, you should be able to see the Workspace query blade:

Figure 1.20 – Virtual machine Log analytics Query blade
Moreover, on a virtual machine's Overview page, you can check the extensions' installation status as well. This list will show the names of the agents that have been installed. In this case, both Windows Dependency Agent and Microsoft Monitoring Agent have been successfully installed, as follows:

Figure 1.21 – Virtual Machine Overview blade showing Extensions
Configuring a Log Analytics agent for Azure VMs extension deployment
Similar to configuring the level of data that's collected by Log Analytics Workspace, you can configure data collection tiers at the Azure Subscription level, and it will affect the number and type of events stored for the Azure Subscription as well. The data that's collected by Microsoft Defender for Cloud is stored in Log Analytics Workspace so that you can search for, audit, and investigate stored events.
Getting ready
Open a web browser and navigate to https://portal.azure.com.
How to do it…
To configure the Log Analytics Agent extension's deployment settings, complete the following steps:
- In the Azure portal, open Microsoft Defender for Cloud. You can open Microsoft Defender for Cloud in multiple ways: by typing Microsoft Defender for Cloud in a search bar, clicking on a favorite link, or by going to All Services.
- On the Microsoft Defender for Cloud – Overview page, from the left menu, select Environmental settings.
- Select the Azure Subscription that you want to configure the Log Analytics Agent extension's deployment settings for. The Settings – Defender Plans page will open.
- From the left menu, select Auto provisioning. The Auto provisioning – Extension page will open, as follows:

Figure 1.22 – Configuring a Log Analytics agent for Azure VMs
- On the right-hand side of the page, under Configuration for Log Analytics agent for Azure VMs, select Edit configuration. On the right-hand side, the Extension deployment configuration blade will open, as follows:
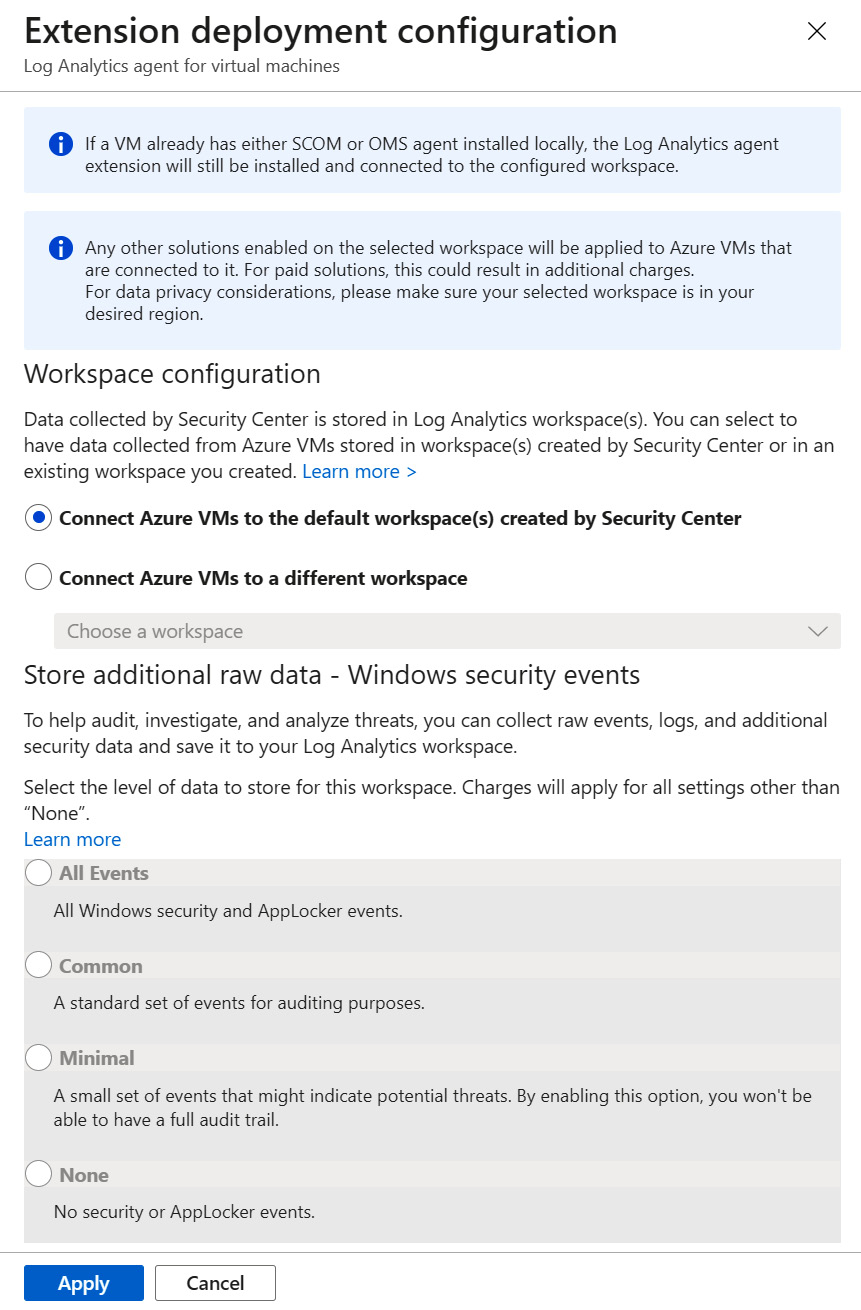
Figure 1.23 – Configuring a Log Analytics agent for virtual machines deployment
- In the Workspace configuration section, select Connect Azure VMs to a different workspace.
- To connect virtual machines to the default workspace created by Microsoft Defender for Cloud, select Connect Azure VMs to the default workspace(s) created by Microsoft Defender for Cloud.
- To connect to something other than the default workspace, select Connect Azure VMs to a different workspace.
- From the dropdown menu, choose the workspace you wish to connect to Microsoft Defender for Cloud.:
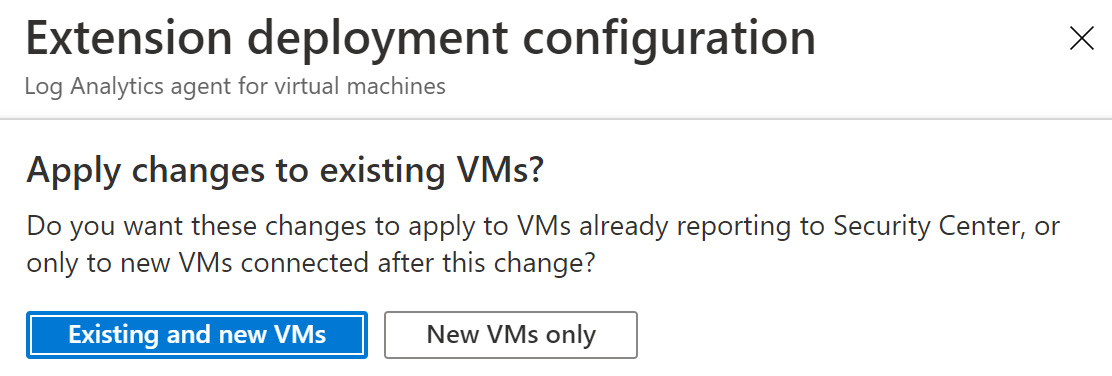
Figure 1.24 – Applying changes to the extension deployment configuration
- Select if you want to apply changes to Existing and new VMs or New VMs only.
- Select the level of data to store for the selected workspace: Minimal, Common, or All Events.
- Select Apply.
How it works…
Microsoft Defender for Cloud creates a resource group and default Log Analytics Workspace in the same geographical location and installs Log Analytics Agent on the default workspace. The default names for the resource group and workspace are DefaultResourceGroup-[geolocation] and DefaultWorkspace-[subscription-ID]-[geolocation]. If you need to customize the data collection location and the level of data that's collected, you can perform the required configuration changes on the Extension deployment configuration page. The level of the data that's collected depends on the setting you selected in the configuration.
Configuring email notifications
As a default behavior, Azure Subscription owners receive emails every time a high severity alert is activated for a subscription. To configure additional email recipients and the level of alerts to be notified, you have the option to configure the Email notifications settings for an Azure Subscription.
Getting ready
Open a web browser and navigate to https://portal.azure.com.
How to do it…
To configure email notifications for an Azure Subscription, complete the following steps:
- In the Azure portal, open Microsoft Defender for Cloud. You can open Microsoft Defender for Cloud in multiple ways: by typing Microsoft Defender for Cloud in a search bar, clicking on a favorite link, or by going to All Services.
- On the Microsoft Defender for Cloud – Overview page, from the left menu, select Environmental settings.
- Select the Azure Subscription that you want to configure the Email notifications settings for. The Settings – Defender Plans page will open.
- From the left menu, select Email notifications. The Settings – Email notifications page will open, as follows:

Figure 1.25 – Configuring email notifications
- From the All users with the following roles dropdown menu, select users with a specific Azure role to be notified of alert events, as follows:

Figure 1.26 – Configuring email recipients
- In the Additional email addresses field, enter one or more email addresses separated by commas to add additional users as alerts recipients, as shown in the following screenshot:

Figure 1.27 – Configuring additional email addresses
- To turn email notifications on or off, select or deselect the checkbox for Notify about alerts with the following severity (or higher), and to set the level or the notification types of emails to be sent by Microsoft Defender for Cloud, select the adjacent dropdown menu and choose High, Medium, or Low:

Figure 1.28 – Configuring notification types
- Select Save to confirm and apply your changes.
How it works…
Azure subscription owners receive alert email notifications by default. To include additional recipients or the control frequency and type of alert notifications users are notified of, you need to configure further settings. A user with the Owner, Contributor, Account Administrator, and Service Administrator roles can receive alert notifications.
Depending on a configured level of alert notifications, Microsoft Defender for Cloud sends a maximum of one email per the following:
- 24 hours for low severity events (or one email per day)
- 12 hours for medium severity alerts (or two emails per day)
- 6 hours for high severity alerts (or four emails per day)
Assigning Microsoft Defender for Cloud permissions
Like other resources and services in Azure, role-based access control (RBAC) roles are the way to control rights and allow actions on Microsoft Defender for Cloud. In this recipe, you will assign appropriate RBAC roles to Microsoft Defender for Cloud for an Azure user.
Getting ready
Open a web browser and navigate to https://portal.azure.com.
How to do it…
- In the Azure portal, open Subscriptions. You can open the Subscriptions blade in multiple ways: by selecting Subscriptions from the Azure portal main page, typing Subscriptions in a search bar, clicking on a favorite link, or by going to All Services:
Figure 1.29 – Choosing an Azure Subscription
- On the Subscriptions blade, select the subscription you want to configure Microsoft Defender for Cloud permissions on.
- On the Azure subscription blade, from the left-hand side menu, select Access Control (IAM). Then, from the right-hand side of the Azure subscription blade, at the top, select Role assignments:

Figure 1.30 – Selecting a Role assignment
- Select Add:

Figure 1.31 – Add role assignment blade
- On the Add role assignment page, under the Role menu, select the Security Admin role. Under Assign access to, select User, group, service principal. Under Select, select one or more members you want to assign a role to. Select Save:

Figure 1.32 – Choosing a role
How it works…
There are two Microsoft Defender for Cloud roles available called Security Reader and Security Admin that allow specific MDC actions to be performed. In addition to these two roles, you can perform certain Azure Security Actions when you are assigned the role of Owner, Contributor, or Reader.
The following table shows the allowed actions and roles in Microsoft Defender for Cloud:

Table 1.1 – Allowed actions and roles in Microsoft Defender for Cloud
To be able to use Workflow Automation in Microsoft Defender for Cloud, you must have appropriate permissions on Logic Apps, which are used in automation scenarios:
- Microsoft.Security/automations/write on the resource group where the automation workflow will be created.
- Logic App Contributor on a Logic App you are creating.
Onboarding Microsoft Defender for Cloud using PowerShell
You can onboard Microsoft Defender for Cloud and perform the initial configuration steps using PowerShell. These steps include setting the Microsoft Defender for Cloud coverage level, configuring Log Analytics Workspace, and installing an agent.
Getting ready
Before executing Microsoft Defender for Cloud PowerShell commands, you must perform some initial steps. Run PowerShell with administrative privileges. The latest Az modules need to be installed, as follows:
Install-Module -Name Az -AllowClobber -Scope CurrentUser
Ensure that an execution policy has been set:
Set-ExecutionPolicy -ExecutionPolicy AllSigned
Ensure that the Az.Security module has been installed:
Install-Module -Name Az.Security -Force
How to do it…
To onboard Microsoft Defender for Cloud using PowerShell, complete the following steps:
- Register your subscriptions to the Microsoft Defender for Cloud Resource Provider:
Set-AzContext -Subscription "subscription_ID"
Register-AzResourceProvider '
-ProviderNamespace 'Microsoft.Security'.
- Agents will have to report to the Log Analytics Workspace you are configuring, which the agents will report. You must have a Log Analytics Workspace that you have already created that the subscription's VMs will report to. You can define multiple subscriptions to report to the same workspace. If this is not defined, the default workspace will be used:
Set-AzSecurityWorkspaceSetting -Name "default" '
-Scope "/subscriptions/<subscription_ID> " '
-WorkspaceId "/subscriptions/<subscription_ID> /resourceGroups/<ResourceGroupName>/providers/Microsoft.OperationalInsights/workspaces/<WorkspaceName>"
- Auto-provision the installation of Log Analytics Agent on your Azure VMs:
Set-AzContext -Subscription "<subscription_ID>"
Set-AzSecurityAutoProvisioningSetting '
-Name "default" -EnableAutoProvision
- Assign the default Microsoft Defender for Cloud policy initiative:
Register-AzResourceProvider '
-ProviderNamespace 'Microsoft.PolicyInsights'
$Policy = Get-AzPolicySetDefinition | where {$_.Properties.displayName -EQ 'Azure Security Benchmark'} New-AzPolicyAssignment '
-Name 'ASC Default <subscription_ID>' '
-DisplayName 'Microsoft Defender for Cloud Default <subscription ID>' '
-PolicySetDefinition $Policy '
-Scope '/subscriptions/<subscription_ID>'
Replace <subscription_ID> with the ID of an Azure Subscription, <WorkspaceName> with the Log Analytics Workspace ID, and <ResourceGroupName> with a name of a resource group.
How it works…
To onboard Microsoft Defender for Cloud using PowerShell, you must use the Az.Security PowerShell module. First, you must register your subscriptions to the Microsoft Defender for Cloud resource provider, then configure the Log Analytics Workspace that Log Analytics Agent will report to. Finally, you must ensure auto-provisioning for Log Analytics Agent has been configured on your Azure virtual machines and assign the default Azure Security policy initiative. Optionally, you can set Microsoft Defender for Cloud Plans to enabled.
There's more…
Optionally, you can enable Microsoft Defender for Cloud Plans using the following command:
Set-AzContext -Subscription "<subscription ID>"
You can also use the following command to do the same:
Set-AzSecurityPricing -Name "default" -PricingTier "Standard"
Enabling Microsoft Defender for Cloud integration with other Microsoft security services
Microsoft Defender for Cloud extends its protection capabilities beyond Microsoft Defender for Cloud Plans security. To configure additional threat protection capacity in Microsoft Defender for Cloud, Microsoft Defender for Cloud Plans must be enabled.
Getting ready
Open a web browser and navigate to https://portal.azure.com.
How to do it…
To configure and enable Microsoft Defender for Cloud integration with Microsoft Cloud App Security and Microsoft Defender for Endpoint, complete the following steps:
- In the Azure portal, open Microsoft Defender for Cloud. You can open Microsoft Defender for Cloud in multiple ways: by typing Microsoft Defender for Cloud in a search bar, clicking on a favorite link, or by going to All Services.
- On the Microsoft Defender for Cloud – Overview page, from the left menu, select Environmental settings.
- Select the Azure Subscription that you want to configure integration with security services for. The Settings – Defender Plans page will open.
- From the left menu, select Integrations. The Enable integrations page will open, as follows:
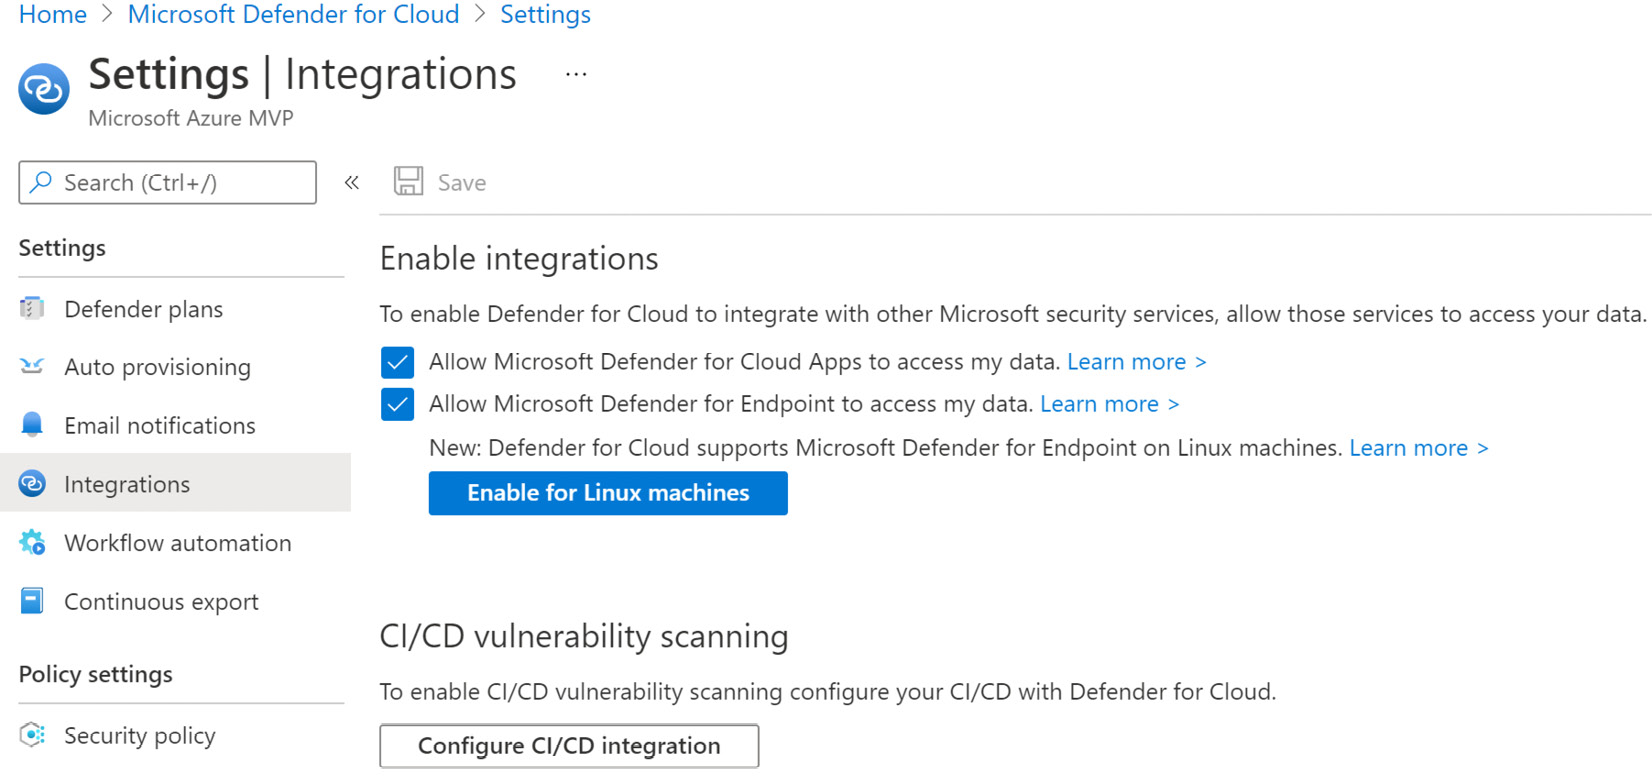
Figure 1.33 – Enabling Cloud App Security and Microsoft Defender for endpoint integration
- To enable Microsoft Defender for Cloud integration with Microsoft Cloud App Security and Microsoft Defender for Endpoint, select their respective checkboxes.
- Click Save to apply your changes.
How it works…
Microsoft Defender for Cloud uses specific packet headers based on Internet Protocol Flow Information Export (IPFIX) data to analyze network layer data that enables network-related alerts to be generated. If you have a Microsoft Cloud App Security (MCAS) license, some of the network-related alerts are operated by MCAS and these alerts are enabled by default. Moreover, by integrating Microsoft Defender for Endpoint with Microsoft Defender for Cloud, additional endpoint protection capabilities become available: automated onboarding for all Windows servers monitored by Microsoft Defender for Cloud and centralized monitoring of Microsoft Defender for Endpoint alerts in Microsoft Defender for Cloud.
Enabling Microsoft Defender for Cloud Plans on Azure Subscriptions and Log Analytics Workspaces
Enabling an Microsoft Defender for Cloud Plans on multiple Azure Subscriptions and Log Analytics Workspaces