
Chapter 8: Firewall Manager
In this chapter, you will learn how to secure Azure assets and public endpoints by controlling network traffic to and from Azure.
Microsoft Defender for Cloud is a security monitoring platform that unifies infrastructure monitoring and advanced threat protection, while getting you secured faster, protecting you against threats, and strengthening the security posture of your workloads.
The Microsoft Defender for Cloud Overview dashboard shows six central tiles – Secure Score, Regulatory Compliance, Workload protections, Inventory, Information protection, and Firewall Manager.
The Firewall Manager tile shows the status of networks and hubs and, while separate products, Azure Firewall and Firewall Manager are crucial network protection services that safeguard Azure assets.
The prominent Firewall Manager position in Microsoft Defender for Cloud, and its importance in protecting Azure workloads, requires knowing how to operate Firewall Manager and deploy an Azure firewall, Azure firewall policies, secured networks, and hubs.
Note
At the time of writing, Azure Firewall Premium was still in preview, so changes as regards product functionality and features, as well as Azure portal changes, are possible.
We will cover the following recipes in this chapter:
- Creating an Azure firewall
- Creating an Azure firewall using PowerShell
- Creating an Azure firewall policy
- Creating an Azure firewall policy using PowerShell
Technical requirements
To complete the recipes in this chapter, the following are required:
- An Azure subscription
- Azure PowerShell
- A web browser, preferably Microsoft Edge
The code samples can be found at https://github.com/PacktPublishing/Microsoft-Defender-for-Cloud-Cookbook.
Creating an Azure firewall
An Azure firewall is a managed Platform-as-a-Service (PaaS) solution that protects resources residing on Azure Virtual Network. The Microsoft Defender for Cloud Overview page supports and displays the status of Firewall Manager and its supported services, firewalls, and hubs. In this recipe, you will create an Azure Firewall Standard SKU.
Getting ready
In these examples, you can choose your own user-defined values instead of the examples provided.
To get ready for an Azure firewall deployment and to complete the preliminary steps, perform the following steps:
- Open a web browser and navigate to https://portal.azure.com.
- Open Virtual Networks and click + Create. The Create Virtual Network blade opens.
- In the Create Virtual Network blade, under the Basics tab, choose Azure Subscription, and, under Resource Group, click Create new, and then type Firewall for a resource group name.
- Under the Instance details group, in the Name field, type PacktPublishing for the Virtual Network name.
- Choose West Europe for an Azure Region.
- Then, click IP Addresses.
- For IPv4 address space, delete any existing address space ranges and type 172.16.0.0/16.
- Under Subnet name, click on Default.
- Change the subnet name to Production. For Subnet address range, type 172.16.0.0/24. Click Save.
- Click + Add subnet. In the Subnet name field, type AzureFirewallSubnet.
Note
This subnet will host an Azure firewall instance and the subnet name must be AzureFirewallSubnet, which is a reserved subnet name.
- For Subnet address range type 172.16.1.0/26. Click Save.

Figure 8.1 – Create virtual network
- Click Review + create.
- Click Create.
How to do it…
To create a Standard tier Azure firewall, complete the following steps:
- In the Azure portal, open Firewalls.
- Click + Create.
- Choose Azure Subscription and, in Resource Group, choose Firewall.
- Under Instance details, in the Name field, type Packt-Firewall.
- For the Region, select the same Region as the resource group and the virtual network Region that you used in the Getting ready section. In this case, choose West Europe for an Azure Region.
- Optionally, choose none, one, or more Availability Zones.
- For Firewall tier, choose Standard.
- Under Firewall management, choose Use Firewall rules (classic) to manage this firewall.
- Under Choose a virtual network, choose Use existing. Choose the PacktPublishing virtual network.
- In the Public IP address field, click Add new.
- In the Add a public IP dialog box, in the Name field, type Packt-Firewall-PIP. An IP address will be created in the same Azure Region as the firewall. Click OK.
- Click Review + create.
- Click Create:

Figure 8.2 – Create a firewall
How it works…
An Azure firewall is a fully stateful firewall as a service, or a PaaS, cloud-based network security service that protects resources in Azure virtual networks. To create an Azure firewall, the first step is to create a virtual network containing a virtual network subnet using a reserved subnet name, AzureFirewallSubnet. An Azure firewall requires a public IP address, created as a static, Standard SKU tier IP address. You can only associate an Azure firewall with a virtual network and IP address from the same Azure Region.
You can use firewall rules or a firewall policy to manage a Standard tier firewall, and a firewall policy to manage a Premium tier firewall. After you create an Azure firewall, you have to configure firewall rules or a firewall policy to control network traffic.
In this recipe, you created a Standard tier Azure firewall, and used a classic method, firewall rules, to manage the firewall.
After you have created an Azure firewall, in the Azure portal, open Microsoft Defender for Cloud. On the Overview page, observe the Firewall Manager tile that shows information pertaining to firewalls, firewall policies, Regions with firewalls, and network protection status.

Figure 8.3 – Firewall Manager tile in Microsoft Defender for Cloud
Creating an Azure firewall using PowerShell
In scenarios where interactivity in the Azure portal is minimized and deployments are automated and scripted, creating an Azure firewall using PowerShell is the choice of many Azure administrators. In this recipe, you will create an Azure Firewall Standard SKU using PowerShell.
Getting ready
Open your preferred PowerShell tool – this could be Visual Studio Code, Windows PowerShell ISE, the PowerShell console, or something else.
Sign in to your Azure account: Connect-AzAccount.
How to do it…
To create an Azure firewall using PowerShell, complete the following steps:
- Define resources – resource group, location (Region), virtual network, subnets, IP address, and firewall names:
$RGName="Firewall"
$Location="West Europe"
$VNetName="PacktPublishing"
$ProdSubnetName="Production"
$FWSubnetName="AzureFirewallSubnet"
$FWpipName="PacktFirewall-PIP"
$FWname="PackFirewall"
- Create a resource group:
New-AzResourceGroup -Name $RGName -Location $Location
- Create subnets:
$ProdSubnet=New-AzVirtualNetworkSubnetConfig '
-Name $ProdSubnetName -AddressPrefix 172.16.0.0/24
$FWSubnet=New-AzVirtualNetworkSubnetConfig '
-Name ' $FWSubnetName -AddressPrefix 172.16.1.0/26
- Create a virtual network containing two subnets:
$VNet=New-AzVirtualNetwork -Name $VNetName '
-ResourceGroupName $RGName -Location $Location '
-AddressPrefix 172.16.0.0/16 -Subnet
$ProdSubnet,$FWSubnet
- Create a public IP address for a firewall:
$FWpip = New-AzPublicIpAddress -Name $FWpipName '
-ResourceGroupName $RGName -Location $Location '
-AllocationMethod Static -Sku Standard
- Create a firewall:
$Azfw = New-AzFirewall -Name $FWname '
-ResourceGroupName $RGName -Location $Location '
-VirtualNetworkName $VNetName -PublicIpName $FWpipName
How it works…
Creating an Azure firewall using PowerShell is like creating an Azure firewall in the Azure portal. First, we defined variables containing names of the resources that will be used in later commands. Prior to creating a virtual network, we created two virtual network subnets, one of them named AzureFirewallSubnet, a requirement for deploying a firewall. Then, we created a virtual network containing two previously defined subnets and proceeded with creating a public IP address. In the last step, we created an Azure firewall using an IP address created as a public endpoint.
Creating an Azure firewall policy
An Azure firewall policy is an Azure resource that defines application, network, and NAT rule collections, as well as additional settings such as TLS inspection, Intrusion Detection and Prevention System (IDPS), threat intelligence, and DNS settings. Azure Firewall Premium SKU uses an Azure firewall policy that allows the central management of firewalls via Azure Firewall Manager. In this recipe, you will create an Azure firewall policy, Premium tier, using the Azure portal.
Getting ready
Open a web browser and navigate to https://portal.azure.com.
How to do it…
To create an Azure firewall policy, complete the following steps:
- In the Azure portal, open Firewall Manager and navigate to Azure Firewall Policies.
- Select + Create Azure Firewall Policy.
- Choose a subscription and resource group.

Figure 8.4 – Create an Azure Firewall Policy – Basics
- Type the name of the policy and choose the Region.
- For Policy tier, select Premium.
- The new policy will inherit rule collection from a parent policy if you associate it with an existing policy. Leave the Parent Policy setting to None.
- Then, click DNS Settings.
- By default, DNS Proxy is Disabled and an Azure firewall uses Azure DNS. If Enabled, you can specify Custom DNS Servers and enable an Azure firewall to forward DNS requests to DNS servers specified in the Custom DNS Servers field. Leave the setting at Disabled.
- Then, click TLS Inspection.
- If Enabled, the TLS termination and inspection function is available. To use TLS inspection, you must provide a valid certificate stored in Azure Key Vault, and a managed identity with read permissions to secrets and certificates, as defined in a Key Vault access policy. If you do not have these resources ready, leave the TLS Inspection setting on Disabled.
Note
TLS 1.2 is supported as TLS 1.0, while TLS 1.1 will be deprecated and no longer supported.
- Then, click Rules.
- On the Rules page, you can add a rule collection or import rules from an Azure firewall. An Azure firewall supports NAT, network, and application rules. It is possible to configure rules after you create a policy.
- Then, click IDPS.
- On the IDPS page, you can configure Policy to the Alert or Alert and deny setting. The Alert setting will generate an alert when suspicious traffic is detected, while the Alert and deny setting will also deny traffic if a matching rule is found. IDPS can be Disabled as well.
- Then, click Threat intelligence.
- Threat intelligence mode can be in a Disabled state, and it also has two other options: Alert Only and Alert and deny. This capability will alert and block inbound and outbound network traffic to known malicious IP addresses and domains. The Add allow list addresses option allows you to specify that the IP address, range, or subnet or Fqdn fields can be excluded from Threat intelligence actions.
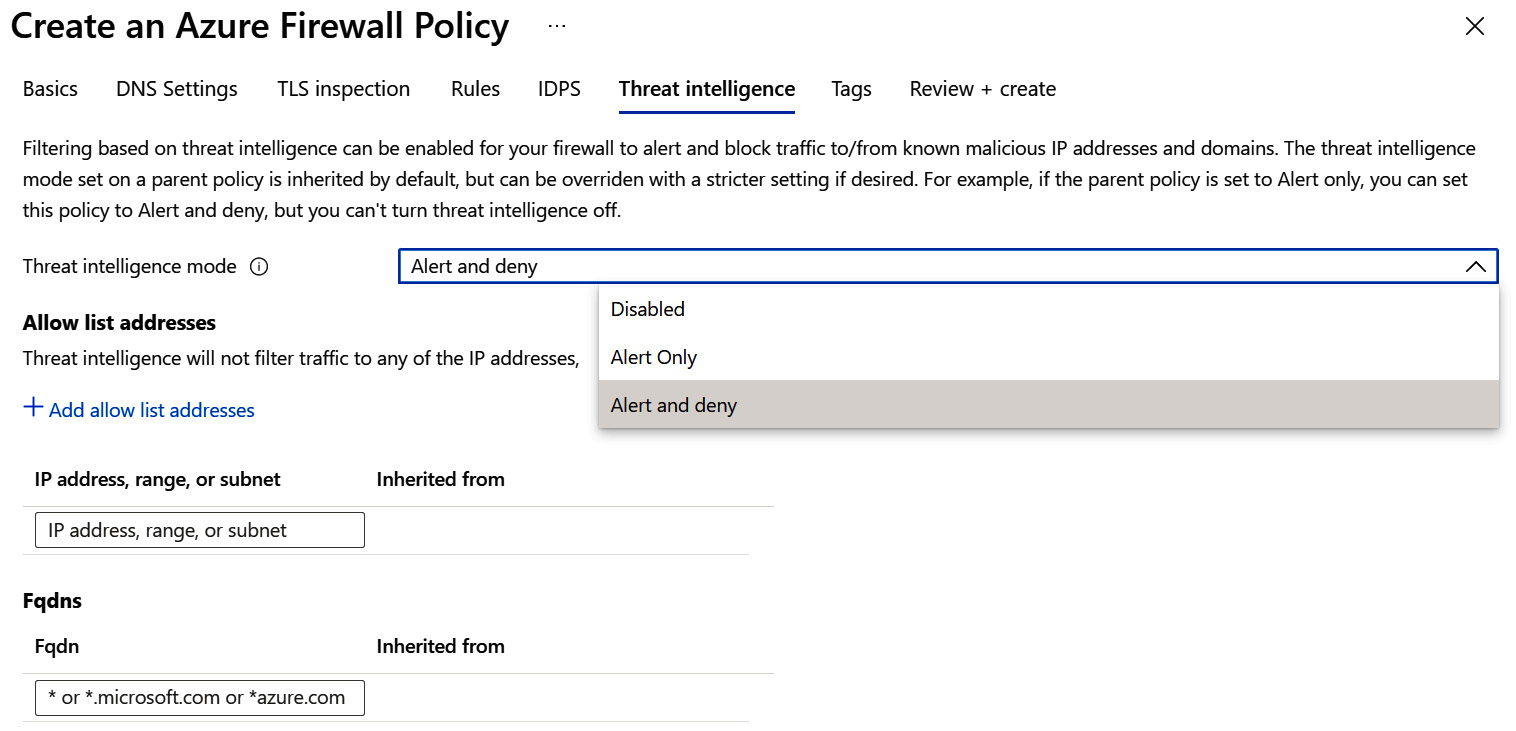
Figure 8.5 – Create an Azure Firewall Policy – Threat intelligence
- Then, click Tags, where you can add tags to the Azure policy.
- Click Review + create to validate the settings.
- Click Create to create a firewall policy.
How it works…
An Azure firewall policy is an Azure resource that defines application, network, and NAT rules and rule collections, along with threat intelligence settings. An Azure firewall policy can be used as a standalone policy, or it can inherit settings from a parent policy.
You can create and associate firewall policies with multiple firewalls using Firewall Manager. If you have deployed virtual WAN, you can associate an Azure firewall and firewall policy with Virtual WAN Hub to make a secured virtual hub, or with a virtual network, making a hub virtual network or secured virtual network.
Creating an Azure firewall policy using PowerShell
You can create an Azure firewall policy and rules using different tools: Azure Firewall Manager, PowerShell, CLI, and REST API. In this recipe, you will create an Azure firewall policy and policy rules using PowerShell.
Getting ready
Open your preferred PowerShell tool – this could be Visual Studio Code, Windows PowerShell ISE, the PowerShell console, or something else.
Sign in to your Azure account: Connect-AzAccount.
How to do it…
To create an Azure firewall policy and policy rules using PowerShell, complete the following steps:
- Define firewall policy resources:
$RGName="Firewall"
$Location="West Europe"
$fwPolicyName="FW-policy"
$netCollName="NetworkCollectionGroup"
$netRuleName="AllowGoogleDNS"
$appCollName="AppCollectionGroup"
$appRuleName="Allow-Packt"
- Create a resource group:
New-AzResourceGroup -Name $RGName -Location $Location
- Create a firewall policy:
$FWpolicy = New-AzFirewallPolicy -Name $fwPolicyName ' -ResourceGroupName $RGName -Location $Location
- Create a network rule collection group:
$nrRCGroup = New-AzFirewallPolicyRuleCollectionGroup '
-Name $netCollName -Priority 1200 '
-FirewallPolicyObject $FWpolicy
- Configure a firewall policy network rule. The network rule allows outbound access to two Google DNS servers at port 53 (DNS):
$netRule01 = New-AzFirewallPolicyNetworkRule '
-name $netRuleName -protocol UDP '
-sourceaddress 172.17.0.0/24 '
-destinationaddress 8.8.8.8,8.8.4.4 -destinationport 53
The following screenshot shows the firewall policy network rule setting in the Azure portal as a result of completing the PowerShell command:

Figure 8.6 – FW-policy – Network Rules
- Configure the network rule collection:
$netColl01 = New-AzFirewallPolicyFilterRuleCollection '
-Name Net-coll01 -Priority 1200 -Rule $netRule01 '
-ActionType "Allow"
- Associate the network rule collection group and the network rule collection with a firewall policy:
Set-AzFirewallPolicyRuleCollectionGroup '
-Name $nrRCGroup.Name -Priority 1200 '
-RuleCollection $netColl01 -FirewallPolicyObject $FWpolicy
- Create an application rule collection group:
$arRCGroup = New-AzFirewallPolicyRuleCollectionGroup '
-Name $appCollName -Priority 1300 '
-FirewallPolicyObject $FWpolicy
- Configure a firewall policy application rule. The application rule allows outbound access to www.packtpub.com:
$appRule01 = New-AzFirewallPolicyApplicationRule '
-Name $appRuleName -SourceAddress 172.17.0.0/24 '
-Protocol "http:80","https:443" -TargetFqdn www.packtpub.com
The following screenshot shows the firewall policy application rule setting in the Azure portal as a result of completing the PowerShell command:

Figure 8.7 – FW-policy – Application Rules
- Configure the application rule collection:
$appColl01 = New-AzFirewallPolicyFilterRuleCollection '
-Name App-coll01 -Priority 1300 -Rule $appRule01 '
-ActionType "Allow"
- Associate the application rule collection group and the application rule collection with a firewall policy:
Set-AzFirewallPolicyRuleCollectionGroup '
-Name $arRCGroup.Name -Priority 1300 '
-RuleCollection $appColl01 -FirewallPolicyObject $FWpolicy
- Open Firewall Policies, select the firewall policy for which you have defined firewall rules, and select Rule Collections. Observe the rule collections you have created using PowerShell:

Figure 8.8 – FW-policy – Rule Collections
How it works…
To create an Azure firewall policy using PowerShell, first, we defined the resource variables and created a resource group. But, before anything else, we created a firewall policy and proceeded to create rules, rule collections, and rule collection groups.
Rule collection groups contain one or more rule collections, and rule collections contain one or more rules.
We created a network rule collection group, containing a network rule collection, which contains one network rule. Later, we created an application rule collection group, containing an application rule collection, which contains one application rule.