
Chapter 4: Secure Score and Recommendations
Microsoft Defender for Cloud has two main goals: to help you understand your existing security situation and to help you effectively increase the security of your infrastructure.
Defender for Cloud continuously evaluates your resources, subscriptions for security problems, and aggregates results into a single score. The secure score is shown as a percentage value and it also gives you the possibility to compare the secure score and security level to previous scores and view them as a timeline, revealing the trend of your infrastructure security levels over time.
Recommendations are grouped into categories, or security controls – logical groups of associated security recommendations.
This chapter will help you get the most out of Microsoft Defender for Cloud's two main objectives, and you will learn how to work with and interpret the secure score and manage security recommendations in Microsoft Defender for Cloud.
We will cover the following recipes in this chapter:
- Understanding, filtering, and sorting recommendations
- Downloading a recommendation report
- Creating a recommendation exemption rule
- Creating a recommendation enforcement rule
- Preventing creating resources using a Deny rule
- Disabling a recommendation
- Fixing recommendations on affected resources
- Managing a recommendation query in Azure Resource Graph Explorer
- Getting a secure score using Azure Resource Graph
Technical requirements
To successfully complete the recipes in this chapter, the following are required:
- An Azure subscription.
- Microsoft Excel.
- A web browser – preferably Microsoft Edge.
- A Microsoft Defender for Cloud plan.
- A PowerBI Pro account.
- The PowerBI Desktop application.
- Resources in an Azure subscription, such as virtual machines, storage, SQL Server, and Logic Apps. Microsoft Defender for Cloud will create resource recommendations based on available resources.
The code samples can be found at https://github.com/PacktPublishing/Microsoft-Defender-for-Cloud-Cookbook.
Understanding, filtering, and sorting recommendations
Microsoft Defender for Cloud uses Azure Policy to define security policy definitions, that is, rules about security conditions that can be grouped in Azure Policy initiatives.
Based on security policies and security initiatives, Microsoft Defender for Cloud determines the compliance status of monitored resources and provides recommendations to correct any potential security misconfigurations.
Depending on the security status and number of monitored resources, the recommendations list can grow significantly. To help you focus your security remediation efforts on controls that matter the most to you, this recipe will show you how to understand the recommendations blade, filter, and sort security recommendations in Microsoft Defender for Cloud.
Getting ready
Open a web browser and navigate to https://portal.azure.com.
How to do it...
To filter, group, and sort security recommendations in Microsoft Defender for Cloud, take the following steps:
- In the Azure portal, open Microsoft Defender for Cloud.
- On the left menu, click Recommendations.
- The Recommendations blade has two tabs: Secure score recommendations and All recommendations:

Figure 4.1 – Microsoft Defender for Cloud recommendations page – Secure score recommendations
The top part of the recommendations blade shows the secure score percentage, Resource health status, Completed controls status, and Completed recommendations status.
Microsoft Defender for Cloud heavily uses color coding as a visual aid to help quicker and more accurate identification of resources' status, and it is present here as well.
The bottom part shows a list of recommendations that directly affect the secure score. The recommendation columns include Controls, Max score, Current Score, Potential Score increase, Unhealthy resources, Resource health, and Actions.
Additionally, the lower part of the blade contains a search field, filter controls, and a sorting menu.
- In the middle of the page, on the right side, identify the sorting menu. By default, the recommendations list is sorted by max score. Click on the sorting menu to collapse the menu and select Sort by potential score increase:
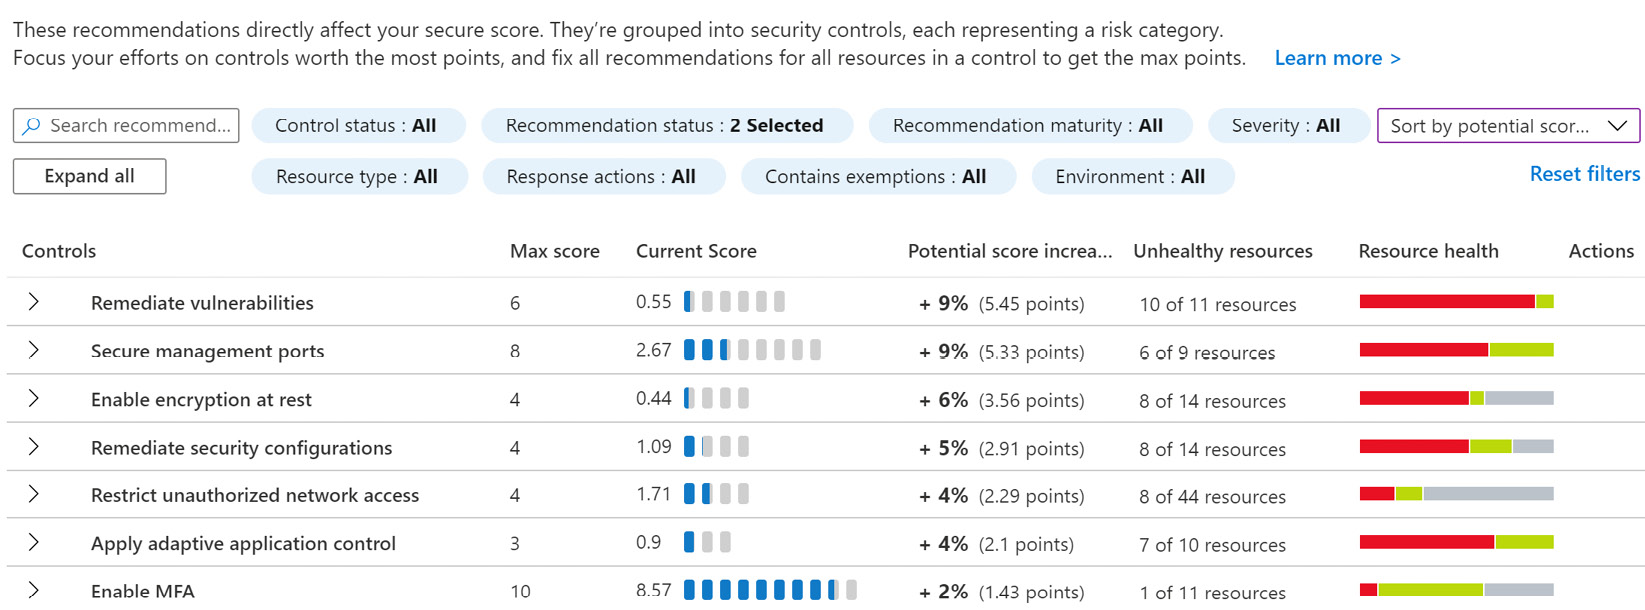
Figure 4.2 – Recommendations – sorted by potential score increase
- Click on the All recommendations tab:
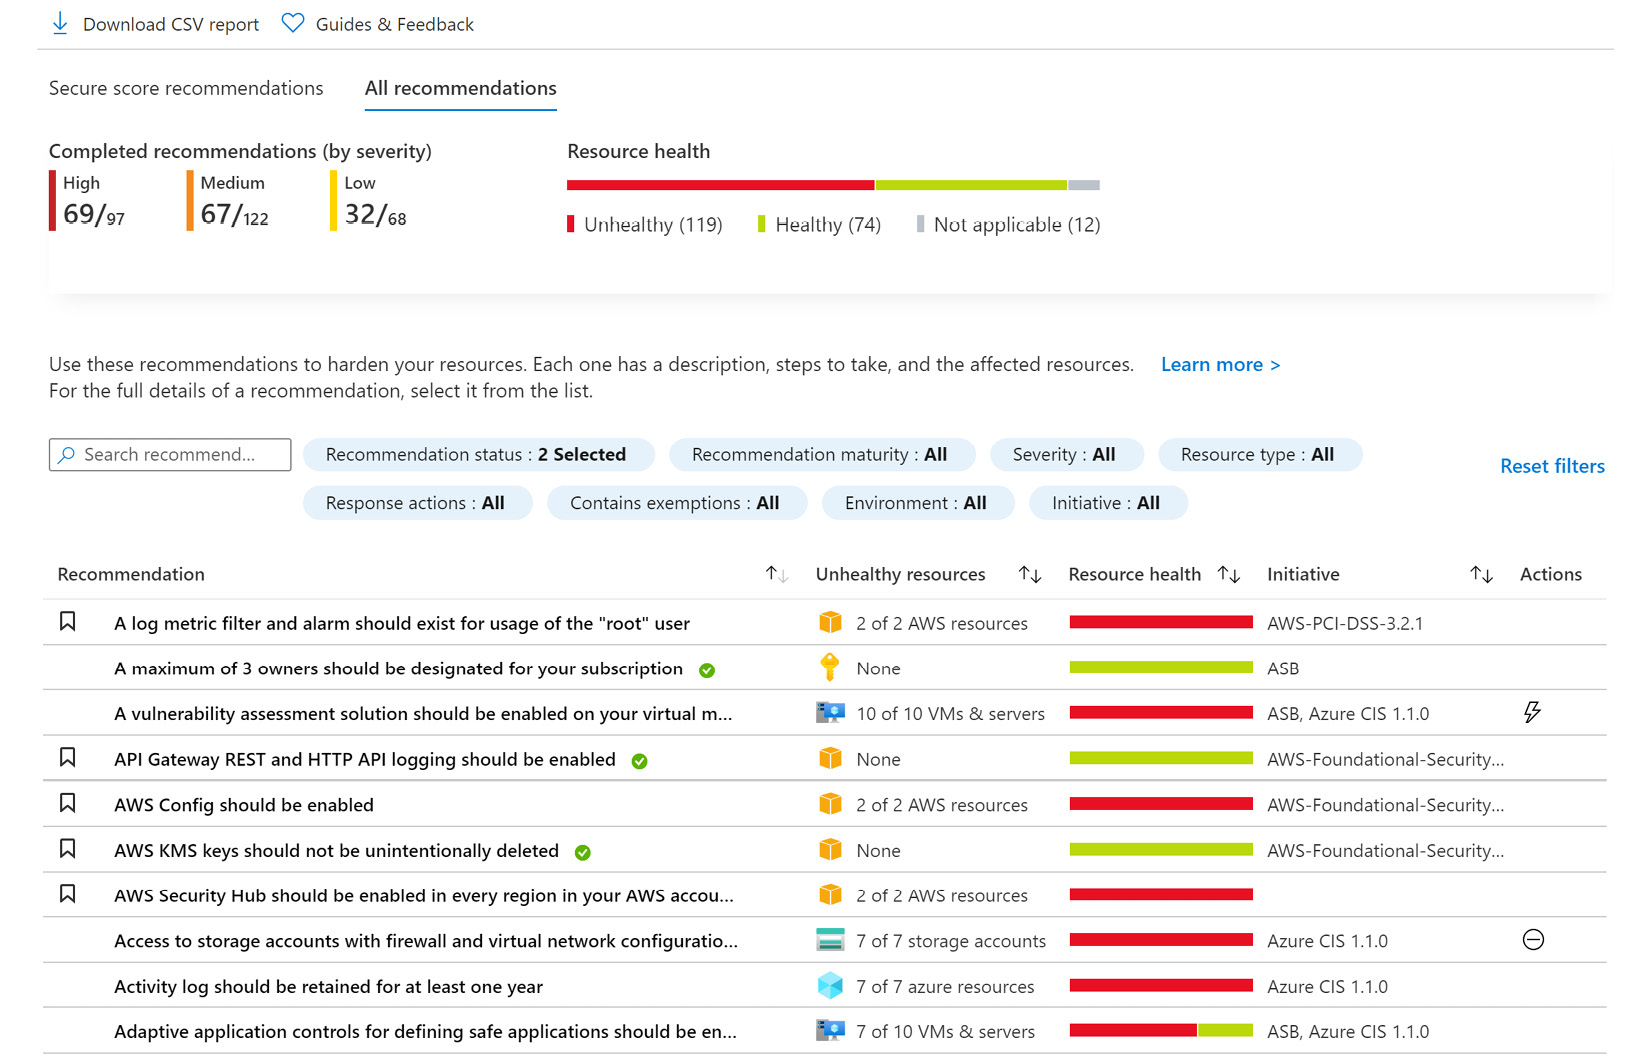
Figure 4.3 – Microsoft Defender for Cloud recommendations page – All recommendations
- At the top of the blade is information about Completed recommendations (by severity) and Resource health.
This page view has a list of all the recommendations you can use to harden your resources and, for support, the columns' names and information have been adjusted from the previous view: Recommendation, Unhealthy resources, Resource health, Initiative, and Actions. The last column is useful as it displays the name of the applicable security initiative to which a recommendation belongs.
Accordingly, the filter options are slightly different as well, displaying Initiative instead of Control status.
- The column headers show the column names and two arrows, pointing up and down, depicting the sorting status. Click on any column header to sort in alphabetic or numerical order.
- Multiple clicks on the same column header cycles through the sorting orders, from A to Z or lower to higher number value, or from Z to A or from higher to lower column value. Click repeatedly on the same column header to cycle through the sorting orders:

Figure 4.4 – Recommendations – sorting order
- To filter the recommendations list, use filters. In this example, you will filter the recommendations based on Severity and Resource type.
In the filter list, click on Severity. A drop-down Severity menu appears:
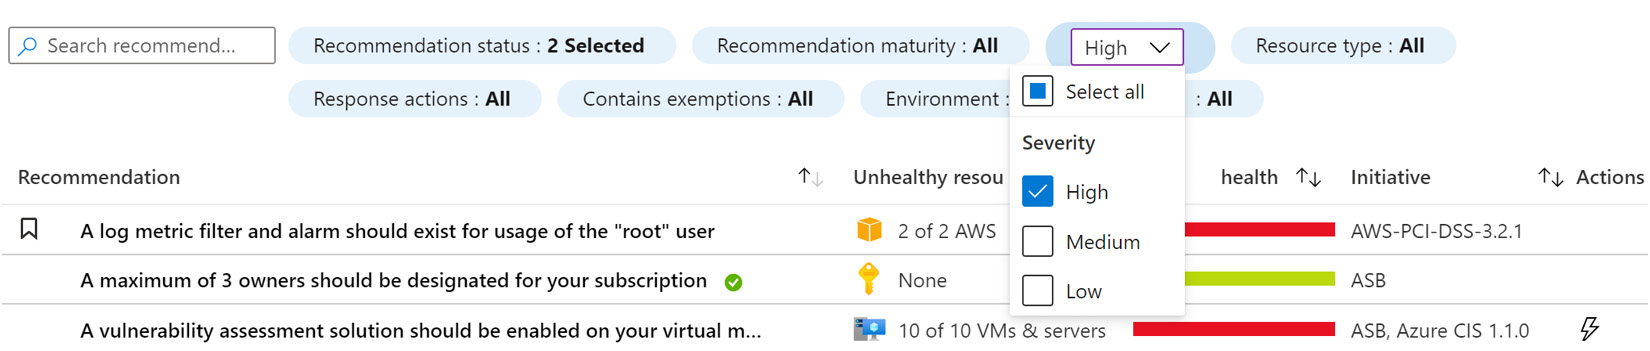
Figure 4.5 – Filter by Severity
- From the Severity drop-down list, if selected, deselect the Medium and Low severity statuses and leave only the High severity status selected.
- Click on the Severity menu or anywhere on the page to apply and close the Severity filter.
- Click on the Resource type filter. A Resource type filter dropdown will appear.
- Click to deselect Select all:

Figure 4.6 – Filter by Resource type
- In the filter menu search field, type Virtual.
- Click and select the virtual machine filter.
- Click on the Resource type menu or anywhere on the page to apply and close the Resource type filter:

Figure 4.7 – Filtered recommendation list
How it works...
You can display security recommendations in groups – that is, gathered under a common control name, or a risk category – or display them individually, as a list.
Security recommendations affect your secure score and to work effectively with a large recommendation list, there are several controls and capabilities available: search fields, sorting, grouping, and filtering capabilities.
Downloading a recommendation report
Microsoft Defender for Cloud allows exporting a list of security recommendations, where it can be used for archival or further analysis, for example.
Getting ready
Open a web browser and navigate to https://portal.azure.com.
How to do it...
To download a report of security recommendations in Microsoft Defender for Cloud, take the following steps:
- In the Azure portal, open Microsoft Defender for Cloud.
- On the left menu, click Recommendations.
- At the top of the blade, click Download CSV report:

Figure 4.8. – Microsoft Defender for Cloud recommendations – Download CSV report
- Save the report.
- Open the report in Microsoft Excel:

Figure 4.9 – Azure security recommendations CSV file
How it works...
Microsoft Defender for Cloud generates a CSV file containing recommendations available and listed at the time of creating a file.
An Azure security list of recommendations in CSV format contains the following fields or columns:
- exportedTimestamp
- subscriptionId
- subscriptionName
- resourceGroup
- resourceType
- resourceName
- resourceId
- recommendationId
- recommendationName
- recommendationDisplayName
- description
- remediationSteps
- severity state
- notApplicableReason
- firstEvaluationDate
- statusChangeDate
- controls
- azurePortalRecommendationLink
- nativeCloudAccountId
Creating a recommendation exemption rule
Microsoft Defender for Cloud allows exempting a recommendation from a list of recommendations in two ways. You can exempt a subscription or management group, or you can exempt a resource. Exempted resources do not impact the secure score.
In this recipe, you will learn how to create an exemption rule for a sample security recommendation.
Getting ready
Open a web browser and navigate to https://portal.azure.com.
How to do it...
To create an exemption for a security recommendation in Microsoft Defender for Cloud, take the following steps:
- In the Azure portal, open Microsoft Defender for Cloud.
- On the left menu, click Recommendations.
- Select the All recommendations tab.
- In the search field, in the middle of the page, to filter the list of recommendations, type virtual machine:
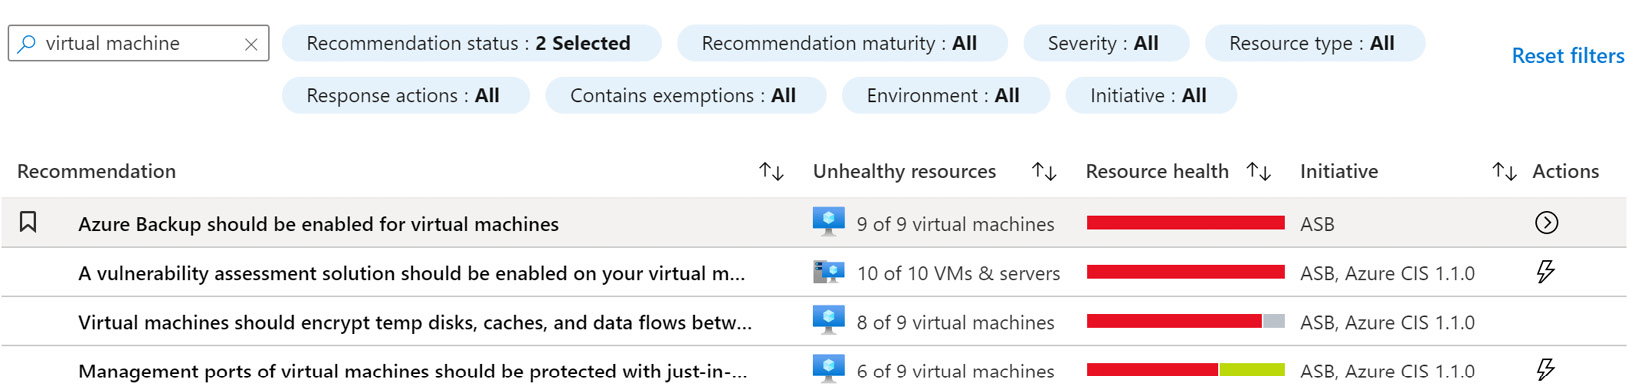
Figure 4.10 – Filtered recommendations list
- From the recommendations list, click on the Azure Backup should be enabled for virtual machines recommendation.
- From the list of Unhealthy resources, select a virtual machine:

Figure 4.11 – Microsoft Defender for Cloud recommendation – Azure Backup should be enabled for virtual machines
- Click Exempt. An exempt window opens on the right side.
- Under Exemption Scope, you can select a scope for exemption: Management groups, Subscriptions, or Resources.
Note
For this security recommendation, selecting Management groups as an exemption scope is not possible.
- Under Exemption details, in the Exemption name field, type a name for the exemption.
- Optionally, you can set an expiration date for an exemption. Click on the checkbox to set an expiration date and time in the future.
- Under Exemption category, you must choose either Mitigated (resolved through a third-party service) or Waiver (risk acceptance).
Use Mitigated when this recommendation has already been resolved by a third-party service or by other means. Use Waiver if you have decided to accept the risk of not mitigating this recommendation for this resource.
- In the Exemption description box, enter a mandatory description for the exemption reasons:
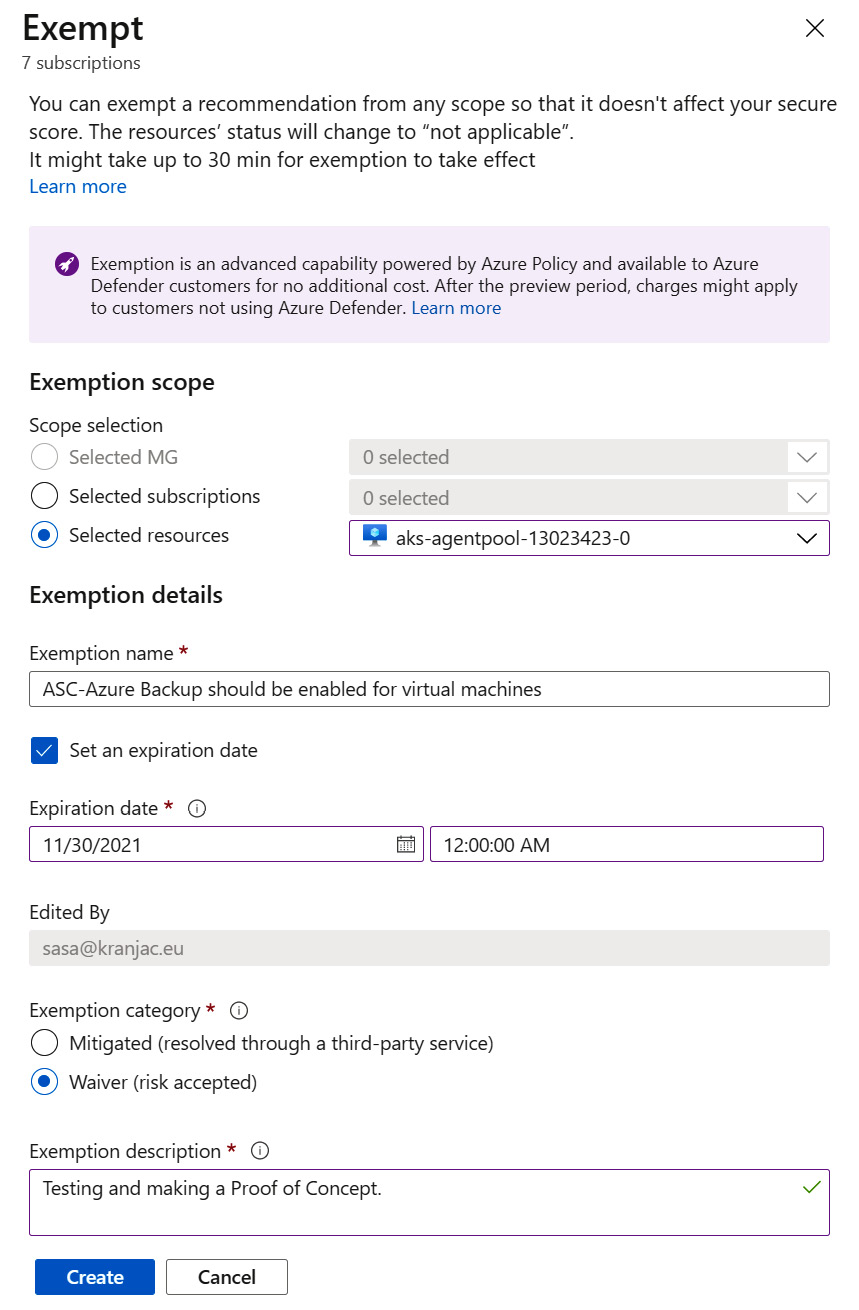
Figure 4.12 – Creating a recommendation exemption
- Click Create. Depending on the freshness interval, policy exemption changes might take several minutes to a few hours to be reflected in Microsoft Defender for Cloud.
- Close the recommendations blade and return to Microsoft Defender for Cloud | Recommendations.
- To view exempted controls, in the filter, click on Contains exemptions. In the menu, deselect No and select Yes. The exempted controls will show in the list. Observe Current Score and Max score as both show Not scored:

Figure 4.13 – Exempted recommendations and controls
- Click on the All recommendations tab.
- To view exempted recommendations, in the filter, click on Contains exemptions. In the menu, deselect No and select Yes. The exempted controls and recommendations will show up in the list:

Figure 4.14 – Exempted recommendations

Figure 4.15 – Recommendation details
- In the middle of the blade, click on the Not applicable resources tab. Observe the virtual machine you created an exemption for earlier. Click on the ellipsis (three dots) and select Manage exemptions.
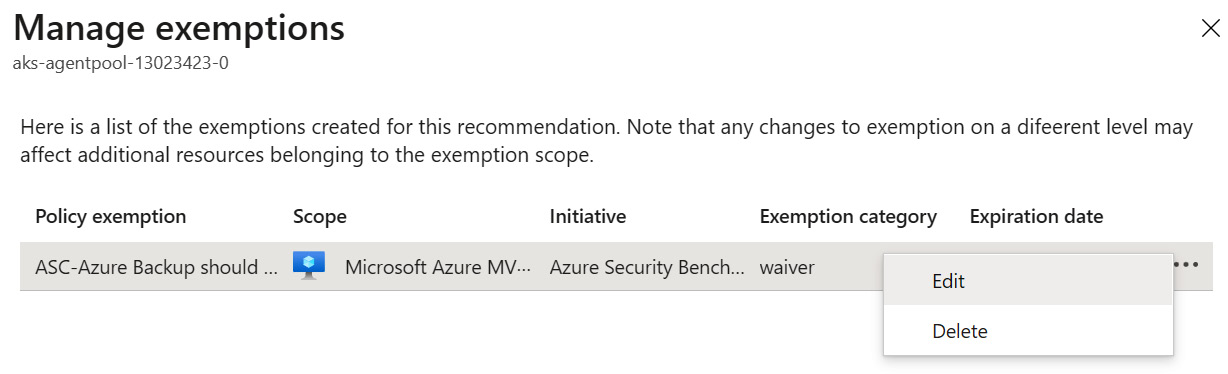
Figure 4.16 – Manage exemptions
- On the Manage exemptions blade, you can manage – Edit and Delete – exemptions created for a particular recommendation.
- Click Close.
- On the top information strip, select View all exemptions:
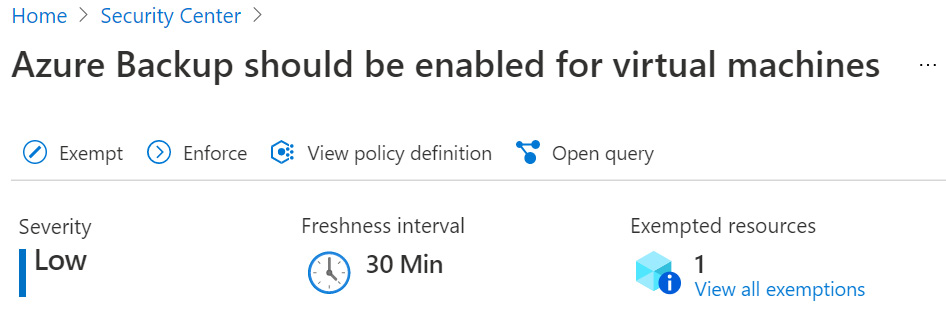
Figure 4.17 – Top information strip on the recommendations blade
- On the Exemptions page, you can view exemptions per Scope, Exemption category, or Search manually by typing a name or ID. In addition, the page shows the number of total exemptions, exemptions approaching expiration, exemptions expired, as well as a list of policy exemptions:

Figure 4.18 – Exemptions
- For each policy exemption, click on the ellipsis to access additional policy actions: edit or delete the exemption, view and edit the assignment, and view the compliance.
How it works...
Any recommendation exemptions will not show and will be hidden on Microsoft Defender for Cloud's recommendations page.
To view specific exempted resources, view the Not applicable tab of a recommendation details page.
To view exempted recommendations, apply the Yes status to the Contains exemptions filter.
Creating a recommendation enforcement rule
Microsoft Defender for Cloud allows enforcing a secure configuration of supported resources. When you use the enforce option, you can prevent security misconfigurations of new resources, considering specific security recommendations.
In this recipe, you will learn how to use the enforce option on non-compliant resources at the time they are created.
Getting ready
To complete the steps in this recipe, you must have a resource that will generate one or more recommendations that currently support the enforce option.
The recommendations that can be used with the enforce option are listed in the There's more... section.
Open a web browser and navigate to https://portal.azure.com.
How to do it...
To filter, group, and sort security recommendations in Microsoft Defender for Cloud, take the following steps:
- In the Azure portal, open Microsoft Defender for Cloud.
- On the left menu, click Recommendations.
- On the Recommendations page, select All recommendations.
- To narrow the recommendations list, in the search field, type logic:

Figure 4.19 – Recommendations list – searching for a recommendation
Note the two icons in the Actions column. The lightning icon means a recommendation supports the Fix capability to resolve the issue, while the right arrow denotes the possibility to enforce a security recommendation.
- At the top of the Diagnostic logs in your logic apps should be enabled recommendation page, click on Enforce. The Assign policy blade opens:
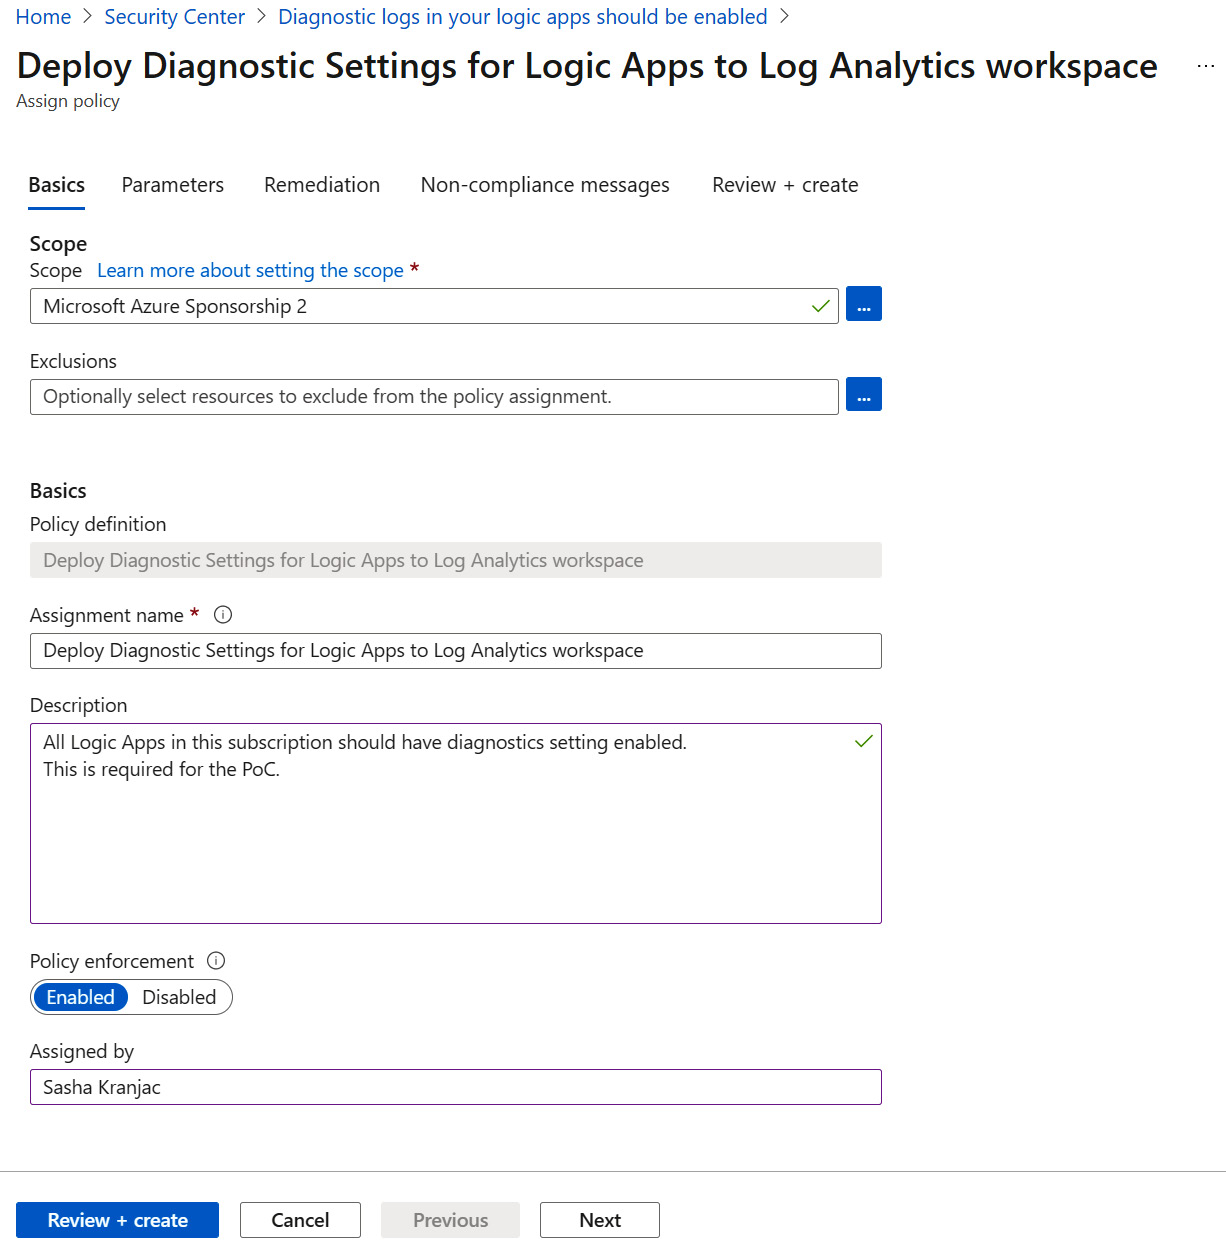
Figure 4.20 – Policy assignment – Basics tab
- Next to the Scope field, click on the ellipsis. A window opens, where you can choose a scope for a policy: Management group, Subscription, or Resource group. Select Subscription and click Select.
- Next to the Exclusions field, click on the ellipsis. A window opens where you can optionally select resources to exclude from the policy assignment.
Note
The exclusion list contains only items that are contained in the scope you chose in the previous step. For example, if the scope is a tenant root group, then the exclusions listed are Management groups, Subscriptions, Resource groups, and Resources. If you choose Subscription for the scope, then the exclusion list contains Resource groups and Resources only.
- Under Assignment name, accept the proposed name or write your own.
- Under Description, describe the rationale behind the decision to enforce the policy.
- Under Policy enforcement, choose Enabled to turn on the policy enforcement. Choose Disabled to create the policy but not enforce it. Compliance assessment results will still be available, even if you choose the Disabled option.
- Under Assigned by, type the name of the person who created the enforcement policy.
- Click Next.

Figure 4.21 – Policy parameters settings
- On the Parameters tab, policy parameters that require your input are listed. These parameters will vary, depending on the recommendation enforcement policy. The Only show parameters that require input setting is checked by default, helping you clear the list of settings that do not require your attention.

Figure 4.22 – Editing policy assignment settings
- For this enforcement, you must choose a Log Analytics workspace, where Logic Apps will send diagnostic information. Choose a workspace from the Log Analytics workspace pull-down menu.
- Click Next.
- At the Remediation page, you can check the Create a remediation task checkbox to create a policy that will apply and take effect on existing resources. After you select the checkbox, you will have to select a remediation policy from a menu.
- The Managed Identity setting is needed to enable the policy to deploy resources and edit tags on remediated resources. You can choose between System assigned managed identity and User assigned managed identity. You must specify a location for System assigned managed identity or choose an identity from the Existing user assigned identities list and its scope:
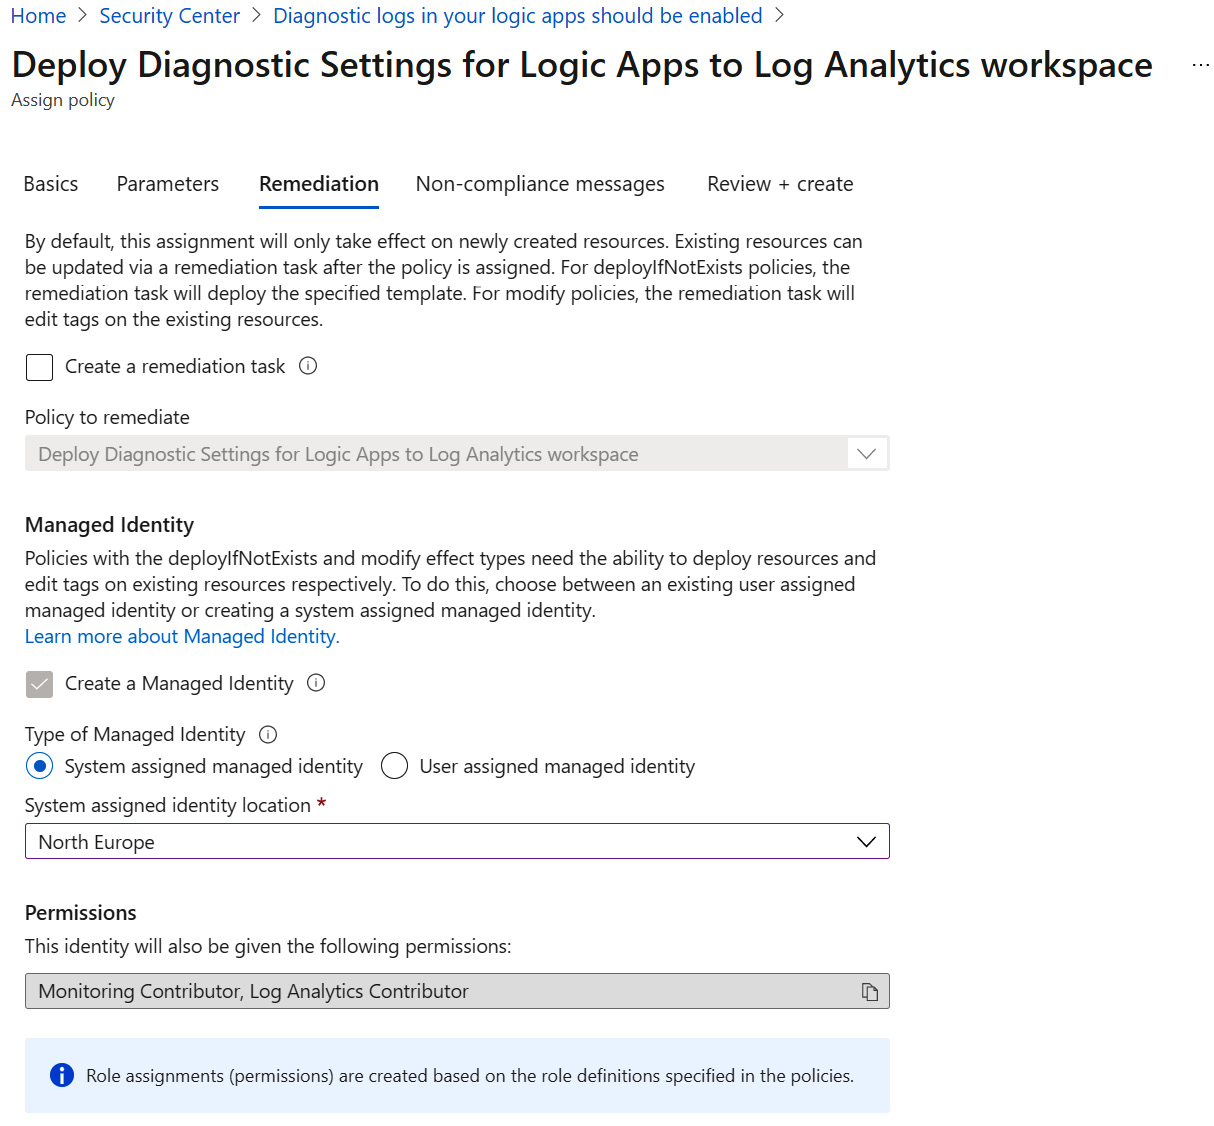
Figure 4.23 – Policy remediation settings
- Click Next.
- On the Non-compliance messages page, enter text that explains to users why a resource is not compliant. The message will be visible in non-compliant resource details or if a resource is denied:

Figure 4.24 – Non-compliance messages policy settings
How it works...
To use the Enforce option, Azure security policies use the DeployIfNotExist effect in Azure Policy to apply settings to newly created and existing resources. For DeployIfNotExist policies, the remediation task will deploy the specified template, and to modify policies, the remediation task will edit tags on the existing resources.
There's more...
At this time, the recommendations that can be used with the Enforce option are the following:
- Auditing on SQL Server should be enabled.
- Azure Arc-enabled Kubernetes clusters should have the Microsoft Defender for Cloud plan's extension installed.
- Azure Backup should be enabled for virtual machines.
- Microsoft Defender for App Service should be enabled.
- Microsoft Defender for container registries should be enabled.
- Microsoft Defender for DNS should be enabled.
- Microsoft Defender for Key Vault should be enabled.
- Microsoft Defender for Kubernetes should be enabled.
- Microsoft Defender for Resource Manager should be enabled.
- Microsoft Defender for servers should be enabled.
- Microsoft Defender for Azure SQL Database servers should be enabled.
- Microsoft Defender for SQL servers on machines should be enabled.
- Microsoft Defender for SQL should be enabled for unprotected Azure SQL servers.
- Microsoft Defender for Storage should be enabled.
- Azure Policy Add-on for Kubernetes should be installed and enabled on your clusters.
- Diagnostic logs in Azure Stream Analytics should be enabled.
- Diagnostic logs in Batch accounts should be enabled.
- Diagnostic logs in Data Lake Analytics should be enabled.
- Diagnostic logs in Event Hubs should be enabled.
- Diagnostic logs in Key Vault should be enabled.
- Diagnostic logs in Logic Apps should be enabled.
- Diagnostic logs in Search services should be enabled.
- Diagnostic logs in Service Bus should be enabled.
- Preventing creating resources using the Deny rule.
Preventing creating resources using a Deny rule
Microsoft Defender for Cloud can prevent creating unhealthy and potentially insecure resources using the Deny effect of Azure Policy.
In this recipe, you will learn how to use the Deny effect of Azure Policy to enforce infrastructure security by preventing the creation of insecure and non-compliant resources.
Getting ready
To complete the steps in this recipe, you must have a resource that will generate one or more recommendations that currently support the enforce option.
The recommendations that can be used with the enforce option are listed in the There's more... section.
Open a web browser and navigate to https://portal.azure.com.
How to do it...
To use the Deny effect of Azure Policy in Microsoft Defender for Cloud, take the following steps:
- In the Azure portal, open Microsoft Defender for Cloud.
- On the left menu, click Recommendations.
- On the Recommendations page, select All recommendations.
- To narrow the recommendations list, in the search field, type storage:
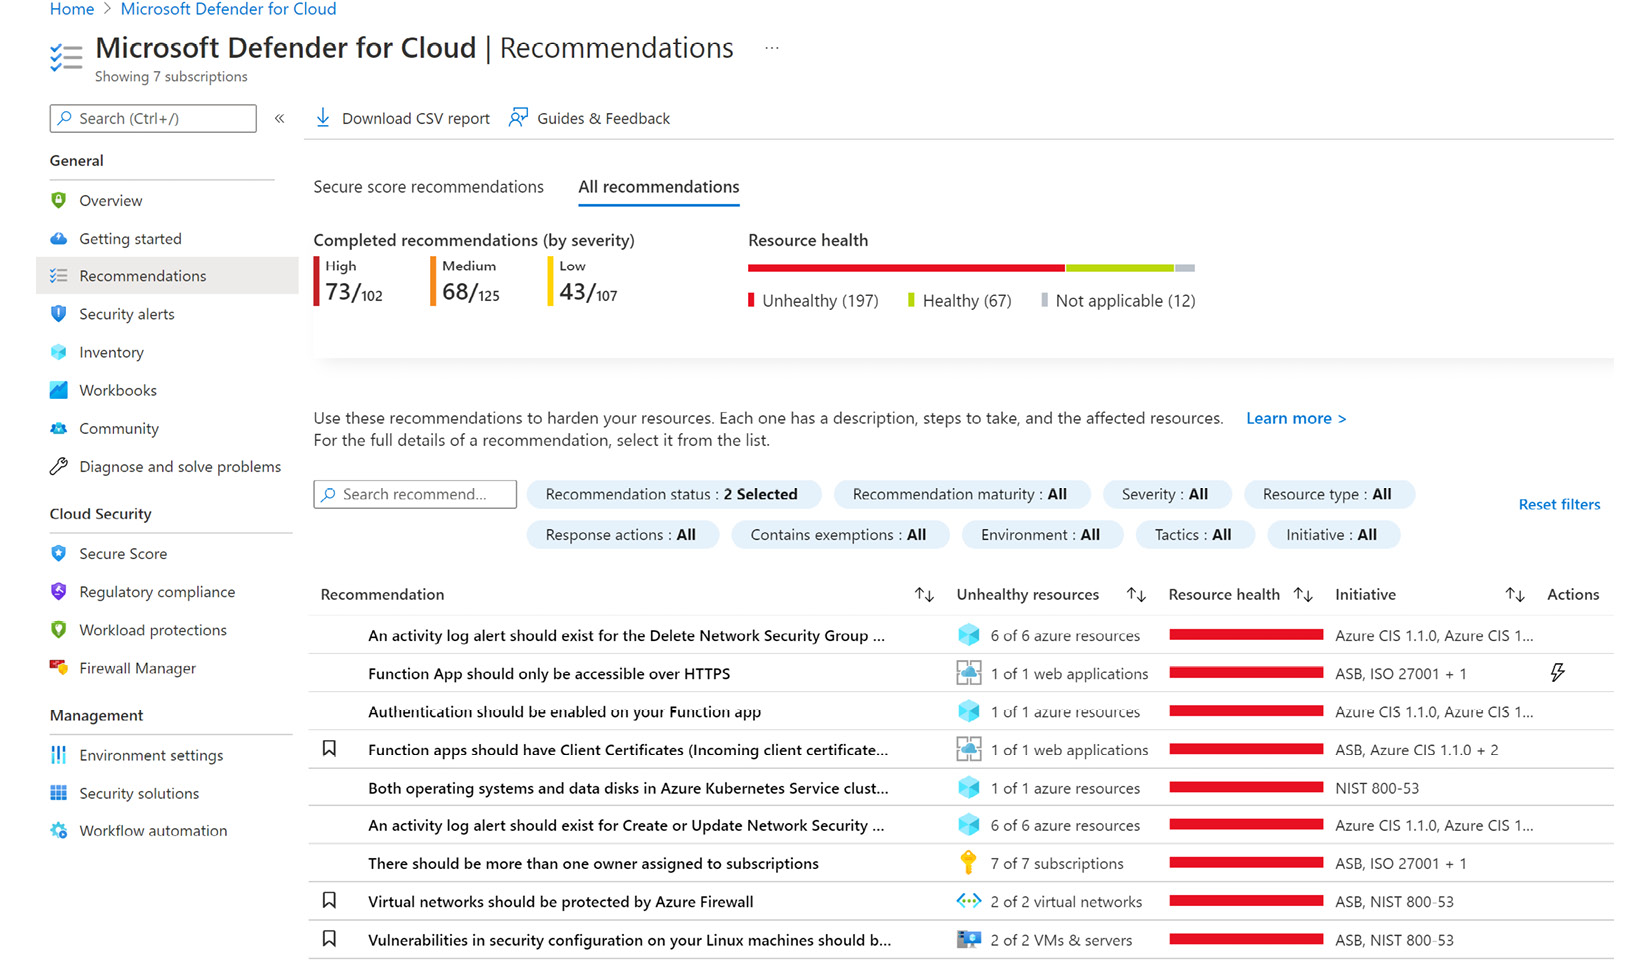
Figure 4.25 – Microsoft Defender for Cloud recommendations
Note the two icons in the Actions column. The lightning icon means a recommendation supports the Fix capability to resolve the issue, while the dash or minus denotes the possibility to apply the Deny action to a security recommendation.
- At the top of the Storage account public access should be disallowed recommendation page, click on Deny. A Deny blade opens:

Figure 4.26 – Deny - Prevent resource creation policy settings
- In the Deny – Prevent resource creation window, select subscriptions to apply the Deny effect to. Click Change to Deny. The current status of the subscription changes to Deny.
- If you want to revert changes for a subscription, select the ellipsis, then click on the Change to audit setting:
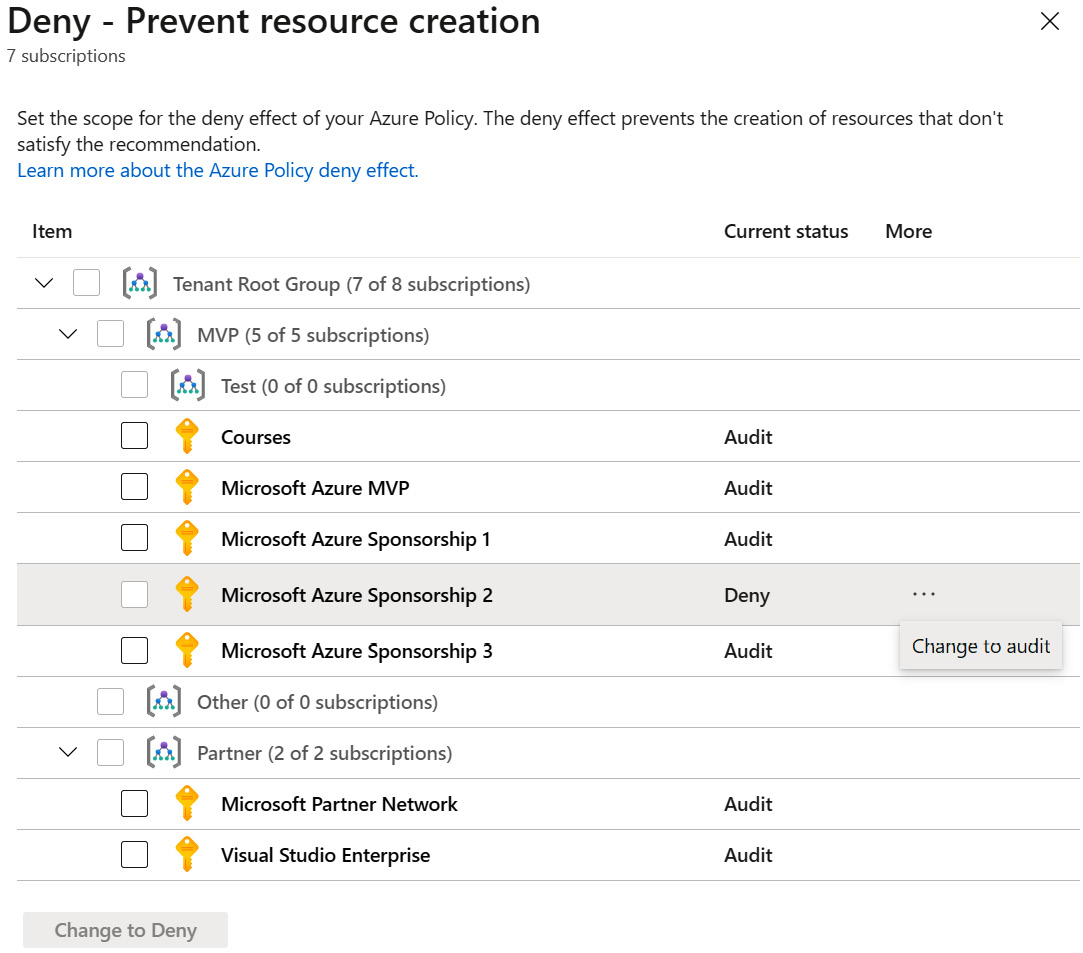
Figure 4.27 – Changing policy settings
How it works...
In Azure Policy, Deny is used to prevent creating a resource that does not match standards defined through a policy definition.
When creating or updating a resource, Deny prevents the request and the request is returned with a 403 (Forbidden) status.
There's more...
At this time, the recommendations that can be used with the Deny option are as follows:
- [Enable if required] Azure Cosmos DB accounts should use customer-managed keys to encrypt data at rest.
- [Enable if required] Azure Machine Learning workspaces should be encrypted with a customer-managed key (CMK).
- [Enable if required] Cognitive Services accounts should enable data encryption with a CMK.
- [Enable if required] Container registries should be encrypted with a CMK.
- Access to storage accounts with firewall and virtual network configurations should be restricted.
- Automation account variables should be encrypted.
- Azure Cache for Redis should reside within a virtual network.
- Azure Spring Cloud should use network injection.
- Container CPU and memory limits should be enforced.
- Container images should be deployed from trusted registries only.
- Containers with privilege escalation should be avoided.
- Containers sharing sensitive host namespaces should be avoided.
- Containers should listen on allowed ports only.
- An immutable (read-only) root filesystem should be enforced for containers.
- Key Vault keys should have an expiration date.
- Key Vault secrets should have an expiration date.
- Key vaults should have purge protection enabled.
- Key vaults should have soft delete enabled.
- Least privileged Linux capabilities should be enforced for containers.
- Only secure connections to your Redis Cache should be enabled.
- The overriding or disabling of containers' AppArmor profiles should be restricted.
- Privileged containers should be avoided.
- Running containers as root user should be avoided.
- Secure transfer to storage accounts should be enabled.
- Service Fabric clusters should have the ClusterProtectionLevel property set to EncryptAndSign.
- Service Fabric clusters should only use Azure Active Directory for client authentication.
- Services should listen on allowed ports only.
- Storage account public access should be disallowed.
- Storage accounts should be migrated to new Azure Resource Manager resources.
- Storage accounts should restrict network access using virtual network rules.
- Usage of host networking and ports should be restricted.
- Usage of pod HostPath volume mounts should be restricted to a known list to restrict node access from compromised containers.
- The validity period of certificates stored in Azure Key Vault should not exceed 12 months.
- Virtual machines should be migrated to new Azure Resource Manager resources.
- A Web Application Firewall (WAF) should be enabled for Application Gateway.
- A WAF should be enabled for the Azure Front Door service.
Disabling a recommendation
In some cases, if a recommendation is not applicable to your environment, you can prevent it from appearing in the list of security recommendations.
In this recipe, you will learn how to disable a recommendation.
Getting ready
Open a web browser and navigate to https://portal.azure.com.
How to do it...
To disable a recommendation and prevent it from appearing in the Microsoft Defender for Cloud recommendation list, take the following steps:
- In the Azure portal, open Microsoft Defender for Cloud.
- On the left menu, under the Management section, click Environment Settings.
- On the Environment Settings blade, select a management group or a subscription. For this example, select Azure subscription.
- On the left menu, click on Security policy:

Figure 4.28 – Security policy settings
- Under Default initiative, select the Microsoft Defender for Cloud default policy or your custom initiative policy to disable a recommendation. Click on the ellipsis next to Microsoft Defender for Cloud default policy (Azure Security Benchmark in Figure 4.28) and choose Edit assignment. The Edit Initiative Assignment blade for the chosen policy opens.
- Click the Parameters tab.
- Deselect the checkbox for the Only show parameters that require input or review option. Displaying all the parameters will take a few moments, as there are a lot of parameters in the policy.
- From the list, search for the policy parameter you want to disable. To filter the list and to search for a parameter, you can use the search field. For example, type logic in the search field.
- From the list, change the AuditIfNotExists setting to Disabled:
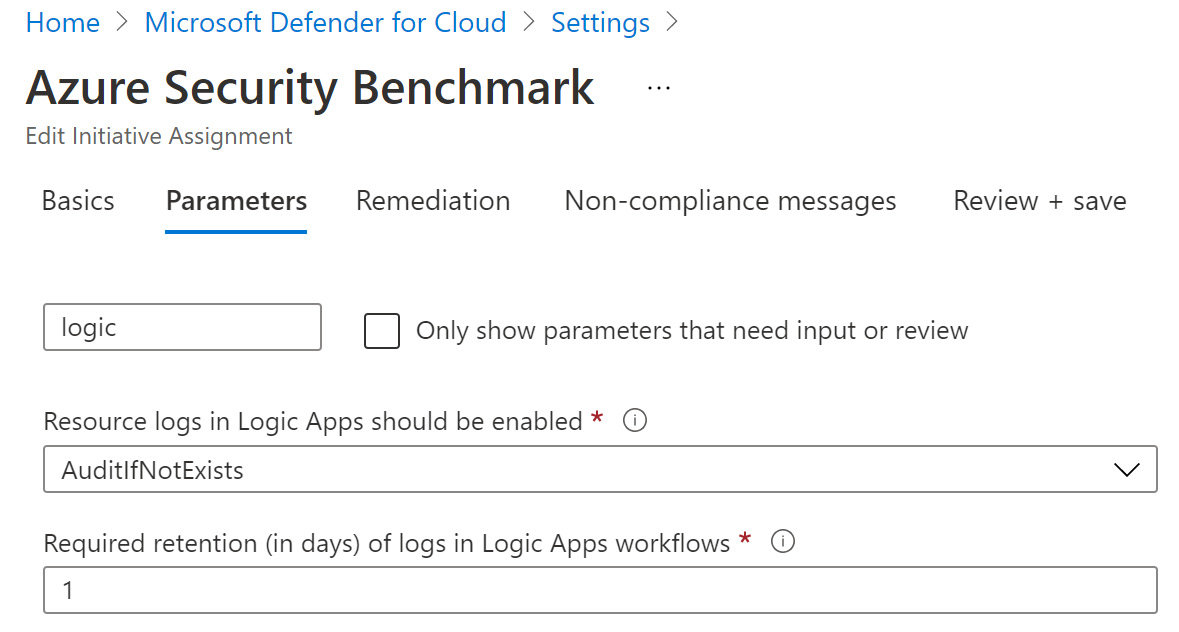
Figure 4.29 – Initiative settings – Parameters tab
- Click Review + save.
How it works...
Microsoft Defender for Cloud uses Azure Policy to define security policy definitions, that is, rules about security conditions that can be grouped in Azure Policy initiatives. These policies are then used to generate security recommendations. To prevent displaying security recommendations that are not relevant, you can disable a policy definition parameter that generates the recommendation.
Fixing recommendations on affected resources
Microsoft Defender for Cloud gives you security recommendations or advice and suggestions on how to secure your resources.
In this recipe, you will learn how to apply remediation steps or to fix a resource based on a recommendation.
Getting ready
Open a web browser and navigate to https://portal.azure.com.
How to do it...
To remediate or fix a security recommendation, take the following steps:
- In the Azure portal, open Microsoft Defender for Cloud.
- On the left menu, click Recommendations.
- Not all recommendations support a quick fix. To filter the recommendations list and display only recommendations that support the Fix option, click on the Response actions filter.
- From the Response actions filter menu, deselect Deny, Enforce, and None, and select Fix:

Figure 4.30 – Response actions filter
- Click anywhere in the blade to close the filter menu and apply the filter. Now you should see the list of recommendations that support the Fix option:
Note
The lightning icon represents a recommendation that supports the Fix capability to resolve the issue, the dash or minus represents the possibility to apply the Deny action to a security recommendation, and the right arrow denotes the possibility to enforce a security recommendation.

Figure 4.31 – All recommendations – enforce action
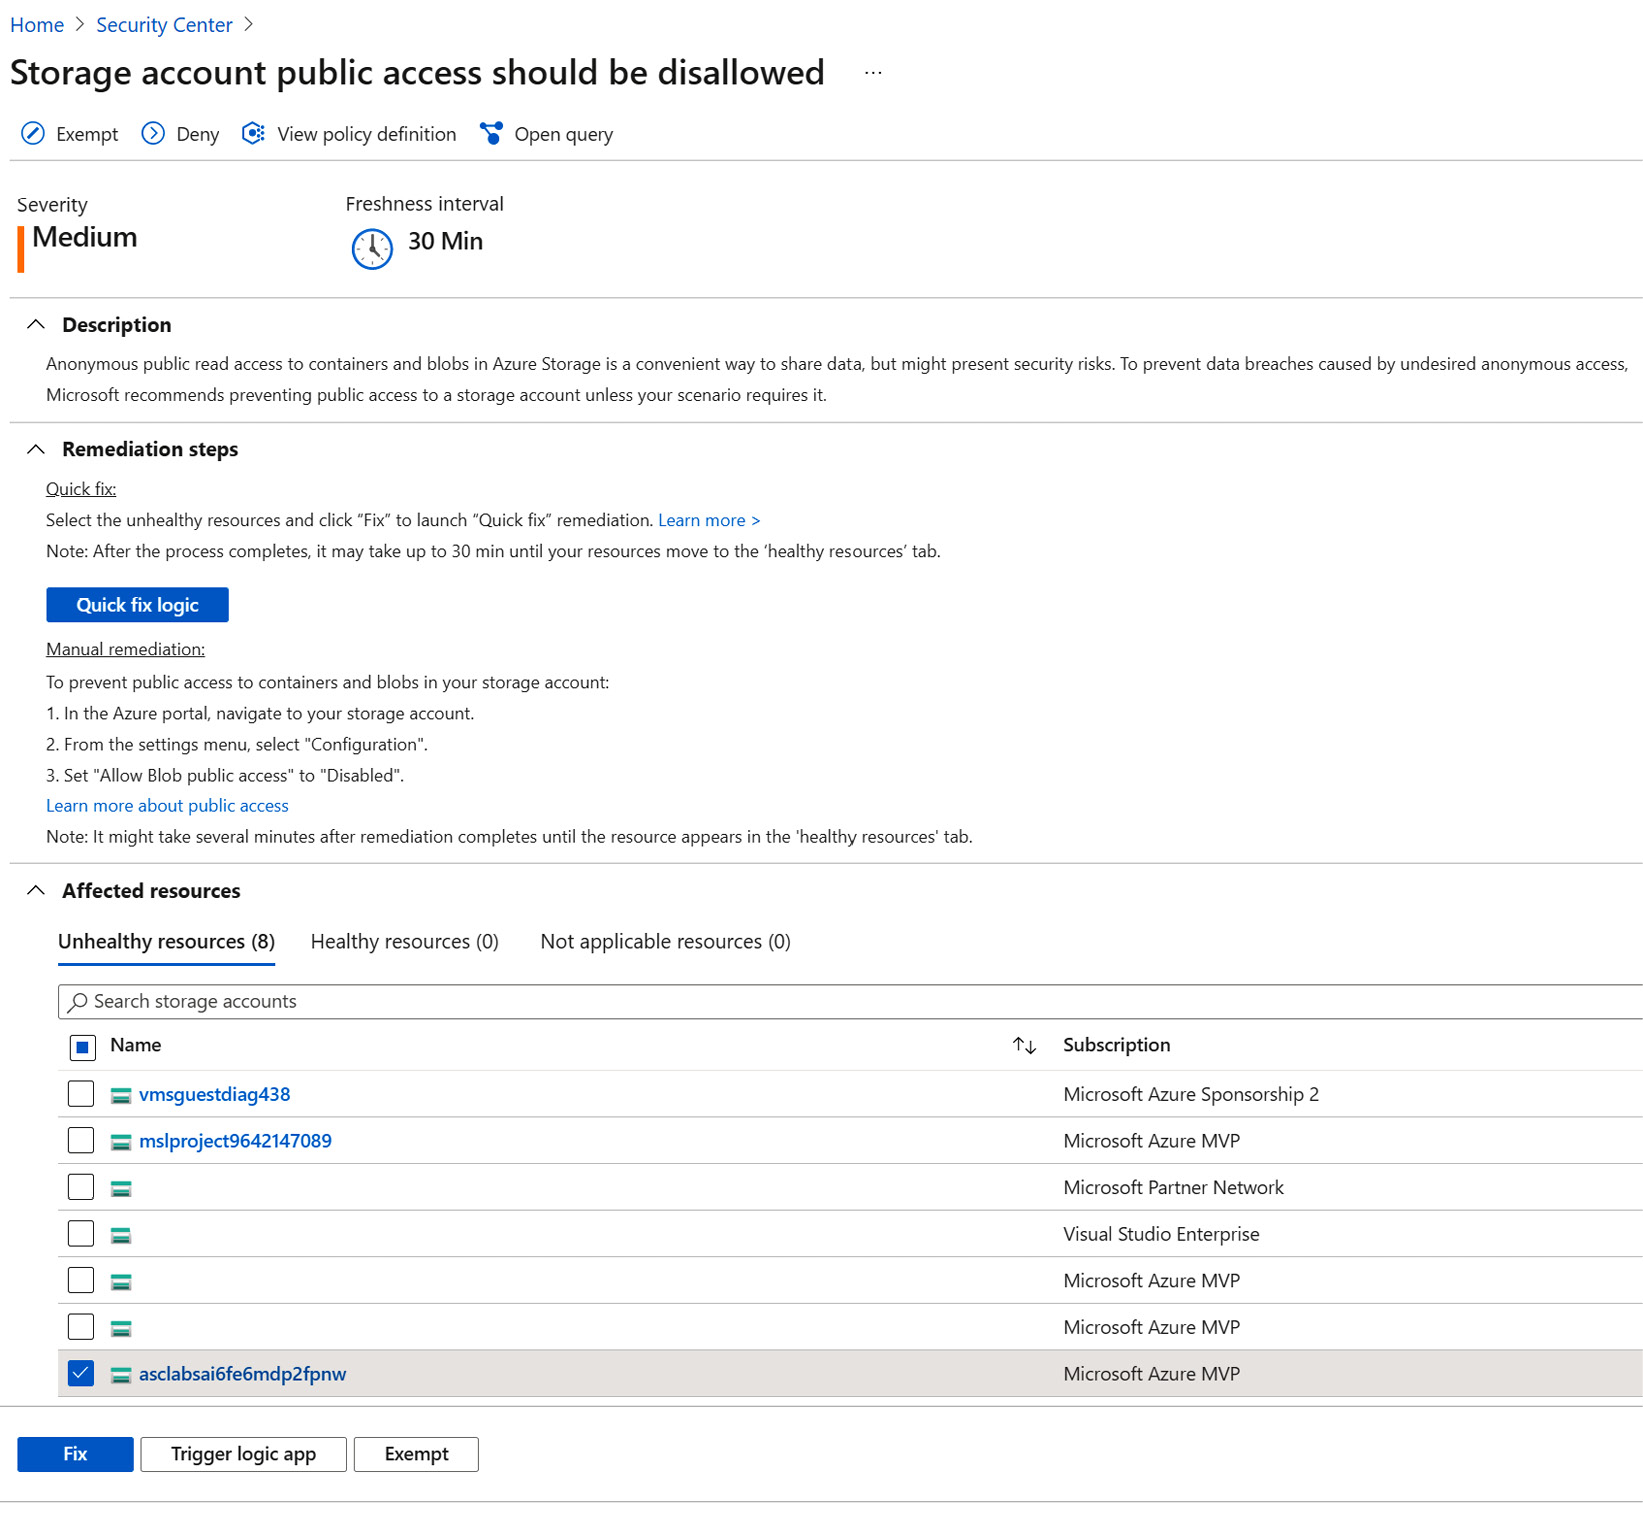
Figure 4.32 – Fixing a recommendation
- On the recommendation page, identify three sections: Description, Remediation steps, and Affected resources.
The Description field explains what a recommendation is about, and why it is important to remediate recommended resources. The Remediation steps section displays the actual steps that you need to take to fix or remediate the affected resource or resources that are listed below the Affected resources section, under the Unhealthy resources tab.
- Select one or more storage accounts to fix or to apply remediation steps.
- Click Fix. A Fixing resources blade opens containing a remediation action description and a list of selected resources that will be remediated:

Figure 4.33 – Fixing resources
- Click the blue button to fix the resources. The text on the button will be displayed as Fix N resources, where N represents the number of selected resources to fix.
How it works...
To fix unhealthy resources, Microsoft Defender for Cloud applies the changes to affected resources. To see what these changes are, read the Remediation steps section on the recommendation information blade.
Additionally, click Quick fix logic to see Automatic remediation script content, in JSON format:

Figure 4.34 – Automatic remediation script content
It can take several minutes after remediation completes to see the resources in the Healthy resources tab.
Managing a recommendation query in Azure Resource Graph Explorer
Microsoft Defender for Cloud uses Azure Policy to define security policy definitions, but for each security recommendation, you can see the appropriate Azure Resource Graph query.
In this recipe, you will learn how to manage a recommendation's Azure Resource Graph query.
Getting ready
Open a web browser and navigate to https://portal.azure.com.
How to do it...
To manage a recommendation's Azure Resource Graph query, take the following steps:
- In the Azure portal, open Microsoft Defender for Cloud.
- On the left menu, click Recommendations.
- In the list of recommendations, search for and select the Secure transfer to storage accounts should be enabled recommendation.
- At the top of the recommendation page, click on Open a query. The Azure Resource Graph Explorer blade opens. On the right side, under the Query 1 tab, is a query that will return the recommendation result. Click Run query:
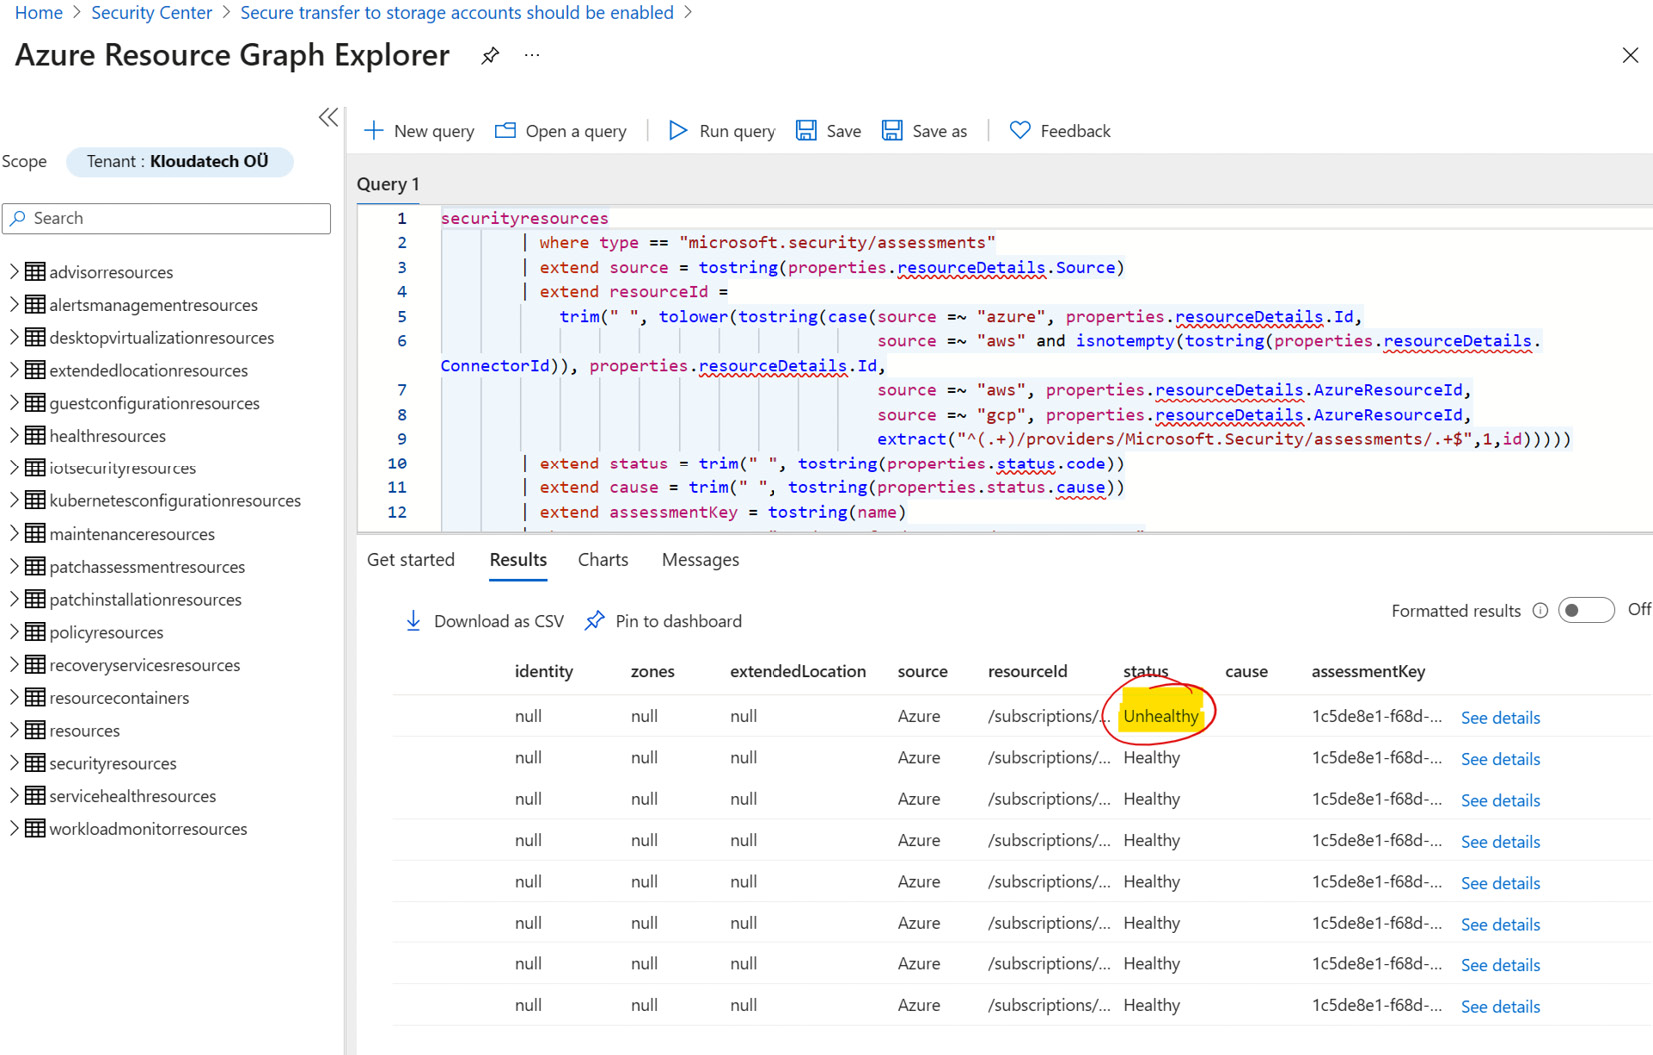
Figure 4.35 – Unhealthy resource status
- The query executes and the result is listed under the Results tab.
- In the results list, in the status column, resources that should be remediated have the Unhealthy status.
- To save the query, select the Save or Save as button.
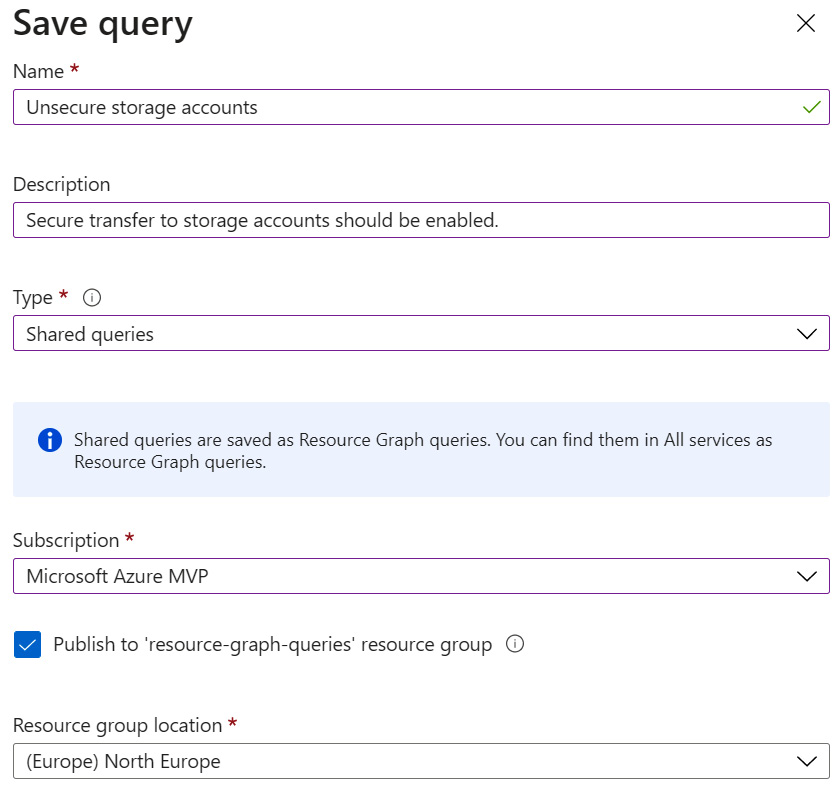
Figure 4.36 – Save query
- Type a name and a description for the query.
- From the Type menu, choose Shared queries. To make a query available only to you, choose Private queries.
- Choose a subscription and a resource group location.
- If the Publish to 'resource-graph-queries' resource group option is checked, a resource-graph-queries resource group is automatically created. If unchecked, you can create and name your own resource group. Leave the setting checked.
- Click Save.
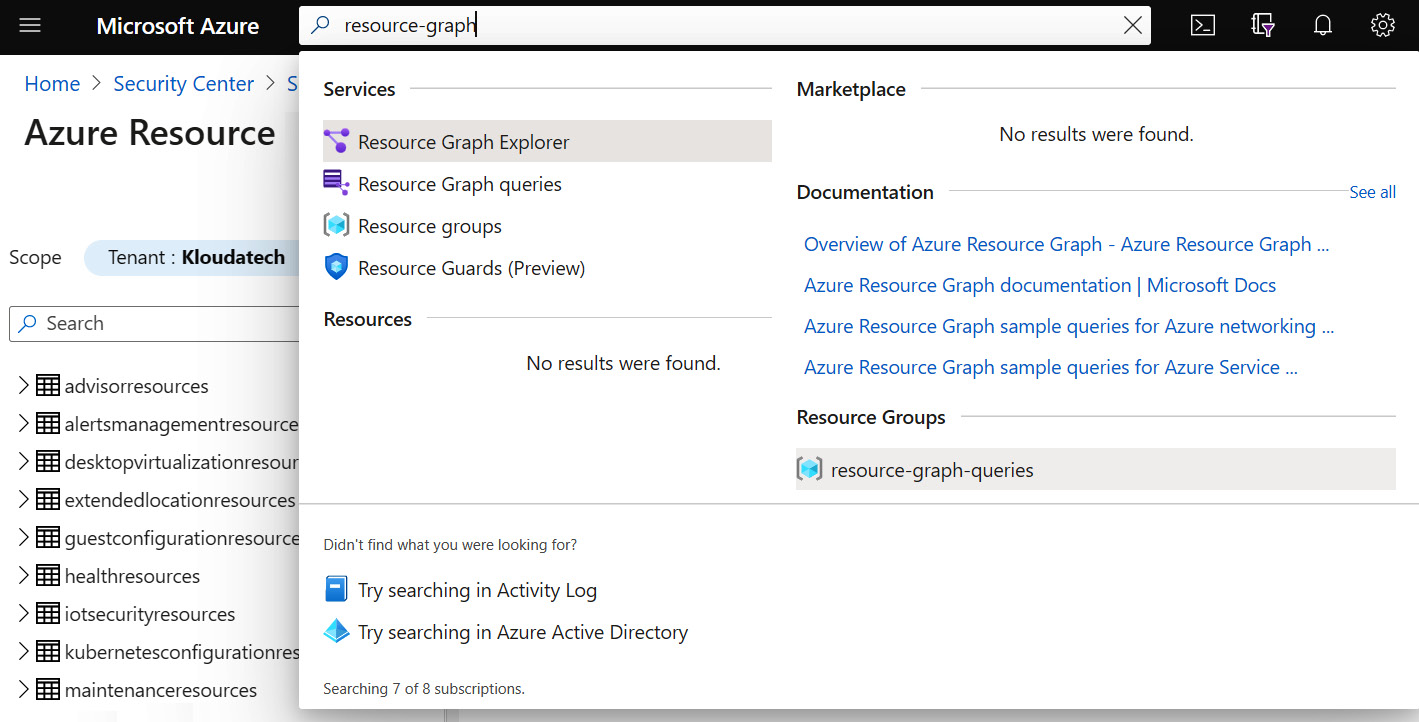
Figure 4.37 – Search for the resource-graph-query resource group
- At the top of the Azure portal, in the search field, type resource-graph to search for a recently created resource group.
- From the list of resource groups, select the Resource-Graph-query resource group:

Figure 4.38 – Saved Azure Resource Graph query
- In the selected resource group, observe the Global location of the recently saved query. Select the query.
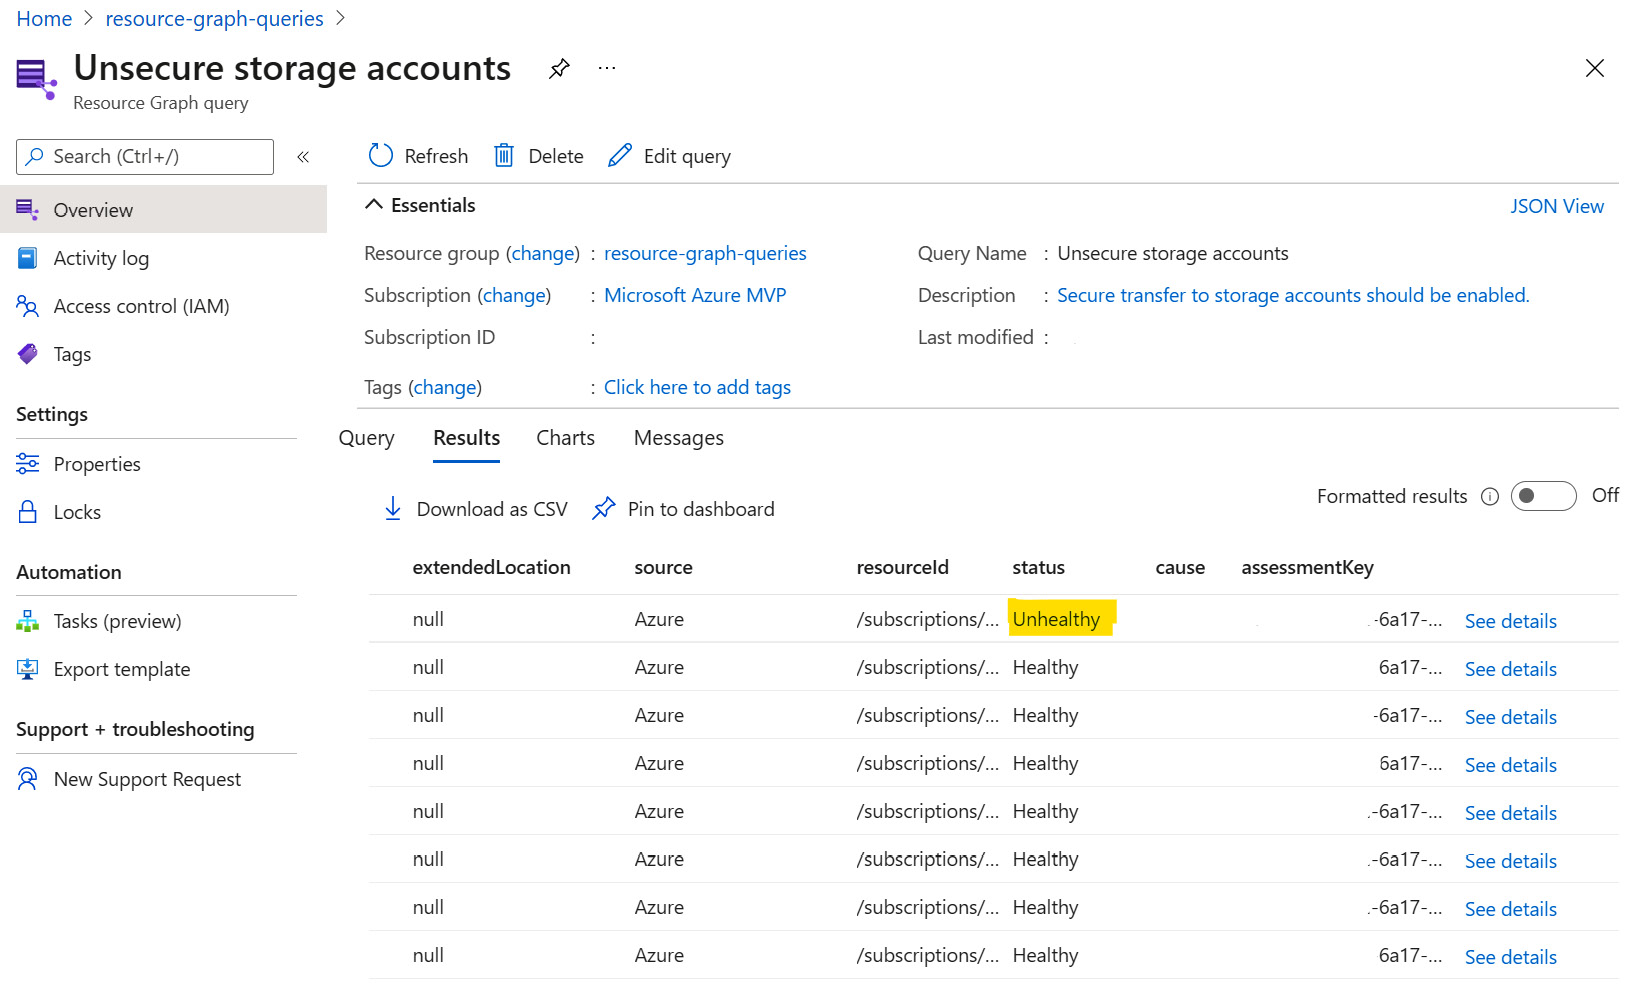
Figure 4.39 – Unhealthy resources query results
- In the Resource Graph query blade, under the Query tab, is the query code. Click on the Results tab to run the query.
How it works...
A private query is only available to you and can be accessed only by you. A shared query is saved to a resource group, and you can control who has access to the shared query via role-based access control role assignments.
Getting a secure score using Azure Resource Graph
Azure Resource Graph is a service in Azure that is capable of querying resources at scale across subscriptions and exploring Azure resources, including the ability to apply complex filtering, grouping, and sorting by resource properties.
In this recipe, you will learn how to use Azure Resource Graph to query resources for the Azure secure score feature.
Getting ready
Open a web browser and navigate to https://portal.azure.com.
How to do it...
To filter, group, and sort security recommendations in Microsoft Defender for Cloud, take the following steps:
- In the Azure portal, open Resource Graph Explorer.
- On the left menu, under the Scope menu, choose a scope for the queries: Tenant, Management Group, or Subscription.
- In the right pane, under the Query 1 tab, type the following Kusto query:
SecurityResources
| where type == 'microsoft.security/securescores'
| extend current = properties.score.current, max = todouble(properties.score.max)
| project subscriptionId, current, max, percentage = ((current / max)*100)
- Click Run query:

Figure 4.40 – Azure Resource Graph Explorer script results
- The query returns the subscription ID, the maximum score for the subscription, as well as the current score value as a number and as a percentage.
Click New query. A new Query tab will open.
- In the Query 2 tab, type the following Kusto query:
SecurityResources
| where type == 'microsoft.security/securescores/securescorecontrols'
| extend SecureControl = properties.displayName, unhealthy = properties.unhealthyResourceCount, currentscore = properties.score.current, maxscore = properties.score.max
| project SecureControl , unhealthy, currentscore, maxscore
- Click Run query:

Figure 4.41 – Azure Resource Graph Explorer query results
- The query returns the status of all security controls and the number of unhealthy resources for each control, as well as the current and maximum secure score.
How it works...
You can use Kusto Query Language (KQL) scripts to query Azure Resource Graph not just for the Azure secure score, but for numerous other objectives.
There's more...
To learn more about Azure Resource Graph, refer to the official documentation at https://docs.microsoft.com/en-us/azure/governance/resource-graph/.