
Chapter 5
Strengthening your Security Posture
During the last couple of years, supply chain attacks, such as Solorigate, reinforced both the importance of having a vulnerability-management system and the fact that many computers are not fully updated and do not use the most secure configuration. As you already learned in Chapter 1, “Threat landscape,” the COVID-19 pandemic even amplified these observations and presented new challenges. What all these challenges and observations have in common is that security hygiene today is one of the most important topics when it comes to protecting IT resources. A security assessment is critical to identifying the current security state of your assets and what you need to do to improve it. Microsoft Defender for Cloud can perform a security assessment for all major workloads: compute, network, storage, and applications. The result of these security assessments is a set of recommendations that will help you enhance the security posture of your workloads.
In this chapter, you will learn how to use Defender for Cloud to perform a security assessment for major workloads and how to use the result of this assessment to improve your defense system.
Driving security posture improvement using Secure Score
When working in a cloud environment, monitoring the security state of multiple workloads can be challenging. How do you know if your security posture across all workloads is at the highest possible level? Are there any security recommendations that you are not meeting? These are hard questions to answer when you don’t have the right visibility and tools to manage the security aspects of your cloud infrastructure.
Microsoft Defender for Cloud reviews your security recommendations across all workloads, applies advanced algorithms to determine how critical each recommendation is, and calculates your Secure Score based on them. Secure Score helps you to assess your workload security posture from a single dashboard. You can view the overall Secure Score in the Defender for Cloud’s Overview dashboard, as shown in Figure 5-1.
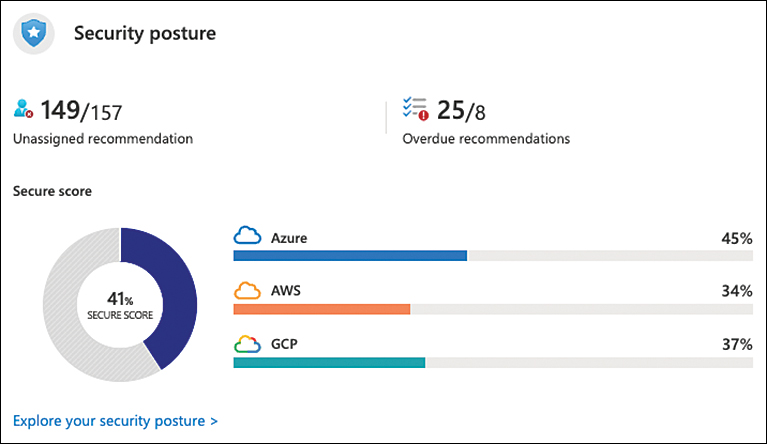
FIGURE 5-1 Overall Secure Score of your workloads assessed by Defender for Cloud
The overall Secure Score shown in the main dashboard’s Security Posture tile is an accumulation of all your security control scores. Keep in mind that this score can vary because it reflects the subscription that is currently selected and the resources that belong to that subscription. If you have multiple subscriptions selected, the calculation will be for all subscriptions. The active recommendations on the selected subscription also make this score change. For example, as shown previously in Figure 5-1, the current overall Secure Score of this environment is 31 percent, while numbers vary between Azure (45 percent), AWS (34 percent), and GCP (37 percent). To access more details about your Secure Score, click the Explore Your Security Posture option in the Security posture tile. This will lead you to the Security Posture blade, as shown in Figure 5-2.
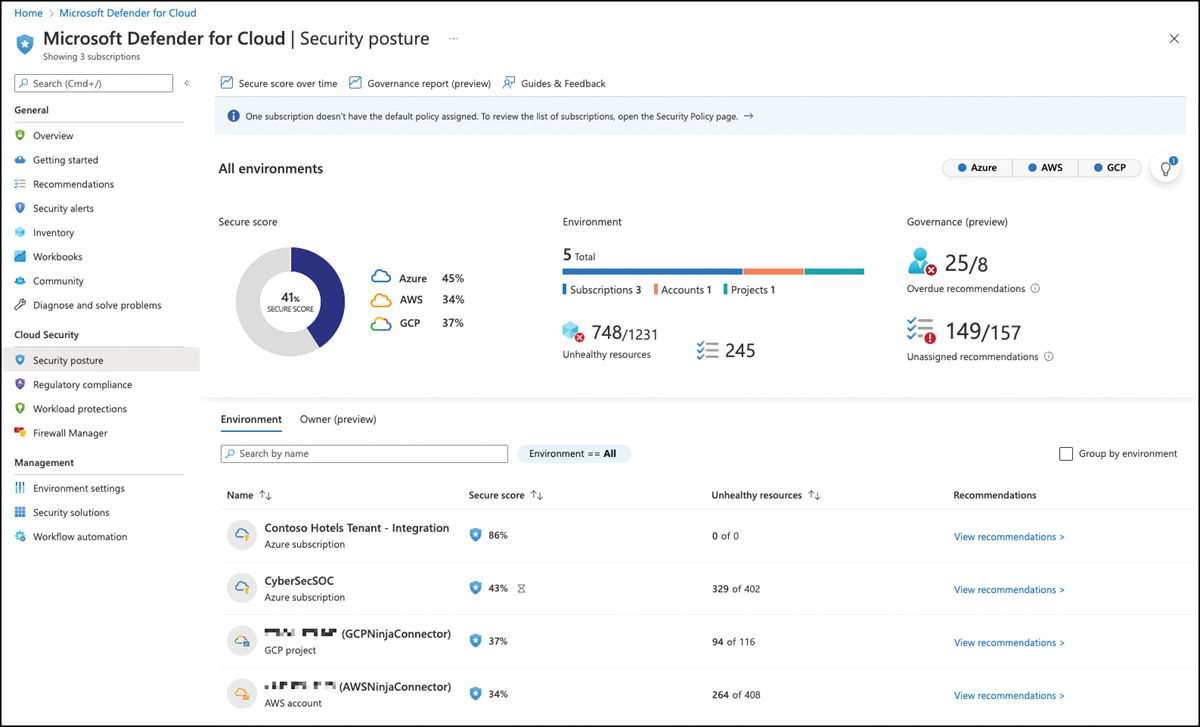
FIGURE 5-2 Details about your current Secure Score
This dashboard provides a better visualization of which Azure subscriptions, AWS accounts, and GCP projects have the lowest scores. Also, this dashboard provides a per-environment breakdown of Secure Scores. From this view, you can see that the Contoso Hotels Tenant—Integration subscription has a Secure Score of 86 percent, whereas other subscriptions have only 34 to 43 percent. Next to the Environments tab, you can select the Owner (preview) tab, which gives you an overview of recommendations assigned per owner. This capability is part of the new security governance experience we will discuss later in this chapter.
From the Environment tab, you can click the View Recommendations option to see all recommendations for a particular subscription, account, or project. If you would rather see recommendations and controls for your entire environment, click the Recommendations button in Defender for Cloud’s main navigation pane, as shown in Figure 5-3.
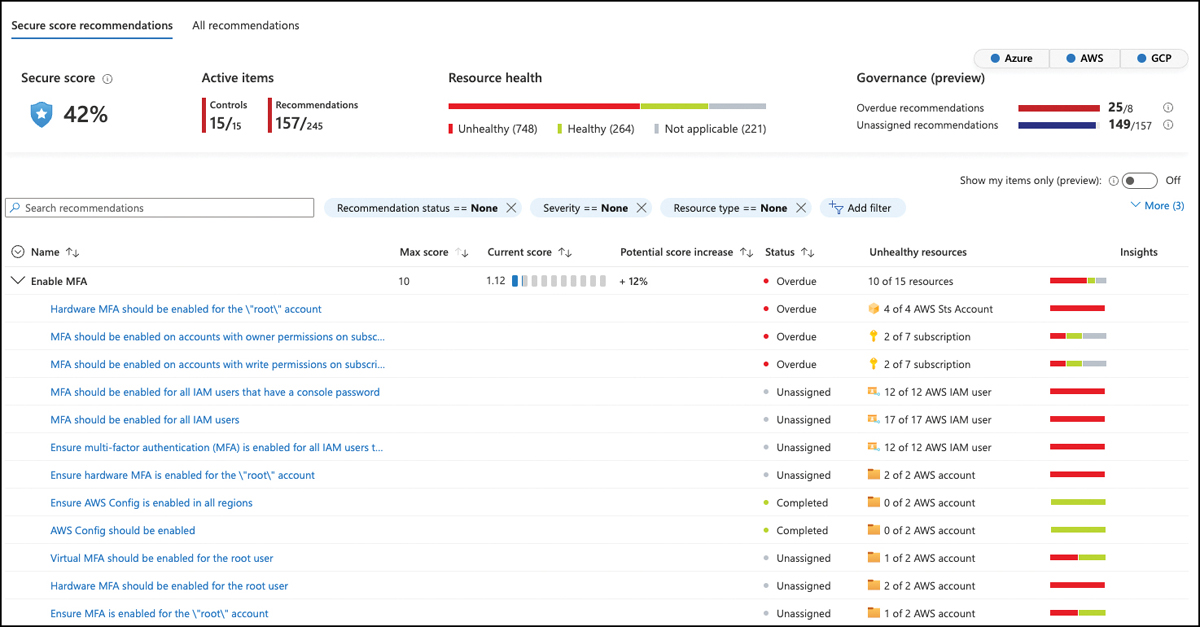
FIGURE 5-3 Recommendations and controls that have a direct impact on the Secure Score
Secure Score calculation is based on a max score that is assigned to a particular security control, in which recommendations are gathered. In Figure 5-3, you see the Enable MFA security control with a max score of 10 points and a current score of 1.12 points. These numbers may change when applying an Environment filter. Figure 5-4 shows the same environment with AWS and GCP removed from the view. On the top-right corner, you can see filter buttons to add/remove a particular cloud environment from the overall view.
To increase your Secure Score, all recommendations within a security control that apply to a particular resource need to be remediated. For example, let’s take a closer look at the Secure Management Ports security control of another environment. In Figure 5-5, you can see that it contains several recommendations, some of which already have been remediated as indicated by the Completed flag, whereas others still need to be addressed, such as the Management Ports Should Be Closed On Your Virtual Machines recommendation, that applies to four of seven virtual machines in this particular environment.
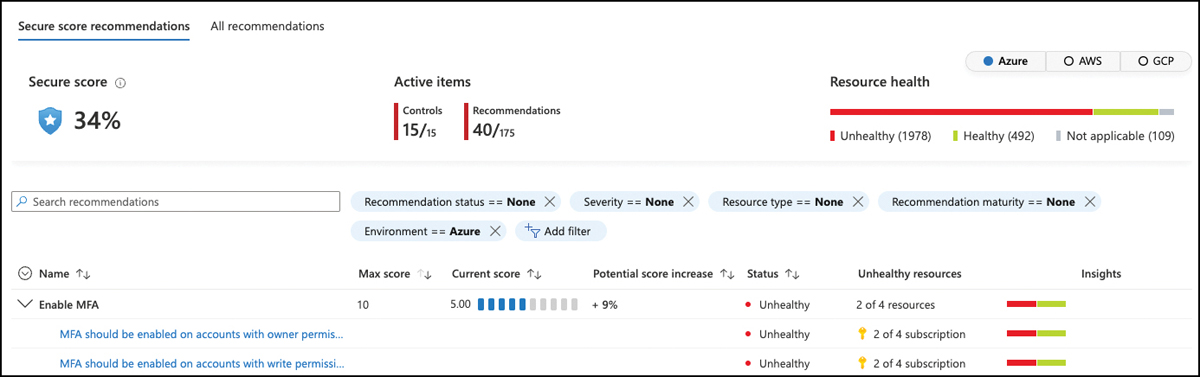
FIGURE 5-4 Secure score when AWS and GCP are removed from the view
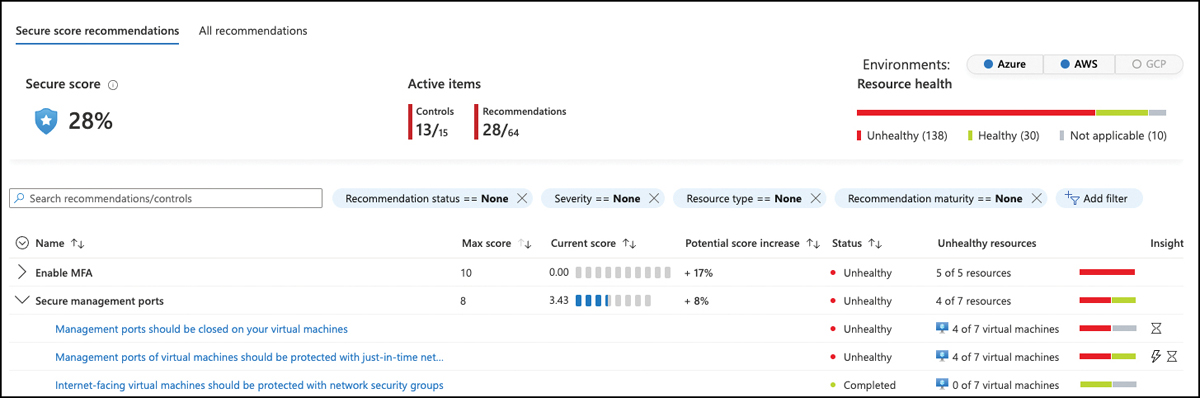
FIGURE 5-5 Recommendations within the Secure Management Ports control
The Secure Management Ports security control weighs a total of 8 points toward your Secure Score once all recommendations are remediated. In this particular environment, there is a potential score increase of +8 percent. The total number of points in a control is static, whereas the percentage toward your Secure Score depends on your environment because the total maximum number of points you can receive depends on the type of resources you have deployed to your subscriptions. Figure 5-5 also shows the Management Ports Of Virtual Machines Should Be Protected With Just-In-Time Network Access Control recommendation, which is flagged as a preview recommendation (shown by the lightning symbol in the Insight column).
Preview recommendations won’t affect your Secure Score as long as they are in preview. In other words, if you remediate all the other recommendations from Figure 5-5 and do not take care of the preview recommendation, you will still get 8 points toward your overall Secure Score. But be aware that once this particular recommendation no longer has a preview status, it will count and then your Secure Score will decrease if you do not take care of remediating it. So, preview recommendations should still be remediated wherever possible to ensure they will not negatively impact your Secure Score once the preview period ends.
More Info
Microsoft will announce these and other breaking changes in the Defender for Cloud documentation before they apply. To learn more, see https://aka.ms/MDFCUpcomingChanges.
To calculate the Secure Score influence per resource, the maximum total number of 8 points for this particular control is divided by the total number of affected resources. In the example above, there is a total of 8 points to be assigned to seven virtual machines, so every machine counts 1.14 points toward the overall Secure Score if all recommendations in that control are remediated. Therefore the current score shown in Figure 5-5 is 3.43 points (3 x 1.14). If there were eight machines, every resource would count 1 point; if there were 16 machines, each would be worth 0.5 points. Remember that the Secure Score in a control will only increase once you have remediated all recommendations that apply to a particular resource.
More Info
To learn more about Secure Score calculation, see https://aka.ms/MDFCSecureScoreCalculation.
Fine-tuning your Secure Score
While Secure Score can be utilized to support your organization in enhancing its security posture, there will be some scenarios in which not all recommendations are applicable to your environment. It is common to have customers asking to fine-tune those recommendations; they ask because there are items they consider to be false positives.
Organizations commonly use a third-party MFA solution for subscription accounts with access permissions, and the organizations believe they can safely ignore the recommendations within the Enable MFA security control. However, because the organizations are not addressing these recommendations, there is a 10-point drop in their Secure Score. How can they safely disable these recommendations?
If you are absolutely sure that this security control’s intent has been addressed by implementing an external factor that is not being taken into consideration by Defender for Cloud, you can follow the steps described in Chapter 4, “Policy management,” to disable the policies that reflect your desired recommendations.
Using resource exemptions
Disabling a security policy on a subscription or management group is a good way to make sure that recommendations that entirely do not apply to your environment are removed from the Secure Score calculation. However, a frequent customer demand is to have a more granular option for exempting resources from a particular recommendation. For example, you have a test environment for which you accept the risk of being exposed, or if some of your VMs are protected by an endpoint protection solution which Microsoft Defender for Cloud does not track, whereas others are protected by Microsoft Defender for Endpoint. Leveraging policy exemptions, an Azure Policy capability you learned about in Chapter 4, Defender for Cloud comes with resource exemptions, which you can use to fine-tune the set of recommendations that apply to your particular environment more granular. You can create a resource exemption in Defender for Cloud when working with recommendations. Figure 5-6 shows the Storage Account Public Access Should Be Disallowed recommendation. When you take a closer look at the recommendation, you see there is already one exempted resource.
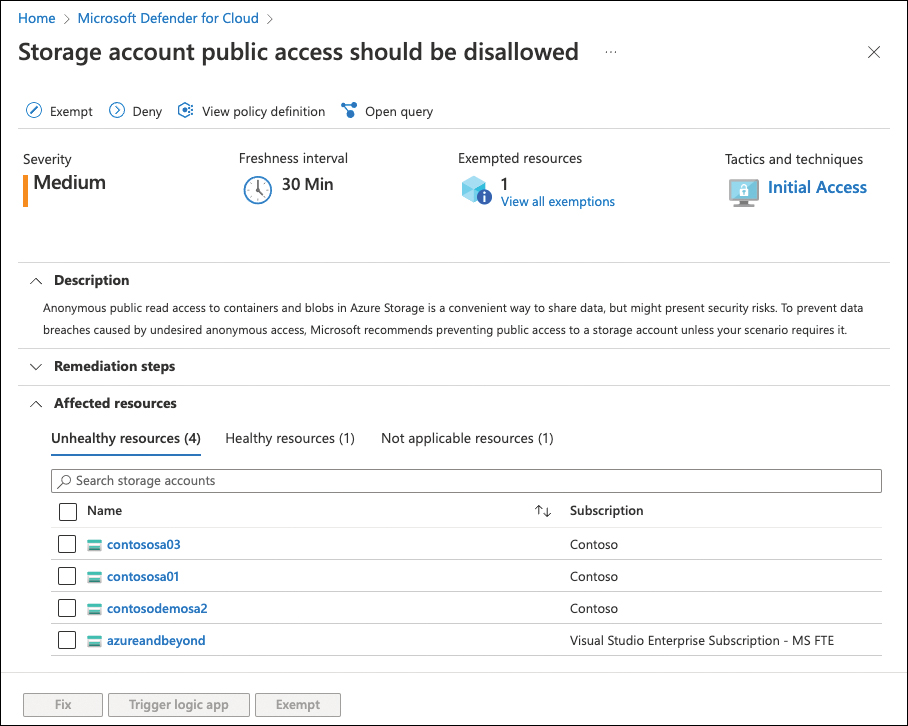
FIGURE 5-6 Exempted resources in a recommendation
If you look at the Affected Resources section, you see that there are four unhealthy resources, one healthy resource, and one not applicable resource. Once you create an exemption for a resource, the resource is moved from unhealthy status to not applicable. To create a new exemption, follow these steps:
Open the Azure portal and sign in with a user who has Security Admin privileges.
In the top search bar, enter Defender, and then click Microsoft Defender For Cloud.
In the Defender For Cloud navigation pane, select Recommendations.
Open a security control and click the recommendation for which you want to create a resource exemption.
In the recommendation’s details view, look for the resource for which you want to create an exemption, select the resource, and click Exempt.
Select the scope you want to create the exemption on—single resource(s), subscription(s), or management group(s)—enter an Exemption Name, and define whether and when the exemption will expire. There are two Exemption Categories:
Mitigated Select Mitigated if the policy’s intent has been met by a process not tracked by Defender for Cloud.
Waiver Select Waiver if your organization has decided to (temporarily) accept the risk of not mitigating the recommendation’s intent.
Finally, enter an Exemption Description that explains the reason for creating the exemption. Then, click Create to finish creating the exemption, as shown in Figure 5-7.
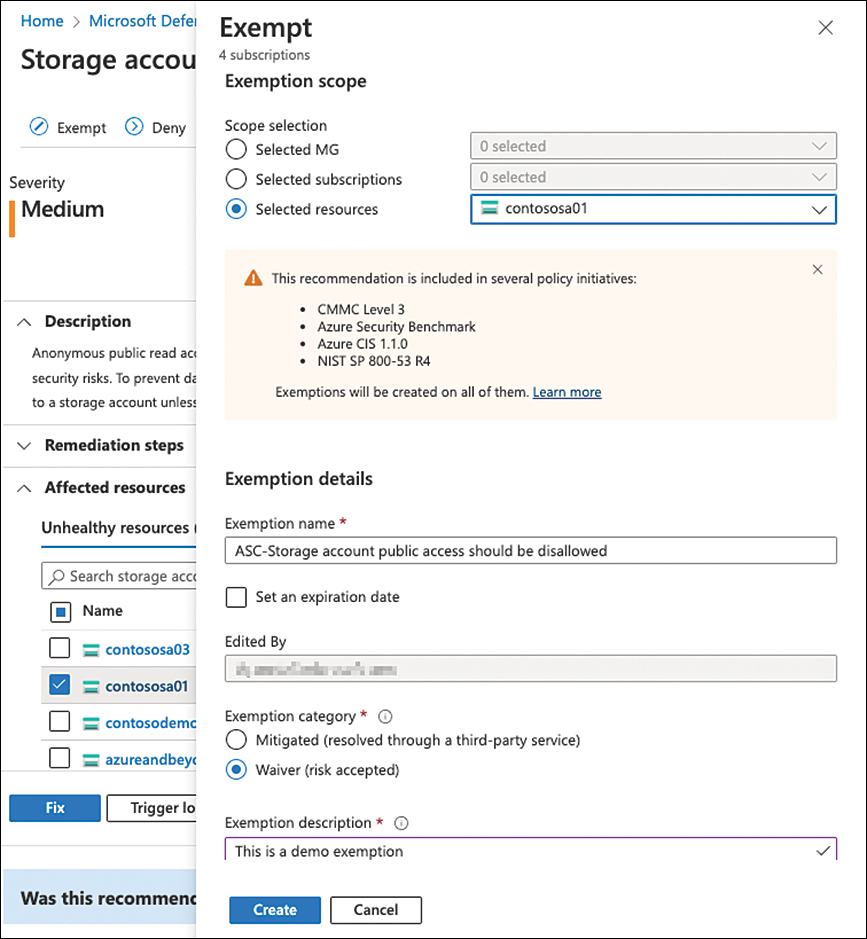
FIGURE 5-7 Create a new resource exemption
In the last section of this chapter, we will take a look at how to build automation artifacts around the resource exemption capability.
Using APIs and Continuous Export to create reports
Secure Score, as it is presented in Microsoft Defender for Cloud, gives you a point in time overview about your current security posture, while customers keep asking for a capability that enables you to keep track of Secure Score changes. You might want to be informed when your Secure Score drops, or you might want to see a progress over time.
Defender for Cloud gives you access to all its information based on the Microsoft.Security REST API provider, and so there is a Secure Score operation group as part of the API provider that lets you pull the Secure Score information for any or all subscription(s) within your environment, anytime you want. What sounds like just another API opens a lot of ways for you to build automations upon. In the following section, you will learn more about some of these automations that you can find in the Microsoft Defender for Cloud Community GitHub.
More Info
You can find the Defender for Cloud GitHub repository at https://aka.ms/MDFCGithub.
Also, Defender for Cloud offers a Continuous Export capability that allows you to regularly export alerts, recommendations, regulatory compliance, and Secure Score information to either an Azure Event Hub or a Log Analytics workspace (or both). Continuous Export will automatically send this information to the respective endpoint (Event Hub or Log Analytics workspace) every time Defender generates a new alert or recommendation for Cloud, a regulatory compliance status changes, or your Secure Score changes. You can use this capability for different purposes. Exporting alerts and recommendations to an Azure Event Hub is a great option if you want to feed your third-party SIEM solution, whereas exporting to a Log Analytics workspace allows you to generate overtime reports to track changes in your environment.
More Info
You can find further information about the Continuous Export capability at https://aka.ms/ContinuousExport.
In the following section, we cover the configuration of Continuous Export for Secure Score data.
Get Secure Score data
With the SecureScores API provider, you can pull Secure Score information for a particular subscription whenever you want. The result will always present the current Secure Score to the particular point in time when pulling the information. Figure 5-8 shows the JSON result when executing a GET request against the Microsoft.Security/secureScores/ascScore API to get the Secure Score information for a subscription.
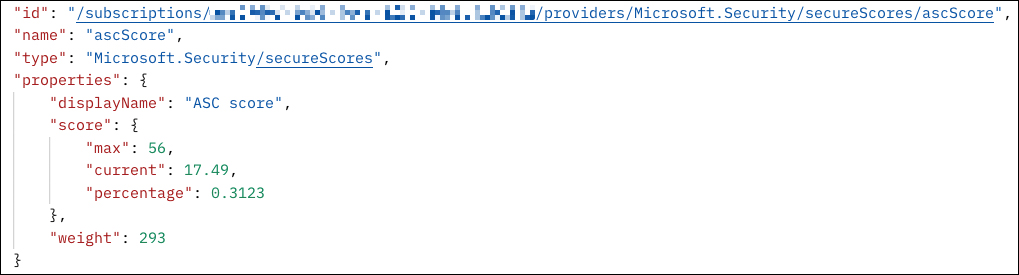
FIGURE 5-8 Result of pulling Secure Score information from the SecureScores API provider
You can see that the result contains the following information:
Maximum points that can currently be achieved, depending on the resource types that are deployed 56
Current points 17.49
Current percentage calculated based on current points divided by total points 0.3123 (=31.23%)
If you compare these results with the Contoso subscription’s Secure Score in Defender for Cloud, you realize that these numbers are the same, as you can see in Figure 5-9.
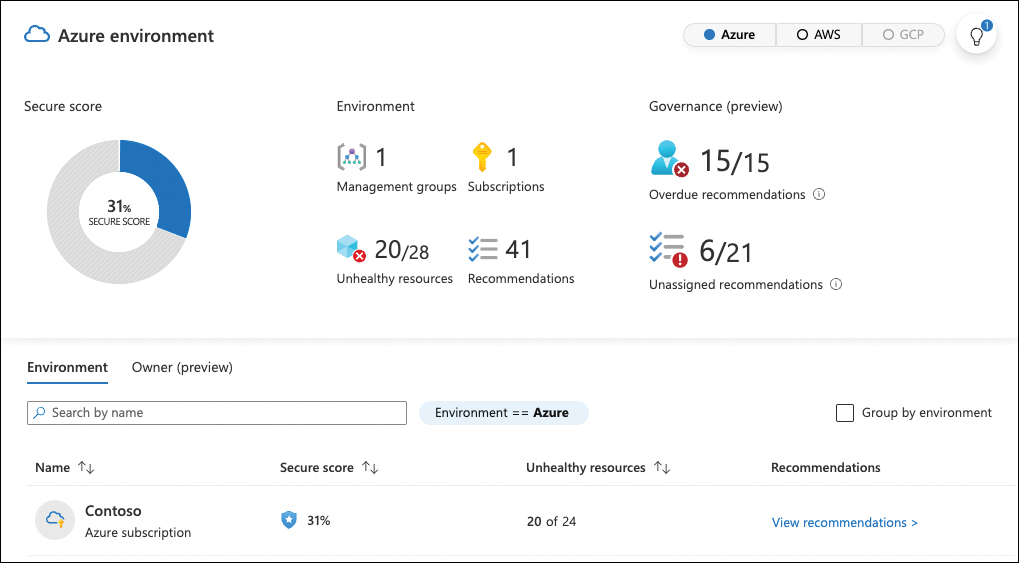
FIGURE 5-9 Secure Score results in Defender for Cloud are the same as provided by the API
Using this API, you can store the current results in an EventHub, Log Analytics workspace, database, and so on. In the Defender for Cloud GitHub, you find a LogicApp called Get- SecureScoreData that will query all your subscriptions for their Secure Score information once a day and store it in a Log Analytics workspace. This Logic App is a great automation artifact for starting other automations built on top of the data stored in Log Analytics.
More Info
You can find the Get-SecureScoreData Logic App at https://aka.ms/MDfCGetSecureScoreData.
Secure Score Continuous Export
With Continuous Export, Defender for Cloud has a built-in capability to export recommendations, alerts, and Secure Score information to either a Log Analytics workspace or an Azure Event Hub (or both), so you can build further automations on top of this data. Continuous Export is always configured on a subscription level, so you need to create a Continuous Export configuration for all subscriptions for which you want to export security data. To enable Continuous Export of Secure Score data, follow these steps:
Open the Azure portal and sign in with a user who has Security Admin privileges.
In the search bar, enter Defender, and then click Microsoft Defender For Cloud.
In the left navigation pane, select Environment Settings.
Select the subscription on which you want to enable Continuous Export, and then click Continuous Export in the left navigation pane.
Determine if you want to export the data to an existing Event Hub or Log Analytics Workspace by selecting the respective tab.
For the Exported Data Types, select Secure Score.
You can export the Overall Score, Control Score, or both. When you select Control Score, you can choose the Controls you want to export, as shown in Figure 5-10.

FIGURE 5-10 Select which Secure Score scope you want to export
Make sure to configure Export Configuration and Export Target as explained in the screen, and then click Save.
Once the configuration has been saved, Defender for Cloud will automatically take care of exporting changes in your Secure Score. If you have configured export to a Log Analytics workspace, you can then, for example, start building an Azure Monitor Workbook based on the data stored in the workspace. In the next section, you will learn about a built-in workbook that leverages Continuous Export to show an environment’s Secure Score over time.
Secure Score over time report
One of the various built-in workbooks integrated with Defender for Cloud and which you can find in the Workbooks tab of Defender for Cloud’s main navigation pane is the Secure Score Over Time report. The workbook relies on the overall score and control score information, which is stored in a Log Analytics workspace, by leveraging Continuous Export. The workbook enables you to track Secure Score changes over time, overall trends, and trends per security control. Figure 5-11 shows the main Secure Score Summary dashboard.
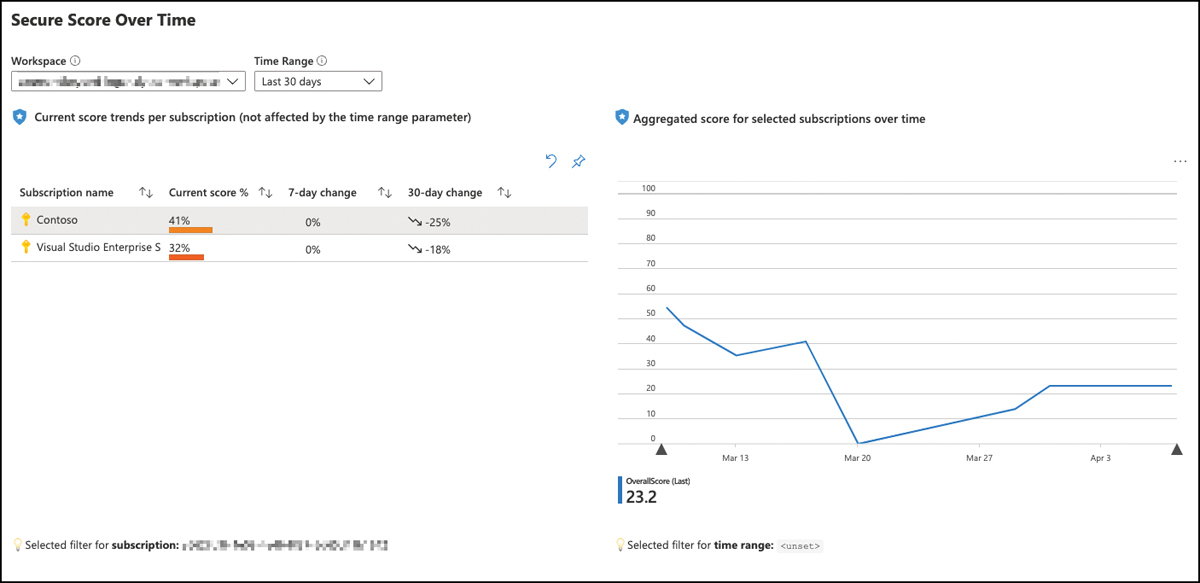
FIGURE 5-11 Secure Score Over Time report summary dashboard
Notify on Secure Score downgrade
Secure Score is the main KPI to express your environment’s security status. With the Secure Score Over Time workbook, you have good visibility about your trend, so you can see how you are doing in improving your organization’s security posture. However, when it comes to a sudden decrease, as might happen when you deploy insecure resources (resources that are not deployed as secure by default), you might want to be notified in addition to seeing it in a dashboard.
You already know that by using the SecureScores API provider, you can regularly export a subscription’s Secure Score. If you compare the latest Secure Score with the score from a previous export, you can react to a decreasing Secure Score and receive a notification using a Logic App that runs once a day. In the Defender for Cloud GitHub repository, you can find a Logic App sample that will send you an email once your Secure Score drops by a configurable percentage (such as 5 percent).
More Info
You can find the Logic App sample to get a notification once your subscription’s Secure Score decreases in the ASC GitHub at https://aka.ms/ASCBook-SecureScoreDrop.
Remediating recommendations
Misconfigurations, lack of security expertise, and lack of visibility are the most common reasons for being vulnerable to attacks. You already know that Defender for Cloud recommendations are based on security policies which are used to assess your environment. Recommendations are the result of these assessments, they give you an overview of where and why your environment is vulnerable. Grouped by security controls, Microsoft Defender for Cloud will show you the most impactful recommendations at the top of the list, as shown in Figure 5-12.
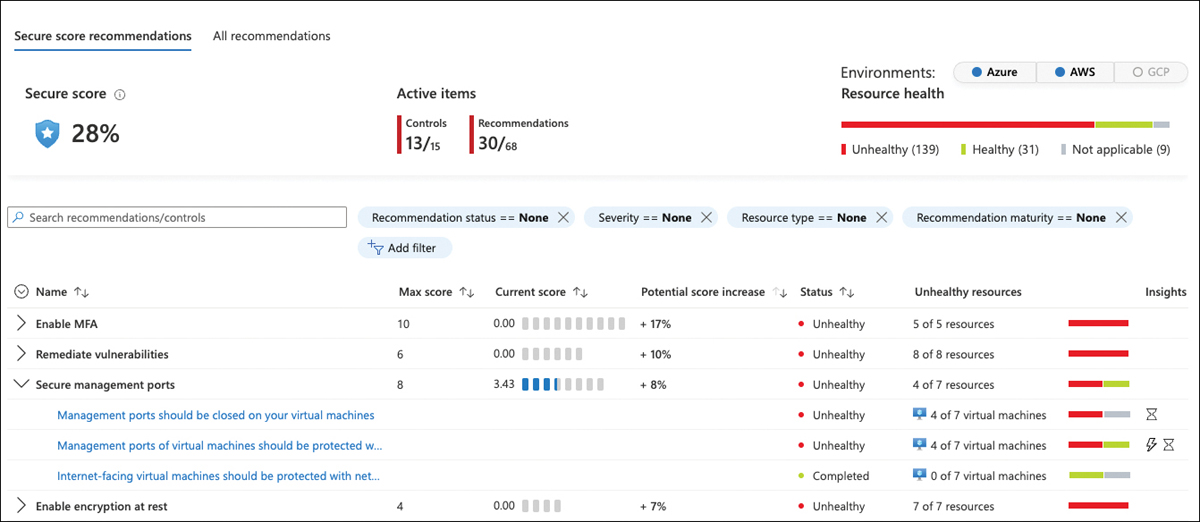
FIGURE 5-12 Security recommendations with filter options, grouped by controls, and ordered by potential Secure Score increase
Also, Defender for Cloud provides you with several filtering options that help you to focus on recommendations and controls that are more important for your environment than others. The following filtering options are available:
Control Status This option lets you filter for security controls with the following status types:
active,completed,not applicable.Recommendation Status This option filters for
active,completed, ornot applicablerecommendations.Recommendation Maturity This option lets you decide to focus on
GAand/orPreviewrecommendations.Quick Fix Available This option lets you select recommendations that only have a Quick Fix capability. Quick Fix helps you easily remediate a particular recommendation for one, some, or all unhealthy resources. This capability uses a built-in remediation process. You will see how to use Quick Fix in action in one of the following sections.
Contains Exemption This option helps you to filter for recommendations that do or do not contain resource exemptions.
Resource Types This is a filter to select recommendations that apply to one, several, or all types of resources. This filter will change according to the types of resources you have deployed in your environment.
Severity This option filters for recommendations with
low,medium, orhigh severity.Initiative This filter lets you filter for recommendations that belong to a particular policy initiative, such as Azure Security Benchmark or a custom initiative you have added to your environment.
Tactics Defender for Cloud has added a MITRE ATT&CK Tactics and Techniques mapping to its recommendations. The Tactics filter lets you filter for recommendations that are mapped to one, several, or all of the 15 tactics.
Environment The Environment filter lets you filter for recommendations that belong to Azure, AWS, and/or GCP, depending on which environment you have connected to your Defender for Cloud estate.
Recommendation Type This option lets you filter for
built-inandcustomrecommendations.Insights This option lets you filter for recommendations that have additional capabilities, such as
Deny,Enforce, orQuick Fix.Resource Group This filter helps you to focus on resources that belong to a particular resource group.
AWS Account and GCP Project These filters help you to only show recommendations that belong to a particular AWS account or GCP connector.
Microsoft Defender for Cloud groups recommendations into 15 controls that make up a total maximum Secure Score of 58 points, which equals 100 percent. Table 5-1 shows all 15 security controls with their maximum scores.
TABLE 5-1 Security Controls and their maximum Secure Score impact
Control | Max score |
|---|---|
Enable MFA | 10 |
Secure management ports | 8 |
Apply system updates | 6 |
Remediate vulnerabilities | 6 |
Enable encryption at rest | 4 |
Encrypt data in transit | 4 |
Manage access and permissions | 4 |
Remediate security configurations | 4 |
Restrict unauthorized network access | 4 |
Adaptive application control | 3 |
Enable endpoint protection | 2 |
Protect application against DDoS attacks | 2 |
Enable auditing and logging | 1 |
Enable enhanced security features | Not scored |
Implement security best practices | Not scored |
The higher the potential Secure Score impact, the more important it is to remediate recommendations within a particular control. In order to start remediating recommendations and controls, it is a good idea to start with the recommendations at the top of the list; doing so will make the biggest difference between secure and insecure configurations. In the following sections, you will learn more about the ideas and recommendations behind these security controls.
Enable multi-factor authentication (MFA)
Back when servers were only installed in your own datacenters, it was a good approach to protect your network and physical boundaries from unauthorized access. Today, however, organizations are no longer providing IT access only from their own offices to their own datacenters. Data is shared across organizations, resource access is allowed from home, the airport, or a restaurant, and identities are stored in the cloud. Today, most security incidents start with an identity-based attack. Just one compromised account is enough for attackers to get access to your environment, and once they’re in, they start moving laterally, elevating their access, and doing what they’ve come for.
Passwords are one of the main problems with identity-based attacks. And while no one likes passwords, attackers sure do because it’s relatively easy to use them as the weakest link in an attack chain. Unique and complex passwords are hard to memorize for hundreds of applications, so users tend to reuse their passwords and create them based on personal information they can easily remember, such as names of dear people or favorite sports teams. All of these make passwords an easy way for attackers to steal user identities.
The use of multifactor authentication for Azure Active Directory-based accounts is an easy but powerful step toward protecting your corporate identities from unauthorized access. Nearly all (99.9 percent) of successful identity-based attacks can be prevented by enabling MFA. That’s why the Enable MFA is the only security control with a maximum Secure Score impact of 10 points, making it the most impactful control of all. The control contains several recommendations that relate to Azure MFA, not a third-party MFA provider. However, if you’re absolutely sure that the control’s intent has been met by a third-party solution that Defender for Cloud is not tracking, you can disable the corresponding security policies, as you’ve already learned in “Fine-tuning your Secure Score” earlier in this chapter. Also, you will see MFA recommendations for multi-cloud environments once you onboarded them to Defender for Cloud, as shown in Figure 5-13.
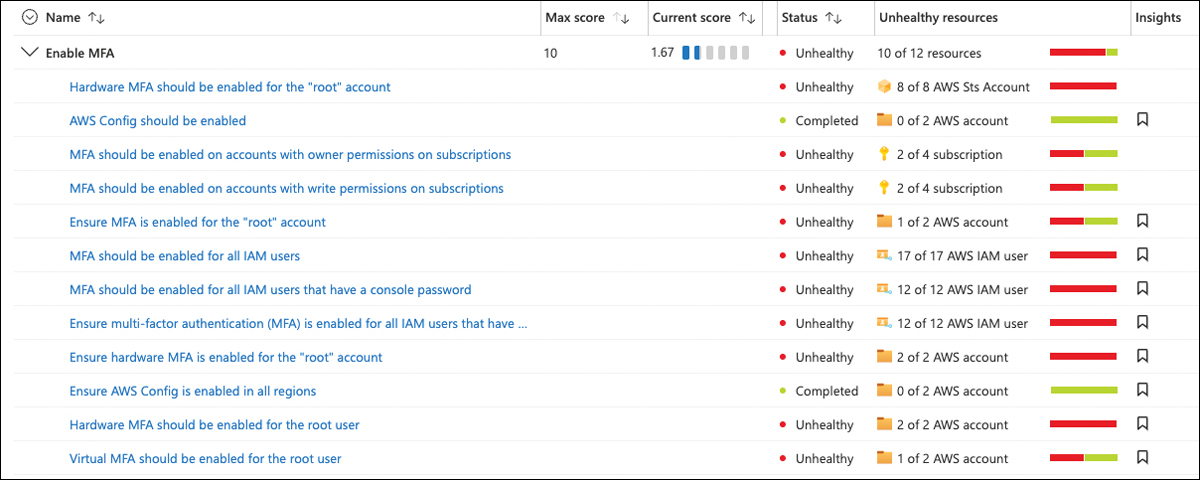
FIGURE 5-13 Enable MFA contains recommendations for Azure subscriptions and AWS accounts
Defender for Cloud will assess all subscriptions within its scope for accounts that have either read, write, or owner permissions. If one account with subscription-wide access does not have MFA enabled, the whole subscription’s recommendation will appear as Unhealthy. Today, Defender for Cloud looks at Conditional Access policies and Security Defaults to determine whether an account is MFA-enabled.
Security Defaults is a set of free identity-security protections for your Azure AD tenant, including the following settings:
Require all users to register for Azure AD Multi-Factor Authentication
Require administrators to perform multi-factor authentication
Block legacy authentication protocols
Require users to perform multi-factor authentication when necessary
Protect privileged activities, such as access to the Azure portal
To activate Security Defaults, follow these steps:
Open the Azure portal and sign in with a user who has Azure AD Global Administrator privileges.
In the search bar, enter Azure Active Directory, and then click the respective option.
In the Azure AD navigation pane, select Properties. Click the Manage Security Defaults link.
Move the Enable Security Defaults toggle switch to Yes and click Save.
More Info
To learn more about Security Defaults, see https://aka.ms/MDfCSecurityDefaults.
Conditional Access policies help you to fine-tune the MFA behavior within your organization. Conditional Access is a premium Azure AD Identity Protection feature, which requires Azure AD Premium P2 licenses. It is important to understand that you can only use one of the two mentioned ways (Security Defaults and Conditional Access) to enforce the usage of MFA within your organization. Once you activate Security Defaults, you’ll no longer be able to configure Conditional Access policies, and once you have configured a Conditional Access policy, you cannot activate Security Defaults.
More Info
To learn more about Conditional Access, see https://aka.ms/ASCBook-ConditionalAccess.
Once you have enforced MFA on all accounts that have access rights to a subscription, it can take up to 12 hours for the change to reflect in Defender for Cloud’s recommendations.
Manage access and permissions
In addition to making sure your identities are protected from credential theft attacks, you should also keep in mind that with great power comes great responsibility. Accounts with elevated and far-reaching access rights are valuable targets for bad actors and, therefore, should be protected in a special way. But security issues can also occur when an account has access rights to resources they should not be allowed to work with. The Manage Access And Permissions control is focused on the principle of least privilege, which says that access rights will always reflect the level of necessity. This control counts as 4 points toward your overall Secure Score, as shown in Figure 5-14.
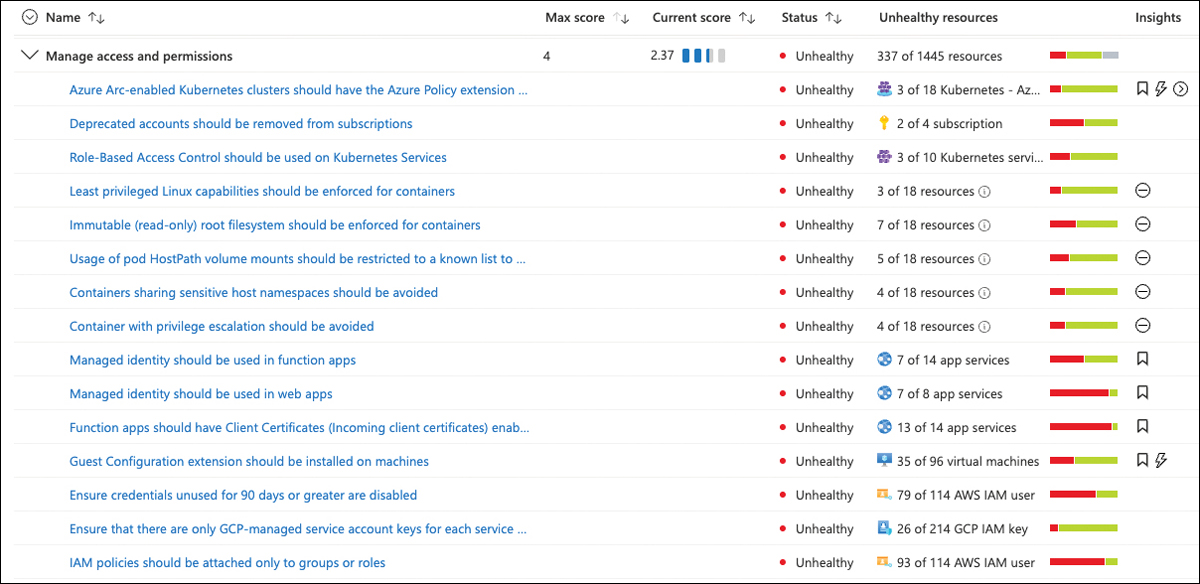
FIGURE 5-14 Manage access and permissions
For security purposes, it is good practice not to give elevated access rights, such as owner or write permissions on the subscription level, to external accounts. External accounts in this context are accounts that are not part of your organization’s Azure Active Directory tenant. Also, deprecated accounts should be removed from your subscription’s access control list. These are accounts that have been blocked from signing in. These accounts can be targets for attackers looking for ways to access your data without being noticed.
Regarding subscription ownership, it is best practice to have more than one (but not more than three) accounts with owner permissions. If you only have one account with that level of access, that might become an issue if the account is compromised or if the account owner joins another team or leaves your organization. However, you shouldn’t have more than three account owners because owner rights are not needed for everyday jobs besides granting access rights.
With the integration of container security and third-party cloud environments, Defender for Cloud also provides recommendations for these environments. For example, it is best practice to avoid privilege escalation in containers, and sensitive host namespaces shouldn’t be shared across containers. Using managed identities to access resources and information is another best practice that applies to App Services environments. To reduce your attack surface, you should think about disabling credentials that have not been used for 90 days or more. Depending on your environment, there can be quite a few recommendations that need to be taken care of, and doing so can become overwhelming. This is where security governance comes into play. Security governance is a new capability in Defender for Cloud that we discuss later in this chapter.
Recommendations and controls focused on compute
In Chapter 3, “Onboarding Microsoft Defender for Cloud,” you learned about the Log Analytics agent, and how it performs security assessments. As part of your onboarding process, you should make sure to address all recommendations that have a higher impact on your Secure Score. First, evaluate all other recommendations and apply the recommendations according to your environment’s needs.
Some recommendations require system downtime, such as applying certain security updates or remediating vulnerabilities that have been found on a machine. This means that after you identify the changes that need to be made in the target system, you may need to start a change-control process to maintain compliance with the security assessment.
Important
Recommendations are only applicable for operating systems supported in Microsoft Defender for Cloud. Visit the latest version of supported operating systems at https://aka.ms/MDfCSupportedOS.
Compute recommendations include a collection of recommendations for Azure VMs, non-Azure computers, Azure Arc machines, App Services, containers, managed clusters such as AKS or Azure SQL, and VM Scale Sets (VMSS).
Important
Remember, new recommendations may be introduced without previous notice, and they will appear with a Preview tag. However, they will not impact your Secure Score as long as they are in preview state.
In addition to agent-based assessments inside the operating system, Microsoft Defender for Cloud has some recommendations that rely on the Azure Policy Guest Configuration extension, which lets Defender for Cloud assess operating system configuration without relying on Log Analytics.
More Info
To learn more about the Guest Configuration feature, see https://aka.ms/MDfC-GuestConfig.
Secure management ports
You learned about the Cyber Kill Chain in Chapter 1. Alongside identity-based attacks, exposed management ports are a valuable target for attackers because they can be used to run attacks, such as brute-force or password-spray attacks. They belong to a group of attacks known as dictionary attacks because they use lists of usernames and passwords to generate log-in credentials that are then used in an automated process. If these attack campaigns are distributed and slow enough, it can be hard to block them.
The problem with username/password lists is that they often contain valid credentials that have been stolen in a random attack. If only one user in your organization has been affected by such a credential theft, and they are using their usernames and passwords for various services, a brute-force or password-spray attack might be successful. Figure 5-15 shows that the threat is a real threat, not a theoretical one. On February 14, 2022, a machine called Contoso-Linux-VM was started with an exposed SSH management port (port 22). Without doing anything else but starting the VM, Microsoft Defender for Cloud fired the Failed SSH brute force attack alert because someone had tried (but failed) to get access to our machine!
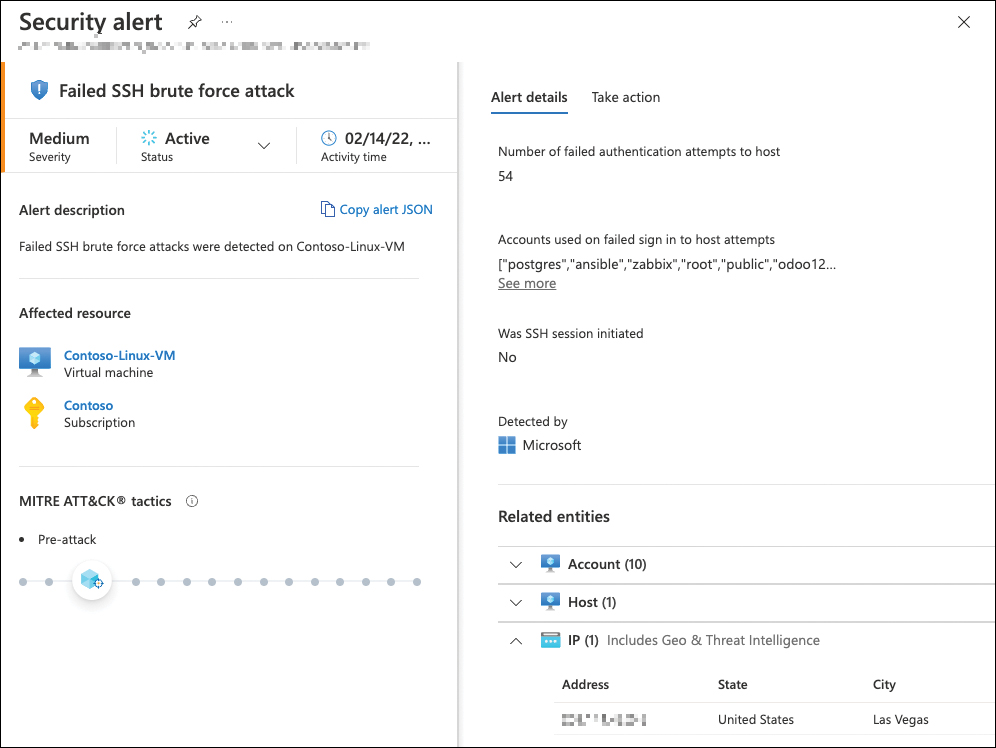
FIGURE 5-15 Failed brute force attack as a result of exposed management ports
Because of its importance, the Secure Management Ports control counts a total of 8 points toward your overall Secure Score. It contains three different recommendations, as shown in Figure 5-16 and listed below.

FIGURE 5-16 Recommendations in the Secure management ports control
Management Ports Should Be Closed On Your Virtual Machines
Management Ports Of Virtual Machines Should Be Protected With Just-In-Time Network Access Control
Internet-Facing Virtual Machines Should Be Protected With Network Security Groups
The third recommendation (Internet-Facing Virtual Machines Should Be Protected With Network Security Groups) is essential for the other two because network security groups (NSGs) are used on both network interface cards (NICs) and subnet configurations to restrict communications between resources that are connected to Azure Virtual Networks (VNets). Defender for Cloud will verify whether an NSG exists on either the VM’s NIC or subnet and then create a recommendation accordingly.
The two other recommendations help you focus on closing exposed management ports on your machines. If an NSG exists on either the NIC or subnet, Defender for Cloud will assess whether there’s a rule that denies external access to management ports such as 22 for SSH or 3389 for RDP. If external access to your machine is allowed, you’ll see this particular machine listed as unhealthy regarding both recommendations. Now you have two options: You can either manually create an NSG rule that completely denies external access, or you can configure just-in-time VM access for that machine, a feature that we will cover in Chapter 8, “Enhanced security capabilities.” Whichever way you choose, once you have made sure that external access to your management ports is blocked, both recommendations will show the machine as healthy.
To manually create a rule that prevents external resource access, follow these steps:
Open the Azure portal and sign in with a user who has Security Admin privileges.
In the search bar, enter Defender, and then click Microsoft Defender For Cloud.
In the Defender for Cloud navigation pane, select Recommendations.
Look for the Secure Management Ports control and select the Management Ports Should Be Closed On Your Virtual Machines recommendation.
Click the name of a VM to which you want to block access. You are now redirected to the VM’s network configuration.
You can either remove an existing allow rule for your management port (which will remove all management access), make the existing rule less permissive by restricting access to only a range of source IP addresses, or click the Add Inbound Port Rule button to create a new rule that will block external access to your machine’s management ports.
For the Source, select Service Tag, and for the Source Service Tag select Internet. For the Destination Port Range, make sure to enter your machine’s management port(s), either as a range (such as 1024-65000) or as a comma-separated list. Set the Action to Deny, and make sure to enter a higher Priority than you have for an existing allow rule, as shown in Figure 5-17.
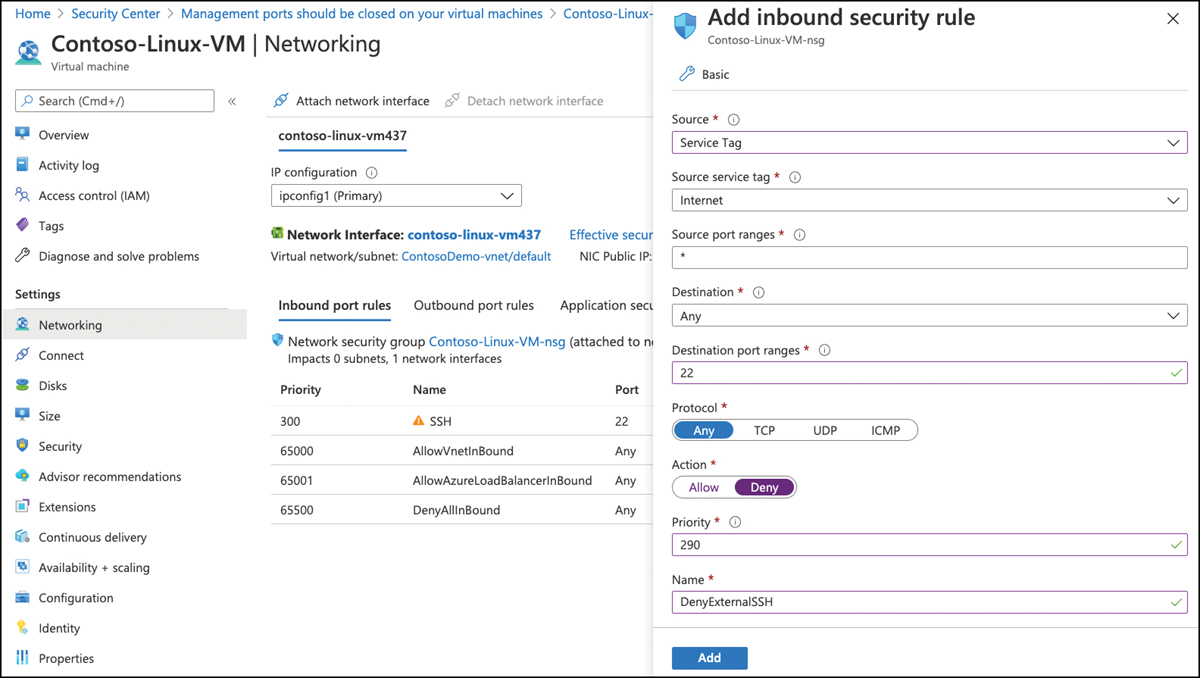
FIGURE 5-17 Adding an inbound security rule
Click the Add button. It will now take up to 24 hours for Defender for Cloud to reassess the machine’s network configuration and show it as healthy regarding both recommendations.
Apply system updates
System updates are the next important topic to focus on. This control counts an additional 6 points toward your overall Secure Score. Defender for Cloud will use the Log Analytics agent to determine if a machine’s operating system is missing updates, or if the machine needs to be restarted in order to apply recently installed updates. Depending on the assessment result, Defender for Cloud will then come up with some recommendations, as shown in Figure 5-18.
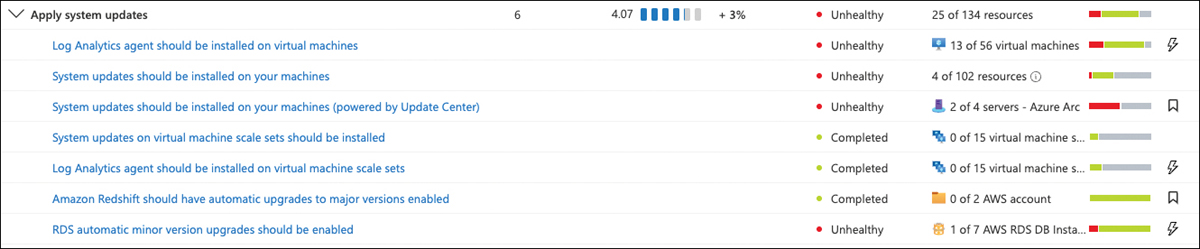
FIGURE 5-18 Recommendations within the scope of system updates
For Defender for Cloud to be able to assess your machines’ OS states, the Log Analytics agent needs to be installed on any type of server you are monitoring, such as Azure VMs, Azure Arc-enabled machines, and VMSS. Also, the Log Analytics agent needs to properly collect security-related information and send it to the configured Log Analytics workspace. Once the Log Analytics agent is working as expected, Defender for Cloud will scan your machines for outstanding update installations or outstanding reboots and reflect the assessment results in its recommendations. If system updates need to be installed, you will see the missing updates as Findings, as shown in Figure 5-19.
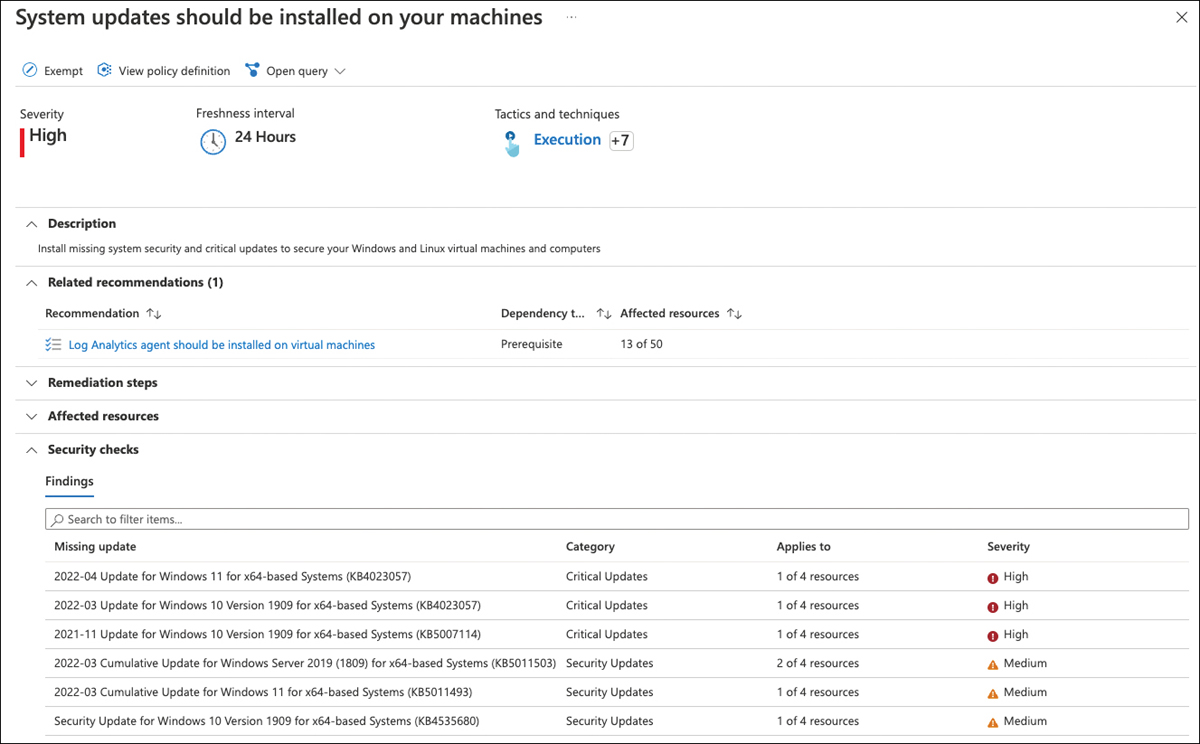
FIGURE 5-19 Missing system updates on several machines
You can click each missing update to see more details about the update, including remediation information.
Remediate vulnerabilities
The remediation of vulnerabilities is another major task to focus on when remediating recommendations that apply to compute resources. The Remediate Vulnerabilities security control counts as a maximum of 6 points toward your overall Secure Score. The collections of recommendations you see within the Remediate Vulnerabilities control will vary depending on the resource types you have deployed to your environment. Figure 5-20 shows the Remediate Vulnerabilities control with several recommendations, some of which already are completed and some of which are remediated on some resources.
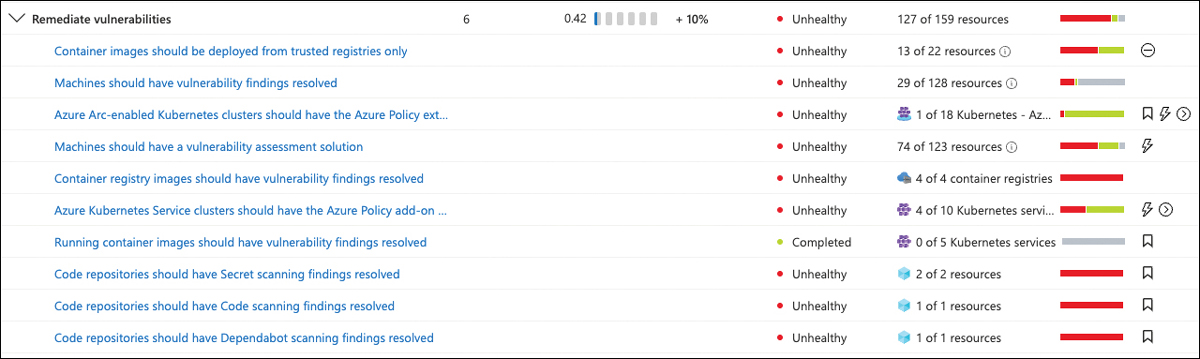
FIGURE 5-20 Recommendations within the Remediate vulnerabilities security control
Vulnerabilities on servers and other compute resources are assessed by an external vulnerability assessment solution. This is when Defender for Cloud’s Vulnerability Assessment integrations come into play for the Cloud Security Posture Management scenario. Microsoft Defender for Servers will allow you to either use the integrated Qualys vulnerability assessment solution on your servers, or to leverage Microsoft Defender for Endpoint’s Threat and Vulnerability Management (TVM). Also, Microsoft Defender for Containers allows you to scan your container registries for vulnerable images, and Microsoft Defender for SQL will allow you to activate vulnerability assessments on your SQL servers, both of which also are powered by Qualys. For more information about the different Defender for Cloud plans, see Chapter 6, “Threat detection.” To enable one of the Defender for Cloud plans, follow these steps:
Open the Azure portal and sign in with a user who has Security Admin privileges.
Open Microsoft Defender For Cloud.
In the left navigation pane, click Environment Settings.
Select the subscription on which you want to activate the Defender for Cloud plan.
Switch the Defender for Cloud Plan you want to activate to On, as shown in Figure 5-21.
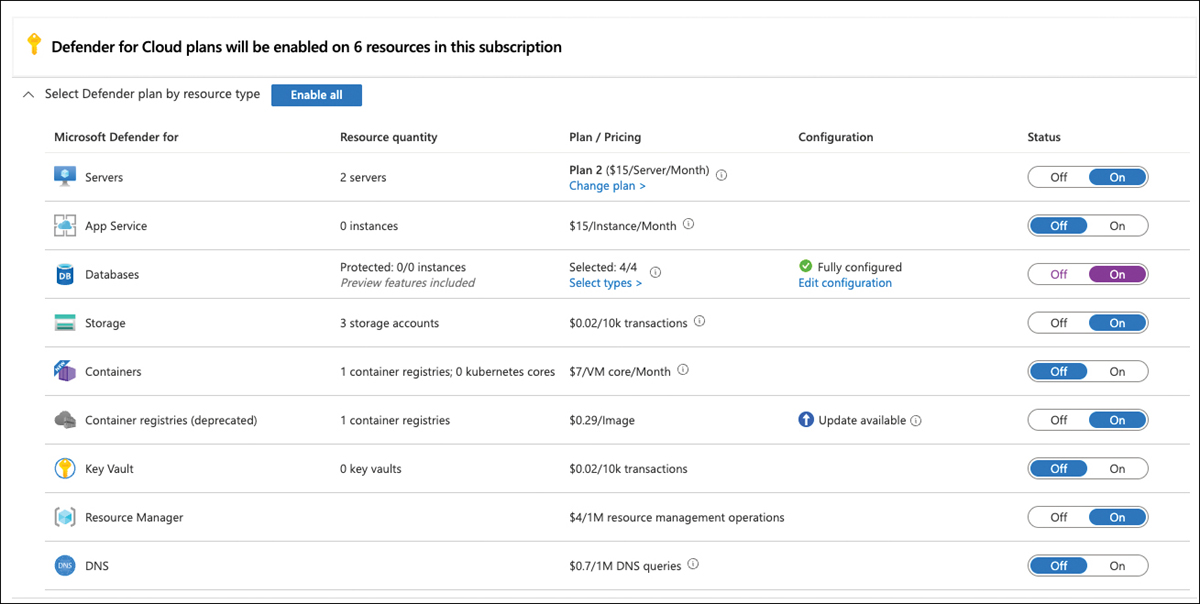
FIGURE 5-21 Select Defender for Cloud Plans
Click Save.
Once you have activated Defender for Servers, you are eligible for using the integrated Qualys VA solution at no additional cost. Also, you can rely on Microsoft Defender for Endpoint’s Threat and Vulnerability Management (TVM). Alternatively, you can deploy an external Qualys VA solution in a Bring-your-own-license (BYOL) scenario if you decide not to use Defender for Servers or if you want to integrate your servers into an existing Qualys environment. The Machines Should Have A Vulnerability Assessment Solution recommendation comes with a Fix capability that enables you to remediate the recommendation with some easy steps directly from the Recommendations overview in Defender for Cloud. To enable one of the integrated solutions, follow these steps:
Open the Azure portal and sign in with a user who has Security Admin privileges. Also, your account needs Write Permissions for any VM on which you want to deploy the Qualys VA extension (or enable TVM).
Open Microsoft Defender For Cloud.
In the navigation pane, click Recommendations.
Open the Remediate Vulnerabilities control and click the Machines Should Have A Vulnerability Assessment Solution recommendation. You can look at the automated remediation logic that is triggered by the fix capability in the recommendation by opening the Remediation Steps section and then clicking Quick Fix Logic, as shown in Figure 5-22.
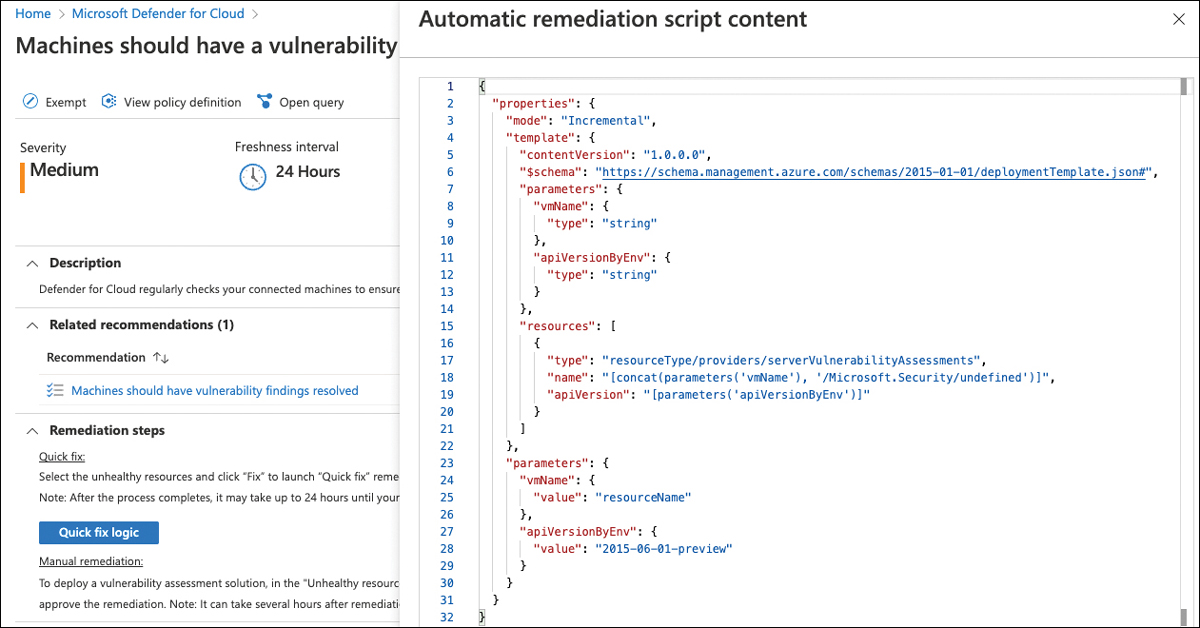
FIGURE 5-22 Remediation logic that is triggered by the Quick fix capability
Select one or several machines to deploy a vulnerability assessment solution to and click Fix.
You can now choose to deploy Threat and Vulnerability Management By Microsoft Defender For Endpoint or Integrated Vulnerability Scanner Powered By Qualys or configure a new third-party solution, which is the BYOL scenario. Select the desired solution, as shown in Figure 5-23, and then click Proceed.
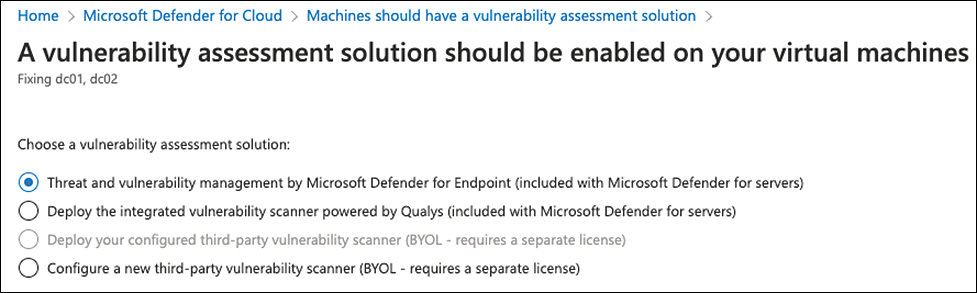
FIGURE 5-23 Deploy a vulnerability assessment solution to your machines
You will see a deployment summary and can start the deployment by clicking the Fix n Resource(s) (where n represents the number of resources) button.
More Info
Learn more about the integrated Qualys VA solution at https://aka.ms/MDfCQualysVA. More information about TVM integration in Defender for Cloud can be found at https://aka.ms/MDfCTVM.
If you have remediated all recommendations within the five security controls we have discussed so far, you have already achieved an overall Secure Score of 58.6 percent (10+4+8+6+6/58=0,5862). Congratulations!
Additional recommendations for Container Security
Microsoft Defender for Cloud comes with a bunch of recommendations that are especially focused on container images in Azure Container Registries and containers running on Kubernetes clusters, such as Azure Kubernetes Services (AKS). You have seen some of these recommendations in the preceding sections already, but there are a lot more that you can find using the new filtering option.
To see recommendations that apply to container registries and Kubernetes clusters only, select Container Registries, Kubernetes Services, and Kubernetes–Azure Arc as resource types in the recommendations filter, as shown in Figure 5-24.
Recommendations for containers are either focused on vulnerability management or environment hardening. Defender for Cloud will continuously monitor your Docker configuration and your Kubernetes clusters, and it will create recommendations for workload protection based on Kubernetes admission control. These recommendations are then added to the respective security controls, such as Remediate Vulnerabilities, Apply System Updates, or Remediate Security Configurations.
Container image scanning is one of the advanced capabilities that comes with Defender for Containers. Once you have enabled the Defender for Containers plan on your subscription, container images will be scanned once they are pushed to the Azure Container Registry, whenever they are pulled, and periodically afterward to ensure vulnerabilities that recently have been discovered are also found in existing images. You will learn more about detecting threats in container environments in Chapter 6.
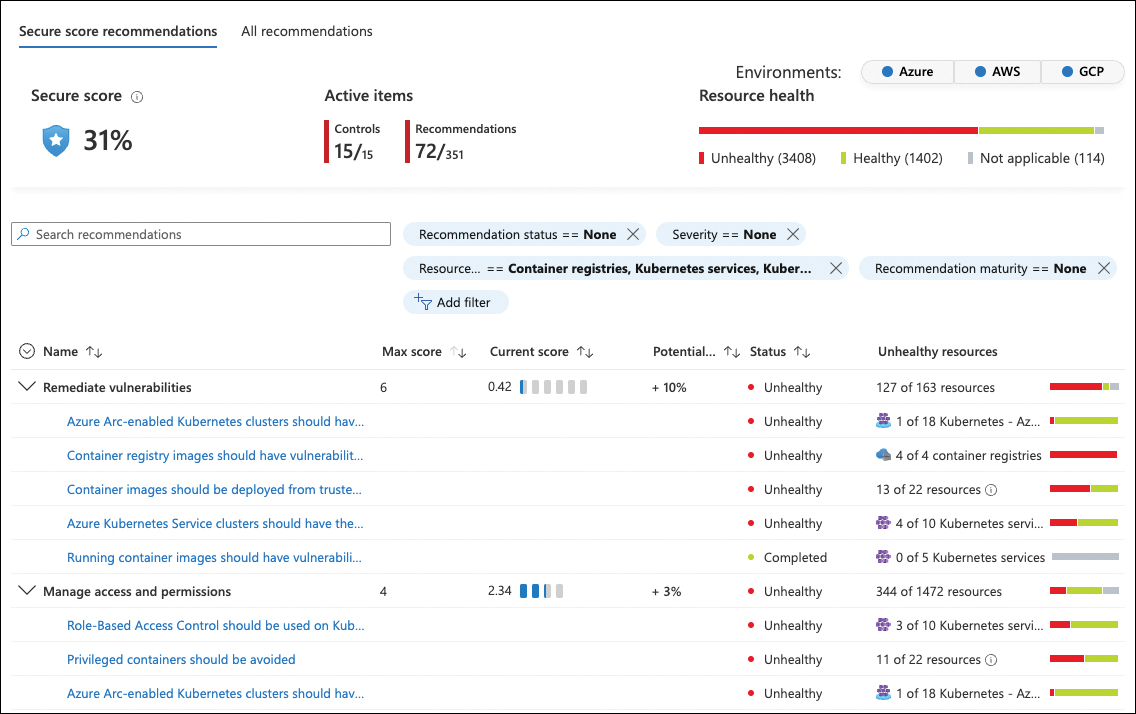
FIGURE 5-24 Recommendations that apply to containers
Enable endpoint protection
After making sure you have protected your organization’s identities and closed the management ports on your machines, you have already made a huge step toward securing your environment from unauthorized access. The problem with malware is that it can be installed by both unauthorized actors and inadvertently—or on purpose—by legitimate users within your organization.
Once a machine is compromised, it might start downloading further malware, opening new attack vectors and helping bad actors in other ways to get a foot into your environment. This is when the Enable Endpoint Protection control comes into play. This control will add two more points toward your overall Secure Score once it is taken care of. As you can see in Figure 5-25, this control also includes the same recommendations for the Log Analytics agent that you already know from the apply system updates control.
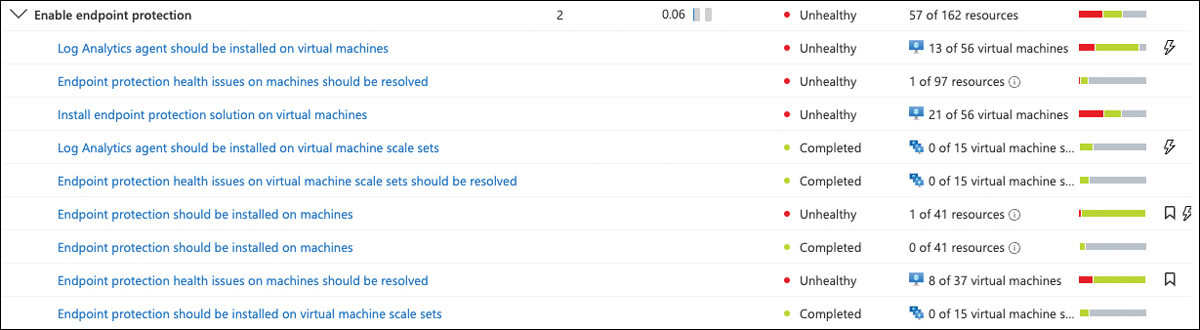
FIGURE 5-25 Enable endpoint protection
The reason for this recommendation being shown multiple times is that Defender for Cloud will also need the Log Analytics agent for assessing whether an endpoint protection solution has been installed on a machine, and if so, if the endpoint protection solution is working properly. Defender for Cloud will discover the following endpoint protection solutions:
Microsoft Defender Antivirus for Windows Server 2016 or later
Microsoft Defender for Endpoint for Linux on Linux Server Family
System Center Endpoint Protection (Microsoft Antimalware) on Windows Server 2012 R2
Trend Micro – Deep Security on the Windows Server Family
Symantec v12.1.1100+ on the Windows Server Family
McAfee v10+ on the Windows and Linux Server Families
Sophos v9+ on the Linux Server Family
Microsoft Defender Antivirus is included in the operating system as of Windows Server 2016 and, therefore, does not require further installation. But if there is a Windows Server 2012 R2 machine without an endpoint protection solution installed, you can use Defender for Cloud to install the Microsoft Antimalware directly from the portal. To install the extension to your machines, follow these steps:
Open the Azure portal and sign in with a user who has Security Admin privileges. Also, your account needs Write Permissions for any VM on which you want to deploy the Microsoft Antimalware extension.
Click Microsoft Defender For Cloud.
In the navigation pane, click Recommendations.
Open the Enable Endpoint Protection control and click the Endpoint Protection Should Be Installed On Your Machines recommendation.
Select the VM(s) on which you want to install the extension and click Install. You will realize that you can only see Windows Server VMs that support installation of the Microsoft Antimalware extension.
Select Install On n VMs (where n represents the number of resources), and then select Microsoft Antimalware and click Create.
If you wish, you can now exclude files, folders, file extensions, or processes and also define a scheduled scan (see in Figure 5-26). Then click OK to start the extension deployment.
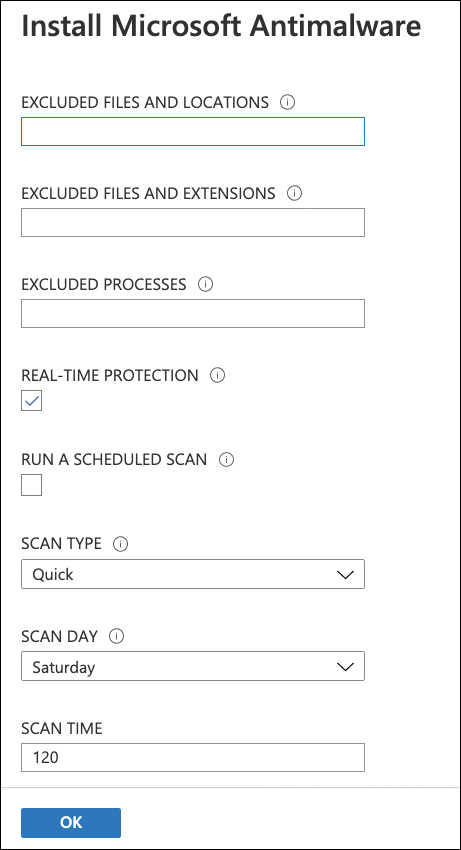
FIGURE 5-26 Configure antimalware settings
More Info
For more information and further references, see https://aka.ms/MDfCEnableEndpointProtection.
Networking
An Azure virtual network is a logical isolation of the Azure cloud dedicated to your subscription. Defender for Cloud will identify the Azure virtual networks available in your subscription, and it will provide recommendations to improve the overall security. Besides networking recommendations, Defender for Cloud has some advanced capabilities that are enabled once you enable Defender for Servers. In the Defender for Cloud navigation pane, click Workload Protections to open the Workload Protections dashboard. In the Advanced Protection section, you will find the Adaptive Network Hardening and Network Map tiles, as shown in Figure 5-27.
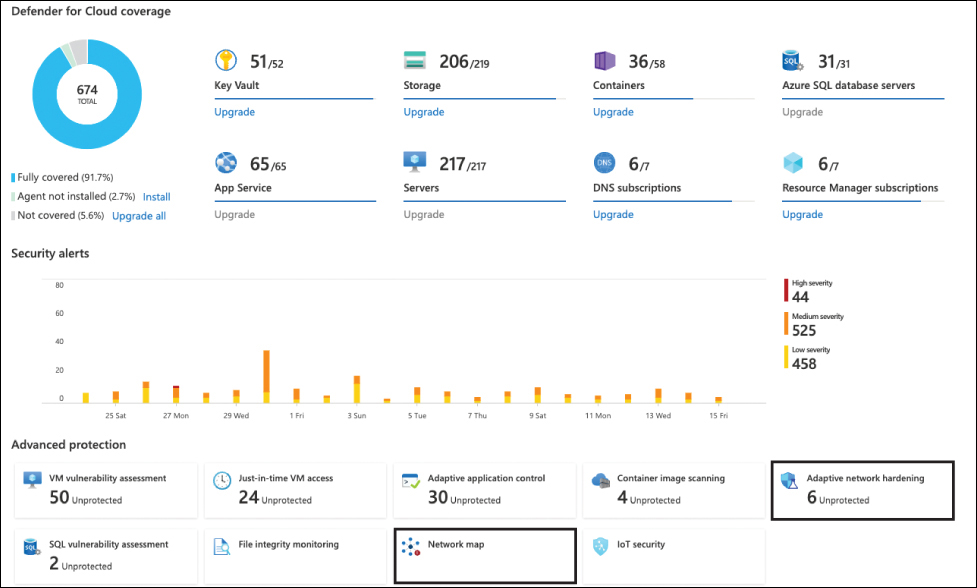
FIGURE 5-27 Defender for Cloud advanced protection capabilities
Network map
The Network Map appears when you click the respective tile on this page. This option allows you to view the topology of your Azure network and the traffic pattern, as shown in Figure 5-28.
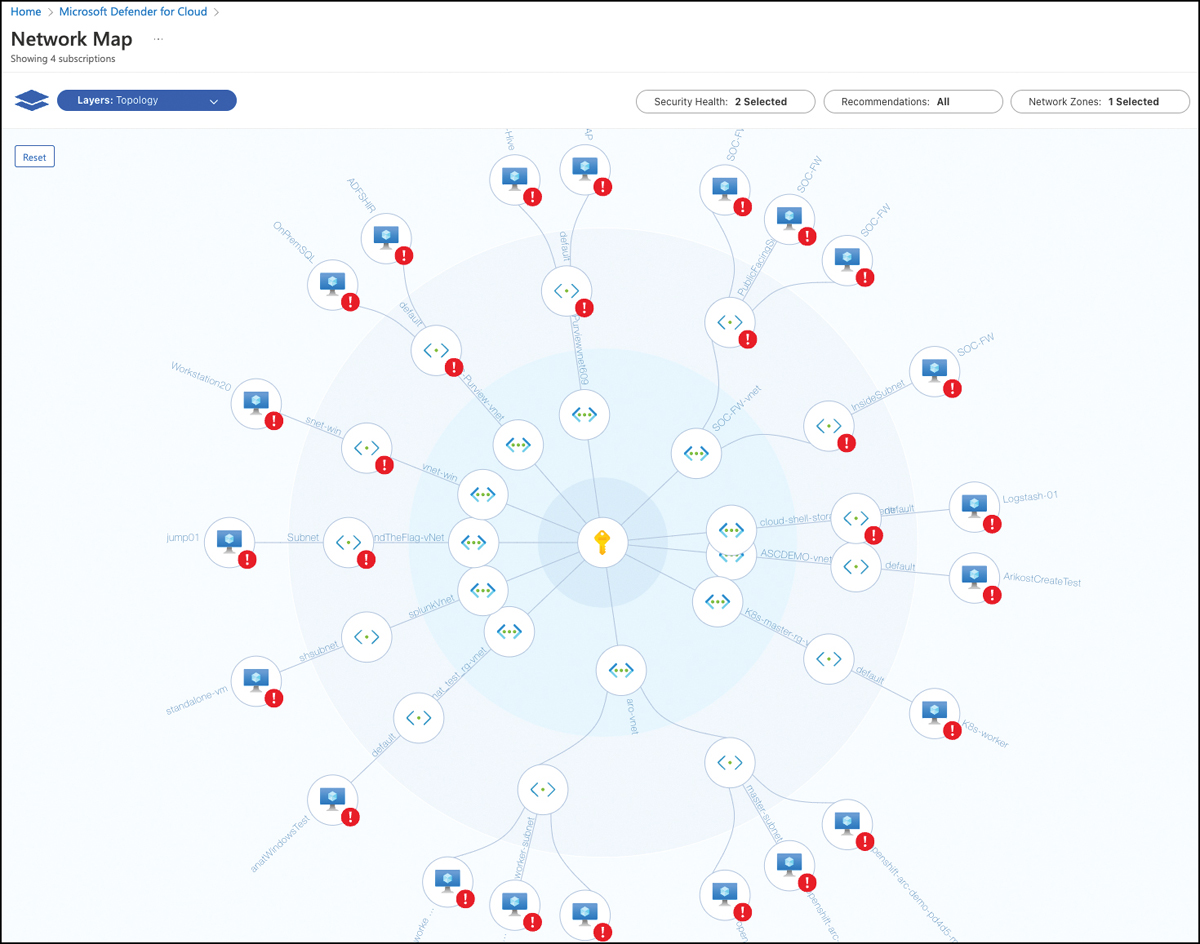
FIGURE 5-28 Network Map showing the Azure network topology for the selected subscription
This map is organized from inside-out, with the subscription shown in the middle, then working outward, you see the Azure VNet, the subnet, and the Virtual Machine (VM) connected to that subnet. The default visualization includes some filters that can be adjusted:
Security Health This is based on severity level (high, medium, low, or healthy) of your Azure resources.
Recommendations These are based on the active recommendations for those resources.
Network Zones These are based on internal or Internet-facing resources (or both).
If you hover the mouse over each icon, you will see more information about that object, and if you click one of those VMs, you will see more details about the VM itself, as shown in Figure 5-29.
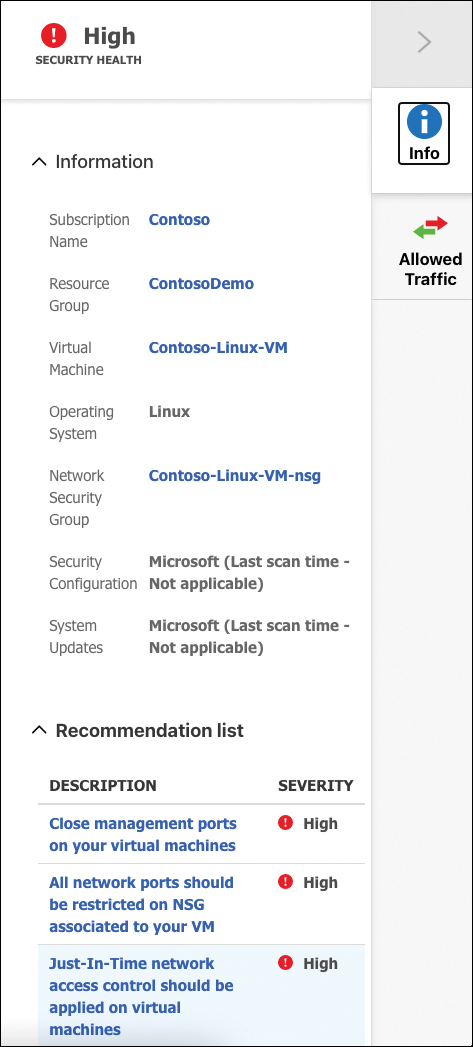
FIGURE 5-29 Properties in the Network Map
On this blade, you have important information about the selected VM, and a list of relevant recommendations is shown at the bottom of the page. On the right side, you can switch to the Allowed Traffic tab. On this tab, you have two tables with the list of TCP and UDP ports open for inbound and outbound traffic. This provides better visibility of the traffic allowed for that specific machine. If you want a broader view of the current possible traffic between your resources, you can switch to the network map view to show not only the network topology, but also possible allowed traffic between resources by selecting Allowed Traffic in the Layer selection in the upper left corner. By switching to this view, you see the same map, but now it shows your configured rules, defining which resources can communicate with other resources.
Adaptive network hardening
The intent of this feature is to enable you to easily harden your network traffic by using Network Security Group (NSG) rules. Defender for Cloud will use machine learning to gather information about the network traffic from/to a machine. After learning about the traffic pattern, Defender for Cloud will suggest a list of rules for hardening the network environment.
When you click the Adaptive Network Hardening tile in Defender for Cloud’s Workload Protections blade, you will see the Adaptive Network Hardening Recommendations Should Be Applied On Internet Facing Virtual Machines recommendation, as shown in Figure 5-30.
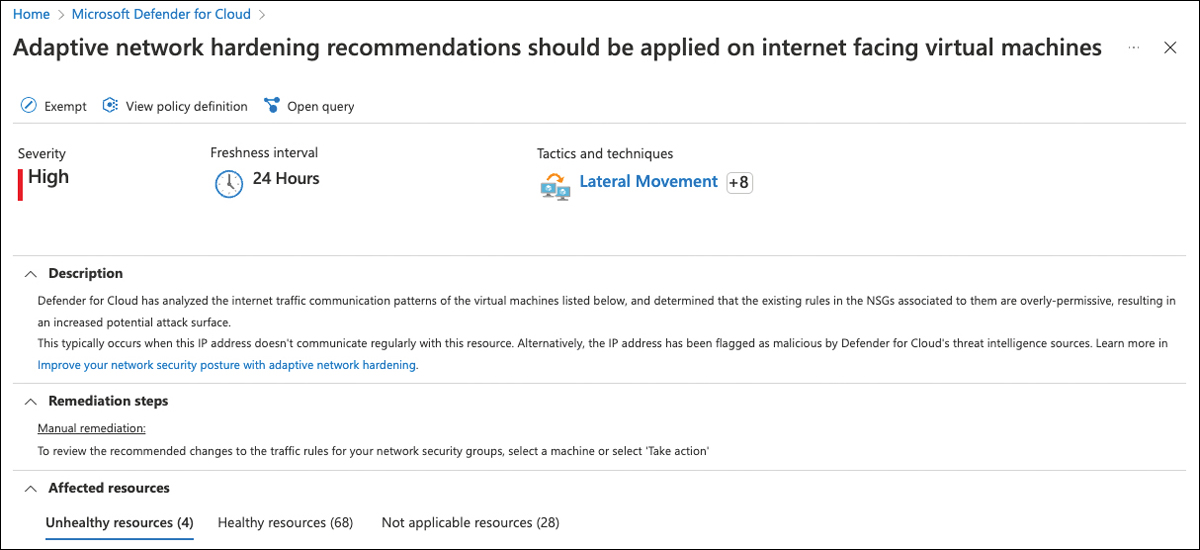
FIGURE 5-30 NSG Hardening dashboard showing the configured VMs
Unhealthy Resources shows the number of VMs with network-hardening recommendations that should be applied. You can click each VM and see the current rules and alerts, as shown in Figure 5-31.
Under the Rules tab, you see the rules automatically created by the Adaptive Network Hardening capability based on the learning process. You can click the Add Rule button to create a new rule, or you can select the suggested rule and click the Enforce button. To see the alerts, you can click the Alerts tab and select the alert itself.
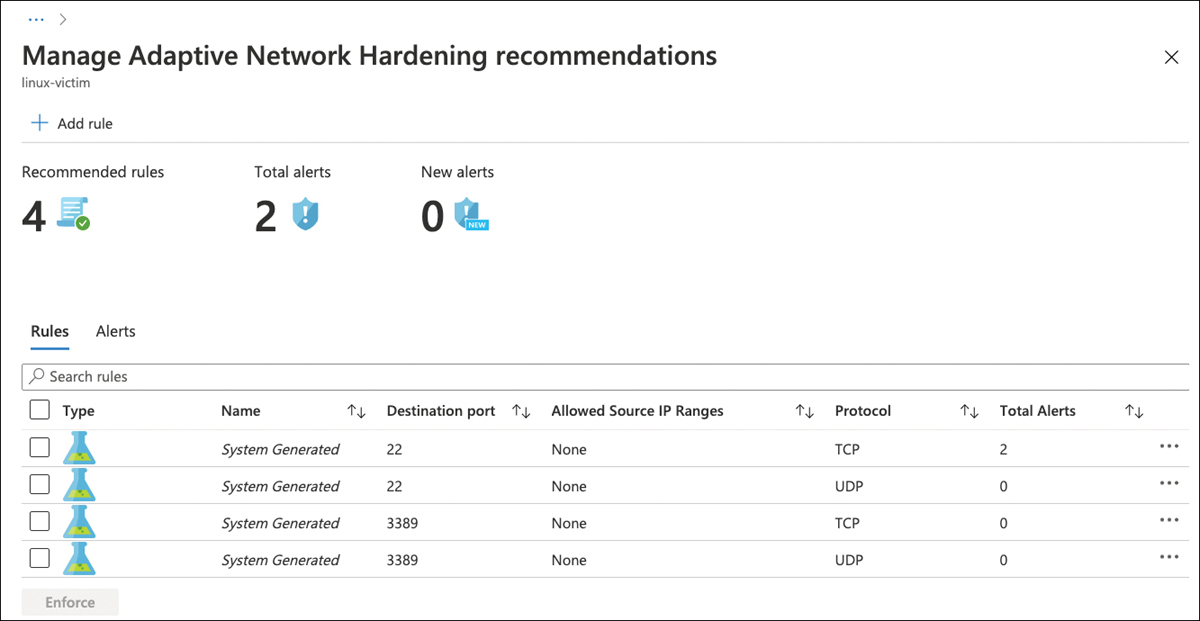
FIGURE 5-31 Hardening policy with visibility for alerts and rules
There will be some cases in which the Adaptive Network Hardening algorithm won’t be able to run, and the Unscanned Resources tab will appear. Following are the scenarios under which the Adaptive Network Hardening algorithm won’t be able to run:
VMs are Classic VMs Only Azure Resource Manager VMs are supported.
Not enough data is available To produce accurate traffic-hardening recommendations, Defender for Cloud requires at least 30 days of traffic data.
VM is not protected by Defender for Servers This feature is only available in the Microsoft Defender for Servers P2 plan.
The following section includes examples of recommendations that can be remediated directly through the Defender for Cloud dashboard.
Data and storage
One of the ultimate goals of an attacker is to gain access to a target’s data. Therefore, it is important to address all security recommendations for storage (where the data is located) and for the data itself.
Defender for Cloud meets these requirements by providing security recommendations for databases, storage accounts, Redis, Data Lake Analytics, and Data Lake storage. Storage and data recommendations vary depending on the environment. To see a list of data and storage recommendations that apply to your environment, select all respective resource types in the recommendations filter. The following sections cover the implementation of some of these recommendations.
Secure transfer to storage accounts should be enabled
Secure transfer is an option that enforces a storage account to only accept requests that are using secure connections (HTTPS). Using HTTPS for all connections enforces authentication between the storage account and the requesting service and makes sure that data in transit is always encrypted and protected from network layer attacks, such as man-in-the-middle, or session-hijacking. You can deny the creation of unsecure storage accounts directly from this recommendation, and you can also auto-remediate existing accounts using the Quick Fix capability, as shown in Figure 5-32.
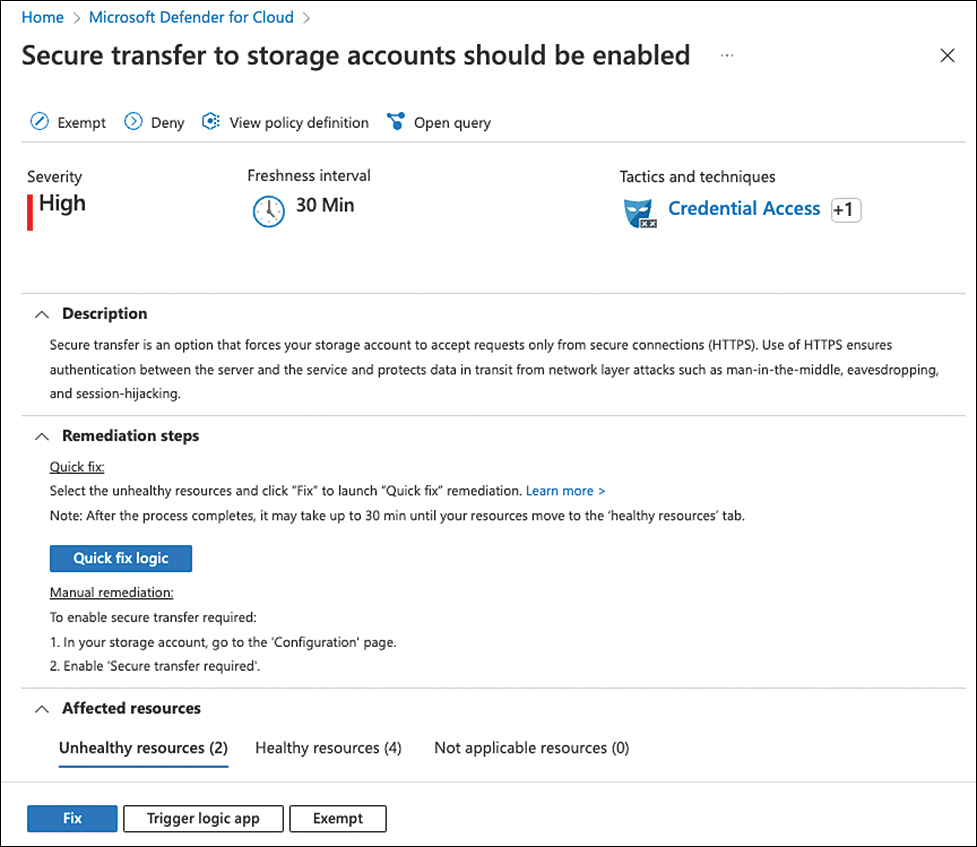
FIGURE 5-32 Secure transfer to storage accounts should be enabled
Enable auditing on SQL server
Defender for Cloud can perform a security assessment to verify whether you are leveraging Azure SQL auditing and threat detection security capabilities. Auditing and threat detection can assist you with the following tasks:
Maintaining regulatory compliance
Understanding database activity
Gaining insight into discrepancies and anomalies
Identifying security violations
Because of this integration with Azure SQL, this recommendation enables you to apply the remediation directly from Defender for Cloud. Follow these steps to address this recommendation:
From the Recommendations blade, open the Enable Auditing And Logging control, and choose Auditing On SQL Server Should Be Enabled.
On the Auditing On SQL Server Should Be Enabled blade, you will see the detailed explanation about this recommendation, Remediation Steps, and Affected Resources, as shown in Figure 5-33.
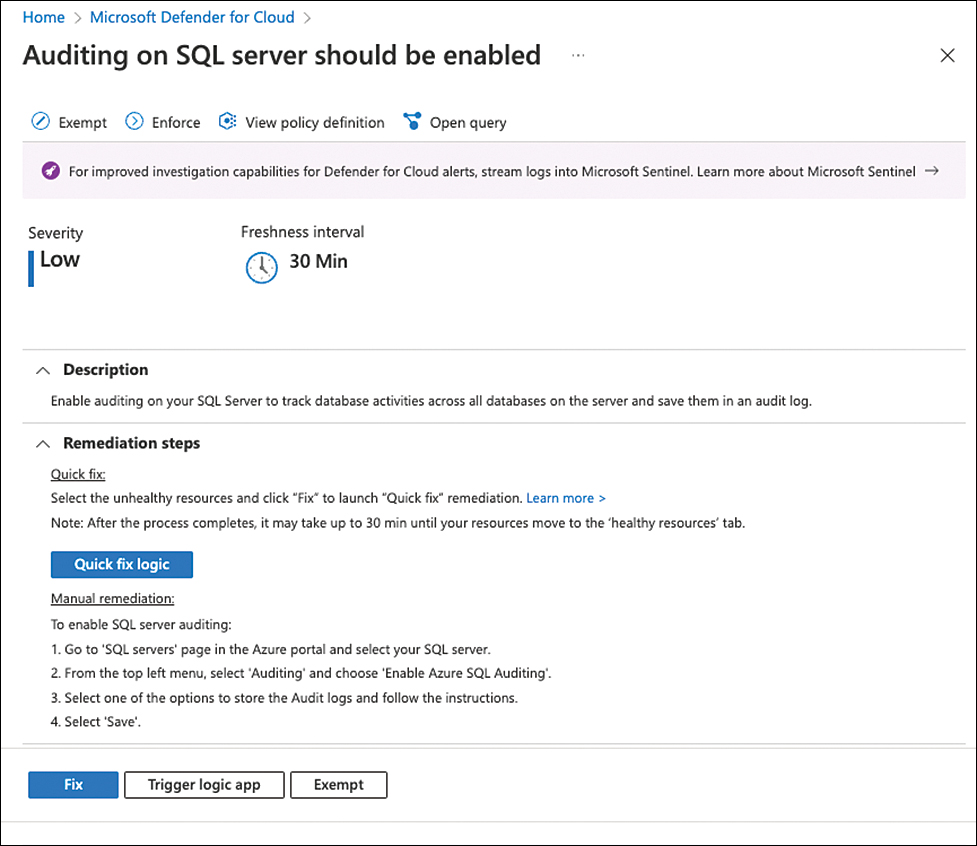
FIGURE 5-33 Details about the advantages of enabling auditing on the SQL server
Click the Unhealthy Resources tab at the bottom of this page to see the SQL servers affected by this recommendation.
Click the SQL server for which you want to remediate this recommendation, and the Auditing blade will open, as shown in Figure 5-34.
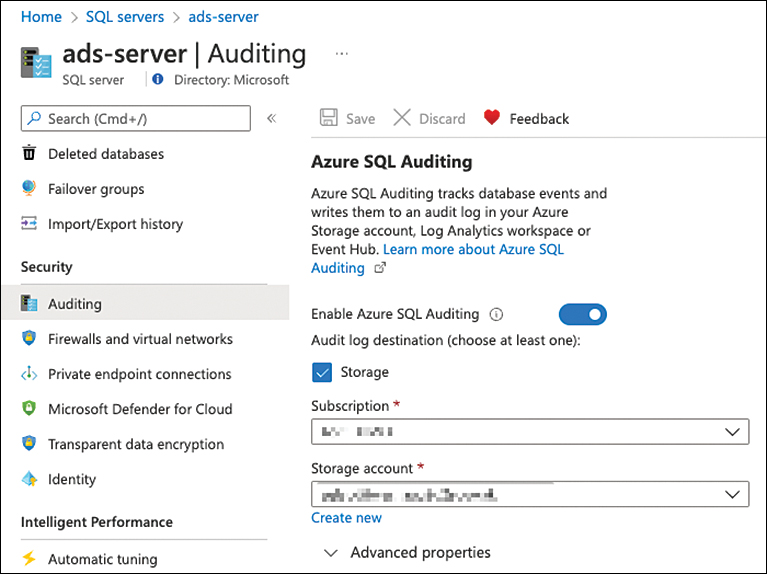
FIGURE 5-34 Remediating the recommendation by enabling auditing
Under Auditing, toggle the switch to On and select the audit log destination, and then click the Save button.
After the save has finished, close this blade.
Using workflow automation to remediate security recommendations
In Chapter 4 you learned that remediating security recommendations is more of a returning process than a one-time job and that it’s not enough to only cover existing resources. Besides using Deny- or Deploy if not exists-policies, Defender for Cloud offers a lot of automation capabilities that help you to auto-remediate recommendations or to remediate at scale.
Workflow automation is a capability that helps you to automatically react to either a new alert or a new recommendation. It leverages Azure Logic Apps as the automation artifact, and within the Logic App, you are offered almost unlimited possibilities to automate processes. The workflow automation feature brings additional trigger types to Logic Apps:
Recommendation The Recommendation trigger will start a Logic App Playbook in the following conditions:
A resource has been added to a recommendation as a result of an assessment
A resource status has changed within a recommendation as a result of an assessment, while the resource status can be healthy, unhealthy, or not applicable
A Logic App is manually triggered from a recommendation within Defender for Cloud
Security Alert The Security Alert trigger will start a Logic App Playbook in the following conditions:
A new security alert is created in Microsoft Defender for Cloud
From an alert, the Logic App is manually triggered
Regulatory Compliance Standards The Regulatory Compliance Standards trigger is triggered when a compliance control’s status within a standard is changed. The status in this case can be
failed,passed,skipped, orunsupported
The first trigger type will help you to create several types of automation artifacts. For example, you could let the Logic App create a JIRA or ServiceNow ticket if a new recommendation is created, or notify stakeholders about new resource exemptions. You could also auto-remediate or quarantine resources if they were part of a recommendation. Every time Defender for Cloud triggers the Logic App, it will send a bunch of information that you can use for further steps:
Name of the assessment as a GUID
Assessment ID
The recommendation’s display name
Metadata information for the recommendation, including a description, remediation steps, and severity
Resource details, including the resource ID
Status code (
healthy,unhealthy, ornot applicable)A deep link to the assessment result in the recommendations blade
This information can then be used within the Logic App, either for storing it or notifying someone but also to retrieve further information from other APIs, such as the different Microsoft Defender for Cloud REST API providers. Figure 5-35 shows a sample result that is sent from Defender for Cloud to the Logic App trigger.
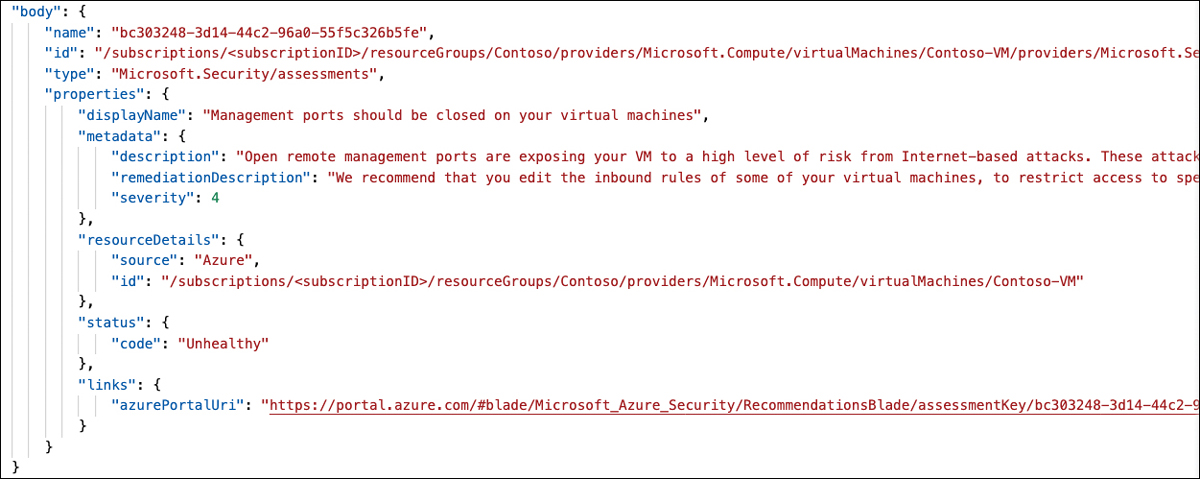
FIGURE 5-35 Information sent from Defender for Cloud to a Logic App within the scope of workflow automation
If you want to auto-remediate a resource, the information about the resource and the assessment/recommendation help you to determine the next steps. In the next section, you will find examples for manually and automatically triggered Logic Apps as a reaction on recommendations. Once you have built your Logic App, you need to create a workflow around it so Defender for Cloud can automatically trigger the Logic App without manual interaction. To create a workflow, follow these steps:
Open the Azure portal and sign in with a user who has Security Admin privileges. Also, your account must have write permissions for the target resource.
In the search bar, enter Defender, then open Microsoft Defender For Cloud.
In the navigation pane, select Workflow Automation, and then click + Add Workflow Automation.
Enter a Name, and select the Subscription and Resource Group in which the workflow configuration will be stored.
From the Defender For Cloud Data Types dropdown, you can choose between Security Alert, Recommendation, or Regulatory Compliance Standards. This setting will determine the trigger type on which the workflow will react. Notice that the blade will change depending on your selection.
Select Recommendation.
Select the recommendations to react on, the severity, and the recommendation state on which to trigger your workflow, as shown in Figure 5-36.
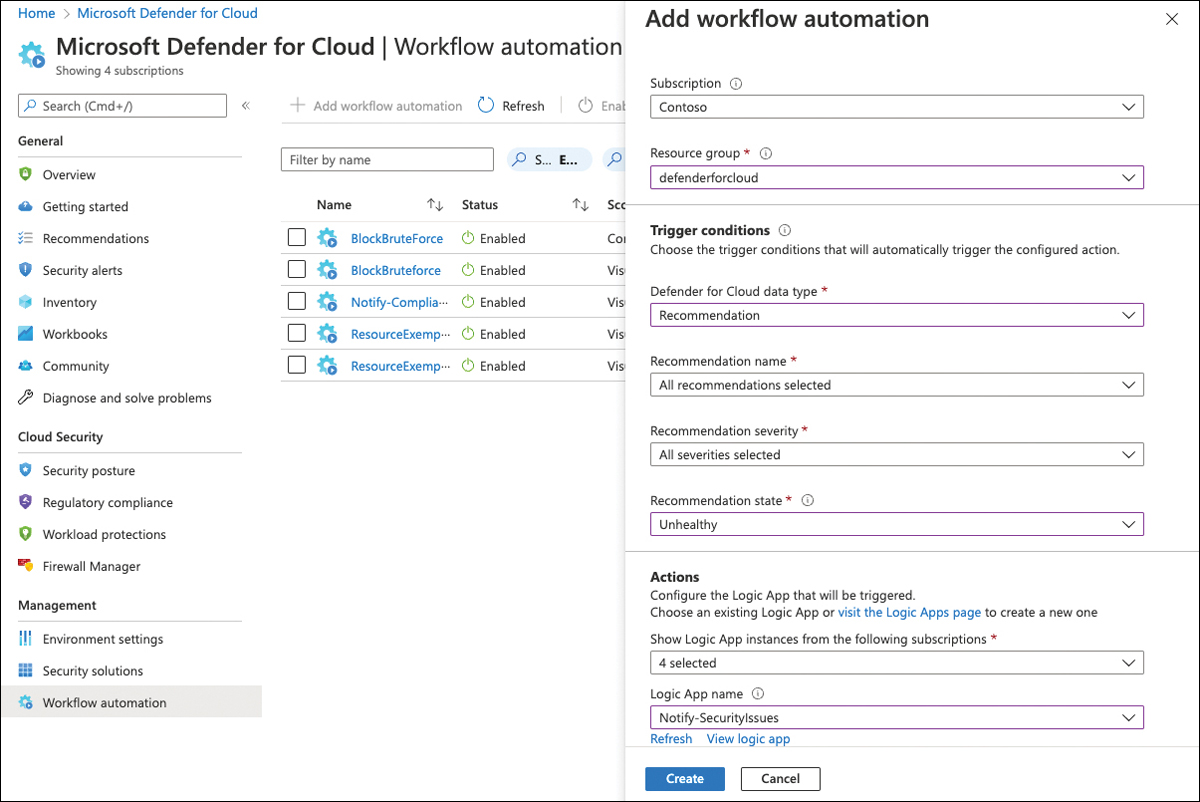
FIGURE 5-36 Add a workflow to Defender for Cloud
Select the Subscription in which you have created your Logic App and then select the Logic App from the dropdown. Click Create.
Once the workflow automation has been created, it will trigger the Logic App you’ve selected whenever the trigger condition is true. In Figure 5-36, this means that every time a resource is flagged as
unhealthyin any assessment, the Logic App will be triggered.
Resource exemptions and automation
Workflow automation and the capability to manually trigger Logic Apps directly from the Defender for Cloud blades offer a variety of options to enrich your ASC experience. In this chapter’s last section, we give you some ideas about what is possible with different connectors and API providers.
In order to create resource exemptions, a capability that we have discussed earlier in this chapter, your account needs to have elevated access rights: Security Administrator or Resource Policy Contributor. However, often users whose job it is to remediate security findings might have resource access rights so they can change the resources they are responsible for, but not administrative rights on subscriptions or governance aspects. In this case, they might want to but cannot exempt a resource from a recommendation because of the lack of access rights. With the Trigger Logic App capability, you can use a Playbook for them to request a resource exemption directly from the recommendation’s blade. Once the Trigger Logic App button is clicked and the Logic App is selected, Defender for Cloud will send information about the recommendation and the resource, which is enough to generate an email that is sent to the subscription’s security contact. Figure 5-37 shows an email body in the Logic App Designer, that contains dynamic values from the recommendations trigger.
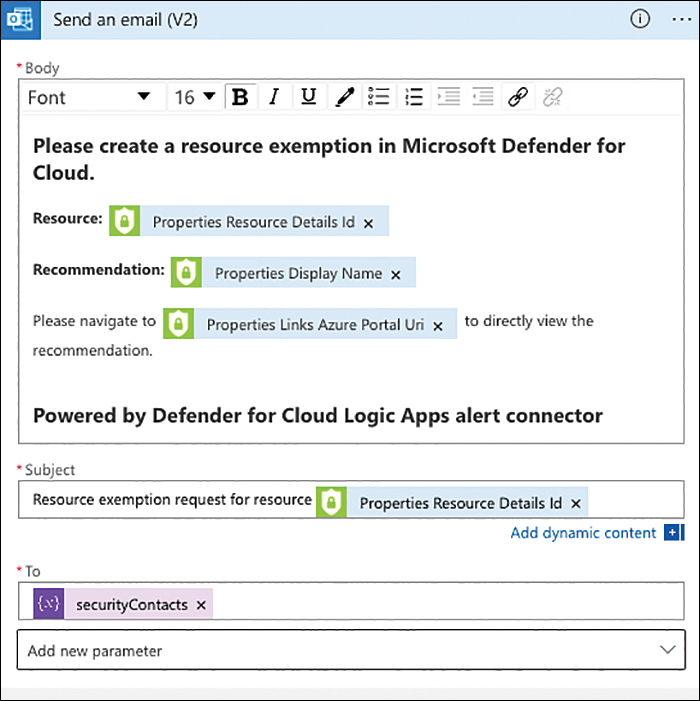
FIGURE 5-37 Email template that contains dynamic values from the Logic App trigger
To retrieve the security contacts that are used as the email recipients, the Logic App will pull the information from the Microsoft.Security/securityContacts API provider, as shown in Figure 5-38.

FIGURE 5-38 API connection in a Logic App
While this Logic App is not very difficult to create, it still offers a great benefit toward remediating security recommendations as it allows you to directly request an exemption without leaving Defender for Cloud at any time.
More Info
You can find more information about this Logic App and download it from the Defender for Cloud GitHub in our article at https://aka.ms/MDfCRequestResourceExemption.
Another automation within the scope of resource exemptions is the notification once a new exemption has been created. This artifact is a bit more complex because it demands to retrieve information from the Defender for Cloud trigger, as well as several API providers, including Azure Policy APIs.
Although resource exemptions are based on policy exemptions and, therefore, do not belong to either alerts or recommendations, we can still use the recommendations trigger to automatically react on them. This is because once you create a resource exemption, the resource status will change from unhealthy to not applicable.
Also, creating a resource exemption will add an exempt value to the cause attribute in the information that is sent to the Logic App. Figure 5-39 shows the properties coming from Defender for Cloud once a new exemption has been created.
With that being said, every time the Logic App is triggered, we first need to check if both conditions (status is NotApplicable and cause is Exempt) are true. If so, the Logic App will continue to pull information from the Microsoft.Authorization/policySetDefinitions and Microsoft.Authorization/policyExemptions API providers. Once you create a resource exemption, this exemption is created in Azure Policy and can then be retrieved from the policyExemptions API. It will contain information about the person who has created the exemption, so it is worth looking at. Unfortunately, there is no direct way of using the information coming from Defender for Cloud to pull exactly the one exemption that has been created and triggered the Logic App, so you need to take a detour over the policySetDefinitions provider. This provider will retrieve the Defender for Cloud Policy Initiative with all of its policy definitions (and their IDs), so we can compare the policy definition IDs from the initiative with the ID we get from the Logic App trigger. In Figure 5-39, you can see this information as policyDefinitionID in the metadata section.
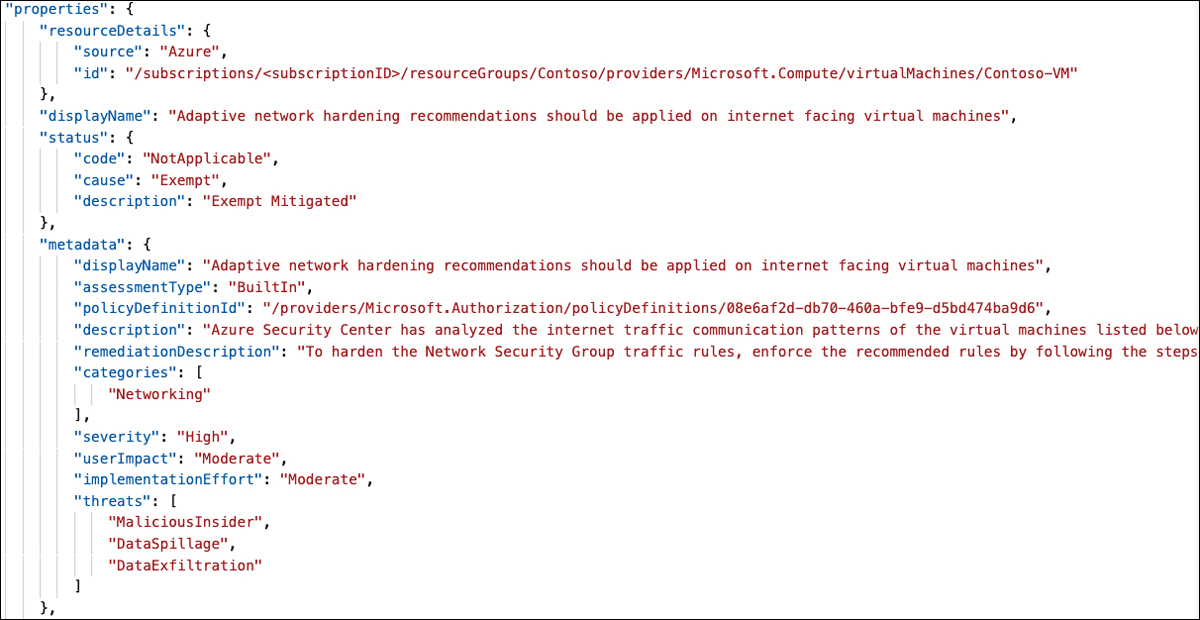
FIGURE 5-39 Assessment properties after a recommendation has been created
Once there is a match, the corresponding Policy Definition Reference ID from the initiative can be compared with the reference ID from the policy exemptions. Once there is another match, you know you have found the exemption that has just been created. Then you can export the exemption to Log Analytics and take its createdBy information together with the information coming from the trigger to send a notification email.
More Info
You can find more information about this Logic App and download it from the Defender for Cloud GitHub in our article at https://aka.ms/MDfCNotifyResourceExemption.
With their capability to work with other Azure resources, but also with APIs and third-party connectors, Logic Apps are a great way to enhance your Defender for Cloud experience. Now, it’s your turn to create your own Logic App within the scope of workflow automation. Let us know how it went and get it published at https://aka.ms/MDfCGitHub.
Security governance and contextual security
Often, the amount of security recommendations and resources these recommendations apply to becomes overwhelming. For example, when the Log4J vulnerability was disclosed at the end of 2021, you might have seen thousands of vulnerable machines in your environment reported by Defender for Cloud using one of the integrated vulnerability assessment solutions we discussed earlier in this chapter. With thousands of affected machines, you might have wondered where to start your remediations.
Also, we have seen companies struggle with responsibilities. Who owns a resource? Who is responsible for remediating high-severity vulnerabilities? Is there a team that ensures network configurations are in place?
This is why Microsoft implemented the two new concepts of security governance and contextual security into Microsoft Defender for Cloud.
Using security governance to create responsibility
Security governance is one of the new concepts added to Microsoft Defender for Cloud. Its goal is to create responsibility for remediating recommendations and vulnerabilities on resources in your hybrid and multicloud environments. One of the main aspects with security governance is ownership of recommendations. As mentioned before, the overall number of unhealthy resources and open security recommendations can easily become overwhelming in a company’s multicloud estate. By assigning owners to recommendations, it creates a responsibility. At the same time, you have a contact to reach out to in case remediation does not take place. Figure 5-40 shows the Owner (preview) tab in the Security Posture blade you already saw at the beginning of this chapter.
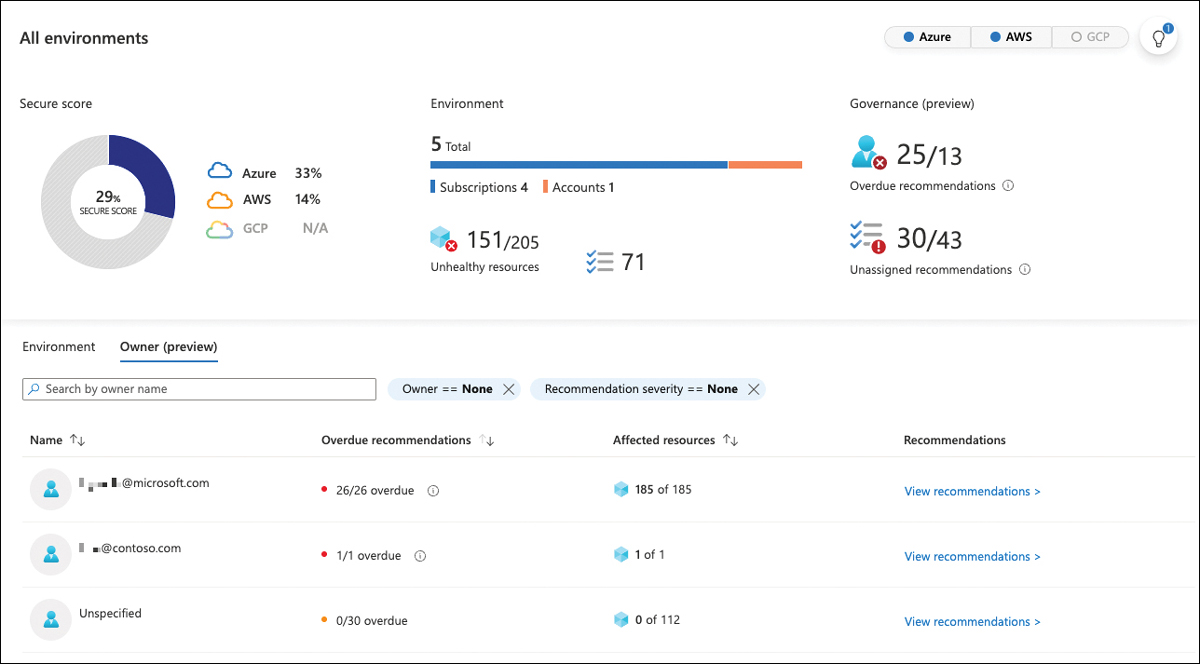
FIGURE 5-40 Different owners assigned to recommendations in Defender for Cloud
When you click the View Recommendations link next to a particular owner, you will see only recommendations to which this owner account is assigned.
In addition to ownership, Microsoft introduced the concepts of due date and grace period with security governance. By assigning a due date to a recommendation, you can make sure that the person who is responsible for its remediation has a defined amount of time to remediate security recommendations. Grace period, in this context, means that as long as the due date has not been reached (in other words, as long as the recommendation is not yet overdue), your Secure Score will not decrease.
Ownership, grace period, and due dates can either be assigned per each recommendation or by using governance rules. Figure 5-41 shows the Management Ports Of Virtual Machines Should Be Protected With Just-In-Time Network Access Control recommendation with an owner and due date assigned to some resources.
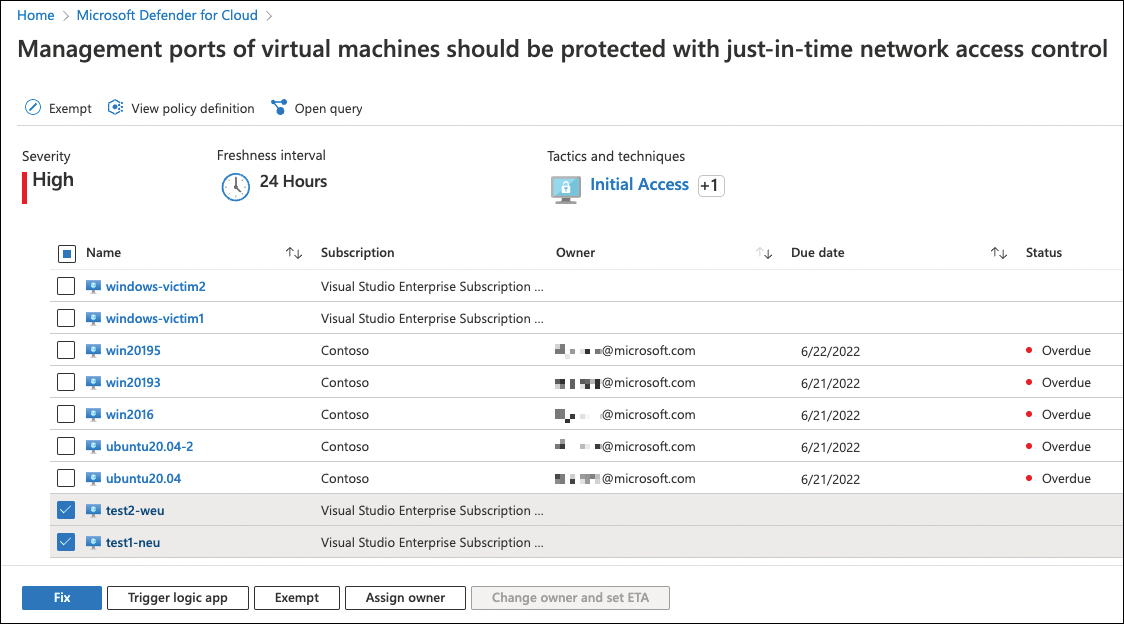
FIGURE 5-41 A recommendation with owner and due date assigned to some resources
As shown in Figure 5-41, there are some resources that do not yet have an owner assigned, but you can manually do so directly from any recommendation by following these steps.
In any recommendation’s details blade, select the unhealthy resources to which you want to assign an owner, then click the Assign Owner button on the bottom, as shown in Figure 5-41.
Enter an Owner, which should be a valid email address, and a Due Date. Optionally, enable the Apply Grace Period toggle, as shown in Figure 5-42.
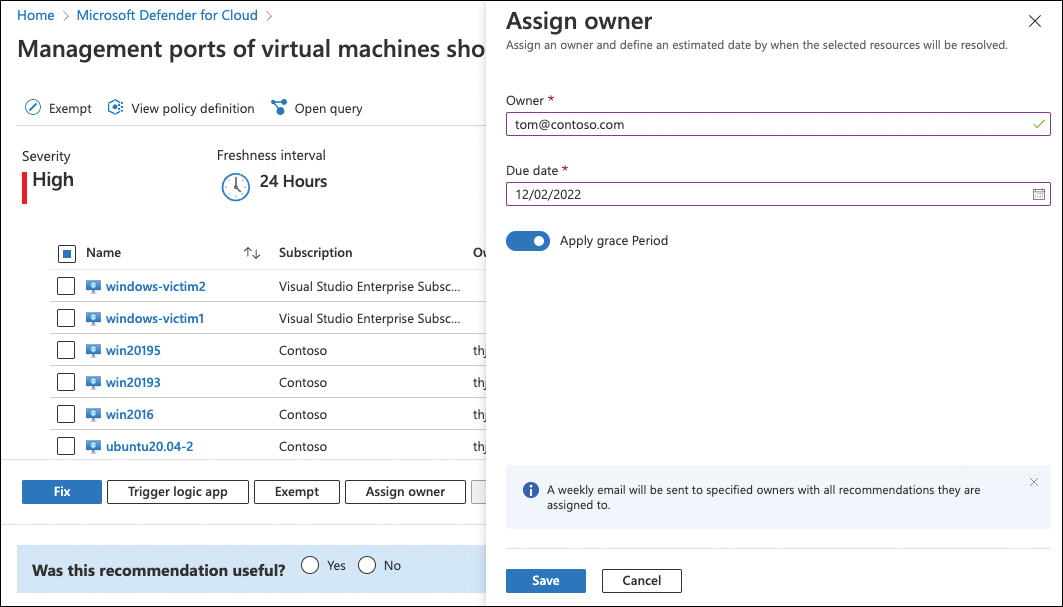
FIGURE 5-42 Assign an owner, due date and grace period
Click Save. The new owner and due date will be added to the same recommendation for the resources you selected, as shown in Figure 5-43.

FIGURE 5-43 A new owner and due date have been added to the recommendation
While this manual approach can be a perfect fit for changing existing owners and due dates, or for assigning an owner and date for resources that have not had an owner, yet. A better approach for enterprises at scale is to leverage governance rules. When writing this book, governance rules can only be applied to a subscription, but management groups will be supported in a future release. To assign a governance rule, follow these steps:
Log in to the Azure portal with an account that has Contributor, Security Admin, or Owner access rights.
In the top search bar, enter Defender, then click Microsoft Defender For Cloud.
In the Defender For Cloud navigation pane, select Environment Settings, then select the Azure subscription, AWS account, or GCP project for which you want to create a governance rule. Then, in the Policy Settings section, select Governance Rules (Preview).
Click + Add Rule on the top navigation bar to start creating a new governance rule. The Create New Governance Rule dialog box will appear, which allows you to configure a variety of settings. Enter a Rule Name, Description, and Priority. Governance rules with a lower priority will take precedence over rules with a higher priority.
Select which recommendations you want your rule to affect. Either select all recommendations by severity, such as all high-severity recommendations in your subscription, or define specific recommendations you want to be addressed by this governance rule. The latter option is perfect in scenarios such as assigning ownership to all MFA-related recommendations to one owner and all network-related recommendations to another one.
Select the method to assign an Owner to your governance rule. You can either enter a valid Email Address, or you can assign an owner By Resource Tag. The latter option is the more dynamic one, as it allows you to specify a Tag Key used in your environment. For example, in case you use an
Ownertag across all your resources and, as a value, you are using a valid email address, the governance rule can leverage this tag to assign ownership. That way, you can use a one-rule-fits-all approach. The governance rule will evaluate resources first, followed by resource groups and subscriptions, until the tag you specified is found. So, in case you assign the specified tag to resource groups or subscriptions instead of resources, the governance rule will assign the specified owner to all resources within this particular scope.Select the remediation timeframe. This is a time range relative to the date on which a governance rule is applied to a resource. As opposed to manually assigning an owner and due date, with a governance rule you can select 7, 14, 30, and 90 days only. For example, when you select 7 days as a remediation timeframe, the due date for each recommendation specified in step 5 will be 7 days after a resource has been flagged as unhealthy.
Decide whether you want to apply the grace period feature to your governance rule. If so, enable the Apply Grace Period switch.
Finally, select whether you want to notify owners and their direct managers weekly about open and overdue tasks. If so, a weekly email similar to the one shown in Figure 5-44 will be sent out.

FIGURE 5-44 A weekly governance status report email sent by Defender for Cloud
The direct manager is resolved from the corresponding Azure AD attribute.
Click Create.
Once a governance rule is applied to a subscription, it will cover all recommendations and resources in scope based on the rule’s configuration. It will also automatically apply to new future resources.
Find only your own recommendations
As you have learned, the owner is assigned based on a valid email address. Microsoft Defender for Cloud will use this information to find the corresponding user account in Azure AD. If there is a matching account with at least the Security Reader role’s access rights, you can use it in Defender for Cloud to only see recommendations for which you are responsible. Follow these steps to see only your recommendations:
Log in to the Azure portal with an account that at least has Security Reader access rights.
In the top search bar, enter Defender, and then click Microsoft Defender For Cloud.
In the Defender For Cloud navigation pane, select Recommendations.
In the recommendations view, enable the Show My Items Only (Preview) switch.
Alternatively, if you want to see another owner’s recommendations, use the Owner filter, and select the
owneryou want to track, as shown in Figure 5-45.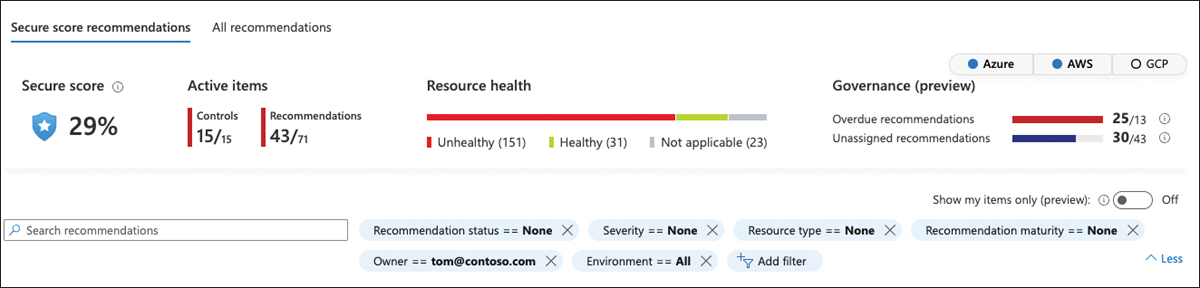
FIGURE 5-45 Filter recommendations by Owner
Using Attack Paths to focus on the right resources
Bringing recommendations into context is an important aspect of making educated decisions when it comes to remediating vulnerabilities and security recommendations. For example, when you have thousands of machines that are vulnerable for Log4J, you need to decide which machine to focus on first. Let’s assume among all vulnerable machines, you have three different types of machines in your organization:
Azure VMs that are not connected to the network or that cannot communicate with resources outside of their own VNet
Azure VMs that are only connected to the Internet but don’t have access to any other resources in your environment
Azure VMs that are accessible from the Internet that can communicate with and access a storage account containing sensitive information
Everybody will agree that machines that belong to the third category will be the most important to remediate and, therefore, should be addressed first. So, the resource’s context is relevant for the decision. This is where a new concept called attack paths comes into play. With attack paths, Microsoft Defender for Cloud can show resources, vulnerabilities, and security recommendations, including their context. The concept knows a variety of pre-defined paths based on the most common attack vectors that attackers use to gain access to information and resources.
Important Note
When writing this book, the attack paths and cloud security map features were in a private preview and not yet fully implemented in the UI, so while we can explain the concept, the UI might slightly change when the feature is finally released.
Figure 5-46 shows the Attack Paths blade in Defender for Cloud with all attack paths that are found in this environment.
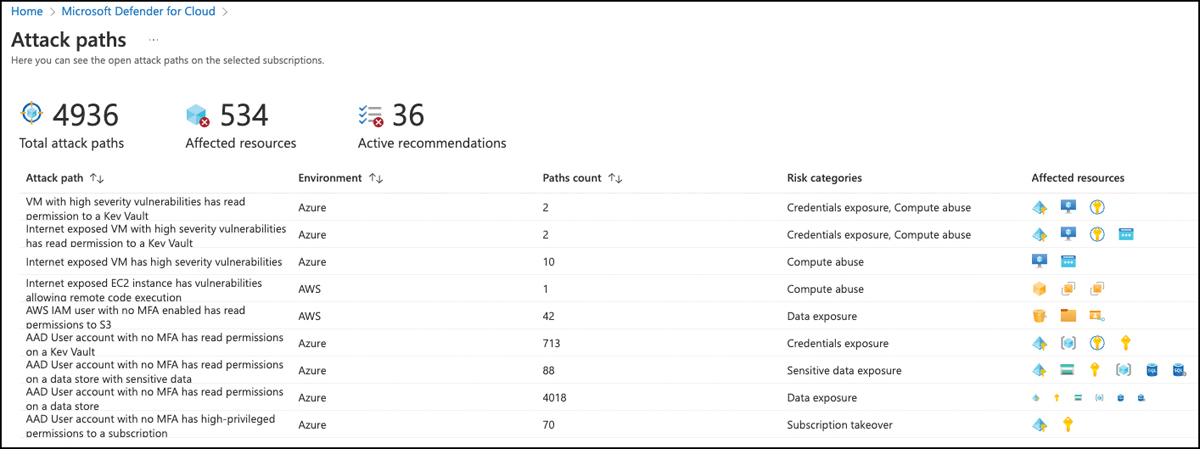
FIGURE 5-46 Attack paths in Defender for Cloud
As mentioned earlier, attack paths are predefined, and you will only see paths relevant to your environment. In other words, if you don’t have any Internet-facing virtual machines, you won’t see the Internet Exposed VM Has High Severity Vulnerabilities attack path in your environment. Let’s take a closer look at this particular attack path. Figure 5-47 shows the details when you click the attack path.
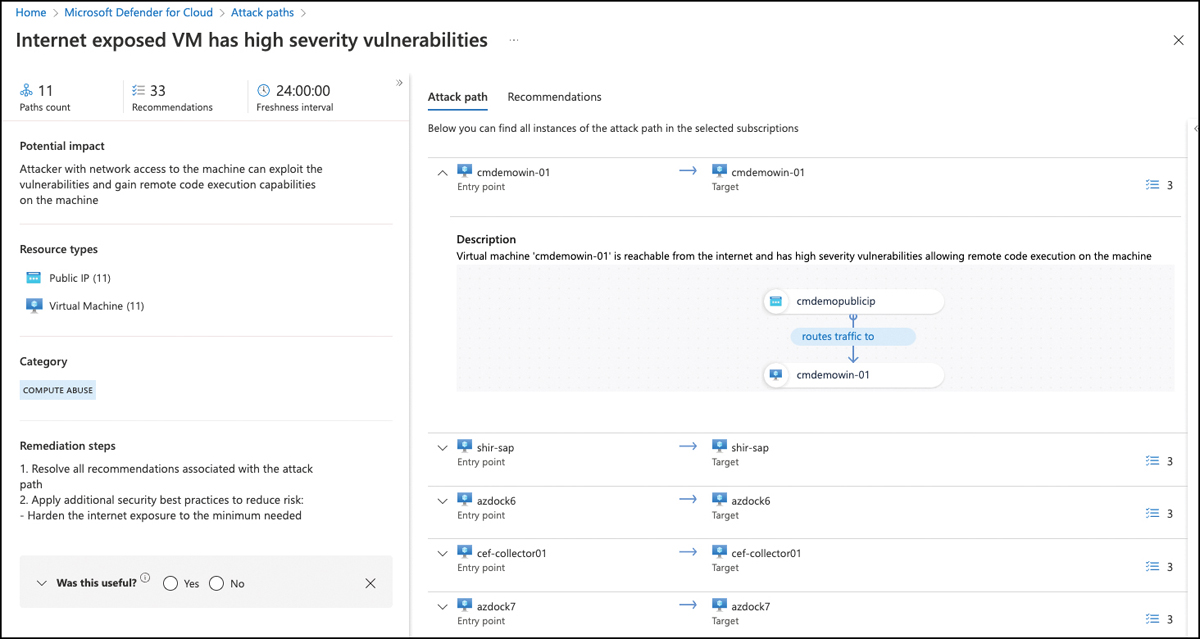
FIGURE 5-47 Attack path details
It shows the number of attack paths that belong to the same pattern. In Figure 5-47, this means there are 11 machines that are exposed to the Internet, all of which have high-severity vulnerabilities allowing remote code execution on them. The number of recommendations (33) shows how many security misconfigurations need to be addressed to break the attack path. On the right side, the details page shows two tabs, Attack Path and Recommendations.
The Attack Paths tab shows the attack vector for each machine. Selecting an attack path opens the resource details view. You can click each step in the view to see even more details about the vulnerable resource. In Figure 5-48, you see Insights for a virtual machine called cmdemowin-01.
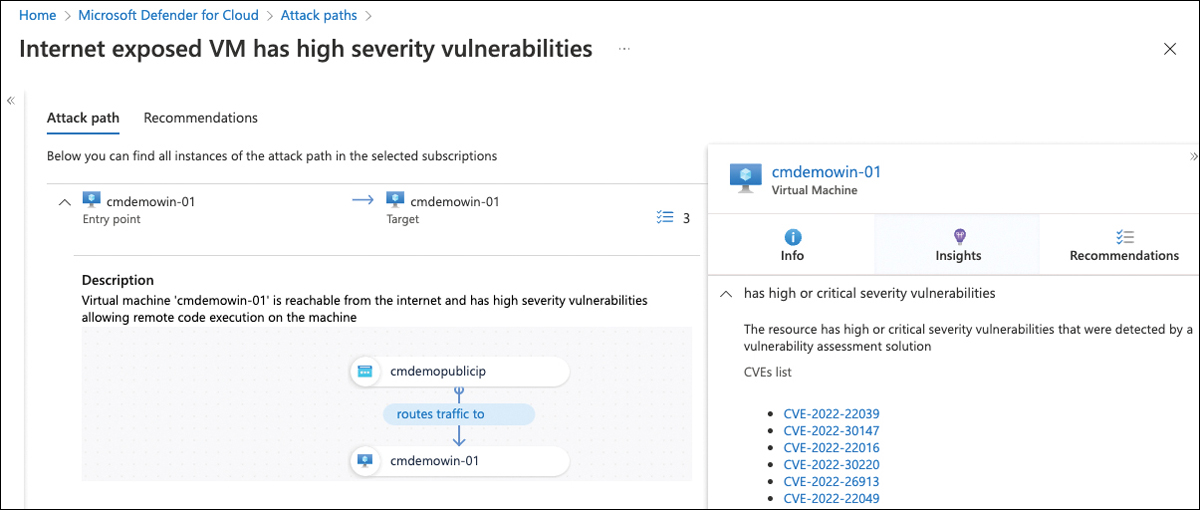
FIGURE 5-48 Attack path insights for a virtual machine
Resource insights in this attack path show high-or critical-severity vulnerabilities as CVE IDs detected on this machine. Defender for Cloud relies on one of the integrated vulnerability assessment solutions you learned about earlier in this chapter.
Besides Insights, there is a Recommendations view on the Attack Path tab that will show all security recommendations detected for the machine you are currently looking at, as shown in Figure 5-49.
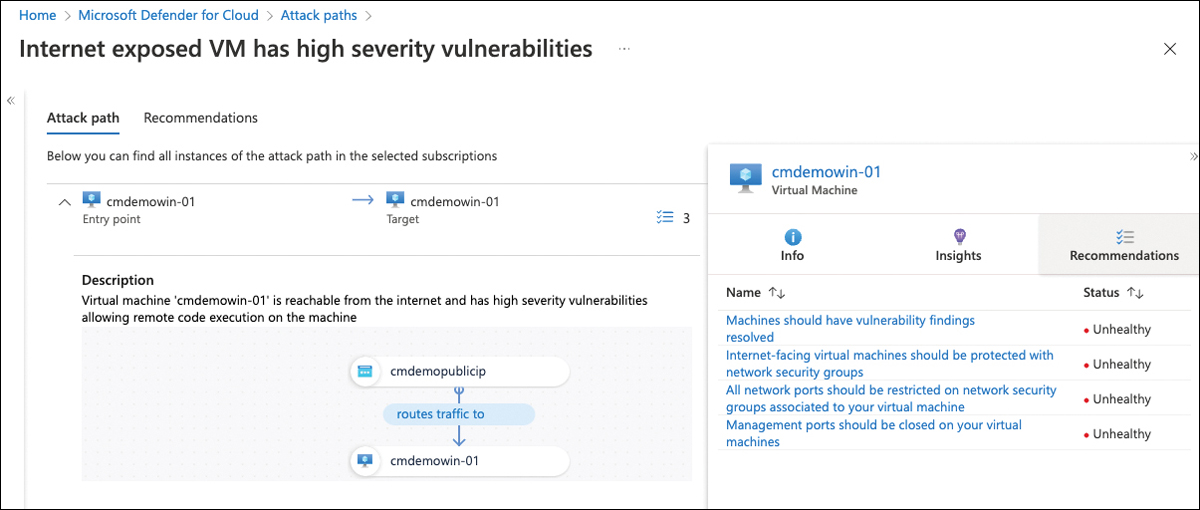
FIGURE 5-49 Security recommendations for an Azure VM in the Attack paths view
While the Attack Path tab shows details for one particular attack path, the Recommendations tab shows recommendations for all resources affected by the same pattern. As mentioned earlier, the environment used to explain the feature knows 11 machines affected by the same attack vectors. So, in the Recommendations tab, you will see security recommendations for all 11 VMs that are suitable for closing the attack vector, as shown in Figure 5-50.
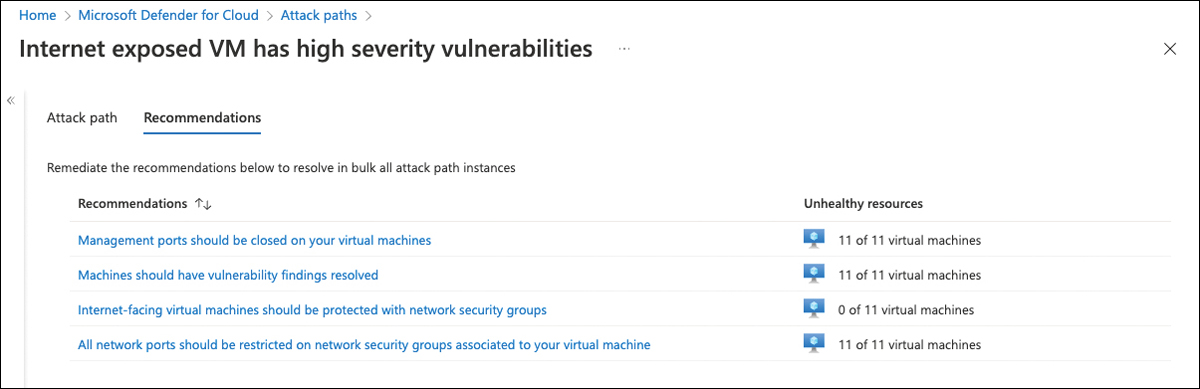
FIGURE 5-50 Security recommendations for all resources affected by the same attack path pattern
If you close the loop to the initial example with Log4J on thousands of servers, you will realize that the new attack path capability will definitely help you make an educated decision about which machines to remediate first. In this example, it’s the 11 machines that are highlighted in the Internet Exposed VM Has High Severity Vulnerabilities attack path.
Build your own views with Cloud Security Map
Within the scope of Defender for Cloud’s contextual security concept, attack paths are important when focusing on the right resources to remediate security issues quickly. However, because they are pre-created by Microsoft based on the most common attack vectors, it’s a static concept. Of course, you want to be able to build your own custom views and queries to get the insights you are most interested in.
This is when Cloud Security Map comes into play. Cloud Security Map allows you to either see underlying queries that are used to show attack paths, or you can build your own queries based on all accessible insights in Defender for Cloud. Figure 5-51 shows the Cloud Security Map in the Defender for Cloud portal.
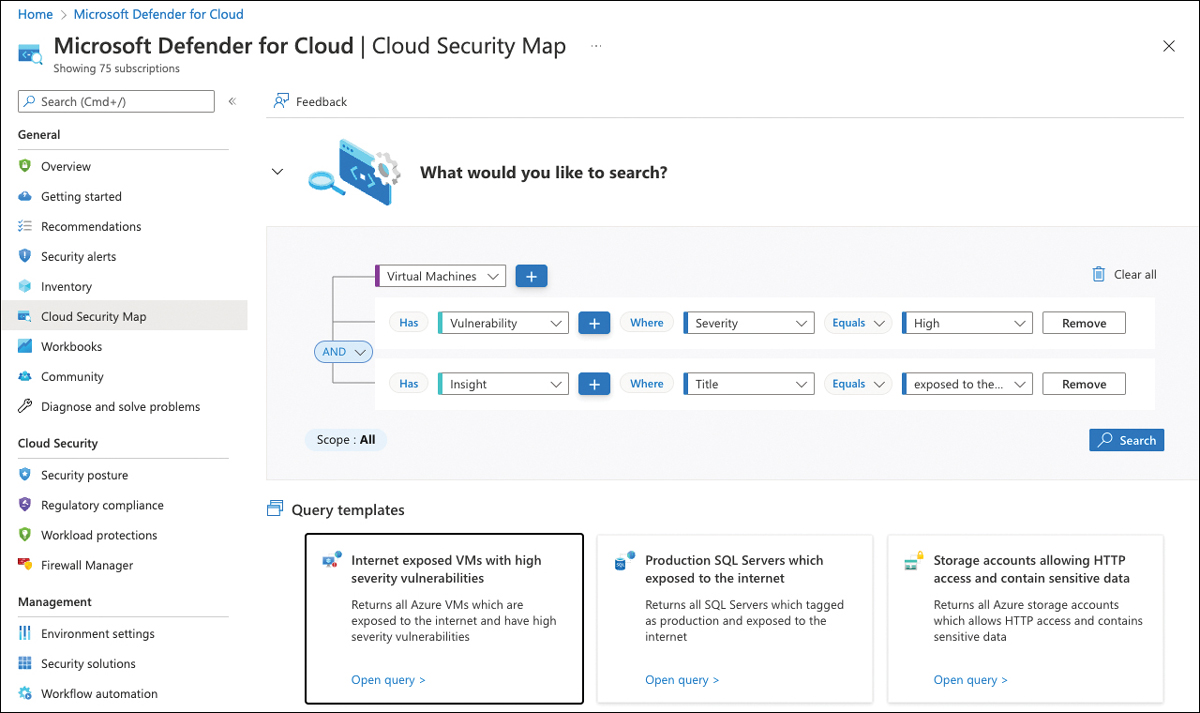
FIGURE 5-51 Cloud Security Map in the Defender for Cloud portal
The query shown in Figure 5-51 is taken from a query template called the Internet Exposed VMs With High Severity Vulnerabilities query template. We used this query earlier to create an attack path. You can use the different dropdowns and + buttons to select resources and insights according to your needs. In the example above, the following information is being considered:
The resource type is Virtual Machines.
These machines have vulnerabilities with at least high severity.
These machines are exposed to the Internet.
You can also further narrow down the selection, for example, by adding the exposed network port you want to filter for, as shown in Figure 5-52.

FIGURE 5-52 Cloud Security Map in the Defender for Cloud portal
Once done, you can click the Search button to start the query process. You will be presented with all resources to which your filter applies. It’s important to mention that the scope includes all Azure subscriptions and AWS and GCP connectors in your environment. With that said, both the attack paths and Cloud Security Map are truly multicloud and multitenant capable, providing a unified overview and bringing into context resources from all your cloud estate.