1. The File Menu Becomes the Backstage View
Open the File menu in Excel 2010 and you might be shocked to see that it takes up 100% of your screen real estate. This new panel is called the Backstage view and represents a significant development effort in Office 2010.
Understanding “In” Versus “Out” Commands
Microsoft added the Ribbon to Excel 2007 to make working in your spreadsheet easier. Microsoft describes the typical WYSIWYG interaction model for a command such as bolding a cell as follows:
• Scan the worksheet.
• See something you want to change.
• Find the command.
• Use the command.
• See the results on the page.
All the commands on the Home, Insert, Page Layout, Formulas, Data, Review, and View tabs of the Ribbon are commands that you use when you work in your document. Microsoft calls these commands the “In” commands.
By contrast, the commands on the File menu are not for working in the document. You use these commands after you finish the document and you are ready to do something with it. Perhaps you want to print, or email, or save the document. All the out commands share the characteristic that they don’t act on a specific point in the worksheet and their results don’t appear in the spreadsheet. For lack of a better term, Microsoft calls these commands the “Out” commands.
Note
![]()
First, it is great to note that once again a File menu exists in Excel 2010. For the past 3 years, people using Excel 2007 had a version of Office in which the File menu had been replaced by a branding decoration. This led to huge frustrations as people searched the other Ribbon tabs trying to find items that used to be on the File menu. Although this frustration gave my Power Excel seminar audiences a shared common experience and a reason to laugh at Microsoft’s folly, it is seriously good to see that Microsoft abandoned this idea and came back with a File menu. As late as July 2009, the technical preview of Office 2010 was sticking with the branding element instead of the File menu. Someone in the usability lab had the genius to run a test in which they tried putting the letters “F-i-l-e” on the tab instead of the Office icon. Microsoft reports that discoverability of the Backstage view increased dramatically, so it abandoned the branding decoration.
After developing the Ribbon for Excel 2007, Microsoft felt it had simplified the process of finding the In commands. But the WYSIWYG model falls apart for the Out commands:
• You can’t scan the worksheet for something you want to change. The status of the Out features doesn’t appear in the worksheet.
• The Out commands suffered from low discoverability. Whereas people using Excel 2007 figured that an editing command had to exist somewhere, people were not searching for the Out commands. For example, some items, such as the Document Inspector, were hidden several layers deep and rarely found.
To address these issues, Microsoft added the Backstage view to provide a consistent home for the Out commands.
Using Backstage View
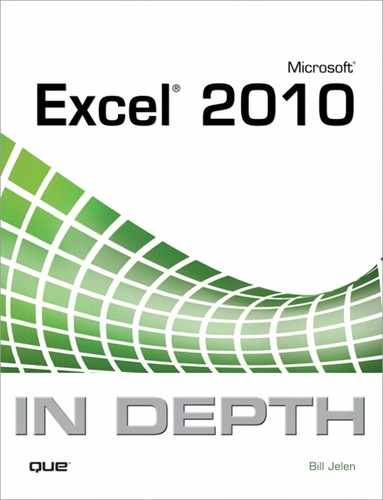
To open the Backstage view, click the File menu. The Backstage view fills the screen, as shown in Figure 1.1.
Figure 1.1. Backstage view.
Backstage is split into three sections: the narrow left navigation panel and two wider sections that provide information.
Pressing the Esc Key to Close Backstage View
To get out of Backstage and return to your worksheet, you can either press the Esc key or click another Ribbon tab.
Using the Four Quick Commands in the Left Navigation
Four commands are so important that they get their own real estate in the top of the left navigation pane: Save, Save As, Open, and Close. The Save and Close commands act as soon as you select them. The Save As and Open commands bring up another dialog box where you can save or open a document. Not much has changed in the Save As or Open dialog boxes.
At the bottom of the left navigation are two additional quick commands: Options and Exit. The Options command leads to the Excel Options dialog box.
![]() See Chapter 6, “The Excel Options Dialog,” for details on the Excel options.
See Chapter 6, “The Excel Options Dialog,” for details on the Excel options.
Tip
![]()
Because the commands in the Backstage view are all Out commands, they do not operate on a specific point in the spreadsheet. Thus, you do not need to actually see your spreadsheet while you use the commands. Microsoft takes the liberty of having the Backstage view fill the entire width of the screen. The screen is divided into three asymmetric parts: a narrow left navigation pane, a medium-width central command gallery, and a wide information pane on the right side.
The remaining entries in the left navigation each lead to large galleries of information and commands: Info, Recent, New, Print, Save & Send, and Help. Each of these will be described in the sections that follow.
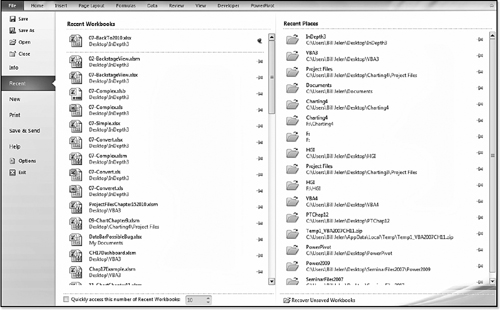
Opening Recent Files
If you have no workbook open in Excel and you go to the File menu, you start in the Recent gallery (see Figure 1.3).
Figure 1.2. None of the visible clickable “X” elements close Backstage.
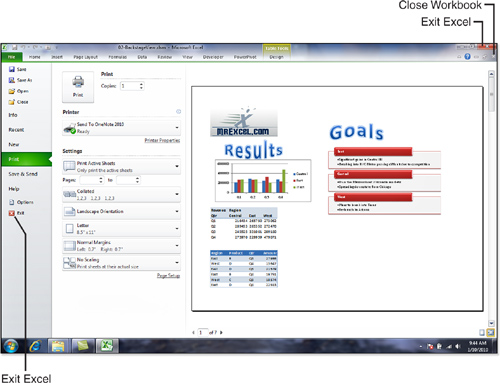
Figure 1.3. The Recent pane.
In the central panel, you have a list of recent workbooks. As in Excel 2007, this list can show up to 50 documents instead of the 9 that were available in Excel 2003.
The central panel includes a vertical scrollbar so that you can scroll to more documents than are visible on your screen.
The right side of the screen includes a great new feature called Recent Places. This list shows all the folders from where you have recently opened documents. If I am currently working on next year’s budget, it is likely that I will have to open other documents in the FutureBudget folder. Having the list of folders on the right side is a feature that you will find yourself using frequently. When you click a folder on the right side of the screen, you are taken to the standard Excel Open dialog, but it will already be showing the selected folder.
Tip
![]()
Initially, the Recent Workbooks list includes up to 25 documents. If you visit File, Options, Advanced, Display, you find a setting for Show This Number of Recent Documents. Dial this up to 50 documents.
In Figure 1.3, notice the two columns of gray pushpins. If you click one of those gray pushpins, it turns into a colored pushpin that appears to be pushed into the screen. This pins an item to either the Recent Workbooks or the Recent Places list. When an item is pinned to the list, it stays at the top of the list, no matter how many other files you might open. This is great for the files that you use for month-end reporting. Even if you happen to open 153 other files during the course of the month, when the next month-end period rolls around, you can be sure that your month-end report file is at the top of the Recent list.
One-Click Access to Recent Files
During the beta for Office 2010, many people complained that the Recent File list is now two clicks away instead of one click away. When any Excel workbook is open, clicking the File menu takes you to the Info panel instead of the Recent gallery. People complained that they had twice as many clicks to select File, Recent before they could see their recently used files.
There are two solutions for this.
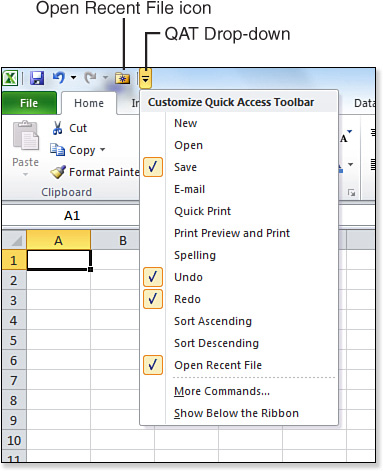
First, you can easily add the Recent File List to the Quick Access Toolbar. At the right side of the Quick Access Toolbar is a drop-down arrow. Open this drop-down arrow to reveal 12 common commands you can add to the Quick Access Toolbar. (See Figure 1.4) If you choose Open Recent File from this list, you have an Open Recent File icon on your Quick Access Toolbar. Click this icon to go directly to the Recently Used File List. For people who like the keyboard accelerators, using Alt+4 invokes the fourth icon on the Quick Access Toolbar, so there is a one-keystroke method for accessing the Recently Used File list, provided it is one of the first nine icons on your Quick Access Toolbar.
Figure 1.4. Add Open Recent Workbooks to the QAT.
There is a second method for quickly accessing recent workbooks. At the bottom of the Recent Workbooks list is a check box and a Spin button. On a 900×1440 monitor, you have room for about 10 more items along the left navigation panel. This check box allows you to fill that space with recent files. Select the check box and choose any number of files. In Figure 1.5, 10 new files are shown in the left navigation.
Figure 1.5. Use Alt+F+1 to access the first item pinned to your recent workbooks list.
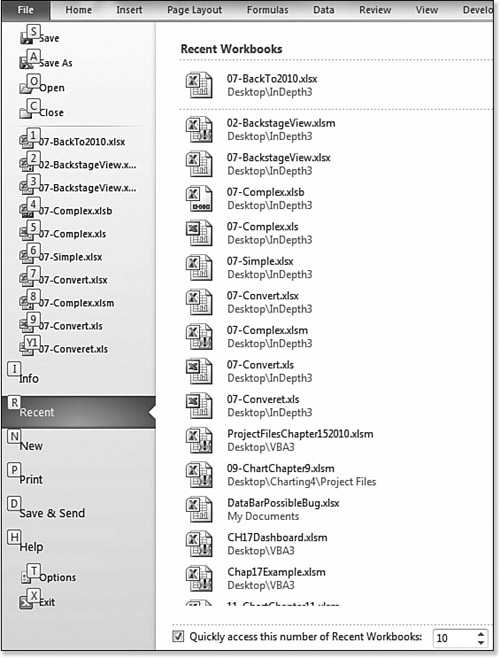
If you have items pinned to the Recent Workbooks list, they are shown immediately after the Quick Commands in the left navigation. The rest of the space is filled with recent documents.
Tip
![]()
If you were a fan of the keyboard shortcut of Alt+F+1 to open the most recent file, you will appreciate that using this check box allows Alt+F+1 to continue to work as expected.
![]() To see a demo about the Recent Files pane, search for “Excel In Depth 1” at YouTube.
To see a demo about the Recent Files pane, search for “Excel In Depth 1” at YouTube.
Recovering Unsaved Workbooks
As in legacy versions of Excel, the AutoSave feature can create copies of your workbook every n minutes. (“Legacy” in this book refers to Excel 2003 and earlier versions.) If an AutoSave version of your workbook exists, you can now access that file using the Recover Unsaved Workbooks icon at the bottom of the Recent Places list.
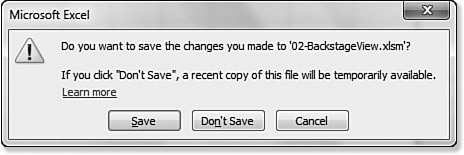
Do you ever get to the end of your workday, use the X to close Excel, and then are greeted with a barrage of Do You Want to Save questions, as shown in Figure 1.6? I frequently forget that the nth workbook that I have open is not saved. I will think that I had opened these workbooks to get information, that I had not made any significant changes, and will either start clicking Don’t Save repeatedly, or will hold down Shift and click Don’t Save, which is equivalent to clicking the nonexistent Don’t Save to All selection.
Figure 1.6. If you accidentally click Don’t Save after Excel has AutoSaved, you might be able to recover the document.
As I see that important file get closed, I realize that I just lost all my changes to that file and cringe. This is a common problem that happens to everyone sooner or later. Provided that the file was open long enough to experience an AutoSave, you may be able to get the file back.
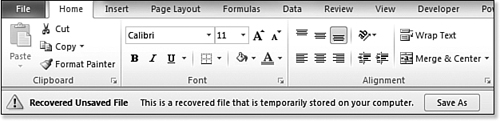
Go to Recover Unsaved Workbooks and find the date and time of the last AutoSave. It might be within 5 minutes of the last time you edited a cell in that document. When you find the file and open it, the Information Bar reports that this is a Recovered Unsaved File (see Figure 1.7). Click Save As to give the file a name.
Figure 1.7. Excel recovers the file. You need to Save As to make the recovery permanent.
Caution
![]()
This raises some privacy concerns. If you are frequently working on documents that you don’t want others to see, they might be able to recover them from the last autosaved version. I don’t recommend it, but if you need to, you can turn off this new feature. To do this, go to File, Options, Save, and clear the Keep the Last AutoSaved Version if I Close Without Saving check box.
Clearing the Recent Workbooks List
If you need to clear out the Recent Workbooks List, you should visit File, Options, Advanced, Display. Set the Show This Number of Recent Documents list to zero. This is unlike the behavior in Excel 2003. In Excel 2003, to clear out the ninth item from the list, you had to reset only the number of files back to 8 and Excel would forget about number 9. In Excel 2010, if you switch from 50 files to 1 file, then back to 50 files, all 50 files will come back. The only way to clear the recent workbooks list is to set the value back to zero. You can then reset it to 50 and Excel will start collecting history again.
Getting Information About the Current Workbook
When a workbook is open and you go to the File menu, you start in the Info gallery for that workbook.
As shown in Figure 1.8, the Info pane lists all sorts of information about the current workbook. In legacy versions of Excel, much of this information might have been tough to determine without using VBA or even going out to Windows Explorer.
Figure 1.8. The Info gallery includes all of the properties of the file.

Some of the information is now at your fingertips in the Info gallery:
• The workbook path is shown at the top of the gallery. You can select the text in the path, and use Ctrl+C to copy and then paste the path wherever you might need to paste it.
• You can see the file size.
• You can see when the document was last modified and who modified it.
• If any special states exist, these will be reported at the top of the middle pane. Special states might include the following:
• Macros not enabled.
• Links not updated.
• Checked out from SharePoint.
• You can see if the file has been AutoSaved and recover those AutoSaved versions.
• You can mark the document as final that will cause others opening the file to initially have a read-only version of the file.
• You can edit links to other documents.
• A thumbnail of the current window of the document appears in the top right in case you forgot which document you are editing.
• You can add Tags or Categories to the File.
• Using the Check for Issues drop-down, you can run a compatibility checker to see if the workbook is compatible with legacy versions of Excel. You can run an accessibility checker to see if any parts of the document will be difficult for people with disabilities. You can run a Document Inspector to see if any private information is hidden in the file.
Correcting Special States Such as Disabled Macros and Links
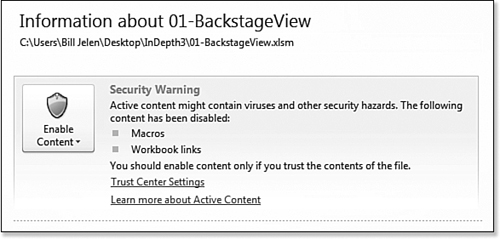
Open a workbook that contains macros and external links. A message appears in the Information Bar that this content has not been enabled.
If you visit the Backstage view, the fact that the content has not been enabled appears at the top of the center pane (see Figure 1.9).
Figure 1.9. You see a summary that certain content is not enabled.
Note
![]()
These rules apply only to workbooks stored on a local hard drive. If the file is stored on a network, then Excel is going to ask you about enabling macros every time that you open the file.
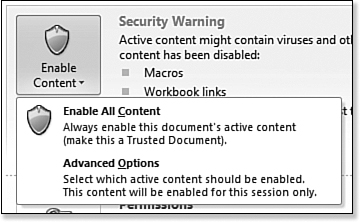
Open the Enable Content drop-down and you are presented with an easy way to make the document a trusted document (see Figure 1.10). If you choose the top item in the drop-down, all the content will be enabled and you will no longer be asked about enabling this content in this file on this computer.
Figure 1.10. It is now easier to Trust a document using this drop-down.
Excel’s Automatic Trusting of a Document
Say that you have an .xlsm workbook stored on a local hard drive. This workbook has some macros that you recorded. If you open this workbook and select to Enable Macros, then Excel assumes that you are OK with the macros and automatically enables those macros the next time.
This is a good feature. Excel asks you only once about the file. This makes it far more likely that you will actually leave the Excel Macro Security setting so that all macros are disabled with notification.
If you send the workbook to someone else and they save it on their computer, they will be presented with the Enable Macros question again, but they would be asked about it only once.
Opening a File in the Protected View Sandbox
Another new feature in Excel 2010 is the protected view. If you download a workbook from the Internet or another unsafe location, you can open the workbook, but it will default to something called Protected View. In this view, you cannot edit the workbook. Macros will not run. Links will not update. The theory is that you can actually look around the document, look for macros, look for links, and so on before you decide to trust the document.
After making sure that the document is safe, you can click the Enable Editing button in the Info bar (see Figure 1.11).
Figure 1.11. Workbooks from the Internet open in a protected sandbox.

Marking a Workbook as Final to Prevent Editing
Open the Protect Workbook icon in the Info gallery to access a setting called Mark as Final (see Figure 1.12). This marks the workbook as read-only. It will prevent someone else from making changes to your final workbook.
Figure 1.12. Mark a document as Read Only.

Of course, if the other person visits the Info gallery, that person can reenable editing. This feature is simply designed to warn the other people that you’ve marked it as final and no further changes should happen.
If you can convince everyone in your workgroup to sign up for a Windows Live ID, you can use the Restrict Permission by People setting. This layer of security allows you to define who can read, edit, and/or print the document.
Caution
![]()
The Document Inspector is not foolproof. Do you frequently hide settings by changing the font color to white or by using the ;;; custom number format? This won’t be found by the Document Inspector. The Document Inspector also won’t note that you had scrolled over outside the print area and jotted your after-work grocery list in column X.
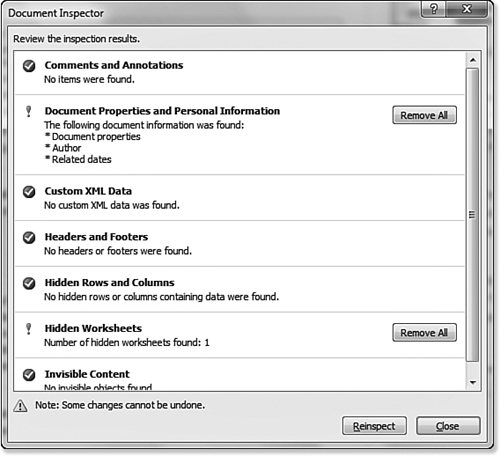
Finding Hidden Content Using the Document Inspector
The Document Inspector can find a lot of hidden content, but it is not perfect. Still, finding 95% of the types of hidden content can protect you a lot of the time.
To run the Document Inspector, select File, Info, Check for Issues, Inspect Document, and click OK. The results of the Document Inspector shown in Figure 1.13 shows that the document has personal information stored in the file properties (author’s name) and a hidden worksheet.
Figure 1.13. Look for hidden personal items in the workbook.
Creating a New Workbook from a Template
Tip
![]()
If you just want a new blank workbook, use Ctrl+N and avoid the hassle of File, New, Blank Workbook, Create.
If your manager asks you to create a new calendar, expense report form, invoice, and so on, you should visit the New category in Backstage view. There are hundreds of templates already prebuilt on Office Online. Although the gallery initially offers Budgets, Calendars, and seven other categories, as shown in Figure 1.14, you can browse through the More Categories folder for hundreds of other types of prebuilt worksheets.
Figure 1.14. Many prebuilt templates are available for your use from Office Online.
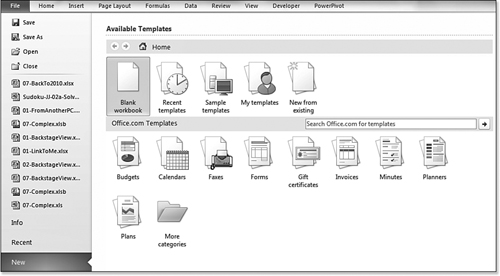
These are free for your use as a registered owner of Microsoft Excel.
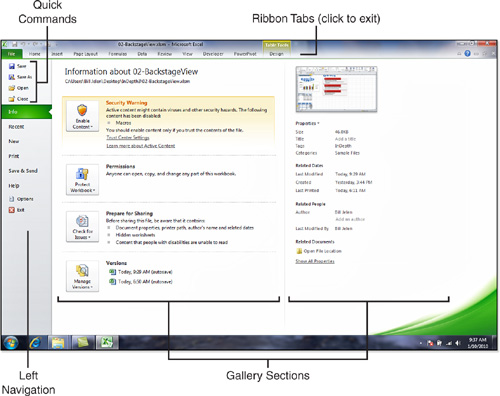
Printing and Print Preview
Print Preview has been moved to the Print category in Backstage view.
Backstage view consolidates settings that used to be in Page Setup, in the Print dialog, in Print Preview, and in the Printer Settings dialog. (See Figure 1.15)
Figure 1.15. Print Preview and printer settings are combined in Backstage view.
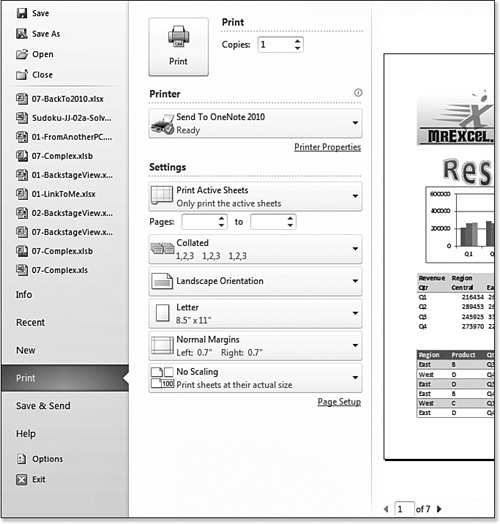
Microsoft created a brand new type of gallery for the Print section of Backstage view. Rather than have a drop-down for Orientation, this new gallery shows you the current Orientation setting. If you need to change the orientation, you can open the drop-down to access more settings. But if the setting is correct, you don’t have to access the drop-down at all.
Note that Ctrl+P now brings you to the Printing gallery in Backstage view. If you want to do QuickPrint, you should add the QuickPrint icon to the Quick Access Toolbar. Printing is covered in detail in Chapter 36, “Printing.”
Sharing Your Workbook Using Save & Send
The Save & Send gallery in Backstage view offers several categories of changes. Each item in the central pane leads to more choices in the right pane.
Figure 1.16 shows Send Using E-Mail. The right pane offers choices to attach the workbook to an email, send as PDF, send as XPS, or send as Internet Fax.
Figure 1.16. Attach your workbook to an email.

The Save to Web allows you to save your workbook to your Windows Live account.
Save to Sharepoint allows you to save your document to your company’s SharePoint library.
Change File Type offers to let you convert your file to an Excel 97-2003 workbook, an OpenDocument Spreadsheet, a binary workbook, or other file types (see Figure 1.17).
Figure 1.17. Convert your file to one of several file types.
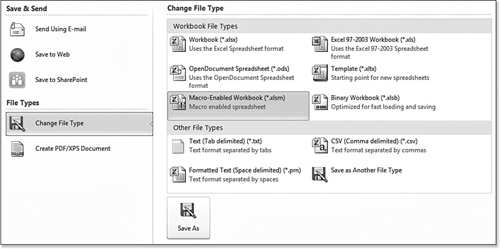
Finally, Create PDF/XPS Document allows you to save your workbook as an Adobe PDF file or the competing XPS format from Microsoft.
Getting Updates and Help
You can access Excel help at any time by pressing F1 or by clicking the blue question mark in the top-right corner of the Excel screen.
If you go to the Help gallery in Backstage view, you have access to Help, Getting Started, Contact Us, Options, and Check for Updates.
Help is the same as clicking the blue Question Mark icon.
Options is the same as using Options in the left navigation pane.
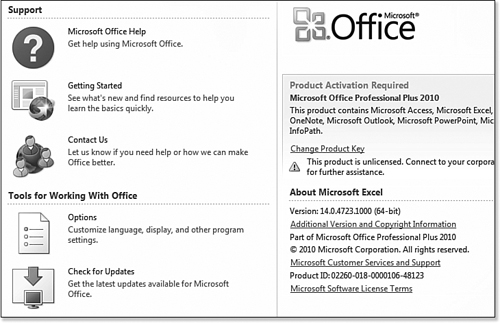
The right side of the screen tells you if your version of Excel has been activated or if you are in a trial. You can access your product key and product version using this panel (see Figure 1.18).
Figure 1.18. Get updates, find your current version, or activate Office on the Help panel.
There are many benefits to the new Backstage view with only a few drawbacks. Those drawbacks, such as requiring an extra click to get to the Recent Files list, usually have workarounds. You should find that the Backstage view will receive a better welcome than the initial backlash against the Ribbon.