
13. Using SuperPreview
An Overview of SuperPreview
In the early days of web design, it wasn’t uncommon for a page to render dramatically different from one browser to the next. Web standards were still largely in flux and proprietary code was widespread. Because of these conditions, web designers would typically either spend a considerable amount of time implementing hacks to fix rendering problems or would design for one particular browser flavor and recommend that site visitors use that specific browser.
Web standards have solidified greatly over the years, and modern browsers are typically compliant with those standards. However, these conditions don’t mean the end of compatibility concerns. Some users are still using older browsers, and some of those browsers can introduce some serious layout problems.
SuperPreview
Expression Web 3 introduces SuperPreview, a new and extremely powerful tool for identifying layout problems with your site. SuperPreview has many benefits over traditional tools for previewing pages, but perhaps the most revolutionary is the capability to preview a page using several versions of Internet Explorer without having to install multiple versions.
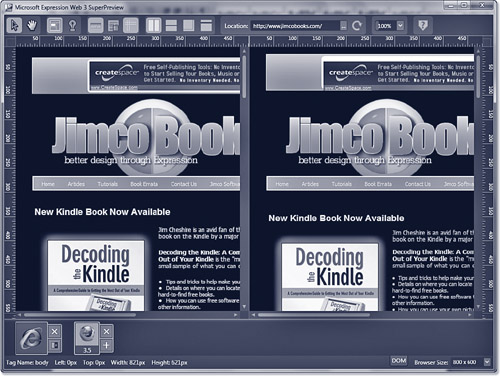
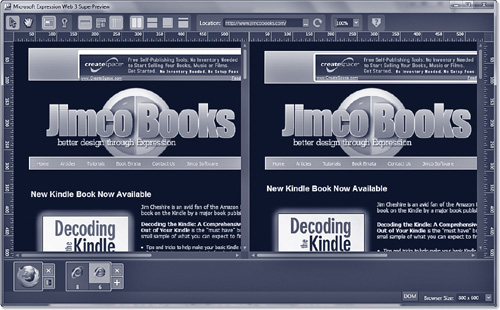
SuperPreview enables you to view a preview of a page in a baseline browser and a comparison browser. Figure 13.1 shows a SuperPreview preview of the Jimco Books site using Internet Explorer 6 as the baseline browser and Firefox 3.5 as the comparison browser. SuperPreview’s built-in rendering engine for Internet Explorer 6 makes it possible to see exactly what your page looks like in Internet Explorer 6 without having it installed on your system.
Figure 13.1 SuperPreview is a powerful tool for checking your page’s appearance and layout in multiple browsers.
Tip
![]()
SuperPreview also supports Firefox.
How SuperPreview Generates a Preview
When you launch SuperPreview, it first determines which browsers should be available for preview. If you have Internet Explorer 6 installed, SuperPreview will only provide a preview of Internet Explorer 6. If you have Internet Explorer 7, SuperPreview will make Internet Explorer 6 and 7 available for preview. If you have Internet Explorer 8, SuperPreview will make Internet Explorer 6, 7, 8, and Internet Explorer 8 in IE7 compatibility mode available for preview.
In addition to these IE versions, SuperPreview will also make Firefox available as a choice if you have Firefox installed. As of this writing, SuperPreview does not support other browsers, but Microsoft has said that they plan on providing support for Safari on the Mac using a cloud service to be made available sometime later.
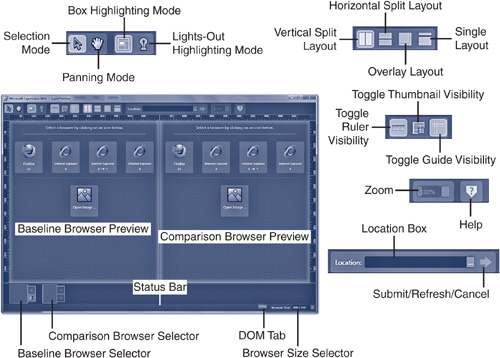
To generate a preview using SuperPreview, first select the baseline browser by selecting one of the browser options from the left pane; then select a comparison browser from the right pane. Enter a URL to preview in the Location box as shown in Figure 13.2 and press Enter.
Figure 13.2 The left pane in SuperPreview shows options for the baseline browser, whereas the right pane shows the comparison browser.
Note
![]()
Microsoft has released two different versions of SuperPreview. SuperPreview for Internet Explorer is a free, standalone application and supports only Internet Explorer. SuperPreview with Expression Web 3 adds support for Firefox and is integrated with Expression Web 3. However, it can also be launched separately using the Microsoft Expression Web 3 SuperPreview icon that is installed in your Start menu when Expression Web 3 is installed.
When SuperPreview builds its preview, it runs the URL you specify through the actual rendering engine for the browsers you’ve chosen. In addition to loading the page, SuperPreview will also execute all script in the page through the OnLoad event so that any client-script designed to change page rendering will be recognized by the preview that is generated. The result is a 100% accurate preview of your page. In other words, if you select Internet Explorer 6 and generate a preview, you can be assured that what you see is exactly what visitors using Internet Explorer 6 will see when your page is viewed.
The SuperPreview Interface
Before we go too much further into using SuperPreview, it might help to look at the SuperPreview user interface. After we’ve reviewed all of the interface tools available, we’ll look at how you can use those tools to identify rendering problems in your pages.
Tip
![]()
It’s important to realize that SuperPreview is not an interactive web browser. SuperPreview essentially generates a snapshot of a page. Therefore, interactive UI elements such as menus and links don’t work in SuperPreview.
Pointer Modes
The leftmost two toolbar buttons control the pointer mode, meaning how the mouse pointer works in SuperPreview. The first button changes the pointer mode to Selection mode. With Selection mode enabled, clicking inside the preview selects the element on which you click. This is useful to examining the specific properties of a page element.
The next button sets the pointer mode to Panning mode. With this mode selected, you can drag the page you are previewing so you can view areas of the page that don’t fit within the confines of the preview window.
Pointer modes are mutually exclusive. In other words, clicking the Selection mode button deactivates Panning mode, and vice versa.
Tip
![]()
When you change the DOM Highlighting mode, your pointer mode will automatically switch to Selection mode.
DOM Highlighting
When operating in Selection mode, clicking any page element will select that element. SuperPreview uses one of two highlighting modes to identify which DOM element is selected. Highlighting modes are selected using the Box Highlighting Mode and the Lights-Out Highlighting Mode buttons, as shown previously in Figure 13.2.
When Box Highlighting mode is selected, clicking a DOM element draws a border around the element. When Light-Out Highlighting mode is selected, clicking a DOM element highlights the selected element and causes all other DOM elements to appear dimmed, as shown in Figure 13.3.
Figure 13.3 Lights-Out Highlighting mode lets you easily identify exactly which DOM element is selected.
UI Helpers
The next section of the toolbar contains three user-interface helpers. The Toggle Ruler Visibility button toggles the display of the rulers along the edges of the preview window. The Toggle Thumbnail Visibility button toggles a small thumbnail view of the page in the lower-right corner of each preview. The Toggle Guide Visibility button toggles the display of the guides.
Layout Modes
The Layout Modes section of the toolbar contains buttons to control how your previews are laid out.
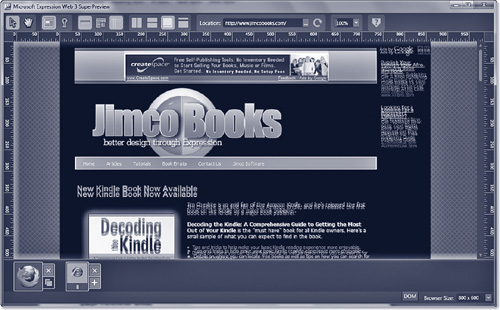
The Vertical Split Layout button shows the baseline and comparison browser previews side-by-side. This is the default setting. The Horizontal Split Layout button displays the baseline and comparison browser previews one on top of the other. The Overlay Layout button provides a view of the baseline browser superimposed on top of the comparison browser as shown in Figure 13.4.
Figure 13.4 Overlay Layout is perhaps one of the most powerful and impressive features in SuperPreview.
Finally, the Single Layout button allows you to view either the baseline browser or the comparison browser in its own window.
Preview URL
The URL you are previewing is specified using the Location textbox. However, you can also click the ellipses button and select a file on your local disk to preview. This is useful in cases where you want to view a preview of a file in a disk-based site before publishing it to the Internet.
Tip
![]()
Another quick and easy way to preview a page from a disk-based site in SuperPreview is to right-click the file in Expression Web 3’s Folder List panel and select Display in SuperPreview from the menu. The benefit to this method is that ASP.NET and PHP pages will display using the Microsoft Expression Development Server so you see the page the way viewers of your site will see it.
Baseline and Comparison Browser Selectors
The baseline and comparison browser selectors allow you to choose which browser you want to use for your baselines browser and comparison browser. Each has a Close button in the upper-right corner so you can choose a different browser if you wish. Additionally, the baseline browser selector offers a button under the Close button that alternates the baseline browser between the left and right preview panes. The comparison browser selector provides an Add button underneath the Close button that makes choosing multiple browsers as a comparison browser easy.
If multiple browsers are selected as the comparison browser, you’ll see multiple browser selector buttons available for the comparison browser. In Figure 13.5, both Internet Explorer 8 and Internet Explorer 6 are being used as a comparison browser. To switch the preview pane between IE8 and IE6, simply click the corresponding version on the comparison browser button.
Figure 13.5 Multiple browsers can be chosen for the comparison browser. You can easily switch between them by clicking the appropriate button.
DOM Tab
The DOM tab expands a window at the bottom of the SuperPreview window that shows the DOM tree for the currently previewed page. Using the DOM tab, you can easily locate the actual DOM element that is responsible for any rendering irregularities.
Figure 13.6 shows the DOM tree expanded after clicking the DOM tab. Notice that the currently selected element in the preview window is also selected in the DOM tree.
Figure 13.6 The DOM tree provides a quick and easy way to identify the code responsible for rendering problems.
Browser Size Drop-down
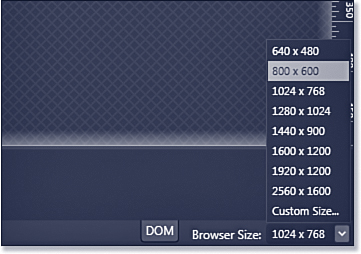
The Browser Size drop-down contains a list of popular resolution settings and allows you to preview your page using whatever resolution you choose. If your desired resolution is not listed, you can choose Custom from the drop-down as shown in Figure 13.7 and you can then define your own size.
Figure 13.7 The Browser Size drop-down makes previewing your page in a specific resolution as simple as a click.
After you select a new browser size, SuperPreview will regenerate any previews it is currently displaying.
Now let’s use SuperPreview to investigate a rendering problem in a page so you can begin to fully realize the power and potential of this tool.
Using SuperPreview to Preview Layout
You’ve probably already realized that SuperPreview can be an incredibly valuable tool when you know that your page renders differently in a specific browser version. However, what you might not realize is that SuperPreview can help you identify subtle rendering differences you might not have even been aware of. Let’s look at just such an example as we discover how SuperPreview can help to identify why a page renders slightly differently in two different browsers.
Setting Up the Previews
The first thing you need to do when using SuperPreview is choose your browsers. For this particular test, we’re going to select Firefox 3.5 as the baseline browser and Internet Explorer 8 in IE7 compatibility mode as the comparison browser. To do this, simply click Firefox 3.5 in the left preview pane and Internet Explorer 8 → 7 in the right preview pane. Your SuperPreview dialog should look like the one shown in Figure 13.8.
Figure 13.8 SuperPreview is now configured with Firefox 3.5 as the baseline browser and Internet Explorer 8 in IE7 mode for the comparison browser.

Generating Previews
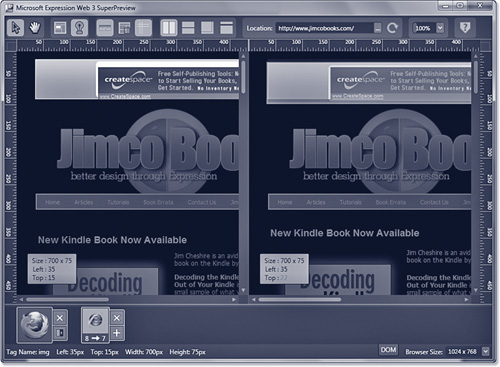
In the Location box, enter www.jimcobooks.com and press Enter. SuperPreview will generate a preview of the page using each of the browsers that were selected as shown in Figure 13.9.
Figure 13.9 This SuperPreview example shows both an obvious rendering problem and some problems that aren’t immediately apparent.

Note
![]()
To select Firefox 3.5, you must have Firefox 3.5 installed. To select Internet Explorer 8 → 7, you must have Internet Explorer 8 installed.
You might immediately notice that the banner ad on this page is a little off between the two previews. However, what you may not notice many other small rendering differences. To see these, click the Overlay Layout button. After you do, you’ll see that several page elements on this page are positioned differently in Firefox 3.5 and in IE8 running in IE7 compatibility mode (as shown previously in Figure 13.4).
Fixing Rendering Problems
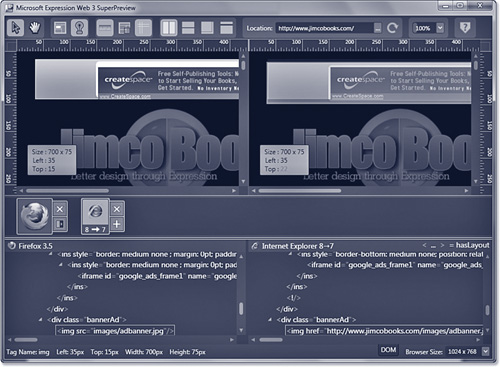
First of all, the banner ad on the page appears to be slightly lower on the page in Firefox than in Internet Explorer. To get a better idea of what might be causing this problem, switch to Lights Out Highlighting mode and click the banner ad. The SuperPreview window should look like the one shown in Figure 13.10.
Figure 13.10 Locating rendering problems is made easier with the combination of Lights Out Highlighting mode and Overlay Layout.

The additional whitespace at the top of the banner in Firefox is obvious, but notice that the Size, Left, and Top measurements displayed in SuperPreview are identical in both browsers. That tells you that the rendering problem is not with the banner ad itself, but likely with another element’s position in relation to the banner ad.
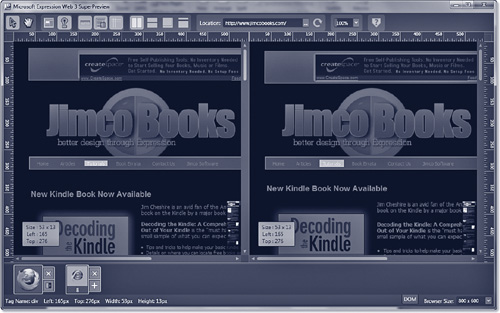
Click anywhere on the page other than on the banner ad to deselect it. Click the orange graphic that surrounds the banner ad to select it. Notice now that the Top measurement shows a difference between Internet Explorer and Firefox (see Figure 13.11).
Figure 13.11 The Top measurement shows a difference between the two browsers. SuperPreview will highlight any differences by displaying the values in red text.
We now know that the orange border around the banner ad is the source of the rendering problem, but to find out exactly what might be causing this problem, we need to investigate the code that underlies the page element. Fortunately, SuperPreview provides tools for investigating the DOM as well.
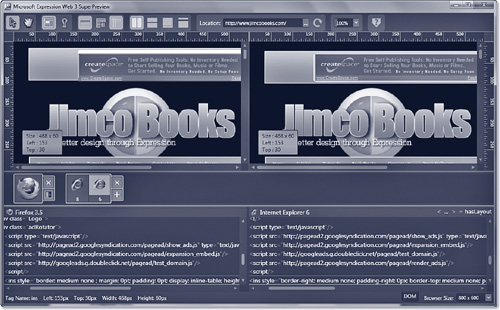
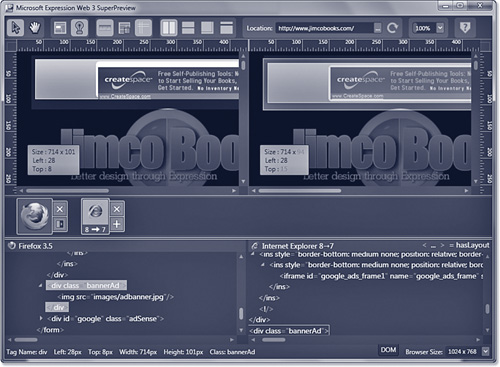
Click the DOM tab (shown previously in Figure 13.2) to display the DOM for the page as shown in Figure 13.12. Notice that the element we’ve selected is an <img> element, but it’s wrapped in a <div> with a class of bannerAd.
Figure 13.12 The DOM tab shows a synchronized view of the page’s DOM so you can locate the code behind your preview.
If you click the <div> in the DOM tree, you’ll notice that the size of the <div> is different in Firefox than it is in Internet Explorer (see Figure 13.13). This is the source of the problem. By modifying the bannerAd CSS class and specifying height, width, and top CSS properties, this rendering problem can easily be corrected.
Figure 13.13 SuperPreview lets you easily identify the source of this rendering problem. Here we see that the <div> is sized differently in Firefox and Internet Explorer.
As you can see by this example, SuperPreview offers some incredibly powerful tools for identifying exactly why rendering problems exist. Some rendering problems aren’t as easy to resolve as this one, but identifying the source element of the problem is often one of the most difficult steps in resolving rendering issues, and SuperPreview provides power and flexibility web designers have not had before.
Note
![]()
It might interest you to know that I identified this rendering problem and how to resolve it while writing this chapter using SuperPreview. However, I left it broken so you would be able to investigate the issue while reading this book.
Using the Snapshot Panel
In some cases you might want to preview a page quickly in a particular browser. In such cases, you can use Expression Web 3’s Preview in Browser feature, but if you’d like a quick preview without having to take the extra step of previewing in your browser, the Snapshot panel offers a great solution. Using the Snapshop panel, you can see a preview using the SuperPreview preview engine inside a panel integrated into the Expression Web 3 interface.
Tip
![]()
Another advantage of the Snapshot panel is the capability to preview pages in IE6 without having IE6 installed.
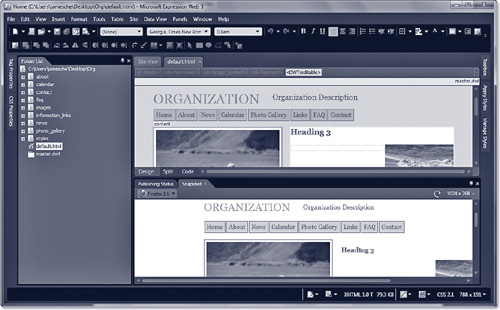
To activate the Snapshot panel, select Panels, Snapshot. By default, the Snapshot panel is displayed at the bottom of the Expression Web 3 interface, as shown in Figure 13.14, but you can drag the panel and dock it on any side just as you can with any other panel in Expression Web 3.
Figure 13.14 The Snapshot panel offers a preview using the SuperPreview engine right within the Expression Web 3 interface.
You can switch between different browsers in the Snapshot panel by selecting your desired browser from the Drop-down in the upper-left of the Snapshot panel.
Note
![]()
The Snapshot panel will work only with local sites. If you have a remote site open using FTP or HTTP, the Snapshot panel will not work.
As you’ve seen in this chapter, the powerful preview tools offered by SuperPreview substantially reduce the pain involved in dealing with designing for multiple web browsers. As Microsoft continues to evolve this product, I have no doubt but that we’ll see even more amazing capabilities for web designers.
Lagniappe (lan yap’) n., a gift or bonus
Building Layouts with SuperPreview
One of the more common methods of web design is to build a mock-up of a site in a tool such as Expression Design or Adobe Photoshop and then to develop the code and CSS necessary to replicate that mock-up. SuperPreview can be an important part of ensuring that the code you are creating is cross-browser compliant.
To use SuperPreview to assist in building sites that use a mock-up, click the Open Image button in one of the preview panes and browse to your mock-up. Next, select your desired browser in the other SuperPreview preview pane and then switch to Overlay Layout. Your browser preview will be superimposed over your mock-up, and you’ll be able to quickly and easily determine whether your page is rendering correctly.
Tip
![]()
SuperPreview even supports .psd files (Adobe Photoshop files) when you click the Open Image button, so there’s no need to export your Adobe Photoshop mock-ups to another format before using them with SuperPreview.
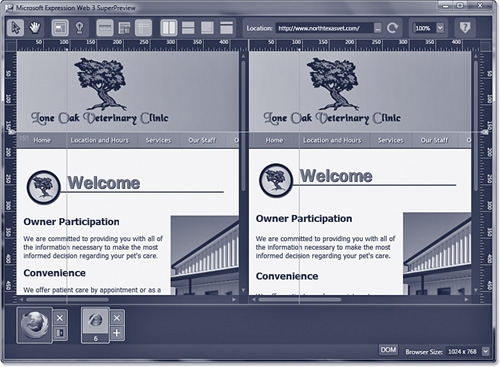
Another great feature in SuperPreview that aid in building layouts is the inclusion of Photoshop-like guides. If you click and drag from one of the rulers onto the preview area, a guide can be placed either horizontally or vertically on the page so precise layouts are made easier. As shown in Figure 13.15, SuperPreview will show the current position of the guide as you are dragging.
Figure 13.15 Photoshop-like guides make checking positioning of precise layouts easy.
To remove a guide, simply drag it back to the ruler. Alternatively, you can use the Toggle Guide Visibility button to hide any guides you’ve placed.
Using these tools, SuperPreview stands poised to revolutionize how web designers troubleshoot and resolve rendering issues between browsers, and I think it’s one of the most exciting new features in Expression Web 3.