
2. Creating, Opening, and Importing Sites
What Is a Site?
At first glance, that might seem like a patronizing question, but it’s not. I’m not talking about a site in the generic sense. I’m talking about a site as it relates to Expression Web 3.
Expression Web 3 is a capable page editor, but it’s really designed to work with a collection of related files. That collection of related files is what Expression Web 3 refers to as a site.
Expression Web 3 has many features that are designed with a site in mind. The reporting features of Expression Web 3, for example, are designed to provide information on an entire site. There are also numerous dialogs that allow you to take a specific action on all files in a site, and the Find and Replace feature in Expression Web 3 is most robust when used with a site and not just a single page.
A site can consist of pages, Cascading Style Sheets (CSS) files, script files, image files, and so on. It also can contain other folders for the purpose of organizing the files within the site.
How Expression Web 3 Maintains a Site
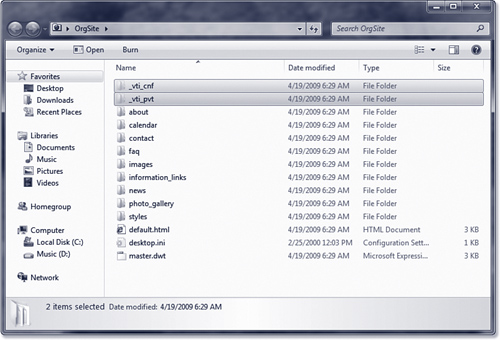
By default, Expression Web 3 tracks files and folders in your site, as well as other important information about the site, using hidden files called metadata. These files are in hidden folders that begin with _vti and are located in the same folder as the rest of your site, as shown in Figure 2.1.
Figure 2.1 The _vti folders shown here contain special configuration information that Expression Web 3 uses to keep track of your site.
Don’t See _vti Folders
![]()
If you have Expression Web 3 configured to use metadata files to keep track of your content, but you don’t see any _vti folders when you open the disk path where the site is located, the _vti folders are hidden. The default settings in Windows won’t show you hidden folders. To show hidden files and folders, follow these steps for Windows 7, Windows Vista, or Windows Server 2008:
1. Click Start and click Computer.
2. Click the Organize button and select Folder and Search Options.
3. Click the View tab.
4. Select the Show Hidden Files and Folders radio button (Show Hidden Folder, Files, and Drives on Windows 7) and click OK.
In Windows XP or Windows 2003 Server:
1. Click Start and click My Computer.
2. Select Tools, Folder Options.
3. Click the View tab.
4. Select the Show Hidden Files and Folders radio button and click OK.
You should now be able to see the _vti folders.
If you choose, you can configure Expression Web 3 so it doesn’t use metadata to track your site’s files. However, it’s best to just allow Expression Web 3 to keep metadata for your site. Doing so allows it to efficiently track changes to your site. However, if you choose not to use them, the functionality of the live site will not be affected.
![]() “For more information on configuring your site settings, see Chapter 15, Site Management and Reporting.”
“For more information on configuring your site settings, see Chapter 15, Site Management and Reporting.”
Note
![]()
The _vti folders are not visible in Expression Web 3’s folder list. Expression Web 3 explicitly hides those folders from view so you don’t unintentionally modify them.
Sites and Subsites
Expression Web 3 will enable you to create a new site within an existing site (a site known as a subsite), but for Expression Web 3 to recognize the subsite, it will need to add metadata information to the site. If the option to store site information using hidden metadata is disabled, Expression Web 3 will no longer be able to recognize the subsite as a separate site.
Site Templates
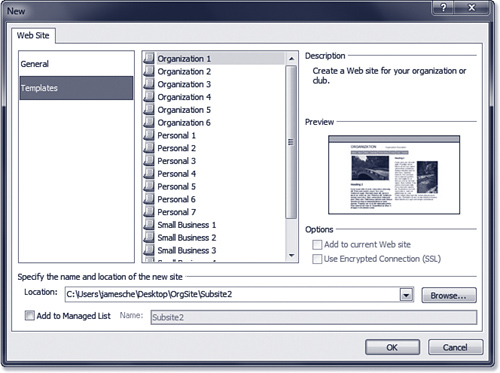
The quickest way to get a site up and running is to use the templates provided in Expression Web 3. You access the list of templates by selecting New, Site, and selecting Templates in the New dialog as shown in Figure 2.2. These aren’t cheap-looking, stock templates. They are professionally designed templates that are customizable.
Figure 2.2 Expression Web 3 comes with professionally designed, customizable templates so you can get a fully functional site up and running quickly.
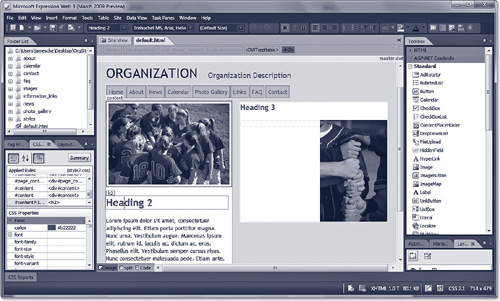
The site in Figure 2.3 was created using one of Expression Web 3’s many site templates. The site uses a Dynamic Web Template so that changes can be made quickly if necessary.
Figure 2.3 Dynamic Web Templates allow you to make changes to a template site just by updating the Dynamic Web Template.
![]() For more information on Dynamic Web Templates, see Chapter 19, “Using Dynamic Web Templates.”
For more information on Dynamic Web Templates, see Chapter 19, “Using Dynamic Web Templates.”
Note
![]()
An empty site is a convenient way to create a site from a folder of existing files. When you select the Empty Site option, Expression Web 3 will not add any files or folders to the location you specify.
The templates in Expression Web 3 make heavy use of external style sheets, as shown in Figure 2.4. Because the look and feel of a site is implemented using CSS, it’s quite simple to use the robust CSS features in Expression Web 3 to alter the look and feel of all pages in a site without much effort.
Figure 2.4 The look and feel of this site is implemented using several CSS files shown here, making it easy to modify.
![]() For more information on working with CSS in Expression Web 3, see Chapter 18, “Managing CSS Styles.”
For more information on working with CSS in Expression Web 3, see Chapter 18, “Managing CSS Styles.”
Note
![]()
You don’t have to use a template to create a site. You can use the One Page Site option in the New dialog to create a site with one blank page, or you can create an empty site.
Types of Sites
When starting work on a site, you’ll need to decide which type of site to create. The three types of sites to choose from are
• Disk-based site
• FTP (File Transfer Protocol) site (or secure FTP using SFTP [FTPS])
• HTTP (Hypertext Transfer Protocol) site (or secure HTTP [HTTPS] with Secure Sockets Layer [SSL])
Disk-based Sites
Disk-based sites are created at a specific disk location. The advantage of a disk-based site is that it can be created anywhere on your local file system or on a remote drive. You can also create disk-based sites on thumb drives, external hard drives, and so on.
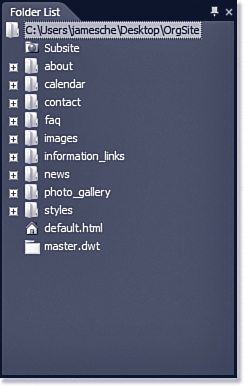
Figure 2.4 shows the folder list of a disk-based site open in Expression Web 3. Note that the path to the site is a disk location on my C: drive.
A disk-based site is the most flexible kind of site because it allows the site to be located in any folder you wish. For example, if you receive files for a site from someone else, you can work with them as a site in Expression Web 3 easily by simply copying the files into a folder on your computer and opening that folder as a site.
1. Select Site, New Site.
2. Enter the path for the new site, as shown in Figure 2.5, or click the Browse button to navigate to the desired location.
Figure 2.5 To create a disk-based site, enter a disk path in the New dialog.
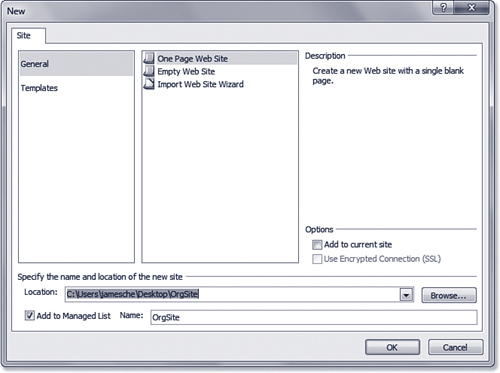
3. Select a general site or a site template from the dialog.
4. Check the Add to Managed List check box if you’d like for the new site to appear in your Managed Sites List.
5. Click OK to create the site.
Tip
![]()
If you tell Expression Web 3 to create a site in a folder that doesn’t exist, the folder will be created for you automatically. There is no prompt when this happens.
You can create a disk-based site on a mapped drive or on a universal naming convention (UNC) share (\servershare) as well. However, you’ll need to have the correct permissions so you can write to the remote location. Check with your system administrator if you’re not sure.
If a site is already open in Expression Web 3 and you’d like to add a new site to the existing site check the Add to Current Site checkbox and Expression Web 3 will add the new site to the existing site. This is a convenient way to add pages from a template to an existing site.
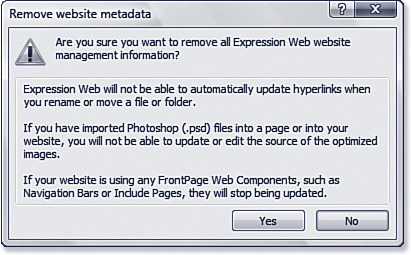
If content already exists at the location you specify, Expression Web 3 will add metadata to the existing folders. If you’re not using Dynamic Web Templates, or if you don’t want Expression Web 3 to maintain links in your site, you might want to stop Expression Web 3 from saving additional files in your site. If you don’t want Expression Web 3 metadata in the folder, select Site, Site Settings and uncheck the Manage The Site Using Hidden Metadata Files check box in the Site Settings dialog, as shown in Figure 2.6. When you uncheck that box and click OK, you’ll be asked whether you’re sure you want to remove the metadata, as shown in Figure 2.7. If you click Yes, all the _vti folders and metadata therein will be removed.
Figure 2.6 To get rid of the _vti folders and the metadata they contain, uncheck the option to store site information in metadata files in the Site Settings dialog.
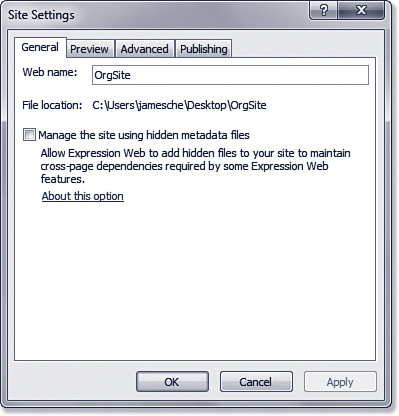
Figure 2.7 When you choose to remove metadata files, Expression Web 3 will warn you that you’ll lose some functionality.
Caution
![]()
If you’re using Dynamic Web Templates in your site, you will need to allow Expression Web 3 to store metadata files in your site. You also should leave metadata enabled if you want Expression Web 3 to correct links as pages are moved or renamed.
Don’t ignore the warning about removing metadata! Some of the information in the site’s metadata will be lost permanently if you choose to remove the metadata.
Expression Web 3 can use the Microsoft Expression Development Server to test disk-based sites, allowing you to take full advantage of ASP.NET and PHP features that require a web server.
![]() For more information on the Microsoft Expression Development Server, see Chapter 33, “Using the Microsoft Expression Development Server.”
For more information on the Microsoft Expression Development Server, see Chapter 33, “Using the Microsoft Expression Development Server.”
Tip
![]()
Because a site can be created anywhere on the file system, it’s easy to lose track of where a particular site was created. The Recent Sites menu option on the File menu is a convenient way to locate a recently created site. You can also use the Managed Sites List to easily keep track of your sites.
FTP Sites
FTP sites are usually located on a remote web server. Most web hosts provide FTP access so you can use FTP with your site. Most applications require you to develop a site locally and then FTP the files to the remote web server. Expression Web 3 takes a different approach in that it offers you the ability to work on an FTP site live on the web server. Because FTP is offered by almost all hosts, it is a convenient way to work with sites using Expression Web 3. If you choose to use FTP with Expression Web 3, use SSH File Transfer Protocol (SFTP) or FTP over SSL (FTPS) if possible so that the information (such as usernames and passwords) is encrypted.
Caution
![]()
You can delete a site by right-clicking the site name in the Folder List and selecting Delete. However, be careful about deleting sites you’ve created on your file system. If you create a site in a location with existing files and folders and then delete that site, Expression Web 3 will delete everything in that folder.
Files and folders deleted by Expression Web 3 are not moved to the Recycle Bin. They’re gone forever!
To open an FTP site, select Site, Open Site and enter the FTP path. When you click Open, Expression Web 3 will ask whether you want to open the site live or copy it to your local machine, as shown in Figure 2.8.
Figure 2.8 Expression Web 3 offers the option of opening an FTP site live on the web server.

![]() For a more in-depth discussion of FTP, see Chapter 14, “Publishing a Site.”
For a more in-depth discussion of FTP, see Chapter 14, “Publishing a Site.”
Caution
![]()
If you choose to work on your site live using FTP, keep in mind that any changes you make are immediately visible on the live site after you save the page.
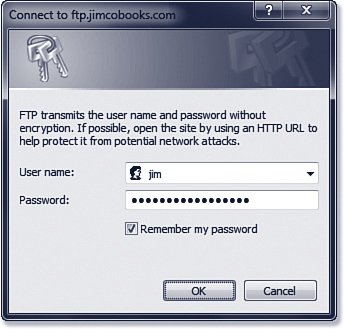
After you choose whether you want to edit the site live or copy it to your local machine, Expression Web 3 will prompt you for your username and password. If you want Expression Web 3 to remember your password for the site, check the Remember My Password box, as shown in Figure 2.9.
Figure 2.9 Expression Web 3 will remember your password for a site if you check the Remember My Password check box.
Tip
![]()
To use SFTP, use the format sftp://site.com. To use FTPS, use the format ftps://site.com. Your host or server administrator will need to configure a secure FTP connection to use one of these methods.
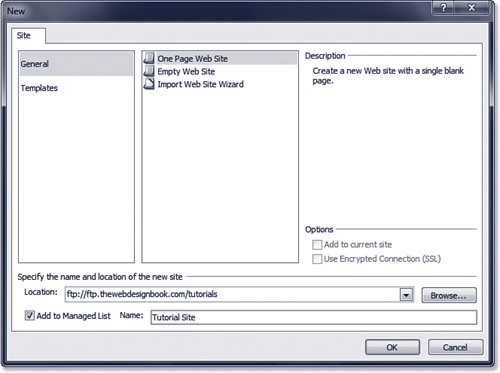
To create an FTP site, enter the FTP path to your web server in the New dialog as shown in Figure 2.10. You will likely be prompted for a username and password as shown previously in Figure 2.9.
Figure 2.10 When creating a site using FTP, enter the FTP location. If you don’t know the correct location, your web server administrator can help.
Caution
![]()
If you’re a notebook user with wireless capability, you probably use wireless Internet access in hotels when you travel. Be aware that many hotel networks are unsecure, and anything you transmit and receive over the wireless network can be intercepted by anyone else in the hotel using the wireless network.
When you are in a hotel and need to use its wireless network, use a virtual private network (VPN) solution such as Hamachi (www.hamachi.cc) or GoToMyPC (www.gotomypc.com) so you can securely access the network. You can also connect the hotel’s wired network (Ethernet cable) to a wireless access point such as Apple’s Airport Express to create your own secure wireless network.
HTTP Sites
HTTP sites, employ the same technology that is used when browsing your site. This method offers a greater selection of authentication methods for the web server administrator. In a private network environment, Windows-integrated authentication can be used so that user credentials are securely exchanged. You can also use secure HTTP (HTTPS) so credentials are encrypted.
Figure 2.11 shows the Folder List of an HTTP site open in Expression Web 3. Notice that the address of the site in Expression Web 3 is the same address that would be used to browse this site in a web browser.
Figure 2.11 If your host has the FrontPage Server Extensions installed, you can open your site live using HTTP (or HTTPS if your server supports SSL) as shown here.

Cannot Locate Server Error Creating FTP Site
![]()
If Expression Web 3 cannot locate an FTP site you’ve created, it’s likely that you mistyped it. However, there are other reasons this might fail.
Try opening a command prompt and pinging the FTP site. For example, the following command will test for the existence of an FTP server at jimcosoftware.com:
If you get no reply from the ping, it means you aren’t getting to the server. Check your Internet connection by browsing to a known site. If that works and you still can’t access the FTP site, check with the server administrator or your hosting company.
Repeatedly Prompted for Username and Password
![]()
Suppose you’re trying to create a site on a remote server. When you enter your username and password, the dialog asking for your credentials just keeps popping back up.
This is almost certainly caused by a typographical error in the username and/or password. Assuming you aren’t mistakenly entering the wrong case because your Caps Lock key is engaged, carefully retype your username and password. If the server still won’t accept them, try contacting your hosting company or server administrator.
There’s one caveat to creating a site using HTTP. The web server on which you are creating the site must be running the FrontPage Server Extensions. Many hosting companies no longer offer support for FrontPage Server Extensions, so if having the capability of using HTTP to open your site is important to you, you’ll want to make sure that the hosting company you choose supports the FrontPage Server Extensions.
![]() For more information on the FrontPage Server Extensions, see Chapter 14, “Publishing a Site.”
For more information on the FrontPage Server Extensions, see Chapter 14, “Publishing a Site.”
Creating an HTTP Site
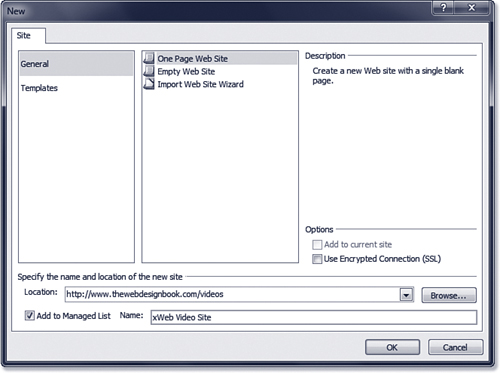
To create an HTTP site, enter the URL for the site in the New dialog as shown in Figure 2.12. If necessary, enter your username and password.
Figure 2.12 When creating a site using HTTP, use the same uniform resource locator (URL) that you would use to browse the site in your web browser.
![]() For more information on the FrontPage Server Extensions and WebDAV, see Chapter 14, “Publishing a Site.”
For more information on the FrontPage Server Extensions and WebDAV, see Chapter 14, “Publishing a Site.”
You cannot create a new site at the root of a web server (for example, at http://www.mysite.com). If you try to, Expression Web 3 won’t even check to see whether a Web server exists at that location. Instead, it will notify you that you need to create a subsite instead, as shown in Figure 2.13.
Figure 2.13 If you try to create a new site at the root of a web server, Expression Web 3 will immediately notify you that you must create a subsite instead.

If you enter an address for a new subsite and Expression Web 3 cannot locate a web server at the URL you specify, you will see the dialog shown in Figure 2.14. This dialog means that Expression Web 3 attempted to contact the domain you specified (oiuoiu.com in the case of Figure 2.14) and did not find any such domain.
Figure 2.14 If there is no web server at the location you specify when creating a subsite, Expression Web 3 will notify you.

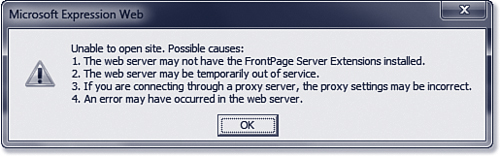
Finally, if you attempt to create a new subsite on an existing web server and either that server doesn’t have the FrontPage Server Extensions installed or there is a configuration problem with the FrontPage Server Extensions, you will see the dialog shown in Figure 2.15. You will also see this dialog in cases where there is a web server at the URL you specify but the web server is not available.
Figure 2.15 If the FrontPage Server Extensions are not installed, or if there is a problem with the FrontPage Server Extensions on the server you specify, you’ll be notified of the problem.
Creating a Site Using SSL
If you require additional security and your server is configured to allow SSL traffic, you can create a site using SSL by checking the Use Encrypted Connection (SSL) check box, as shown in Figure 2.16.
Figure 2.16 You can create a site using SSL by checking the Use Encrypted Connection (SSL) check box. Your server must be configured to accept SSL traffic.

Tip
![]()
Many Internet service providers provide custom pages when you attempt to access a site that doesn’t exist. If your Internet service provider includes this feature, you might see the dialog shown in Figure 2.15 if you try to create a site on a server that doesn’t exist.
When you check the Use Encrypted Connection (SSL) check box, Expression Web 3 will automatically change the URL you have specified if necessary so it uses HTTPS instead of HTTP. When this option is selected, any data sent over the network (including your username and password) will be encrypted.
Tip
![]()
If you enter a URL that starts with “https://”, Expression Web 3 will automatically check the Use Encrypted Connection (SSL) check box.
Importing Sites
Expression Web 3’s Import Site wizard is a convenient and powerful way to import site content. Using the Import Site wizard, you can easily control how a site is imported. You can choose whether to use the FrontPage Server Extensions, FTP, and so on, and in some cases, you can also specify how Expression Web 3 decides whether to import certain files.
Note
![]()
SSL is a technology that was developed by Netscape many years ago to allow for the secure exchange of information across the Internet.
To use SSL, your web server administrator needs to configure the web server appropriately.
Using the Import Site Wizard
The Import Site wizard is accessed by selecting Site, Import, Import Site Wizard. Let’s have a look at the steps involved in importing a site.
Caution
![]()
Always remember that sites are copyrighted material. Current laws as of this writing automatically provide for a common-law copyright on any published site.
You can use the Import Site wizard to import any site you wish, but it is illegal to use the content or the design of someone else’s site without their express written permission.
Step 1: Choosing an Import Method
In step 1, you will need to choose how the site’s files are imported. You can choose among the following methods of importing a site:
• FTP
• SFTP
• FrontPage Server Extensions
• WebDAV
• File System
• HTTP
Tip
![]()
Keep in mind that when you import a site, you aren’t necessarily moving the site from a remote location to your local machine. The act of importing a site is really just the process of copying the site from one location to another.
All these methods except the FrontPage Server Extensions method use the Publish feature of Expression Web 3 to import the remote site. After you’ve specified the necessary information for Expression Web 3 to open the remote site, the remote site is published to the destination you’ve selected.
![]() For more information on using the Publish feature in Expression Web 3, see Chapter 14, “Publishing a Site.”
For more information on using the Publish feature in Expression Web 3, see Chapter 14, “Publishing a Site.”
FTP, SFTP, and FTPS
To use the FTP to import a site, choose the FTP option. You need a username and password to import a site using FTP.
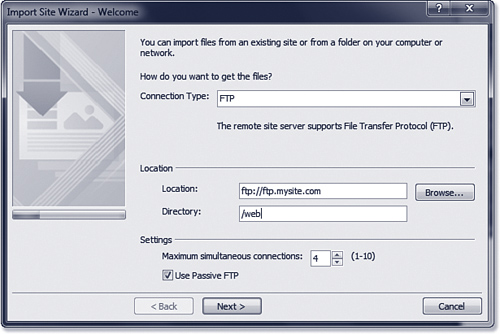
To import a site using FTP, enter the FTP address of the remote site in the Web Site Location text box, as shown in Figure 2.17. Depending on the configuration of the remote site, you might also need to enter a directory in the Directory text box, and enable passive FTP by checking the Use Passive FTP check box. You can also increase the number of simultaneous connections from the default of 4 up to a maximum of 10. Doing so will improve the speed at which the site is imported. However, there is a limit to the total number of connections your computer can have open at any one time, so increasing the connections in Expression Web 3 can impact other applications.
Figure 2.17 Importing using FTP might require a directory and passive FTP. Ask the administrator of the remote site if you’re not sure.
If you would like to import the site using secure FTP, choose either the SFTP or FTPS option when importing.
![]() For more information on the options available with FTP, see Chapter 14, “Publishing a Site.”
For more information on the options available with FTP, see Chapter 14, “Publishing a Site.”
After you’ve entered the necessary information, click the Next button to continue. You’ll be prompted for a username and password before you can proceed to the next step.
FrontPage Server Extensions
If the remote site is running FrontPage Server Extensions, the FrontPage Server Extensions option in the Import Site wizard is the best one to choose.
After selecting this method, enter the URL of the remote site in the Location text box shown in Figure 2.18. Use the same URL that you would use when viewing the site in a web browser.
Figure 2.18 The FrontPage Server Extensions method of importing a site allows you to import subsites as well.
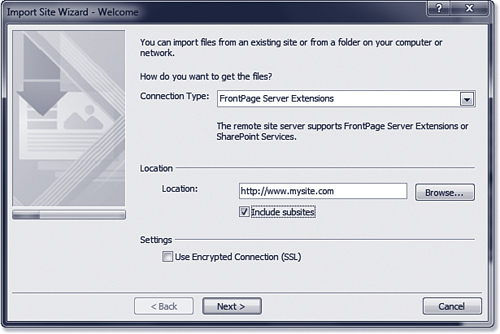
You have the option of including subsites by checking the Include Subsites check box. You can also import a site using the Secure Sockets Layer (SSL).
![]() For more information on subsites, see “Sites and Subsites,” p. 27, earlier in this chapter.
For more information on subsites, see “Sites and Subsites,” p. 27, earlier in this chapter.
Caution
![]()
If the remote web server has the FrontPage Server Extensions installed, make sure you use this option when importing the site. If you don’t, the files that provide the FrontPage Server Extensions with configuration information won’t be imported.
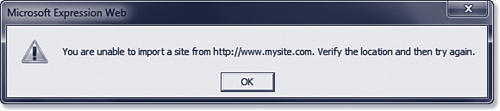
To proceed to the next step, click the Next button. If the FrontPage Server Extensions are not installed on the remote site, you will be notified that you cannot import the site, as shown in Figure 2.19.
Figure 2.19 If the FrontPage Server Extensions aren’t installed, Expression Web 3 will tell you that the selected site cannot be imported.
Assuming the FrontPage Server Extensions are located on the site, you’ll be prompted for a username and password to import the site. The username and password you will need to enter are assigned by the administrator of the site or by the hosting company.
Tip
![]()
When you see the dialog shown in Figure 2.19, you should first check to see whether the FrontPage Server Extensions are installed on the remote site. If you find that they are installed and you still get this dialog, check with your host to find out what might be wrong.
WebDAV
If the remote web server supports Web Distributed Authoring and Versioning (WebDAV), you can use this option to import a site. WebDAV is similar to using the FrontPage Server Extensions option, but the FrontPage Server Extensions are not required for WebDAV.
When using WebDAV, you don’t have the option of including subsites when you import a site. However, you can import using SSL when using the WebDAV method by checking the Use Encrypted Connection (SSL) check box. If you want to import a subsite’s content, you will need to specify the path to the subsite instead of the path to the parent site.
Tip
![]()
Most hosting companies do not support WebDAV publishing at this time.
Just as with the FrontPage Server Extensions method, you will need to enter a username and password when importing a site using WebDAV.
![]() For more information on WebDAV, see Chapter 14, “Publishing a Site.”
For more information on WebDAV, see Chapter 14, “Publishing a Site.”
File System
The File System method is often used when importing a site from a local file system. However, it can also be used to import a site from any location to which you have access via the file system. In other words, in addition to importing from a local drive, you can also use either a universal naming convention (UNC) path or a mapped drive to import using this method.
Note
![]()
The file system method is often used in an office network environment where many file servers are available.
A UNC path consists of a server name and a share name and is in the format \servershare. For example, to access a share called sites on a server named server1, you would use the UNC path \server1sites.
Because Expression Web 3 provides support for disk-based sites, you can also choose to include subsites when using the File System method by checking the Include Subsites check box.
Tip
![]()
Windows automatically sets up a share for the root of every drive on your computer. You can access any share by using the format \server<drive>$. For example, to access the root of the C drive on a computer named desktop, you would use the UNC path \desktopc$.
You will need to use an Administrator account to access these shares.
HTTP
The HTTP method is used to import a site to which you don’t have access via any of the previously discussed methods. This is the only method that does not require authorization to complete the import process.
The HTTP import process is quite different from the other import methods. In fact, you can import any site you can get to on the Internet using this method. Instead of actually publishing the site during the import process, the HTTP import method can be configured to follow hyperlinks from the home page.
When you choose the HTTP method to import a site, the Import Site wizard adds the Set Import Limits step, as shown in Figure 2.20.
Figure 2.20 The HTTP method of importing a site adds another step to the Import Site wizard.
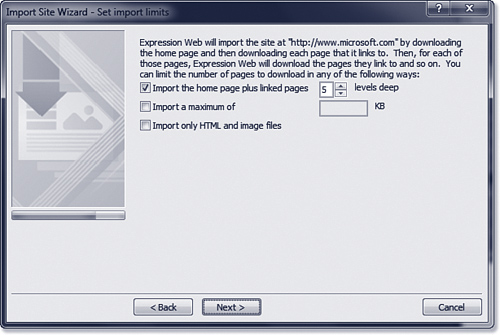
In this step, you can specify exactly how the Import Site wizard decides what to import using the following check boxes:
• Import the Home Page Plus Linked Pages # Levels Deep—When a site is imported, Expression Web 3 will follow hyperlinks to the depth that you specify. For example, if you specify 2 for the number of levels, Expression Web 3 will import the home page, all pages linked to directly from the home page, and all pages linked to directly from those pages.
Note
![]()
The Set Import Limits step actually appears as the third step in the wizard. I am covering it here only because it’s unique to the HTTP method of importing.
• Import a Maximum of # KB—Use this option when you want to put a cap on the amount of content that gets imported. This is particularly useful if you have metered bandwidth or a slower Internet connection.
When this option is selected, Expression Web 3 will import the home page of the site and then follow all links from that page. It will continue to follow links and import files until the maximum limit is reached.
Tip
![]()
By default, Expression Web 3 will import all files that are reachable from the home page and all child pages.
• Import Only HTML and Image Files—When this box is checked, Expression Web 3 will only import images and HTML files. Other files such as script files, CSS files, Flash files, and so on will not be imported.
Import Web Site Wizard Skips Set Import Limits Step
![]()
If you’re choosing HTTP as your import method, but you don’t have the option of choosing the import limits when you run through the wizard, it’s likely that the site you are trying to import is configured with the FrontPage Server Extensions. If Expression Web 3 detects that the FrontPage Server Extensions are installed on the remote site, it will automatically use the FrontPage Server Extensions option when importing the site.
You’ll have the option of choosing what to import when you are presented with the Site view at the end of the process.
Username and Password Not Accepted
![]()
If you’re trying to import a site and get rejected even though you’ve entered the correct information when asked for your username and password, the most likely cause of this is an incorrect password. Take care to type the characters correctly and make sure that your Caps Lock isn’t on. If you’re positive that you’ve entered the information correctly, check with the hosting company or administrator of the remote web server.
Step 2: Specifying a Destination Web Location
The second step of the Import Site wizard (shown in Figure 2.21) is where you’ll specify the destination location for the imported site. This can be a UNC path, a disk location, or an HTTP location. However, when specifying an HTTP location, the site must have the FrontPage Server Extensions installed.
Figure 2.21 You can specify a destination for an imported site in the Import Site.
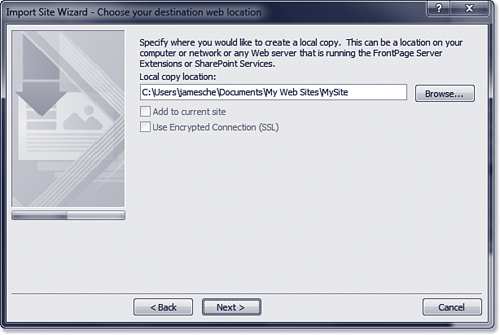
If you already have a site open in Expression Web 3, check the Add to Current Web Site check box if you’d like the imported site to be added to the open site. If you require additional security, you can specify that SSL be used to import the site if you use an HTTP path for the destination.
Step 3: Finish
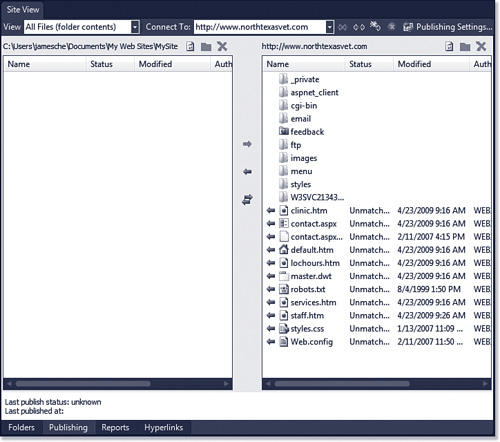
After you’ve specified all the necessary information, click the Finish button in the last step of the wizard to finish the import process. If you’ve chosen HTTP as your method of importing, the site will begin importing immediately. Otherwise, you’ll be presented with the Site view, as shown in Figure 2.22. You can then complete the import process by using the Site view to copy the files and folders.
Figure 2.22 In all import methods except the HTTP method, you will use the Site view to complete the import process.
![]() For more information on Site view when publishing, see Chapter 14, “Publishing a Site.”
For more information on Site view when publishing, see Chapter 14, “Publishing a Site.”
Deciding on a Site Type
As you’ve seen in this chapter, there are quite a few choices when it comes to deciding on a site type in Expression Web 3. Deciding which type is best for your site is often a confusing endeavor.
Until recently, web designers using the Microsoft platform were limited in their choice of site types when it came to remote sites. If you wanted full functionality, you were restricted to using the FrontPage Server Extensions. Sure, you could use FTP, but then you couldn’t work with a remote site live.
Expression Web 3 (and the Visual Studio family of products) has changed all of that, and there’s a general tendency by Microsoft these days to shift away from a reliance on the FrontPage Server Extensions. You can now use FTP just as easily as you used HTTP in earlier products.
In my opinion, FTP (preferably FTPS or SFTP) is the best solution for today’s sites. FTP is well-suited to fast file transfers, you have the ability to use many tools other than Expression Web 3 to manage your files (including the FTP command-line client that comes with Windows), and unlike the FrontPage Server Extensions option used when creating HTTP sites, FTP will be around for many years to come.
Disk-based sites are also a perfectly valid option, especially if you are creating your site locally and then publishing it to the live server at a later time. One of the greatest advantages of a disk-based site is that it can easily be moved from one location to another (or stored on a removable drive) without breaking anything. Even if you are using a server technology such as ASP.NET or PHP, a disk-based site is still a viable choice because you can test your server-side code using the Microsoft Expression Development Server.
If given the choice between using a technology that’s being phased out and one that has proven to be a long-lived technology, I’ll choose the one with greater longevity every time.