2
Create and manage files
In this chapter
When working in Microsoft Word, Excel, or PowerPoint, you save content in individual files. In each app, you can save files as different types depending on each file’s purpose. The standard files are Word documents, Excel workbooks, and PowerPoint presentations. Regardless of the app or file type, you use similar techniques for creating and working in files, for changing the display of content, and for displaying and modifying the information stored with each file (its properties).
You don’t often create freestanding files when working with Outlook items (although you can create template files and save messages and other Outlook items as files). The component of this chapter that relates to Outlook is the discussion of views. In Outlook, you choose views not of a file but of an entire module—such as the Calendar module. Displaying different views of modules can help you locate specific items or information more easily. Similarly, displaying different views of files or different file elements can make it easier to work in a document, on a worksheet, or on a slide. Each app offers a variety of content views.
This chapter guides you through procedures related to creating files, opening and moving around in files, displaying different views of files, displaying file properties, and saving and closing files, using techniques that are common to working in files created in Word, Excel, or PowerPoint.
Create files
When creating a new document, workbook, or presentation, you can start by using a blank file or by using a file based on a design template or content template.
Word and Excel offer content templates that provide purpose-specific placeholder content for documents or workbooks.
PowerPoint offers some content templates, but most are design templates that control thematic elements (colors, fonts, and graphic effects) and slide layouts. Each template has a corresponding theme, so you can create a presentation based on one template but then entirely change its appearance by applying a different theme.
As discussed in Chapter 1, “Explore Office 2019,” when you start Word, Excel, or PowerPoint without opening a file, the app displays a Home page that gives you options for opening and creating files. Additional options for creating new files are available from the New page of the Backstage view.

A variety of templates are available from the New page of each app
![]() IMPORTANT
IMPORTANT
The templates that appear by default in your installation of Word, Excel, or PowerPoint might be different from those shown in images in this book. The templates can change depending on your use of the app and the installation of app updates.
You can start new files in different ways:
You can start from a blank document, workbook, or presentation that contains one page, worksheet, or slide. You can then add content, apply structure and design elements, and make any necessary configuration changes.
You can save time by basing your file on one of the many content and design templates that come with the Office apps. You can also preview and download many prepopulated templates from the Office website. These templates provide not only the design elements but also suggestions for content that is appropriate for different types of presentations, such as reports or product launches. After you download a template, you simply customize the content provided in the template to meet your needs.
 Tip
TipYou can suppress the Home page (also called the Start screen) if you want to go directly to a new, blank file when you start an app. For more information, see “Change Office and app options” in Chapter 1, “Explore Office 2019.”
To create a new blank document, workbook, or presentation
Start the app.
When the Home page appears, press the Esc key.
Or
If the app is already running, select the File tab to display the Backstage view.
In the left pane of the Backstage view, select New to display the New page.
On the New page of the Backstage view, select the Blank file thumbnail.
To preview design templates
Display the New page of the Backstage view.
On the New page, scroll the pane to view the design templates installed with the app.
Select any thumbnail to open a preview window that displays a sample document page, worksheet, or title slide.
Do any of the following:
Select Create to create a document, workbook, or presentation based on the template in the preview window.
Select the arrow to the right of the preview window to view the next template, or the arrow to the left to view the previous template.
In the upper-right corner of the preview window, select the Close button (the X) to close the preview window without creating a document, workbook, or presentation.
To create a document, workbook, or presentation based on an installed template
Display the New page of the Backstage view.
Scroll the pane to locate the design template you want to use.
Double-click the thumbnail to create the file.
To create a document, workbook, or presentation based on an online template
Display the New page of the Backstage view.
To specify the initial search term, do either of the following:
In the search box at the top of the page, enter a term related to the template content or design you’re looking for, and then select the Search button.
Below the search box, select one of the suggested searches.
In the Category list, select any category or categories to further filter the templates.

Selecting multiple categories applies multiple filters
TipApplied category filters are indicated by colored bars at the top of the Category list. To remove a filter, point to it and then select the X that appears to the right of the category name, or double-click the category name.
Scroll the pane to locate a design that fits your needs.
Double-click any thumbnail to create a file based on the template.
TipIf the app supports template preview, select any thumbnail to preview the design template, and select the More Images arrows to see the content defined as part of the template. Then select Create in the preview window to create the file.
Open and move around in files
The Home page that appears by default when you start Word, Excel, or PowerPoint displays a list of files you worked on recently in that app, and a link to open other existing files. If the file you want to open appears on the Home page, you can open it directly from there. Otherwise, you open files from the Open page of the Backstage view.

The Open page includes all the locations you’ve linked to from an Office app
If you open a document that is too long to fit entirely on the screen, you can bring off-screen content into view without changing the location of the cursor by using the vertical scroll bar in the following ways:
Select the scroll arrows to move up or down by one line.
Select above or below the scroll box to move up or down by the height of one screen.
Drag the scroll box on the scroll bar to display the part of the document corresponding to the location of the scroll box. For example, dragging the scroll box to the middle of the scroll bar displays the middle of the document.
If the document is too wide to fit on the screen, Word displays a horizontal scroll bar that you can use in similar ways to move from side to side.
You can also move around in a document by moving the cursor. To place the cursor in a specific location, you simply select there. You can also press a keyboard key to move the cursor. For example, pressing the Home key moves the cursor to the left end of a line.
The following table lists ways to use your keyboard to move the cursor.
Cursor movement |
Key or keyboard shortcut |
Left one character |
Left Arrow |
Right one character |
Right Arrow |
Up one line |
Up Arrow |
Down one line |
Down Arrow |
Left one word |
Ctrl+Left Arrow |
Right one word |
Ctrl+Right Arrow |
Up one paragraph |
Ctrl+Up Arrow |
Down one paragraph |
Ctrl+Down Arrow |
To the beginning of the current line |
Home |
To the end of the current line |
End |
To the beginning of the document |
Ctrl+Home |
To the end of the document |
Ctrl+End |
To the beginning of the previous page |
Ctrl+Page Up |
To the beginning of the next page |
Ctrl+Page Down |
Up one screen |
Page Up |
Down one screen |
Page Down |
In a long document, you might want to move quickly among elements of a certain type—for example, from heading to heading, from page to page, or from graphic to graphic. Similarly, in a presentation, you might want to move quickly to a specific slide or presentation section. You can do this from the Navigation pane.

Move between objects of a specific type
To open a recent document, workbook, or presentation
Start Word, Excel, or PowerPoint.
On the Home page, in the Recent list, select the file name of the file you want to open.
Or
With the app running, select the File tab to display the Backstage view.
In the left pane of the Backstage view, select Open to display the Open page.
In the right pane of the Open page, scroll the file list if necessary to locate the file you want to open, and then select the file name to open it.
To open an existing document, workbook, or presentation
Start Word, Excel, or PowerPoint.
Do either of the following to display the Open page of the Backstage view:
On the Home page, at the bottom of the left pane, select Open Other Files.
With the app running, display the Backstage view and then select Open.
In the Places list, select the local or network storage location where the file is stored.

The Places list includes all the locations you’ve linked to from an Office app
Navigate to the file storage folder by using one of the following methods:
In the right pane, select a recent folder. Then select any subfolders until you reach the folder you want.
In the left pane, select Browse to open the Open dialog box. Then select folders in the Navigation pane, double-click folders in the file pane, or enter the folder location in the Address bar.
Double-click the file you want to open.
TipIn the Open dialog box, selecting a file name and then selecting the Open arrow displays a list of alternative ways to open the selected file. To look through a file without making any inadvertent changes, you can open the file as read-only, open an independent copy of the file, or open it in Protected view. You can also open the file in a web browser. In the event of a computer crash or other similar incident, you can tell the app to open the file and try to repair any damage.
To open the Navigation pane in a Word document
On the View tab, in the Show group, select the Navigation Pane check box.
To browse by object in a Word document
Open the Navigation pane, and then do any of the following:
At the top of the Navigation pane, select Headings. Then select any heading to move directly to that location in the document.
At the top of the Navigation pane, select Pages. Then select any thumbnail to move directly to that page of the document.
At the right end of the search box, select the arrow. In the Find list, select the type of object you want to browse by. Then select the Next and Previous arrows to move among those objects.
Display different views of files
In each app, you can display the content of a file in a variety of views, each suited to a specific purpose. The views in each app are specific to that app’s files.
Word 2019 includes the following views:
Print Layout view This view displays a document on the screen the way it will look when printed. You can review elements such as margins, page breaks, headers and footers, and watermarks.
Read Mode view This view displays as much document content as will fit on the screen at a comfortable size for reading. In this view, the ribbon is replaced by one toolbar at the top of the screen with buttons for searching and navigating in the document. You can view comments, but you can’t edit the document in this view.
Web Layout view This view displays the document the way it will look when viewed in a web browser. You can see backgrounds and other effects. You can also review how text wraps to fit the window and how graphics are positioned.
Outline view This view displays the structure of a document as nested levels of headings and body text and provides tools for viewing and changing the hierarchy.
Draft view This view displays the content of a document with a simplified layout so that you can quickly enter and edit text. You cannot view layout elements such as headers and footers.
Excel 2019 includes the following views:
Normal view This view displays the worksheet with column and row headers.
Page Layout view This view displays the worksheet on the screen the way it will look when printed, including page layout elements.
Page Break Preview view This view displays only the portion of the worksheet that contains content, and any page breaks. You can drag page breaks in this view to move them.
You can also create custom views that apply a specific set of display and print settings to a worksheet.
PowerPoint 2019 includes the following views for use while developing a presentation:
Normal view This view includes the Thumbnails pane on the left side of the app window, the Slide pane on the right side of the window, and an optional Notes pane at the bottom of the window. You insert, cut, copy, paste, duplicate, and delete slides in the Thumbnails pane, create slide content in the Slide pane, and record speaker notes in the Notes pane.
Notes Page view This is the only view in which you can create speaker notes that contain elements other than text. Although you can add speaker notes in the Notes pane in Normal view, you must be in Notes Page view to add graphics, tables, diagrams, or charts to your notes.
Outline view This view displays a text outline of the presentation in the Outline pane and the active slide in the Slide pane. You can enter text either directly on the slide or in the outline.
Reading view In this view, which is ideal for previewing the presentation, each slide fills the screen. You can select buttons on the navigation bar to move through or jump to specific slides.
Slide Sorter view This view displays thumbnails of all the slides in the presentation. In this view, you manage the slides, rather than the slide content. You can easily reorganize the slides, group them into sections, and apply transitions to one or multiple slides. You can also apply transitions from one slide to another and specify how long each slide should remain on the screen.
While presenting a slide show, PowerPoint displays the slides in Slide Show view and presenter tools in Presenter view.
View options are available from the View Shortcuts toolbar near the right end of the status bar and from the View tab of the ribbon.

View options on the PowerPoint status bar; the active view is shaded
![]() SEE ALSO
SEE ALSO
On a touchscreen device, the appearance of the buttons on the View Shortcuts toolbar changes depending on whether you’re in Mouse mode or Touch mode. For more information, see “Work with the ribbon and status bar,” in Chapter 1, “Explore Office 2019.”
When you want to focus on the layout of a document, worksheet, or slide, you can display rulers and gridlines to help you position and align elements. You can also adjust the magnification of the content area by using the tools available in the Zoom group on the View tab, or the Zoom button or Zoom slider at the right end of the status bar.
If you want to work with different parts of a document or workbook, you can open the file in a second window and display both, or you can split a window into two panes and scroll through each pane independently. You’re not limited to working with one file at a time. You can easily switch between open files, and you can display more than one app window simultaneously.
Not represented on the View tab is a feature that can be invaluable when you are fine-tuning the layout of a document in Word. Nonprinting characters, such as spaces, tabs, and paragraph marks, control the layout of your document, and hidden characters provide the structure for behind-the-scenes processes, such as indexing. You can control the display of these characters for each window.
To switch among views of a file
On the View Shortcuts toolbar, select the view button you want.
On the View tab, in the File Views group, select the view you want.
To change the magnification of content in the app window
On the View tab, in the Zoom group, select Zoom to open the Zoom dialog box.

Depending on the app, you can select a magnification level, enter a specific percentage, or select a page configuration
In the Zoom dialog box, select a Zoom to or Magnification option or enter a specific percentage in the Percent box, and then select OK.
Or
Using the zoom controls at the right end of the status bar, do any of the following:
At the left end of the slider, select the Zoom Out button to decrease the zoom percentage.
At the right end of the slider, select the Zoom In button to increase the zoom percentage.
In PowerPoint, at the right end of the status bar, select the Fit slide to current window button.

Selecting the Fit Slide To Current Window button is a quick way to view a slide at the largest size that fits in the Slide pane
To display or hide rulers, gridlines, and guides in a document or presentation
On the View tab, in the Show group, do any of the following:
Select or clear the Ruler check box.
Select or clear the Gridlines check box.
In PowerPoint, select or clear the Guides check box.
To display nonprinting characters and formatting marks in a document
On the Home tab, in the Paragraph group, select the Show/Hide ¶ button.
To split a document or workbook window into two panes
On the View tab, in the Window group, select the Split button.
To display a different open document, workbook, or presentation
On the View tab, in the Window group, select the Switch Windows button, and then select the file you want to view.
Point to the app button on the Windows taskbar, and then select the thumbnail of the presentation you want to display.
To display multiple open files of one type at the same time
On the View tab, in the Window group, select the Arrange All button.
Display and edit file properties
Properties are file attributes or settings, such as the file name, size, created date, author, and read-only status. Some properties exist to provide information to computer operating systems and apps. You can display properties within a document, workbook, or presentation (for example, you can display the slide number on a slide). Word, Excel, and PowerPoint automatically track some of the properties for you, and you can set others.
You can examine the properties attached to a file from the Info page of the Backstage view.

Some of the properties stored with a typical PowerPoint presentation
You can change or remove basic properties in the default Properties pane, expand the Properties pane to make more available, or display the Properties dialog box to access even more properties.
To display file properties
Display the Info page of the Backstage view. The standard properties associated with the file are displayed in the Properties area of the right pane.
At the bottom of the Properties pane, select Show All Properties to expand the pane.
At the top of the Properties pane, select Properties and then select Advanced Properties to display the Properties dialog box.
To edit file properties
In the Properties pane, select the value for the property you want to edit to activate the content box.
Enter or replace the property value, and then press Enter.
Or
In the Properties dialog box, do either of the following:
On the Summary page, select the box to the right of the property you want to modify, and then enter or replace the property value.
On the Custom page, select the property you want to modify in the Name list, and then enter or replace the property value in the Value box.
Save and close files
You save a document, workbook, or presentation the first time by selecting the Save button on the Quick Access Toolbar or by displaying the Backstage view and then selecting Save As. Both actions open the Save As page, where you can select a storage location.

The Recent list shows places where you’ve saved files from this app
You can save the file in a folder on your computer or, if you have an internet connection, in a folder on your Microsoft OneDrive. If your company is running Microsoft SharePoint, you can add a SharePoint site so that it is available from the Places pane of the Save As page, just like any other folder.
![]() SEE ALSO
SEE ALSO
For information about OneDrive, see the sidebar “Save files to OneDrive” later in this chapter.
Selecting Browse at the bottom of the left pane displays the Save As dialog box, in which you assign a name to the file.
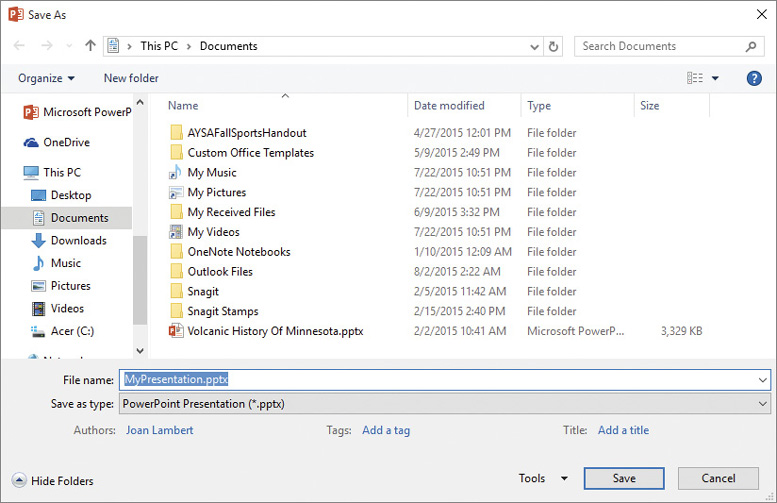
Use standard Windows techniques in either the Address bar or the Navigation pane to navigate to the folder you want
![]() Tip
Tip
If you want to create a new folder in which to store the file, select New Folder on the Save As dialog box toolbar.
After you save a file for the first time, you can save changes simply by selecting the Save button on the Quick Access Toolbar. The new version of the file then overwrites the previous version.
![]() Tip
Tip
By default, Word, Excel, and PowerPoint periodically save the file you are working on. To adjust the time interval between saves, display the Backstage view, and select Options. In the left pane of the Options dialog box, select Save, and then specify the period of time in the Save AutoRecover Information Every box.
Every time you open a document, workbook, or presentation, a new instance of the app starts. You can close the file and exit that instance of the app. If you have only one document, workbook, or presentation open, you can close the file and exit the app, or you can close the file but leave the app running.
To save a document, workbook, or presentation for the first time
Select the File tab to display the Backstage view.
In the left pane of the Backstage view, select Save As.
On the Save As page of the Backstage view, select a storage location, and then select a recently accessed folder in the right pane, or select Browse.
In the Save As dialog box, browse to the folder you want to save the file in.
In the File name box, enter a name for the file.
If you want to save a file in a format other than the one shown in the Save As Type box, select the Save as type arrow and then, in the Save as type list, select the file format you want.
In the Save As dialog box, select Save.
To add a cloud storage location
On the Save As page of the Backstage view, select Add a Place.
In the Add a Place list, select Office 365 SharePoint or OneDrive.
In the Add a service window, enter the email address you use to sign in to the cloud storage service, and then select Next.
In the Sign in window, enter the password associated with the account, and then select Sign In to add the cloud storage location associated with that account to the Places list.
TipTo save a copy of a file, display the Save As page of the Backstage view, and then save the file with a different name in the same location or with the same name in a different location. (You can’t store two files of the same type with the same name in the same folder.)
To save a file without changing the name or location
On the Quick Access Toolbar, select the Save button.
In the left pane of the Backstage view, select Save.
Press Ctrl+S.
To close a document, workbook, or presentation
At the right end of the title bar, select the Close button to close the file and the app window.
Display the Backstage view, and then select Close to close the file without exiting the app.
On the Windows taskbar, point to the app button to display thumbnails of all open files of that type. Point to the thumbnail of the file you want to close, and then select the Close button that appears in its upper-right corner.
Key points
You create new documents, workbooks, and presentations from the New page of the Backstage view. When creating Office files, you can choose a blank template, a template that includes preset formatting, or a template that includes starter content.
You can open files from File Explorer or from the Open page of the Backstage view. The Recent list on the Open page displays files you’ve recently worked on or pinned for easy access.
You can display different views of files, depending on your needs as you create the file and the purpose for which you are creating it.
Every file has properties; some are automatically tracked and updated, and others can be set by users.
The first time you save a file, you specify its name, location, and file format. Each Office app offers several file formats; some are specific to the app, and others can be opened in third-party apps. You can save additional copies of a file by specifying a different name or location.
 Practice tasks
Before you can complete these tasks, you need to copy the book’s practice files to your computer. The practice files for these tasks are located in the Office2019SBSCh02 folder. You can save the results of the tasks in the same folder.
The introduction includes a complete list of practice files and download instructions.
Create files
Complete the following tasks:
Start PowerPoint and create a new, blank presentation.
Display the available presentation design templates.
Preview a template that you like.
Without closing the preview window, preview the next or previous template.
From the preview window, create a presentation based on the currently displayed template. Notice that the unsaved blank presentation closes.
Leave the presentation open for use in a later set of practice tasks.
Open and move around in files
Start Word, and then complete the following tasks:
From within Word, open the NavigateFiles document located in the practice file folder.
In the second line of the document title, click at the right end of the paragraph to position the cursor.
Use a keyboard method to move the cursor to the beginning of the line.
Use a keyboard method to move the cursor to the beginning of the word Regulations.
Use a keyboard method to move the cursor to the end of the document.
Use the scroll bar to move to the middle of the document.
TipIf the vertical scroll bar is not visible, move the pointer to display the scroll bar.
Use the scroll bar to change the view of the document by one screen.
Open the Navigation pane and select Headings at the top if it isn’t already selected.
In the Navigation pane, select Landscaping to move the cursor directly to the selected heading in the document.
At the top of the Navigation pane, select Pages. On the Pages page, scroll through the thumbnails to review the amount of visible detail, and then select the thumbnail for page 5 to move the cursor directly to the top of the selected page.
At the right end of the Navigation pane title bar, select the Close button to close the pane.
Close the document without saving it.
Display different views of files
Open the DisplayViews presentation, and complete the following tasks:
In Normal view, display slide 2 of the presentation. Then switch to Slide Show view.
Move forward through the presentation to its end. Then switch to Slide Sorter view and select slide 1.
Display the presentation in Reading view. Use any method to navigate to slide 4, and then use the most efficient method to return to slide 1.
Display the presentation in Normal view.
Use commands on the View tab to arrange the DisplayViews presentation and the presentation you created in the first set of practice tasks side by side on the screen.
In the DisplayViews presentation, display the gridlines. Notice that they appear in both open presentations.
Switch to the presentation you created in the first set of practice tasks. Display the guides. Notice the effect of these actions in the other open presentation.
Set the magnification of the active presentation to 60% and notice the effect of this action in the other open presentation.
Leave both presentations open for use in a later set of practice tasks.
Display and edit file properties
Start Excel, and then complete the following tasks:
Open the DisplayProperties workbook.
Display the workbook properties.
Expand the Properties list to display all properties. Then display the advanced properties.
In the Properties dialog box, set the Title property to Shipping Costs. Then close the dialog box.
Verify that the title appears in the Properties list on the Info page of the Backstage view.
Close the workbook and save your changes.
Save and close files
Complete the following tasks:
Save a copy of the DisplayViews presentation in the practice file folder as MyPresentation. Close the presentation and this instance of PowerPoint.
Close the presentation you created in the first task without exiting PowerPoint. Then exit the app.