14
Organize your Inbox
In this chapter
You can use Outlook 2019 to manage multiple email accounts, including multiple Microsoft Exchange Server or Office 365 accounts and their associated contacts, calendars, and other elements. Even if you use Outlook only for sending and receiving email messages, it can be challenging to keep track of them and to locate specific information that you’re looking for. Fortunately, Outlook provides many simple yet useful features that you can use to organize messages and other Outlook items and to quickly find information you need.
By default, the message list displays the email messages you receive in order by time and date of receipt (from newest to oldest). You can arrange, group, and sort messages in Outlook to keep conversation threads together and to help you quickly determine which are the most important, decide which can be deleted, and locate any that need an immediate response.
You can simplify the process of organizing Outlook items of all kinds by assigning categories to related items. You can then arrange, sort, filter, and search for Outlook items by category.
This chapter guides you through procedures related to working with Conversation view, arranging messages by specific attributes, organizing items by using color categories, and organizing messages in folders.
Display and manage messages
You might receive dozens or hundreds of email messages each day. The developers of Outlook have experimented with many ways of presenting messages to users, with the goal of putting the messages you want at your fingertips and keeping the messages you don’t want out of your way. In this topic, we’ll look at the new Focused Inbox and the Conversation view of your messages. Both tools help you more easily locate and respond to important current conversations.
Select the primary Inbox content
The Junk Mail filter is a useful tool that has filtered out likely spam messages for many years. Outlook 2016 displayed all the messages that survived the Junk Mail filter on the default All tab of the Inbox and also provided an Unread tab on which you could view only those messages you hadn’t yet interacted with. Outlook 2019 goes one step further with the Focused Inbox, which displays the messages you’re likely to want to read on the Focused tab and messages of the type that you’ve previously ignored or deleted on the Other tab. This is somewhat like the Clutter feature, which moved random, and often important, messages to a separate folder, but it’s easier to find the messages now.
The Focused Inbox is the default setting, but you can easily switch between the Focused/Other and All/Unread views.

Primary settings for managing the display of messages in the Inbox
To hide or show the Focused Inbox
In the Mail module, display the View tab.
In the Focused Inbox group, select Show Focused Inbox.
Display and manage conversations
When a recipient replies to an email message, the exchange of multiple messages creates a conversation. Conversations that involve multiple recipients and responses can contain many messages. Conversation view is an alternative arrangement of messages grouped by subject. All the messages with the same subject appear together in your Inbox (or other message folder) under one conversation header.

Until you expand the conversation header, the entire conversation takes up only as much space in your Inbox as a single message would
The conversation header provides information about the messages within the conversation, including the number of unread messages and whether one or more messages includes an attachment, is categorized, or is flagged for follow up.
Select the conversation header or the Expand button to display the most recent message in the Reading Pane and to display all the unique messages in the conversation (the most recent message in each thread) in the message list. Reading only these messages will give you all the information that exists in the conversation.

When a conversation is expanded to display unique messages, the conversation header displays recent participants and subjects
![]() Tip
Tip
When an email conversation involves more than two people, particularly if the email was addressed to a large distribution list, often more than one person responds to the same message, and other people respond to each of those messages. Multiple conversations that emerge from the primary conversation are referred to as branches.
Benefits of displaying messages as conversations include the following:
When you receive a message that is part of a conversation, the entire conversation moves to the top of your Inbox and the new message appears when you select the conversation header.
A blue vertical line and bold blue subject indicate that a conversation includes unread messages. If there are multiple unread messages, the number is indicated in parentheses following the subject. The senders of the unread messages are listed below the subject.
Sent messages are available from within the conversation. (They remain stored in the Sent Items folder, but you can read and open them from the Inbox.) This is particularly convenient when you need to access sent attachments that aren’t available in the replies.
You can manage all the messages that are part of a conversation as a group. Selecting the conversation headers selects all the messages in the conversation. You can move or categorize all the messages as a unit.
You can modify the way Conversation view displays messages to suit the way you work by turning the following display settings on or off:
Show Messages from Other Folders By default, Conversation view displays messages stored in any folder, including sent messages stored in the Sent Items folder. (Within an expanded conversation, sent messages are indicated by an italic font.) You can turn off this setting to display only messages from the current folder.
Show Senders Above the Subject By default, when a conversation is collapsed, the conversation header displays the names of all the conversation participants above the conversation subject; when the conversation is fully expanded, the conversation header displays only the subject. This setting reverses the order of the information in the conversation header; the names of the conversation participants are displayed above the conversation subject. In some cases, such as when Outlook displays a message on the second line, the subject might not be visible at all.
Always Expand Selected Conversation This setting causes Outlook to display all messages in a conversation when you select the Expand Conversation button or conversation header once.
Use Classic Indented View This setting causes Outlook to indent older messages within individual message threads to show the progression of the thread. This setting is not as effective as the default setting for displaying split conversations, because a message might be at the root of multiple branches but can appear only once in the message list.
Outlook tracks conversations by subject regardless of whether you display the messages in Conversation view. You can use the following features to manage conversations:
Ignore Conversation This command moves the selected conversation and any related messages you receive in the future directly to the Deleted Items folder.
 IMPORTANT
Be cautious when using the Ignore Conversation command. Outlook identifies conversations based on message subjects. If you receive unrelated messages in the future that have the same message subject as a conversation that you’ve chosen to ignore, you won’t receive those messages.
Clean Up Conversation This command deletes redundant messages— messages whose text is wholly contained within later messages—from a conversation or folder. By default, Outlook doesn’t clean up categorized, flagged, or digitally signed messages. You can modify conversation clean-up settings when you start a clean-up process and on the Mail page of the Outlook Options dialog box.
 Tip
TipBecause Conversation view displays only unique messages until you fully expand the conversation, a specific message that you’re looking for might not be immediately visible. If this happens, you can temporarily disable Conversation view by choosing a different message arrangement. For more information, see “Arrange messages by specific attributes” later in this chapter.
To turn Conversation view on or off for one or all folders
![]() IMPORTANT
IMPORTANT
Conversation view is available only when messages are arranged by date.
On the View tab, in the Messages group, select or clear the Show as Conversations check box.

Specify the scope of the change
In the Microsoft Outlook message box, indicate the scope of the change by selecting All mailboxes or This folder.
TipWhen you arrange a folder by an attribute other than date, Conversation view is temporarily disabled. For more information, see “Arrange messages by specific attributes” later in this chapter.
To display the messages within a conversation
Select the conversation header or the Expand button once to display the unique messages in the conversation.
Select the Expand button again to display all messages in the conversation.
To select all the messages in a conversation
Select the conversation header once. Any action you take on the selected header applies to all messages in the conversation.
To change the way conversations are displayed in the message list
On the View tab, in the Messages group, select Conversation Settings. On the Conversation Settings menu, a check mark indicates that an option is turned on.

Change the default display settings
On the Conversation Settings menu, select a setting to turn it on or off.
To remove redundant messages from a conversation
Select any message in the conversation.
On the Home tab, in the Delete group, select the Clean Up button, and then on the menu, select Clean Up Conversation.

You can change the location to which Outlook moves the messages it cleans up
If the Clean Up Conversation message box opens, do the following:
If you want to instruct Outlook to clean up conversations without requesting confirmation, select the Don’t show this message again check box.
If you want to change the conversation clean-up settings, select Settings to display the Mail page of the Outlook Options dialog box. Scroll to the Conversation Clean Up section and change any of the settings you want to. Then select OK.

You can retain specific categories of messages
Select Clean Up.
To remove redundant messages from a folder
Select any message in the folder.
On the Home tab, in the Delete group, select Clean Up, and then on the menu, select Clean Up Folder or Clean Up Folder & Subfolders.
If the Clean Up Folder message box opens, do the following:
If you want to instruct Outlook to clean up folders without requesting confirmation, select the Don’t show this message again check box.
If you want to change the conversation clean-up settings, select Settings to display the Mail page of the Outlook Options dialog box. Scroll to the Conversation Clean Up section and change any of the settings you want to. Then select OK.
Select Clean Up Folder.
To ignore a conversation
Select any message in the conversation, and then do either of the following:
On the Home tab, in the Delete group, select the Ignore Conversation button.
Press Ctrl+Del.

Automatically delete future messages in the conversation
If the Ignore Conversation message box opens, do the following:
If you want to instruct Outlook to ignore conversations without requesting confirmation, select the Don’t show this message again check box.
Select Ignore Conversation.
To stop ignoring a conversation
Display the Deleted Items folder.
Locate and select any item in the ignored conversation.
On the Home tab, in the Delete group, the Ignore button is active for a conversation that is being ignored. Select the Ignore button to turn it off.
Arrange messages by specific attributes
By default, Outlook displays messages arranged by date, from newest to oldest. Alternatively, you can arrange items by any of the following attributes:
Account Messages are grouped by the email account to which they were sent. This is useful if you receive messages for more than one email account in your Inbox (for example, if you receive messages sent to your POP3 account within your Exchange account mailbox).
Attachments Messages are grouped by whether they have attachments and secondarily by date received.
Categories Messages are arranged by the category you assign to them. Messages without a category appear first. Messages with multiple categories assigned to them appear in each of those category groups.
Flag: Start Date or Due Date Unflagged messages and messages without specific schedules appear first. Messages that you’ve added to your task list with specific start or due dates are grouped by date.
From Messages appear in alphabetical order by the message sender’s display name. If you receive messages from a person who uses two different email accounts, or who sends messages from two different email clients (for example, from Outlook and from Windows Mail), the messages will not necessarily be grouped together.
Importance Messages are grouped by priority: High (indicated by a red exclamation point), Normal (the default), or Low (indicated by a blue downward-pointing arrow).
To Messages are grouped alphabetically by the primary recipients (the addresses or names on the To line). The group name exactly reflects the order in which addresses appear on the To line. Therefore, a message addressed to Bart Duncan; Lukas Keller is not grouped with a message addressed to Lukas Keller; Bart Duncan.
Size Messages are grouped by message size, including any attachments. Groups include Very Large (5–10 MB), Large (1–5 MB), Medium (25 KB–1 MB), Small (10–25 KB), and Tiny (less than 10 KB). This feature is useful if you work for an organization that limits the size of your Inbox, because you can easily locate large messages and delete them or move them to a personal folder.
Subject Messages are arranged alphabetically by their subjects and then by date. This is similar to arranging by conversation except that the messages aren’t threaded.
Type Items in your Inbox (or other folder) are grouped by the type of item— for example, messages, encrypted messages, message receipts, meeting requests and meeting request responses, tasks, Microsoft InfoPath forms, and server notifications.
Arrange messages by specific attributes After arranging the items in your message list, you can change the sort order of the arrangement. The message list header displays the current sort order and arrangement of the message list.

Numbers come before letters when sorting from A to Z
By default, the messages within each arrangement are in groups specific to that category. For example, when messages are arranged by date, they are grouped by date; groups include each day of the current week, Last Week, Two Weeks Ago, Three Weeks Ago, Last Month, and Older. Each group has a header. You can collapse a group so that only the header is visible, or select and process messages by group.

Collapsing groups of messages displays only the group headers
In Single view or Preview view, you can sort messages by any visible column. If you want to sort by an attribute that isn’t shown, you can add that column to the view.
To arrange messages by a specific attribute
In any view: On the View tab, in the Arrangement gallery, select the message attribute.
In Compact view: In the message list header, select the current arrangement, and then select the message attribute.
In Single view or Preview view: Right-click any column header, select Arrange By, and then select the message attribute.
To reverse the default sort order of the message list arrangement
In any view: On the View tab, in the Arrangement group, select Reverse Sort.
In Compact view: In the message list header, select the current sort order.
In Single view or Preview view: Right-click any column header, and then select Reverse Sort.
TipIn a list view, you can sort by any column by selecting the column header, and reverse the sort order by selecting the column header again.
To group or ungroup messages
In any view: On the View tab, in the Arrangement gallery, select Show in Groups.
In Compact view: Select the message list header, and then on the menu, select Show in Groups.
In Single view or Preview view: Right-click the header of the column you want to group by, and then select Group By This Field.
To select a group of messages
Select the group header.
To expand the current message group
Select the arrow at the left end of the group header.
Press the Right Arrow key.
On the View tab, in the Arrangement group, select Expand/Collapse, and then select Expand This Group.
To collapse the current message group
Select the arrow at the left end of the group header.
Press the Left Arrow key.
On the View tab, in the Arrangement group, select Expand/Collapse, and then select Collapse This Group.
To expand or collapse all message groups
On the View tab, in the Arrangement group, select Expand/Collapse, and then select Expand All Groups or Collapse All Groups.
Press Ctrl+Plus sign to expand all groups, or Ctrl+Minus sign to collapse all groups.
To reset the message arrangement (and other view settings)
On the View tab, in the Current View group, select Reset View.
In the Microsoft Outlook dialog box, select Yes.
Categorize items
To help you more easily locate Outlook items associated with a specific subject, project, person, or other common factor, you can create a category specific to that attribute and assign the category to any related items. You can assign a category to any type of Outlook item, such as a message, an appointment, or a contact record. For example, you might have categories for different people, clients, interest groups, or occasions.
Each category has an associated color, which provides a visual indicator in the item windows and in the module content views. More importantly, you can use the category property to search, sort, and filter items within or across all the Outlook modules.

Messages that have multiple categories assigned appear in multiple category groups
Outlook 2019 comes with six starter categories named for their associated colors. You can rename these six categories to suit your needs. If you don’t rename a standard color category before assigning it for the first time, Outlook gives you the option of renaming the category the first time you use it.

You can rename a category multiple times
You can create new categories as you need them. Each category can have the following elements:
Name The category name can be one simple word or a long, descriptive phrase. The first 32 characters of the category name are visible in the Color Categories dialog box, but pointing to a truncated name displays the entire name in a ScreenTip.
Shortcut key You can assign any of the 11 available keyboard shortcut combinations (Ctrl+F2 through Ctrl+F12) to the individual color categories.
Color You can assign any of the 25 available colors to a category, or you can choose not to assign a color and to rely only on the name to distinguish between categories. When you assign a category that doesn’t have an associated color to an Outlook item, the color block or color bar is shown as white. You can assign a color to multiple color categories.
Categories that you assign are represented by color blocks in a content list view, and by color bars in the open item window and the Reading Pane.

You can assign multiple categories to a message or other item
When Conversation view is on, the conversation header displays all the color category blocks assigned to the individual messages in the conversation.
You can designate one category as the Quick Click category. When displaying items in a view that includes a Categories column—such as Single view or Preview view— selecting the Categories column assigns the Quick Click category.
![]() Tip
Tip
You can instruct Outlook to automatically assign a category to an incoming message that meets specific criteria by creating a rule.
You can apply a category with one click or by using a keyboard shortcut
To quickly view the items that have a specific category assigned to them, you can group items by category or include the category in a search. In a list view of any module, you can sort and filter by category. On the To-Do Bar, you can arrange flagged messages and tasks by category.
To display the Categorize menu
On the Home tab of any mail or contact folder, in the Tags group, select Categorize.
On the item tool tab (such as Appointment or Meeting) of any calendar item, in the Tags group, select Categorize.
Right-click an item or selection of items, and then select Categorize.

The Categorize menu displays recently assigned categories
To open the Color Categories dialog box
Display the Categorize menu, and then select All Categories.

You can manage all aspects of categories in the Color Categories dialog box
To assign a category to a message or other item
Select the item or items that you want to categorize.
Display the Categorize menu, and then do either of the following:
If the menu includes the category you want to assign, select the category.
If the menu doesn’t include the category you want to assign, select All Categories. In the Color Categories dialog box that opens, select the check box of the category you want to assign, and then select OK.
To assign or remove the Quick Click category
In any module content list view, click or tap in the Categories column for the item.

Clicking or tapping in the column turns the category on or off
Store information in Outlook notes
You can store miscellaneous information such as reminders, passwords, account numbers, and processes by saving them in electronic notes. Because your notes are available to you from wherever you access Outlook, this can be a very convenient way of retaining information you might need later. And because you’re less likely to accidentally delete a note than a message, it is safer than sending information to yourself in an email message.

You can categorize notes to easily find them
You can enter only text into a note; you can’t format the text or include graphic elements. Notes do support hyperlinks; if you enter a website address and then press Enter, the website address will change to blue underlined text to indicate that it is a hyperlink. You can select the hyperlink to open the website or page in your default web browser.
Although notes are a type of Outlook item, they don’t appear in the same type of windows as messages, appointments, contact records, and tasks. Instead, they appear in the form of “sticky notes.” By default, note icons and sticky note representations are a pale yellow color, like the color of standard paper sticky notes. When you assign a category to a note, the note color changes to the category color.
You can view, sort, and organize notes in the same way you do other Outlook items. The standard views include Icons, Notes List, and Last 7 Days.
As with other Outlook items, if you’re looking for a specific piece of information in a note, you can quickly locate it by entering a search word or phrase in the Search Notes box at the top of the content area.
TIP To access the Notes module, select the ellipsis at the end of the Navigation Bar and then select Notes, or press Ctrl+5.
To store information in a note:
Display the Notes module.
On the Home tab, in the New group, select New Note to display a new note. The current date and time appear at the bottom.
Enter the subject or title of the note, press Enter, and then enter the information you want to store in the note. The first line of the note becomes its subject.
To save and close the note, select the Close button in the upper-right corner to display the note in the content area. Only the subject is visible. You can access the stored information by opening the note. Categorize items
To remove a category from an item
Open the item, and then right-click the colored category bar.
On the shortcut menu, select Clear “Category”, Clear All Categories, or the name of the category that you want to clear.
Or
Select or open the item, and then display the Categorize menu.
On the Categorize menu, select Clear All Categories, or select the category that you want to clear.
To create a category
Open the Color Categories dialog box, and then select New.
In the Add New Category dialog box, do the following, and then select OK:
In the Name box, enter the category name.
In the Color list, select the color you want to assign to the category.
If you want to assign a keyboard shortcut, select it in the Shortcut Key list.

Choose from among 25 colors
To rename a category
Open the Color Categories dialog box.
Select the name or select the check box of the category, and then select Rename to activate the category name for editing.
Change or replace the category name, and then press Enter or click away from the active name box.
TipThe category order doesn’t immediately change, but the next time you display the categories in a list or dialog box, they will be in alphabetical order.
To delete a category
Open the Outlook Options dialog box, and display the Advanced page.
Scroll down on the Advanced page to display the Other section, and then select the Quick Click button.
In the Set Quick Click dialog box, select the list, select the category that you want to set as the default, and then select OK.
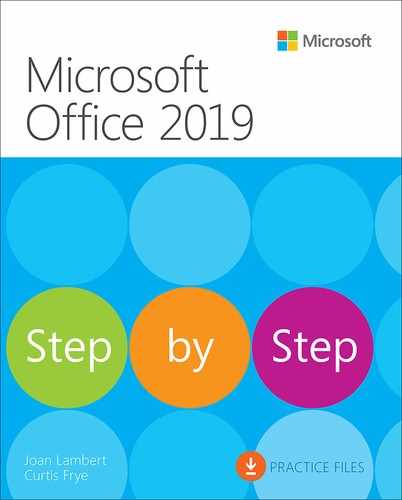
To set or change the Quick Click category
Display the Categorize menu, and then select Set Quick Click.
In the Set Quick Click dialog box, select the list, select the category that you want to set as the default, and then select OK.
Or
Open the Color Categories dialog box.
Select the name or the check box of the category, and then select Delete or press Alt+D.
In the Microsoft Outlook message box asking you to confirm the deletion, select Yes.
Organize messages in folders
After you read and respond to messages, you might want to keep some for future reference. You can certainly choose to retain them all in your Inbox if you want, but as the number of messages in your Inbox increases to the thousands and even tens of thousands, it might quickly become overwhelming. (Yes, faithful reader, it happens to the best of us!) To minimize your Inbox contents and avoid an accumulation of unrelated messages, you can organize messages into folders. For example, you can keep messages that require action on your part in your Inbox and move messages that you want to retain for future reference into other folders.
![]() Tip
Tip
Because the Outlook search function provides the option of searching within all folders containing items of a particular type, you can easily locate a message that’s been moved to a folder without having to remember which folder it’s in.
Popular personal-organization experts advocate various folder structures (for paper folders and email message folders) as an important part of an organizational system. You can apply any of these ideas when you create folders in Outlook, or you can use any other structure that works for you. For example, you might create folders that designate the level of action required, create a folder for each project you’re working on, or create a folder to store all messages from a specific person, such as your manager, regardless of the message subject.
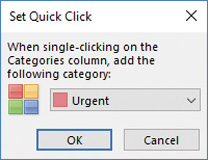
Subfolders of the Inbox, in the Navigation pane of the Mail module and in the Folders list
When you create a folder, you specify the location of the folder within your existing Outlook folder structure and the type of items you want the folder to contain. You can create folders to contain the following types of items:
Calendar items
Contact items
InfoPath Form items
Journal items
Mail and Post items
Note items
Task items
The selection you make governs the folder icon that precedes its name in the Folder Pane, the folder window layout, the ribbon tabs and commands available in the folder, and the content of the Folder Pane when displaying the folder.
You can move messages to folders manually, or if your organization is running Exchange, you can have the email system move them for you. You can automatically move messages to another folder by creating a rule—for example, you can automatically move all messages received from your manager to a separate folder. You can also set up different rules that go into effect when you’re away from the office.
To create a message folder
Do either of the following to open the Create New Folder dialog box:
On the Folder tab, in the New group, select New Folder.
Press Ctrl+Shift+E.

The default settings in the Create New Folder dialog box match the module you open it from
In the Name box, enter a name for the new folder.
In the Folder contains list, select Mail and Post Items.
In the Select where to place the folder box, do either of the following:
Select your mailbox (at the top of the list) to create the folder at the same level as the Inbox.
Select your Inbox to create a subfolder of the Inbox.
Select OK.
Print messages
Although electronic communications certainly have less of an environmental impact than paper-based communications, you might at times want or need to print an email message—for example, if you want to take a hard copy of it to a meeting for reference, or if you keep a physical file of important messages or complimentary feedback. You can print the message exactly as it appears in your Inbox or embellish it with page headers and footers. Outlook prints messages in Memo style, which prints your name, the message header information, and then the message content as shown on the screen, including font and paragraph formats.

You can preview the message and modify the print settings
To preview and print a message, follow these steps:
In an open message window, display the Print page of the Backstage view. The right pane displays the message as it will appear when printed. In the Printer list, select the printer you want to use.
Do either of the following:
To print one copy of the message with the default settings, select Print.
To print only specific pages, print multiple copies, or print attachments, select Print Options, change the settings in the Print dialog box, and then select Print.
To print a message with the default settings without first previewing it, right-click the message in the message list, and then select Quick Print.
To move a message to a folder
Drag the message from the message list to the destination folder in the Folder Pane.
Or
In the message list, select the message you want to move.
Do either of the following to display the Move menu:
On the Home tab, in the Move group, select Move.
Right-click the message, and then select Move.

The Move menu automatically includes folders that you create
On the Move menu, do either of the following:
Select the folder you want to move the message to.
Select Other Folder. In the Move Items dialog box displaying the full Folders list, select the folder you want to move the message to, and then select OK.
TipWhen Conversation view is turned on, moving the last message of a conversation from a folder removes the conversation from that folder.
Key points
You can display messages in your Inbox individually or as threaded conversations to keep your Inbox cleaner.
You can group and sort messages by sender, time, subject, size, category, or any other field.
You can assign color-coded categories to messages and then group and sort items by using color categories. You can use the default Outlook categories or tailor them to fit your needs.
You can create folders to organize your mail, and move items to folders manually or automatically. Key points
 Practice tasks
No practice files are necessary to complete the practice tasks in this chapter.
The introduction includes a complete list of practice files and download instructions.
![]() IMPORTANT
IMPORTANT
As you work through the practice tasks in this book, you will create Outlook items that might be used as practice files in later chapters. If you haven’t created specific items referenced in later chapters, you can substitute items of your own.
Display and manage messages
Start Outlook, display your Inbox in Compact view, and complete the following tasks:
Display the messages in your Inbox as conversations. Notice the changes in the appearance and grouping of the messages in the message list.
Change the conversation settings so that the senders are shown below the subject in the message list instead of above it. Consider the benefits of the two options.
Select one conversation that has several messages, display the unique messages in the conversation, and then display all the messages in the conversation.
Remove redundant messages from the conversation.
Select any message in the conversation, and open the Ignore Conversation dialog box. Read the message in the dialog box, and then select Cancel.
Configure the conversation settings to suit your preferences.
Arrange messages by specific attributes
Display your Inbox in Preview view, and then complete the following tasks:
Use any method described in this chapter to arrange messages by sender (From).
Use any method described in this chapter to reverse the default sort order of the message list arrangement.
Switch to Compact view. Notice that the messages are no longer arranged by sender; the arrangement is only applied to the view in which you set it.
Use any method described in this chapter to group the messages in your Inbox.
Collapse a group of messages so that only the group header is displayed, and then expand the group again.
Collapse all message groups, and then expand them all.
Configure the view and arrangement settings to suit your preferences.
Categorize items
Display your Inbox in Compact view, and then complete the following tasks:
Create a new email message addressed to yourself. Enter Work with categories as the subject, and send the message.
When the message appears in your Inbox, select it.
Create a new color category, and do the following:
Name the category StepByStep.
Assign the Dark Maroon color to the category.
Assign the Ctrl+F10 keyboard shortcut to the category.
Finish creating the category, and close any open dialog boxes. Notice that the selected message now has the StepByStep category assigned to it.
Set the StepByStep category as the Quick Click category.
Switch to Single view. In the message list, point to an unassigned category block in the Categories column to display the ScreenTip.
Select the block to assign the Quick Click category to the message. Then select again to remove the category.
Organize messages in folders
Display your Inbox, and complete the following tasks:
Create a new folder, and do the following:
Name the folder StepByStep.
Configure the folder to contain messages.
Save the folder as a subfolder of your Inbox.
Finish creating the folder. Then move the Work with categories message that you created in an earlier set of practice tasks to the StepByStep folder.
Retain the folder, message, and category for use in practice tasks in later chapters.