5
Merge data with documents and labels
In this chapter
Many organizations communicate with customers or members by means of letters, newsletters, and promotional pieces that are sent to everyone on a mailing list. You can use a reasonably simple process called mail merge to easily insert specific information from a data source into a Word document to create personalized individual items such as form letters, labels, envelopes, or email messages. You can also use this process to create a directory, catalog, or other listing that incorporates information from the data source.
The primary requirement for a mail merge operation is a well-structured data source. You can pull information from a variety of data sources—even your Microsoft Outlook address book—and merge it with a starting document or a content template to create the output you want. Word includes a wizard that can guide you through the processes, but this chapter provides information about each individual process so you can quickly get started with your merging projects.
This chapter guides you through procedures related to choosing and refining data sources, choosing the output type and starting documents, previewing the results and completing the merge, and creating individual envelopes and labels.
Understand the mail merge process
The process for creating a mail merge document is straightforward and logical. All the tools for performing mail merge operations are available from the Mailings tab. From this tab, you can run the wizard or perform individual steps of the mail merge process on your own.

Mail merge tools are located on the Mailings tab
Three important terms used when discussing mail merge processes are:
Data source The file or storage entity that contains the variable information you want to pull into the merge output.
Field A specific category of information, such as a first name, last name, birthdate, customer number, item number, or price.
Record A set of the information that goes in the fields—for example, information about a specific person or transaction. A record doesn’t have to contain information for every field, but it must have a placeholder for any missing information.
The mail merge process varies slightly depending on whether you’re creating one document per record or one document containing all the records. However, the basic process is this:
Identify a data source that contains the records you want to use.
Create a document into which you want to merge the records.
In the document, identify the fields from the data source that you want to merge into the document.
Preview the results and make any necessary adjustments.
Merge the data into the document to either create one or more new documents or to print the merge results directly to the printer.
You can perform the mail merge process by using the commands on the Mailings tab of the ribbon, or you can get step-by-step guidance from the Mail Merge wizard. The wizard displays options in a series of panes, and you choose the options you want. If you’re new to mail merge, the wizard can provide a helpful framework. If you are comfortable with the mail merge process and know what you want to create, it can be faster to perform the steps manually.
To use the Mail Merge wizard
Start Word and display the Mailings tab.
In the Start Mail Merge group, select Start Mail Merge, and then select Step-by-Step Mail Merge Wizard.
In each of the six panes of the wizard, select an option or provide the requested information.
In the last pane, specify whether to send the merge output directly to the printer or to create one or more documents that you can review and save.
This chapter provides in-depth information about how to get the results that you want from the mail merge process, whether you use the wizard or the commands on the Mailings tab.
Start the mail merge process
For most mail merge projects, you need a starting document that provides structure and common content, and that identifies the locations where you want to insert data. You specify the data to merge into each location by inserting merge fields. The merge fields pull data from the data source fields into the starting document. To identify the data fields available for the mail merge operation, you must select the data source and import its records into the Mail Merge Recipients list.
The best starting point varies based on the type of output that you want to create. The output categories include letters, email messages, envelopes, labels, and directories.
In this topic, we discuss ways of getting started with a mail merge process based on the output type.
![]() Tip
Tip
If you find that you need help, you can start the wizard from any point in the process and move back to make changes or forward to keep the work you’ve done.
Get started with letters
If you’re creating a form letter or similar document, you can write the document, connect to the data source, and then insert the merge fields, or you can start with a blank document, connect to the data source, and then insert the merge fields as you write the document. Either way, you can’t insert merge fields in a document until you connect to the data source.
If you’re creating a document that needs to go through a review process, it’s easier to do that before you connect to the data source; otherwise, the document tries to connect to the data source each time a reviewer opens it. When that’s the case, you can insert placeholders in the document where you plan to insert merge fields later. You can set off the placeholders from the real text by using brackets or highlighting to indicate to reviewers that the placeholders aren’t final content, and to make them easy to locate later.

It’s easiest to write and edit your document before starting the mail merge process
If you need help creating a document for your intended purpose, you can use any of the Word content templates. A wide variety of templates are available from the New page of the Backstage view.
To start a letter mail merge
Open a blank document or a document that contains the static content you want to pull data into.
On the Mailings tab, in the Start Mail Merge group, select Start Mail Merge.
On the Start Mail Merge menu, select Letters. There is no visible change to the document.
To continue and complete the process:
Use the procedures described in “Choose and refine the data source” later in this chapter to identify the data source and available fields.
Create or edit the document content, and use the procedures described in “Insert merge fields” later in this chapter to insert the merge fields.
Use the procedures described in “Preview and complete the merge” later in this chapter to finish creating the letter.
Get started with labels
The mail merge processes for labels are designed not only for stickers but also for name tags, badge inserts, business cards, tab inserts for page dividers, CD labels, postcards, notecards, printable magnets, and anything else that you print onto paper or other sheet-fed media that is divided into fixed areas. Many of these products are available from office supply and craft supply retailers. Common manufacturers of label materials include Avery and 3M, but there are many others.
![]() SEE ALSO
SEE ALSO
For more information about creating mailing labels, see “Create individual envelopes and labels” later in this chapter.
When generating labels from a data source, you’re usually printing data from multiple records onto each sheet, but you can also print a full sheet of each record.
When creating labels, you select the manufacturer and product number of the specific printing media, and then Word creates a table that defines the printable area of the label sheet. You insert merge fields into the first cell as a template for all the other cells, format the content as you want it, and then copy the cell content to the other fields. If you’re making sheets of labels that pull data from multiple records, each additional field starts with a «Next Record» tag that signals Word to move to the next record.

The starting document and first page of results for a label mail merge
It’s important that you select the correct manufacturer and product, because the document page setup is very precisely controlled to match the media.

The definition for each label includes the dimensions of the printable and nonprintable areas of the sheet
To start a label mail merge
Open a blank document and display paragraph marks and formatting symbols.
On the Mailings tab, in the Start Mail Merge group, select Start Mail Merge.
On the Start Mail Merge menu, select Labels. The Label Options dialog box opens.

Thousands of label products are available from this dialog box
In the Printer information area, choose the correct printer type for the label forms and, for standard printers, choose the input tray (or manual feed) for the label sheets.
On the label package, identify the manufacturer and product number of the labels you will use. In the Label information area, do the following:
In the Label vendors list, select the label manufacturer.
In the Product number list, select the product number.
 Tip
TipTo save time, click or tap in the Product Number box and then press the keyboard key corresponding to the first character of the product number to jump to that section of the list. Then scroll to locate the specific product number. If the label product you’re using doesn’t already appear in the list, select the Find Updates On Office.Com link to refresh the list.
In the Label Options dialog box, select OK to return to the document. Word creates the label form in which you will enter the merge fields and any static content.

Ensure that paragraph symbols and formatting marks are shown before continuing
To continue and complete the process:
Use the procedures described in “Choose and refine the data source” later in this chapter to identify the data source and available fields.
Create or edit the static label content, and use the procedures described in “Insert merge fields” later in this chapter to insert the merge fields.
Use the procedures described in “Preview and complete the merge” later in this chapter to finish creating the labels.
Get started with email messages
When you want to send the same information to all the people on a list—for example, all your customers, or all the members of a club or your family—you don’t have to print letters and physically mail them. Instead, you can use mail merge to create a personalized email message for each person in a data source. As with a form letter that will be printed, you can either use the Mail Merge wizard or use the buttons on the Mailings tab to insert merge fields into a document. These merge fields will be replaced with information from the specified data source, and the starting document will be converted to individual email messages.
Many email messages need no merge fields other than a greeting line.

If you want to edit the custom greeting, right-click the merge field and then select Edit Greeting Line
Because email messages tend to be less formal than printed letters, you might want to start the messages with a custom greeting rather than one of the predefined greeting options (Dear and To).
To start an email mail merge
Open a blank document or a document that contains the static content you want to pull data into.
On the Mailings tab, in the Start Mail Merge group, select Start Mail Merge.
On the Start Mail Merge menu, select E-mail Messages. Word displays the current content in Web view.
 SEE ALSO
For information about the available views, see “Display different views of documents” in Chapter 2, “Create and manage documents,” of Microsoft Word 2019 Step by Step, by Joan Lambert (Microsoft Press, 2018).
To continue and complete the process:
Use the procedures described in the next topic, “Choose and refine the data source,” to identify the data source and available fields.
Create or edit the document content, and use the procedures described in “Insert merge fields” later in this chapter to insert the merge fields.
Use the procedures described in “Preview and complete the merge” later in this chapter to finish creating the messages.
Choose and refine the data source
The mail merge process combines variable information from a data source with static information in a starting document. The basic data source requirement is the same regardless of the output format: It must be a container that stores information in a consistent structure.
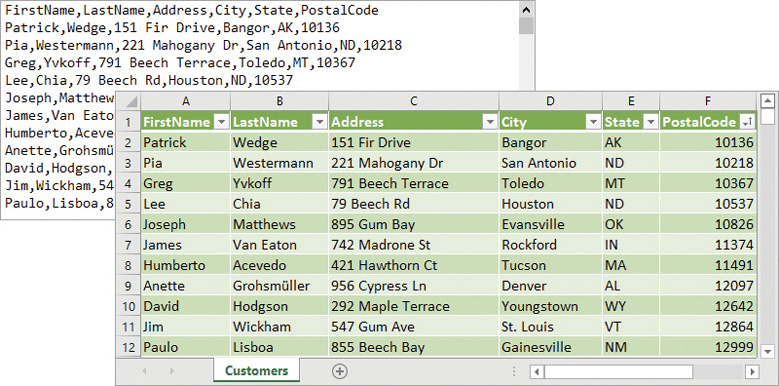
Data sources store information in a consistent structure
Most data source structures store data in a tabular format, with fields identified at the top and records following. The most straightforward example of this, and the one we work with throughout this chapter, is a Microsoft Excel workbook.
Each field in a data source must be identified by a unique name so you can pull data from the field into the starting document. In Excel, the field names are the table headers or column headers.

The Mail Merge Recipients dialog box displays all the records from the data source
Select an existing data source
The full list of acceptable data source file types is lengthy. Typical data sources include Excel worksheets and delimited text files, but you can also pull data from tables in Microsoft Word, Access, or SQL Server; from a Microsoft Outlook contact list; or from a variety of other, less common sources.
![]() Tip
Tip
If your company or organization uses another contact-management system, you can probably export information to one of these formats. Delimited text files are the most basic format of structured information storage and should be an export option from any other information storage system.

All the file types that are accepted as data sources
The data source doesn’t have to be stored on your computer; the wizard can link to remotely stored data. If the data source is stored on a server that requires you to log on, you can provide your credentials and, optionally, store your password.
![]() Tip
Tip
It isn’t necessary for the data source file to be closed during the import operation; you can import records from an open file, edit and save the file, and refresh the list with the changes.
If you use Outlook to manage your email, contacts, and calendar information stored in Microsoft Exchange or Exchange Online, you can import data from an Exchange account contact folder to use as a mail merge data source. The Mail Merge wizard polls your Outlook data folders and provides a list of contact folders that you can use. When you choose a contact folder, the wizard imports the contact list.
It’s likely that your contact list contains a variety of contacts—clients, employees, friends, relatives, and other people you have corresponded with. Many of these contacts might not be current, and many of them might not be people to whom you want to direct the specific form letter or email message that you’re creating. But that’s okay; you can import the entire contact list and then use the filtering function in the Mail Merge Recipients dialog box to identify only those people you want to include in your current mail merge project.

A selected check box indicates that a record will be included in the mail merge
![]() SEE ALSO
SEE ALSO
For information about filtering records for a mail merge, see “Refine the data source records” later in this topic.
To select an existing data source
On the Mailings tab, in the Start Mail Merge group, select Select Recipients to display the data source options.

You must choose or create a data source file
On the Select Recipients menu, do either of the following:
Select Use an Existing List. In the Select Data Source dialog box, browse to and select the data source file, and then select Open.
Select Choose from Outlook Contacts. If the Select Contacts dialog box opens, select the contact folder that you want to import, and then select OK.
Create a new data source
If the information that you want to include in your data source isn’t already stored in a file or address list, you can create a “Microsoft Office Address List” while working in the Mail Merge wizard; the wizard saves your list as a table in an Access database (.mdb) file in the My Data Sources subfolder of your Documents folder.
The process of entering information through the Address List interface is somewhat tedious, because you must manually populate each field—so if you have a lot of records, it’s easier to enter your data into an Excel worksheet. However, it’s fine for an impromptu mail merge process, such as creating a set of name tags for a meeting.

Creating a simple list through the wizard
You’re not limited to collecting contact information; you can add, remove, and reorder the fields to store the type of data that is pertinent to your mail merge process.
To create a data source from the Mailings tab
On the Mailings tab, in the Start Mail Merge group, select Select Recipients, and then select Type a New List.
In the New Address List dialog box, do the following:
Select Customize Columns. Add any fields to the column list that you plan to include in the mail merge operation. To keep things tidy, you can remove fields that you don’t plan to use.
Enter the information for each record, selecting New Entry to create another.
When you finish, select OK.
In the Save Address List dialog box, provide a name for the database file, and then select Save.
Refine the data source records
The data source you choose doesn’t have to be specific to the item you’re creating. For example, you could create postcards announcing an in-store sale only for customers who live in that area or create gift certificates only for people who have birthdays in the next month.
If you don’t want to include all the data source records in your mail merge operation, you can now whittle down the list to those you want. You can use the following processes to remove a record from the recipient list:
Filter the list on one or more fields You can filter the list to display only the records that you want to include, or to locate (and then remove) the records that you want to exclude.
Remove duplicates The wizard can help to identify entries that might be duplicates. You can either clear the check boxes for the duplicate versions that you don’t want to use, or you can remove the entries from the data source file, save the file, and refresh the recipients list.
Manually exclude records Each record has a check box. Clearing the check box removes the record from the mail merge operation.
Excluding records from the mail merge operation does not remove them from the Mail Merge Recipients list or from the original data source file. They will still be available for you to use in this or another mail merge operation.
In addition to limiting the set of information used in a mail merge, you can also sort the records to specify the order in which they appear in the mail merge document— for example, in postal code order for a bulk mailing.
![]() IMPORTANT
IMPORTANT
The Refine Recipient List in the Mail Merge Recipients dialog box includes a Validate Addresses link. At the time of this writing, selecting the link displays a message that an address validation add-in is required. Selecting the link to locate the add-in returns an error. This feature might be fixed by the time you read this book; when it is, you can validate mailing addresses against standards to filter out recipients whose mailing addresses don’t appear to be valid per postal regulations.
To display the Mail Merge Recipients list
On the Mailings tab, in the Start Mail Merge group, select Edit Recipient List.
To filter the recipients list to display only records you want to include
Display the Mail Merge Recipients list.
In the Refine recipient list area, select Filter to display the Filter Records tab of the Filter And Sort dialog box.
In the Field list, select the field you want to filter by.
In the Comparison list, select one of the following:
Equal to
Not equal to
Less than
Greater than
Less than or equal to
Greater than or equal to
Is blank
Is not blank
Contains
Does not contain
In the Compare to list, enter the criterion for the field filter.
To apply multiple criteria, select And or Or in the leftmost list and then enter the additional criteria.
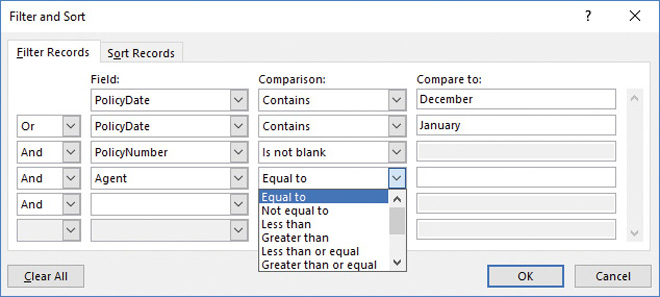
A multi-filter operation that returns only specific insurance policy subscribers
In the Filter and Sort dialog box, select OK. Records not displayed in the filtered list are not included in the mail merge operation.
To filter records out of the recipients list
Following the instructions in the previous procedure, filter the Mail Merge Recipients list to display the records you want to exclude.
Select the check box in the column heading area (twice if necessary) to clear the check boxes of all the records returned by the filter operation.

Clearing a check box removes a record from the recipient list but not from the data source
In the Refine recipient list area, select Filter to redisplay the Filter Records tab of the Filter And Sort dialog box.
On the Filter Records tab, select the Clear All button, and then select OK to remove the filter. The records that you excluded while the filter was applied are still excluded.
To remove duplicate records from the recipients list
Display the Mail Merge Recipients list.
In the Refine recipient list area, select Find duplicates to display records that have similar field entries.
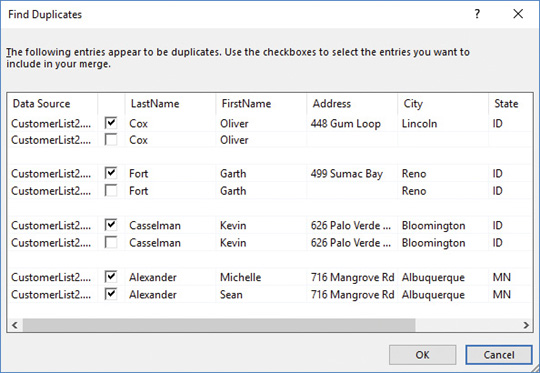
Review possible duplicates
In the Find Duplicates dialog box, clear the check boxes of any records that you want to exclude from the mail merge operation. Then select OK.
To sort records in a data source
Display the Mail Merge Recipients list.
To sort the records by one field, select the field name (the column header) of the field you want to sort by. (Select the field name again to sort in the opposite order.)
Or
To sort the records by multiple fields, do the following:
In the Refine recipient list area, select Sort to display the Sort Records tab of the Filter And Sort dialog box.

You can sort by up to three fields
In the Sort by list, select the first field you want to sort by. Then select the adjacent Ascending or Descending option to specify the sort order.
In the first Then by list, select the second field you want to sort by, and the adjacent Ascending or Descending option.
In the second Then by list, specify the third sort field and order, or select (None).
In the Filter and Sort dialog box, select OK.
To manually exclude records from the recipients list
Display the Mail Merge Recipients list.
If necessary, sort or filter the list to locate records.
Clear the check boxes of any records that you want to exclude from the mail merge operation.
Refresh data
You can save and close the document at any point in the mail merge process. When you reopen the document, if you’ve already connected to the data source and inserted merge fields, Word prompts you to refresh the data connection.

The recipient list reflects changes to the source data when you reopen the document
You can also refresh the data manually at any time from within the document by selecting the Refresh button in the Data Source area of the Mail Merge Recipients dialog box.
Insert merge fields
In the document, merge fields are enclosed in chevrons (« and »). However, you can’t simply type the chevrons and the field name; you must insert the merge field by using the commands on the Mailings tab. This creates a link from the merge field to the data source field.
The commands that you use to insert merge fields in a starting document are in the Write & Insert Fields group on the Mailings tab.

The tools for inserting fields in mail merge documents
Every field in the data source is available to insert as an individual merge field. Two additional merge fields that pull information from the data source are available to save you time:
Address Block This merge field inserts elements of a standard address block (the recipient’s name, company name, and postal address) that you select so you can insert all the information with one merge field.
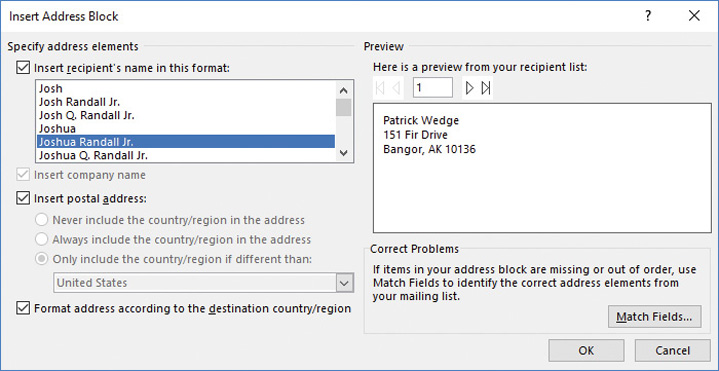
You can customize the Address Block merge field
Greeting Line This merge field inserts a personalized salutation or substitutes a generic salutation for records that are missing the necessary information.

You can select from multiple greetings and name forms
After you insert the first merge field in a document, the Highlight Merge Fields button in the Write & Insert Fields group on the Mailings tab becomes active. Select this button to highlight (in gray) all the merge fields in the document so they’re easier to locate.

Highlight the merge fields to more easily locate them and verify that they aren’t placeholders
![]() IMPORTANT
IMPORTANT
Before you can perform the procedures in this topic, you must select a data source. For more information, see “Choose and refine the data source” earlier in this chapter.
To insert a single merge field
Position the cursor in the location where you want to insert the merge field.
On the Mailings tab, in the Write & Insert Fields group, select Insert Merge Field, and then select the field you want to insert.
To insert an Address Block merge field
Position the cursor in the location where you want to insert the Address Block merge field.
On the Mailings tab, in the Write & Insert Fields group, select Address Block.
In the Insert Address Block dialog box, select the address block elements you want to include and select the format for the recipient’s name.
In the Preview box displaying your first data record, check that the address block looks correct. You can move through additional records to check further.
When you finish, select OK.
To insert a Greeting Line merge field
Position the cursor in the location where you want to insert the Greeting Line merge field.
On the Mailings tab, in the Write & Insert Fields group, select Greeting Line.
In the Insert Greeting Line dialog box, select the greeting line elements you want to include and the generic format for records that don’t have the elements you specify.
In the Preview box displaying your first data record, check that the greeting looks correct. You can move through additional records to check further.
When you finish, select OK.
Preview and complete the merge
After you specify the data source you want to use and enter merge fields in the main document, you can preview the effect of merging the records into the documents, and then perform the actual merge. You can further filter the source data during the preview process. When you’re ready, you can either send the merged documents directly to the printer or you can merge them into a new document. If you merge to a new document, you have another chance to review and, if necessary, edit the merged documents before sending them to the printer.
![]() IMPORTANT
IMPORTANT
Before you can perform the procedures in this topic, you must select a data source and insert merge fields. For more information, see “Choose and refine the data source” and “Insert merge fields” earlier in this chapter.
To preview merged documents
Display the starting document with merge fields in place and the data source attached.
On the Mailings tab, in the Preview Results group, select Preview Results to display the data source information in place of the merge fields.
In the Preview Results group, do any of the following:
Select the Next Record or Previous Record button to move through the data source one record at a time.
Select the First Record or Last Record button to move to the first or last record in the data source.
Select Preview Results again to redisplay the merge fields.
To merge the data to a new document
On the Mailings tab, in the Finish group, select Finish & Merge, and then Edit Individual Documents. The Merge To New Document dialog box opens.

You can limit the merge to one record or a range of records
In the Merge to New Document dialog box, indicate the record or records that you want to merge, and then select OK.
To merge the data and print the resulting file
On the Mailings tab, in the Finish group, select Finish & Merge, and then Print Documents.
In the Merge to Printer dialog box, indicate the record or records that you want to merge, and then select OK.
In the Print dialog box, select your printer, configure any other printer settings as you want them, and then select OK.
To merge the data and email the resulting messages
On the Mailings tab, in the Finish group, select Finish & Merge, and then Send Email Messages. The Merge To E-mail dialog box opens.
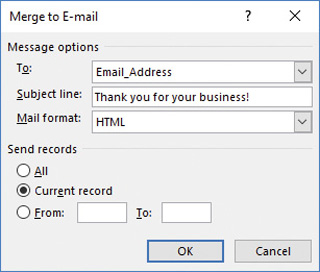
You specify the address field and subject line before sending the messages
In the Message options area, do the following:
In the To list, select the field that contains the recipients’ email addresses.
In the Subject line box, enter the message subject you want the email message to display.
In the Mail format list, select Attachment, Plain text, or HTML.
In the Send records area, indicate the record or records that you want to merge. Then select OK.
Create individual envelopes and labels
If you want to print a lot of envelopes or mailing labels based on data source fields, you can use the mail merge function to create documents, and then print the documents onto envelopes or sheet-fed labels rather than regular paper.
However, you can also use the prominently placed Envelope and Labels functions to create one or more individually addressed envelopes or address labels. Because these functions are related to “mailing” envelopes or packages, they have been (somewhat confusingly) placed on the Mailing tab of the ribbon, which is otherwise home to only the mail merge functionality.
Generate individual envelopes
The Envelope function prints a delivery address and can also print a return address and electronic postage, if you have the necessary software installed. You can manually enter the delivery address, or you can pick it up from a document (usually a letter) that contains an address.

You can edit the address information before creating or printing the envelope
![]() Tip
Tip
You can save time by storing your return address with your user information. The stored address then appears by default as the return address in the Envelopes And Labels dialog box.
![]() IMPORTANT
IMPORTANT
The electronic postage options on the Envelopes tab of the Envelopes And Labels dialog box require the installation of an electronic postage add-in. Selecting the link to locate the add-in returns an error. This feature might be fixed by the time you read this book; when it is, you can print electronic postage directly onto envelopes.
When creating envelopes, you can specify the envelope size, the address locations, and the fonts for the addresses. You can also specify the paper source, the envelope feed method (horizontally or vertically and face up or face down), and the alignment of the envelope. Then Word configures the page layout options and print options as required for your selections.
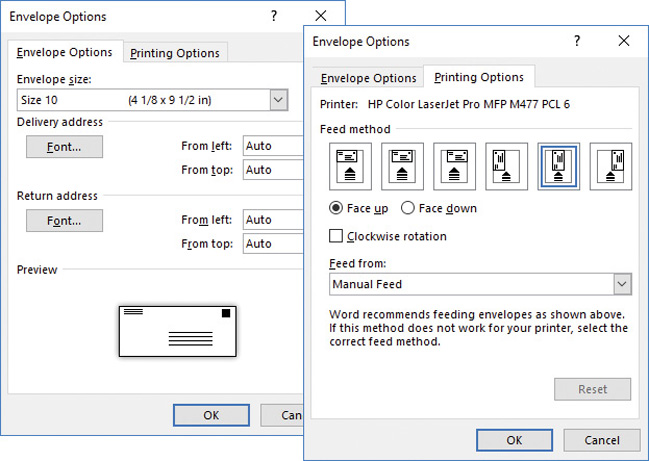
You can position the addresses on the envelope exactly where you want them
When you create an envelope based on an address in a letter, you can print the envelope immediately or add the envelope page to the document, and then print the envelope and letter later.

Adding the envelope to the document inserts it as a separate document section with unique page layout settings
To save your mailing address for use in Word documents
Open the Word Options dialog box, and then select the Advanced tab.
On the Advanced page, in the General section, enter your name and address in the Mailing Address box. Then select OK.
To set up an envelope with a manually entered address
Open any document.
On the Mailings tab, in the Create group, select Envelopes to open the Envelopes And Labels dialog box.
The Return Address box contains your user name or your mailing address, if you saved that in the Word Options dialog box. (If you saved and then deleted your mailing address, the Return Address box might be blank.)
In the Return address area, do either of the following:
Review the return address information and modify it as necessary.
If you plan to print to envelopes that have a preprinted return address, select the Omit check box.
In the Delivery address box, enter the name and address that you want Word to print on the envelope.
To set up an envelope from an address in a document
Open the document and select the address.
On the Mailings tab, in the Create group, select Envelopes to open the Envelopes And Labels dialog box with the selected address in the Delivery Address box. The Return Address box contains your user name and your return address (if you’ve saved that in Word).
Review the addresses and make any changes you want. If you plan to print on an envelope that has a preprinted return address, select the Omit check box in the Return address area.
To configure or confirm the envelope printing options
At the bottom of the Envelopes tab of the Envelopes and Labels dialog box, select Options to open the Envelope Options dialog box.
On the Envelope Options tab, set the envelope size, delivery address font and position, and return address font and position.
On the Printing Options tab, set the feed method, rotation, and paper source.
 IMPORTANT
If the printer shown at the top of the Printing Options tab is not the correct printer, select OK in each of the open dialog boxes to save your settings and return to the source document. Then select the correct printer in the source document and return to the Envelopes And Labels dialog box to finish creating the envelope.
Select OK to return to the Envelopes And Labels dialog box.
To print or save the envelope
After you set up the envelope and configure the envelope printing options, do either of the following
Load an envelope into the printer in the manner configured in the Envelope Options dialog box. Then at the bottom of the Envelopes and Labels dialog box, select Print to print the envelope.
At the bottom of the Envelopes and Labels dialog box, select Add to Document to insert the envelope content as a separately formatted section at the beginning of the current document.
Generate individual mailing labels
The Labels function is designed to print one address (a delivery address or a return address) onto a sheet of labels, to create either a single label or a full sheet of the same label. Instead of selecting an envelope size, you select a label form by first selecting the label manufacturer and then selecting the specific product number. Word sets up a document to precisely match the content layout areas of the selected form.

The content cells defined by the table match the printing areas of the label sheets
As discussed in “Get started with labels” earlier in this chapter, the term “labels” refers not only to rectangular stickers but also to many other things that you print onto sheet-fed media that is divided into fixed areas. You can use the Labels function to print on any of these. It’s important that you select the correct form because the print areas are very specifically defined.
To set up individual mailing labels
Open any document.
On the Mailings tab, in the Create group, select Labels to open the Envelopes And Labels dialog box.
In the Address area, do either of the following:
If you’ve saved your return address information in Word and you want to create a return address label, select the Use return address check box to insert the saved address into the Address box. Then review the return address information and modify it as necessary.
Enter the name and address that you want Word to print on the label.

Although the field specifies an address, you can print any text on the labels
In the Print area, do either of the following to correctly configure the label output:
If you want to print one full sheet of labels, select Full page of the same label.
If you want to print only one label, select Single label, and then enter the row and column of the position on the sheet of the label you want to print on.
TipThis feature permits you to easily reuse a partial sheet of blank labels.
In the Label area, confirm that the label type is the correct one for the printed label forms you are using. If it is not, configure the label settings in the Label Options dialog box.
SEE ALSOFor information about configuring label settings, see “Get started with labels” earlier in this chapter.
To print or save the mailing label
After you set up the label and configure the label printing options, do either of the following
Load a label form into the printer in the manner configured in the Label Options dialog box. Then at the bottom of the Envelopes and Labels dialog box, select Print to print the label.
At the bottom of the Envelopes and Labels dialog box, select New Document to generate a new document that contains the merged labels.
Key points
The mail merge process is that of merging variable information from a data source into the static content of a main document such as a letter, envelope, sheet of labels, or email message.
Mail merge data sources are organized into sets of information, called records, with each record containing the same items of information, called fields.
You insert merge field placeholders into the main document to tell Word where to merge fields from the data source.
You don’t have to use all the records from a data source for a mail merge. You can filter the data and exclude specific records.
The mail merge process can create a new document that you can edit or save, or you can send the results directly to your printer or to email recipients.
 Practice tasks
Before you can complete these tasks, you need to copy the book’s practice files to your computer. The practice files for these tasks are located in the Office2019SBSCh05 folder. You can save the results of the tasks in the same folder.
The introduction includes a complete list of practice files and download instructions.
Understand the mail merge process
Start Word, open a new blank document, and then perform the following tasks:
Start the Mail Merge wizard and investigate the options provided therein.
Using the wizard, create any mail merge item you want. Use the CustomerList workbook from the practice file folder as your data source.
If you create a mail merge document, save it as MyMerge, and then close it.
Start the mail merge process
Open the StartMerge document from the practice file folder, and then perform the following tasks:
Start a letter mail merge. Notice that the document does not change.
Start an email mail merge. Notice that the document view changes to Web Layout.
Start a label mail merge and investigate the options in the Label Options dialog box. Choose a label vendor and product number and display the label details.
Create the label sheet and allow Word to replace the contents of the StartMerge document when prompted to do so.
Close the StartMerge document without saving it.
Choose and refine the data source
Open the RefineData document, and then perform the following tasks:
Start a letter mail merge. Select the CustomerList workbook from the practice file folder as the data source, and select the Customers$ table of the workbook when prompted to do so.
Sort the recipient list alphabetically, in ascending order, by the customers’ last names.
Remove duplicate records from the recipient list.
Filter the list to display only those records for customers who live in either the state of Texas (TX) or the state of Louisiana (LA).
Manually exclude all the Louisiana (LA) records from the recipient list, and then return to the letter.
From the Select Recipients menu, create a new data source. Add your name and the names of two other people. Add any other information you want, and then save the new list as PracticeList.mdb.
Save and close the RefineData document.
Insert merge fields
Open the InsertFields document, and then perform the following tasks:
Start a letter mail merge. Select the PolicyholdersList workbook from the practice file folder as the data source, and select the PolicyHolders$ table of the workbook when prompted to do so.
Replace each placeholder in the document with its corresponding merge field.
Save the InsertFields document but don’t close it.
Create a new blank document and start a new letter mail merge. Use the same data source as in step 1.
Open the Insert Address Block dialog box. Review the settings and make any changes you want, and then insert the merge field.
In the document, two lines below the address block, insert a Greeting Line merge field.
Save the document as MyFields, and then close it. Leave the InsertFields document open for the next set of practice tasks.
Preview and complete the merge
Complete the previous set of practice tasks to modify the InsertFields document. Then perform the following tasks:
Use the tools in the Preview Results group on the Mailings tab to preview the results of completing the mail merge. Then redisplay the merge fields.
Merge the data source into the document to create a new document. Save the document as MyLetter, and then close it.
Redisplay the InsertFields document and follow the procedure to merge the output directly to the printer. (If you don’t want to print the file, select Cancel in the final dialog box.)
Follow the procedure to merge the output to email messages. Explore the settings, and then select Cancel.
Save and close the InsertFields document.
Create individual envelopes and labels
Open the CreateEnvelopes document, and then perform the following tasks:
Open the Word Options dialog box and display the Advanced page. In the General section, check whether you have saved your mailing address. If you have not, do so now.
Open the Envelopes and Labels dialog box. Verify that the Return Address box contains your saved mailing address.
In the Delivery address box, enter the name and address of another person. Then add the envelope to the document.
In the document, select the letter recipient’s name and address, and then open the Envelopes and Labels dialog box. Verify that the Return Address box contains your mailing address, and that the Delivery Address box contains the letter recipient’s name and address.
In the Envelope Options dialog box, configure the envelope printing options and then, if you want, load an envelope into your printer and print the addresses onto the envelope.
Save and close the CreateEnvelopes document.
Create a new blank document.
Display the Labels tab of the Envelopes and Labels dialog box. If your saved mailing address is not already shown in the Address box, select the Use return address check box to add your saved information to the Address box.
Configure the merge output to print one full sheet of labels.
If you have a sheet of labels to print to, configure the label settings. Then load a sheet of labels into the printer and print the addresses onto the labels.
If you don’t have a sheet of labels, generate a new document that contains the merged labels. Then save the document as MyLabels, and close it.