
Chapter 6
Notebooks
In Chapter 5, you learned about hunting in Microsoft Sentinel. This chapter is going to cover another hunting option, using Notebooks. More precisely, Jupyter Notebooks. Besides hunting, you will explore other options, like enrichment and extending your incident triage experience using Notebooks.
A lot has already been written about Jupyter Notebooks, hereafter referenced as Notebooks. In summary, Jupyter is an interactive development and data manipulation environment. A Notebook is generally referenced as a document that integrates live code, equations, computational output, visualizations, and other multimedia resources, along with explanatory text in a single document.
The intent of this chapter is to provide you with practical information and guidance to start exploring Notebooks.
Understanding Microsoft Sentinel Notebooks
When Notebooks were introduced in Microsoft Sentinel, it initially caused some confusion related to their positioning and purpose—specifically, related to the concepts of Workbooks and Playbooks. If you are new to Microsoft Sentinel and are being introduced to Workbooks, Playbooks, and Notebooks, it generally creates confusion.
Tip
More information about the history of Notebooks, including documentation, can be found here: https://jupyter.org
Table 6-1 clarifies and positions the three different features, although Notebooks are being used more and more in the incident triage phase:
TABLE 6-1 Notebooks compared to Workbooks and Playbooks
| PLAYBOOKS | WORKBOOKS | NOTEBOOKS |
|---|---|---|---|
Roles |
|
|
|
Usage |
|
|
|
Pros |
|
|
|
Cons |
|
|
|
There are multiple options to run a Notebook, like running your own Jupyter server, running it on JupyterHub, or running it in a Docker container. In this chapter, you will explore running Notebooks in Microsoft Sentinel.
Referencing Microsoft Sentinel Notebooks, instead of just Notebooks, should be considered as running a Notebook within Microsoft Sentinel’s integrated environment.
Note
Microsoft Sentinel Notebooks can be run in any Jupyter-compatible environment.
To be able to run Notebooks within Microsoft Sentinel, you have the option to run Notebooks on the Azure Machine Learning (AML) platform or Azure Synapse Analytics (in preview at the time of writing this chapter). The latter is more suitable for large-scale data processing. Because this is not the case for the samples we explore in this chapter, we will configure an AML environment in the next section.
Configuring an AML workspace and compute
To start exploring Notebooks in Microsoft Sentinel, you will first set up an AML workspace and create a compute resource to run your Notebooks. Please note that you will need AML contributor permissions to follow along.
Note
For more information on the required AML permissions and roles, see https://aka.ms/AMLpermissions.
Follow these steps to start:
Open the Azure portal and sign in as a user who has Microsoft Sentinel contributor and AML contributor privileges.
Navigate to the Microsoft Sentinel page.
Under Threat management, click Notebooks.
In the top-middle pane, under Configure Azure Machine Learning, click Create New Azure ML Workspace, as shown in Figure 6-1.
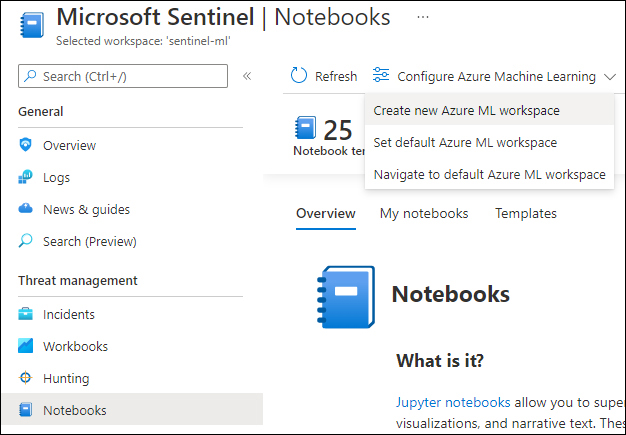
FIGURE 6-1 Create a new Azure ML workspace
In the create wizard that follows, provide your custom values, as shown in Figure 6-2. (Some of them are auto-populated, but that can be changed.)
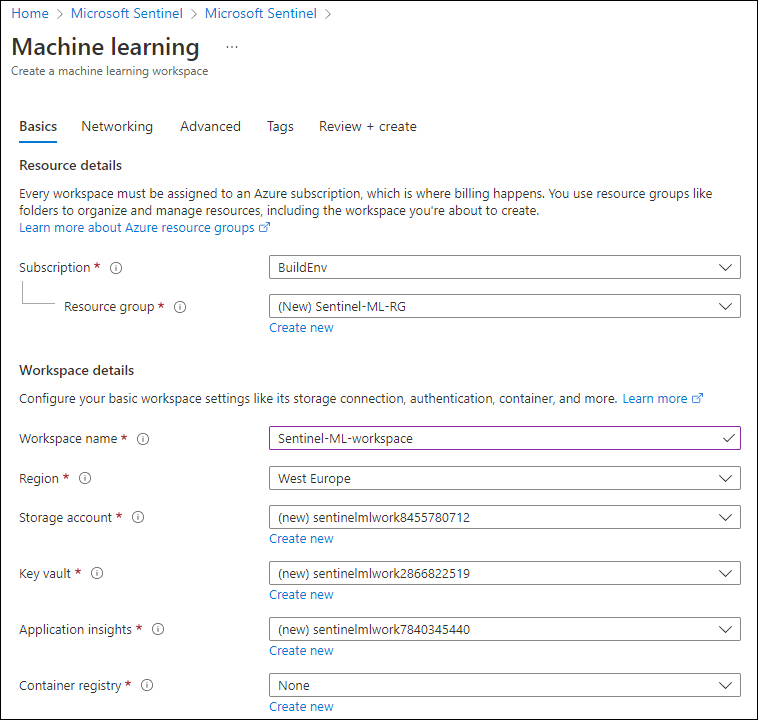
FIGURE 6-2 Create A Machine Learning Workspace wizard
Note
As a security best practice, a Key Vault should be used to store sensitive information, like your workspaceId, workspaceKey, an API key, or any information that needs to be protected. How to do this will be covered in one of the sample Notebooks. Values retrieved from a Key Vault will not be stored in your Notebook.
Click Next, and on the Networking tab, select your preferred endpoint configuration, as shown in Figure 6-3.
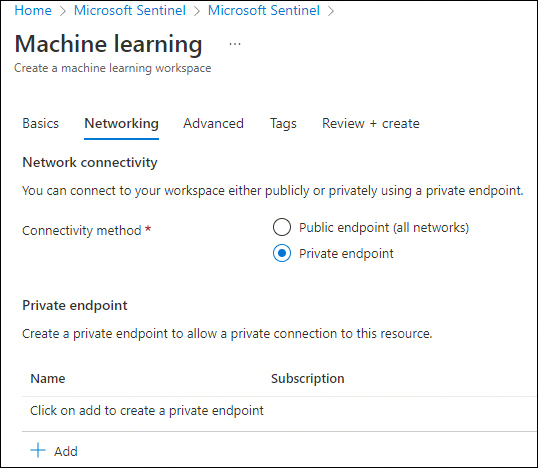
FIGURE 6-3 The Networking tab
Note
A public endpoint enables data access to your workspace from outside the virtual network and is publicly routable, whereas a private endpoint is a network interface that uses a private IP address from your virtual network and connects you privately and securely.
Optionally, you can configure the remainder of the wizard and click the Create button, as shown in Figure 6-4.
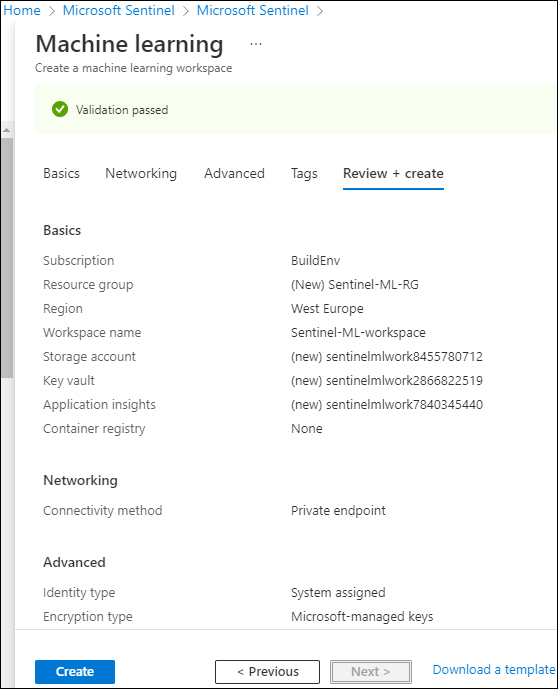
FIGURE 6-4 Create A Machine Learning Workspace wizard summary
When the deployment is done, go back to the Notebooks page by clicking your browser’s back button
Click the Templates tab, as shown in Figure 6-5.
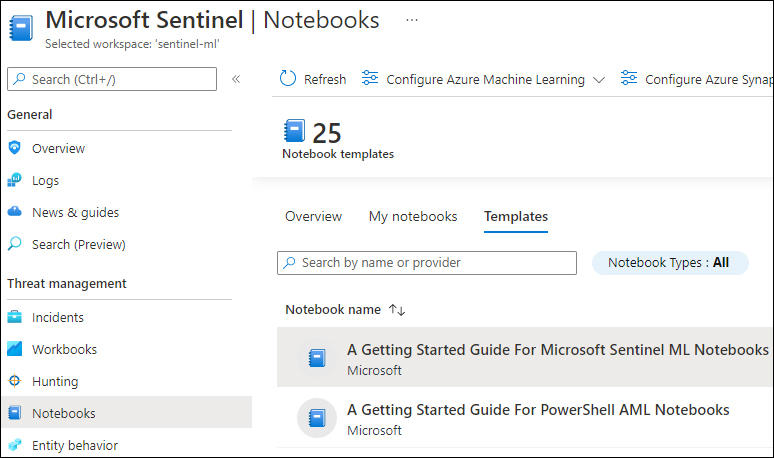
FIGURE 6-5 Notebook templates
This tab shows the Notebook templates, based on a selection of the GitHub Notebooks repository. Click once on the A Getting Started Guide For Microsoft Sentinel ML Notebooks option. In the right pane, click the Create From Template button, as shown in Figure 6-6.
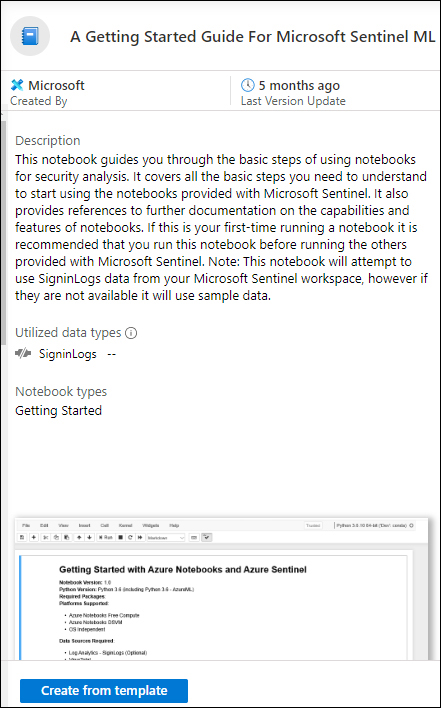
FIGURE 6-6 Create a Notebook from a template
Select your created AML workspace and click the Save button, as shown in Figure 6-7.
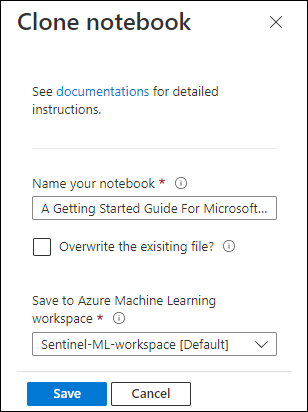
FIGURE 6-7 Save the cloned Notebook
Now that you have cloned and saved the Notebook, click Launch Notebook, which will open the Microsoft Azure Machine Learning Studio page.
Before you can run a Notebook, you need to create a Compute Instance, which will run your Notebook.
In the upper-right pane, click the + sign, as shown in Figure 6-8.

FIGURE 6-8 Create a compute instance
On the Configure Required Settings page, provide your Compute Name, your Virtual Machine Type, and Virtual Machine Size, as shown in Figure 6-9.
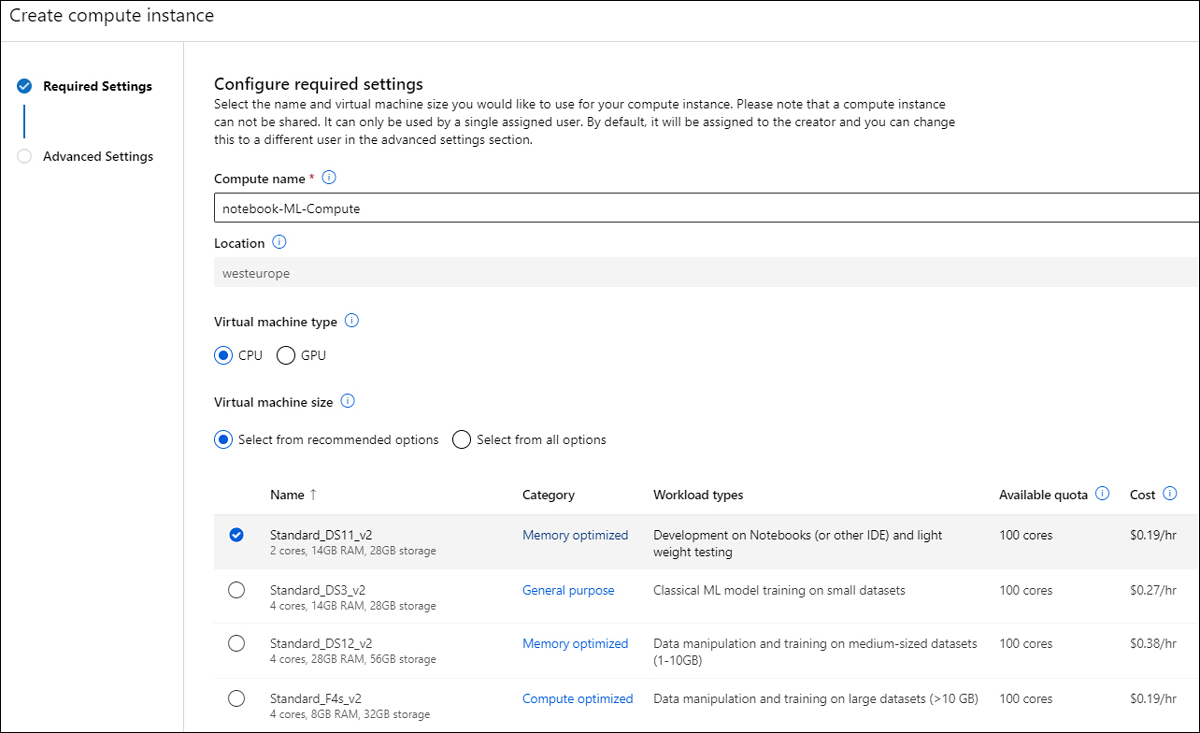
FIGURE 6-9 Create Compute Instance wizard
The Advanced Settings show options to provide a Startup And Shutdown Schedule (recommended) and additional options, as shown in Figure 6-10.
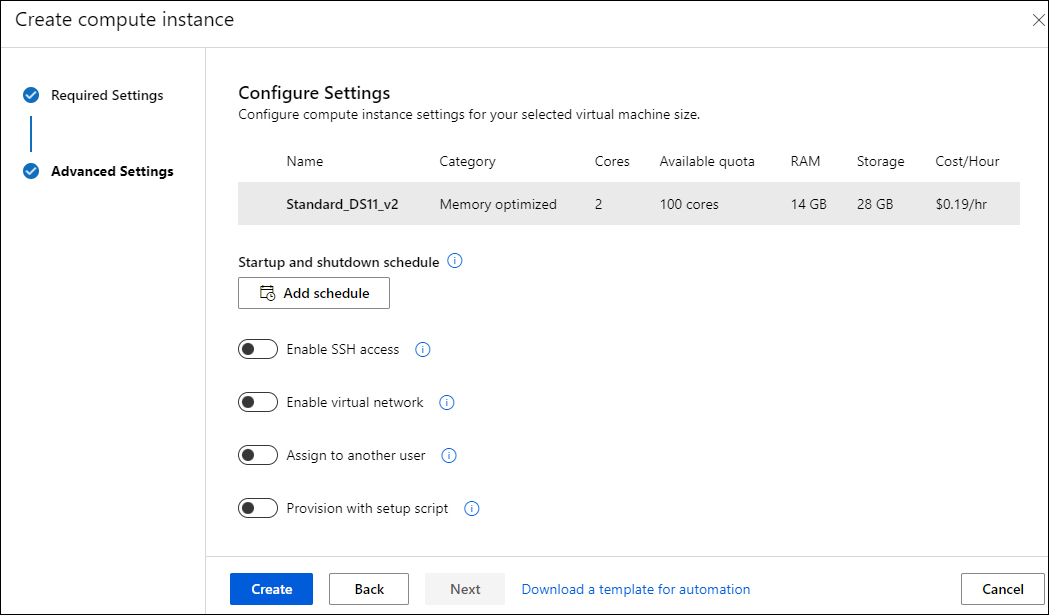
FIGURE 6-10 Create a compute instance wizard advanced settings
Tip
For testing purposes, it is recommended that you select the Standard_DS11_v2 VM size and configure a startup and shutdown schedule to be cost-effective.
Click the Create button to create your compute instance.
The compute instance status will change to Creating, as shown in Figure 6-11.

FIGURE 6-11 Compute instance creation in progress
Wait until the creation of your compute is complete and the status is Running.
In the yellow notification bar, click Authenticate, as shown in Figure 6-12, which allows you to use Azure SDK.

FIGURE 6-12 Authenticate the compute to use any Azure SDK
This completes the setup and configuration of the AML workspace and the required compute. You are almost ready to explore Notebooks!
Configuration steps to interact with your Microsoft Sentinel workspace
For your Notebooks to interact with Microsoft Sentinel, the last preparation step is to create a configuration file, which contains at least your workspace key and workspace identifier. MSTICpy, which will be covered later in this chapter, is a Python package developed by Microsoft’s Threat Intelligence Center (MSTIC) security analysts and engineers, which will make this step very easy.
In the previous steps, you have cloned the Getting Started with Azure ML Notebooks and Microsoft Sentinel Notebook. It is highly recommended that you go through this Notebook, which is intended to give you an interactive introduction. Completing this Notebook will jumpstart your learning experience. It also contains the required steps to configure your connection to Microsoft Sentinel.
Tip
You can run a cell by either clicking the Run icon, which is shown on the left side of the cell if you hover over it or by selecting Shift+Enter.
As stated in the Notebook, it is important to explore and run each cell in sequence because certain cells have dependencies. After you have completed the previous steps, you will notice that the msticpyconfig.yaml file has been generated and now contains configuration information that was automatically populated based on your current Azure connection, as shown in Figure 6-13.
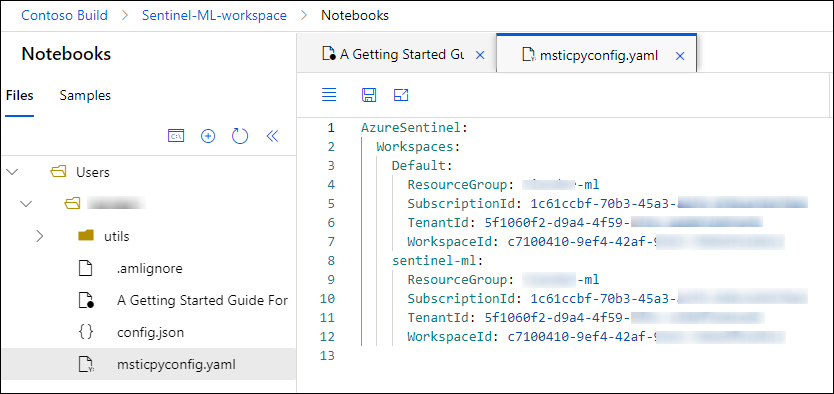
FIGURE 6-13 The msticpyconfig.yaml file
Tip
You might need to refresh the file listing for your msticpyconfig.yaml file to show; do this by clicking the refresh icon in the left panel.
To be able to query your Microsoft Sentinel workspace, you use the QueryProvider object. This step is listed in “A Getting Started Guide For Microsoft Sentinel ML Notebooks,” in section 3.3, “Load a QueryProvider for Microsoft Sentinel.” Upon running this cell, you will see this confirmation: …Loading KqlMagic extension…done. The next section, “Authenticate to the Microsoft Sentinel workspace,” will perform the actual authentication against Microsoft Sentinel, as shown in Figure 6-14.
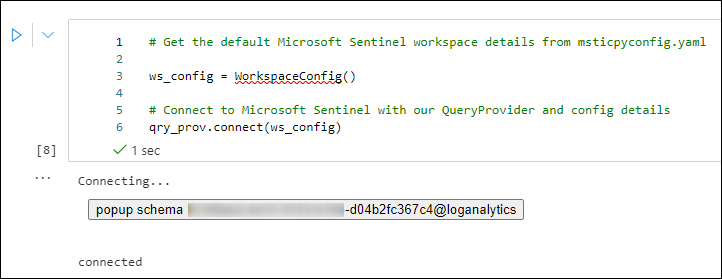
FIGURE 6-14 Authenticating to Microsoft Sentinel
If your token has expired, you will be prompted to authenticate using a device login; if not, the authentication will be seamless.
Tip
If you load a new Notebook, you will be prompted again to log in using device authentication. If you want to log in only once, you can create a new cell and run !az login.
Running a cell sometimes installs new packages, which requires a kernel restart for the changes to be applied. If running a cell fails because of an updated package, you might want to restart the kernel and try again.
The MSTICpy library
As briefly mentioned earlier in this chapter, the MSTICpy library, developed by MSTIC’s security analysts and engineers, provides a rich set of Python tools that are intended to be used for security investigations and hunting.
Tip
For more information on MSTICpy, see https://aka.ms/MSTICpydocs.
Because several sample Notebooks provide an excellent overview and examples on how to use MSTICpy, this section will cover a couple of practical examples.
To quickly test several Notebooks from the Microsoft Sentinel GitHub repo, you can easily clone the repository, as shown below:
Ensure that your ML compute is running, and you are in the Microsoft Azure Learning Studio environment, as you have done in the previous steps
Click the Open Terminal icon, as shown in Figure 6-15.
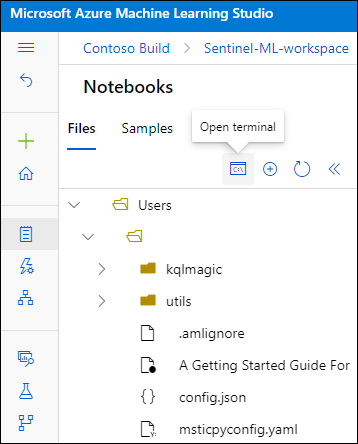
FIGURE 6-15 Open Terminal
This will open a terminal in a new tab. From here, you can create a new folder, or you can browse to an existing one, where you can store the Notebooks you are about to clone.
Optionally, you can create a folder, navigate to that folder, and copy and paste the following code to clone the GitHub Notebooks, as shown in Figure 6-16:
git clone https://github.com/Azure/Azure-Sentinel-Notebooks.git
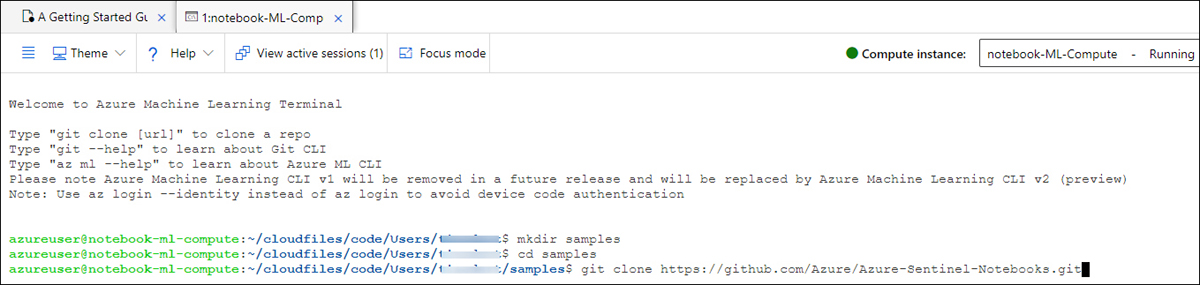
FIGURE 6-16 The git clone command
Press Enter to execute the command, which should show output similar to that shown in Figure 6-17.
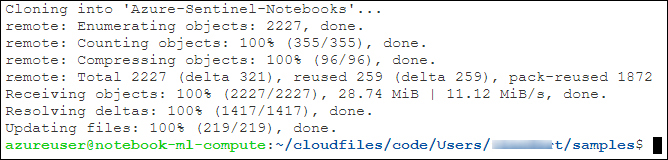
FIGURE 6-17 Output of the git clone command
Refresh the folder view in the left pane, which will show your newly created folder and cloned Notebooks, as shown in Figure 6-18.
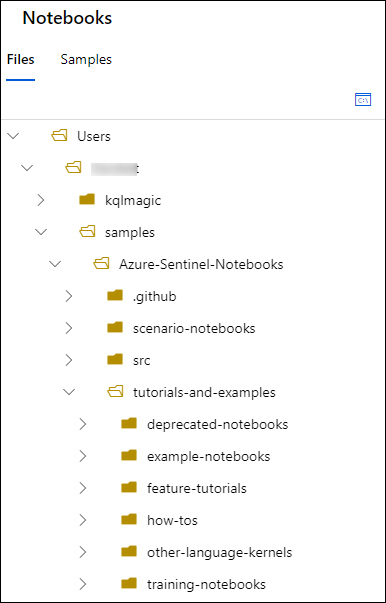
FIGURE 6-18 The Samples folder with the cloned Notebooks
Note
The
git clonecommand that you just used is an easy way to clone the Notebooks, but it is not how you would typically maintain a synchronized GitHub repo for CI/CD purposes.
Hunting and enrichment examples
This section provides a couple of Notebook-hunting examples to get you started. The following is based on the Notebook examples that you have cloned in the previous section and assumes that you have run through and completed the “A Getting Started Guide For Microsoft Sentinel ML Notebooks” Notebook.
Sign-ins that did not pass the MFA challenge
The MSTICpy library contains several useful pre-built queries that you can use. To see a list of queries and the syntax you can use, enter this query:
qry_prov.browse_queries()
When you use this query in a new cell and run it, it will show you the output, as shown in Figure 6-19, including the syntax and examples.
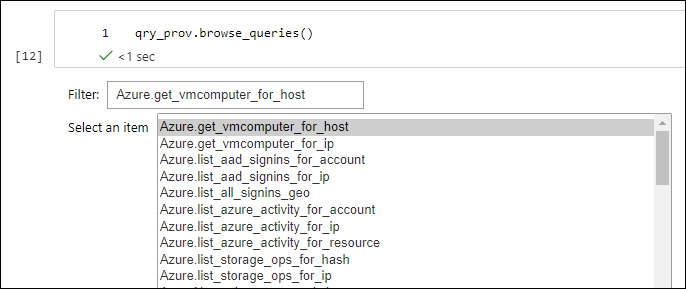
FIGURE 6-19 MSTICpy built-in query listing
Explore the Azure.list_allsignins_geo query because you will use it in the next example. In the example below, you are going to do the following:
Run a query against the
SiginLogstable.Apply a filter for the
ResultDescriptioncolumn.Look for values that contain the
User did not pass the MFA challengestring.Look for unique
IP addressesin the returned results.Create a
Threat Intelligence lookup object.
Check the IP addresses against VirusTotal.To follow along, create a new cell in the “A Getting Started Guide For Microsoft Sentinel ML Notebooks” Notebook. Ensure that you are authenticated and that you have executed all cells and their dependencies.
You are going to use the Python
Pandaslibrary, create a new cell, copy and paste the line below and execute the cell by pressing Shift+Enter:import pandas as pd
Create a new cell and paste in the following:
#this query comes from the query provider:
signin_df = qry_prov.Azure.list_all_signins_geo()

#show the first 5 results:
signin_df.head()
Execute the cell.
You should see a similar output as shown in Figure 6-20.
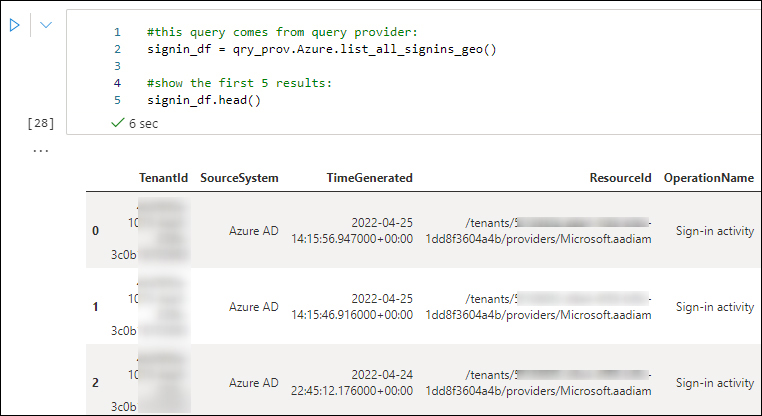
FIGURE 6-20 Query the signinlog table. (Some information has been intentionally blurred.)
Create a new cell and copy and paste the following into it:
#create a new pandas dataframe and filter for a specific string:
signin_mfa_df = signin_df[signin_df["ResultDescription"].str.contains("User did
not pass the MFA challenge")]

#look for unique IP addresses
signin_mfa_df = (pd.unique(signin_mfa_df['IPAddress']))

#show the array of unique IP addresses:
signin_mfa_df
That should return similar results as shown in Figure 6-21.
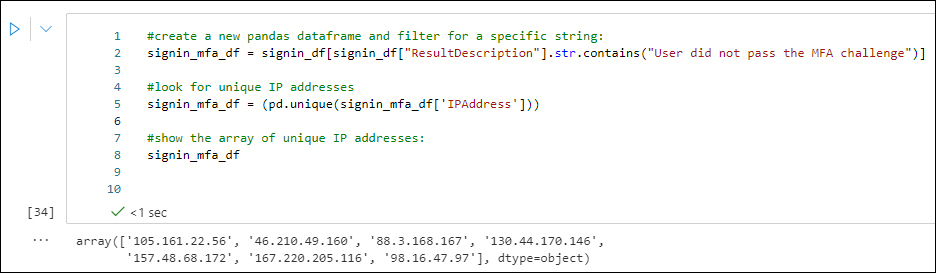
FIGURE 6-21 Results of the signinlog table with a filter condition
Now that you have values stored based on your filter condition, you are going to create a threat intelligence lookup object. Copy and paste the following into a new cell:
#create a Threat Intelligence object:
ti = TILookup()

#use the IPAddress column values and check these against VirusTotal:
ti.lookup_iocs(signin_mfa_df, obs_col="IPAddress", providers=["VirusTotal"])
That should return similar results as shown in Figure 6-22.
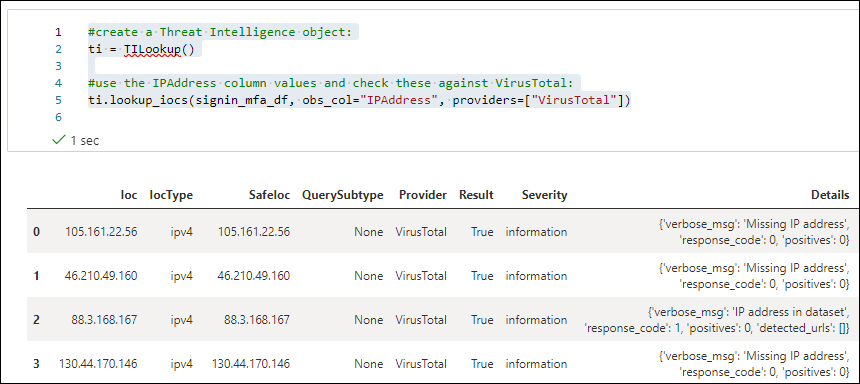
FIGURE 6-22 Results of a VirusTotal lookup
If you want to filter on specific threat intelligence columns, such as a
Severityvalue of warning orResult == True, you can adapt the query by using something like this:#create a Threat Intelligence object: ti = TILookup() #use the IPAddress column values and check these against VirusTotal: ti_warning = ti.lookup_iocs(signin_mfa_df, obs_col="IPAddress", providers=["VirusTotal"]) #filter out the column "Result" for a value of "True" ti_warning[ti_warning["Result"]==True]
That will return results similar to those shown in Figure 6-23.
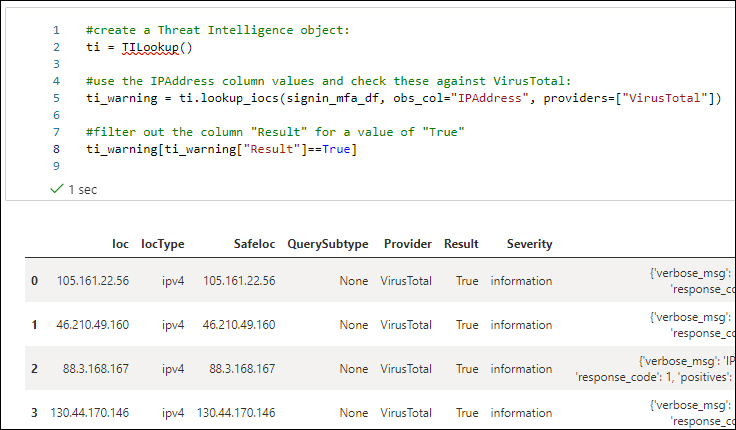
FIGURE 6-23 Results of a VirusTotal lookup based on a Result filter
You can easily use a visualization by taking the same data frame and plotting it, using something similar to this:
ti_warning["Result"].value_counts().plot(kind='pie')
See Figure 6-24.
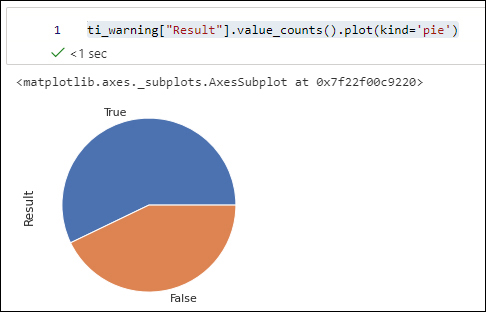
FIGURE 6-24 VirusTotal results visualized
Creating interactive cells
For triaging an incident, it is very common to use interactive cells that will prompt you for input. The example below is based on Maxmind’s GeoLiteLookup for retrieving geo IP information. The installation and configuration are covered in the sample Notebook that you have been using so far.
Add a new cell in the Notebook that you have been working on.
Copy and paste the following into your new cell:
# Investigate an IP address, ask for user input:
IPaddress = input("Which IP address to investigate? ")
# use as sample: '90.156.201.97'

iplocation = GeoLiteLookup()
loc_result, ip_entity = iplocation.lookup_ip(ip_address=IPaddress)

print('Raw result')
display(loc_result)

print('IP Address Entity')
display(ip_entity[0])
Execute the cell. Your output should look like Figure 6-25.
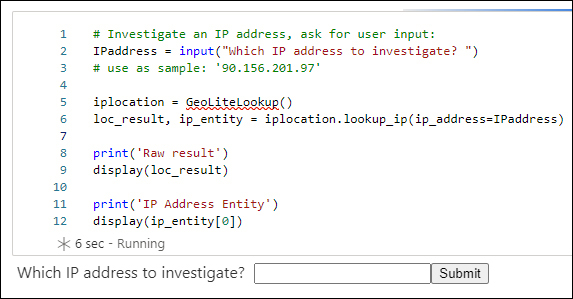
FIGURE 6-25 GeoIP look up
After pasting in an IP address and clicking Submit, you should see something similar to what’s shown in Figure 6-26.
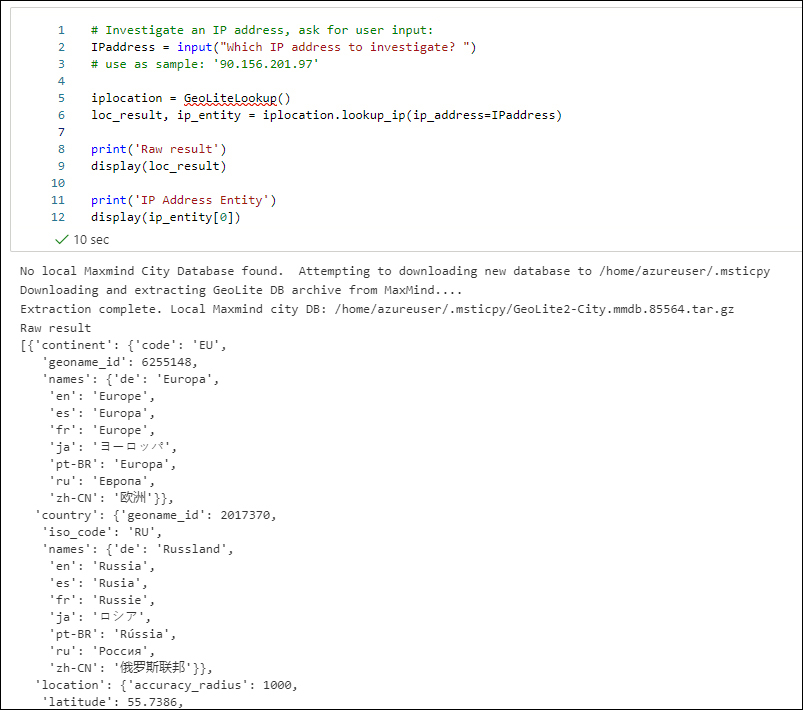
FIGURE 6-26 GeoIP look up results
The intention of this chapter was to provide you with an interactive introduction to Notebooks, with practical examples for you to try out. This chapter only scratched the tip of the iceberg. To continue your exploration and Notebook learning path, a copy of the next steps, as listed in the sample Notebook you have been using, is summarized below:
Run the Getting Started Notebook in Azure Sentinel. This will help you get your configuration set up.
Try the MSTICPy Lab at https://aka.ms/msticpy-demo.
Read the documentation at https://msticpy.readthedocs.io/en/latest/GettingStarted.html.
Learn more about Pandas at https://pandas.pydata.org/docs/.
Check out our other Notebooks for ideas! See https://github.com/Azure/Azure-Sentinel-Notebooks.