
This recipe will detail how to modify the settings of a SCEP client using the Settings tab of the SCEP client UI. Although, typically in a large-scale environment, the settings for a SCEP client will be defined in a SCEP policy on the SCCM server, it is useful to understand how to modify these settings at a local client level for testing and troubleshooting purposes.
If a SCEP client is receiving a policy from an SCCM server, or through GPO, the extent to which the local SCEP policy settings can be modified in the client user interface is defined in that policy. A stand-alone SCEP client's setting can be fully modified, although in both cases, local administrator rights will be needed to save changes.
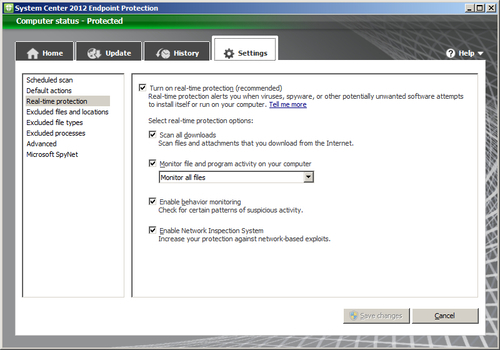
- To begin, open the SCEP client UI and select the Settings tab, as shown in the following screenshot:
- Select the Scheduled scan menu option to modify the frequency and type of scans.
- Select the Default actions menu option to modify SCEP's reactions to malware detections of the listed severities.
- Select the Real-time protection menu option to modify the behavior of SCEP's real time anti-malware engine.
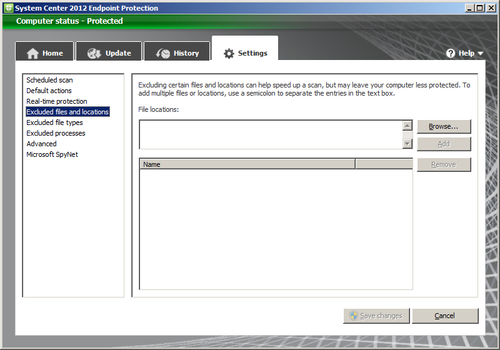
- Select the Excluded files and locations menu option to add or remove custom file and directory exclusions, as shown in the following screenshot:
- Select the Excluded file types menu option to add or remove custom exclusions for specfic file types.
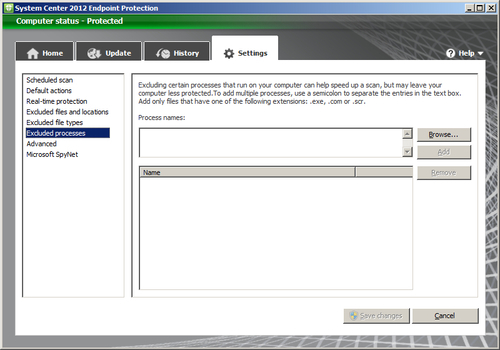
- Select Excluded processes to add or remove custom exlusions for specific applications and programs as depicted in the following screenshot:
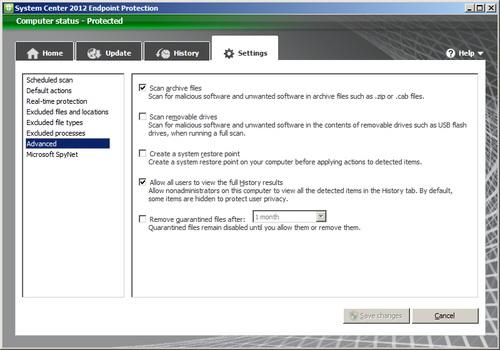
- Select the Advanced menu option to modify how SCEP handles removable drives, how long it stores files in quarantine, and how long it keeps events in the History tab. Refer to the following screenshot:
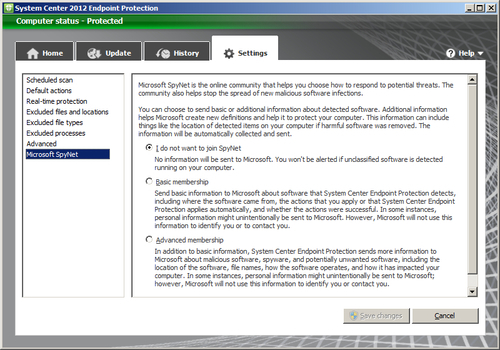
- Select the Microsoft SpyNet tab also known as the Microsoft Active Protection Service (MAPS) menu option to enable or disable particpation in Microsofts Spynet system.
- Click on Save changes to complete your modifications.
On the Scheduled scan page, you can define the interval for how often a scan will occur and whether it will perform a full or quick scan. You can also disable scheduled scan altogether by unchecking Run a scheduled scan on my computer.
Microsoft has also added a couple of options for scheduled scans, which are designed to minimize the performance impact for end users. The Start scheduled scan only when my computer is on but not in use option will delay the starting of scan until the system is idle. The Limit CPU usage during a scan to setting allows for CPU throttling between 10 percent and 100 percent; this is an especially valuable setting when configuring a SCEP policy for an application or file server.
The next page of settings covers Default Actions, which are preset reactions the SCEP client will take when malware is detected. What category a piece of malware will fall into is defined within the SCEP definitions.
If any SCEP policy has been assigned to a PC from SCCM, you will not be able to modify the Default Actions settings locally. A standalone client on the other hand does allow for the modification of the Default Actions settings, which are as follows:
- The Real Time Protection page allows you to modify how the anti-malware engine interacts with the OS. Real time protection can be completely disabled here, although it's never recommended to do so, unless you're troubleshooting an issue with a client.
- The Monitor file and program activity on your computer setting allows for some performance tweaking on file servers. You could choose to only scan incoming files or only outgoing files. It's recommended to leave this setting at the default setting of Monitor all files unless you have an explicit reason to do otherwise, such as troubleshooting I/O performance on a file server.
- The Enable behaviour monitoring setting allows you to toggle the Behavior Monitoring feature of SCEP. This is a new technology that Microsoft has developed which monitors running processes for suspicious actions that could indicate an infection. For example, a process that loads and then attempts to modify certain sections of the registry known to be favored by viruses could trigger a Behavior Monitoring event.
- Enable Network Inspection System allows you to turn the NIS service on or off. As I mentioned earlier, NIS monitors network traffic for patterns that correspond to known vulnerabilities in Windows. NIS is only supported on Windows Vista SP1, Windows 7, and Windows 2008 server systems.
- The Excluded Files and Locations page allows for either specific files or entire directories to be excluded from scanning.
When a SCEP client is installed, some preset exclusions will already be defined. Adding additonal exclusions should be done with caution. If a new exclusion is needed, the specific files should be excluded before choosing to exclude an entire directory. The use of wildcards, such as an asterisk (*) and system variables, are allowed.
The Excluded File Types page
allows you to exclude specfic file extensions. To exclude a file type, simply enter the three-character file extension, such as MDB. A period symbol (.) is not needed and will be stripped out if used. Common file types will have a description added automatically. As a best practice, it is recommended to use file type exclusions sparingly. Adding exclusions for a specific file is more secure approach.
The SCEP client has the ability to exclude .Exe, .Com, and .Scr processes. To add an exclusion for a process, you must know the complete path to .Exe, .Com, or .Scr. The path can either be typed in manually or browsed to.
The Advanced page provides some additional settings, including how SCEP treats archive files, whether the client will automatically scan removable drives and it also enables the creation of system restore points before taking action on a detected piece of malware. You can also grant the user the ablitly to view the malware incedent history and define how long items will be stored in the quarantine.
Although it might have a nefarious sounding name, Spynet is actually Microsoft's cloud-based service that allows SCEP clients to report information about programs that display suspicious behavior. The name Spynet is being phased out and rebranded as Microsoft Active Protection Service (MAPS). Keep in mind, on the local client side, the option is still called Spynet in the UI. Future service packs will most likely alleviate this discrepancy.
Spynet must be enabled if you plan on utlizing the Dynamic Signature Service component of SCEP. Dynamic Signatures are essentially cloud-based partial signatures files for new emerging threats, meaning these threats are so new that Microsoft has not had time to add these patterns to the latest version of the full SCEP definiton file.