
In my professional capacity as an architect and team lead, I am sometimes asked by junior developers what they can do to improve their skills. Should they watch YouTube videos about various topics in software development? Are there good books they should read? What about side projects?
My advice has always been the same: to get better at anything, software development very much included, you’ve got actually to do the thing you want to get better at! Nothing beats experience. So yes, side projects are the way to go.
However, not all experience is equal. With programming, there is one thing that I genuinely believe improves developer skills more than any other type of side project, and that’s games. Even if you’re a business developer like me, games are where it’s at.
Why is that? Simply put, games force us to confront many different software development challenges: algorithms, data structures, optimization, smart design, flexible architecture, and so on. That’s before you even think about the more obvious things like visual design and graphics. They also, by their nature, are an exciting challenge to face because they are, by their nature, meant to be fun! Shouldn’t the process of making a game be fun too? Indeed, it is, even when being challenging – and it will be challenging, and in ways you can’t predict!
So, in this chapter and the next, we’re going to take that philosophy to heart and build ourselves a game using React, TypeScript, and Node, as well as a few other things. To be sure, this isn’t going to be a AAA game title ala Halo or even something as addicting as Minecraft. But it will afford you the chance to view what you’ve learned through a different lens and use some different development muscles, all of which will provide you some new perspectives – along with some new skills – with which to create going forward.
What Are We Building?

A basic Mahjong Solitaire layout
To be more accurate, what’s depicted there is actually called Mahjong Solitaire. Plain old Mahjong is a little different, though they both are played with tiles depicting various Chinese symbols – perfectly logical given that the game was invented in China during the Qing dynasty (1636–1911). Mahjong is vaguely similar to Poker in that you are trying to create “hands” using tiles you are given at the start plus the tiles on the board, and you play with multiple people, usually four.
Mahjong Solitaire, on the other hand, is, as the name implies, played in solitude by one person. The goal is to find matching tiles and remove them from the board. The trick is that the board is three-dimensional: there are five layers of tiles in that screenshot, and you can only match and remove pairs that are “free,” which means that there is no tile above them and none to either the left or right of each. You continue until you either remove all the tiles, which is considered a win, or you have no more legal moves left, which is regarded as a “dead-ended” board.
Now, our little game here, BattleJong, is going to be a bit different. First, we’ll do away with the Chinese symbols and go with something… different. We’ll get to that in the next chapter! Also, we’re going to make this a bit more social: as the word “Battle” in the name implies, you’re going to play against another person.
The way it will work is that you’ll play simultaneously with someone else. You’ll get up to ten points per matched tile pair. However, how long it takes you to find a match will deduct from that number. You’ll always get at least one point per match, but you could get anything from one to ten, depending on how long you take each time. In the end, whoever has the highest score wins.
It’s not a complicated game mechanic to be sure, and it’s not even original, as versions of Mahjong like this were done as far back as the mid-1990s in the DOS days. But, for our purposes here, it’s perfect: being not too complicated means it won’t be overwhelming, and the need to play against someone introduces the need for some sort of server. And it’s not just any server: we need it to be real time, and the server needs to be able to send data to the client at any time. This makes for a challenge and, more importantly, allows me to introduce some new things to the mix.
Basic Requirements
Each player should see a board similar (but a bit different) from Figure 10-1 (client).
They should be able to click a tile, have it highlighted in some way, and then click another (client).
If they match, the pair should be removed, and the server must be told how many points resulted from the match. The server must then update the other player with that information and keep track of the cumulative score of both (both).
Logic should be in place to ensure each player can only select “free” tiles (client).
When a player launches the client, it must contact the server and “register” the user. Once two players are registered, the game will begin automatically (server).
Whenever a player clears the board, or it is determined that there are no more valid moves left, the server should be told (both).
Once both players register the board completed, the server will determine who won based on score and inform both players (server).
As you can see, most of the work is really client side, which means it’ll be covered in the next chapter. However, the server certainly does have some work to do, so let’s get to work building it!
Setting Up the Project
That gives us the basic setup we need for the server.
You may be wondering why, in the two projects presented in this book, I didn’t use Webpack on the server side. Indeed, you can do so. However, my feeling is that since server-side code by its nature isn’t being shipped down to a browser, there’s less need for Webpack there. Bundling up your code efficiently matters less when it’s just going to be sitting on a server. I’d rather keep the workflow more uncomplicated and not introduce another tool to the toolchain when working on that code, so I left Webpack out of the server-side mix for those reasons, not because of any technical issues.
Some tsconfig.json Changes
strict – This enables all strict type-checking options. That means that it will enable noImplicitAny, noImplicitThis, alwaysStrict, strictBindCallApply, strictNullChecks, strictFunctionTypes, and strictPropertyInitialization. You can override any of these as you wish though, and explicitly enabling them is redundant, but does no harm.
noImplicitAny – This will cause tsc to raise an error any time it detects that a variable as part of an expression or declaration was of type any implicitly (in other words, if you don’t specify a type, even if it’s any). This forces you to declare types more consistently.
strictNullChecks – In strict null checking mode, the null and undefined values are not in the domain of every type and are only assignable to themselves and any (the one exception being that undefined is also assignable to void).
strictFunctionTypes – With this enabled, function-type parameter positions are checked contravariantly instead of bivariantly (both contravariant and bivariant). This topic can get pretty complicated and would take a lot of space to explain properly here, so I’m going to refer you to some existing documentation to do the job for me: http://www.stephanboyer.com/post/132/what-are-covariance-and-contravariance.
strictBindCallApply – Simply put, this enables stricter checks when you use the bind(), call(), and apply() functions. Since these can get you into trouble if you aren’t careful, having them checked more robustly is a Very Good Thing!
strictPropertyInitialization – This ensures that non-undefined class properties are initialized in the constructor. Note that this option requires that strictNullChecks be enabled to take effect.
noImplicitThis – This will cause tsc to raise an error if it encounters “this” expressions with an implied any type.
alwaysStrict – This causes tsc to parse your code in ES6 strict mode and also to include the "use strict" directive at the top of output JavaScript files to enable a stricter ES6 adherence policy at runtime.
As a rule, I suggest always enabling these checks. It will lead to writing better TypeScript code in almost all situations. You could run into some cases where you need to disable them for one reason or another, but I’d start with them enabled and only disable if you really need to.
Adding Node Modules
Express you already know about, and the ws library is what we’ll use for client-server communications. But I can’t get into that just yet because there’s a bit of precursor explanation that has to happen. That’ll be coming in short order, but before that, we need to complete the project setup.
Adding Types
With those installed, we’re good to go for the server side of BattleJong.
Source File Rundown
Believe it or not, but for this project, there is only a single source file to deal with, and it’s not even all that large (under 150 lines of actual code!).
So let’s get right into it!
The Starting Point (the ONLY Point, in Fact!): server.ts
Ooh, WebSocket, that sounds interesting! You may have even heard the term before, and now “ws” probably starts to make some sense! Let’s see what that’s all about now, shall we?
A Quick Detour: WebSockets
The World Wide Web was initially conceived as a place where it was the client’s responsibility to request information from a server, and indeed that’s how most interactions today still occur. Everything is initiated by the client requesting some information, or requesting some operation be performed. But that eliminates a host of interesting possibilities or at least makes them more difficult and nonoptimal since you wind up having to use various clever hacks.
For example, if you have a machine that provides stock prices to a client to display in a dashboard, the client must continuously request updated prices from the server. This is what’s referred to as the “polling” approach. The downsides, primarily, are that it requires constant new requests from the client to the server (read: lots of network traffic), and the prices will only be as fresh as the polling interval, which you typically don’t want to make too frequent for fear of overloading the server. The prices, therefore, aren’t truly real time, something that can be very bad if you’re an investor.
With the advent of AJAX techniques, developers started to investigate ways to have bidirectional communication, in which the server could push new stock prices out to the client. One such method is called “long polling.” Sometimes called Comet, long polling is a technique by which the client opens a connection with a server, as usual. But then, the server holds the request open. It never sends the HTTP response completion signal, so the connection persists. Then, when the server has something to transmit to the client, the connection is already established, and the information can be sent immediately to the client. This trick is sometimes referred to as a “hanging-GET” or “pending-POST,” depending on the HTTP method used to establish the connection.
This can be tricky to implement for many reasons, but probably the key one is that the connection processing thread is held on the server. Given that it’s an HTTP connection and HTTP servers have some limit on the number of such request processing threads they can support, the overhead to keeping them alive for a long time is not at all inconsequential. Before long, your server can be brought to its knees, even without seemingly having all that many clients connected.
The server “agrees to the upgrade,” in WebSockets parlance. Once this handshake completes, the HTTP request is torn down, but the underlying TCP/IP connection it rode in on, so to speak, remains. That’s the persistent connection with which the client and server can communicate in real time, without having to reestablish a connection every time. To be clear, there is still overhead the server must maintain, but because TCP/IP requires considerably fewer resources than does HTTP riding on top of it, more persistent connections can be maintained with WebSockets than with any clever HTTP hack.
WebSockets also comes with a JavaScript API, supported by all current browsers, that you can use to establish connections, and both send and receive messages (and messages is what we call data that is transmitted over a WebSocket connection, in either direction). We’ll get into that API in the next chapter when we build the client, but for now, we need to think about how WebSockets is used on the server side.
Simply put, you begin – after importing the library, of course – by constructing a WebSocket server and tell it what port to listen on. Since port 80 is normally for HTTP traffic, I went with 8080, so that it’s similar, but different.
The next part is vital: you must define what happens when messages are received from the client (I suppose you don’t have to do this, but then not much is ever going to happen in your application!). To do this, you have to first listen for the “connection” event, which you do by calling the on() method of the WebSocket.Server instance, as shown. Several events occur (message, close, error, headers, and listening, in addition to connection), but connection is the most important one because it’s the first time you have reference to the WebSocket object that will be associated with this client going forward. Each connected client will have its own WebSocket instance, so you need to hook up a “message” event handler function to that WebSocket. It’s important to understand that you’re hooking it up to each individual WebSocket that’s created by a client connecting, not to the WebSocket.Server. This is a common mistake, so be careful!
From that point on, any messages that are sent from the client (however that happens – it doesn’t matter right now!) will be handled by this function. In this case, all it does is echoes the message back to the client, and here you can see how information is sent from the server to the client: the send() method of the WebSocket instance for that client. Note that any code that has a reference to this WebSocket can send messages to the client, not just code inside the message event handler. For example, as long as you keep a reference to the WebSocket in global scope, you could have some code in a timeout() firing every ten seconds to send a message to the client.
That, basically, is how the ws library is used on the server side, minus one or two other things that we’ll get to as we look at the code. WebSockets, in general, isn’t a complicated thing from a developer standpoint, and you’ll see that’s true on the client side as well in the next chapter.
Back to the Code!
The score is, obviously, the player’s current score. The stillPlaying property will be true to start and will remain true until the client signals that the player has either cleared the board, or they have no more valid moves available, at which point it will flip to false. The two objects in this players object are keyed by PID, or Player ID.
This object and its children, in essence, represent the “game state” at any given moment in time, at least as far as the server is concerned.
Serving the Client: The Express Server
That should look familiar to you because it is essentially the same code you saw in the MailBag app. For BattleJong, though, we’re not defining a RESTful interface, so all we need is the static middleware to serve the contents of the client/dist directory.
At this point, we have an HTTP server listening on port 80. Next, we need to set up another server, this one for WebSocket connections (yes, you absolutely can create multiple servers from a single Node source file!).
Handling Messages: The WebSocket Server and Overall Game Design
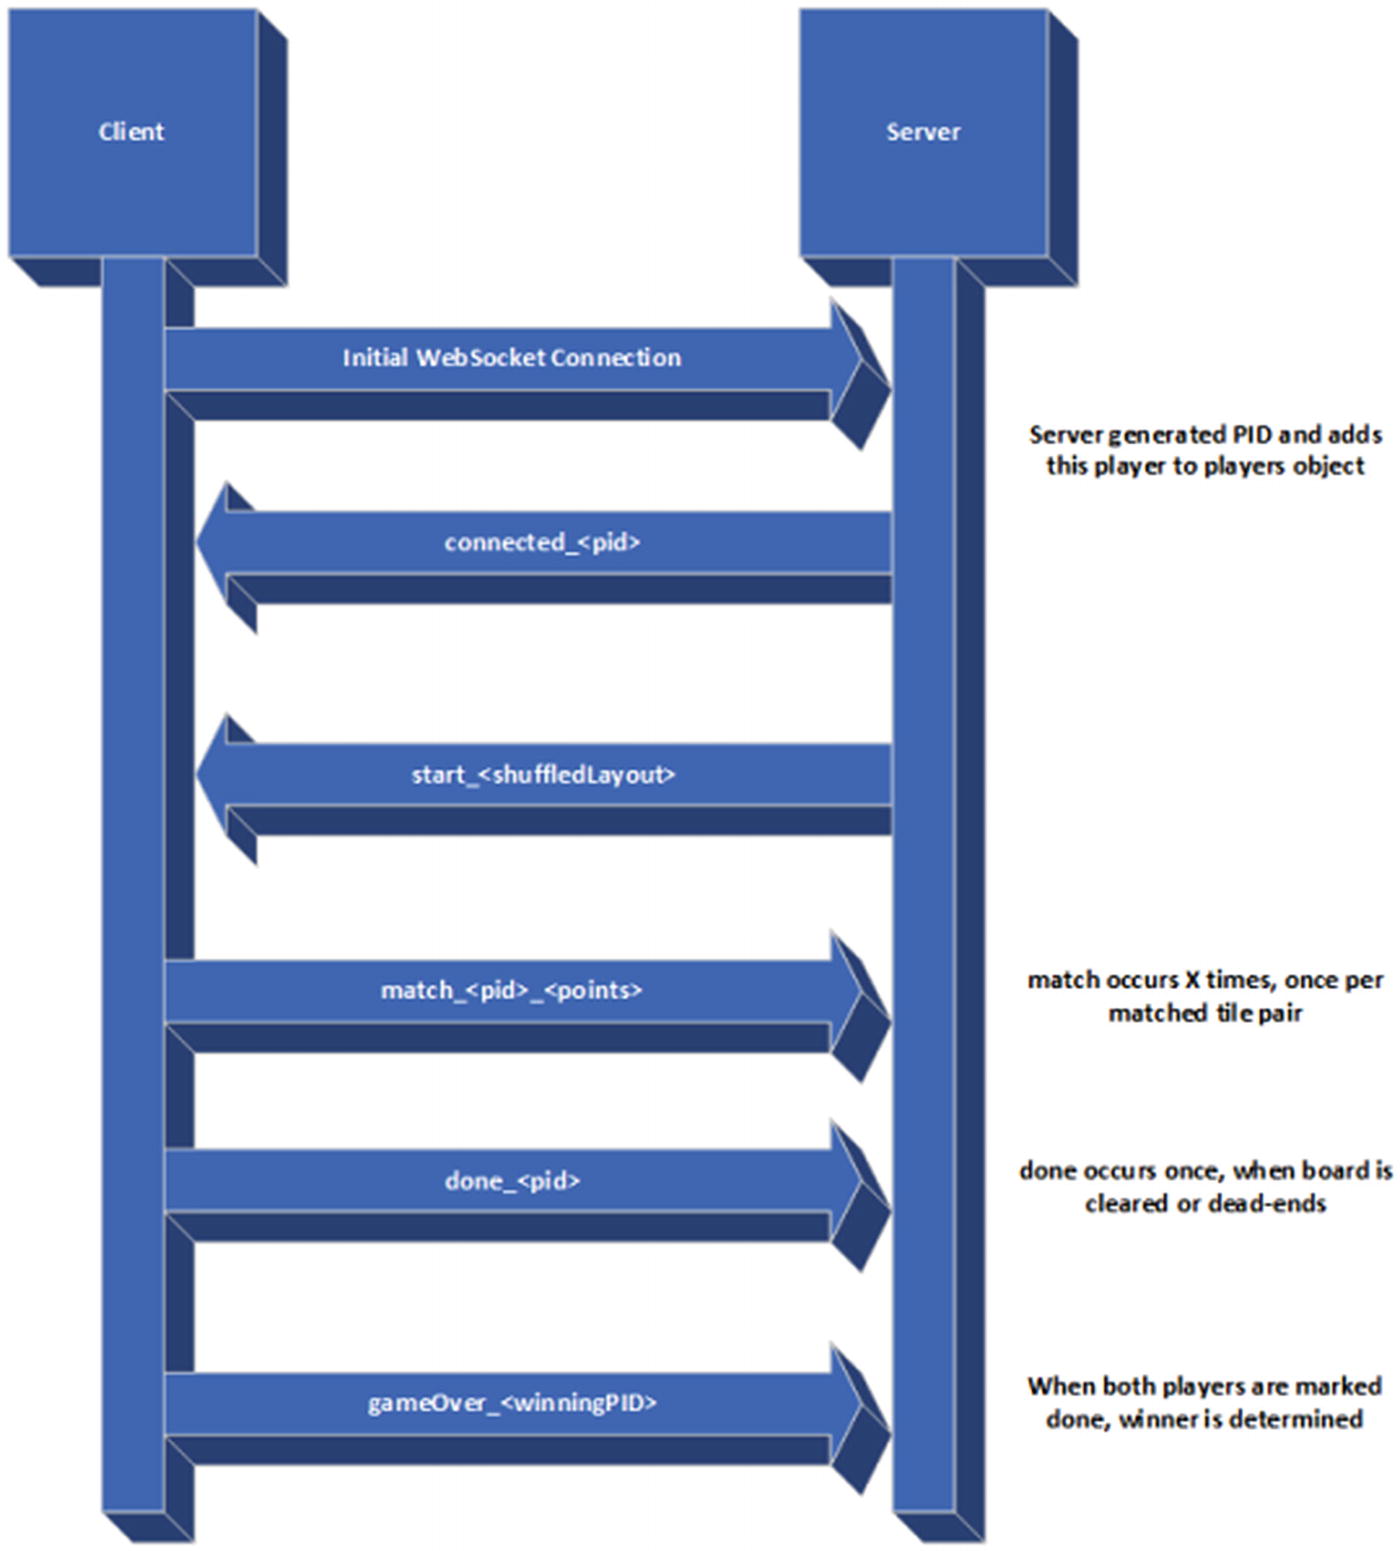
The overall sequence flow of events that makes BattleJong work
When the client is initially loaded, it connects to the server via WebSockets. Although there is nothing our code has to do at that point as far as WebSockets is concerned, the code sends a “connected” message to the client. As part of this message, the PID is sent. All subsequent messages from the client must include this as it’s how the server identifies the correct player for various operations.
Once there are two players connected, the server sends the “start” message to both players. This message includes a shuffled layout. We’ll get into all of that later. For now, suffice to say it’s the arrangement of tiles that the client should display.
From that point on, the client will send one of two messages: “match” or “done”. The match message is for when they match a tile pair. The server needs to know the PID and how many points the player got, so those are part of the message. This message can be sent multiple times during the course of gameplay.
Once the player either clears the board or there are no more valid moves left, the “done” message is sent. All the server needs to know is the PID in that case (because it doesn’t care whether the board was cleared or dead-ended), so that’s all that’s sent.
Once the server sees that both players have sent the done message, then it looks at the scores and sends to both players the PID of the winning player. The client will determine what to do based on that (which will be covered in the next chapter, but in short, either a “you won” or a “you lost” message will be shown).
It’s even simpler than Express: instantiate WebSocket.Server, courtesy of the ws library, and tell it what port to listen on. That’s the bare minimum we need to do. Optionally, you can supply a callback function to execute once the server is ready, and here I use it to display a log message.
Every message that comes from the client, or that is sent from the server, will be in the form “<message>_<pid>_*” where <message> is the message being received or sent, <pid> is a unique ID associated with each player (more on this shortly), and ∗ is additional data (not needed by all messages).
I’ll describe each of the messages in turn next and show the code associated with each.
Message: “match”
The score that the client sends is added to the player’s current score by adding it to the score property of the object corresponding to this player in the players object (remember that this object’s properties are keyed by PID). Now, the client that sent this message knows its score, of course, but the other player needs to be told about it. To keep things simple, we’re going to broadcast, so to speak, the score to both players and let them act appropriately.
To do so, we must iterate over the connection of connected clients. Note here that this is a property of the WebSocket.Server instance, not the particular client’s WebSocket that initiated this message, like most of this code has been using. It makes sense: the WebSocket server itself would be the thing that knows about all connected clients, not an individual client’s WebSocket. For each client, the iteration provides us the WebSocket for that client, so we can call send() on each to send a message in the form “update_<pid>_<score>”. The client will take that information and update its display accordingly (as you’ll see in the next chapter, the score of both players is updated in real time on each player’s screen).
Message: “done”
There’s a bit more work here that needs to happen, but not all that much. First, the player that sent this message is marked as done by changing the stillPlaying property of the object associated with it in the players collection to false. Next, we need to see if both players are done. Since players is an object and not an array, we can’t just access players[0] and players[1] to do this check. Instead, we have to iterate the properties of the object. That’s where the for loop comes in. But we have to be careful to only look at properties defined on the object itself, not any that may come from its prototype, which is why we do players.hasOwnProperty(player). After that, it’s a simple matter of incrementing playersDone if stillPlaying is false for each player.
If we finish that loop and playersDone is 2, then the game has ended. In this case, it’s time to determine a winner! That’s easy enough: we get an array of keys in the players object and then compare the scores of both, pulling the PID of the winning player out. Finally, the “gameOver_<winningPID>” message is broadcast to both players, and our work here is done!
Eagle-eyed readers will notice that the iteration in the check of stillPlaying could have been done the same way as the score comparison was made, thus avoiding the iteration (or vice versa). This is true, and I just did it two different ways to give you some different approaches to consider for accomplishing these things. If I were writing this code “for real,” so to speak, I’d have done it with Object.keys both times I think, but as they say on the Interwebs: YMMV (Your Mileage May Vary).
Finishing Up the WebSocket Server
At this point, our WebSocket server is set up to handle the two messages the client can send, but there’s still a little bit left to be done inside the callback function passed to the wsServer.on("connection") statement (remember that what we’ve been looking at is all contained in that!).
Naturally, we need to broadcast this message, as you’ve seen before. But what gets sent to both players is a shuffled layout, meaning the random distribution of tiles on the board. That random layout is produced by a call to the shuffle() function , and that’s our next (and last, as it happens) stop on the BattleJong server train!
Of Tiles and Board Layouts
I’ve mentioned the board layout a few times, but what does that really mean in terms of code? Well, recall earlier that I described a Mahjong Solitaire layout as being multiple levels of stacked tiles. If you want to model that in code, there’s probably more than one way, but perhaps the most natural is a multidimensional array. Each primary dimension of the array is one of five layers of tiles, starting with the bottom-most layer. The secondary dimension will then represent each row. The tertiary dimension will then represent a column, or a specific tile, in the row.
In other words, what we’re dealing with is simply five grids laid on top of one another. In each position of each layer, there either can be a tile or not. And, in the case of Mahjong, and BattleJong by extension, a tile can be one of 42 types.
To save space, I’ve only shown the first two layers’ worth of data, but there are simply three more arrays of arrays for those layers. Simply stated, where you see a zero, there is no tile. Where you see a one, there is a tile.
As you look at this, if you can sort of mentally strip away the 0’s and just try to visualize the pattern of the 1’s and you compare it to the Mahjong layout shown at the start of this chapter, you should be able to begin to see how the overall layout is built up from these layers (note that I altered the arrangement from the standard Mahjong layout just a little, purely for aesthetic reasons – I like perfect symmetry!).
That provides us the basic layout of the tiles, but it doesn’t tell us which tiles (which 1’s) are which type of tile. For that, we need the shuffle() function .
Shuffling the Board
The goal of the shuffle() function is to take that underlying layout array of arrays (of arrays!) and change all the 1’s to other values that correspond to tile types. I mentioned earlier that there are 42 tile types, which is the standard number for Mahjong, so I stuck with that. When we get to the client code, you’re going to find that there are 42 image files named 101.png, 102.png, 103.png, and so on. Therefore, our goal here is to change each 1 in layout to 101, 102, 103, and so on.
Before we get into this, I want to point out that this uses the American-style shuffle, which is a purely random shuffle and can lead to an unsolvable arrangement. In our case, that’s okay because since both players will be using the same layout, it doesn’t so much matter that there’s no path to clearing the board, what matters is that they’re on an even playing field regardless.
We begin by cloning the layout array. We don’t want to alter it in case we want to start a new game, so a clone it is. Next, we’re going to allow our layout to have up to four wildcard tiles. Wildcard tiles are tiles that can match any other tile type. Some Mahjong variants have wildcards, and some don’t. I decided to include them, but they will be random like the tiles, which means not all shuffles will produce a layout with wildcards. But, because I don’t want there to be more than four, we’re going to need to keep track of how many are randomly selected, if any.
So, the real work is done by iterating over each layer in the layout, then each row in a layer, and finally, each tile (or column) in the row. Every time we hit a 1, it’s time to select a tile randomly! We choose a random number from 0 to 41 (numTileTypes is 42, which gives us our upper bounds, non-inclusive, to the random selection) and then add 101 to it to get a value that will correspond to one of our tile images on the client.
Now, if the value chosen is 101, that’s going to be the value for a wildcard. In that case, we need to see how many wildcards have already been selected. If we’ve already filled our quota of wildcards, then the value is bumped to 102 so that it’s no longer a wildcard.
Finally, the non-randomized layout is returned and will then be sent to the client as you saw earlier.
At this point, we’ve got ourselves a BattleJong server in search of a client to make it a complete game!
Suggested Exercises
Rather than use Express to serve the client, can you write “naked” Node code to do it? You must ensure that it doesn’t conflict with the WebSocket server, of course, but it’s not really as hard as it may at first seem.
Can you rework the shuffle() function such that it only produces a shuffle that is winnable? You’ll have to research how to do this (and there are multiple approaches) and then implement the algorithm.
Summary
In this chapter, we built the not especially complicated server side of the BattleJong equation. In the process, you learned about WebSockets and started to exercise your game programming skills a bit.
In the next chapter, we’ll tackle the client side of the game and see how to hook it up to the server to complete the puzzle and have ourselves a fully playable two-person game.