With both MailBag and BattleJong built, it’s time to touch on one last topic that has become very common in modern application development to deal with the problem of application distribution: Docker. In this chapter, you’ll learn what Docker is and what containerization generically is, and you’ll learn how to “wrap up” both of the applications we built over the last four chapters together with Docker so that it is quick and easy to distribute them to other developers (and possibly even end users).
An Introduction to Containers and Containerization
Before we even talk about containers, let’s talk about virtual machines, or VMs.
A VM is essentially an emulation of a real, physical computer. You have your actual computer, which is considered the “host” for a VM, and then on top of that host, you have some sort of hypervisor. This may sound a bit circular, but a hypervisor is an entity that allows VMs to be run on top of it. In other words, it’s an abstraction layer between a VM and the physical host machine it’s running on. The job of a hypervisor is to distribute the resources of the physical machine – CPU, memory, and so on – between VMs running on it, and these VMs we call “guests.”
Hypervisors come in two flavors: hosted hypervisors or hardware hypervisors. The difference is that hosted hypervisors run on top of the host OS, while hardware hypervisors run underneath the OS. The primary difference is performance: hardware hypervisors provide much better performance than hosted hypervisors.
However, with either type, a crucial consideration is that the virtual machine approach is fundamentally heavyweight. What I mean is there is a lot of overhead involved because, remember, a VM is essentially an emulation of a machine. That’s right, it’s emulating everything: including the hardware. On any given piece of physical hardware, regardless of hypervisor type, there will be a limit to how many VMs you can run on it because of this, and performance will never be quite as good as a non-VM situation.
Containers seek to avoid this “weight” issue in favor of something lighter on resources so that physical server resources can be used more efficiently and shared between more deployed apps, thereby allowing a server to do more.
In contrast to a VM, a container performs operating-system-level virtualization. This is achieved by abstracting what’s known as “user space,” that is, where your applications run. There is no emulation occurring with containers. Instead, they actually share kernel space with the host OS. But a container looks like a VM in most other regards in that they represent an isolated user space where your applications can run. In this way, you can have many containers running, all with their own user space but sharing the kernel resources of the host operating system. This is a far more efficient approach than VMs and allows for many more containers to run on a given host system.
A key point about containers is that they allow you to package up not only your application but also its runtime environment. Yes, that means things like a JDK for a Java application and JavaScript libraries for a Node app, but it also means the underlying operating system environment. When you create a container, you start from a blueprint known as an image. The image almost always begins with an operating system and then has stuff added to it, building up to the final image. So, if you want to package up your Node application, you will also, in a container, package up a version of, say, Linux that it will run on.
Containers function as if they were the sole OS on the hardware. Anything running in them is unaware that they are on a shared system, just like a VM, but it’s still just a process running on a host system, not a fully emulated computer and OS on top of it, and it’s not going through a hypervisor like a VM is.
A container relates to an image in that the image is the blueprint, and a container is an instance of the image. You can think of it like a class-object relationship: classes are essentially the blueprint that is used to build instances of that class that we then call objects.
This yields what is perhaps the most significant benefit of containers: a consistent runtime environment without the overhead of a VM. The host operating system mostly doesn’t matter (with some caveats concerning cross-platform containers, vis-à-vis Windows containers on Linux hosts and vice versa). Only what’s in the container matters, and only what’s in the container will impact the functioning of the app(s) in that container. You can change the host operating system and know that what’s in the container will still be the same environment you originally build and so everything will work as it always has, no fear of breakage due to the host change.
Another benefit of containers is that they start fast, almost instantly in most cases, which makes them easy to scale. If you have an application running in a container and the load on it starts getting too heavy, it’s relatively quick and easy (assuming your application code allows for this) to spin up more containers with instances of your app running to share the load.
Container capabilities have been built into Linux for many years, but it only began to gain traction with the introduction of something that made dealing with the technology much easier: Docker.
The Star of the Show: Docker
Using “naked” containers on Linux is… not pleasant. It can be complex to get them working and, even more so, to manage all the images and containers you may spawn from them. It’s doable, but it was difficult enough for a long time that containerization didn’t get used very much. You must deal with two key features of Linux: control groups, or cgroups, and namespaces. These deal with how processes and their resources can be grouped, isolated, and managed as a unit by the kernel and limits on what a given process can see. If that sounds kind of technical and complicated, well, that’s because it is! Even for those well-versed in Linux, it can get hairy.
That all changed with the introduction of Docker, which is the product of a company named – not surprisingly – Docker! In simplest terms, Docker is just a set of tools that makes it easy, from a command line, to build images, create containers, and manage it all, including interacting with remote repositories of images. For a while, Docker was a Linux-only technology, but that’s changed in recent years, and you can now use Docker on every major operating system.
Docker daemon – This is a background process that runs on a host machine that is responsible for various tasks, including the management, building, running, and distribution of containers. This is what interacts with the underlying containerization capabilities, the thing that is kind of not fun to deal with.
Docker client – This is a CLI that you interact with, which makes calls to the daemon on your behalf. This, combined with the daemon, makes your human interface to the underlying containerization capabilities much easier to use.
Docker Hub – A public registry of images maintained by the company Docker. Using Docker Hub is entirely optional, and you even can set up your own if you wish. In either case, it’s a repository of images that you can easily pull from to “spin up” containers (“spin up” is a common phrase for when you create a container from an image).
Once you get Docker installed, it’s the Docker client, and perhaps Docker Hub, that you’ll interact with. So, let’s see about getting it installed so we can start playing with all this stuff!
Installing Docker
How you install Docker varies from operating system to operating system, so I couldn’t detail the process for every possible variation here. However, I can tell you that on Windows, it’s just a regular application installation (assuming you’re running Windows 10 – older versions of Windows are a bit more involved to get set up), and on Linux, it’s just installing a small handful of packages.
The URL you need to have in mind is this: https://docs.docker.com/install/. This is the official Docker installation page. There, you will find instructions for installing Docker for a variety of systems. Please visit there and follow the instructions applicable to your system.

Output of the docker info command execution
If you don’t see this, then take the time to go over the installation instructions again for your system so that you have a reliable Docker environment before we move on.
Your First Container: “Hello, World!” of Course!
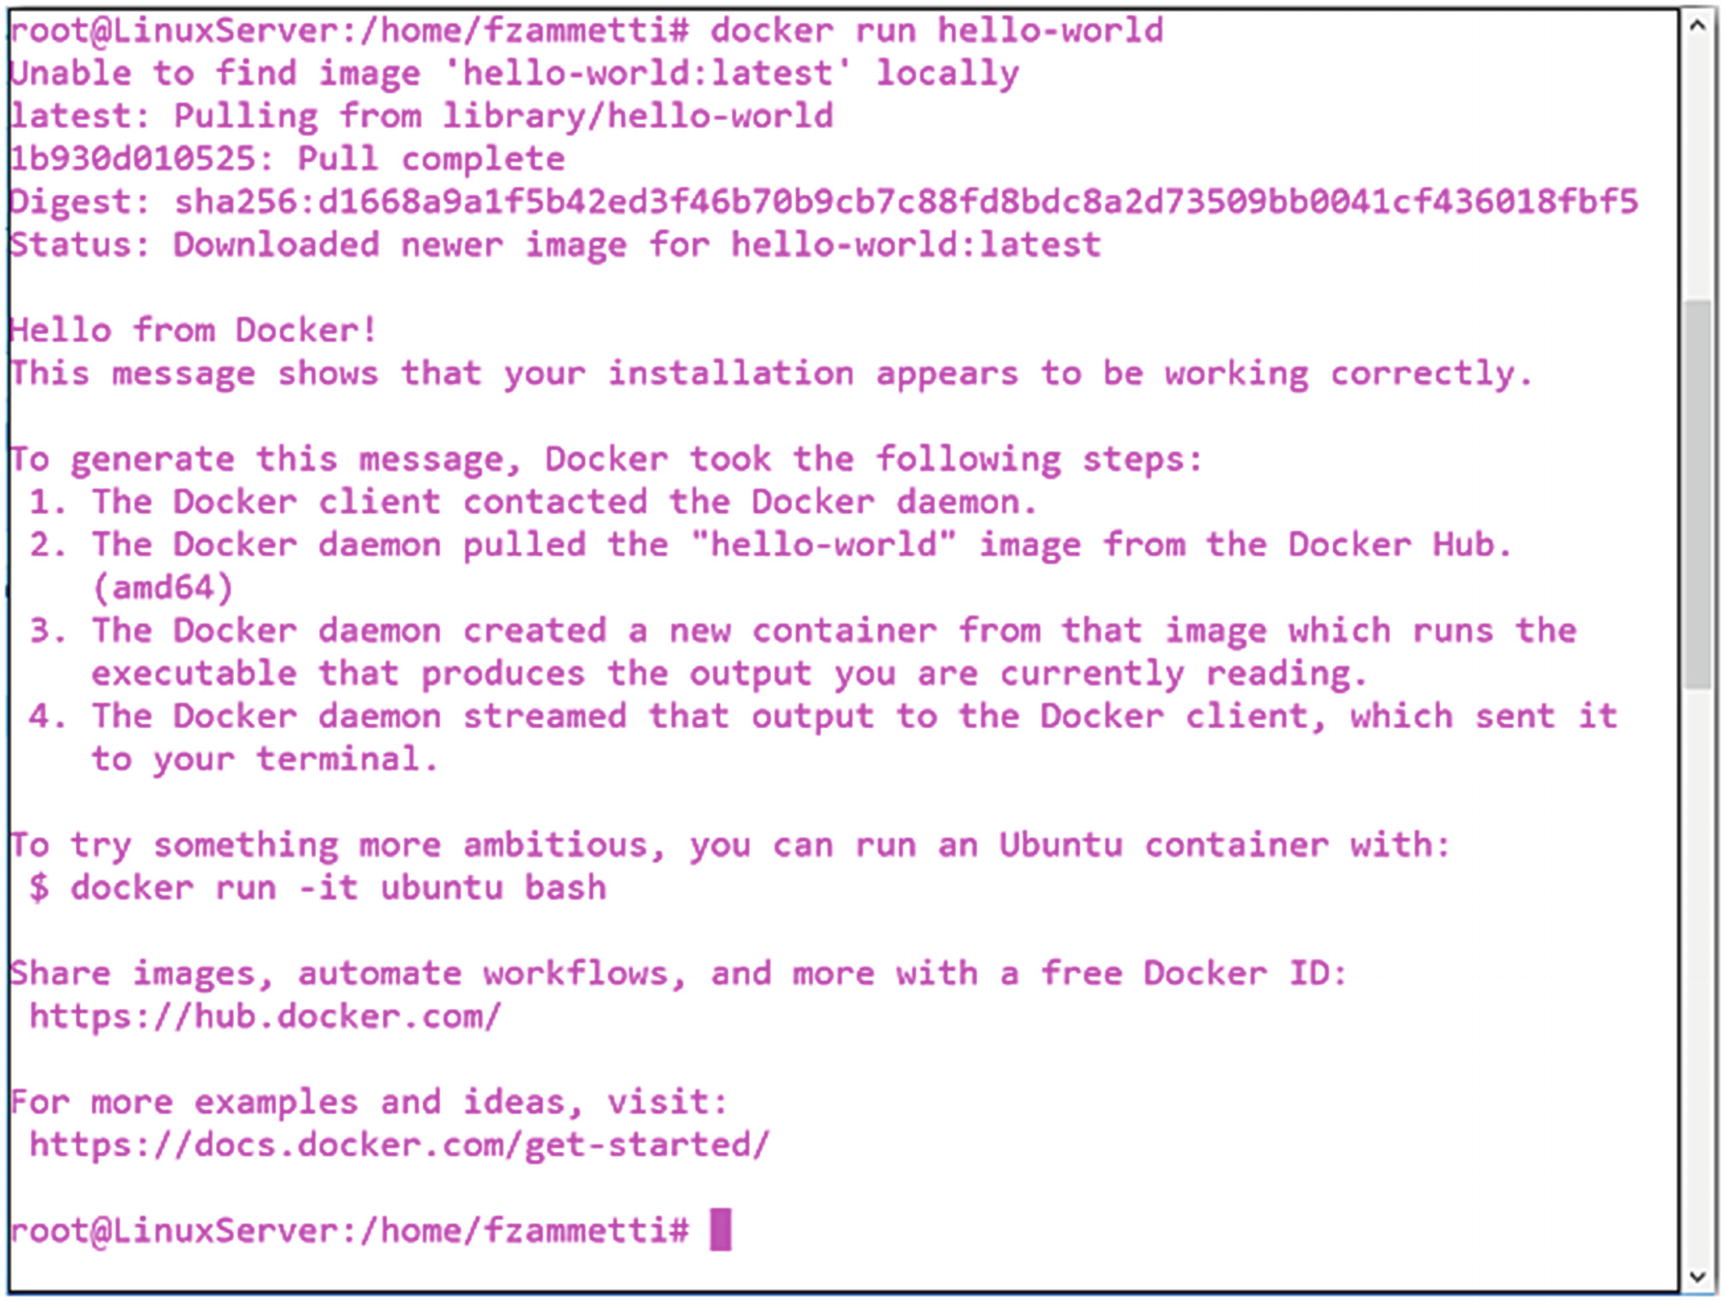
The Docker hello-world, up and running!
As I said, this did a couple of things for you automatically, and in fact, part of what it did was to output, well, precisely what it did! That’s helpful, isn’t it?
Now, if you execute that command again, you’ll find that it’s even faster this time, and that’s because the image has already been downloaded from Docker Hub and is stored on your system, so that step can be skipped. Instead, Docker spins up a new container virtually instantly.
In short, the docker run command is how you start new containers.
A Quick Rundown of Key Docker Commands
For most Docker work, only a small handful of commands are needed. Anything more would constitute more advanced Docker functionality, and as this is meant as only an introduction, most of that won’t be covered. But let’s look at the basics now.
Listing Images

A list of images on your system
Listing Containers

The non-running containers on the system
Starting (and Stopping) Containers
For this hello-world container, however, nothing will happen when you do this, and the container will exit immediately. It only seems to show that helpful information when initially run.
Now you should see a container with the specified name, which you can then use to interact with it.
Remove Containers and Images
If the container is running, Docker won’t let you remove it until you stop it.
As with containers, Docker won’t allow you to delete an image that’s used by a container, regardless of whether it’s running or not, so you’ll need to clean up the containers first.
Pulling Images
Now, the image will be downloaded if it’s not already on your system (if it is, docker will try to update it if the latest version is newer than what’s on your system). After that, you can do a docker run to spin up containers like before.
You can push images to a repository as well, but we’ll get to that later.
Searching for Images
This returns a list of many images that include the string “hello-world” in their name.
Attaching to a Container
The -d option “detaches” the terminal session from the container, which causes it to run in the background (assuming whatever is inside the container doesn’t exit immediately). You’ll be returned to your command prompt, but the container will continue to run. The -p option is for exposing network ports. Here, we’re saying that port 8080 inside the container should be exposed on port 80 of the host machine’s network interface.
Once you execute this command, do a docker ps, and you should see a running container for the first time.
Here, you can see a few things. First, the -i option keeps STDIN open so that it can be interacted with. The -t option allocates a new pseudo-tty terminal session. The /bin/bash at the end is a command that is executed after the container is started. All three combined results in you being “inside” the container. The command prompt you see at that point is the command prompt inside the container itself. Go ahead and do some bash-y stuff (e.g., ls), and you should notice that what you see differs from your host operating system (though if you’re using Ubuntu, then it’s going to look very similar anyway). Execute the exit command and you’ll be dropped back to your actual command prompt.
Viewing Container Logs
Here, “logs” include anything routed to standard out, barring any specific configuration done inside the container.
At this point, you know most of the basics for using Docker. But all of that was based on existing images. What about creating your own? Let’s do that now!
Creating Your Own Image
Now, as cool as I hope you find Docker at this point, it would be considerably more useful if we could create images ourselves, wouldn’t it? Let’s do it and find out!
You should be able to access it at http://localhost:8080.
Of course, what it returns, “I am running inside a container!”, is a dirty lie at this point! So, let’s go ahead and make it true!
To do so, we must add another file to the mix: Dockerfile. Yes, that’s literally the name! A Dockerfile is a file that tells Docker how to build an image. In simplest terms, it is basically a list of commands that Docker will execute, as if it were you, the user, inside a container. Virtually any valid bash commands can be put in it, as well as a few Docker-specific ones. Docker will execute the commands in the order they appear in the file and whatever the state of the container is at the end becomes the final image.
The first command, FROM, is a Docker-specific command (the only one required, in fact) that tells Docker what the base image is. All images must be based on some existing image. If you want to start “from scratch,” the closest you can generally get is to choose an image that is nothing but an operating system. In this case, however, since we’re using Node, we can start from an image that, yes, has an operating system, but then also has Node already installed on top of it. Alternatively, we could start with an image like ubuntu, and then put the commands into the Dockerfile that would install Node (apt-get install nodejs), and we would wind up with an image that is basically the same as this. But let’s be lazy and use what’s already there!
Images can have tags attached to them, which you can roughly think of as version numbers. Here, we’re telling Docker that we want to use the latest image named node that includes Node v10.x. The tags are image-specific, so you’ll need to consult Docker Hub (or whatever repository you’re using) to see what it means for a given image.
The next command, WORKDIR , really does two things, potentially. First, it creates the named directory if it doesn’t already exist. Then, it does the equivalent of a cd to that directory, making it the current working directory for subsequent commands.
Next, two COPY commands are used. This is another Docker command that copies content from a source directory on the host to a destination directory in the image’s file system. The command is in the form COPY <src> <dest>, so here we’re saying to copy from the current working directory on the host (which should be the project directory) to the current working directory in the image (which is now the one created by the WORKDIR command) any file named package*.json (which means package.json and package-lock.json) and our server.js file.
After that, we must think as if we’re executing these commands ourselves. If someone gave us this Node project, we would next need to install the dependencies listed in package.json. So the Docker RUN command is used, which tells Docker to execute whatever command follows as if we were doing it ourselves at a command prompt (because remember that basically is what a Dockerfile is!). You know all about the npm install at this point, so after this is done, all the necessary code for the application to run is present in the image.
Now, in this case, we need to expose a network port; otherwise, our host system, let alone any other remote systems, won’t be able to reach our Node app inside the container. It’s a simple matter of telling it which port to expose, which needs to match the one specified in the code, obviously.
Finally, we want to specify a command to execute when the container starts up. There can be only one of these in the file, but we can do virtually anything we want. Here, we need to execute the equivalent of node server.js as we did manually to test the app.
The CMD command allows us to do this. The format this command takes is an array of strings where the first element is an executable, and all the remaining elements are arguments to pass to it.
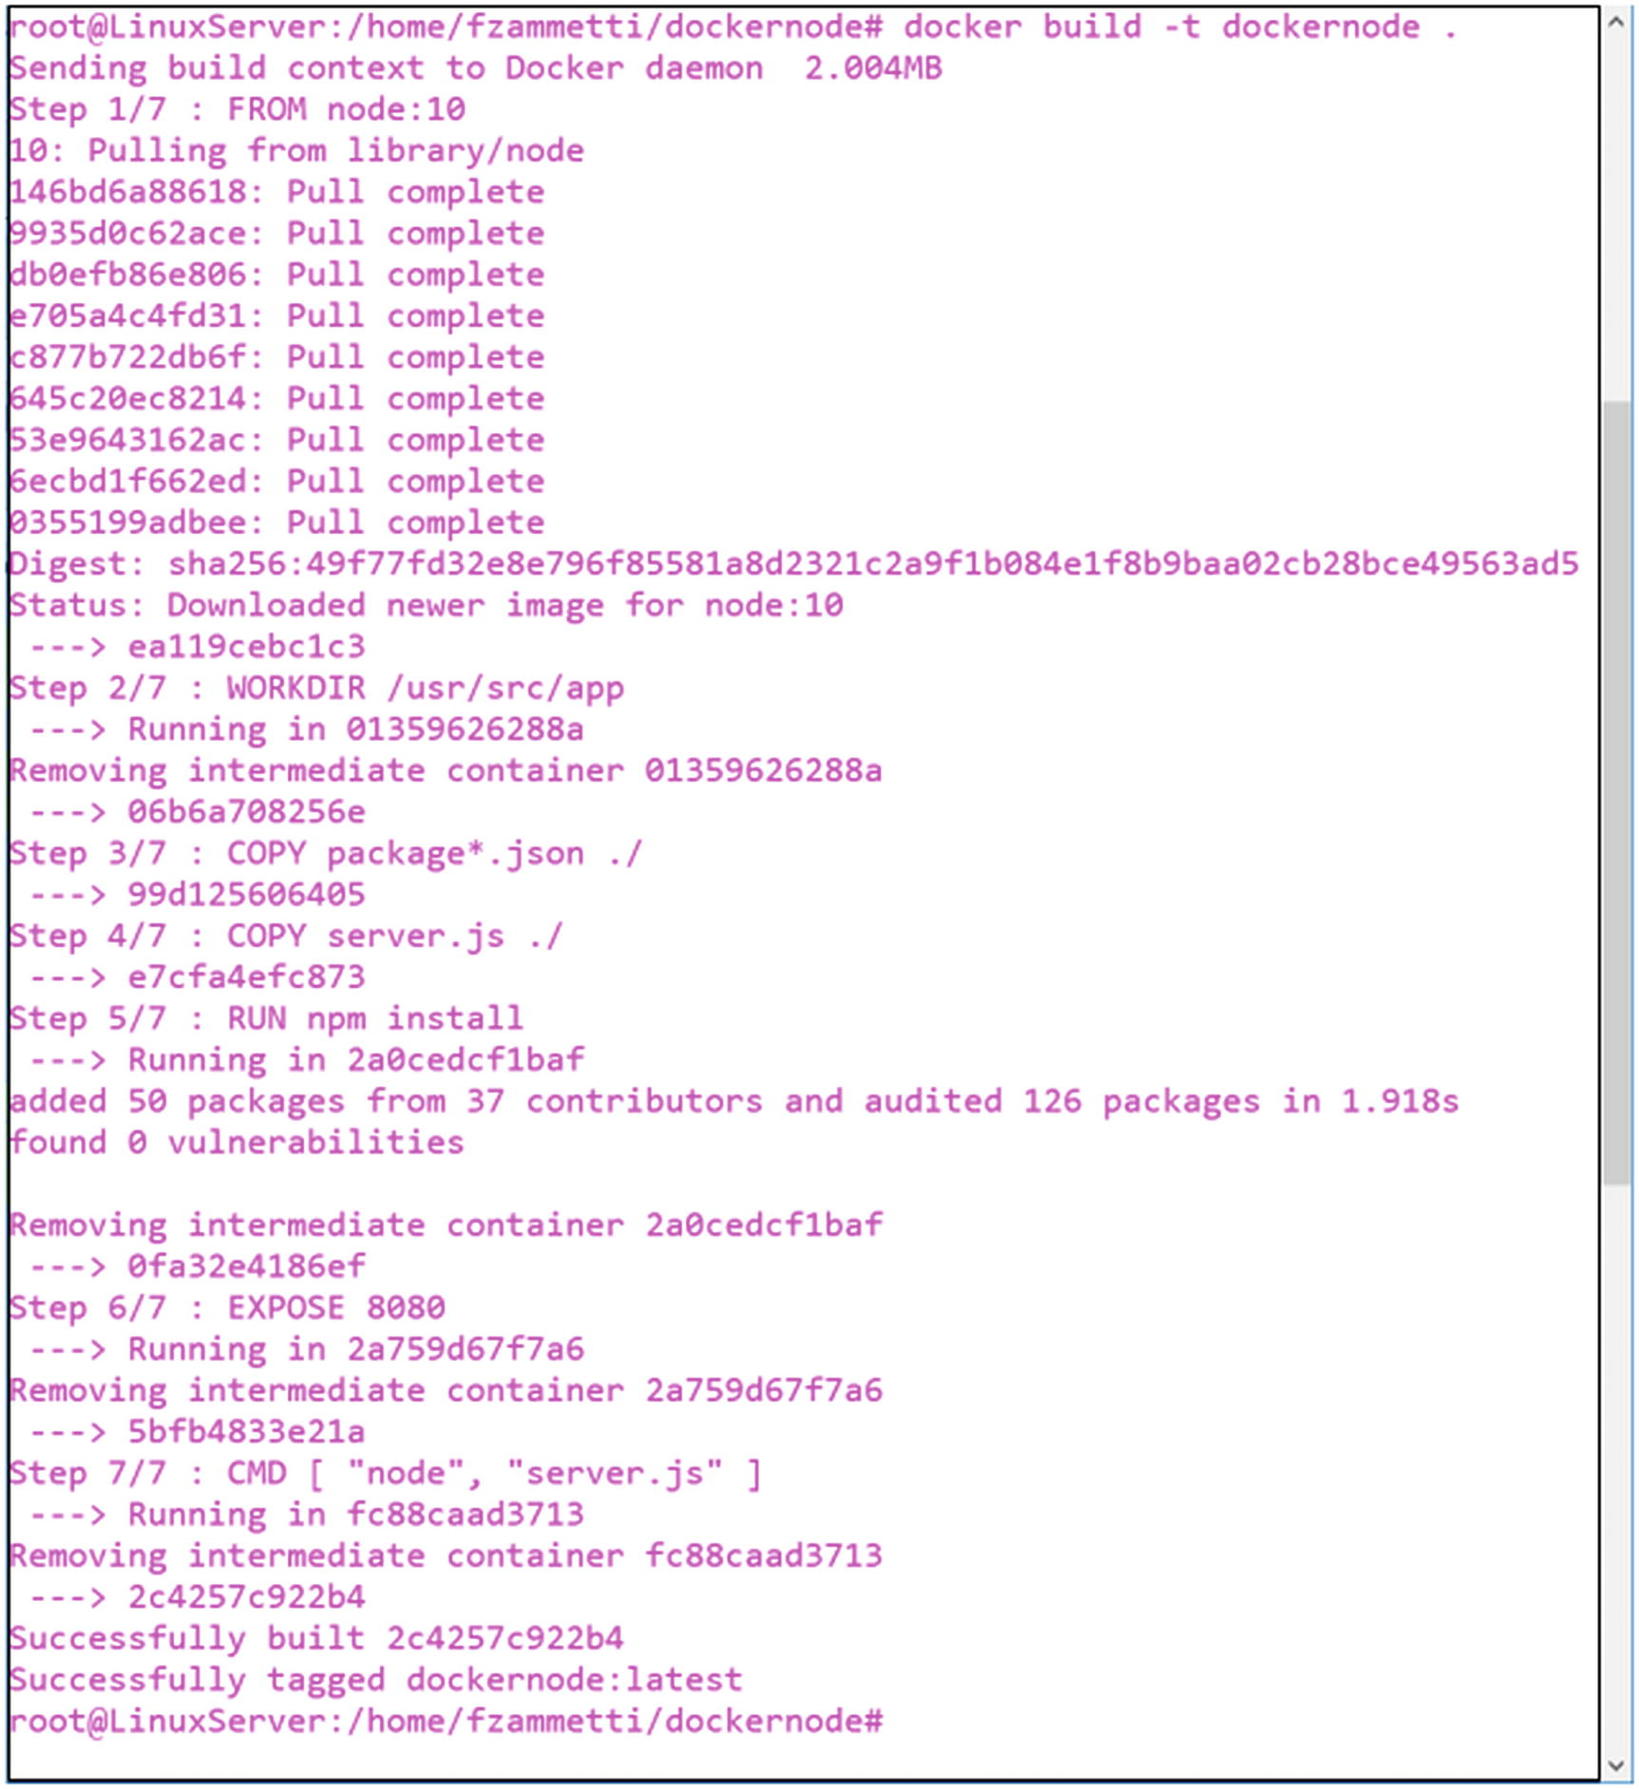
Building the dockernode example image
you should now see the “dockernode ready” string. You could attach to the container if you wanted to now and play around.
Don’t get confused here: dockernode is the name (tag) of an image, but it’s also the name assigned to a running container (and also the name of the project directory). It’s perfectly allowed to have an image tag that matches a container name; however, you may generally want not to do that to avoid any potential confusion.
That’s another way to get an interactive shell into a running container, but it should generally work with virtually any image and, most importantly, it will work even if the container shuts down immediately. To be clear, if nothing is running in the container, that won’t change. If your app crashes on startup, for example, it will still do so. But, now, you’ll be able to browse the file system, including, critically, any log files that may have been written.
This will provide you detailed information about the image and its history (there is also a literal docker image history <image_id_or_name> command too that delves into an image’s actual build history more).
Deploying to Docker Hub
Now that you’ve built an image, let’s talk about getting it into a repository, Docker Hub, specifically (though this all applies to any repository you might interact with).
First, to put an image into Docker Hub (referred to as pushing), you need an account. So, head on over to hub.docker.com and create an account for yourself. You will be allowed to have one private repository (where a repository refers to an image essentially) with a free account, as well as unlimited public ones. That’ll be plenty good enough for what we’re doing here.
Once you set up the account, the next step is to create a repository. To do so, assuming you’re viewing your account in the Docker Hub web site in a web browser right now, you should see a Create Repository button right there near the top. Click that, and then give your repository a name. For the sake of what we’re doing, name it <your_username>/modern-full-stack-development-dockernode (it’s a good idea to namespace any of your repositories with your username unless you’re building some sort of official image that many people would be interested in, think things like Nginx, Node, or Ubuntu).

Logging into Docker Hub from the Docker CLI
If you refresh your account page on Docker Hub, you should now see some changes. Click the repository, and you should see a “latest” tag has been created. That’s it. Your image is now on Docker Hub!
If you want to test it, delete the image on your system (docker rmi dockernode) and then pull the image (docker pull <your_username>/modern-full-stack-development-dockernode) and you should be able to spin up a container based on that.
You could now make that repository public if you wanted, which would then allow anyone else who wants it to pull your image and use it, or perhaps base their own image on it.
Wrapping Up MailBag and BattleJong
Now, you have everything you need to containerize MailBag and BattleJong, which is the ultimate goal we’ve been working toward.
As with dockernode, we’ll start with the plain node image. From that, we create a directory in the image for the project. Then, we make it our work directory and copy in both the client and server directories to it. Note that when you copy a directory into an image, you need to specify the target directory explicitly. Just putting a period won’t work as it does with files.
After that, since I said not to install the dependencies, we need to get them into the image. Otherwise, this project won’t run (in fact, it won’t build, let alone run, and you should realize that we do indeed have to build it since it’s not in its executable form as it stands). So, the npm install is run after switching to the client directory.
But we still have to build the client because it’s not in its final form – there’s no dist directory yet – so then it’s just running Webpack to do the job for us. That produces the dist directory and its contents.
Then, we need to do the same thing for the server, though there we’re just compiling with tsc, no Webpack involvement there.
Finally, we expose port 80, since that’s what the server listens on, and then start the server by executing the equivalent of node ./dist/main.js.
Now, if you do this, you will hit a problem when Docker gets to the RUN npm webpack –mode production line: it will hang, never completing the image. The reason is straightforward: remember that we configured Webpack to monitor our files and automatically rebuild when they change? Well, that’s exactly what it’s going to do as the image is being built, so it will never complete. To fix that, you need to go into the webpack.config.js file and set watch to false. After that, the build should be successful and everything else should work as expected.
The name of the file that is our server is different, but besides that, it’s the same.
I have created images for both of these apps on Docker Hub, as well as dockernode, and you can pull them any time you want. They are named fzammetti/modern-full-stack-development-dockernode, fzammetti/modern-full-stack-development-mailbag, and fzammetti/modern-full-stack-development-battlejong.
Suggested Exercises
This is another of those chapters where suggesting exercises specific to its topic is a little tough by its very nature. However, one thing immediately comes to mind, and it’s something that would test all your skills in one go, not just Docker knowledge:
Create a new app using everything you’ve learned throughout this book, package it with Docker, and push it to Docker Hub for all the world to see!
How about your own game of some sort? Or, maybe a calculator? Perhaps an address book for contacts? What about copying Google Keep for taking notes? You could always write an app to store bookmarks.
Basically, anything that interests you, go for it! It doesn’t need to be anything world-changing; it just has to touch on most, if not all, of the topics I’ve covered in this book. If you can accomplish that, then I’ve succeeded in my task of teaching you a thing or two!
Summary
With this chapter, our journey together through modern application development is complete! Here, you learned about Docker and containerization, learned how to create an image from the applications we built together, and saw how to run them.
I genuinely hope you’ve had a great experience with this book and that you’d learned a great deal. I hope I’ve helped provide you the tool you need to go out into the world and build wonderful applications using modern tools and techniques. And hey, if you create the next big thing and get all rich, maybe remember where you got the skills to do so and throw a coin to your favorite tech author!