In the good old days of web development, things were simple. You created a directory, maybe some subdirectories, if you were a bit more organized, and into it, you poured all your resources: a stylesheet or two here, a sprinkling of images, some HTML files, and a heaping helping of JavaScript files. Then, a single HTML file served as your entry point, and it would go out and load, by way of script tag references, to load all your JavaScript files, as well as your CSS files and images.
Now, at a fundamental level, that’s precisely still how things work technically, but over time the picture has gotten… messier. Developers will frequently make use of a large number of smaller, more focused libraries and toolkits. What we build is orders of magnitude more complex with far more moving parts, things you need to include.
Of course, people have realized that this isn’t efficient. Each networked request is a new connection to the server, and many of those requests must occur serially, so nothing happens until the resources are loaded (and processed in some way). And worse, what if a script file is loaded at the start that isn’t needed until the user performs some specific action? What if they never perform that action? You’ve just wasted a bunch of time and bandwidth and maybe slowed the whole site down for something that you didn’t wind up even needing!
And that’s before we even talk about how you have to self-organize the code, think of things like ensuring scripts are loaded in the proper order and that everything that one script depends on is both included and loaded before it’s used, that code that references other code can find one another at runtime.
And all that is before we talk about newer JavaScript tricks like modules and the problem of cross-browser development and the desire to use more modern coding techniques while still supporting older browsers (to a point at least).
As this evolution has occurred, before long, developers were looking for a way out of this mess, and that’s when the notion of bundles was born. In this chapter, we’ll talk about one specific bundler: Webpack.
What’s a Bundle, and How Do I Make One?
In simplest terms, a bundle is a conglomeration of various resources that a web page needs to function. The obvious component of a bundle is JavaScript, but in some cases it also includes CSS and even images, encoded for use in data URLs (if you aren’t familiar with the concept, that’s where an image, or other file, is Base64-encoded and included as a string as the source, most commonly, of an <img> tag using the data: prefix). A bundle most frequently is a single file, though no rule says it must be (well, I would argue that a bundle is always a single file, and if you have multiple files, then you, in fact, have multiple bundles – but either way the basic concept is the same). The benefit of a bundle is that it is, usually, just a single request across the network, plus the fact that when creating a bundle, you can layer on other optimizations like code minification and compression and such.
How does one create a bundle? Well, at the most fundamental level, you could do it manually by merely concatenating all your JavaScript files together into one. Do that, and you’ve got yourself a bundle! But, in that case, it’s a bundle of only JavaScript, no other resources like CSS or images, and perhaps, more importantly, is that when you do that you have to take on responsibility for ensuring everything is in the right order and that there are no conflicts. IIFEs, or Immediately Invoked Function Expressions, are a way to solve these problems. If each thing you concatenate is inside an IIFE, then there are no worries (well, mostly at least) about scope collisions. Plus, that way, the order no longer matters. The problem with this solution though is that any time a single file changes, you have to rebundle everything.
Plus, it becomes difficult to determine if things are being included that are no longer necessary (the term tree-shaking refers to determining when an included dependency is not actually being used, and that’s more difficult in this approach than what Webpack does, as you’ll see). Aside from that, there is also sometimes code that shouldn’t be in the bundle for other reasons, maybe because it’s only for development, or because it’s only needed in specific versions of the page. Then, you’ll probably need to create some sort of simple tooling (maybe just some shell scripts) to exclude things that aren’t necessary (and consider if you use a library like, say, React: what if there are parts of the library you don’t use? It would be nice if you could leave those out and make the bundle smaller, thereby improving load performance, wouldn’t it?)
Further, when thinking of JavaScript, wouldn’t it be nice if you could use modules to organize your code and know it would work across all browsers? That’s not the case today: not all browser versions support them and those that do have some variances to deal with. This is true whether you start from plain JavaScript or TypeScript, but with TypeScript it’s more complicated because you have the compile step to worry about as well. If you could organize your code with modules and not have to worry about compiling your TypeScript, you’d have the best of all possible worlds, right?
For all these reasons, a good tool that can do bundling intelligently is a must, and that’s where Webpack comes in.
What’s Webpack All About?
Webpack isn’t the only bundler out there, but it has quickly become the de facto standard and is, by probably most web developers, considered the best. Although it used to have a reputation for not being exceptionally easy to work with, that has changed with the latest version. It’s now quite easy to get started!
Webpack can do a lot more than merely bundling code, though. For example, it can transpile TypeScript and even knows how to work with React and its .tsx files. So, in the end, Webpack can be more than a bundler; it can be a right and proper and full-featured build tool for your web applications. Most of this is optional and can be added on as you need it, so at the start, Webpack is rather simple, but it is highly extensible so can meet your needs every step of the way.
There are just a few core concepts that you must have at least a basic grasp of to use Webpack with your applications.
Dependency Graph
Start with a basic web page. You have an HTML file, one or more JavaScript files, probably a stylesheet or two, and maybe some images. If you start with the HTML page, it’s easy to understand that it depends on those JavaScript, stylesheet, and image files. Sure, a browser can render that HTML without those things, but it may not look anything like you expect without those additional resources.
When you tell Webpack to bundle your application, it looks at all the files it finds in it (or that you explicitly name – we’ll see how to configure Webpack shortly). It examines them and determines which files depend on which others. It builds what’s called a dependency graph from that analysis, and with that, it can determine what needs to be included, what can be dropped, what order things need to be in, and so on. Without the dependency graph, nothing Webpack does would be possible, so while you won’t be dealing with it directly in any way, it’s essential to understand that’s how Webpack is doing its work on your behalf.
With it, though, Webpack can intelligently create bundles for you that have the minimum amount of code required to make your web site or web app work like it should while ensuring that it loads as efficiently as possible in the process.
Entry
When Webpack builds the dependency graph, it’s constructing a tree structure under the covers, and any tree structure must begin from a single point, or node, or in the case of Webpack and web applications: a module. By default, Webpack will assume the entry point is called ./src/index.js, relative to the directory it’s run in. But you, of course, can name a different starting entry point, and we’ll see how to do that soon. Regardless, from that starting point, the dependency graph is built as Webpack examines the entry point and then recursively examines each file that it in any way depends on.
Output
In the previous section, take note of the location of the default entry point: a src directory (short for source, obviously). That’s the typical model that Webpack follows: a src directory where all your unbundled source code lives. But where does Webpack put your bundled code? The answer, by default, is a directory named dist (short for distribution). Further, by default, the name of the bundle that will be created is main.js (most of the time, you’ll get a single bundle, and in fact for our discussions here, we’re going to assume that’s all you ever get because multiple output bundles are a bit more advanced of a topic and nothing we need to be concerned with for the purpose of this book). All of this can be altered, of course, to ensure you get the output you want exactly where you want it, but we’re just considering the default case right now and the basic concepts.
Loaders
Once you know where your code starts, how Webpack will produce a dependency graph from analyzing it, and where it will put the resultant bundle, it’s time to look at the concept of loaders, which are components that transform dependencies in some way. Out of the box, Webpack only understands one thing: JavaScript (well, it also understands JSON files, but given that JSON is a subset, or component, of JavaScript, it’s still really just one thing). To understand anything else, you need to specify a loader for it. But, whether you use only the default JavaScript loader or add more, the job of a loader is simple: to process some type of file and convert them into valid modules that can be added to the dependency graph and ultimately to be bundled and consumed by your application later.
A loader has two critical attributes associated with it: a test property and a use property. The test property enables Webpack to determine which files it should transform. The use property specifies what loader to use for it. When put together, a rule is formed that Webpack will follow that basically says: “Hey, Webpack, when you encounter a reference to a file whose path matches the test property, go ahead and process that file with the loader specified by the use property, pretty please?”
Now, any time Webpack encounters a file in your src directory with an extension of .jpg or .png, which will match the regex specified in the test property, it will use the url-loader loader to encode it and add it to the bundle.
Don’t get hung up on those details, we’ll get into it all shortly, but that should give you a good idea how loaders are used. And remember if all you have are JavaScript files, then this isn’t necessary because Webpack knows how to handle those automatically.
Plugins
Plugins are another mechanism available to you in Webpack. Conceptually, they are similar to loaders, but they serve a fundamentally different purpose, and that purpose is virtually anything!
Need to optimize your bundle? Plugin! Need to insert some environment variables into your bundle? Plugin! Need to add I18n resources to your bundle? Plugin! Want to add some sort of copyright notice to the top of each generated bundle? Plugin!
I think you get the point!
BabelMinifyWebpackPlugin – Used for minification with babel-minify
BannerPlugin – Adds a banner to the top of each generated chunk
CommonsChunkPlugin – Extracts common modules shared between chunks
CompressionWebpackPlugin – Prepares compressed versions of assets to serve them with Content-Encoding
ContextReplacementPlugin – Overrides inferred context of a require expression
CopyWebpackPlugin – Copies individual files or entire directories to the build directory
DefinePlugin – Allows global constants configured at compile time
DllPlugin – Splits bundles in order to drastically improve build time
EvalSourceMapDevToolPlugin – Enables a more fine-grained control of eval source maps
ExtractTextWebpackPlugin – Extracts text (CSS) from your bundles into a separate file
HotModuleReplacementPlugin – Enables Hot Module Replacement (HMR)
HtmlWebpackPlugin – Creates HTML files to serve your bundles
I18nWebpackPlugin – Adds i18n support to your bundles
IgnorePlugin – Excludes certain modules from bundles
LimitChunkCountPlugin – Sets min/max limits for chunking
LoaderOptionsPlugin – Used for migrating from Webpack 1 to 2
MinChunkSizePlugin – Keeps chunk size above the specified limit
MiniCssExtractPlugin – Creates a CSS file per JS file
NoEmitOnErrorsPlugin – Skips emit phase on compilation errors
NormalModuleReplacementPlugin – Replaces resource(s) that matches a regex
NpmInstallWebpackPlugin – Auto-installs missing dependencies during development
ProgressPlugin – Reports compilation progress
ProvidePlugin – Uses modules without having to use import/require
SourceMapDevToolPlugin – Enables fine-grained control of source maps
TerserPlugin – Enables control of the version of Terser
UglifyjsWebpackPlugin – Enables control of the version of UglifyJS
ZopfliWebpackPlugin – Prepares compressed versions of assets with node-zopfli
You can also add all sorts of third-party plugins, but that’s a much larger conversation that you may never need to have if the built-in ones are sufficient, but at least now you know what to Google for if it comes up.
Modes
Whenever Webpack performs a build, it can be done in one of several modes: development, production, or none. Which mode is used determines which of the built-in plugins are used, if any, and controls what options are passed to them to do their work. In simplest terms, the mode determines what optimizations Webpack does to your bundles.
When the mode is none, as you might guess, it does no optimizations at all.
When the mode is development, the NamedChunksPlugin and NamedModulesPlugin are enabled. Also, the option process.env.NODE_ENV on the DefinePlugin is set to a value of development (as the name implies, this is associated with using Webpack for Node code, which you absolutely do if you want; Webpack isn’t necessarily just about client-side code!).
When the mode is production, the process.env.NODE_ENV on DefinePlugin is again set, but now the plugins FlagDependencyUsagePlugin, FlagIncludedChunksPlugin, ModuleConcatenationPlugin, NoEmitOnErrorsPlugin, OccurrenceOrderPlugin, SideEffectsFlagPlugin, and TerserPlugin are all enabled. The result is a much more optimized bundle, as you would expect to have for a production release.
The mode of a Webpack build can be set in its configuration file, or it can be passed in as a command-line argument, so you have flexibility in that.
Browser Compatibility
In short, Webpack, by default, supports all ES5-compliant browsers (Internet Explorer 8 and lower are not supported). Webpack requires the Promise object to implement import() statements and require.ensure() statements . You can still support older browsers if you wish, but to do so requires loading a polyfill before using those sorts of statements. There is a section in the Webpack documentation that discusses this at webpack.org, but it’s a topic I won’t be covering here, I just wanted to make you aware of it.
Getting Started with Webpack
This is the first_example for this chapter in the source code for this book, if you’re not following along (which I would frankly suggest you do rather than just go directly to the existing source code so that you get a feel for doing all this yourself).
When you do this, Webpack will request that you install the webpack-cli module, and you should say yes to allow it since you won’t get much further than this if you don’t! This is what will allow you to execute Webpack commands. You’ll only need to do this the first time you execute Webpack.
You should see a warning about the mode option not being set when you execute this command. That’s okay! Webpack will default to production mode if you don’t set the mode in the configuration file or pass it on the command line as previously discussed, and this is fine for our purposes here.
When this completes, you should find that you now have a dist directory, and within it should be a main.js file. Recall from earlier that by default, Webpack looks for src/index.js as the entry point and creates dist/main.js, and that’s precisely what we see here, entirely without telling Webpack anything at all about our project.
If nothing else, that proves that Webpack has definitely done some transformations on our code because that doesn’t look even remotely like what we wrote! However, if you start to dig through it, you can start to see how it related to the original code and how it was optimized. For example, Webpack is smart enough to realize that the value of variable c is always going to be 10, so it was optimized away and you can see in the final alert() near the end how it has a hardcoded value of 10.
This is a crucial point to understand: in general, you’ll rarely look at the final bundle, and you’ll even less commonly debug it. You effectively must trust that Webpack is doing the right thing for you and that though it may look vastly different, the code it produces does what your original code was intended to do. Yes, you might, at times, find that a bug in Webpack (or a loader or plugin) is an issue, but just like with a compiler, you must have a level of trust in the tooling.
Getting More Complex
So far, we haven’t done any Webpack configuration at all, and instead we have just relied on its default behavior. In a project of any real complexity, that’s likely not going to be enough. So, let’s get into configuring Webpack. To do so, we’ll need a configuration file:
This is the second_example for this chapter in the source code for this book.
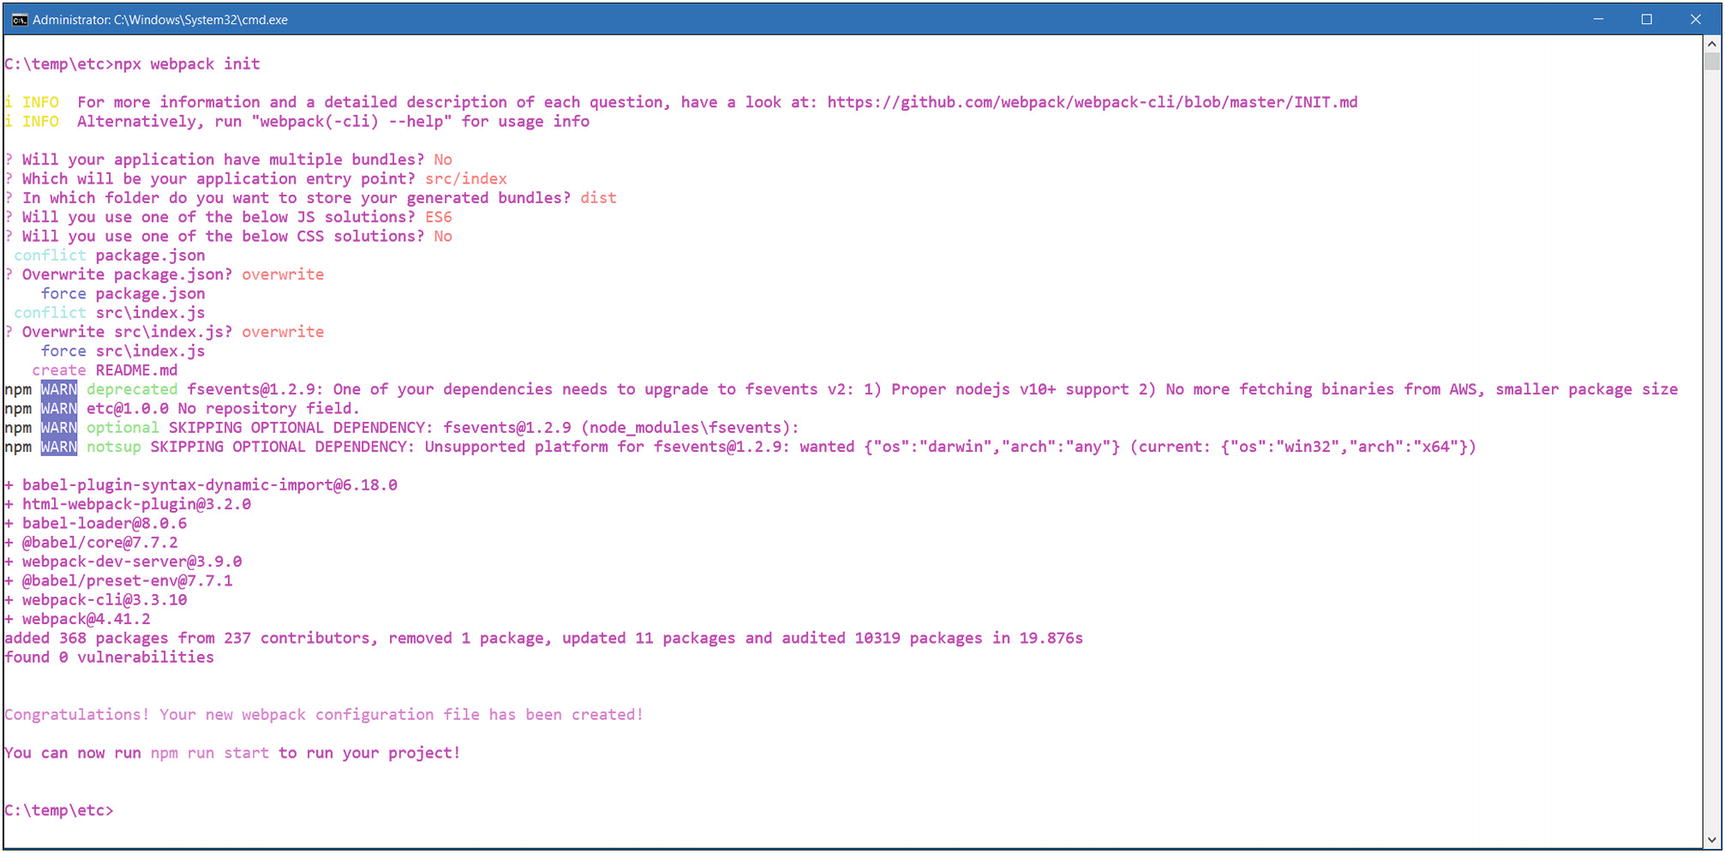
The Webpack initialization process
As you can see, there are a series of questions you’re asked, beginning with whether your application will have multiple bundles. As stated earlier, this is a bit of a more advanced topic that I won’t be covering in this book, so a terse “no” is the right answer. Then, we are asked for the entry point, and here I’ve just selected the default that is presented, which is also the case for the folder to store the output in.
After that, you are asked whether your project will use ES6 or TypeScript. As you can guess, for the projects in the subsequent chapters, we’ll be using TypeScript, but for now, we’ll stick with plain old JavaScript, version ES6 in this case. We’re also asked about CSS solutions, things like SASS or LESS, but we don’t need any of that here.
Since that also creates an NPM package.json file , it’s all you really need to do, but it only works if Webpack is installed globally. Since in this case it’s not, we had to install it first, hence why we did npm init first, and why Webpack now is asking to overwrite package.json.
After that, an npm install is automatically executed to install all the dependencies that Webpack added to package.json, all the things it needs to do its work.
That will start up a small web server and even launches the page in your default web browser! Once it does, open your web developer tools, and you should see a message in the console “Hello World from your main file!”
To get back to where we want to be, let’s now open that index.js file and copy into it the example code from earlier. Do that, save the file, and watch what happens: like magic, after a few seconds, the page automatically refreshes in the browser, and you see the alert(10) message as we expect! What happened is that Webpack continues to monitor the source files and when it seems them change it does a build automatically. It then, also automatically, deploys the updated code to the web server, and thanks to the code on the page it created for us, it refreshes the page for us.
At this point, I encourage you to also look at the code in your browser (using View Source) to see the HTML file. Then, also be sure to look at the JavaScript file that it references. I think you’ll be rather surprised what’s in there! It’s far beyond even the already kind of verbose code we saw in the earlier example. But all of it is what allows Webpack to perform all this magic for us. Again, you’ve got to trust your tools for things like this; there’s little choice (I know that I would not want to debug the code I see there!).
Configuration
This is code that will eventually be executed by Node on behalf of Webpack, so it begins with imports to provide the node path module and the Webpack Node module itself. The html-webpack-plugin module is then imported, which is the Webpack plugin responsible for the creation of that HTML file that loads the finished bundle and allows us to do real-time edits.
After that comes module.exports, the contents of which are targeted to Webpack itself, to configure its operation. The mode property defines the mode of operation, as previously discussed. As you can see, it defaults to development. The entry point is also named, so if you wanted to change the source file that is the top of the dependency graph tree, you could do it right there by simply providing the filename and relative path to it.
Next comes some configuration of the output, including where it goes (the dist directory) and the name of the final bundle file. The name specified here is a little more unusual than you would usually write yourself because when an automatic build is done, that is when Webpack sees some changed source files, it produces a unique bundle name so that caching in the browser doesn’t defeat the autoload mechanism. The [name] and [chunkhash] are internal tokens that Webpack provides to ensure the filename is unique on each rebuild (look at the JavaScript file imported into the generated HTML file to see that in action).
Then comes the plugins property , which is an array of plugin objects. As you can see, the html-webpack-plugin is instantiated (an instance of the HtmlWebpackPlugin class, as defined in the associated source file) and added to the array. But before that comes another plugin: webpack.ProgressPlugin. As you probably have surmised, this is responsible for showing progress updates on the screen during build operations.
After that comes the module property . This allows you to tell Webpack how to build your bundle. The goal here is to provide a set of rules. Each rule has a test, which is a regex that matches one or more files. For each rule that matches, the loader(s) specified will be used to transform the files, and you can provide options for each loader. Here, we can see that Webpack has added Babel to the mix and specified that any .js or .jsx file should be handled by it. The configuration for the Babel loader should look somewhat familiar: you can see the presets being used as we saw in previous chapters. In addition, a plugin is added for this loader: the syntax-dynamic-import plugin . This is responsible for determining what code can be left out of the bundle based on what is imported and what isn’t.
After that comes a section for the optimizations to apply. There are quite a few options available here, and rather than echo the Webpack documentation, and I’ll instead just point you in its direction: https://webpack.js.org/configuration/optimization. The one seen here, the splitChunks optimization , is actually just configuration for the SplitChunksPlugin. The job of this plugin is to ensure duplicate resources aren’t included. For example, if two modules reference a third, the dependency graph would have the third module listed twice. At bundle time, you wouldn’t want it to be included twice, though. This plugin, and the configuration for it here, avoids that. For further details on its configuration, see the documentation. However, it should be noted that the default configuration is expected to be sufficient for most projects, so in reality this is mostly boilerplate that you can ignore unless and until a time comes where you need to dig into the details.
Finally, the devServer property is what is responsible for enabling the built-in web server function, as well as monitoring for source file changes.
Quite honestly, even this configuration is more than you might need. But that’s the beautiful thing about Webpack: it is highly configurable, so when a need arises, a quick trip to the documentation is all that’s likely to be required to find just the right configuration you need.
Using Modules
So far, the examples we’ve looked at have been straightforward JavaScript examples. What happens though when we want to use more advanced concepts like modules? As you’re aware from previous chapters, modules aren’t universally supported across all browsers. Not only that but there are several competing module formats available, and they aren’t usually interoperable.
This is where Webpack really starts to earn its keep.
This is the third_example for this chapter in the source code for this book.
Now, as you do this, if you happened to have executed npm run start and didn’t stop it, you should see that Webpack is dutifully rebuilding as you go. Probably you will have seen some build failures along the way if you did things in the order I said here, and that’s fine. If you edit index.js first, Webpack will try to build it, but won’t be able to find module1.js and module2.js yet. Hence, you’ll get a build error. That’s fine and completely expected.
Ultimately though, once you’ve made the change to index.js and added the other two files, you should get a successful build (or, if Webpack wasn’t monitoring, just execute npm run start again). Either way, you should get the page launched in your browser, and you should see an alert() message showing 600, proving that both modules were bundled together with the entry point, and everything works as we expect it to.
That demonstrates how modules can be used and how Webpack will resolve them correctly and bundle them. It also shows that this will now work across browsers, even on those that don’t know about modules. This is arguably the real power of Webpack because now you can organize your code well using modules and know that it’s going to work across all browsers (or Node, if this isn’t code that you’ll be running in a browser).
Wither TypeScript?
As a final topic, let’s talk about how we could use TypeScript instead of plain old JavaScript. We’ll take the third example from before and change the three source files to TypeScript.
This is the fourth_example for this chapter in the source code for this book.
That gives us the tsconfig.json file that Webpack needs, and its default form should work for this example.
If we had initialized the Webpack project with TypeScript support from the beginning, then this would have been done for us already, but since we’re building on the previous project, we can’t do that (well, we could re-initialize the project as we did earlier, but as you now know, that would overwrite a bunch of files, and this time we want to avoid that to show the progression of adding additional capabilities to the project on the fly).
Now, Webpack is ready to deal with .ts files and knows to ignore the node_modules directory . Getting some .ts files to work with is the next step! Go into the src directory and change the three files there from .js extensions to .ts extensions. Since, as you’ll recall, all valid JavaScript is all valid TypeScript, that should be all we have to do.
But, in fact, there is one more thing we need to do it turns out: in the (now) index.ts file, update the imports to specify module1.ts and module2.ts (just adding the extensions). Failing to do that will result in a compilation failure saying the modules can’t be found. It’s a minor change, but a change none the less.
With all that done, if you still have Webpack monitoring for changes, then you should have a clean build, and the page should have refreshed and shown the proper alert() message. If not, do npm run start again and make sure everything works as expected.
That’s all it takes to use TypeScript instead of JavaScript! Now you can use all the goodness you learned about in the previous two chapters in TypeScript land to make your projects that much more robust!
And, with that, you now know all the basics about Webpack that you need to build most applications. To be sure, there’s much more to Webpack, and indeed you could read an entire book on it and all the options it provides, and I would definitely encourage you to at some point! It’s a potent tool that will serve you well if you learn more about it. But this (plus some other things we’ll see in later chapters) covers the bases that any project of virtually any complexity will use, and that’s the point: building a foundation.
Summary
In this chapter, we looked at Webpack. You learned what it is, the basic concepts underlying it, how to install it, how to create a basic project with it, and how to configure it, at least at a basic level.
And, with that, we now have all the tools we need to start building our project! When you’re ready, jump on into the next chapter so we can start having some fun!