
Internet Information Server (IIS) is a default web server shipped with Windows (like Apache is on Linux). In its latest incarnation it brought numerous improvements over the previous versions. One of the biggest criticisms of the previous versions is its monolithic implementation that used too many system resources and did not permit fine-grained configuration of its services. That is no longer the case. Administrator is now able to install and activate only services required by his web application. Another criticism was directed towards less performing implementation of script extensions. This means that PHP could never be as optimized and as fast compared to Apache web server. Because of that, Microsoft implemented FastCGI for IIS 7 and at the same time worked with the PHP community to produce fast and reliable PHP connector. In order to secure our Moodle instance we need to make web server as secure as possible. The way to do that is to install and configure PHP as FastCGI scripting engine.
Note
FastCGI rationale
CGI (Common Gateway Interface) programs are executables launched by the web server for each request in order to process the request and generate dynamic responses that are sent back to the client. CGI has poor performance due to the high cost of starting and shutting down a process for each request (this is more of a problem on Windows than on Linux). FastCGI addresses the performance issues inherent to CGI by providing a mechanism to reuse a single process over and over again for many requests.
To learn more about FastCGI for IIS visit http://www.iis.net/download/FastCGI.
Using FastCGI to run PHP offers complete isolation of the scripting engine and makes it possible to run different versions of PHP in separate websites. Furthermore it is unnecessary to add PHP directory into system PATH, making OS as clean as possible. We will cover the manual process of installing and configuring PHP because every administrator should really understand what happens behind the scenes and be able to easily adapt to any particular circumstances.
Before doing anything we need to be sure that IIS is properly set up. Here are the steps you should perform to make sure everything is as it should be:
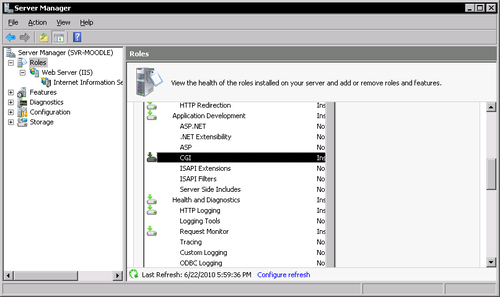
- Make sure you have installed support for CGI (which includes FastCGI as well). Open the Server Manager applet and look into the WEB Server Role pane.
Note
To open server manager go to Control Panel/Administrative Tools and start Server Manager snap-in or from command line execute this:
start %SystemRoot%system32CompMgmtLauncher.exe
- Install the FastCGI update located at http://support.microsoft.com/?kbid=980363. It fixes various problems and improves stability.
- Install Administration pack 1.0. It can be downloaded from this location: http://www.iis.net/download/AdministrationPack. With this add-on you get the option to properly configure any FastCGI extension.
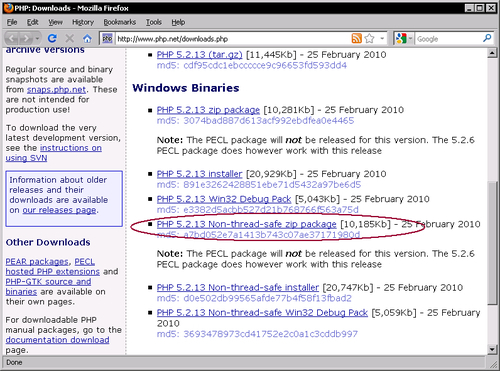
In order to fully use the capabilities of new FastCGI you should download and install non-thread-safe version of PHP.
Extract the contents of the ZIP file in a new empty directory. We recommend something like c:php5. Locate the file php.ini-recommended and rename it to php.ini. This is the recommended starting point for PHP configuration on production servers. On Windows machines PHP expects to find php.ini in the Windows main directory which is usually called Windows. We do not recommend using this kind of deployment. It is highly recommended to have everything related to the particular version of PHP in one and only one main directory (c:php5 in our example).
Open your newly created php.ini in any text editor and start applying the following modifications:
- Locate the line with
expose_phpdirective and make sure it looks like this:expose_php = Off
- Locate the commented line with
error_logdirective and change it to look like this:error_log ="c:/php5/err.log"
- Make sure to remove ; at the beginning of the line so that the directive will have actual effect.
- Locate the
fastcgi.impersonatedirective and uncomment it so that it looks like this:fastcgi.impersonate = 1;
- Set
extension_dirdirective to point to <PHP dir>/ext which in our case would be:extension_dir = "c:/php5/ext"
- Locate the Windows extensions section in
php.iniand uncomment (remove; from the beginning of every line you want to enable) following lines:extension=php_curl.dll extension=php_gd2.dll extension=php_mbstring.dll extension=php_mysqli.dll extension=php_openssl.dll extension=php_xmlrpc.dll extension=php_xsl.dll extension=php_zip.dll
- Configure time zone: It is highly recommended to configure timezone explicitly in php to ensure proper date and time handling. To do that locate the line with
date.timezoneoption and configure it to look like thisdate.timezone=<TZ from Olson database>. For example:date.timezone = America/Detroit
To see the list of available time zones visit the PHP documentation page http://php.net/manual/en/timezones.php.
Every scripting engine executed inside IIS is assigned to an application pool. Application pool in IIS is an isolated amount of system resources used to run specified executables. To increase security of Moodle and PHP we should do the following:
- Whenever possible use one website per web application: This is rather an obvious statement. If we have a particular web application and make it exclusive for that website, in case of illegal access the perpetrator will be able to damage only one service which is important especially in a shared hosting environment.
- Website should have its root folder on a separate non-system partition: With this we isolate the file systems between websites making it impossible to damage one website from another.
- Website should have separate application pool: By separating scripting engines in various pools we can easily isolate executions between websites and further improve the stability of the execution.
- An application pool should be using a separate account for executing its processes: By applying a separate account for executing pool processes we give explicit access only to the resources needed and used by a particular web application, again minimizing potential damage and increasing security.
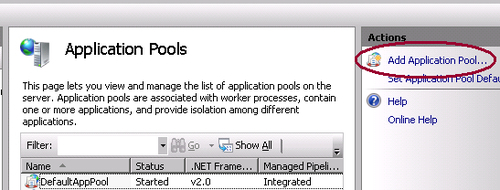
Every scripting engine executed inside IIS is assigned to an application pool. An application pool in IIS is an isolated amount of system resources used to run specified executables. They can be created through IIS Manager snap-in. You can start it by going to the Control Panel | Administrative Tools | Internet Information Services (IIS) Manager. Click on Application pools and choose Add application pool on the right side of the manager pane.
In the new dialog, enter new Application pool name, choose No Managed Code in .NET framework version: option, and leave all the other options as they are.

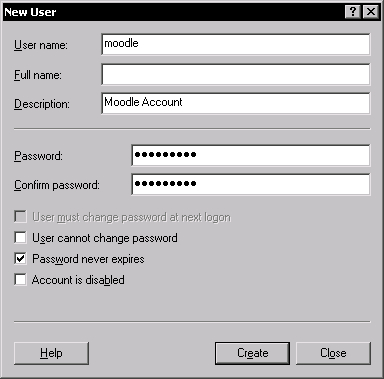
Create a new user that will be used to access Moodle files both by web server and PHP. To do that, open Control Panel | Administrative Tools and choose Server Manager. In Server Manager expand Configuration | Local Users and Groups and click on Users. Right-click with the mouse in the right pane and choose option—New user.
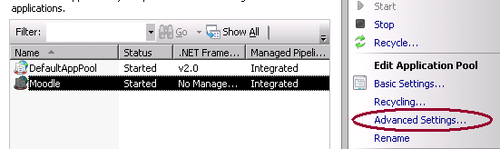
Go back to the IIS Manager and open the Application Pools section. Choose Moodle Application Pool and click on the Advanced Settings… action located on the right side of the panel.
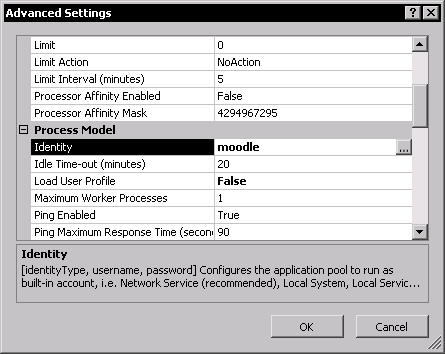
Click on the Identity option and choose Custom Account and then click on the set button. Enter Moodle for username and the password that you configured during the creation of Moodle account.
Open IIS Manager snap-in and go into the Sites section. On the right side of the panel click on the Add Website option.
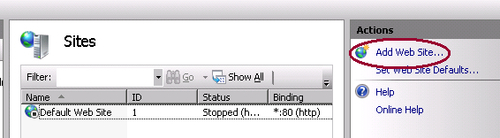
Type the name of your new website (Moodle), choose the application pool we just created, specify the physical location of your site (directory where you plan on placing Moodle), and configure the website to use user account Moodle for accessing site resources (Connect as button). Once you have finished entering that entire information click OK.

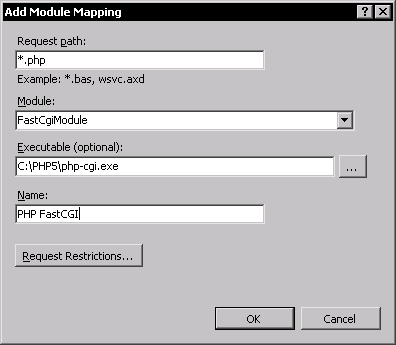
After all these steps we can finally add PHP support for our newly created website. In IIS Manager click on the Sites section and enter into Moodle website. Among various options you will see Handler Mappings. Double-click on that one and you will be presented with the current list of resource mappings.
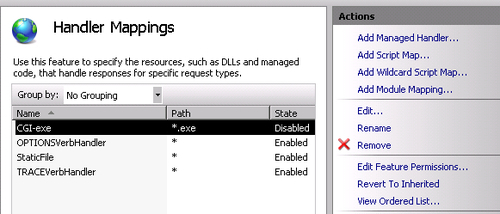
Click on the Add Module Mapping option and configure PHP handler as it is presented in the following screenshot:
Now just one more step is needed to finish PHP configuration under IIS. We need to specify two environment variables for our FastCGI executable so that it can work properly. To add these variables, once again we go to the IIS Manager and click on the main server home. In there we will see the FastCGI settings icon (this icon is visible only if you installed the IIS Administration pack). We will see all FastCGI handlers configured on our server. In this case we have just one item, php-cgi.exe. Double-click on that item and you will be presented with Edit FastCGI Application dialog. The part interesting to us is EnvironmentVariables. We need to add two items in this list. First is the PHPRC variable. When specified this variable is used by PHP to determine the location of php.ini that should be used during execution. As mentioned before, on Windows by default PHP uses php.ini in Windows system directory. We want it to use the one located in c:php5. See the following screenshot:
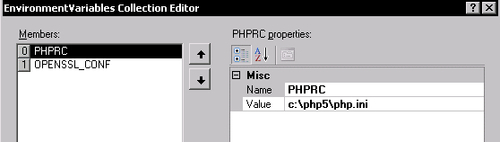
Another variable we need to add is OPENSSL_CONF. This one is important because it points to the location of openssl.cnf needed by PHP extension OpenSSL. Without that the variable extension will not work and therefore any part of Moodle that depends on that functionality will also not work. OpenSSL configuration file that ships with standard PHP is always located in<PHP directory>extrasopensslopenssl.cnf.
We can now move on to the securing procedure for MySQL server.