We briefly touched upon the subject of collision detection in Chapter 7 when we needed to know when the flaming arrows were hitting the player and the dragon. In that chapter game, just one type of collision detection was used, between just one sprite and another (one-to-one). However, Pygame supports several types of collision detection techniques that we will be learning to use in this chapter. The subject of sprite groups will also become more important as you will see in the chapter example, called The Zombie Mob Game, which will use a large group of zombies versus the player for some fast-action gameplay. These are fairly advanced topics but all of the concepts hold each other up rather than stand on their own, so the code does get easier after a time.
In this exciting chapter you will learn how to:
Check for collisions between two sprites
Check for collisions between whole groups of sprites
Create an awesome game called The Zombie Mob Game
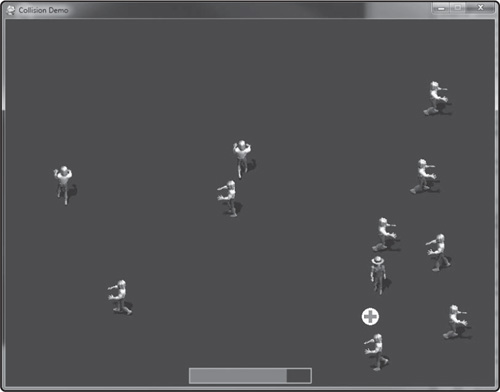
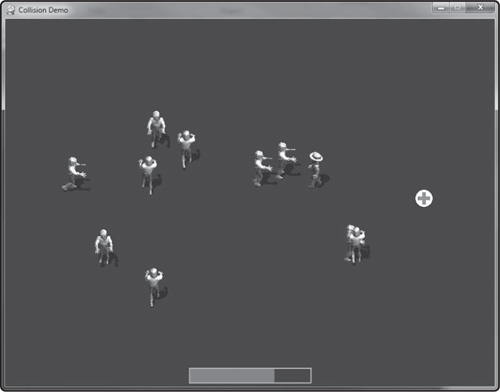
The Zombie Mob Game, shown in Figure 8.1, is a fast-paced game in which the player has to run away from the zombies while collecting food in order to survive. This type of gameplay helps to demonstrate collision testing quite well because so many sprites are involved in the game. The gameplay will be improved even further in the next chapter when custom levels are designed for the game while learning about arrays and tuples.
Pygame supports several forms of collision detection that we can use for several different circumstances. Why do we need so many? Basically, for optimized code. Some forms of collision testing will involve just two sprites, while some test all of the sprites in an entire sprite group. It’s even possible to test two groups against each other and get a list of all affected sprites in each group! This is a particularly interesting technique for a game like The Zombie Mob Game where there are item sprites to be picked up, a player sprite, and a large group of zombie sprites.
One-on-one collision testing between just two sprites (rather than testing within a whole sprite group) is done with the pygame.sprite.collide_rect() function. Two parameters are passed, and each must be derived from pygame.sprite.Sprite. More specifically, any object can be passed as a parameter as long as it has a Rect property called rect available. In the function itself, left.rect and right.rect are used for the collision test, so if your first “sprite” (or any other object) has a rect property, then it will technically work, and the same goes for the second parameter called right. The function just returns a bool value (True or False) as a result of the collision test. This simple function will be your workhorse for custom sprite collision testing!
Using our custom MySprite class as a basis for examples, here is a simple one:
first = MySprite("battleship.png", 250, 120, 1)
second = MySprite("rowboat.png", 32, 16, 1)
result = pygame.sprite.collide_rect( first, second )
if result:
    print_text(font, 0, 0, "What were you thinking!?")
    sys.exit()
There’s a variation of this function that we can also use for somewhat better results in some cases, depending on the sizes of the sprite images. The function is pygame.sprite.collide_rect_ratio(). The difference is, this function has an additional parameter—a float—where you can specify a percentage of the rectangle for the sprites to be used for collision. This is useful when there’s a lot of empty space around the edges of a sprite image, in which case you’ll want to make the rectangle smaller.
The syntax is a little strange, though, because the function actually creates an instance of a class with the reduction value, and then that result is passed the two sprite variable names as additional parameters.
pygame.sprite.collide_rect_ratio( 0.75 )( first, second )
Circle collision is based on a radius value for each sprite. You can specify the radius yourself or let the pygame.sprite.collide_circle() function calculate the radius automatically. We might want to specify our own radius (as a new property of the sprite passed to this function) in order to fine-tune the collision results. If the radius property is not already there, then the function just calculates the radius based on the image size. The automatically created circle will not always produce very accurate collision results because the circle’s radius completely encompasses the rectangle (that is, the diagonals rather than the width or height).
if pygame.sprite.collide_circle( first, second ):
    print_text(font, 0, 0, "Ha, I caught you!")
A variation of this function is also available with a float modifier parameter called pygame.sprite.collide_circle_ratio().
pygame.sprite.collide_circle_ratio( 0.5 )( first, second )
The last collision testing function in pygame.sprite has the potential to be really awesome if used correctly! The function is pygame.sprite.collide_mask(), and receives two sprite variables as parameters, returning a bool.
if pygame.sprite.collide_mask( first, second ):
    print_text(font, 0, 0, "Argh, my pixels!")
Now, the awesome part is how this function works: if you supply a mask property in the sprite class, an image containing mask pixels for the sprite’s collidable pixels, then the function will use it. Otherwise, the function will generate this mask on its own—and that’s very, very bad. We definitely do not want a collision routine to mess with pixels every time it’s called! Imagine if you have just 10 sprites using this function, all colliding with each other—that’s 100 collision function calls, and 200 mask images being generated. So, this function has the potential to give really great collision results, but you simply must supply the mask image yourself!
To create a mask, look at the functions in the Surface module for reading and writing pixels. I’ll give you a few hints: Surface.lock(), Surface.unlock(), Surface.get_at(), and Surface.set_at(). It’s a lot of work, so unless your game really would benefit from this kind of precision, just use rectangular or circular collision instead!
The first group collision function we’re going to study now is pygame.sprite.spritecollide(). This function is surprisingly easy to use considering how much work it does. In a single function call, all of the sprites in a group are tested against another single sprite for collision, and a list of the collided sprites is returned as a result! The first parameter is the single sprite, while the second is the group. The third is a bool that really has great potential! Passing True here will cause all collided sprites in the group to be removed! That’s a lot of hard work being done for us in a single function call. To manage the “damage,” all sprites removed from the group are returned in the list!
collide_list = pygame.sprite.spritecollide( arrow, flock_of_birds, False)
Now, there is a variation of this function, which is probably not a big surprise given what we’ve seen already! The variation is pygame.sprite.spritecollideany(), and is a faster version of the function. Rather than returning all of the sprites in a list, it just returns a bool when a collision occurs with any sprite in the group. So, as soon as a collision occurs, it returns immediately.
if pygame.sprite.spritecollideany( arrow, flock_of_birds ):
    print_text(font, 0, 0, "Nice shot, you got one!")
The only problem is, you will have no way of knowing which sprite in the group was hit, but depending on gameplay that may not matter. Let me explain how this is useful. Imagine you have a maze-style game where all the walls of the maze are stored in a sprite group. Now, any time the player sprite has a collision with one of the walls in that group, it doesn’t matter which wall, we just want to make the player stop moving. Presto, instant wall collision handling!
The last collision detection technique we’ll look at is pygame.sprite.groupcollide(), which tests for collisions between two sprite groups. This is a potentially very intensive process and should not be used lightly if there are a very large number of sprites in either group being passed to it. The return from this function is a dictionary containing key-value pairs. Every sprite in the first group is added to the dictionary. Then, every sprite from group two that collides is added to the entry for group one in the dictionary. Some items from group one may be empty, while some might have many sprites from group two. Two additional bool parameters specify whether sprites should be removed from group one and two when a collision occurs.
hit_list = pygame.sprite.groupcollide( bombs, cities, True, False )
We’re going to use the information about collision detection now to make a game with a lot of sprites on the screen. The Zombie Mob Game pits the player against a mob of zombies. But, there’s no weapon! This player character is a helpless civilian without weapons, and the goal is to avoid the zombies while collecting food in order to have energy to keep running away. The energy level drops every time the player moves, and if the energy reaches zero then the player won’t be able to move any more and the zombies will have their favorite (and only) food for dinner—your brains.
Besides making the game using collision detection techniques, we’re going to explore modular programming at this point too because our library of code is getting kind of repetitive. We have the MySprite class, the print_text() function, and as you may recall, the useful Point class introduced back in Chapter 6—these will be used frequently. So, we’ll put them in a separate source code file for reuse. Python make this really easy to do, too! Just put your code in another file with a .py extension, and call it whatever you want. Then, in the program code where you want to use that helper code, add an import statement! I’m going to call the helper library file MyLibrary.py. So, in the game file we’ll add this line:
import MyLibrary
Well, in a manner of speaking. If you do it that way, then you have to add MyLibrary. (with a period) in front of every class name and function in MyLibrary.py to use it. Not a big deal, but I want the code to pretty much remain as it has in past chapters. So, we’ll use a variation of import that includes everything in the file into Python’s global namespace:
from MyLibrary import *
One more thing: Any time you need to reference something in MyLibrary, you’ll have to pass it as a parameter or create a local reference to the object. The screen variable, for example, is used for drawing. So, instead of passing it to every function that needs it, we can just call pygame.display.get_surface() to retrieve the existing surface. The print_text() function needs this line added, for example.
screen = pygame.display.get_surface()
Below is the source code for the MyLibrary.py file. Now, just go ahead and add any new functions or classes to this file and then copy the file to the folder where any of your Python/Pygame games are located, so that you can use it. Just note that we will not be including these classes and functions in any future examples, so take note of where they went!
# MyLibrary.py
import sys, time, random, math, pygame
from pygame.locals import *

# prints text using the supplied font
def print_text(font, x, y, text, color=(255,255,255)):
    imgText = font.render(text, True, color)
    screen = pygame.display.get_surface()
    screen.blit(imgText, (x,y))

# MySprite class extends pygame.sprite.Sprite
class MySprite(pygame.sprite.Sprite):

    def __init__(self):
        pygame.sprite.Sprite.__init__(self) #extend the base Sprite class
        self.master_image = None
        self.frame = 0
        self.old_frame = -1
        self.frame_width = 1
        self.frame_height = 1
        self.first_frame = 0
        self.last_frame = 0
        self.columns = 1
        self.last_time = 0

    #X property
    def _getx(self): return self.rect.x
    def _setx(self,value): self.rect.x = value
    X = property(_getx,_setx)

    #Y property
    def _gety(self): return self.rect.y
    def _sety(self,value): self.rect.y = value
    Y = property(_gety,_sety)

    #position property
    def _getpos(self): return self.rect.topleft
    def _setpos(self,pos): self.rect.topleft = pos
    position = property(_getpos,_setpos)

    def load(self, filename, width, height, columns):
        self.master_image = pygame.image.load(filename).convert_alpha()
        self.frame_width = width
        self.frame_height = height
        self.rect = Rect(0,0,width,height)
        self.columns = columns
        #try to auto-calculate total frames
        rect = self.master_image.get_rect()
        self.last_frame = (rect.width // width) * (rect.height // height) - 1

    def update(self, current_time, rate=30):
        #update animation frame number
        if current_time > self.last_time + rate:
            self.frame += 1
            if self.frame > self.last_frame:
                self.frame = self.first_frame
            self.last_time = current_time

        #build current frame only if it changed
        if self.frame != self.old_frame:
            frame_x = (self.frame % self.columns) * self.frame_width
            frame_y = (self.frame // self.columns) * self.frame_height
            rect = Rect(frame_x, frame_y, self.frame_width, self.frame_height)
            self.image = self.master_image.subsurface(rect)
            self.old_frame = self.frame

    def __str__(self):
        return str(self.frame) + "," + str(self.first_frame) +
               "," + str(self.last_frame) + "," + str(self.frame_width) +
               "," + str(self.frame_height) + "," + str(self.columns) +
               "," + str(self.rect)

#Point class
class Point(object):
    def __init__(self, x, y):
        self.__x = x
        self.__y = y

    #X property
    def getx(self): return self.__x
    def setx(self, x): self.__x = x
    x = property(getx, setx)

    #Y property
    def gety(self): return self.__y
    def sety(self, y): self.__y = y
    y = property(gety, sety)

    def __str__(self):
        return "{X:" + "{:.0f}".format(self.__x) +
            ",Y:" + "{:.0f}".format(self.__y) + "}"
Our Zombie Mob Game uses some artwork to make it look really cool. I was going to make the zombies just as green circles and the player as a white circle, but that would not make it onto the cover of any game development magazines or the front page of any web logs, so this game will be using good artwork! The player character’s artwork is shown in Figure 8.2.
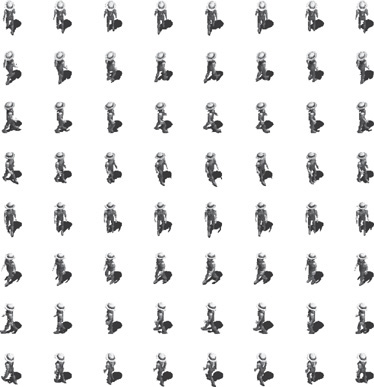
Note the specifications of this sprite sheet, since we’ll have to know this information for our source code. There are eight columns across, and eight rows, so that’s 64 total frames. You can’t tell from the figure, but by opening the bitmap file in a graphic editor to view it, you will note that the file dimensions are 768 × 768. That breaks down to a frame size of 96 × 96 pixels. But, we don’t really need all of these frames of animation. This is a great sprite sheet for a game that could use eight directions of movement: north, south, east, west, and all four diagonals. Our zombie game will just be using the four primary directions—but going to eight could be an upgrade to the game if you want to tackle it! Figure 8.3 shows the sprite sheet for the zombie. All of the zombie sprites will share this one bitmap file.
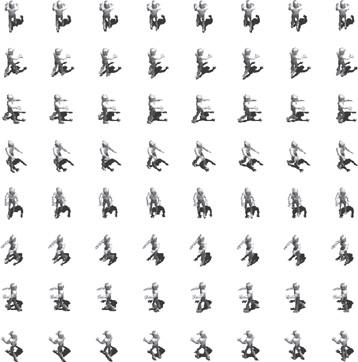
To make these sprites move in the four directions when there are eight animation sequences, we have to manually control the animation frame ranges. Table 8.1 shows the specifications for the animations. Since both the player and zombie sprite sheets have the same dimensions, this applies to both. While studying the table’s figures, use the figures showing the two sprite sheets as a reference. I’ve found it actually helps to count each frame in each row. Once you have counted the first few rows, you should notice a pattern emerge—based on the number of columns (eight). Since this is a pattern, we can use it to automatically calculate the range for each direction.
Table 8.1. Sprite Sheet Dimensions
Row | Description | Start Frame | End Frame |
|---|---|---|---|
0 | north | 0 | 7 |
1 | -- | 8 | 15 |
2 | east | 16 | 23 |
3 | -- | 24 | 31 |
4 | south | 32 | 39 |
5 | -- | 40 | 47 |
6 | west | 48 | 55 |
7 | -- | 56 | 63 |
The direction value will be added to the sprite class as a new property. While we’re at it, we will also need a velocity property added to MySprite so that the sprite can be moved based on its direction. So, yes, we will need to open up MyLibrary and make an addition to the MySprite class. That’s what it’s there for, so don’t be afraid to modify it! Let’s do that right now while we’re thinking about it:
class MySprite(pygame.sprite.Sprite):
    def __init__(self):
        pygame.sprite.Sprite.__init__(self) #extend the base Sprite class
        self.master_image = None
        self.frame = 0
        self.old_frame = -1
        self.frame_width = 1
        self.frame_height = 1
        self.first_frame = 0
        self.last_frame = 0
        self.columns = 1
        self.last_time = 0
        self.direction = 0
        self.velocity = Point(0,0)
That’s all we have to do to add it as a global property. Oh, it’s not a real Python class property, but it will work fine this way, like the others. The only time I create a real property with a get() and set() pair (which are called the accessor/mutator methods, by the way), is when either one has to do some logic, as was the case with the X and Y properties.
Now, we have a MySprite.direction property available, so what we want to do is set the direction based on user input. When the player presses the Up key, we will set the direction to 0 (north). Likewise, we’ll do the same for the Right key (2, east), the Down key (4, south), and the Left key (6, west). The code below takes into account both the arrow keys and W-A-S-D keys commonly used for movement.
    if keys[K_UP] or keys[K_w]:      player.direction = 0
    elif keys[K_RIGHT] or keys[K_d]: player.direction = 2
    elif keys[K_DOWN] or keys[K_s]:  player.direction = 4
    elif keys[K_LEFT] or keys[K_a]:  player.direction = 6
The direction will then determine the frame range that will be used for animation. So, if you press the Up key, the range 0 to 7 will be used, and so on according to Table 8.1. The great thing about the direction property is that we can use it in a simple calculation to set the range. No if statement is needed!
    player.first_frame = player.direction * player.columns
    player.last_frame = player.first_frame + 8
We’ll want to be sure this code comes before player.update(), which is where animation is updated.
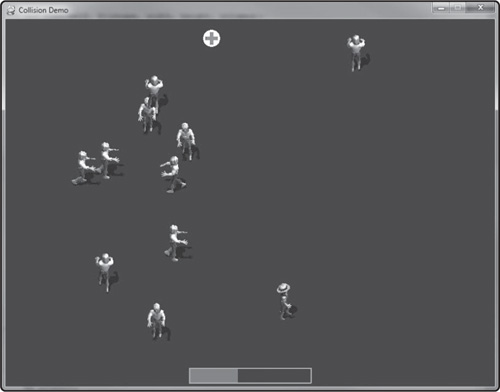
Our collision code in the game will involve two stages. First, we’ll use pygame.sprite.spritecollideany() to see if the player sprite touches any zombie sprite. If that comes back with a hit, then we’ll do a second collision test using pygame.sprite.collide_rect_ratio() and reduce the collision boxes by 50 percent for a more accurate result—which leads to better gameplay. The reason this second stage is needed is because the frames in the sprite sheets are quite large compared to the actual image pixels in each frame, so the collision needs to be tightened up a bit for better gameplay. A scratch sprite object called attacker is used to track when the player has been hit by a zombie. After the two-stage collision checks pass, then the player loses health, and the zombie is pushed back a little ways to give the player room to escape. Figure 8.4 shows the player about to be attacked!
Note
Be careful when writing code that causes something to reverse direction (or any other state), because if it isn’t also moved out of that position (or state), then it will keep flip-flopping back and forth and seem to “wig out” on the screen. At worst, this can actually lock up the game.
    #check for collision with zombies
    attacker = None
    attacker = pygame.sprite.spritecollideany(player, zombie_group)
    if attacker != None:
        #we got a hit, now do a more precise check
        if pygame.sprite.collide_rect_ratio(0.5)(player,attacker):
            player_health -= 10
            if attacker.X < player.X:   attacker.X -= 10
            elif attacker.X > player.X: attacker.X += 10
        else:
            attacker = None
The health sprite is a little red cross on a white circle that the player can pick up to gain +30 health (of course you may change this if you want to make the game harder or easier!). The code to let the player pick up the health sprite looks like this. When the health sprite is picked up, then the player receives bonus health and it is moved to a new random location on the screen. Figure 8.5 shows the health sprite and the player needs it badly in this case!
    #check for collision with health
    if pygame.sprite.collide_rect_ratio(0.5)(player,health):
        player_health += 30
        if player_health > 100: player_health = 100
        health.X = random.randint(0,700)
        health.Y = random.randint(0,500)
Note
The player can move just slightly faster than the zombies, which makes the game fun. If the player moves at the same or slower speed than the zombies, then the gameplay would be frustrating. Always give your player the edge over the bad guys so they’ll keep coming back to play. Frustrating the player is a sure-fire way to make them quit playing.
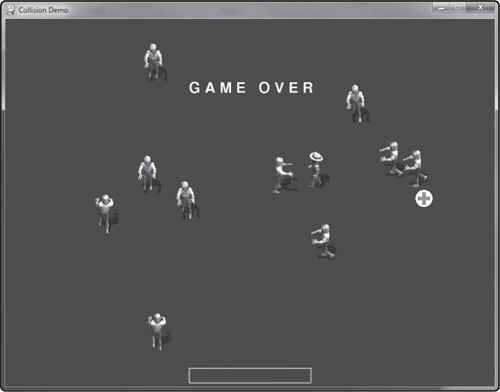
If the player gets attacked by the zombies too much and can’t get to the health powerup, then eventually the health bar runs out and the player dies. This marks the end of the game. There is no way to reset the game other than by running it again.
Here, finally, is the complete source code for The Zombie Mob Game. It’s a rather short listing considering how much gameplay this game is packing! Thanks to the MyLibrary.py file, we’ve managed to store away the reusable code and tighten up our game’s main code listing.
# Zombie Mob Game
# Chapter 8
import itertools, sys, time, random, math, pygame
from pygame.locals import *
from MyLibrary import *

def calc_velocity(direction, vel=1.0):
    velocity = Point(0,0)
    if direction == 0: #north
        velocity.y = -vel
    elif direction == 2: #east
        velocity.x = vel
    elif direction == 4: #south
        velocity.y = vel
    elif direction == 6: #west
        velocity.x = -vel
    return velocity

def reverse_direction(sprite):
    if sprite.direction == 0:
        sprite.direction = 4
    elif sprite.direction == 2:
        sprite.direction = 6
    elif sprite.direction == 4:
        sprite.direction = 0
    elif sprite.direction == 6:
        sprite.direction = 2

#main program begins
pygame.init()
screen = pygame.display.set_mode((800,600))
pygame.display.set_caption("Collision Demo")
font = pygame.font.Font(None, 36)
timer = pygame.time.Clock()

#create sprite groups
player_group = pygame.sprite.Group()
zombie_group = pygame.sprite.Group()
health_group = pygame.sprite.Group()

#create the player sprite
player = MySprite()
player.load("farmer walk.png", 96, 96, 8)
player.position = 80, 80
player.direction = 4
player_group.add(player)

#create the zombie sprite
zombie_image = pygame.image.load("zombie walk.png").convert_alpha()
for n in range(0, 10):
    zombie = MySprite()
    zombie.load("zombie walk.png", 96, 96, 8)
    zombie.position = random.randint(0,700), random.randint(0,500)
    zombie.direction = random.randint(0,3) * 2
    zombie_group.add(zombie)

#create heath sprite
health = MySprite()
health.load("health.png", 32, 32, 1)
health.position = 400,300
health_group.add(health)

game_over = False
player_moving = False
player_health = 100

#repeating loop
while True:
    timer.tick(30)
    ticks = pygame.time.get_ticks()

    for event in pygame.event.get():
        if event.type == QUIT: sys.exit()
    keys = pygame.key.get_pressed()
    if keys[K_ESCAPE]: sys.exit()
    elif keys[K_UP] or keys[K_w]:
        player.direction = 0
        player_moving = True
    elif keys[K_RIGHT] or keys[K_d]:
        player.direction = 2
        player_moving = True
    elif keys[K_DOWN] or keys[K_s]:
        player.direction = 4
        player_moving = True
    elif keys[K_LEFT] or keys[K_a]:
        player.direction = 6
        player_moving = True
    else:
        player_moving = False

    #these things should not happen when the game is over
    if not game_over:
        #set animation frames based on player’s direction
        player.first_frame = player.direction * player.columns
        player.last_frame = player.first_frame + player.columns-1
        if player.frame < player.first_frame:
            player.frame = player.first_frame

        if not player_moving:
            #stop animating when player is not pressing a key
            player.frame = player.first_frame = player.last_frame
        else:
            #move player in direction
            player.velocity = calc_velocity(player.direction, 1.5)
            player.velocity.x *= 1.5
            player.velocity.y *= 1.5

        #update player sprite
        player_group.update(ticks, 50)

        #manually move the player
        if player_moving:
            player.X += player.velocity.x
            player.Y += player.velocity.y
            if player.X < 0: player.X = 0
            elif player.X > 700: player.X = 700
            if player.Y < 0: player.Y = 0
            elif player.Y > 500: player.Y = 500

        #update zombie sprites
        zombie_group.update(ticks, 50)

        #manually iterate through all the zombies
        for z in zombie_group:
            #set the zombie’s animation range
            z.first_frame = z.direction * z.columns
            z.last_frame = z.first_frame + z.columns-1
            if z.frame < z.first_frame:
                z.frame = z.first_frame
            z.velocity = calc_velocity(z.direction)

            #keep the zombie on the screen
            z.X += z.velocity.x
            z.Y += z.velocity.y
            if z.X < 0 or z.X > 700 or z.Y < 0 or z.Y > 500:
                reverse_direction(z)


        #check for collision with zombies
        attacker = None
        attacker = pygame.sprite.spritecollideany(player, zombie_group)
        if attacker != None:
            #we got a hit, now do a more precise check
            if pygame.sprite.collide_rect_ratio(0.5)(player,attacker):
                player_health -= 10
                if attacker.X < player.X:
                    attacker.X -= 10
                elif attacker.X > player.X:
                    attacker.X += 10
            else:
                attacker = None

        #update the health drop
        health_group.update(ticks, 50)

        #check for collision with health
        if pygame.sprite.collide_rect_ratio(0.5)(player,health):
            player_health += 30
            if player_health > 100: player_health = 100
            health.X = random.randint(0,700)
            health.Y = random.randint(0,500)

    #is player dead?
    if player_health <= 0:
        game_over = True

    #clear the screen
    screen.fill((50,50,100))

    #draw sprites
    health_group.draw(screen)
    zombie_group.draw(screen)
    player_group.draw(screen)

    #draw energy bar
    pygame.draw.rect(screen, (50,150,50,180), Rect(300,570,player_health*2,25))
    pygame.draw.rect(screen, (100,200,100,180), Rect(300,570,200,25), 2)

    if game_over:
        print_text(font, 300, 100, "G A M E   O V E R")

    pygame.display.update()
That concludes our experiments in surviving the apocalypse. Sprite collision detection was also somewhat important in this chapter as well. The Zombie Mob Game was a pretty good example of several types of collision in practice. As the game code demonstrated, the response to collision events is extremely important.