This chapter explores the rather mysterious subject of arrays and the related subject of tuples that goes along with it. The two are essentially the same thing: an array when used simply like an array, and a tuple when treated like a container object with properties and methods. A list is a Python class that we will also learn to use. We will use this new knowledge to create a game with pre-defined levels.
In this chapter, you will learn to:
Define and use arrays and lists
Use a tuple as a constant array of data
Create a data-driven game
The Block Breaker Game uses the concepts presented in this chapter. As a data-driven game, it will be possible to make changes to the game level definitions which will change the appearance of those levels and affect the gameplay without changing any other lines of code. This will be a good demonstration of lists and tuples.
Since arrays are just simplified lists, we can combine these two in a single section and cover lists to encompass both. A list is a container of data—any data you want to store using normal Python variables. A list can also contain objects based on your own classes, like MySprite. In fact, a sprite group, such as pygame.sprite.Group, is just a list! So, you should already feel somewhat familiar with the subject after having used lists already. Lists are considered mutable because the elements in a list can be changed, and the list can be modified in various ways by adding, removing, searching, and sorting.
A list is created by either defining the elements all at once, or by adding elements at a later time. For example:
ages = [16, 91, 29, 38, 14, 22]
print(ages)
[16, 91, 29, 38, 14, 22]
Lists can contain other data besides integers, such as strings.
names = ["john","jane","dave","robert","andrea","susan"]
print(names)
['john', 'jane', 'dave', 'robert', 'andrea', 'susan']
We can get the data from any element in the list by index number. The element can also be changed by referencing the index number. Here, we’ll change the value in index 1, then reset it afterward.
ages[1] = 1000
print(ages[1])
1000
ages[1] = 91
New items can be added to the list with the append() method:
ages.append(100)
print(ages)
[16, 91, 29, 38, 14, 22, 100]
An element can be inserted into the middle of the list with the insert() method, which accepts an index position and a value.
ages.insert(1, 50)
print(ages)
ages.insert(1, 60)
print(ages)
[16, 50, 91, 29, 38, 14, 22, 100, 20, 20, 20]
[16, 60, 50, 91, 29, 38, 14, 22, 100, 20, 20, 20]
If there are duplicate elements in the list, they can be counted using the count() method.
ages.append(20)
ages.append(20)
ages.append(20)
print(ages)
print(ages.count(20))
[16, 91, 29, 38, 14, 22, 100, 20, 20, 20]
3
A list can be searched for the first occurrence of a specific element with the index() method. Note that a list is zero-based, so the first item is in index position zero, not one. The first occurrence of the value 20 in the list at this point is index 7 (the 8th element).
print(ages.index(20))
7
An element of the list can be removed with the remove() method. The first occurrence of the value passed will be the one removed, and just one, not all. In the code below, note that the first occurrence of 20 that was recently added is removed.
ages.remove(20)
print(ages)
[16, 60, 50, 91, 29, 38, 14, 22, 100, 20, 20]
The entire list can be reversed with the reverse() method. This has the effect of changing every element in the list. The following code shows the result when the elements in our sample list have been reversed. They are then returned to the original ordering with a duplicate call to reverse().
ages.reverse()
print(ages)
[20, 20, 100, 22, 14, 38, 29, 91, 50, 60, 16]
ages.reverse()
The elements of a list can be sorted with the sort() method. As the sample code below demonstrates, the sort order can be reversed with a call to reverse(), so a descending sort is not needed.
ages.sort()
print(ages)
ages.reverse()
print(ages)
[14, 16, 20, 20, 22, 29, 38, 50, 60, 91, 100]
[100, 91, 60, 50, 38, 29, 22, 20, 20, 16, 14]
A stack is a list with a first-in, last-out (FILO) mechanism for managing elements, where the last item added is the first item removed. A method called pop() makes it a little easier to use a list like a stack by removing the last item on the list. The usual parlance for stack programming is that elements are “pushed” onto the stack, not just added or appended, but we can use append() for the same purpose. A stack is a great tool for managing short-term memory, and it is the technique used by compilers and interpreters to read parameters passed to a function.
stack = []
for i in range(10):
    stack.append(i)
print(stack)
stack.append(10)
print(stack)
n = stack.pop()
m = stack.pop()
print(stack)
[0, 1, 2, 3, 4, 5, 6, 7, 8, 9]
[0, 1, 2, 3, 4, 5, 6, 7, 8, 9, 10]
[0, 1, 2, 3, 4, 5, 6, 7, 8]
A queue is similar to a stack in functionality, but it uses a first-in, first-out (FIFO) mechanism for managing elements, where the first item added is the first item removed. Python already has a queue module that can be used for this purpose, so we’re only simulating one with a list for illustration.
queue = []
for l in range(10):
    queue.append(l)
print(queue)
queue.append(50)
queue.append(60)
queue.append(70)
print(queue)
n = queue[0]
queue.remove(n)
print(queue)
[0, 1, 2, 3, 4, 5, 6, 7, 8, 9]
[0, 1, 2, 3, 4, 5, 6, 7, 8, 9, 50, 60, 70]
[1, 2, 3, 4, 5, 6, 7, 8, 9, 50, 60, 70]
A list can also contain lists, which is called a multi-dimensional list. A two-dimensional list might be called a grid, since the data will look like a spreadsheet. This is a common technique for storing game level data. Working with n-dimensional lists in Python can be tricky until you learn the syntax. Here is a two-dimensional list:
grid = [[1,2,3],[4,5,6],[7,8,9]]
print(grid)
[[1, 2, 3], [4, 5, 6], [7, 8, 9]]
Note the syntax for creating the list values, with brackets separated by commas. The first dimension is represented by the outer brackets. If you remove the second dimension, the list becomes:
grid = []
which is what we would expect. Adding the second dimension is a matter of syntax. To make the second dimension easier to visualize, we can use a more visually appealing form of definition:
grid = [
    [1,2,3],
    [4,5,6],
    [7,8,9]]
Python doesn’t “see” an n-dimensional list in this manner, so it is helpful only to the programmer.
To change a single element in a two-dimensional list such as this one, we have to use an index within brackets for the syntax. For example, the following prints out the first “element” of the list’s first dimension followed by the size of the element:
print(grid[0])
print(len(grid[0]))
[1, 2, 3]
3
Here is another way to display the elements in the list contained in grid[0]:
for n in grid[0]: print(n)
1
2
3
Understanding that an element can be another list helps when working with lists such as this. Just add a second pair of brackets with an index value to access the values in that inner list.
grid[0][0] = 100
grid[0][1] = 200
grid[0][2] = 300
print(grid[0])
[100, 200, 300]
The fastest way to fill a list of lists (another term for a two-dimensional list) with data is with a for loop. The following syntax can be used to fill a new list of lists with a single value:
grid = [
    [10 for col in range(10)]
        for row in range(10)]
for row in grid: print(row)
[10, 10, 10, 10, 10, 10, 10, 10, 10, 10]
[10, 10, 10, 10, 10, 10, 10, 10, 10, 10]
[10, 10, 10, 10, 10, 10, 10, 10, 10, 10]
[10, 10, 10, 10, 10, 10, 10, 10, 10, 10]
[10, 10, 10, 10, 10, 10, 10, 10, 10, 10]
[10, 10, 10, 10, 10, 10, 10, 10, 10, 10]
[10, 10, 10, 10, 10, 10, 10, 10, 10, 10]
[10, 10, 10, 10, 10, 10, 10, 10, 10, 10]
[10, 10, 10, 10, 10, 10, 10, 10, 10, 10]
[10, 10, 10, 10, 10, 10, 10, 10, 10, 10]
We can also define a whole list with a unique value for each element position. Here is a list definition for a game level with 12 columns and 10 rows:
level = [
    1,1,1,1,1,1,1,1,1,1,1,1,
    2,2,2,2,2,2,2,2,2,2,2,2,
    3,3,3,3,3,3,3,3,3,3,3,3,
    1,1,1,1,1,1,1,1,1,1,1,1,
    1,1,1,1,1,0,0,1,1,1,1,1,
    1,1,1,1,1,0,0,1,1,1,1,1,
    1,1,1,1,1,1,1,1,1,1,1,1,
    3,3,3,3,3,3,3,3,3,3,3,3,
    2,2,2,2,2,2,2,2,2,2,2,2,
    1,1,1,1,1,1,1,1,1,1,1,1]
When printing out the list, there will be no formatting of lines because this is just one long definition of data for an element that just so happens to be the level data for a game. If the elements must be lined up, then a little bit of finagling of the index has to be done with a pair of for loops. It helps to remember that the first dimension represents “Y” while the second or inner dimension represents “X,” if you want to think of the data in the list in terms of X and Y coordinates. In that case, each row will be processed first, and the elements inside each row (the columns) will be processed in order per row.
Here’s one way to do it if you wish to have some control over how the values are printed out:
for row in range(10):
    s = ""
    for col in range(12):
        s += str(level[row*10+col]) + " "
    print(s)
1 1 1 1 1 1 1 1 1 1 1 1
1 1 2 2 2 2 2 2 2 2 2 2
2 2 2 2 3 3 3 3 3 3 3 3
3 3 3 3 3 3 1 1 1 1 1 1
1 1 1 1 1 1 1 1 1 1 1 1
1 1 1 0 0 1 1 1 1 1 1 1
1 1 1 1 1 0 0 1 1 1 1 1
1 1 1 1 1 1 1 1 1 1 1 1
1 1 1 1 3 3 3 3 3 3 3 3
3 3 3 3 3 3 2 2 2 2 2 2
This rather complex formatting of the elements is necessary because this is a single-dimension list disguised as a two-dimensional one! The tip-off is the index calculation: row * 10 + col, which is based on the formula for converting an index from two dimensions into one dimension:
index = (row #) x columns + (column #)
To simplify the code and eliminate this calculation, we can just define the level data as a two-dimensional list in the definition itself:
level = [
    [1,1,1,1,1,1,1,1,1,1,1,1],
    [2,2,2,2,2,2,2,2,2,2,2,2],
    [3,3,3,3,3,3,3,3,3,3,3,3],
    [1,1,1,1,1,1,1,1,1,1,1,1],
    [1,1,1,1,1,0,0,1,1,1,1,1],
    [1,1,1,1,1,0,0,1,1,1,1,1],
    [1,1,1,1,1,1,1,1,1,1,1,1],
    [3,3,3,3,3,3,3,3,3,3,3,3],
    [2,2,2,2,2,2,2,2,2,2,2,2],
    [1,1,1,1,1,1,1,1,1,1,1,1]]
To print out (or just access the list in general), we have only to treat each row as a list within the list using a simple for loop:
for row in level: print(row)
[1, 1, 1, 1, 1, 1, 1, 1, 1, 1, 1, 1]
[2, 2, 2, 2, 2, 2, 2, 2, 2, 2, 2, 2]
[3, 3, 3, 3, 3, 3, 3, 3, 3, 3, 3, 3]
[1, 1, 1, 1, 1, 1, 1, 1, 1, 1, 1, 1]
[1, 1, 1, 1, 1, 0, 0, 1, 1, 1, 1, 1]
[1, 1, 1, 1, 1, 0, 0, 1, 1, 1, 1, 1]
[1, 1, 1, 1, 1, 1, 1, 1, 1, 1, 1, 1]
[3, 3, 3, 3, 3, 3, 3, 3, 3, 3, 3, 3]
[2, 2, 2, 2, 2, 2, 2, 2, 2, 2, 2, 2]
[1, 1, 1, 1, 1, 1, 1, 1, 1, 1, 1, 1]
A tuple is similar to a list, but it is read-only, meaning the items cannot be changed once they have been initialized in code—which makes tuples immutable. The elements in a tuple are enclosed in parentheses rather than brackets to denote the difference. Once defined, a tuple can only be replaced. Why use a tuple instead of a list? The main advantage to a tuple is that it is faster than a list. If you will not be changing the data, then use a tuple for better performance. But if you need to change data, then use a list.
The process of creating a tuple is called packing. Tuples are used often to pass complex data to and from functions and class methods. A tuple’s data can only be created once and then it is immutable. In the short example below, a tuple is created containing the values 1 through 5. Then variables a, b, c, d, and e are set to the value of each respective element in the tuple. If the code looks familiar, that’s because we’ve been using tuples fairly regularly up to this point without formally recognizing them!
tuple1 = (1,2,3,4,5)
print(tuple1)
(1, 2, 3, 4, 5)
Note that the parentheses are optional when working with a tuple, as the following code illustrates. The process of reading data out of a tuple is called “unpacking.”
a,b,c,d,e = tuple1
print(a,b,c,d,e)
1 2 3 4 5
More complex tuples can be created with code:
data = (100 for n in range(10))
for n in data: print(n)
100
100
100
100
100
100
100
100
100
100
String data can also be stored in a tuple:
names = ("john","jane","dave","robert","andrea","susan")
print(names)
('john', 'jane', 'dave', 'robert', 'andrea', 'susan')
Some methods commonly found when working with a list are also available to a tuple, but only those methods that retrieve data, not change it. Trying to change data in a tuple generates a run-time error in the Python interpreter.
print(names.index("dave"))
2
Elements in a tuple can be searched using range sequence operators such as in:
print("jane" in names)
True
print("bob" in names)
False
We can have Python return the number of elements of a specific value stored in a tuple using the count() method:
print(names.count("susan"))
1
We can also get the length of all elements in a tuple with the len() function:
print(len(names))
6
Tuples work exceptionally well as a constant array container due to its ability to search and return data quickly. The syntax will be similar to that for lists, but using parentheses rather than brackets. Here is a 2D tuple containing level data for a game:
level = (
    (1,1,1,1,1,1,1,1,1,1,1,1),
    (2,2,2,2,2,2,2,2,2,2,2,2),
    (3,3,3,3,3,3,3,3,3,3,3,3),
    (1,1,1,1,1,1,1,1,1,1,1,1),
    (1,1,1,1,1,0,0,1,1,1,1,1),
    (1,1,1,1,1,0,0,1,1,1,1,1),
    (1,1,1,1,1,1,1,1,1,1,1,1),
    (3,3,3,3,3,3,3,3,3,3,3,3),
    (2,2,2,2,2,2,2,2,2,2,2,2),
    (1,1,1,1,1,1,1,1,1,1,1,1))
Accessing the data in a 2D tuple can be done with the same code used to access a list, using a for loop or by index.
for row in level: print(row)
(1, 1, 1, 1, 1, 1, 1, 1, 1, 1, 1, 1)
(2, 2, 2, 2, 2, 2, 2, 2, 2, 2, 2, 2)
(3, 3, 3, 3, 3, 3, 3, 3, 3, 3, 3, 3)
(1, 1, 1, 1, 1, 1, 1, 1, 1, 1, 1, 1)
(1, 1, 1, 1, 1, 0, 0, 1, 1, 1, 1, 1)
(1, 1, 1, 1, 1, 0, 0, 1, 1, 1, 1, 1)
(1, 1, 1, 1, 1, 1, 1, 1, 1, 1, 1, 1)
(3, 3, 3, 3, 3, 3, 3, 3, 3, 3, 3, 3)
(2, 2, 2, 2, 2, 2, 2, 2, 2, 2, 2, 2)
(1, 1, 1, 1, 1, 1, 1, 1, 1, 1, 1, 1)
We’re going to put our new knowledge of lists and tuples to work in a game called Block Breaker. This is a traditional ball-and-paddle game where the goal is to clear all of the blocks from the playing field while keeping the ball from getting past the paddle. This is essentially “Ping Pong”-style gameplay for one player. We’re going to build the game section by section and explain it as we go rather than showing all of the source code at once. Let’s begin with the imports:
# Block Breaker Game
# Chapter 9
import sys, time, random, math, pygame
from pygame.locals import *
from MyLibrary import *
Note that MyLibrary.py is needed. We’ll be making a few changes to the library’s source code here in a bit!
There are three levels in the game now, but you are welcome to add new levels to the game or edit the ones already defined. The game code uses len(levels) when changing the game level, so you can add as many new levels as you want to the levels tuple without having to change anything in the source code dealing with level changing limits. Figure 9.2 shows the block sprite sheet image.
Figure 9.3 shows the first level of the game. It is not important to have 1’s defined in the level 1 data; that was just done to help illustrate the level this is referring to. Although the block image used for the game is treated like an animated sprite, we could have just used a simple white block and colored it when drawing it with any color value.
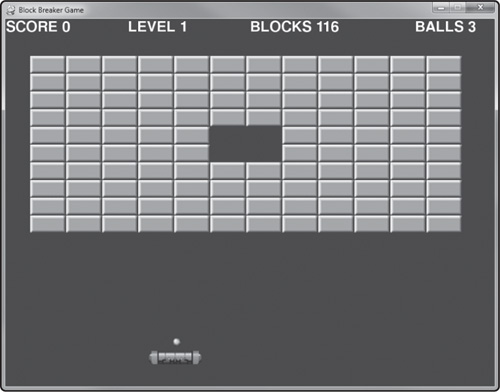
levels = (
(1,1,1,1,1,1,1,1,1,1,1,1,
 1,1,1,1,1,1,1,1,1,1,1,1,
 1,1,1,1,1,1,1,1,1,1,1,1,
 1,1,1,1,1,1,1,1,1,1,1,1,
 1,1,1,1,1,0,0,1,1,1,1,1,
 1,1,1,1,1,0,0,1,1,1,1,1,
 1,1,1,1,1,1,1,1,1,1,1,1,
 1,1,1,1,1,1,1,1,1,1,1,1,
 1,1,1,1,1,1,1,1,1,1,1,1,
 1,1,1,1,1,1,1,1,1,1,1,1),
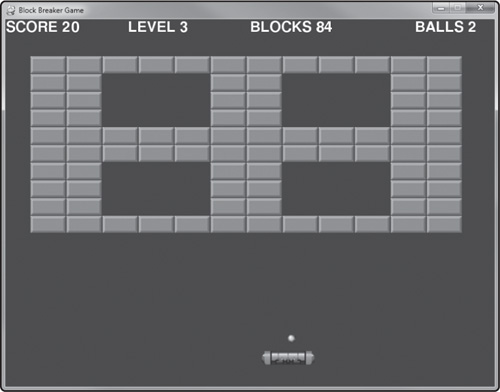
Figure 9.4 shows the second level of the game. Like the level 1 data, the 2’s found herein are only illustrative. You may change them to any value from 0 to 7, as there are 8 different blocks.
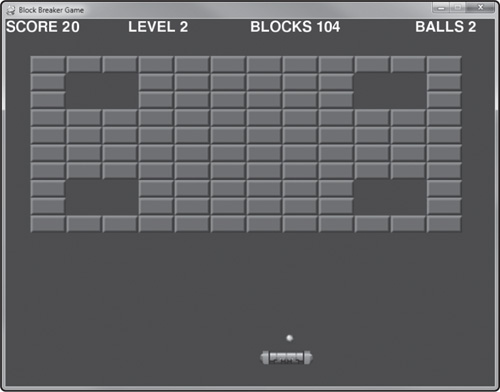
(2,2,2,2,2,2,2,2,2,2,2,2,
 2,0,0,2,2,2,2,2,2,0,0,2,
 2,0,0,2,2,2,2,2,2,0,0,2,
 2,2,2,2,2,2,2,2,2,2,2,2,
 2,2,2,2,2,2,2,2,2,2,2,2,
 2,2,2,2,2,2,2,2,2,2,2,2,
 2,2,2,2,2,2,2,2,2,2,2,2,
 2,0,0,2,2,2,2,2,2,0,0,2,
 2,0,0,2,2,2,2,2,2,0,0,2,
 2,2,2,2,2,2,2,2,2,2,2,2),
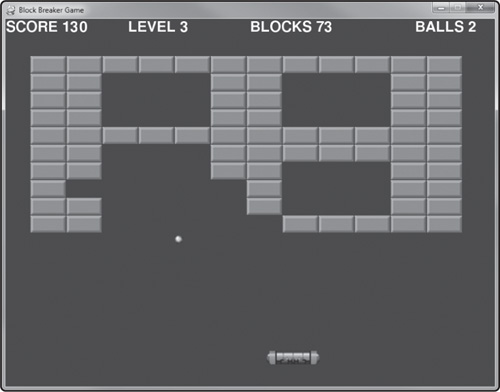
Figure 9.5 shows the third and final level of the game.
(3,3,3,3,3,3,3,3,3,3,3,3,
 3,3,0,0,0,3,3,0,0,0,3,3,
 3,3,0,0,0,3,3,0,0,0,3,3,
 3,3,0,0,0,3,3,0,0,0,3,3,
 3,3,3,3,3,3,3,3,3,3,3,3,
 3,3,3,3,3,3,3,3,3,3,3,3,
 3,3,0,0,0,3,3,0,0,0,3,3,
 3,3,0,0,0,3,3,0,0,0,3,3,
 3,3,0,0,0,3,3,0,0,0,3,3,
 3,3,3,3,3,3,3,3,3,3,3,3),
)
There are three functions in the game for working with the levels. First is goto_next_level(), which just increments the level number, makes sure it’s within the range of defined levels. Next, the update_blocks() function handles the situation when the level has been cleared. The load_level() function cycles through the level data to create a sprite group called block_group containing all of the blocks for the current level. Note the use of global variable definitions in these functions—something we have not used very much until now. The global keyword lets the function make changes to a variable which was defined elsewhere in the program.
#this function increments the level
def goto_next_level():
    global level, levels
    level += 1
    if level > len(levels)-1: level = 0
    load_level()

#this function updates the blocks in play
def update_blocks():
    global block_group, waiting
    if len(block_group) == 0: #all blocks gone?
        goto_next_level()
        waiting = True
    block_group.update(ticks, 50)

#this function sets up the blocks for the level
def load_level():
    global level, block_image, block_group, levels
    block_image = pygame.image.load("blocks.png").convert_alpha()
    block_group.empty() #reset block group
    for bx in range(0, 12):
        for by in range(0,10):
            block = MySprite()
            block.set_image(block_image, 58, 28, 4)
            x = 40 + bx * (block.frame_width+1)
            y = 60 + by * (block.frame_height+1)
            block.position = x,y
            #read blocks from level data
            num = levels[level][by*12+bx]
            block.first_frame = num-1
            block.last_frame = num-1
            if num > 0: #0 is blank
                block_group.add(block)
We have a new function in this game to manage initializing Pygame and loading game assets such as bitmap files. The code was beginning to grow by leaps and bounds and will be easier to understand and modify this way.
#this function initializes the game
def game_init():
    global screen, font, timer
    global paddle_group, block_group, ball_group
    global paddle, block_image, block, ball

    pygame.init()
    screen = pygame.display.set_mode((800,600))
    pygame.display.set_caption("Block Breaker Game")
    font = pygame.font.Font(None, 36)
    pygame.mouse.set_visible(False)
    timer = pygame.time.Clock()

    #create sprite groups
    paddle_group = pygame.sprite.Group()
    block_group = pygame.sprite.Group()
    ball_group = pygame.sprite.Group()

    #create the paddle sprite
    paddle = MySprite()
    paddle.load("paddle.png")
    paddle.position = 400, 540
    paddle_group.add(paddle)

    #create ball sprite
    ball = MySprite()
    ball.load("ball.png")
    ball.position = 400,300
    ball_group.add(ball)
The code to move the paddle taps into the keyboard and mouse events to see when the user is moving the mouse. The mouse can be used to move the paddle left or right, but some may find the game hard to play that way, so the left and right arrow keys are also supported. There is a flag called waiting that causes the ball to wait for the player to launch it. This happens when the game first starts or when the player misses the ball (and loses it). Either a mouse button or the Space key will launch the ball when the ball is in the waiting state.
#this function moves the paddle
def move_paddle():
    global movex,movey,keys,waiting
    paddle_group.update(ticks, 50)
    if keys[K_SPACE]:
        if waiting:
            waiting = False
            reset_ball()
    elif keys[K_LEFT]: paddle.velocity.x = -10.0
    elif keys[K_RIGHT]: paddle.velocity.x = 10.0
    else:
        if movex < -2: paddle.velocity.x = movex
        elif movex > 2: paddle.velocity.x = movex
        else: paddle.velocity.x = 0
    paddle.X += paddle.velocity.x
    if paddle.X < 0: paddle.X = 0
    elif paddle.X > 710: paddle.X = 710
There are two functions to manage the ball in the game. reset_ball() is a very simple function with just one line, but it is important to make this code reusable because this is where the ball’s velocity is defined. Changing the velocity in just one place—this function—is much better than digging through the code for the several instances where the velocity has to be set. The move_ball() function does quite a bit of work to make the ball move correctly. The ball needs to move based on its velocity, and also bounce off the edges of the screen. And if the ball falls down below the paddle, then one “ball” or “life” is lost, which could potentially end the game.
#this function resets the ball's velocity
def reset_ball():
    ball.velocity = Point(4.5, -7.0)

#this function moves the ball
def move_ball():
    global waiting, ball, game_over, lives
    #move the ball
    ball_group.update(ticks, 50)
    if waiting:
        ball.X = paddle.X + 40
        ball.Y = paddle.Y - 20
    ball.X += ball.velocity.x
    ball.Y += ball.velocity.y
    if ball.X < 0:
        ball.X = 0
        ball.velocity.x *= -1
    elif ball.X > 780:
        ball.X = 780
        ball.velocity.x *= -1
    if ball.Y < 0:
        ball.Y = 0
        ball.velocity.y *= -1
    elif ball.Y > 580: #missed paddle
        waiting = True
        lives -= 1
        if lives < 1: game_over = True
The collision_ball_paddle() function handles the collision between the ball and paddle. The ball does not merely bounce off of the paddle by reversing direction. Depending on where the ball hits the paddle, it will deflect away differently, as is typical for this game genre. Hitting the paddle’s left side causes the ball to swing to the left, while hitting the right side of the paddle causes the ball to swing right, regardless of the direction it was moving when it hit. This gives the player more control over the ball than just keeping it away from the bottom of the screen.
#this function test for collision between ball and paddle
def collision_ball_paddle():
    if pygame.sprite.collide_rect(ball, paddle):
        ball.velocity.y = -abs(ball.velocity.y)
        bx = ball.X + 8
        by = ball.Y + 8
        px = paddle.X + paddle.frame_width/2
        py = paddle.Y + paddle.frame_height/2
        if bx < px: #left side of paddle?
            ball.velocity.x = -abs(ball.velocity.x)
        else: #right side of paddle?
            ball.velocity.x = abs(ball.velocity.x)
The collision_ball_blocks() function handles collision detection between the ball and blocks. More importantly, this function handles collision response—that is, what happens after the collision takes place. We’re using the pygame.sprite.spritecollideany() function with the ball and block_group passed as parameters, so the ball will be tested against the whole block group. There’s some pretty good intelligence in this function that causes the ball to bounce away from the collided block based on the ball’s position at the time of collision. To that end, the center of the ball is compared with the center of the paddle. If the ball hits a block from the left or right, it deflects in X but continues in Y. If the ball hits above or below the block, it deflects in Y but continues in X. The result isn’t perfect, but offers pretty good gameplay for such a small investment of code.
#this function tests for collision between ball and blocks
def collision_ball_blocks():
    global score, block_group, ball

    hit_block = pygame.sprite.spritecollideany(ball, block_group)
    if hit_block != None:
        score += 10
        block_group.remove(hit_block)
        bx = ball.X + 8
        by = ball.Y + 8

        #hit middle of block from above or below?
        if bx > hit_block.X+5 and bx < hit_block.X + hit_block.frame_width-5:
            if by < hit_block.Y + hit_block.frame_height/2: #above?
                ball.velocity.y = -abs(ball.velocity.y)
            else: #below?
                ball.velocity.y = abs(ball.velocity.y)

        #hit left side of block?
        elif bx < hit_block.X + 5:
            ball.velocity.x = -abs(ball.velocity.x)
        #hit right side of block?
        elif bx > hit_block.X + hit_block.frame_width - 5:
            ball.velocity.x = abs(ball.velocity.x)

        #handle any other situation
        else:
            ball.velocity.y *= -1
The main source code for The Block Breaker Game includes calls to initialize the game, setting up of global variables to their initial values, and of course, the while loop. Due to the use of so many functions that have already been covered, the main code is much easier to read and modify, as I’m sure you would agree (compared to the example in previous chapters).
#main program begins
game_init()
game_over = False
waiting = True
score = 0
lives = 3
level = 0
load_level()

#repeating loop
while True:
    timer.tick(30)
    ticks = pygame.time.get_ticks()

    #handle events
    for event in pygame.event.get():
        if event.type == QUIT: sys.exit()
        elif event.type == MOUSEMOTION:
            movex,movey = event.rel
        elif event.type == MOUSEBUTTONUP:
            if waiting:
                waiting = False
                reset_ball()
        elif event.type == KEYUP:
            if event.key == K_RETURN: goto_next_level()

    #handle key presses
    keys = pygame.key.get_pressed()
    if keys[K_ESCAPE]: sys.exit()

    #do updates
    if not game_over:
        update_blocks()
        move_paddle()
        move_ball()
        collision_ball_paddle()
        collision_ball_blocks()

    #do drawing
    screen.fill((50,50,100))
    block_group.draw(screen)
    ball_group.draw(screen)
    paddle_group.draw(screen)
    print_text(font, 0, 0, "SCORE " + str(score))
    print_text(font, 200, 0, "LEVEL " + str(level+1))
    print_text(font, 400, 0, "BLOCKS " + str(len(block_group)))
    print_text(font, 670, 0, "BALLS " + str(lives))
    if game_over:
        print_text(font, 300, 380, "G A M E   O V E R")
    pygame.display.update()
Before calling it a day, there are some changes to be made to the MyLibrary.py file to accommodate some gameplay needs in this chapter project. The MySprite class gets an update to make it a little easier to use, as well as give it an important optimization that will cut down on memory usage. When the MySprite class was created, it had just a simple load() method for loading a bitmap into the master_image image. Now, we need a way to recycle an image that is shared by many sprite objects. In the case of The Block Breaker Game in this chapter, we have about 100 blocks per level. Loading the blocks.png file into every single one would be a gross waste of memory, not to mention take a bit of time to start up. So, we’ll change MySprite to support image sharing. A modification is made to load(), and a new method called set_image() is added.
    def load(self, filename, width=0, height=0, columns=1):
        self.master_image = pygame.image.load(filename).convert_alpha()
        self.set_image(self.master_image, width, height, columns)

    def set_image(self, image, width=0, height=0, columns=1):
        self.master_image = image
        if width==0 and height==0:
            self.frame_width = image.get_width()
            self.frame_height = image.get_height()
        else:
            self.frame_width = width
            self.frame_height = height
            rect = self.master_image.get_rect()
            self.last_frame = (rect.width//width)*(rect.height//height)-1
        self.rect = Rect(0,0,self.frame_width,self.frame_height)
        self.columns = columns
There’s one more change to make in MySprite. This change applies to the update() method, and is a small bug fix. The original update() method just uses timing to change animation frames. The bug occurs when the range is changed (first_frame and last_frame), without also changing the frame variable too.
  def update(self, current_time, rate=30):
        if self.last_frame > self.first_frame:
            #update animation frame number
            if current_time > self.last_time + rate:
                self.frame += 1
                if self.frame > self.last_frame:
                    self.frame = self.first_frame
                self.last_time = current_time
        else:
            self.frame = self.first_frame