1.3. Change the Port and Configure Other Server Settings
Most of the free servers listed in Section 1.2 use a nonstandard default port in order to avoid conflicts with other Web servers that may be using the standard port (80). However, if you are using the servers in standalone mode and have no other server running permanently on port 80, you will find it more convenient to use port 80. That way, you don’t have to use the port number in every URL you type in your browser. There are one or two other settings that you might want to modify as well.
Changing the port or other configuration settings is a server-specific process, so you need to read your server’s documentation for definitive instructions. However, I’ll give a quick summary of the process for three of the most popular free servers here: Tomcat, JRun, and ServletExec.
Apache Tomcat
Tomcat Port Number
With Tomcat 4, modifying the port number involves editing install_dir/conf/server.xml, changing the port attribute of the Connector element from 8080 to 80, and restarting the server. Remember that this section applies to the use of Tomcat in standalone mode on your desktop system where no other server is already running permanently on port 80. On Unix/Linux, you must have system administrator privileges to start services on port 80 or other port numbers below 1024. You probably have such privileges on your desktop machine; you do not necessarily have them on deployment servers.
The original element will look something like the following:
<Connector
  className="org.apache.catalina.connector.http.HttpConnector"
  port="8080"...
  ... />
It should change to something like the following:
<Connector
  className="org.apache.catalina.connector.http.HttpConnector"
  port="80"...
  ... />
The easiest way to find the correct entry is to search for 8080 in server.xml; there should only be one noncomment occurrence. Be sure to make a backup of server.xml before you edit it, just in case you make a mistake that prevents the server from running. Also, remember that XML is case sensitive, so for instance, you cannot replace port with Port or Connector with connector.
With Tomcat 3, you modify the same file (install_dir/conf/server.xml), but you need to use slightly different Connector elements for different minor releases of Tomcat. With version 3.2, you replace 8080 with 80 in the following Parameter element.
<Connector ...>
  <Parameter name="port" value="8080"/>
</Connector>
Again, restart the server after making the change.
Other Tomcat Settings
Besides the port, three additional Tomcat settings are important: the JAVA_HOME variable, the DOS memory settings, and the CATALINA_HOME or TOMCAT_HOME variable.
The most critical Tomcat setting is the JAVA_HOME environment variable—failing to set it properly prevents Tomcat from handling JSP pages. This variable should list the base JDK installation directory, not the bin subdirectory. For example, if you are on Windows 98/Me and installed the JDK in C:JDK1.3, you might put the following line in your autoexec.bat file.
set JAVA_HOME=C:JDK1.3
On Windows NT/2000, you would go to the Start menu and select Settings, then Control Panel, then System, then Environment. Then, you would enter the JAVA_HOME value.
On Unix/Linux, if the JDK is installed in /usr/j2sdk1_3_1 and you use the C shell, you would put the following into your.cshrc file.
setenv JAVA_HOME /usr/j2sdk1_3_1
Rather than setting the JAVA_HOME environment variable globally in the operating system, some developers prefer to edit the startup script to set it there. If you prefer this strategy, edit install_dir/bin/catalina.bat (Tomcat 4; Windows) or install_dir/bin/tomcat.bat (Tomcat 3; Windows) and change the following:
if not "%JAVA_HOME%" == "" goto gotJavaHome
echo You must set JAVA_HOME to point at ...
goto cleanup
:gotJavaHome
to:
if not "%JAVA_HOME%" == "" goto gotJavaHome
set JAVA_HOME=C:JDK1.3
:gotJavaHome
Be sure to make a backup copy of catalina.bat or tomcat.bat before making the changes. Unix/Linux users would make similar changes in catalina.sh or tomcat.sh.
If you use Windows, you may also have to change the DOS memory settings for the startup and shutdown scripts. If you get an “Out of Environment Space” error message when you start the server, you will need to right-click on install_dir/bin/startup.bat, select Properties, select Memory, and change the Initial Environment entry from Auto to 2816. Repeat the process for install_dir/bin/shutdown.bat.
In some cases, it is also helpful to set the CATALINA_HOME (Tomcat 4) or TOMCAT_HOME (Tomcat 3) environment variables. This variable identifies the Tomcat installation directory to the server. However, if you are careful to avoid copying the server startup scripts and you use only shortcuts (called “symbolic links” on Unix/Linux) instead, you are not required to set this variable. See Section 1.6 for more information on using these shortcuts.
Please note that this section describes the use of Tomcat as a standalone server for servlet and JSP development. It requires a totally different configuration to deploy Tomcat as a servlet and JSP container integrated within a regular Web server. For information on the use of Tomcat for deployment, please see http://jakarta.apache.org/tomcat/tomcat-4.0-doc/.
Allaire/Macromedia JRun
When using JRun in standalone mode (vs. integrated with a standard Web server), there are several options that you probably want to change from their default values. All can be set from the graphical JRun Management Console and/or through the JRun installation wizard.
JRun Port Number
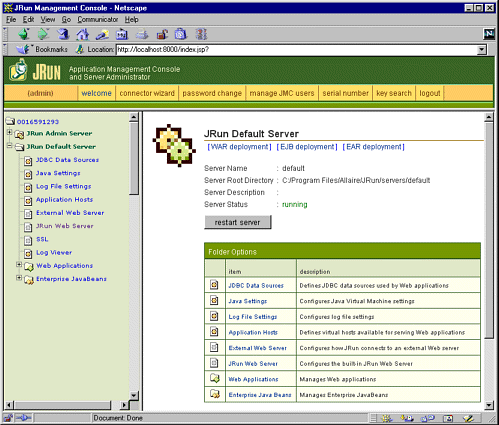
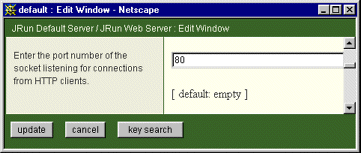
To change the JRun port, first start the JRun Admin Server by clicking on the appropriate icon (on Windows, go to the Start menu, then Programs, then JRun 3.x). Then, click on the JRun Management Console (JMC) button or enter the URL http://localhost:8000/ in a browser. Log in, using a username of admin and the password that you specified when you installed JRun, choose JRun Default Server, then select JRun Web Server. Figure 1-1 shows the result. Next, select Web Server Port, enter 80, and press Update. See Figure 1-2. Finally, select JRun Default Server again and press the Restart Server button.
Figure 1-1. JMC configuration screen for the JRun Default Server.

Figure 1-2. JRun Default Server port configuration window.

Other JRun Settings
When you install JRun, the installation wizard will ask you three questions that are particularly relevant to using JRun in standalone mode for development purposes. First, it will ask for a serial number. You can leave that blank; it is only required for deployment servers. Second, it will ask if you want to start JRun as a service. You should deselect this option; starting JRun automatically is useful for deployment but inconvenient for development because the server icon does not appear in the taskbar, thus making it harder to restart the server. The wizard clearly states that using JRun as a service should be reserved for deployment, but since the service option is selected by default, you can easily miss it. Finally, you will be asked if you want to configure an external Web server. Decline this option; you need no separate Web server when using JRun in standalone mode.
New Atlanta ServletExec
The following settings apply to use of the ServletExec Debugger 4.0, the version of ServletExec that you would use for standalone desktop development (vs. integrated with a regular Web server for deployment).
ServletExec Port Number
To change the port number from 8080 to 80, edit install_dir/StartSED40.bat and add “-port 80” to the end of the line that starts the server, as below.
%JAVA_HOME%injava ... ServletExecDebuggerMain -port 80
Remember that this section applies to the use of ServletExec in standalone mode on your desktop system where no other server is already running permanently on port 80. On Unix/Linux, you must have system administrator privileges to start services on port 80 or other port numbers below 1024. You probably have such privileges on your desktop machine; you do not necessarily have them on deployment servers.
Other ServletExec Settings
ServletExec shares two settings with Tomcat. The one required setting is the JAVA_HOME environment variable. As with Tomcat, this variable refers to the base installation directory of the JDK (not the bin subdirectory). For example, if the JDK is installed in C:JDK1.3, you should modify the JAVA_HOME entry in install_dir/StartSED40.bat to look like the following.
set JAVA_HOME=C:JDK1.3
Also as with Tomcat, if you use Windows, you may have to change the DOS memory settings for the startup script. If you get an “Out of Environment Space” error message when you start the server, you will need to right-click on install_dir/bin/StartSED40.bat, select Properties, select Memory, and change the Initial Environment entry from Auto to 2816.
