4.1. Registering Web Applications
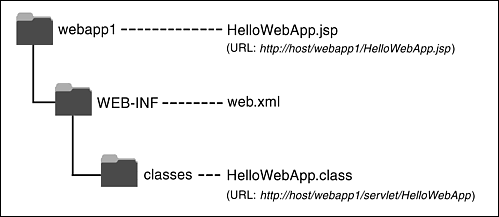
With servlets 2.2 and later (JSP 1.1 and later), Web applications are portable. Regardless of the server, you store files in the same directory structure and access them with URLs in identical formats. For example, Figure 4-1 summarizes the directory structure and URLs that would be used for a simple Web application called webapp1. This section will illustrate how to install and execute this simple Web application on different platforms.
Figure 4-1. Structure of the webapp1 Web application.
Although Web applications themselves are completely portable, the registration process is server specific. For example, to move the webapp1 application from server to server, you don’t have to modify anything inside any of the directories shown in Figure 4-1. However, the location in which the top-level directory (webapp1 in this case) is placed will vary from server to server. Similarly, you use a server-specific process to tell the system that URLs that begin with http://host/webapp1/ should apply to the Web application. In general, you will need to read your server’s documentation to get details on the registration process. I’ll present a few brief examples here, then give explicit details for Tomcat, JRun, and ServletExec in the following subsections.
My usual strategy is to build Web applications in my personal development environment and periodically copy them to various deployment directories for testing on different servers. I never place my development directory directly within a server’s deployment directory—doing so makes it hard to deploy on multiple servers, hard to develop while a Web application is executing, and hard to organize the files. I recommend you avoid this approach as well; instead, use a separate development directory and deploy by means of one of the strategies outlined in Section 1.8 (Establish a Simplified Deployment Method). The simplest approach is to keep a shortcut (Windows) or symbolic link (Unix/Linux) to the deployment directories of various servers and simply copy the entire development directory whenever you want to deploy. For example, on Windows you can use the right mouse button to drag the development folder onto the shortcut, release the button, and select Copy.
To illustrate the registration process, the iPlanet Server 6.0 provides you with two choices for creating Web applications. First, you can edit iPlanet’s web-apps.xml file (not web.xml!) and insert a web-app element with attributes dir (the directory containing the Web app files) and uri (the URL prefix that designates the Web application). Second, you can create a Web Archive (WAR) file and then use the wdeploy command-line program to deploy it. WAR files are simply JAR files that contain a Web application directory and use.war instead of.jar for file extensions. See Section 4.3 for a discussion of creating and using WAR files.
With the Resin server from Caucho, you use a web-app element within web.xml and supply app-dir (directory) and id (URL prefix) attributes. Resin even lets you use regular expressions in the id. So, for example, you can automatically give users their own Web apps that are accessed with URLs of the form http://hostname/∼username/.
With the BEA WebLogic 6 Server, you have two choices. First, you can place a directory (see Section 4.2) containing a Web application into the config/domain/applications directory, and the server will automatically assign the Web application a URL prefix that matches the directory name. Second, you can create a WAR file (see Section 4.3) and use the Web Applications entry of the Administration Console to deploy it.
Registering a Web Application with Tomcat
With Tomcat 4, creating a Web application consists simply of creating the appropriate directory structure and restarting the server. For extra control over the process, you can modify install_dir/conf/server.xml (a Tomcat-specific file) to refer to the Web application. The following steps walk you through what is required to create a Web app that is accessed by means of URLs that start with http://host/webapp1/. These examples are taken from Tomcat 4.0, but the process for Tomcat 3 is very similar.
1. |
Create a simple directory called
webapp1.
Since this is your personal development directory, it can be located at any place you find convenient. Once you have a webapp1 directory, place a simple JSP page called HelloWebApp.jsp (Listing 4.1) in it. Put a simple servlet called HelloWebApp.class (compiled from Listing 4.2) in the WEB-INF/classes subdirectory. Section 4.2 gives details on the directory structure of a Web application, but for now just note that the JSP pages, HTML documents, images, and other regular Web documents go in the top-level directory of the Web app, whereas servlets are placed in the WEB-INF/classes subdirectory. You can also use subdirectories relative to those locations, although recall that a servlet in a subdirectory must use a package name that matches the directory name. Finally, although Tomcat doesn’t actually require it, it is a good idea to include a web.xml file in the WEB-INF directory. The web.xml file, called the deployment descriptor, is completely portable across servers. We’ll see some uses for this deployment descriptor later in this chapter, and Chapter 5 (Controlling Web Application Behavior with web.xml) will discuss it in detail. For now, however, just copy the existing web.xml file from install_dir/webapps/ROOT/WEB-INF or use the version that is online under Chapter 4 of the source code archive at http://www.moreservlets.com. In fact, for purposes of testing Web application deployment, you might want to start by simply downloading the entire webapp1 directory from http://www.moreservlets.com. | |||
2. |
Copy that directory to
install_dir/webapps.
For example, suppose that you are running Tomcat version 4.0, and it is installed in C:jakarta-tomcat-4.0. You would then copy the webapp1 directory to the webapps directory, resulting in C:jakarta-tomcat-4.0webapps webapp1HelloWebApp.jsp, C:jakarta-tomcat-4.0webappswebapp1 WEB-INFclassesHelloWebApp.class, and C:jakarta-tomcat-4.0 webappswebapp1WEB-INFweb.xml. You could also wrap the directory inside a WAR file (Section 4.3) and simply drop the WAR file into C:jakarta-tomcat-4.0webapps. | |||
3. |
Optional: add a
Context
entry to
install_dir/conf/server.xml.
If you want your Web application to have a URL prefix that exactly matches the directory name and you are satisfied with the default Tomcat settings for Web applications, you can omit this step. But, if you want a bit more control over the Web app registration process, you can supply a Context element in install_dir/conf/server.xml. If you do edit server.xml, be sure to make a backup copy first; a small syntax error in server.xml can completely prevent Tomcat from running. The Context element has several possible attributes that are documented at http://jakarta.apache.org/tomcat/tomcat-4.0-doc/config/context.html. For instance, you can decide whether to use cookies or URL rewriting for session tracking, you can enable or disable servlet reloading (i.e., monitoring of classes for changes and reloading servlets whose class file changes on disk), and you can set debugging levels. However, for basic Web apps, you just need to deal with the two required attributes: path (the URL prefix) and docBase (the base installation directory of the Web application, relative to install_dir/webapps). This entry should look like the following snippet. See Listing 4.3 for more detail. <Context path="/webapp1" docBase="webapp1" /> Note that you should not use /examples as the URL prefix; Tomcat already uses that prefix for a sample Web application.
| |||
4. |
Restart the server.
I keep a shortcut to install_dir/bin/startup.bat (install_dir/bin/startup.sh on Unix) and install_dir/bin/shutdown.bat (install_dir/bin/shutdown.sh on Unix) in my development directory. I recommend you do the same. Thus, restarting the server involves simply double-clicking the shutdown link and then double-clicking the startup link. | |||
5. |
Access the JSP page and the servlet.
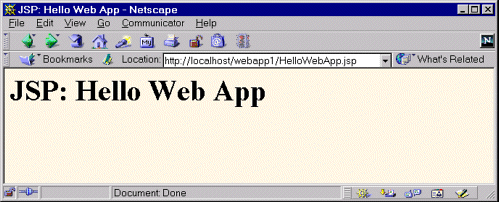
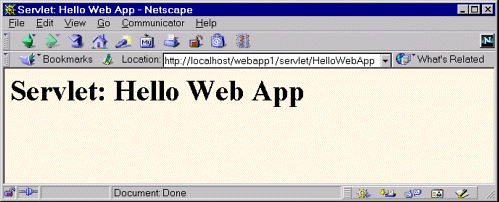
The URL http://hostname/webapp1/HelloWebApp.jsp invokes the JSP page (Figure 4-2), and http://hostname/webapp1/servlet/HelloWebApp invokes the servlet (Figure 4-3). During development, you probably use localhost for the host name. These URLs assume that you have modified the Tomcat configuration file (install_dir/conf/server.xml) to use port 80 as recommended in Chapter 1 (Server Setup and Configuration). If you haven’t made this change, use http://hostname:8080/webapp1/HelloWebApp.jsp and http://hostname:8080/webapp1/servlet/HelloWebApp. Figure 4-2. Invoking a JSP page that is in a Web application.
Figure 4-3. Invoking a servlet that is in a Web application.
|

Listing 4.1. HelloWebApp.jsp
<!DOCTYPE HTML PUBLIC "-//W3C//DTD HTML 4.0 Transitional//EN"> <HTML> <HEAD><TITLE>JSP: Hello Web App</TITLE></HEAD> <BODY BGCOLOR="#FDF5E6"> <H1>JSP: Hello Web App</H1> </BODY> </HTML> |
Listing 4.2. HelloWebApp.java
import java.io.*;
import javax.servlet.*;
import javax.servlet.http.*;

public class HelloWebApp extends HttpServlet {
  public void doGet(HttpServletRequest request,
                    HttpServletResponse response)
      throws ServletException, IOException {
    response.setContentType("text/html");
    PrintWriter out = response.getWriter();
    String docType =
      "<!DOCTYPE HTML PUBLIC "-//W3C//DTD HTML 4.0 " +
      "Transitional//EN">
";
    String title = "Servlet: Hello Web App";
    out.println(docType +
                "<HTML>
" +
                "<HEAD><TITLE>" + title + "</TITLE></HEAD>
" +
                "<BODY BGCOLOR="#FDF5E6">
" +
                "<H1>" + title + "</H1>
" +
                "</BODY></HTML>");
  }
} |
Listing 4.3. Partial server.xml for Tomcat 4
<?xml version="1.0" encoding="ISO-8859-1"?>
<Server>
  <!-- ... -->

  <!-- Having the URL prefix (path) match the actual directory
       (docBase) is a convenience, not a requirement. -->
  <Context path="/webapp1" docBase="webapp1" />
</Server> |
Registering a Web Application with JRun
Registering a Web app with JRun 3.1 involves nine simple steps. The process is nearly identical to other versions of JRun.
1. |
Create the directory.
Use the directory structure illustrated in Figure 4-1: a webapp1 directory containing HelloWebApp.jsp, WEB-INF/classes/HelloWebApp.class, and WEB-INF/web.xml. |
2. |
Copy the entire
webapp1
directory to
install_dir/servers/default.
The install_dir/servers/default directory is the standard location for Web applications in JRun. Again, I recommend that you simplify the process of copying the directory by using one of the methods described in Section 1.8 (Establish a Simplified Deployment Method). The easiest approach is to make a shortcut or symbolic link from your development directory to install_dir/servers/default and then simply copy the webapp1 directory onto the shortcut whenever you redeploy. You can also deploy using WAR files (Section 4.3). |
3. |
Start the JRun Management Console.
You can invoke the Console either by selecting JRun Management Console from the JRun menu (on Microsoft Windows, this is available by means of Start, Programs, JRun) or by opening http://hostname:8000/. Either way, the JRun Admin Server has to be running first. |
4. |
Click on JRun Default Server.
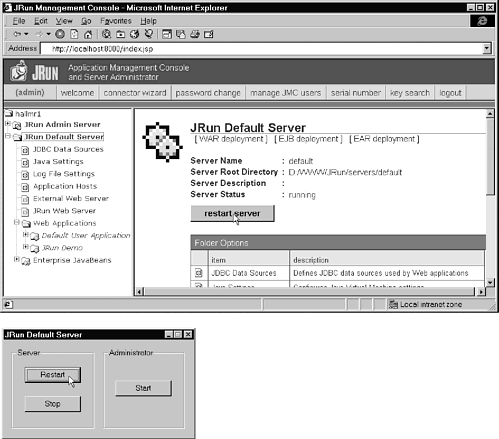
This entry is in the left-hand pane, as shown in Figure 4-4. Figure 4-4. JRun Web application setup screen.
|
5. |
Click on Web Applications.
This item is in the bottom of the list that is created when you select the default server from the previous step. Again, see Figure 4-4. |
6. |
Click on Create an Application.
This entry is in the right-hand pane that is created when you select Web Applications from the previous step. If you deploy using WAR files (see Section 4.3) instead of an unpacked directory, choose Deploy an Application instead. |
7. |
Specify the directory name and URL prefix.
To tell the system that the files are in the directory webapp1, specify webapp1 for the Application Name entry. To designate a URL prefix of /webapp1, put /webapp1 in the Application URL textfield. Note that you do not have to modify the Application Root Dir entry; that is done automatically when you enter the directory name. Press the Create button when done. See Figure 4-5. Figure 4-5. JRun Web application creation screen. You only need to fill in the Application Name and Application Root Dir entries.
|
8. |
Restart the server.
From the JRun Management Console, click on JRun Default Server and then press the Restart Server button. Assuming JRun is not running as a Windows NT or Windows 2000 service, you can also double-click the JRun Default Server icon from the taskbar and then press Restart. See Figure 4-6. Figure 4-6. You must restart JRun for a newly created Web app to take effect.
|
9. |
Access the JSP page and the servlet.
The URL http://hostname/webapp1/HelloWebApp.jsp invokes the JSP page (Figure 4-2), and http://hostname/webapp1/servlet/HelloWebApp invokes the servlet (Figure 4-3). During development, you probably use localhost for the host name. These are exactly the same URLs and results as with Tomcat and ServletExec. This approach assumes that you have modified JRun to use port 80 as recommended in Chapter 1 (Server Setup and Configuration). If you haven’t made this change, use http://hostname:8100/webapp1/HelloWebApp.jsp and http://hostname:8100/webapp1/servlet/HelloWebApp. |


Registering a Web Application with ServletExec
The process of registering Web applications is particularly simple with ServletExec 4. To make a Web app with a prefix webapp1, just create a directory called webapp1 with the structure described in the previous two subsections. Drop this directory into install_dir/webapps/default, restart the server, and access resources in the Web app with URLs that begin with http://hostname/webapp1/. You can also drop WAR files (Section 4.3) in the same directory; the name of the WAR file (minus the.war extension) automatically is used as the URL prefix.
For more control over the process or to add a Web application when the server is already running, perform the following steps. Note that, using this approach, you do not need to restart the server after registering the Web app.
1. |
Create a simple directory called
webapp1.
Use the structure summarized in Figure 4-1: place a simple JSP page called HelloWebApp.jsp (Listing 4.1) in the top-level directory and put a simple servlet called AppTest.class (compiled from Listing 4.2) in the WEB-INF/classes subdirectory. Section 4.2 gives details on the directory structure of a Web app, but for now just note that the JSP pages, HTML documents, images, and other regular Web documents go in the top-level directory of the Web app, whereas servlets are placed in the WEB-INF/classes subdirectory. You can also use subdirectories relative to those locations, although recall that a servlet in a subdirectory must use a package name that matches the directory name. Later in this chapter (and throughout Chapter 5), we’ll see uses for the web.xml file that goes in the WEB-INF directory. For now, however, you can omit this file and let ServletExec create one automatically, or you can copy a simple example from http://www.moreservlets.com. In fact, you can simply download the entire webapp1 directory from the Web site. |
2. |
Optional: copy that directory to
install_dir/webapps/default.
ServletExec allows you to store your Web application directory at any place on the system, so it is possible to simply tell ServletExec where the existing webapp1 directory is located. However, I find it convenient to keep separate development and deployment copies of my Web applications. That way, I can develop continually but only deploy periodically. Since install_dir/webapps/default is the standard location for ServletExec Web applications, that’s a good location for your deployment directories. |
3. |
Go to the ServletExec Web app management interface.
Access the ServletExec administration interface by means of the URL http://hostname and select Manage under the Web Applications heading. During development, you probably use localhost for the host name. See Figure 4-7. This assumes that you have modified ServletExec to use port 80 as recommended in Chapter 1 (Server Setup and Configuration). If you haven’t made this change, use http://hostname:8080. Figure 4-7. ServletExec interface for managing Web applications.
|
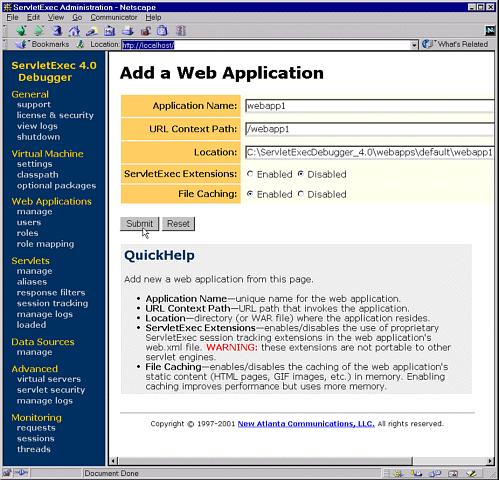
4. |
Enter the Web app name, URL prefix, and directory location.
From the previous user interface, select Add Web Application (see Figure 4-7). This results in an interface (Figure 4-8) with text fields for the Web application configuration information. It is traditional, but not required, to use the same name (e.g., webapp1) for the Web app name, the URL prefix, and the main directory that contains the Web application. Figure 4-8. ServletExec interface for adding new Web applications.
|
5. |
Add the Web application.
After entering the information from Item 4, select Add Web Application. See Figure 4-8. |
6. |
Access the JSP page and the servlet.
The URL http://hostname/webapp1/HelloWebApp.jsp invokes the JSP page (Figure 4-2), and http://hostname/webapp1/servlet/HelloWebApp invokes the servlet (Figure 4-3). During development, you probably use localhost for the host name. These are exactly the same URLs and results as with Tomcat and JRun. This assumes that you have modified ServletExec to use port 80 as recommended in Chapter 1 (Server Setup and Configuration). If you haven’t made this change, use http://hostname:8080/webapp1/HelloWebApp.jsp and http://hostname:8080/webapp1/servlet/HelloWebApp. |