10. Customizing Your Android Phone
In this chapter, you discover how to customize your Android phone to suit your needs and lifestyle. Topics include the following:
→ Using wallpapers and live wallpapers
→ Replacing the keyboard
→ Adding widgets
→ Changing sound and display settings
→ Setting region and language
Your Android phone arrives preconfigured to appeal to most buyers; however, you might want to change the way some of the features work or personalize it to fit your mood or lifestyle. Luckily, your Android phone is customizable.
Changing Your Wallpaper
Your Android phone comes preloaded with a cool wallpaper. You can install other wallpapers, use live wallpapers that animate, and even use pictures in the Photos app as your wallpaper. On most Android phones, the wallpaper you choose is used both on the Lock screen and the Home screen.
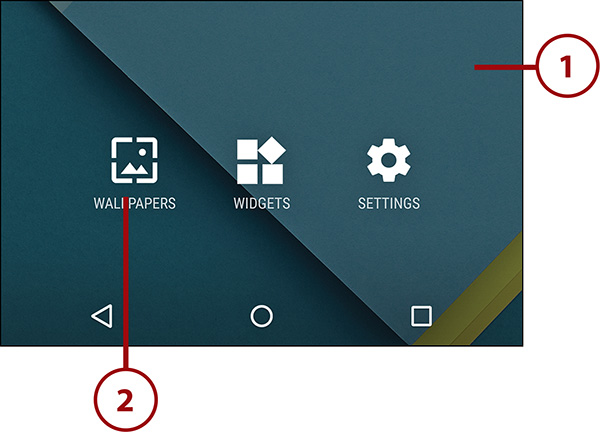
1. Touch and hold on the Home screen.
2. Tap Wallpapers. Use the steps in one of the following three sections to select your wallpaper.
Select Wallpaper from Pictures in the Photos App
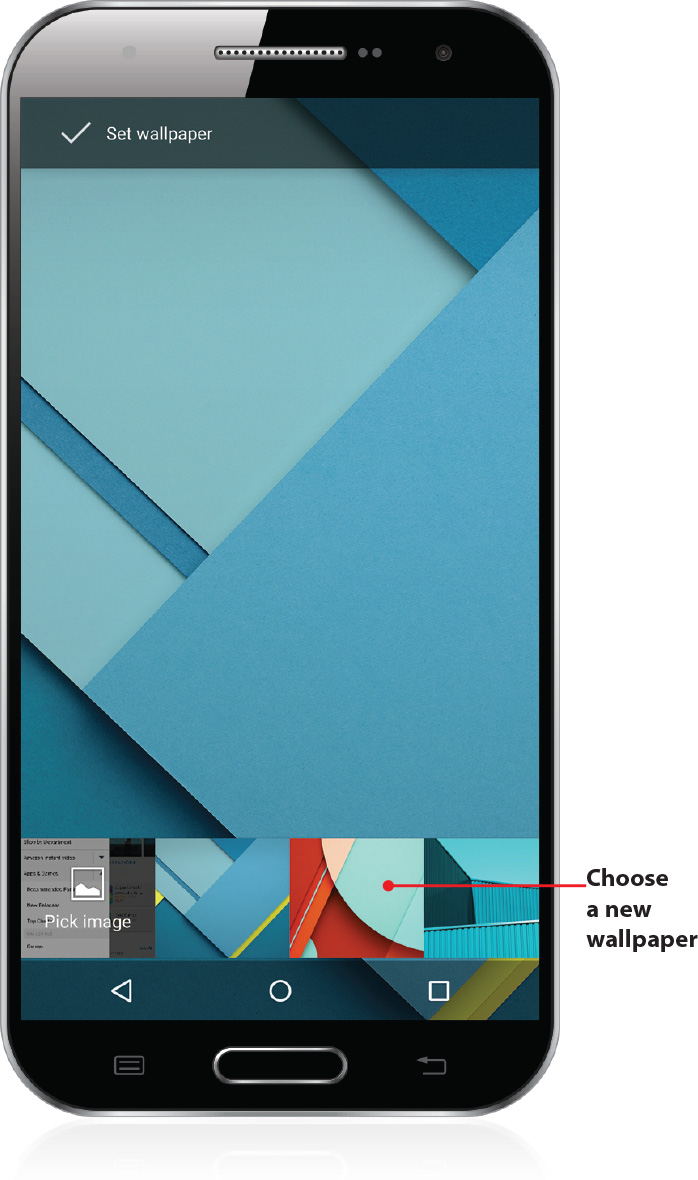
You can use any picture in your Photos app as a wallpaper.
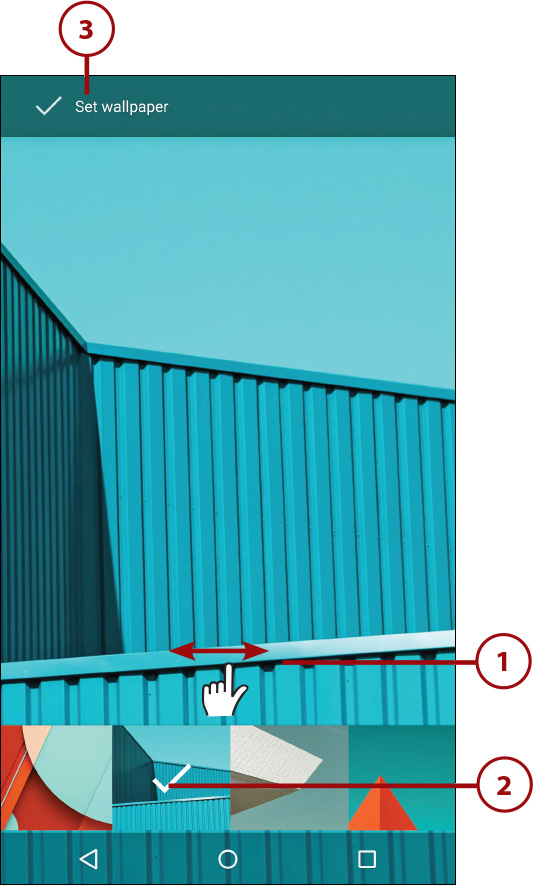
1. Tap Pick Image. If you don’t see the Pick Image box, swipe left to right over the images until it comes into view. On some phones that still use the Gallery app, this box might be labeled From Gallery.
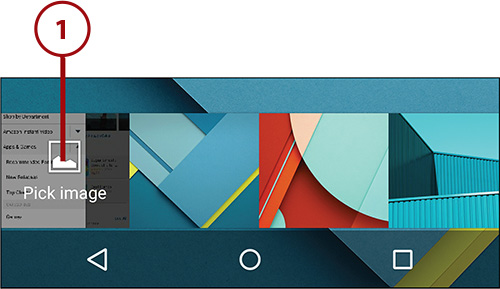
2. Select the photo you want to use as your wallpaper.

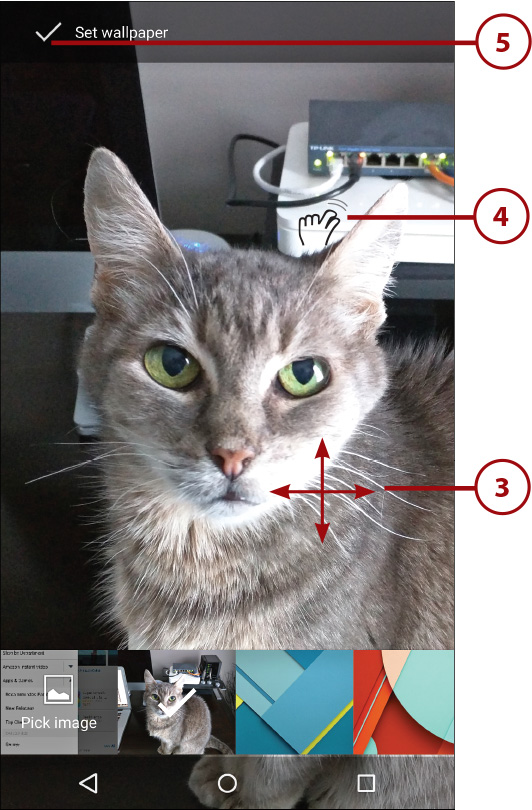
3. Move the picture around on the screen so that it is positioned the way you want it.
4. Use the pinch-to-zoom gesture to zoom in or out of the picture.
5. Tap the check mark to set the photo as the wallpaper.
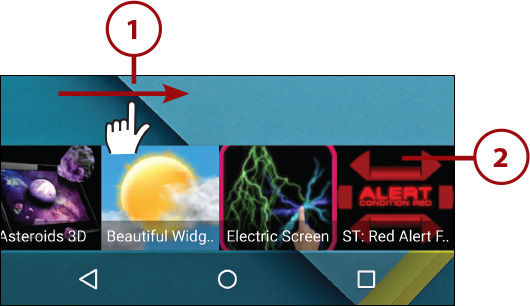
Use Live Wallpaper
Live wallpaper is wallpaper with some intelligence behind it. It can be a cool animation or even an animation that responds to things such as the music you are playing on your Android phone. Live wallpaper can also be something simple, such as the time. There are some cool live wallpapers in the Google Play Store that you can install and use, or you can stick with the selection already on your phone.
1. Swipe from right to left over the wallpaper thumbnails until you see live wallpaper thumbnails. Live wallpaper thumbnails have the wallpaper title displayed over the thumbnail.
2. Tap the live wallpaper you want to use.
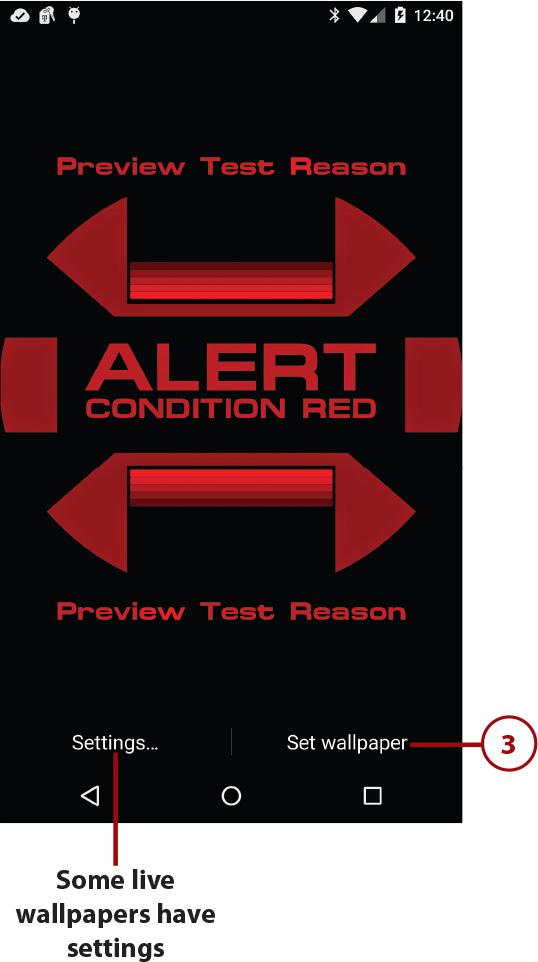
3. Tap Set Wallpaper to use the live wallpaper.
Finding More Wallpaper
You can find wallpaper or live wallpaper in the Google Play Store. Open the app using the Play Store icon and search for wallpaper or live wallpaper. Read more on how to use the Google Play Store in Chapter 9, “Working with Android Apps.”
Choose Wallpaper
Unlike images from the Photos app, wallpaper images are designed to be used as wallpaper on your phone. Your phone comes preloaded with some wallpapers, but you can install more from the Google Play Store.
1. Scroll left and right to see all the wallpapers.
2. Tap a wallpaper to preview it.
3. Tap Set Wallpaper to use the wallpaper.
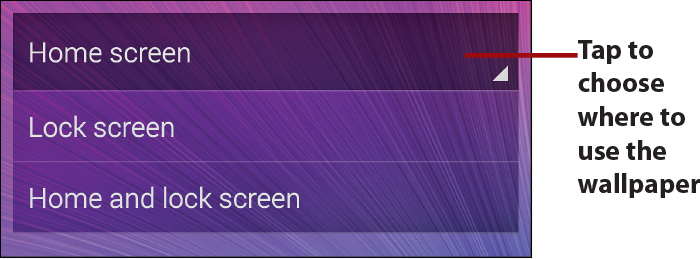
Choosing Wallpaper on the Lock Screen Versus the Home Screen
On most Android phones, when you make your wallpaper selection, it is used on the Lock screen and the Home screen. On some Android phones, such as Samsung phones, when you choose your wallpaper, you can decide whether the wallpaper you are choosing should be used on your Lock screen, Home screen, or both Lock and Home screens.
Changing Your Keyboard
If you find it hard to type on the standard Android phone keyboard, or you just want to make it look better, you can install replacement keyboards. You can download free keyboards or purchase replacement keyboards from the Google Play Store. Make sure you install a keyboard before following these steps.
Using Keyboard Setup Wizards
Most keyboards you install provide a setup wizard that walks you through the following steps, but in case the one you chose does not, you can use the following steps. You can also follow these steps to simply switch between already installed keyboards.
Choose a New Keyboard
Follow these steps to manually choose a new keyboard.
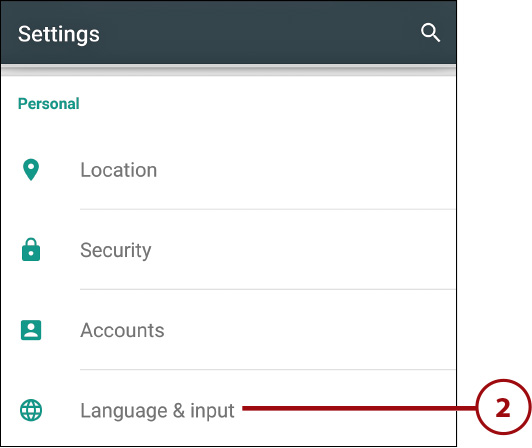
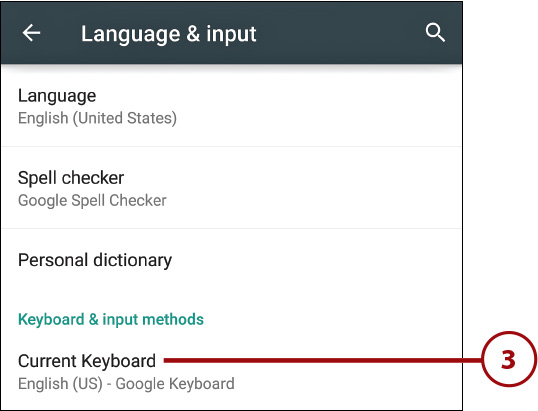
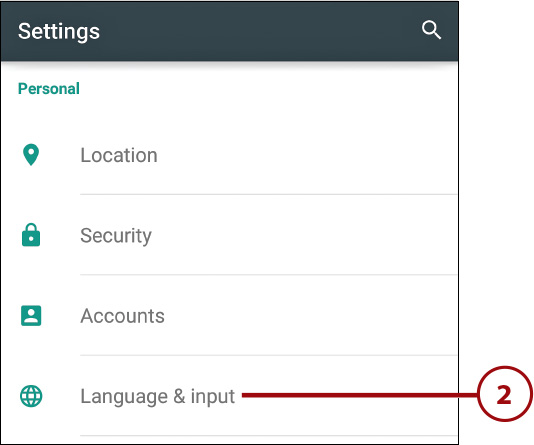
1. Tap Settings.
2. Tap Language & Input in the Personal section.
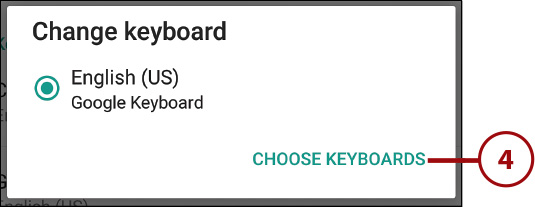
4. Tap Choose Keyboards.
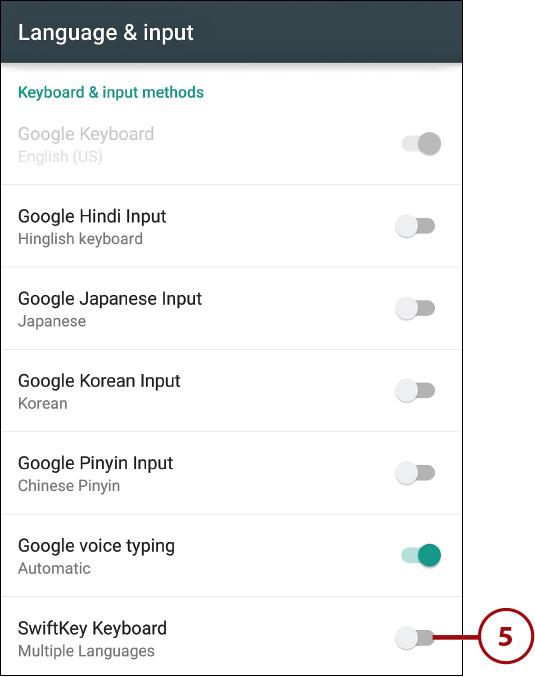
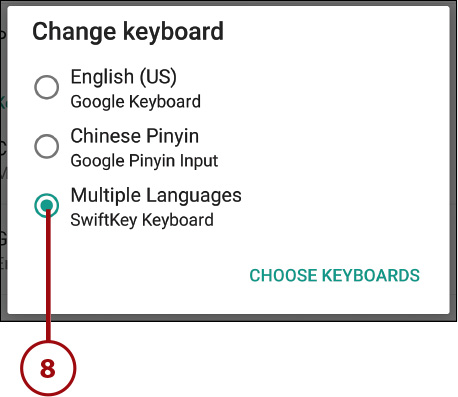
5. Tap the On/Off slider next to a keyboard you have previously installed (SwiftKey, in this case) to enable that keyboard.
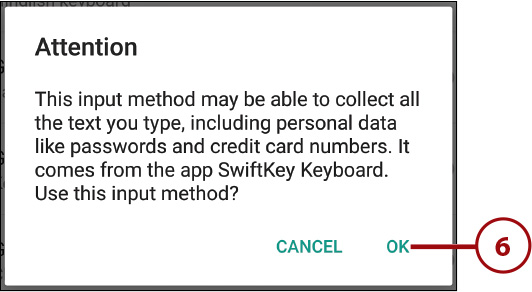
6. Tap OK to change the input method and tap the Back button to return to the previous screen.
Researching Keyboards
When you choose a different keyboard in step 5, the Android phone gives you a warning telling you that nonstandard keyboards have the potential for capturing everything you type. Do your research on any keyboards before you download and install them.
7. Tap Current Keyboard again to change the default keyboard to the one you have just enabled.
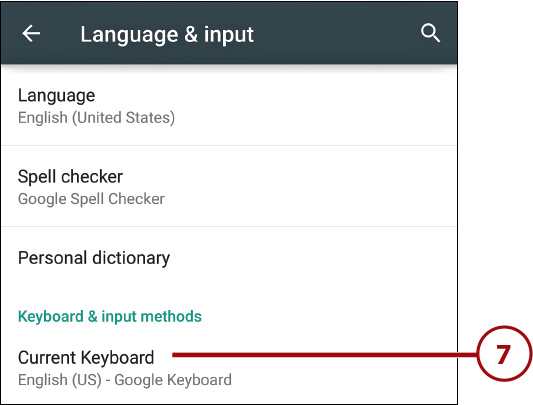
8. Tap the name of your new keyboard to select it.
What Can You Do with Your New Keyboard?
Keyboards you buy in the Google Play Store can do many things. They can change the key layout, change the color and style of the keys, offer different methods of text input, and even enable you to use a T9 predictive input keyboard that you may have become used to when using an old “dumb phone” that had only a numeric keypad.
Adding Widgets to Your Home Screens
Some apps that you install come with widgets that you can place on your Home screen. These widgets normally display real-time information, such as stocks, weather, time, and Facebook feeds. Your Android phone also comes preinstalled with some widgets. This section shows how to add and manage widgets.
Add a Widget
Your Android phone should come preinstalled with some widgets, but you might also have some extra ones that were added when you installed other apps. Here is how to add those widgets to your Home screen.
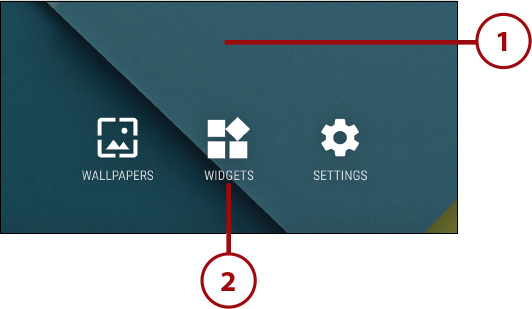
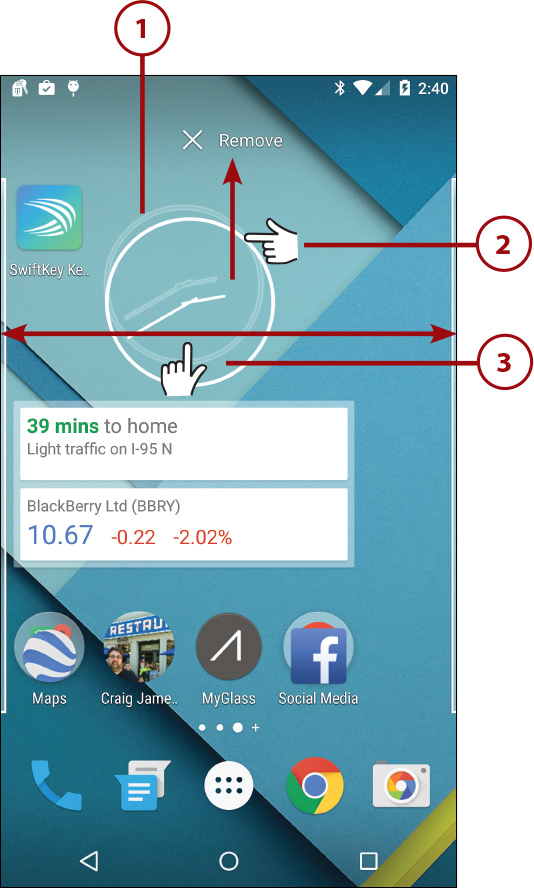
1. Touch and hold an empty area on the Home screen.
2. Tap Widgets.
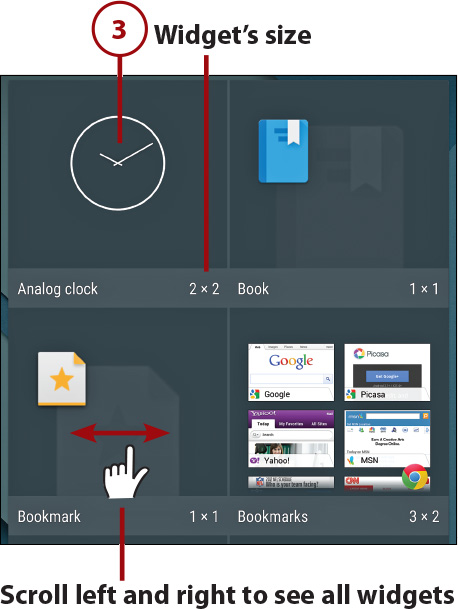
3. Touch and hold a widget to move it to the Home screen. Keep holding the widget as you move to step 4.
4. Position the widget where you want it on the Home screen.
5. Drag the widget between panes of the Home screen.
6. Release your finger to place the widget. Some widgets require extra setup, so when you release them they may prompt you for more information.
How Many Widgets Can Fit on a Home Screen Pane?
Each pane of the Home screen is divided into four blocks across and four blocks down. Notice that each widget shown in the figure for step 3 shows its size in blocks across and down. From that, you can judge whether a widget is going to fit on the Home screen pane you want it to be on, and the information also helps you position the widget in step 4. If the widget won’t fit on a Home screen pane, simply drag it onto another pane, or if all panes are full, drag the widget to the rightmost pane to create a new Home screen pane.
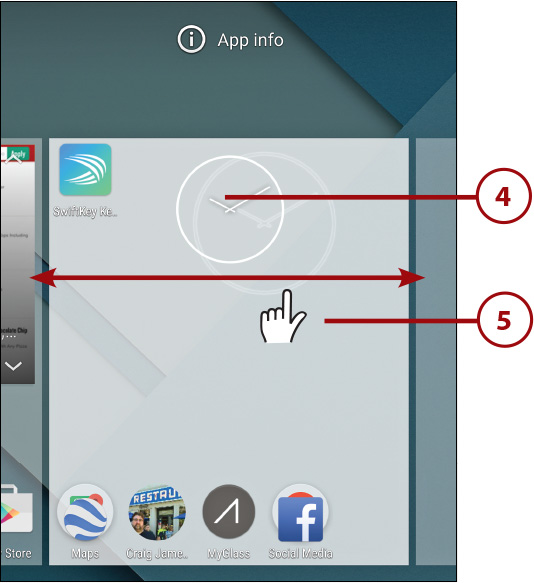
1. Touch and hold the widget until you see a faint shadow of the widget, but continue to hold the widget.
2. Drag the widget to the word Remove to remove it.
3. Drag the widget around the screen, or drag it between the Home screen panes to reposition it.
4. Release the widget.
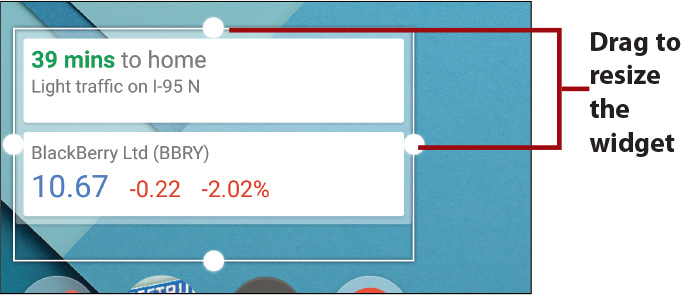
Resizing Widgets
Some widgets can be resized. To resize a widget, touch and hold the widget until you see a blue shadow and then release it. If the widget can be resized, you see the resizing borders. Drag them to resize the widget. Tap anywhere on the screen to stop resizing.
Customizing Language
If you move to another country or want to change the language used by your Android phone, you can do so with a few taps.
Choose a Different Language
Follow these steps to choose a new language on your phone.
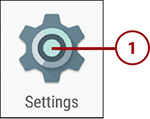
1. Tap Settings.

2. Tap Language & Input in the Personal section.
3. Tap Language.
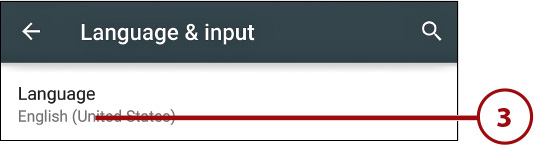
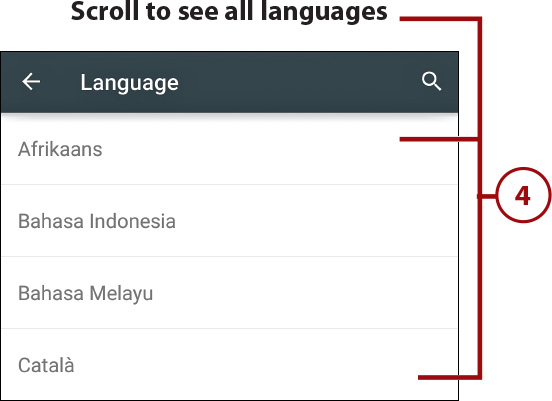
4. Tap the language you want to switch to.
Adjusting Accessibility Settings
Your Android phone includes built-in settings to assist people who might otherwise have difficulty using some features of the device. The Android phone has the capability to provide alternative feedback such as vibration, sound, and even spoken feedback.
Manage Accessibility Settings
Follow these steps to manage your Accessibility settings.
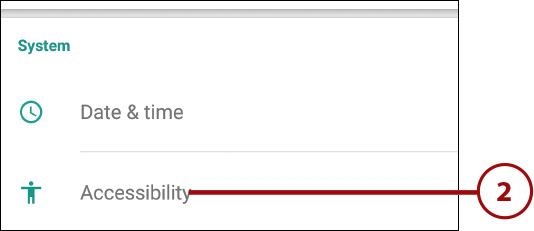
1. Tap Settings.
2. Tap Accessibility in the System section.
3. Tap to enable or disable TalkBack. When enabled, TalkBack speaks everything, including menus.
4. Tap to enable or disable Switch Access.
5. Tap to enable or disable captions and their appearance.
6. Tap to enable or disable the magnification gestures. When enabled, you can zoom any screen by triple-tapping the screen. When zoomed, you can pan around with your fingers.
7. Tap to enable or disable large text. When enabled, all text displayed appears in a larger size.
8. Tap to enable or disable High Contrast Text. This feature is experimental right now, but it makes text easier to read. For example, any white text automatically gets a black outline to make it easier to read.

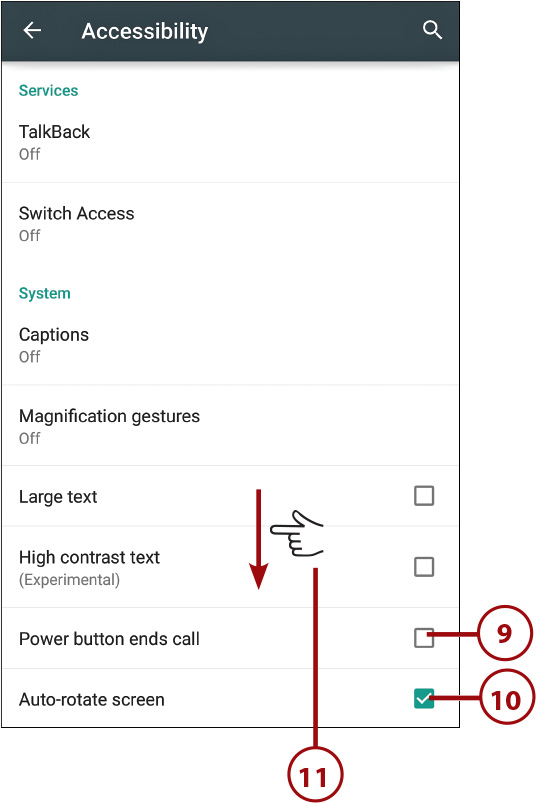
9. Tap to enable a feature that allows you to press your phone’s Power button to end calls.
10. Tap to enable automatic screen rotation. When disabled, the screen does not rotate between Portrait and Landscape modes.
11. Scroll down for more settings.
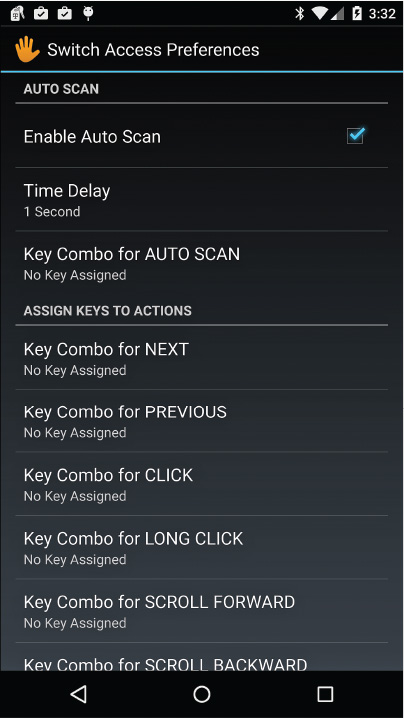
What Is Switch Access?
Switch Access is designed for people with limited mobility. After you connect your external switch hardware via Bluetooth, you can enable and configure the Switch Access feature. You can teach Android to do certain things based on switch combinations. Read more about Switch Access at https://support.google.com/accessibility/android/answer/6122836?hl=en.
12. Tap to enable or disable the feature that causes your phone to speak your passwords as you type them.
13. Tap to enable or disable a shortcut that allows you to enable accessibility features using two gestures.
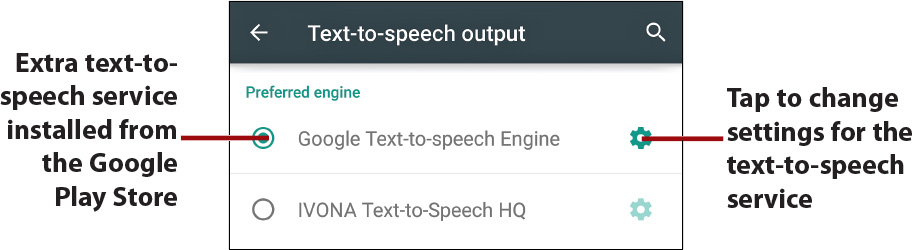
14. Tap to choose which text-to-speech service to use and what language it uses. If you don’t want to use the Google service, you first need to install additional text-to-speech apps from the Google Play Store before attempting to select them here.
15. Tap to change how long you have to hold when you perform a touch and hold on the screen.
16. Tap to enable color inversion. When enabled, your phone uses the negative of each color, which can help people with vision disabilities.
17. Tap to enable or disable color space correction for color blindness. After enabling this feature, you can choose the color blindness correction mode to use.
18. Tap to save your settings and return to the previous screen.

By default, your Android phone uses the Google Text-to-Speech service to speak any text that you need to read. You can install other text-to-speech software by searching for it in the Google Play Store. When it’s installed, it shows as a choice for text-to-speech output.
Modifying Sound and Notification Settings
You can change the volume for games, ringtones, and alarms; change the default ringtone and notification sound; and control what system sounds are used.
Modify Sound and Notification Settings
Follow these steps to manage your sound and notification settings.
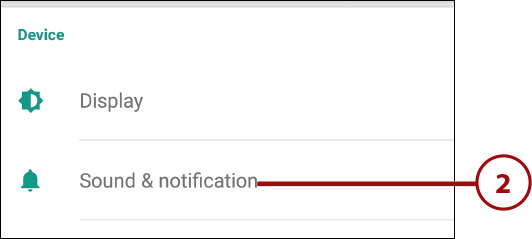
1. Tap Settings.
2. Tap Sound & Notification in the Device section.
3. Move the slider to adjust the volume for games and media, such as videos and music.
4. Move the slider to adjust the volume for alarms.
5. Move the slider to adjust the volume of the ringtone that plays when you receive incoming calls.
6. Tap to vibrate your phone when there is an incoming call, in addition to playing the ringtone.
7. Tap to manage your interruptions from notifications like messages, calls, and events, and whether you always want to be notified or only during specific hours.
8. Tap to choose what ringtone plays when you receive incoming calls.
9. Tap to choose the default ringtone that plays when you receive a new notification.
10. Tap to manage whether to play sounds when you lock your phone or if you want your phone to play the dialpad keys sounds when using the phone. You can also choose whether you want it to play a sound when you touch the screen or vibrate when you touch it.
11. Scroll down for Notification settings.

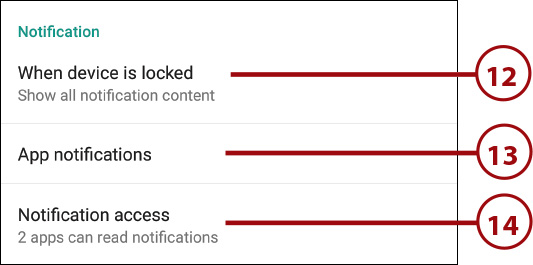
12. Tap to manage whether notifications are displayed on the Lock screen.
13. Tap to manage whether notifications are displayed on a per-app basis, and choose whether an app can send notifications when your phone is set to receive priority notifications only.
14. Tap to manage which apps have access to the notifications. Some apps may need to have access to notifications so they can pass them along to external devices like smartwatches.
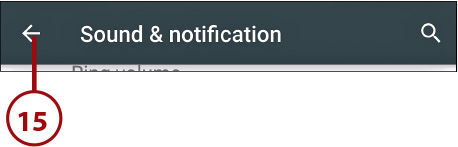
15. Tap to save your changes and return to the previous screen.
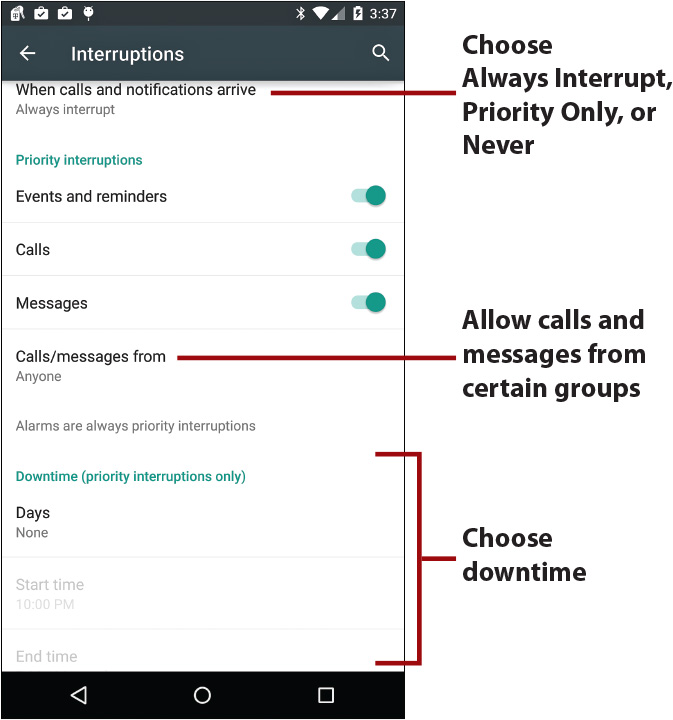
You can manage how you are interrupted by notifications by tapping When Calls and Notifications Arrive and choosing either Always Interrupt, Priority Only, or Never. This enables you to manually set when you are notified. If you choose Priority Only, you can choose what types of notifications you want to receive and even who you want to receive calls from. Finally, you can set your downtime, which is normally while you are asleep. When you set your downtime, your phone automatically switches to receiving only priority notifications during that time. This is great for when you go to sleep at night; your phone will silence all notifications except for calls from certain people and messages, events, and reminders if you have them enabled.
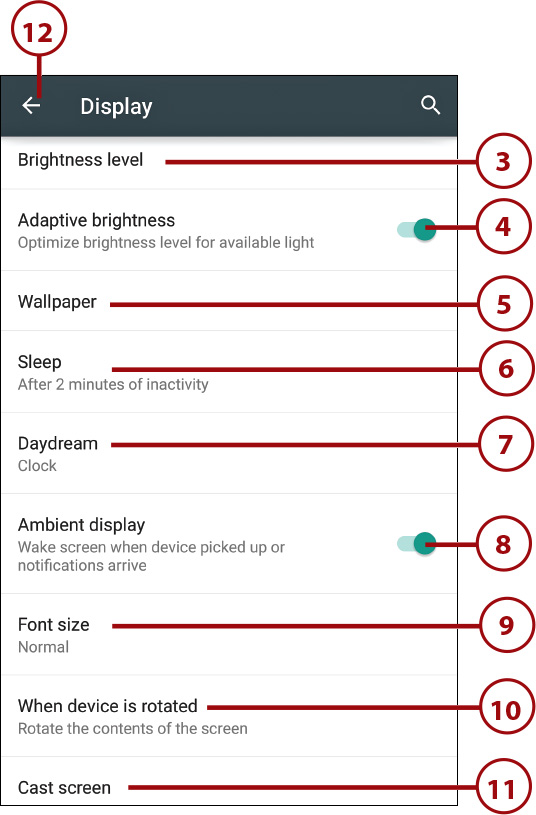
Changing Display Settings
You can change the screen brightness or set it to automatic, change the wallpaper, change how long to wait before your Android phone goes to sleep, change the size of the font used, and change whether to use the Pulse notification light.
2. Tap Display in the Device section.

3. Tap to manually change the screen brightness.
4. Tap to enable adaptive brightness. When enabled, your Android phone uses the built-in light sensor to adjust the brightness based on the light levels in the room.
5. Tap to change the wallpaper. See more about how to change the wallpaper earlier in this chapter.
6. Tap to choose how many minutes of inactivity must pass before your Android phone puts the screen to sleep.
7. Tap to enable Daydream mode and choose what happens when your phone daydreams. It can show the clock, cycle through colors, or show pictures from the Photos app.
8. Tap to enable or disable Ambient Display. When enabled, your phone shows a dimly lit monochrome screen when new notifications arrive, or when you pick it up and there are waiting notifications.
9. Tap to choose the font size of all text used.
10. Tap to choose whether the contents of the screen rotate when you rotate your phone.
11. Tap to use Miracast to mirror your phone’s screen on a TV or other device that has the Chromecast dongle or Nexus Player attached.
12. Tap to save your changes and return to the previous screen.
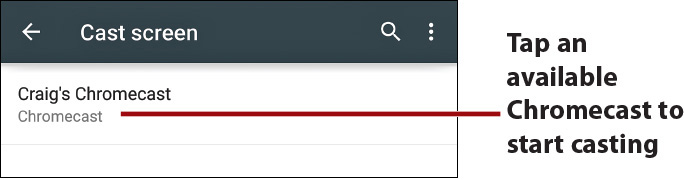
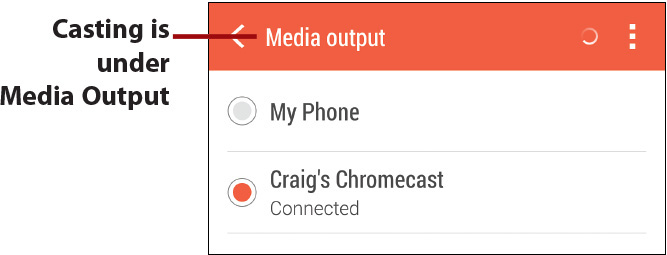
If you own a Google Chromecast or a Google Nexus Player (or are in an area where there is a Chromecast or Nexus Player), then you can use the Cast Screen feature to mirror your phone’s screen on the TV. Your phone must be on the same Wi-Fi network as the Chromecast or Nexus Player for this feature to work. On some devices—such as those from HTC—the Cast Screen section is under Settings, Wireless & Networks, Media Output. On some devices—such as those from Samsung—Cast Screen sometimes doesn’t work.
Changing Security Settings
The security of the data on your phone is important. You may opt to set a device lock password or even encrypt the data that resides on your phone.
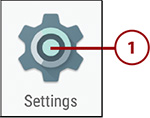
1. Tap Settings.
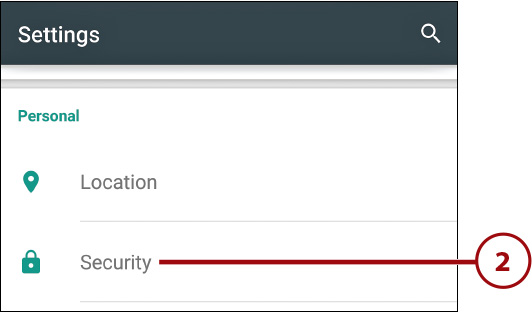
2. Tap Security in the Personal section.
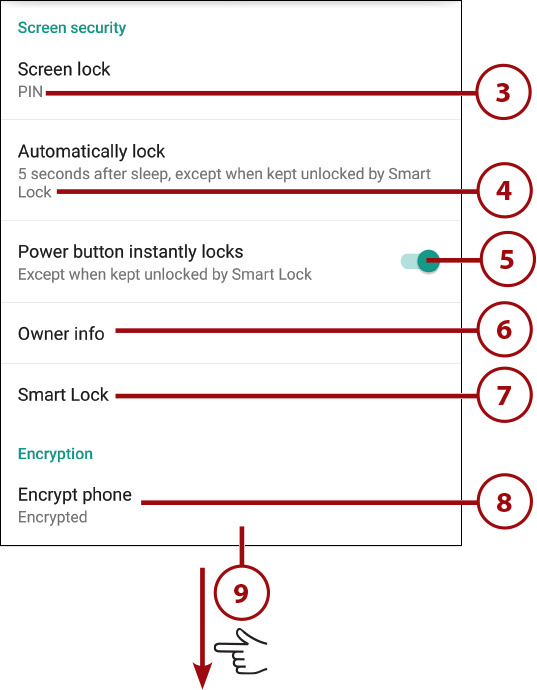
3. Tap to set how your phone is unlocked. Your can choose Swipe (which simply requires that you swipe across the screen), Pattern Lock (which uses an onscreen pattern instead of a passcode), PIN (which is a numeric passcode), or Password (which is a password made up of all types of characters).
4. Tap to choose how long after your phone goes to sleep (when the screen goes blank) it will lock.
5. Tap to choose whether pressing the Power button immediately locks your phone.
6. Tap to choose whether you want your owner information displayed on your phone’s Lock screen, and what information to show.
7. Tap to enable and manage the Smart Lock feature that allows you to keep your phone unlocked when it detects a particular Bluetooth or NFC device, when it detects that it is in a specific location, or when it sees your face.
8. Tap to encrypt the data on your phone. When you encrypt, unless you have a Samsung phone, the encryption is irreversible. After your phone’s data is encrypted, any time you power down your phone and power it up again, you need to enter a decryption passcode.
9. Scroll down for more settings.
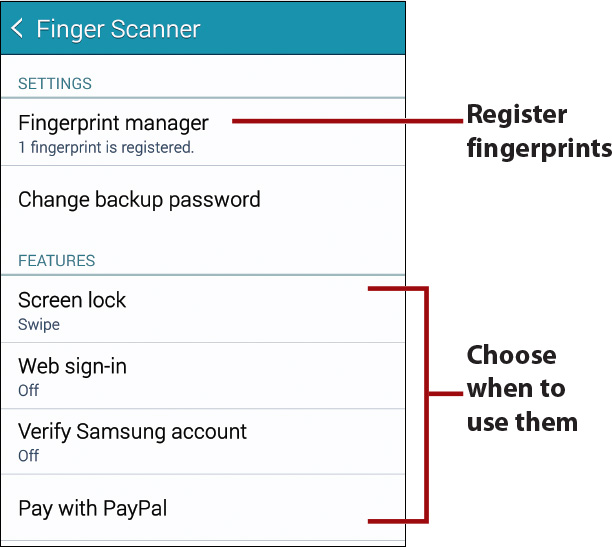
Some Android phones, such as those sold by Samsung, include a physical fingerprint reader. You can register one or more fingerprints and then choose to use them to unlock your phone, pay for things on PayPal, and log in to websites instead of typing unlock codes or login names and passwords.
10. Tap to set or manage a lock on your phone’s SIM card. Use this if you want to lock the SIM card in case it is ever stolen out of your phone.
11. Tap to make passwords visible onscreen as you type them.
12. Tap to manage device administrators.
13. Tap to allow your phone to accept apps not found in the Google Play Store.
14. Scroll down for more settings.
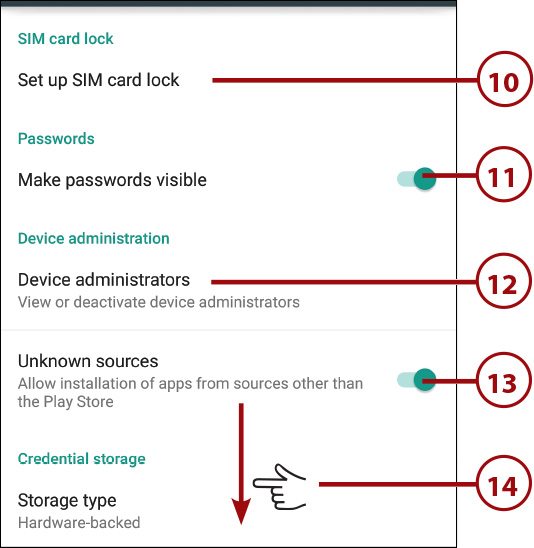
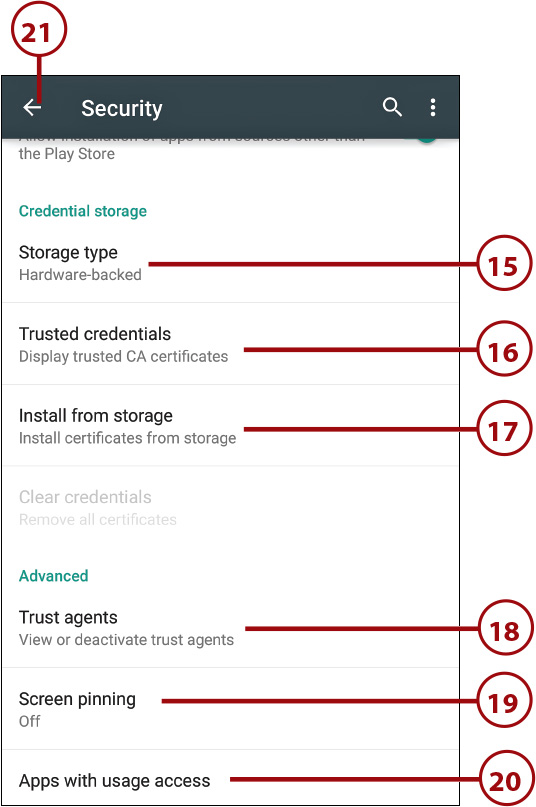
15. The Storage Type item is strictly informational. It indicates whether your phone supports storing your private encryption keys in the hardware (hardware-backed) or in software only.
16. Trusted Credentials allows you to view and select or deselect Trusted Credentials that the Android system uses, and the ones you may be using.
17. Tap to install certificates from your phone’s storage. This assumes you previously saved the certificate to storage.
18. Tap to enable or disable Trust Agents. Today, there is only one Trust Agent called Smart Lock, but in the future there could be other options created by other software vendors.
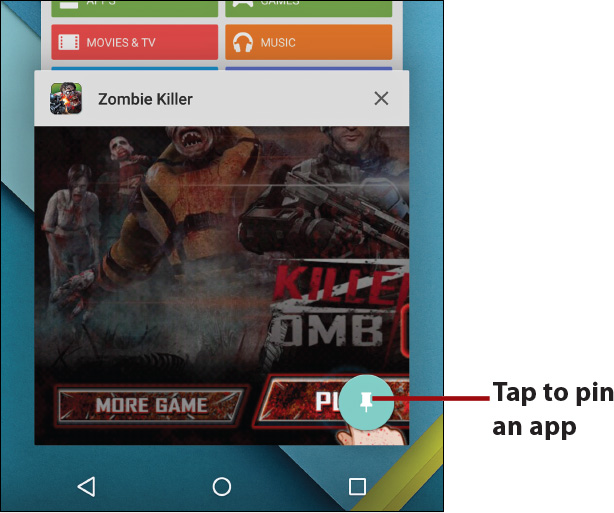
19. Tap to enable or disable Screen Pinning, which allows you to “pin” an app so that the person using it cannot exit the app.
20. Tap to manage which apps running on your phone are allowed to collect app usage information about all apps you have installed. This usage information includes how often each app is run, how long it sits in the foreground (active on your screen), and how long it sits in the background (still running but not visible).
21. Tap to save your changes and return to the main Settings screen.
What Is a Device Administrator?
Device administrators are apps that you have given permission to administer your phone. One of the device administrators is the Android Device Manager. This enables you to log in to www.google.com/android/devicemanager on a desktop computer and reset your device password or erase all your device’s data if it has been stolen. If you enroll your phone in your company’s Enterprise Mobile Management (EMM) system, like those made by AirWatch or MobileIron, those systems also add a device administrator.
>>>Go Further: Understanding Smart Lock