
11. Google Wallet
In this chapter, you find out how to set up Google Wallet on your phone. Topics include the following:
Your Android phone has a built-in Near Field Communications (NFC) radio, which, among other things, enables you to pay for things such as groceries by holding your phone close to the reader at the checkout counter. Currently in the United States you can use Google Wallet to pay for anything in stores where MasterCard® PayPass™ is accepted.
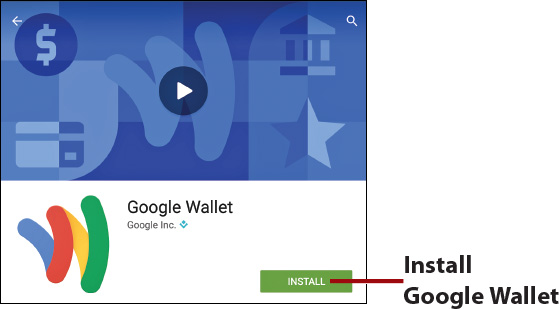
Downloading Google Wallet
Your Android phone might not come preinstalled with Google Wallet. If it isn’t, search for Google Wallet in the Google Play Store and install it. See Chapter 9, “Working with Android Apps,” for more information on installing Android apps.
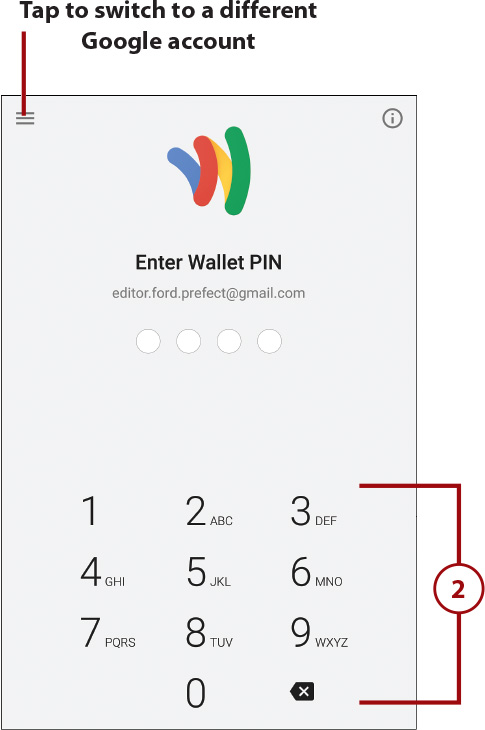
Setting Up Google Wallet
Before using Google Wallet on your phone, you need to set a PIN to secure it.
1. Tap to launch Google Wallet. Google Wallet launches and starts the setup using the primary Google account on your phone.
2. Type a four-digit PIN to secure the Google Wallet app on your phone. After typing a four-digit PIN, the screen automatically advances.
Adding Methods of Payment
Before you can use Google Wallet to wirelessly pay for items at the checkout counter, you need to set it up and select methods of payment. You may have already set up payment methods in Google Wallet if you have purchased items in the Google Play Store. If you have, those payment methods are already available in the Google Wallet app.
Add a Credit Card or Checking Account
Perform these steps from the main Google Wallet screen to add a credit card or debit card as a method of payment.
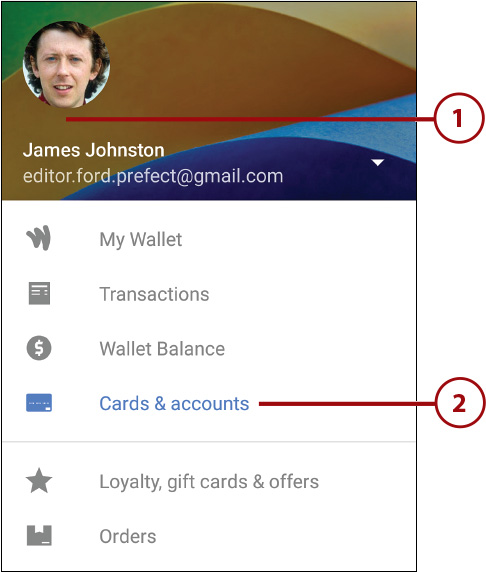
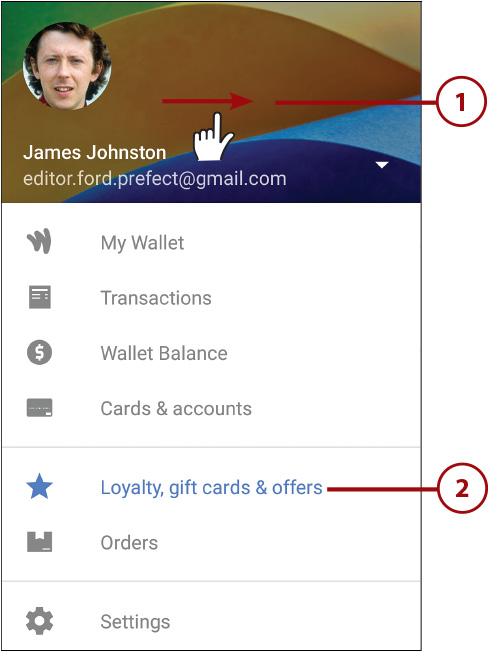
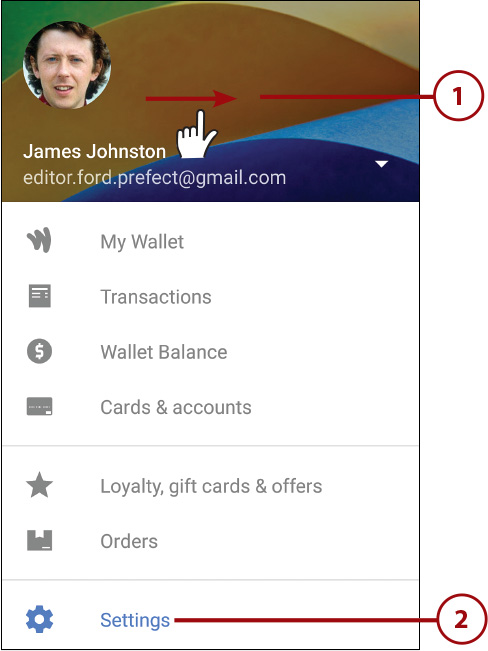
1. Swipe in from the left of the screen.
2. Tap Cards & Accounts.
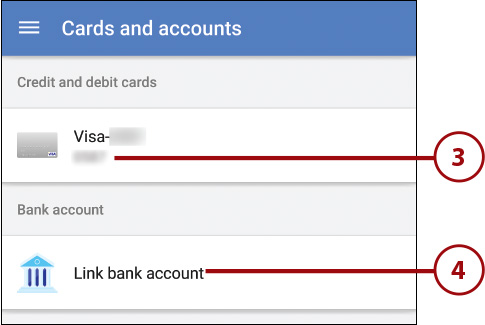
3. Tap an existing payment method to edit it.
4. Tap to link a checking account to your Google Wallet.
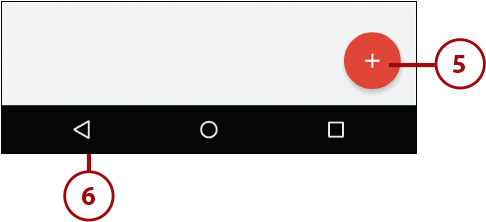
5. Tap to add a new credit or debit card to your Google Wallet.
6. Tap to save your payment methods and return to the main Google Wallet screen.
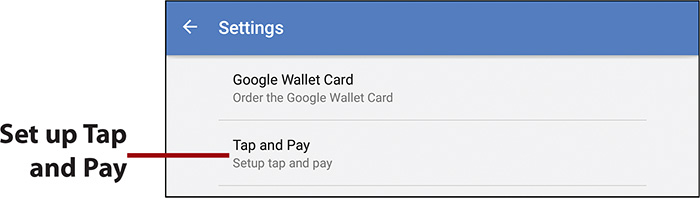
Now that you have added your credit, debit, and checking accounts as methods of payment, you need to set up Tap and Pay, which makes it possible for you to tap your phone at the checkout to pay for items. To enable Tap and Pay, swipe in from the left of the screen and tap Settings. Select Tap and Pay. Google Wallet does one last check on your payment methods and then you’re set. See the “Using Google Wallet” section later in the chapter to learn how to use Tap and Pay.
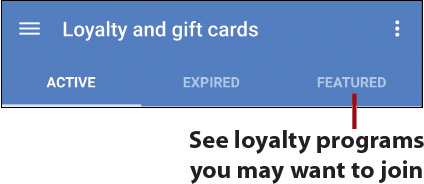
Using Loyalty and Gift Cards
Instead of carrying around your loyalty and gift cards, you can add them to Google Wallet. After a card is in Google Wallet, you can bring up the card at the checkout counter and the cashier can scan the onscreen bar code.
Add an Existing Gift Card
When you add gift cards to Google Wallet, you take pictures of the front and back of your gift cards, enter the merchant information, and enter your balance. This enables you to leave the physical cards at home. When a gift card is added, you get notifications when you are near a location where you can use it.
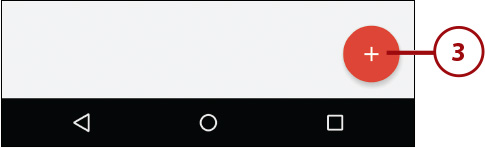
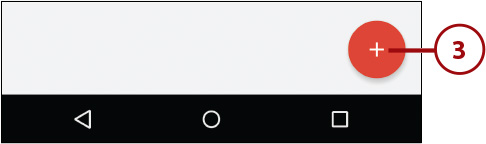
1. Swipe in from the left of the screen.
2. Tap Loyalty, Gift Cards & Offers.

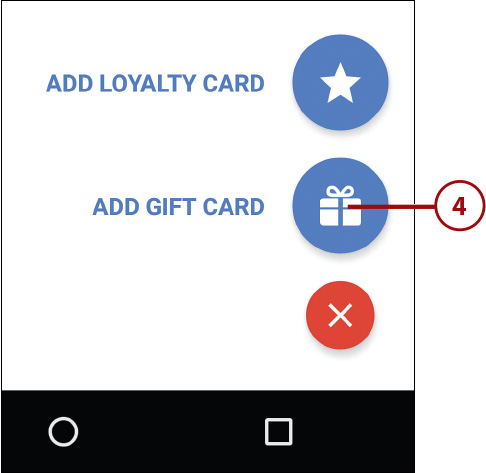
3. Tap the plus symbol to add cards.

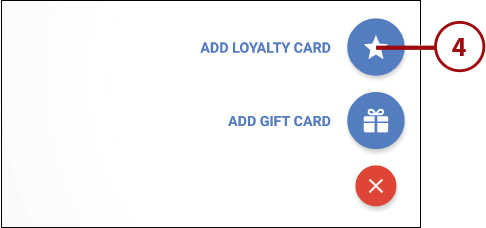
4. Tap Add Gift Card to add a new gift card. Google Wallet walks you through the steps of taking a picture of the front and back of the gift card, typing in your current balance, entering the merchant name, and entering your gift card account number.
Using Gift Cards
To use your gift cards, open Google Wallet and open Loyalty, Gift Cards & Offers. Tap a gift card to use. Google Wallet sets the brightness level on the screen very high and displays the card information—including a bar code for the account number—so that the store clerk can scan the bar code. If that option is not available, the clerk can simply read the information about your gift card on the screen.
Add an Existing Loyalty Card
You can add your store loyalty cards to Google Wallet so that you can use them at the store without having to carry around the actual physical reward card. After you add a loyalty program card, you can be alerted when you are near a location where the card can be used, and in some cases your points balance can be automatically updated in Google Wallet.
1. Swipe in from the left of the screen.
2. Tap Loyalty, Gift Cards & Offers.
3. Tap the plus symbol.
4. Tap Add Loyalty Card.
5. Take a photo of the back of your loyalty card. The screen automatically advances after you align the camera angle and position so that the card is directly below and the edges are close to the corners of the photo area. Each edge turns blue when the card is correctly aligned.
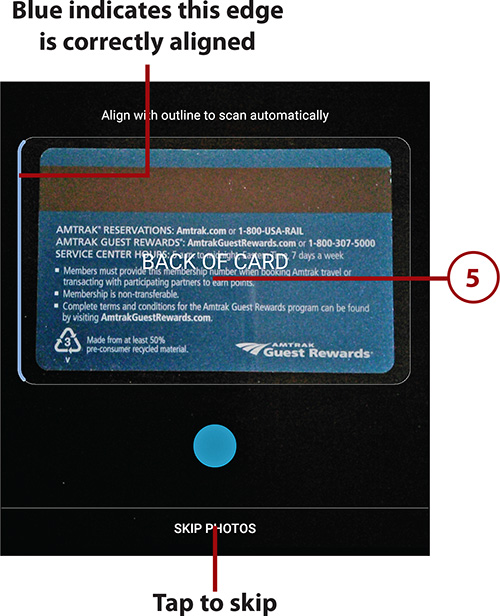
Why Skip the Card Photos?
Although it is good to have photos of the front and back of your loyalty card, it is not required, and this is why you can tap Skip Photos. The one required piece of information is your loyalty card number.
6. Take a photo of the front of your loyalty card. The screen automatically advances after you align the camera angle and position so that the card is directly below and the edges are close to the corners of the photo area. Each edge turns blue when the card is correctly aligned.
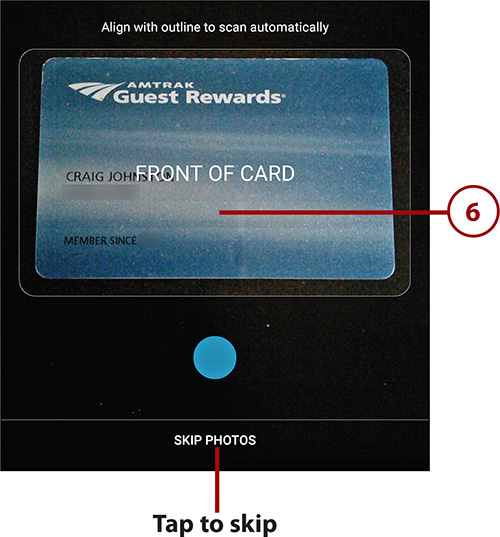
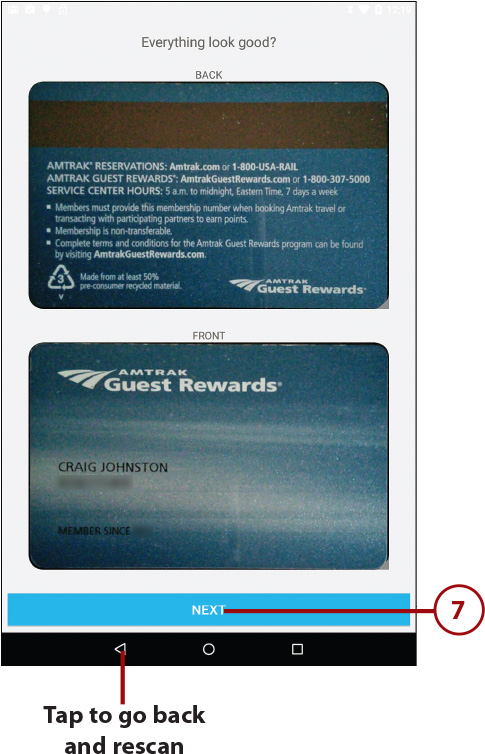
7. Tap Next to continue if the captured front and back of your loyalty card look good; otherwise, tap the Back button to take another photo of the card.
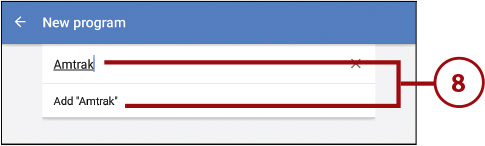
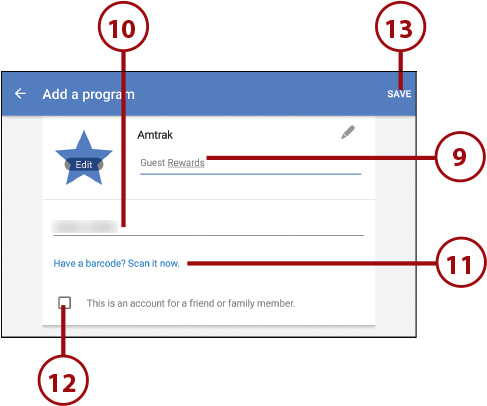
8. Start typing the name of the company that the loyalty program is with. When you see the company’s name in the list, tap the name to add it. The screen automatically advances. This example uses an Amtrak Guest Rewards card, so the company is Amtrak.
9. Enter the name of the loyalty program if it hasn’t been automatically filled in for you. This example uses the Amtrak Guest Rewards program, so type Guest Rewards.
10. Enter your loyalty program account number.
11. Tap if there is a barcode on your loyalty card. When you scan the barcode, the account number is automatically filled in.
12. Check this box if the loyalty card you are adding belongs to someone else.
13. Tap to save your loyalty card.
Using Google Wallet
After you have Google Wallet set up on your Android phone, you can use it to pay for items at the checkout counter.
1. First make sure that you can use Google Wallet at the checkout counter by looking for the symbols shown in the figure.

2. When it is time to pay, press the Power button on the side of your phone to wake it up. Some phones do not require that you first press the Power button to wake them up; these phones wake up when they detect the signal from the reader when you perform step 3.
3. Tap your phone on the reader that has the symbols shown in the figure for step 1.
4. You might be prompted to enter your Google Wallet PIN.
5. Remove your phone from the reader after you hear the confirmation tone.
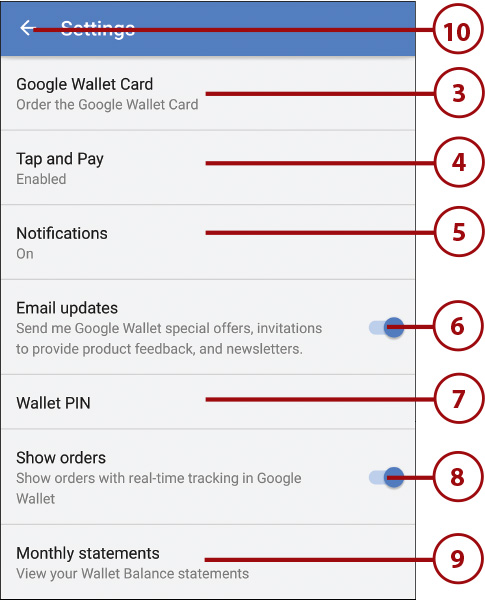
Changing Google Wallet Settings
You can tweak the way Google Wallet behaves on your phone.
1. Swipe in from the left of the screen.
2. Tap Settings.
3. Tap to order a physical Google credit card from Google. This credit card allows you to use your Google Wallet Balance in the real world by just swiping your card.
4. Tap to set up Tap and Pay. You need to set up Tap and Pay before you can use Google Wallet at the checkout counter. Setting up Tap and Pay is simply choosing which method(s) of payment you want to use when you check out.
5. Tap to manage notifications from Google Wallet. You can choose to be notified when you are near a merchant where you can use one of your gift or loyalty cards, when there is an update to one of your gift or loyalty cards, or when someone sends you money.
6. Tap to choose whether you want to receive email updates from Google Wallet.
7. Tap to change your Google Wallet PIN and select how often you are required to enter the PIN. You can set the PIN timeout to 15 minutes, 1 day, or never. Setting it to 1 day or never is more convenient but may also be unsafe if your phone is lost.
8. Tap to show real-time order information for items you have purchased with Google Wallet.
9. Tap to view your monthly Google Wallet statements.
10. Tap to save your changes and return to the main Google Wallet screen.
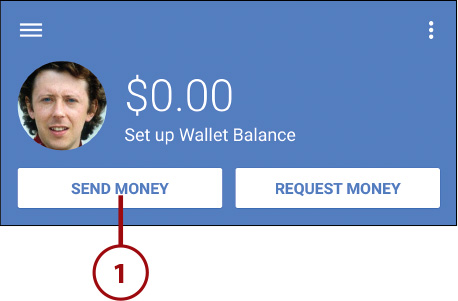
What Is Google Wallet Balance?
Your Google Wallet Balance goes hand in hand with your Google Wallet Card. When you order a Google Wallet Card or you tap your Google Balance, you are asked to verify your identity. After the verification, you receive a physical credit card that is tied to the Google Wallet Balance. You can add to the Google Wallet Balance by transferring money from your existing bank accounts or by accepting money sent to you via Google Wallet.
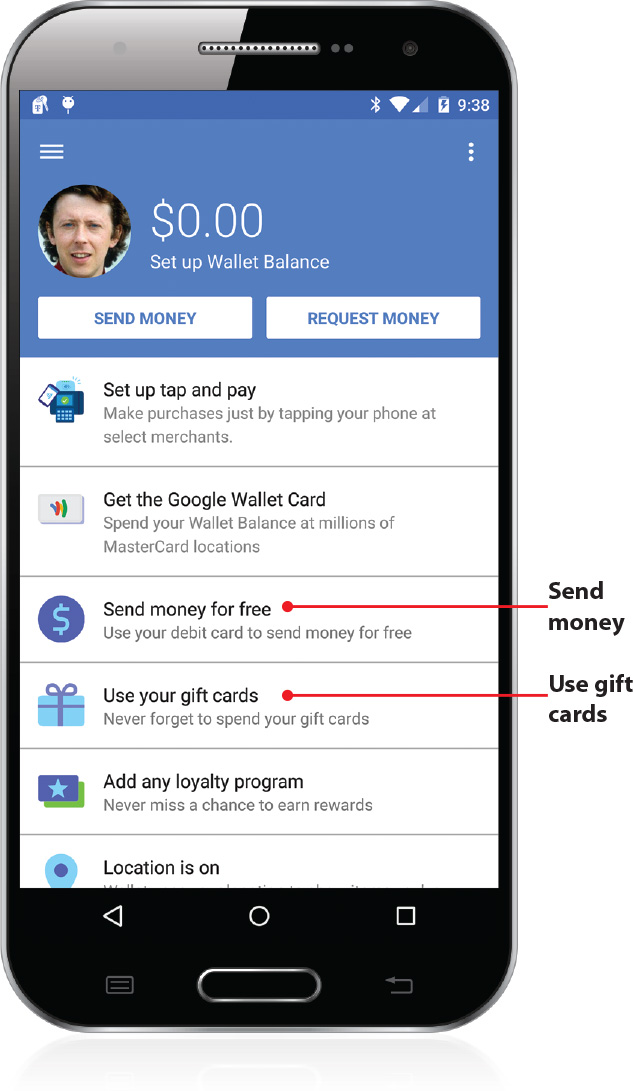
Sending and Receiving Money
Use your Google Wallet to send money to friends and family. You can also request money from others.
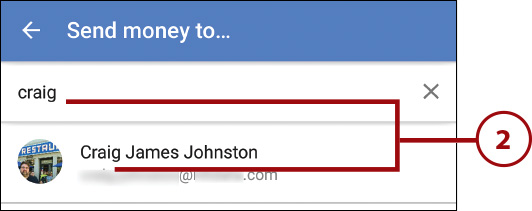
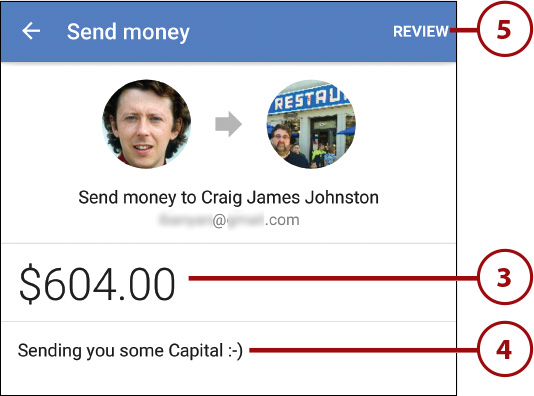
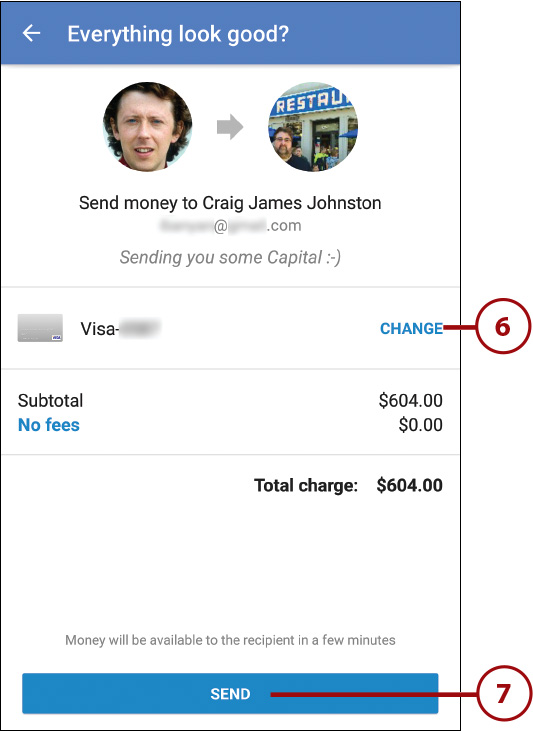
Send Money
1. Tap Send Money.
2. Start typing the person’s name. If a matching name appears, tap it to select it and continue.
3. Type the amount to send.
4. Type a short message to the person you are sending the money to.
5. Tap Review.
6. Tap to change the credit card or checking account being used to send the money from.
7. Tap Send.
Sending and Receiving Money
When you have a positive Google Balance, you can send money to your friends and family using Google Wallet. If the person you are sending money to does not have a Google Wallet account, the person first needs to set one up to receive the money. You can either use the Google Wallet app to send money, or, if you use Gmail in a desktop web browser, you can attach money just like you would attach a picture. If someone owes you money, you can request that they send you money. Again, if the other person does not have a Google Wallet account, he or she needs to set one up before sending you the money.
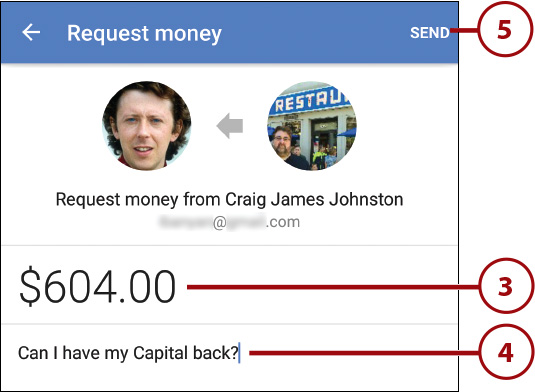
Request Money
1. Tap Request Money.
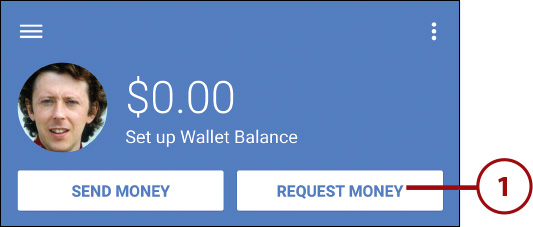
2. Start typing the person’s name. If a matching name appears, tap it to select it and continue.
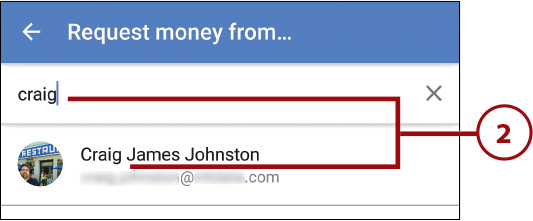
3. Type the amount that you are requesting.
4. Type a short message to the person you are requesting the money from.
5. Tap Send to send the money request.
Both Parties Need Google Wallet
When you have a positive Google Balance, you can send money to your friends and family using Google Wallet. If the person you are sending money to does not have a Google Wallet account, the person first needs to set one up to receive the money. You can either use the Google Wallet app to send money, or, if you use Gmail in a desktop web browser, you can attach money just like you would attach a picture. If someone owes you money, you can request that they send you money. Again, if the person does not have a Google Wallet account, he or she needs to set one up before sending you the money.