
14. Taking and Managing Pictures

In this chapter, you find out how to take pictures with your Android phone, how to store them, and how to share them with friends. Topics include the following:
→ Taking panoramic pictures
→ Taking Photo Sphere pictures
→ Synchronizing pictures
→ Viewing pictures
Most Android phones have both front- and rear-facing cameras. The rear-facing camera is normally quite good, so taking pictures is not a disappointing experience. After you take those great pictures, you can share them with friends. You can also synchronize the pictures directly with your computer using Google Photos in the cloud.
Using the Camera
Before you start taking photos, you should become familiar with the Camera app.
Why Does My Camera App Look Different?
This chapter covers the stock Google Camera app, but some phones from certain manufacturers replace the stock Google Camera app with their own camera app. In many cases, the camera apps have similar features, so you should be able to follow along. However, if you prefer, you can get the stock Google Camera app from the Google Play Store. Search for “Google Camera” and install it.

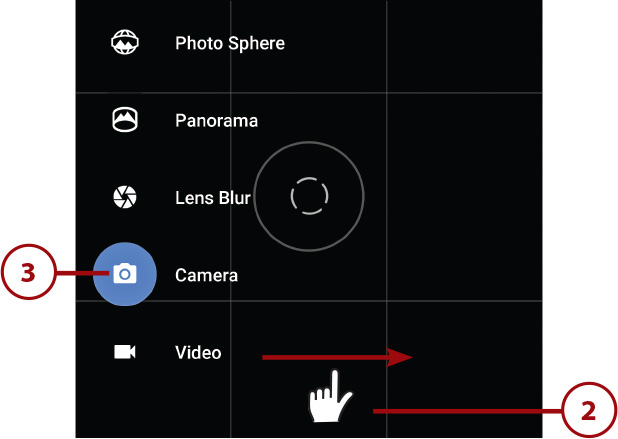
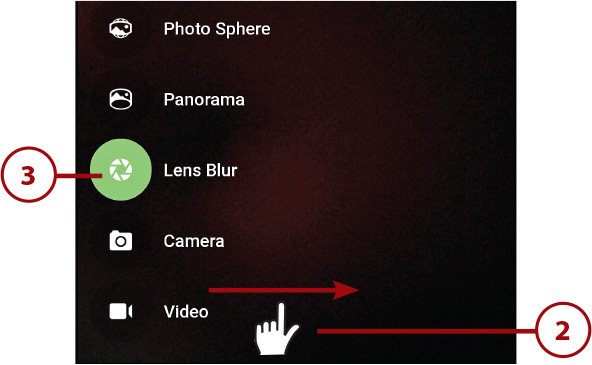
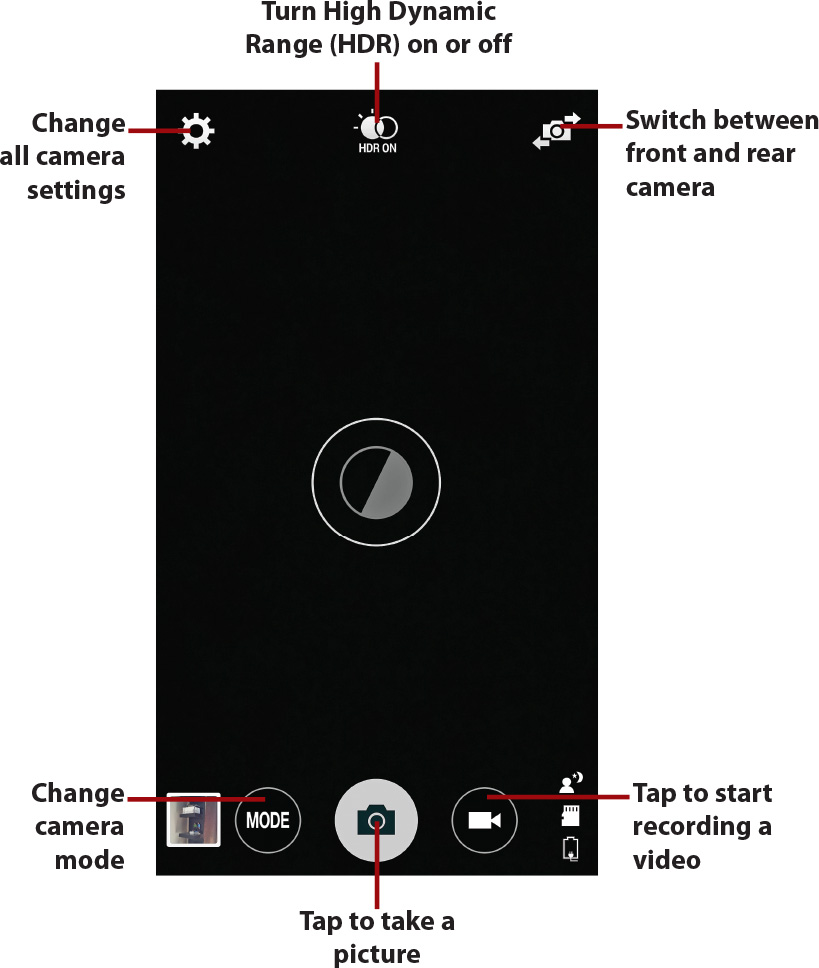
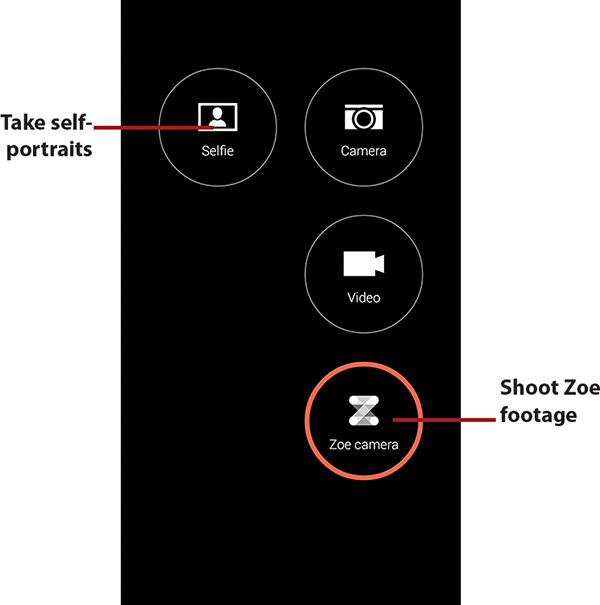
2. Swipe in from the left of the screen to change the camera mode between still camera, panoramic camera, Lens Blur, Photo Sphere, and video camera. (These modes are covered in more detail later in the chapter.)
3. Tap to change the camera settings. (See the next section for more information about the camera settings.)

4. Tap anywhere in the frame to make the camera focus specifically in the area.
5. Tap to switch between the front-facing and rear-facing cameras, overlay a grid pattern on the screen, or manually adjust the exposure setting.
6. Tap to take a picture.

It’s Not All Good: Zooming In—Is It Worth It?

Adjust Camera Settings
Using camera settings, you can change things such as the resolution of each picture, picture review time, filters, Scene mode, white balance, and more. The settings that are not available when you’re in Video mode are noted in the steps.
1. Swipe in from the left of the screen.
2. Tap to see Settings.

3. Tap to enable or disable embedding your GPS coordinates into pictures you take.
4. Tap to enable or disable showing the manual exposure setting on the main camera screen.
5. Tap Resolution & Quality.


6. Tap to adjust the resolution and format of the pictures taken with the rear-facing camera. Your choices range from a 13 megapixel 4:3 ratio image to a 2.1 megapixel 16:9 ratio image. The exact range of resolution and aspect ratio depends on your phone’s camera capabilities.
7. Tap to adjust the resolution and format of the pictures taken with the front-facing camera. Your choices range from a 2.1 megapixel 16:9 ratio image to a 0.1 megapixel 4:3 ratio image. The exact range of resolution and aspect ratio depends on your phone’s camera capabilities.
8. Tap to adjust the format of the video taken with the rear-facing camera. Your choices are Ultra High Definition (UHD) 4K, High Definition (HD) 1080p, HD 720p, and SD 480p. The exact range of resolution depends on your phone’s camera capabilities.
9. Tap to adjust the format of the video taken with the front-facing camera. Your choices are HD 1080p, HD 720p, SD 480p, and CIF. The exact range of resolution depends on your phone’s camera capabilities.
10. Tap to adjust the quality of the images taken with the rear-facing camera when shooting panoramas. Your choices are High, Normal, and Low. The higher the image quality you choose, the slower your camera is to take panoramas.
11. Tap to adjust the quality of the images taken with the rear-facing camera when shooting Lens Blur pictures. Your choices are Normal and Low. The higher the image quality you choose, the slower your camera is to take Lens Blur pictures.
12. Tap to save your changes and return to the main Settings screen.
13. Tap to save your changes and return to the main Camera screen.

Reading More About Recording Video
If you want to read more about using the Camera app to record video, go to Chapter 3, “Audio, Video, and Movies.”
Take Regular Pictures
Now that you have the settings the way you want them, take a few pictures. You can jump to step 5 and take the picture, but you might want to first set up your shot.
1. Tap the Camera icon.
2. Swipe in from the left of the screen to change the camera mode.
3. Tap to select regular Camera mode.
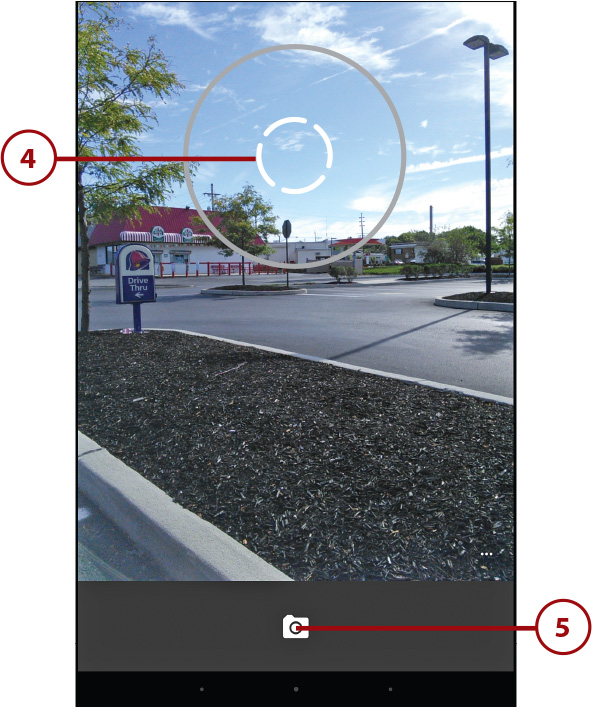
4. Tap the area of the frame you want to focus on specifically. When you release your finger, the camera adjusts its focus.
5. Tap to take the picture.
Focusing on Part of a Picture
You can actually focus on a certain part of a scene. By tapping the part of the picture you want in focus, you see that the rest of the picture goes out of focus. Using this trick enables you to create depth in your photos.
Take Panoramic Pictures
Your Android phone can take panoramic pictures. Panoramic pictures are achieved by taking multiple pictures from left to right or right to left and stitching them together in one long picture. Luckily your Android phone does all that work for you.
2. Swipe in from the left of the screen.

3. Tap to select Panorama.
4. Tap to select the type of panorama you want to take.
5. Tap to shoot a horizontal panorama (left to right or right to left).
6. Tap to shoot a vertical panorama (up/down or down/up).
7. Tap to shoot a wide angle panorama.
8. Tap to shoot a fish-eye panorama.

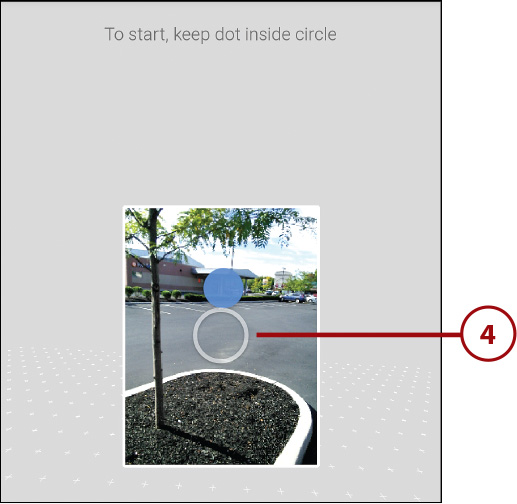
10. Move your phone until the circle is over the closest white dot. This is your starting point. After the dot turns blue, more dots appear to guide you.
11. Slowly move your phone around and guide the circle over the blue dots. Each time you line them up, another image is captured for your panorama.

12. After you capture all the images necessary for the type of panorama you chose, the camera automatically stitches the pictures together into a panorama and saves it.
Can You Change the Width of the Panorama?
To create shorter horizontal or vertical panoramas, instead of rotating all the way from left to right, or up or down, you can tap the check mark to immediately stop the panorama process and save it as is.
Moving Too Fast
When you take panoramic pictures, you have to rotate slowly. If you start moving too fast, the camera indicates this to you. Slow down when this happens; otherwise the panorama will not look good.
Take Photo Sphere (360 Panoramic) Pictures
Your phone can take 360-degree panoramic pictures—or, as Google calls them, Photo Spheres. Photo Sphere pictures are achieved by taking multiple pictures in all directions around you and stitching them together in one large sphere image.
1. Tap the Camera icon.

2. Swipe in from the left of the screen.
3. Tap Photo Sphere.

4. Move your phone until the circle is over the blue dot. After you have done that, wait until you see other white dots appear.
5. Slowly move your phone around and guide the circle over the blue dots. Each time you line them up, another image is captured for your Photo Sphere.
6. Tap the check mark when you have captured enough images. The images are stitched together in the background. You can view your Photo Sphere using the Photos app, which is covered later in this chapter.

Take Lens Blur Pictures
When you take a Lens Blur picture, you can change the focus of the picture after the fact.
1. Tap the Camera icon.

2. Swipe in from the left of the screen.
3. Tap Lens Blur.
4. Tap to start the Lens Blur capture.

5. Slowly move your phone up as indicated by the arrow.
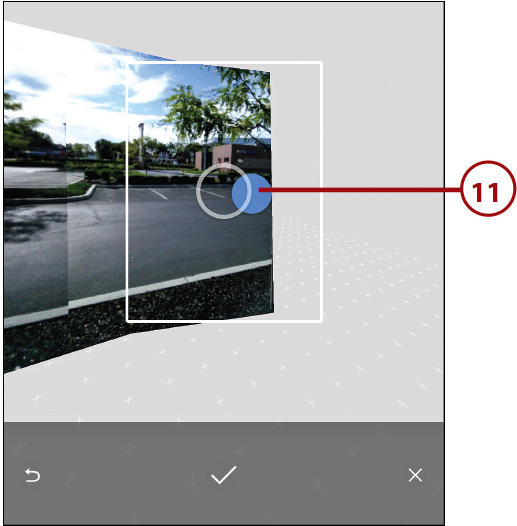
6. After the picture has completed, swipe in from the right of the screen to see the image and adjust the blur.
7. Tap to edit the blur.

8. Tap the picture where you want it to be the clearest.
9. Drag the slider to change how blurry the rest of the picture appears.
10. Tap Done to save your changes.


Viewing and Managing Your Photos
This section covers the photo-specific activities of the Photos app, such as viewing a Photo Sphere and editing photos. For more details about using the Photos app, read Chapter 3, “Audio, Video, and Movies.”
Navigate Photos
1. Tap to launch the Photos app. If this is the first time you are running the Photos app, you may be prompted to enable Auto-Back, which is a feature that makes a backup of all of your photos to your Google Cloud account.

3. Tap to open a Photo Sphere.

Where Are All My Photos and Videos Stored?
When you open the Photos app, in addition to allowing you to view photos and videos on your device, it shows you a lot of other options, so what are they? If you tap Google+, you see your Google+ profile. If you tap Photos, you see all photos and videos on your device and also ones that have previously been copied to your Google+ Cloud account from this and all other devices you own. If you tap Stories, you access a feature of Google+ that creates stories from photos and videos that have previously been copied to your Google+ Cloud account. Tapping Albums shows you all albums on your device and in the Google+ Cloud. Tapping Auto Awesome shows you any photos and videos that have been automatically backed up to your Google+ Cloud account and turned into little movies. (You can also manually create them.) Tapping Videos shows you only videos on your device and in your Google+ Cloud account. Tapping Photos of You displays only photos in which you have been tagged on Google+. Tapping Trash shows photos that you have recently deleted and gives you the opportunity to undelete them.
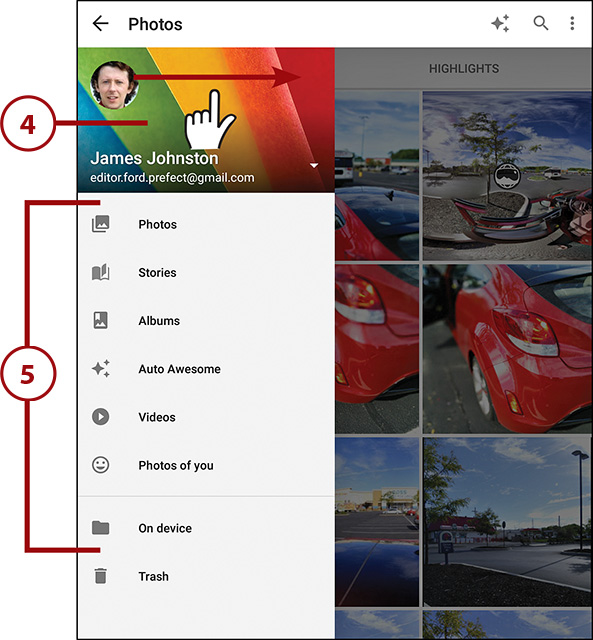
4. Swipe in from the left of the screen.
5. Select where you want to look for your photos, or tap On Device to see only photos and videos you have recorded on this Android phone.
Delete Photo Albums
You can delete one or many photo albums but only if they were created on your Android phone. You cannot delete albums created on your desktop computer that you can also see on your phone.
1. While you have an album open, tap the Menu icon.
2. Tap Delete Album. Bear in mind that deleting an album is permanent and all the photos in that album will be lost.


1. With a photo open, double-tap the picture to zoom in to the maximum zoom level. Double-tap again to zoom all the way back to 100 percent.
2. Use the pinch gesture to have a more controlled zoom in and zoom out.
3. Scroll left and right to see all the photos in the album.
4. Tap to share the picture with friends using Facebook, Twitter, Gmail, Email, Google+, Picasa (Google Photos), and more.
5. Tap the method you want to use to share the picture.

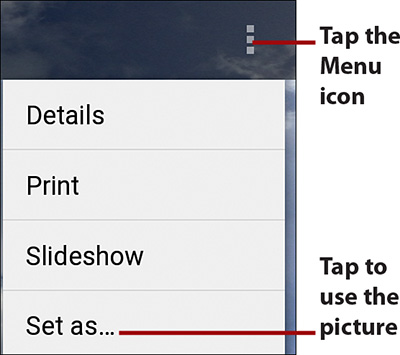
Using a Photo as Wallpaper or Contact Picture
While viewing a photo, tap the Menu icon, and choose Set As. You can choose to use the photo as a contact picture for one of your contacts, or use it as the wallpaper on the Home screen.
Can I Share a Photo Sphere?
You can share a Photo Sphere in one of two ways: as an interactive Photo Sphere, where the viewer can move around your sphere interactively, or as a static image. Google+ is currently the only place that supports interactive Photo Sphere uploads. All other photo-sharing services and social networks, such as Facebook and Twitter, support only static images.
Edit Pictures
You can edit a picture by adding filters to it, enhancing it, or cropping it. These steps apply to still pictures, panoramic pictures, and Photo Sphere pictures.
1. With a photo open, tap the Edit icon.

2. Tap to let the Photos app automatically enhance your picture using changes it thinks will work best.
3. Tap to the crop the picture. When cropping, you can crop freely by dragging the crop box in any direction, choose to keep the original picture’s aspect ratio as you drag the cropping box, or crop the picture always as a square image.
4. Tap to rotate the picture. When rotating the picture, you can rotate it freely using your fingers to make slight adjustments, or use icons to rotate it left or right.
5. Tap to add a filter to the picture.
6. Tap to fine-tune your picture by adjusting brightness, contrast, saturation, shadows, and so on.
7. Tap to do selective image tuning. This allows you to adjust selective parts of the image.
8. Tap to adjust the structure and sharpness of your picture.
9. Swipe right to see more picture adjustments.
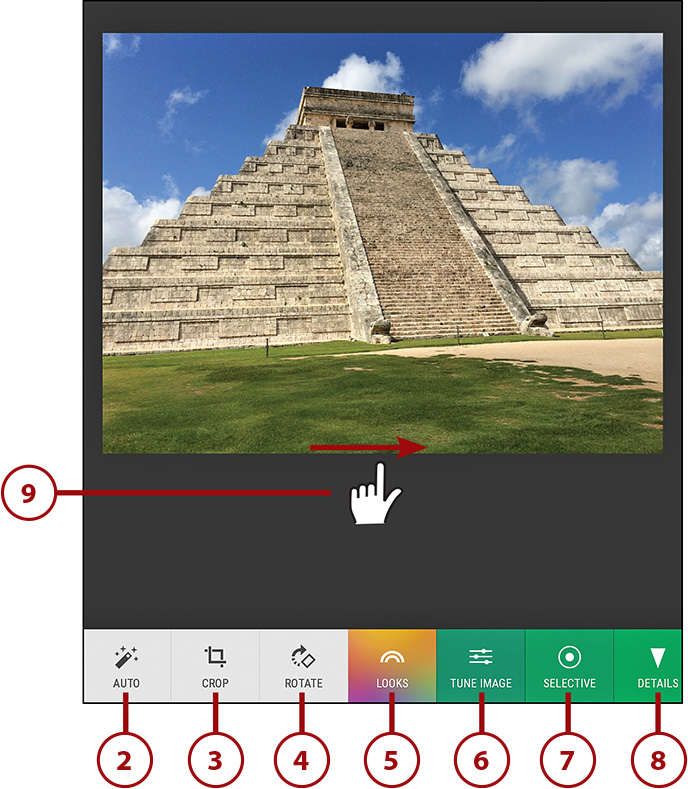
10. Tap to make your picture look vintage.
11. Tap to add drama to your picture.
12. Tap to turn your picture into a black-and-white image.
13. Tap to enhance your picture to look like a High Dynamic Range (HDR) landscape.
14. Tap to enhance your picture using the Retrolux enhancement, which makes your photos look like they were taken with old camera equipment, complete with light streaks and scratches.
15. Tap to force focus on the center of your picture.
16. Tap to apply the Tilt Shift enhancement, which makes the objects in your picture look like they are miniature.
17. Swipe right to choose frames for your picture.
18. Tap Done at the top left of the screen to save your edited photo.

Getting the Original Back
Even after you modify and save the picture, you can get the original picture back. To do this, edit the picture you want to get the original back for, tap the Menu icon, and choose Revert. The original version of the picture is loaded and the modified version is removed permanently.
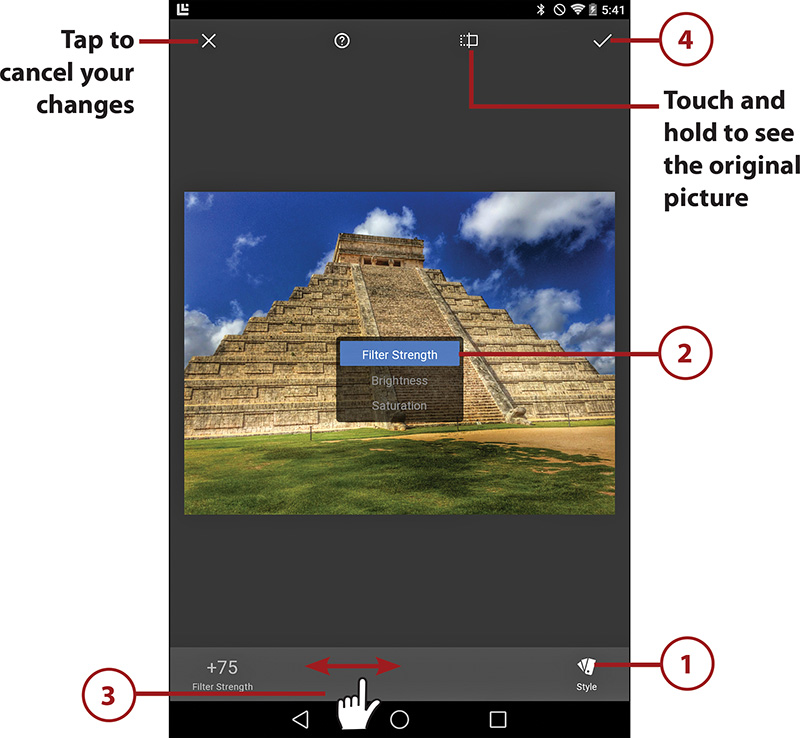
Change the Look of Pictures (Filters)
You can apply filters to your picture to change the way it looks.
1. Scroll left and right to see all the available filters (or looks).
2. Tap a look to preview how it changes your picture.
3. Tap the check mark to save your changes to the picture.

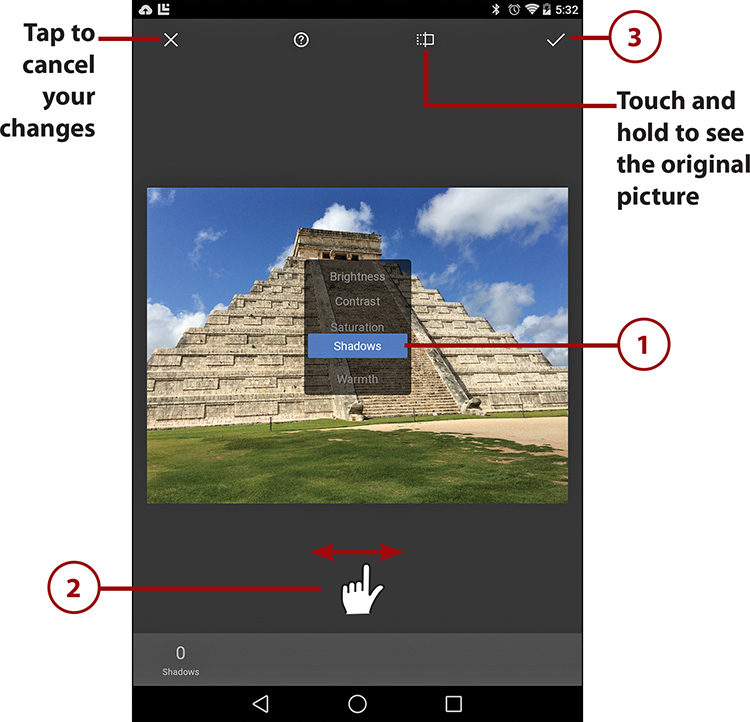
1. Touch and hold on the picture and swipe up and down to see the different settings. Release when you see the setting you want to change.
2. Swipe left and right over the setting value area to adjust the setting.
3. Tap the check mark to save your changes to the picture.
Selectively Tune Image
You can fine-tune different parts of your image instead of the entire image at once.
1. Tap the Add button to add a tune point.
2. Drag the tune point to the part of your image you want to fine-tune. The tune point appears as a blue dot.
3. Touch and hold on the picture and swipe up and down to see the different settings. Release when you see the setting you want to change.
4. Swipe left and right over the setting value area to adjust the setting.
5. Tap the check mark to save your changes to the picture.

Adjust Structure and Sharpness (Details)
1. Touch and hold on the picture and swipe up and down to see the different settings. Release when you see the setting you want to change.
2. Swipe left and right over the setting value area to adjust the setting.
3. Tap the check mark to save your changes to the picture.

Adjusting Structure and Sharpness
To read more about the differences between the Structure and Sharpness enhancements, visit http://blog.phaseone.com/how-to-enhance-details-with-structure/.
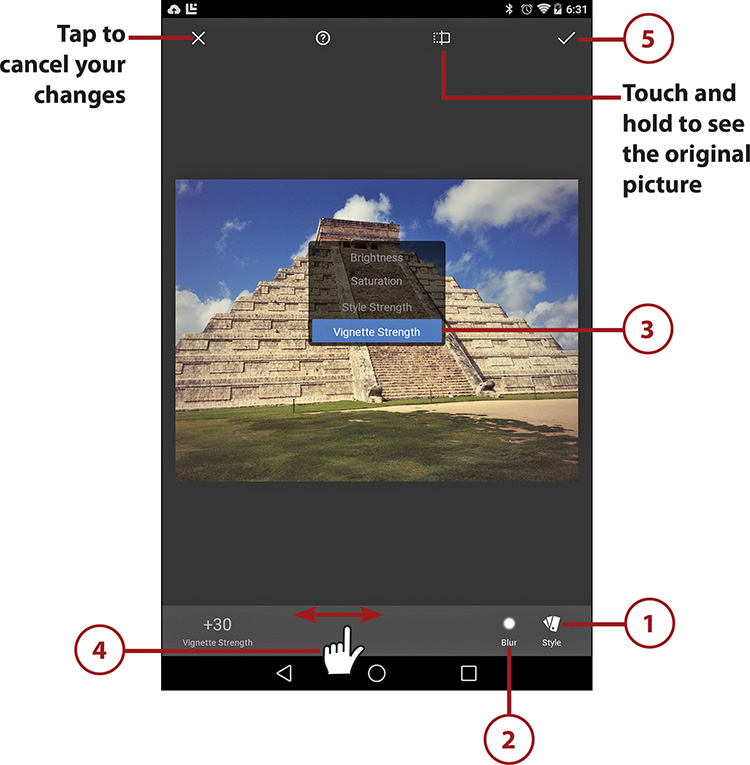
Make Your Picture Look Aged Using Vintage Styles
1. Tap Style to choose a style of aging you want to apply.
2. Tap Blur if you want to make your picture look blurry.
3. Touch and hold on the picture and swipe up and down to see the different settings. Release when you see the setting you want to change.
4. Swipe left and right over the setting value area to adjust the setting.
5. Tap the check mark to save your changes to the picture.
2. Touch and hold on the picture and swipe up and down to see the different settings. Release when you see the setting you want to change.
3. Swipe left and right over the setting value area to adjust the setting.
4. Tap the check mark to save your changes to the picture.

2. Touch and hold on the picture and swipe up and down to see the different settings. Release when you see the setting you want to change.
3. Swipe left and right over the setting value area to adjust the setting.
4. Tap the check mark to save your changes to the picture.
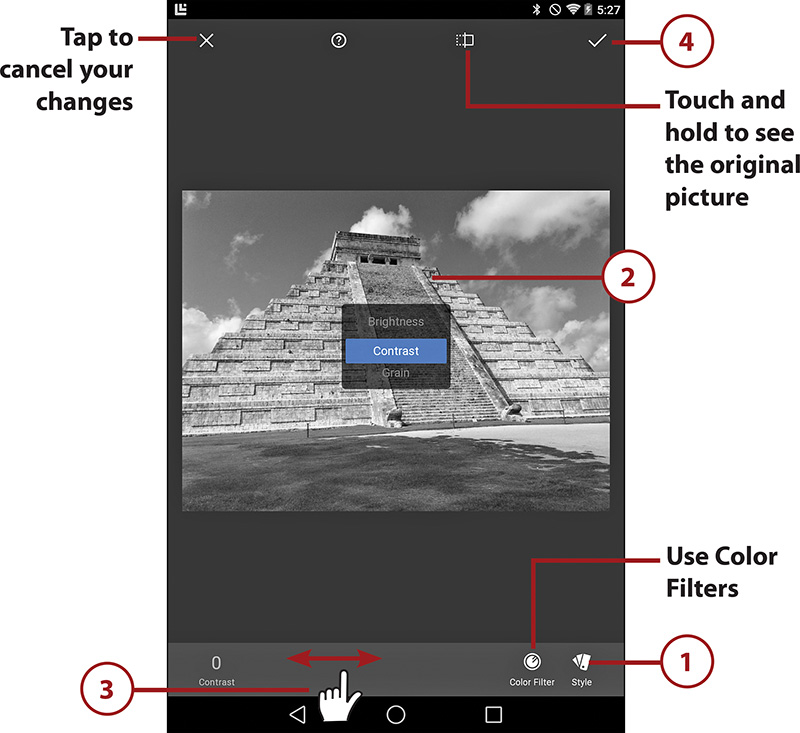
Using Color Filters and Black-and-White Pictures
Because some colors look the same when converted to black and white, you can use color filters to correct this. Tap the check mark to save your changes. Read more about using color filters for black-and-white pictures at http://www.photographymad.com/pages/view/using-coloured-filters-in-black-and-white-photography.
Enhance Your Pictures with HDR Landscape
If your picture is of a landscape, you might want to enhance it using High Dynamic Range (HDR) processing.
1. Tap Style to choose a style you want to apply (for example, whether your picture has people in it or not).
2. Touch and hold on the picture and swipe up and down to see the different settings. Release when you see the setting you want to change.
3. Swipe left and right over the setting value area to adjust the setting.
4. Tap the check mark to save your changes to the picture.
Learning about HDR Landscape Pictures
Read more about using HDR landscape processing at http://www.lightstalking.com/getting-started-in-hdr-landscape-photography/.
Style Pictures as Retrolux Pictures
Give your picture the appearance of being from film that has been damaged.
1. Tap Style to choose the Retrolux style. Tap the style multiple times to cycle through where in your picture the simulated defects should be added.
2. Touch and hold on the picture and swipe up and down to see the different settings. Release when you see the setting you want to change.
3. Swipe left and right over the setting value area to adjust the setting.
4. Tap the check mark to save your changes to the picture.

1. Tap Style and choose the Center Focus style.
2. Tap Blur to choose whether the blur is weak or strong.
3. Touch and hold on the picture and swipe up and down to see the different settings. Release when you see the setting you want to change.
4. Swipe left and right over the setting value area to adjust the setting.
5. Tap the check mark to save your changes to the picture.

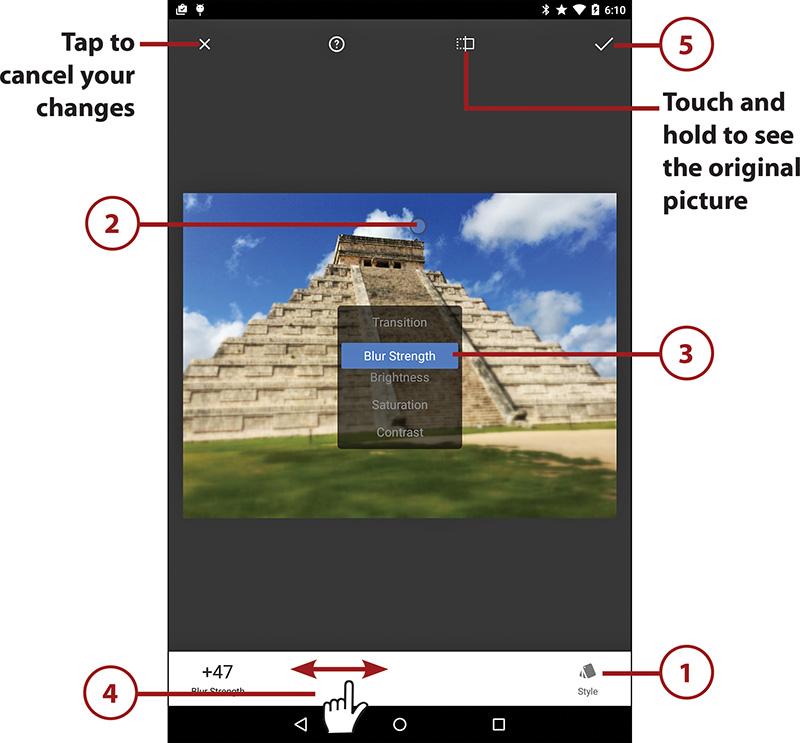
Style Pictures as Tilt Shift Pictures
The Tilt Shift effect makes the objects in your picture look like they are miniatures.
1. Tap Style and choose the Tilt Shift style.
2. Drag the blue dot to where you want the Blur Tilt effect to be applied.
3. Touch and hold on the picture and swipe up and down to see the different settings. Release when you see the setting you want to change.
4. Swipe left and right over the setting value area to adjust the setting.
5. Tap the check mark to save your changes to the picture.
Learning about Tilt Shift Pictures
To read more about the Tilt Shift effect, visit http://www.tiltshiftphotography.net.

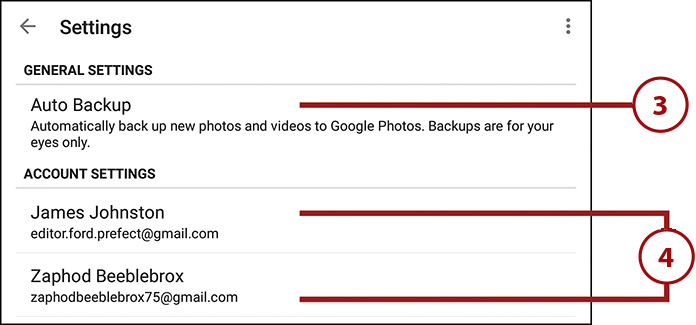
2. Tap Settings.
3. Tap to manage automatically backing up your pictures and videos to your Google+ account.
4. Tap an account to edit settings for that specific Google account.
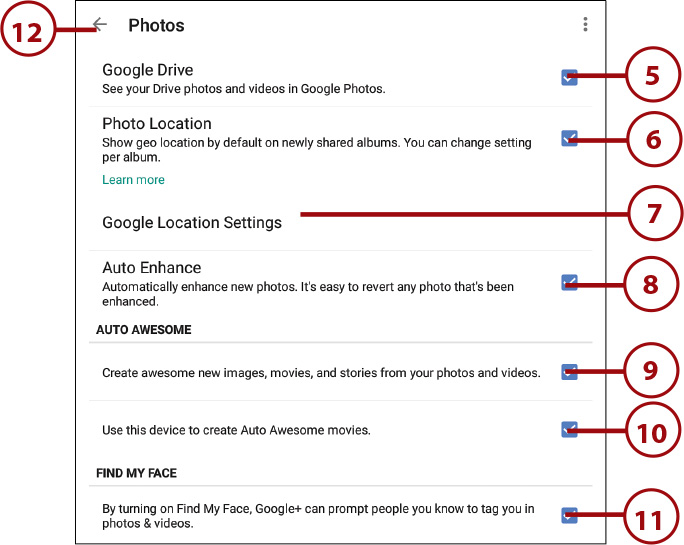
5. Check the box to see in Google Photos the photos and videos you have stored in your Google Drive Cloud account.
6. Check the box to show the location of where photos and videos were taken.
7. Tap to manage how Google handles location settings for this Google account.
8. Tap to let Google automatically enhance your pictures when they are uploaded.
9. Check the box to let Google create “Auto Awesome” images, movies, and stories from your photos and videos. Read more about “Auto Awesome” in Chapter 3.
10. Check the box to allow your phone to do the Auto Awesome processing.
11. Check the box to let Google recognize your face in photos uploaded to Google+ by your friends, and prompt them to tag you.
12. Tap to save your changes and return to the previous screen.
Managing Photos with Your Computer
When you connect your Android phone to a computer, you can move pictures back and forth manually by using software such as Android File Transfer. If you have not yet installed Android File Transfer, follow the installation steps in the Prologue earlier in this book.
Manually Manage Pictures
This section covers moving pictures using the Android File Transfer app if you use a Mac or the media transfer functionality if you use Windows.
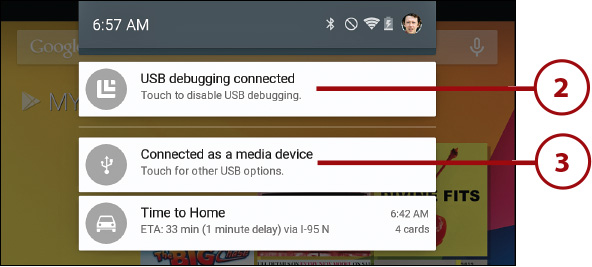
1. Plug your phone into your computer using the supplied USB cable.
2. Pull down the Notification panel to reveal the USB Connected notification.
3. Tap the Connected As a Media Device notification.

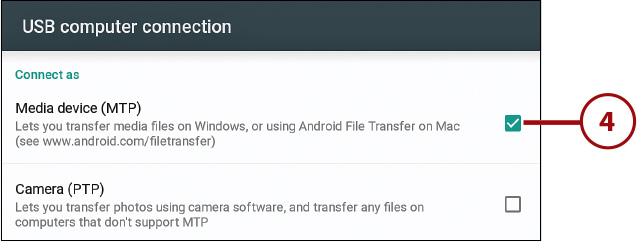
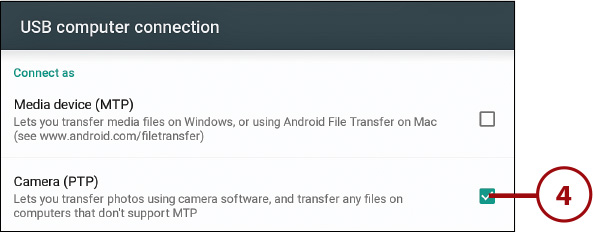
4. Tap to check the box next to Media Device (MTP) if it is not already checked.
Move Pictures (Mac OS X)
After your phone is connected to your Mac, the Android File Transfer app automatically launches, so you can browse the files on your phone as well as move or copy files between your Mac and your phone.
1. Browse your phone to locate the pictures using the Android File Transfer app.
Where Are the Pictures?
Pictures taken with the phone’s camera are in the DCIMCamera folder. All other pictures are in a Pictures folder.
2. Save folders from your phone to your Mac by dragging one or more pictures from your phone to a folder on your Mac.
3. Create a new photo album on your phone by dragging one or more pictures, or a folder filled with pictures, on your Mac to the Pictures folder on your phone.

Move Pictures (Windows)
After your phone is connected to your Windows computer and mounted, you can browse the phone just like any other drive on your computer.
1. Click if you want to import the pictures automatically.
2. Click to open an Explorer view and see the files on your phone.

3. Save pictures from your phone to your PC by dragging one or more pictures from your phone to a folder on your PC.
4. Create a new photo album on your phone by dragging one or more pictures, or a folder filled with pictures, on your PC to the Pictures folder on your phone (not shown).
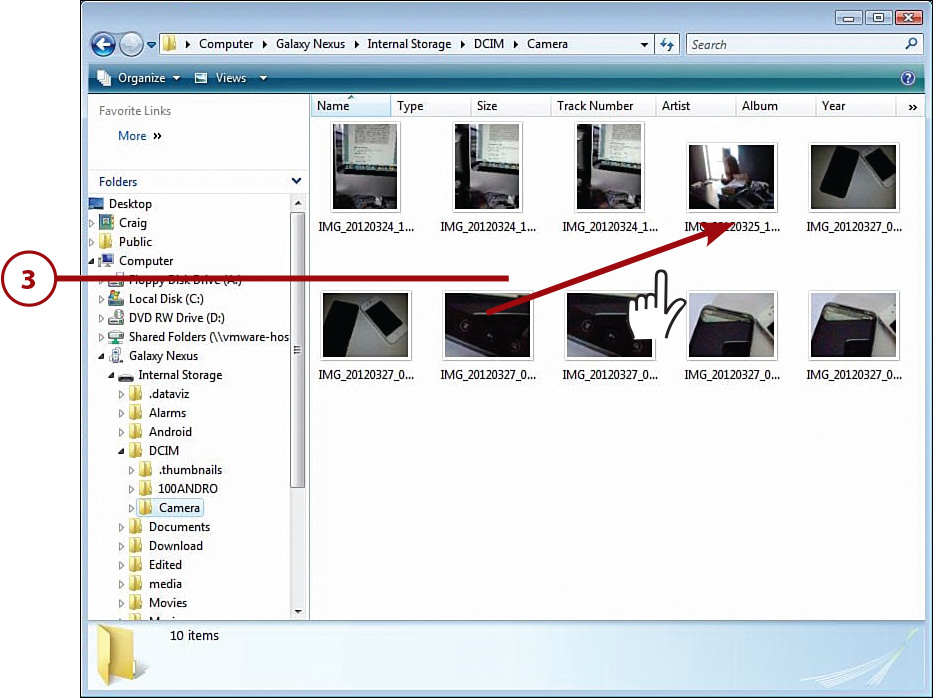
Pictures taken with the phone’s camera are in the DCIMCamera folder. All other pictures are in the Pictures folder.
Automatically Manage Pictures on a Mac
By setting your phone to connect as a Camera, your Mac automatically opens the Photos app.
1. Plug your phone into your computer using the supplied USB cable.
2. Pull down the Notification panel to reveal the USB Connected notification.
3. Tap the Connected As a Media Device notification.
4. Tap to check the box next to Camera (PTP), if it is not already checked.
5. Your phone appears in the Photos app under Import so that you can import photos like you would with any other digital camera. In this example, the phone is a Nexus 6.

Synchronizing Pictures Using Your Google Cloud
You can synchronize pictures to your phone from your computer without connecting your phone to your computer. Just use your Google account’s built-in Cloud service. All photo albums that you create in the Cloud are automatically synchronized to your phone.
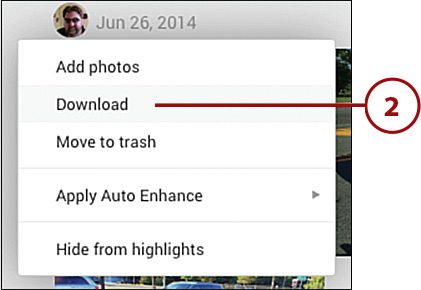
1. Log in to Google with your computer. Hover your mouse over the menu, and click Photos.

2. Download all photos from a specific day by clicking the down arrow to the right of the date and selecting Download.
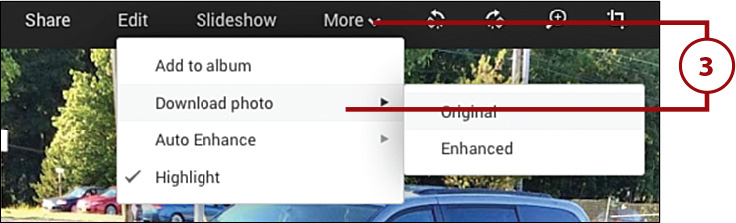
3. Download a specific photo by opening the photo, clicking the More menu, and selecting Download Photo.
Using HTC Synchronization Software
If you have an HTC Android phone, you can use the HTC Sync Manager software to move images between your HTC phone and your desktop computer. You can also automate the synchronization of data between your computer and phone any time you plug it into your computer. When you plug your HTC phone into your computer, you should see a link to download HTC Sync Manager. If you don’t, go to this link: http://www.htc.com/us/software/htc-sync-manager/.

Using Samsung Synchronization Software
If you have a Samsung Android phone, you can use the Samsung Kies software to move images between your Samsung phone and your desktop computer. You can also automate the synchronization of data between your computer and phone anytime you plug it into your computer. You can download Samsung Kies from http://www.samsung.com/us/kies/.
