3. Connecting Your Mac to a Network
In this chapter, you learn how to get your Mac online, including tasks like:
![]() Connecting to secure wireless networks
Connecting to secure wireless networks
![]() Configuring network address, DNS, and routing information
Configuring network address, DNS, and routing information
![]() Verifying network connections
Verifying network connections
![]() Creating VPN connections
Creating VPN connections
![]() Managing multiple connections with Locations
Managing multiple connections with Locations
Being connected to a network gives you access to information, files, and services such as email or the Web. Your Mac comes with the latest networking technology—802.11ac Wi-Fi and gigabit Ethernet, making it a snap to connect to existing wired or wireless networks.
In this chapter, we explore the connection options available to you on your Mac.
Connecting to a Wired Network
The most common type of network connection in the business world is a wired Ethernet connection. The cables used to connect to the network look like oversized phone connectors and, as luck has it, plug directly into your Mac’s Ethernet port. Your system supports gigabit Ethernet—capable of exchanging information at extremely high speeds.
Making an Ethernet (Wired) Connection
On a network that is set up to automatically configure your computer using DHCP, the most complicated thing you need to do is plug in the network cable!
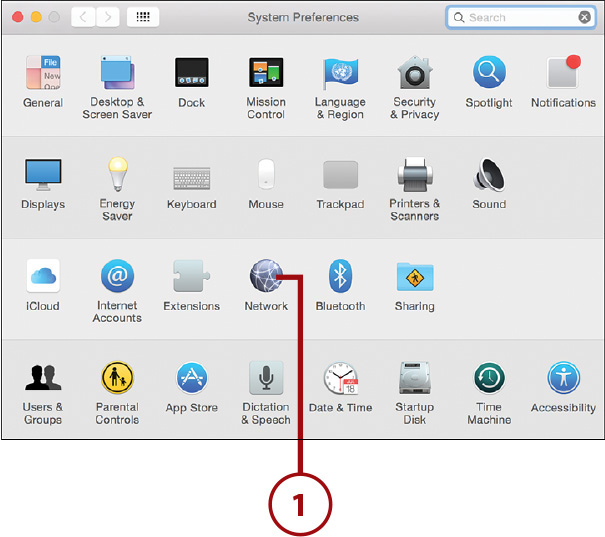
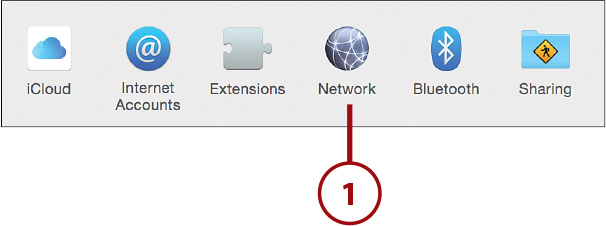
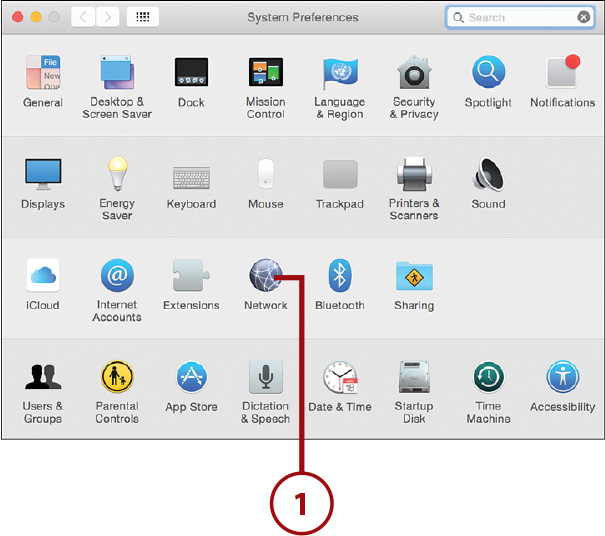
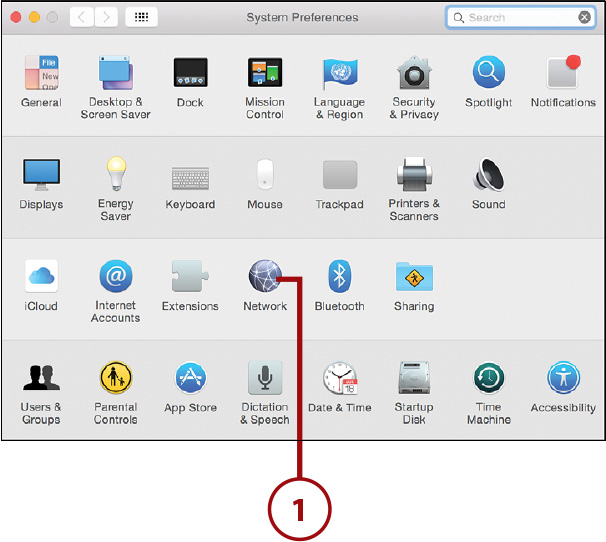
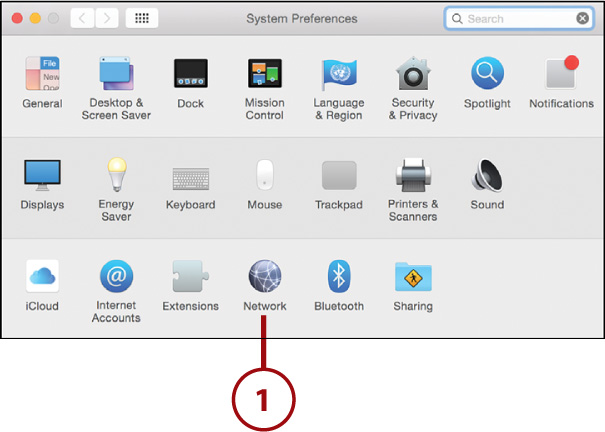
1. Open the System Preferences panel and click the Network icon.
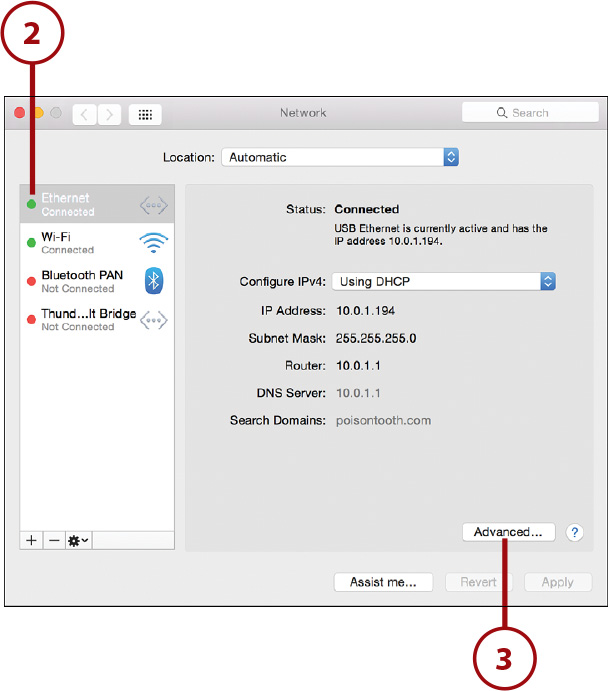
2. The network preferences panel displays. All of the active network interfaces are listed here. Red dots indicate that no connection is present on the interface.

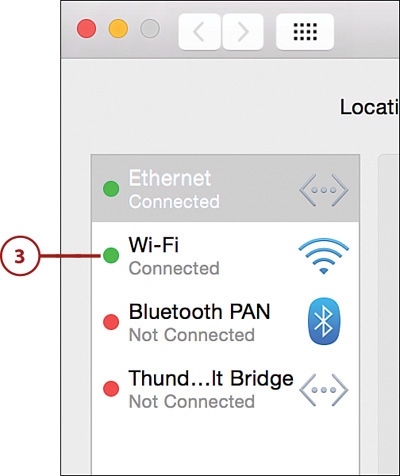
3. Plug the network cable into the back of your Mac. After a few seconds, the interface should update, showing a green dot for an active connection. The pane to the right of the interfaces displays the information that your computer is using to communicate online.
Things Not Working?
If your network connection is showing a yellow dot, you might have to configure your settings manually, or if you’re using a DSL connection, you might have to use PPPoE to make your connection. If this is the case, skip ahead to “Manually Configuring Network Settings.”
If, however, you see a red dot, you need to check your cable or the device you’re plugging into because your Macintosh can’t detect any type of network.
Connecting to a Wireless Network
When wireless network cards first started appearing, they were limited to portable computers. Over the past decade, however, Wi-Fi has taken off as a networking standard for both laptops and desktop computers. Current wireless network speeds are approaching wired connections, so, slowly but surely, wireless is taking over.
Using the built-in AirPort wireless card in your Mac, you can connect to almost any type of wireless network.
Making a Wireless Connection
Apple makes life easy. Your Mac comes ready (and able) to connect to wireless networks with a minimal amount of fuss.
Finding and Connecting to a Network
If you haven’t already made a wired connection, your Mac’s Wi-Fi (wireless) card will be active and searching for networks that it can connect to.
1. If your Mac finds an available network, it prompts you to make a connection.
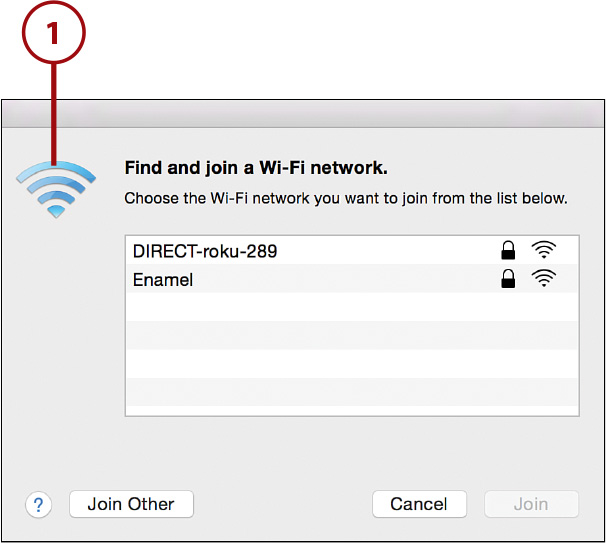
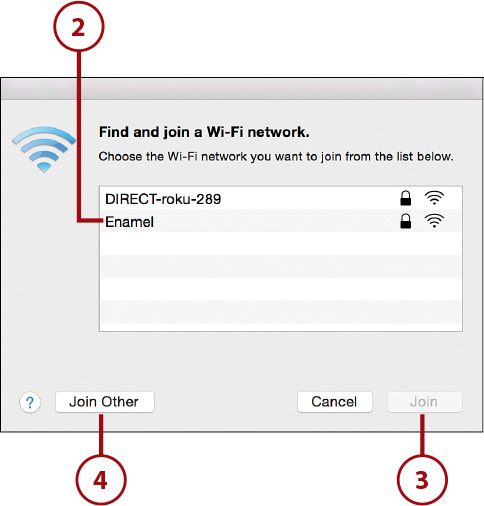
2. Choose the network name to connect to. Note that the network signal strength and security are denoted by icons to the right of the name. If a lock is present, the network requires authentication. This is covered in “Authenticating on a Wireless Network” later in this chapter.
3. Click Join to connect to the selected network.
4. If you’ve been given the specific name of a network (called an SSID) by a network administrator and it doesn’t appear in the available networks list, click the Join Other button to enter the name and attempt to find the network.
Things Not Working?
If you’ve successfully connected to a wireless network, but it doesn’t seem to work, you might need to configure the network settings manually. Keep in mind that you need to get those settings from your wireless network administrator.
If this is the case, skip ahead to the “Manually Configuring Network Settings” task.
Manually Choosing a Wireless Connection
If you want to manually choose a wireless network connection, you can use the Wi-Fi menu in your menu bar.
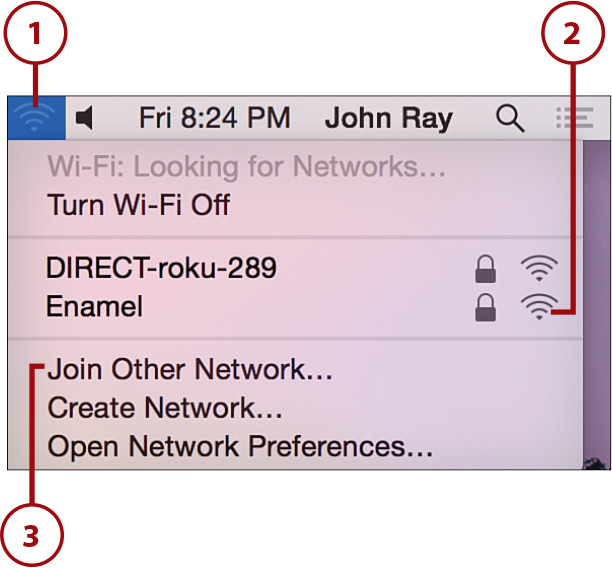
1. The Wi-Fi menu displays a list of all of the available wireless access points, their signal strengths, and their security requirements.
2. Choose the network name to which you want to connect from the list. If you’re connecting to a network that shows a lock icon, it requires authentication. This topic is covered in “Authenticating on a Wireless Network” later in this chapter.
3. If you want to connect to a network using only its name, choose Join Other Network to enter the name and attempt the connection.
Alternative Wi-Fi Configuration
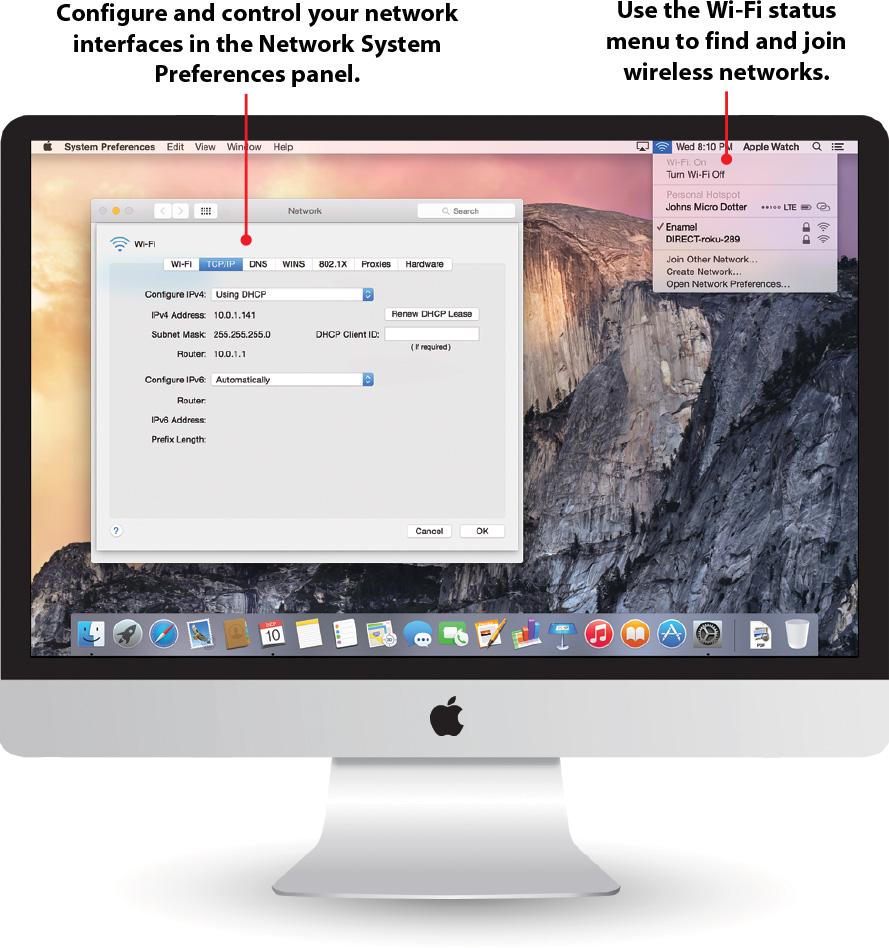
If you’d prefer to manage all your network connection information in one place, you can access these same options by opening the Network System Preferences panel and selecting the Wi-Fi interface.
You can also use the Show Wi-Fi Status in Menu Bar checkbox to remove or add (if it’s missing) the Wi-Fi status menu item.
Authenticating on a Wireless Network
When your Mac connects to an open (unsecured) network, it works immediately. If you’re connecting to a network that is secure, however, you need to authenticate, which means you need to provide a password or other identifying information. This requirement is usually denoted by a lock icon next to the network’s signal strength icon.
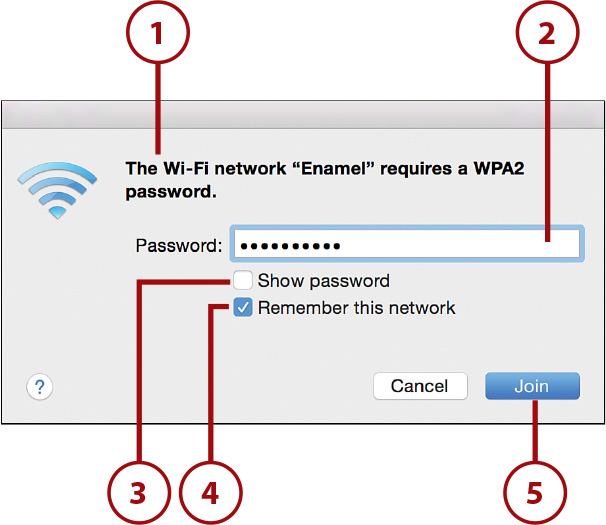
1. If you attempt to connect to a network that has a security requirement, you are prompted for a password.
2. Enter the password (or other information, depending on the security settings).
3. Click Show Password if you’d like to see the password instead of dots while you type.
4. To make sure that the network can be used again in the future without requiring that you retype the password, check the Remember This Network button.
5. Click Join to finish and authenticate to the network.
Disabling (and Enabling) Wireless Networking
Not everyone wants to have wireless networking always enabled. It can potentially expose you to network attacks on poorly secured wireless networks. Disabling the Wi-Fi network interface, and re-enabling it, is just a menu option away.
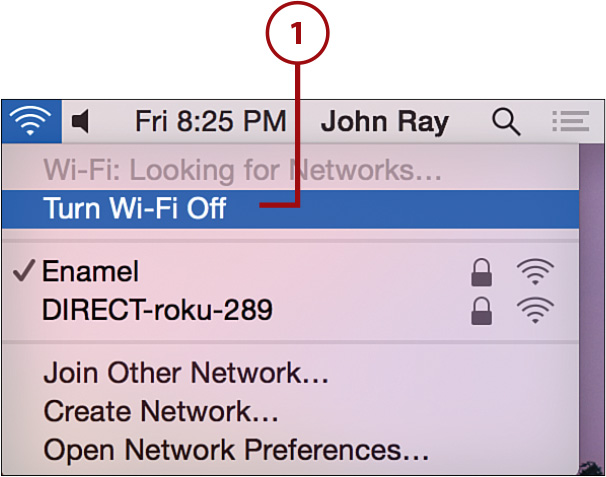
1. To disable the Wi-Fi card, choose Turn Wi-Fi Off from the Wi-Fi status menu.
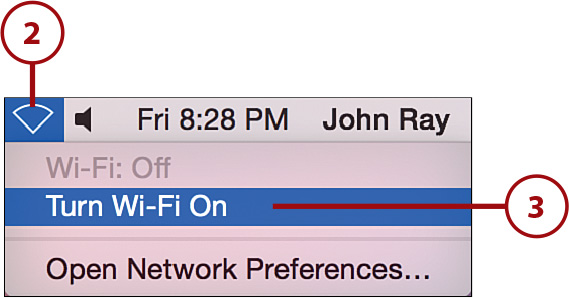
2. The Wi-Fi menu updates to an outline of the usual multiline symbol. The Wi-Fi hardware is now powered down.
3. To re-enable the Wi-Fi card, choose Turn Wi-Fi On from the Wi-Fi status menu.
Need More Wi-Fi Detail? No Problem.
To see all the stats about your Wi-Fi connection, hold Option while clicking the Wi-Fi menu. You’ll see signal strength, speed, and more!
Manually Configuring Network Settings
Network connections, when automatically configured, seem to work almost like magic. Your computer finds a signal (wired or wireless), makes a connection, and everything just “works.” Behind the scenes, however, there are a handful of network settings that make this happen. If a network doesn’t support auto-configuration, using a protocol known as DHCP, you need to make these settings manually.
Your network administrator needs to provide the following settings in order to manually set up your network:
• IP Address—A numerical address that uniquely identifies your computer.
• Subnet Mask—A value that helps your computer determine what network it is on.
• Router—The address of a device that moves network traffic between other local computers and remote networks (such as the Internet).
• DNS—The address of a device providing domain name lookups to your network. This service translates human-readable names (such as www.apple.com) into IP addresses and vice-versa.
• Proxy Settings—A device that sends and receives network traffic on your behalf, acting as a middleman for services.
Configuring TCP/IP and Proxy Settings
To manually change your TCP/IP and Proxy settings, follow these simple steps:
1. Open System Preferences and click the Network panel icon.
2. The network panel opens, showing all the available interfaces. Click the interface you want to configure (usually Ethernet or Wi-Fi).
3. Click the Advanced button to view the full manual interface for network settings.
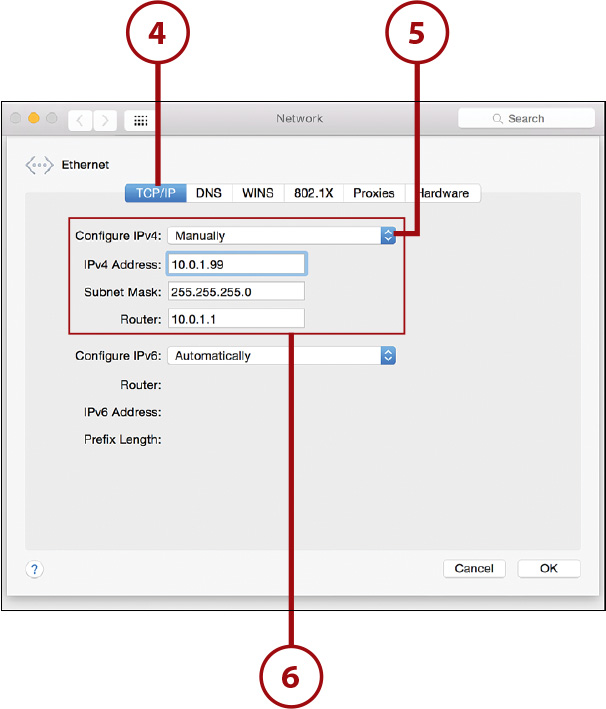
4. The Advanced configuration screen appears. Click TCP/IP in the button bar to access the common TCP/IP network settings.
5. Use the Configure IPv4 drop-down menu to change your settings to be configured Manually.
6. Enter the IP address, Subnet Mask, and Router, as provided by your network administrator.
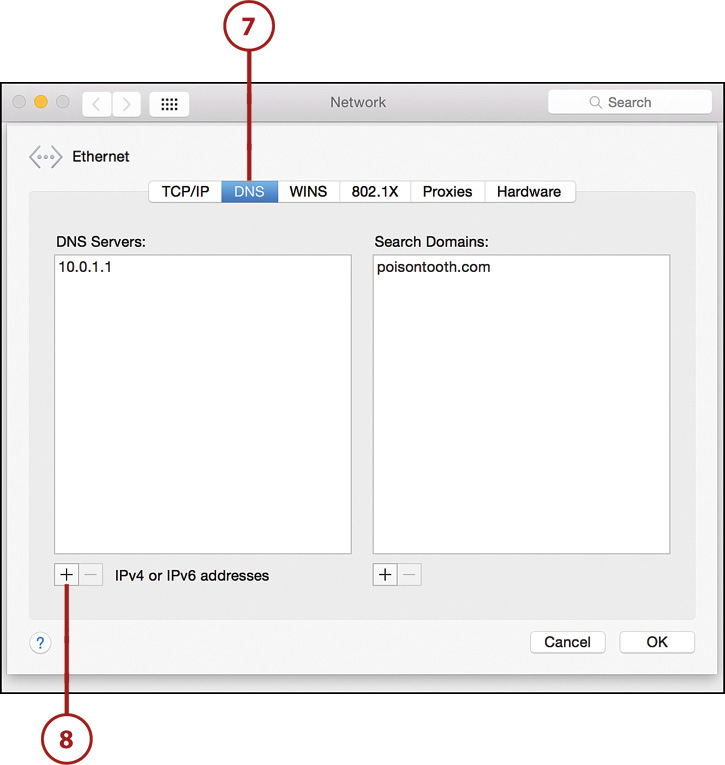
7. Click DNS in the button bar to change your domain name server settings.
8. Click the + button below the DNS Servers list to add a new server to the list. Your ISP or network administrator usually provides at least two addresses to use; be sure to type it exactly as provided. (Use the – button to remove unused DNS Servers. Search Domains are not required unless specified by your administrator.)
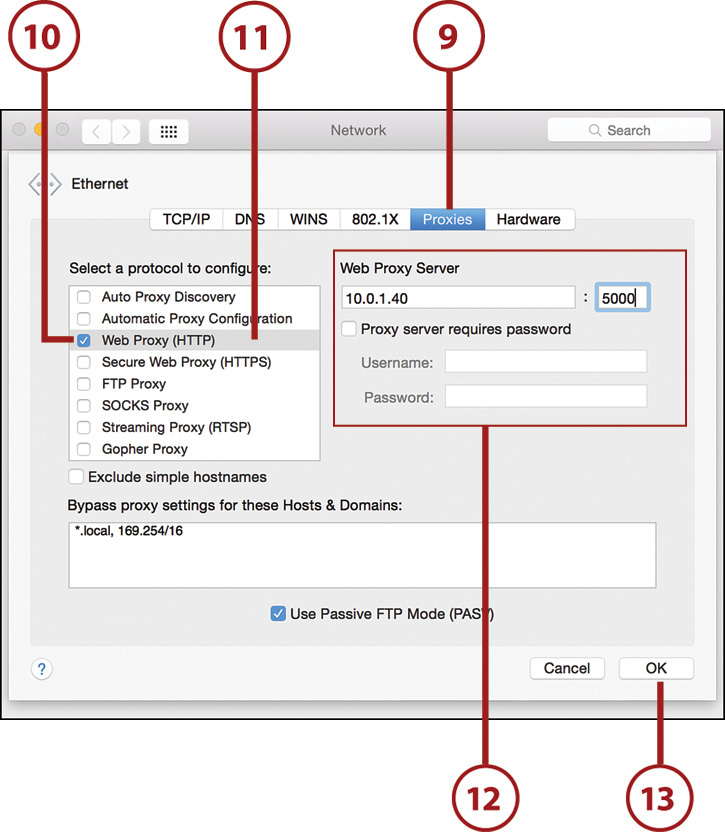
9. If your network requires the use of a proxy, click the Proxies button in the button bar. If not, skip ahead to step 13.
10. Click the checkboxes beside the protocols that you want to configure.
11. Click the protocol names to configure each proxy. Setup fields appear to the right of the protocol list.
12. Enter the proxy information as provided by your network administrator.
13. Click OK to exit Advanced setup.
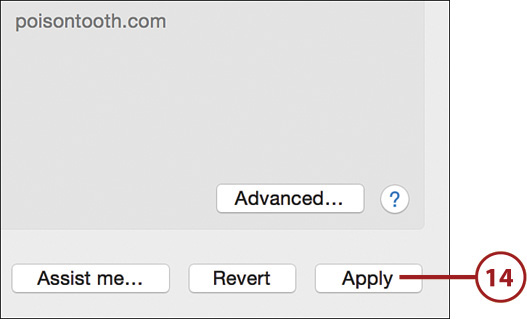
14. Click Apply to activate and begin using your new network settings.
Switching to Automatic Configuration
To revert back to the default “automatic” configuration of a network interface, you need to select Using DHCP from the Configure IPv4 drop-down menu.
Activating PPPoE for DSL Connections
In some cases, most typically when using a DSL modem, you need to activate PPPoE (Point-to-Point Protocol over Ethernet) in order to make a connection.
1. Open System Preferences and click the Network panel icon.
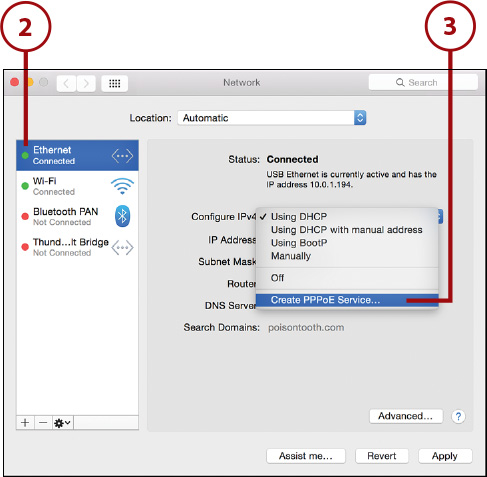
2. Select your active Ethernet Interface.
3. Choose Create PPPoE Service from the Configure IPv4 dropdown menu.
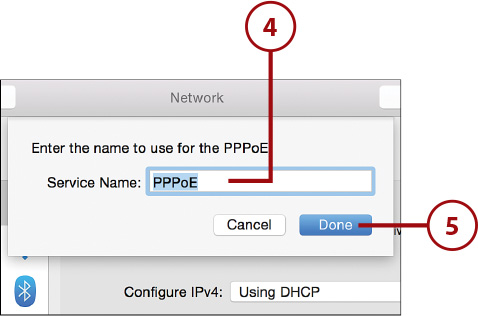
4. Choose a name for the connection. (The default, PPPoE, is fine.)
5. Click Done.
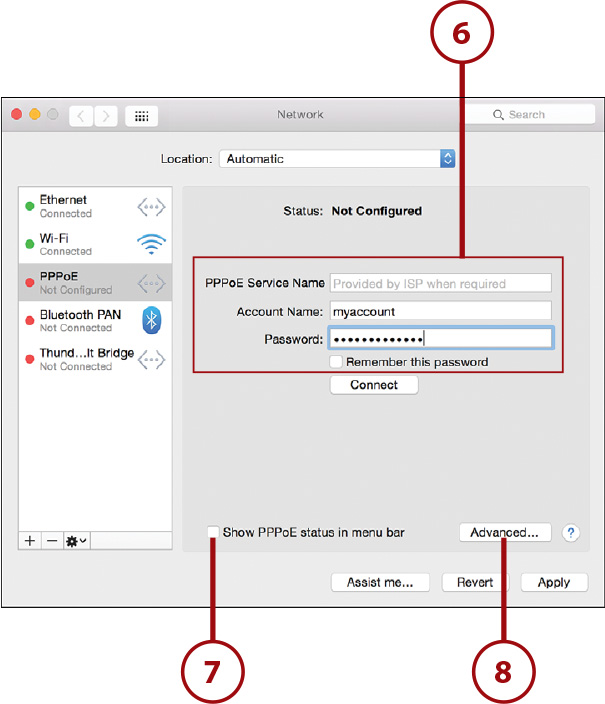
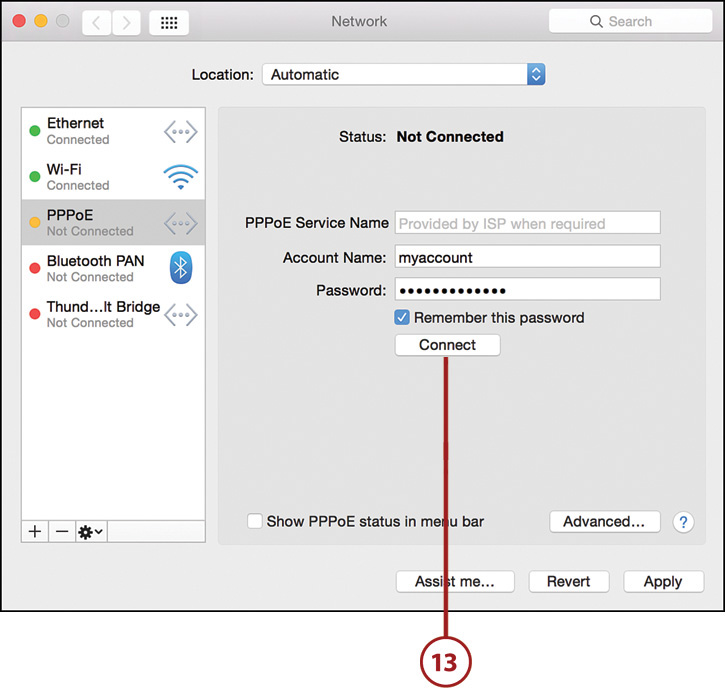
6. Enter the PPPoE information as provided by your ISP. Choose to remember the password if desired.
7. Click the Show PPPoE Status in Menu Bar checkbox to add a convenient menu option for connecting and disconnecting to the service.
8. Click the Advanced button.
9. Click PPP to open a variety of options for configuring your connection.
10. To help maintain a stable connection, check Connect Automatically When Needed and uncheck the Disconnect checkboxes if desired.
11. If required by your ISP, configure the TCP/IP settings manually as described in the “Configuring TCP/IP and Proxy Settings” task.
12. Click OK to close the Advanced settings.
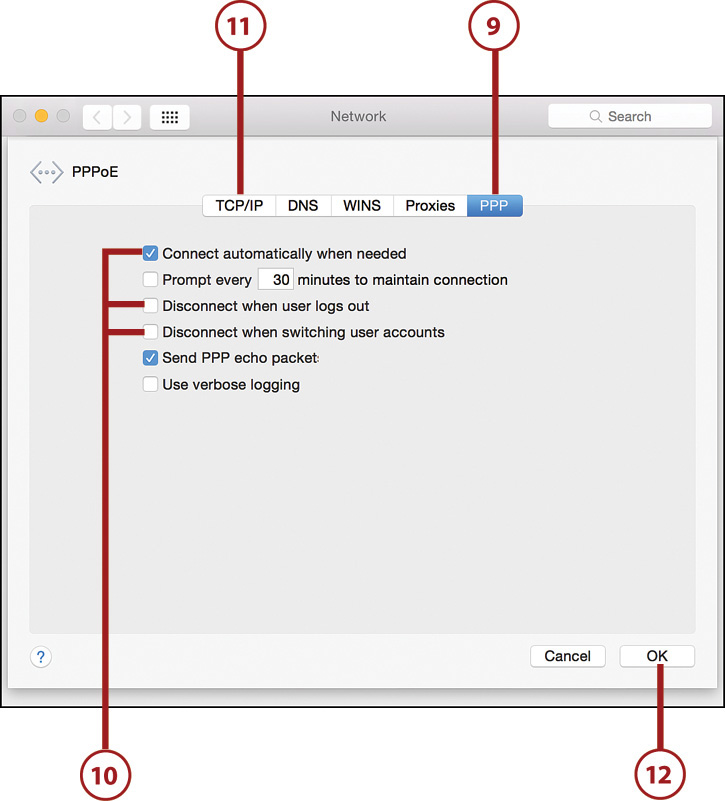
13. Click Connect to begin using the PPPoE interface you’ve configured.
Creating Virtual Private Network Connections
In the modern world, it’s difficult not to bring your work home with you. Your Mac makes an excellent workstation for both business and school use and is more than capable of handling serious tasks. Unfortunately, network security requirements frequently force businesses and schools to disable direct access to their networks. This limits your ability to access printers, file servers, and other critical resources that you might need to work remotely.
Thankfully, many organizations also provide Virtual Private Network (VPN) servers. Using a VPN server, your Mac can use its current network connection (wired or wireless) to securely connect to your company’s network. You can access all of the same resources that you see when you’re sitting in your office chair.
Creating a VPN Connection
Yosemite supports three types of VPN connections—L2TP, PPTP, and Cisco IPSec. You need to find out from your network administrator which option is right for you, along with the settings you need to make the connection.
1. Create a new VPN connection by opening the System Preferences and clicking the Network icon.
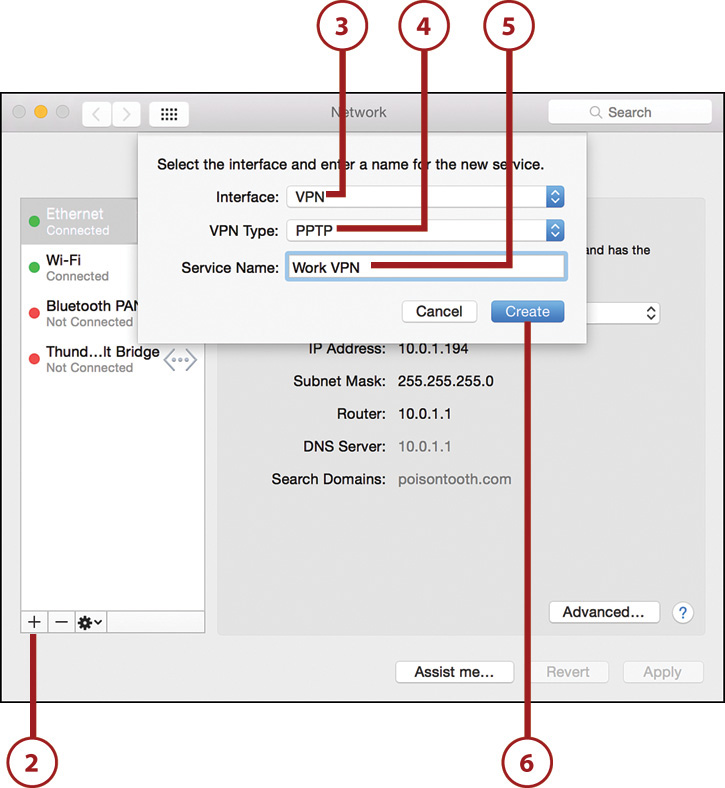
2. Click the + button at the bottom of the interfaces pane.
3. Choose VPN as the interface.
4. Set the VPN type to the type specified by your network administrator.
5. Enter a meaningful name for the VPN service, such as “Work VPN.”
6. Click Create.
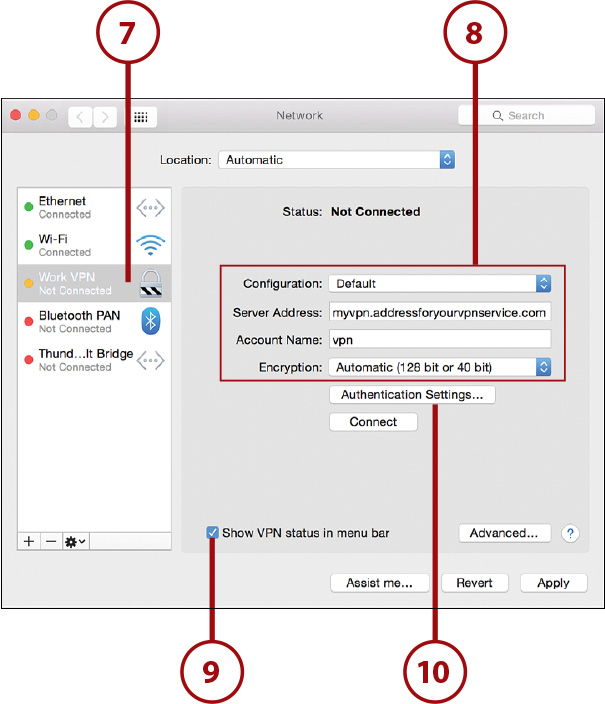
7. A new VPN interface is created and added to the list of network interfaces. Make sure the VPN interface is highlighted.
8. Configuration options appear on the right side of the network preferences panel. Enter the server address and account information provided by your network administrator.
9. Click the Show VPN Status in Menu Bar checkbox. This adds a menu item to the menu bar so you can quickly connect and disconnect from a VPN.
10. Click the Authentication Settings button.
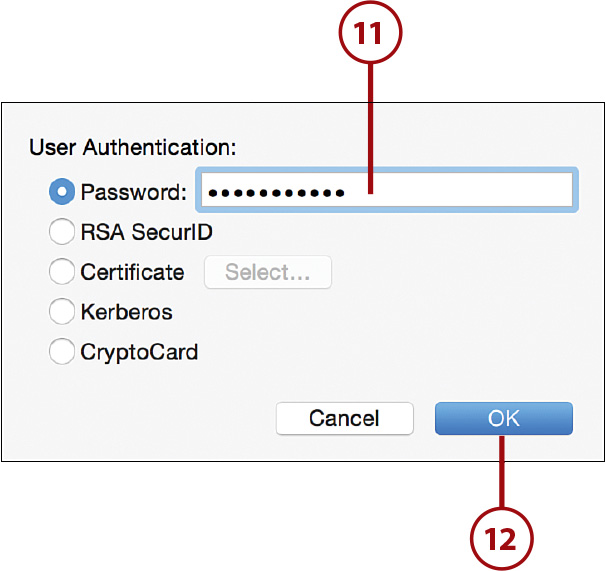
11. You are prompted for a method of authentication. Enter a password or choose one of the other available options as directed by your network administrator
12. Click OK.
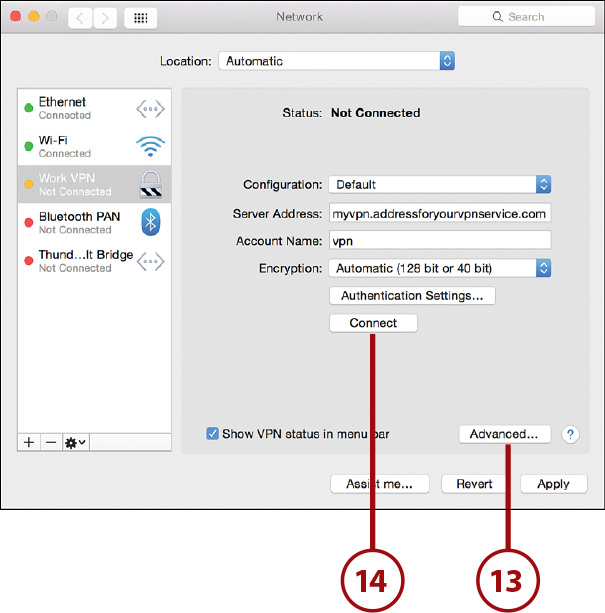
13. If you have been given specific network settings by your network administrator, click the Advanced button and enter the options as described in “Manually Configuring Network Settings.”
14. Click the Connect button to connect to the VPN.
Managing Your VPN Connection
If you’ve chosen to show the VPN status in your menu bar, you can use the menu item to quickly connect and disconnect at any time. In addition, you can show the amount of time you’ve been connected, in case connection charges apply.
Managing Multiple Connections with Locations and Configurations
If you work in a business or academic environment, you might find that you need to juggle network settings depending on what you are trying to accomplish. My workplace, for example, includes a wired network and three wireless networks—each providing a different level of access and a different way of viewing network resources. Depending on the day, I might need to connect to the intranet wireless, guest wireless, or just use a wired connection.
To help keep things straight, Yosemite includes Configurations and Locations—two important tools for keeping multiple sets of network information.
For interfaces such as VPNs or other devices that might have multiple “versions” of their settings, you can create configurations. A configuration holds information such as the server you’re connecting to and your specific network settings.
A location, on the other hand, has a much broader scope. Locations enable you to create new configurations across all your interfaces and swap them out instantly. Creating a new location is like establishing an entirely new network setup—making instant reconfiguration a snap.
Creating Configurations
To create a configuration, do the following:
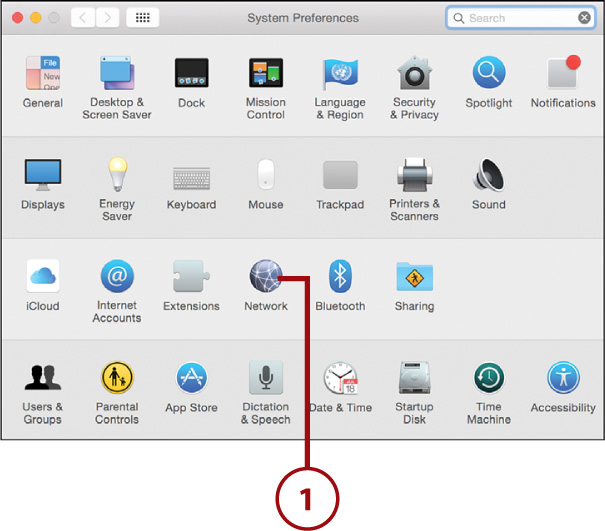
1. To create a configuration (if supported by your network interface), first open the System Preferences and click the Network icon.

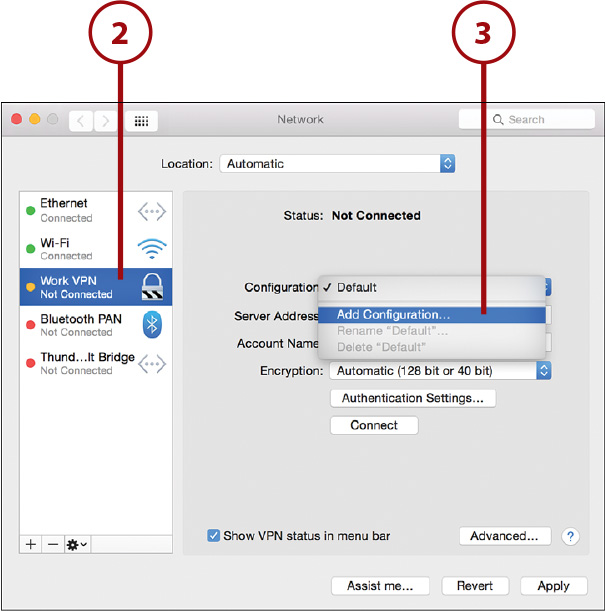
2. Click the interface for which you want to create a new configuration.
3. Using the Configuration pop-up menu, choose Add Configuration.
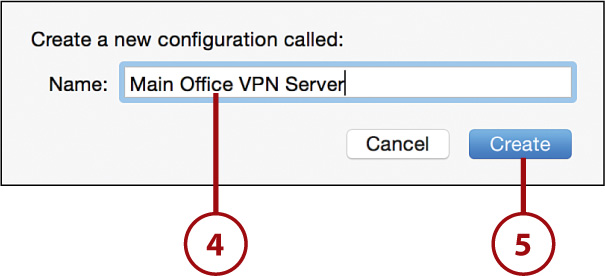
4. Enter a name for the configuration.
5. Click Create. You may now configure the network interface as described in the chapter.
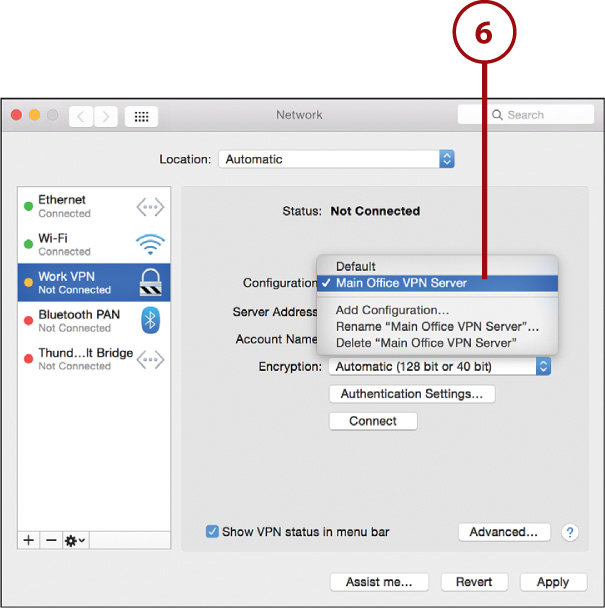
6. Your new settings are stored and accessible under the configuration name you provided so that you can easily switch from one to another. (You can also remove or rename configurations under this menu.)
Adding and Using Locations
Locations are like configurations on steroids. Lots of steroids. Using locations, you can create entirely new sets of network interfaces and options and switch between them easily.
1. Open the System Preferences and click the Network icon.
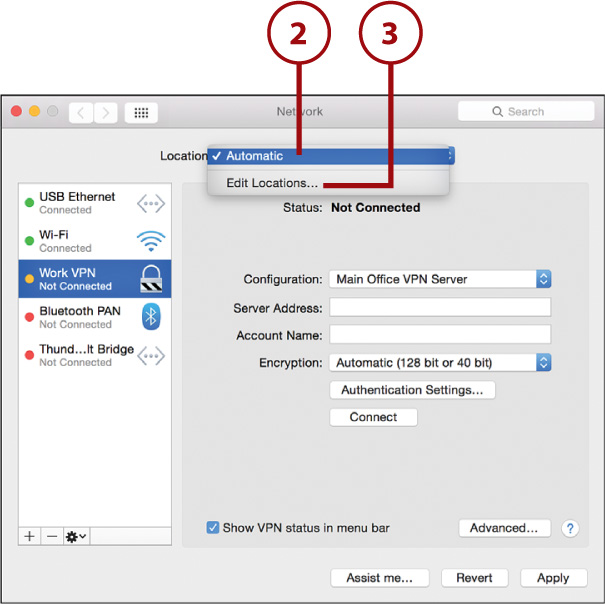
2. The default location of Automatic is set at the top of the network panel.
3. Choose Edit Locations from the Location drop-down menu.
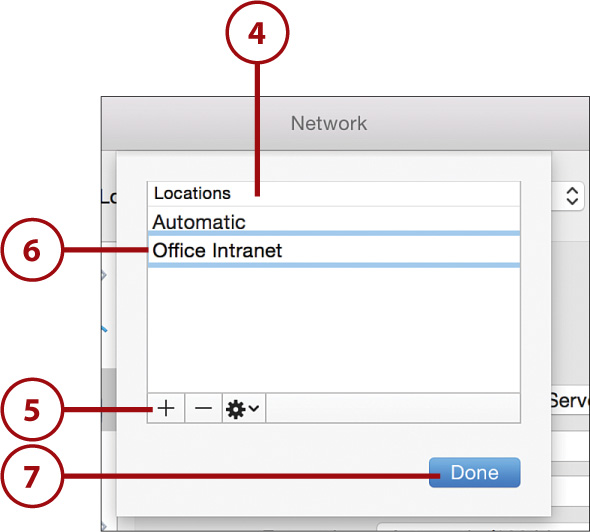
4. A dialog box that lists any configured locations displays.
5. Click the + button to add an entry for a new location. (Use – to remove locations you no longer want.)
6. Type a name to describe the location, such as “Office Intranet.”
7. Click Done.
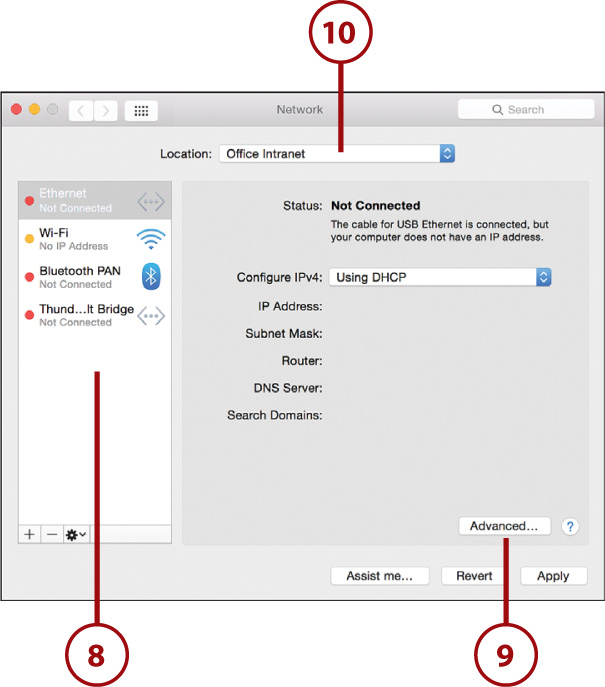
8. All your network settings are now set to their defaults for the new location. All VPN connections and other interfaces are gone. You are, in effect, starting fresh with configuring your Mac network setup.
9. Configure your network settings as described in this chapter.
10. After you’ve completed your setup, you can switch between locations using the Location drop-down menu within the System Preferences Network panel. Remember that you can return to your original network settings by choosing the location named “Automatic.”
Seeking Automated Network Assistance
The Yosemite operating system provides a few automated tools to help you configure and diagnose your Mac’s network settings. Be aware that the automated tools might not be able to fully set up your connection; and if you have complicated network configurations, you might want to manage the settings manually anyway. Let’s review what you need to do to use these tools.
Launching Diagnostics
To launch the diagnostics system, follow these steps:
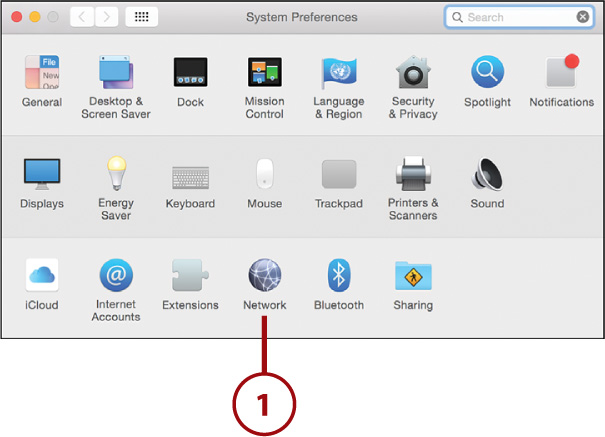
1. Open the System Preferences panel and click the Network icon.
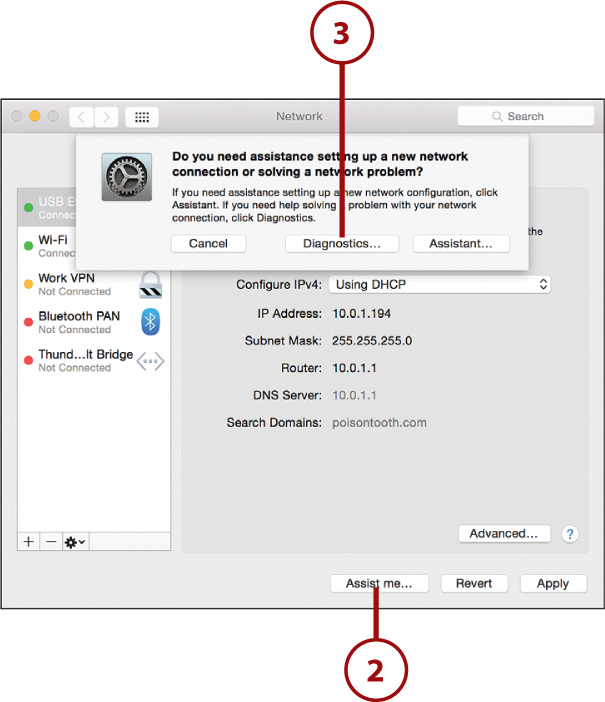
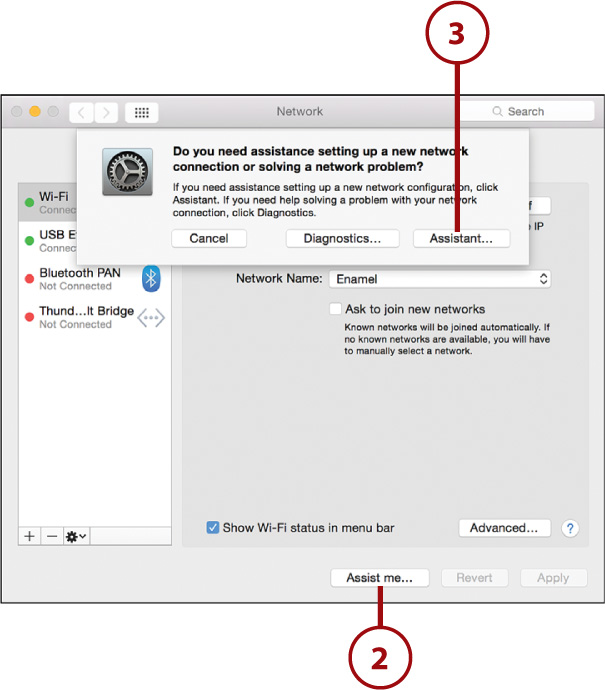
2. Click the Assist Me button at the bottom of the window.
3. Click Diagnostics in the dialog box that displays.
4. Choose the Network interface to run diagnostics on. If you’ve configured locations, you are first prompted to choose your location.
5. Click Continue.

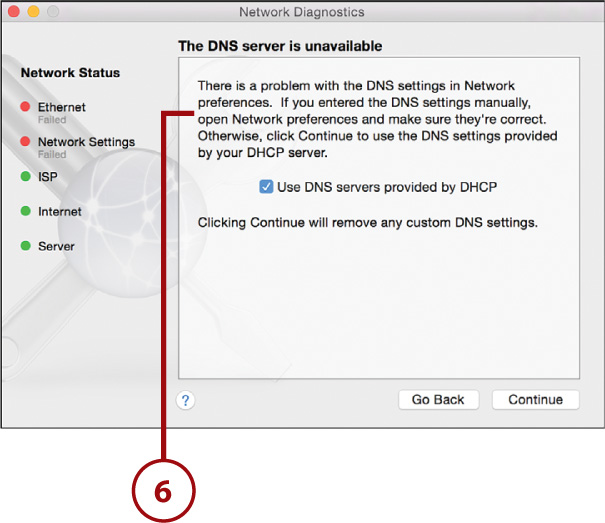
6. Review the results and follow the onscreen instructions.
1. Open the System Preferences panel and click the Network icon.
2. Click the Assist Me button at the bottom of the window.
3. Click Assistant in the dialog box that appears.
4. Provide a location where you will be using the network connection. This process creates a new location, as described in the previous “Adding and Using Locations” section.
5. Click Continue.

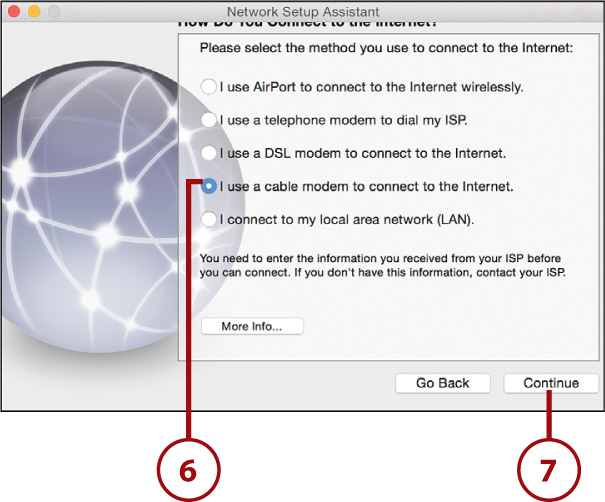
6. Choose the type of connection you are making.
7. Click Continue.
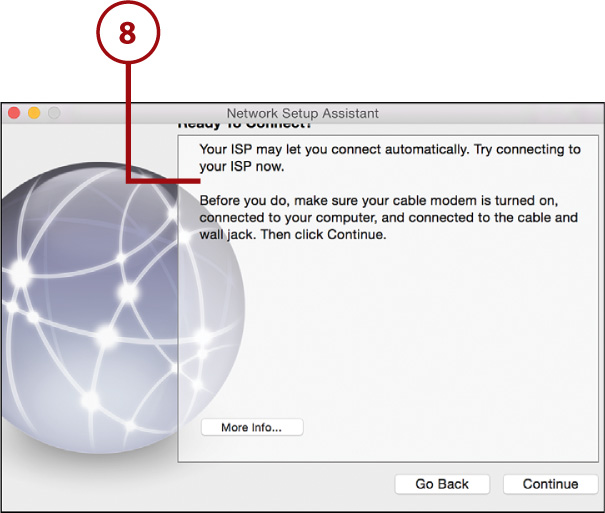
8. Follow the onscreen instructions to let Yosemite attempt to configure your network settings for you.