
7. Being Social with Messages, FaceTime, Twitter, and Facebook
In this chapter, you learn how to use your Mac to be social online, including:
![]() Configuring instant messaging in Messages
Configuring instant messaging in Messages
![]() Conducting video, audio, and screen-sharing chats
Conducting video, audio, and screen-sharing chats
![]() Messaging across computers and iOS devices
Messaging across computers and iOS devices
![]() Posting Tweets and Facebook updates
Posting Tweets and Facebook updates
In addition to providing methods of sending and consuming content, the Internet (and Yosemite) gives us new ways to be social. Using the tools built into OS X, you can send instant messages, conduct video chats, send tweets, and keep in touch with Facebook.
In this chapter, you find out how to use many of the features of Messages, FaceTime, and Yosemite social networking options. These will help you stay on top of current events in your friends’ lives and interact with people around the world—without driving up your phone bill.
Instant Messaging with Messages
When email isn’t conversational enough, instant messaging can take over. Your Mac comes with a first-rate instant messaging application called Messages (found in the Applications folder). You can use Messages for text messaging, audio conferencing, video conferencing, and even screen sharing. If you have an iCloud, GoogleTalk, Jabber, or AIM (AOL Instant Messenger) account, you’re ready to go.
There are two ways to use Messages, although both are integrated (somewhat poorly) into the same interface. First, you can use Apple’s unique iMessage protocol to send and receive messages on all your iOS devices and Macs simultaneously. Using this approach, you can start a conversation on Messages on your iPad and then pick it up immediately on your Mac just by starting Yosemite’s Messages app. Best of all, after you enable an iMessage account, you don’t even have to start Messages to receive notifications. As long as your Mac is online, you will receive your iMessages.
The second way to use Messages is with a traditional instant messaging account, such as AIM, Yahoo! Messenger, or GoogleTalk. The process is pretty similar, regardless of your approach, and when you’ve started a messaging session, you’ll be using the same interface regardless.
To keep things straight in your mind, remember that if I talk about using an iMessage account or sending an iMessage, I’m referring to Apple’s Mac and iOS messaging system. I’ll be as specific as possible as I describe the features in Messages.
Adding Accounts to Messages
Apple simplifies the process of configuring Messages by emailing you to create an iMessage account and a traditional account the first time you run the app. After that, however, I recommend that you manage your accounts in different locations.
Configuring Your Account During Startup
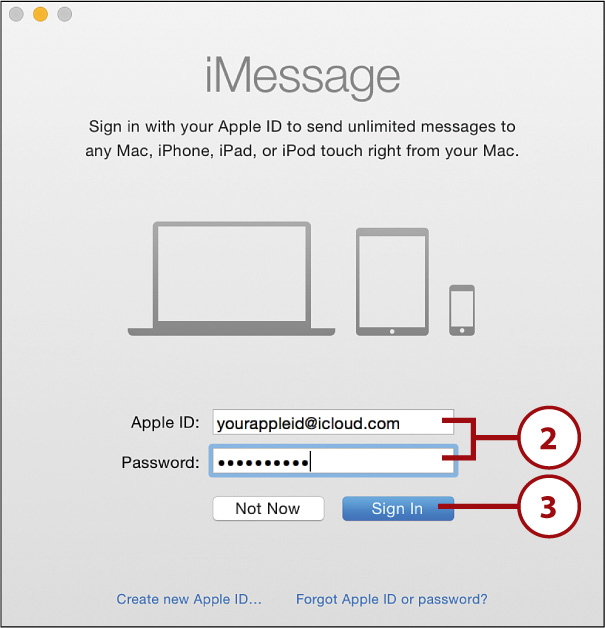
Unlike other accounts, to configure iMessage within Messages, you need to use the application itself. This is likely to change in the future, but for now, don’t expect too much consistency in the interface. The easiest way to configure Messages with an iMessage account is to do so during the first run, like this:
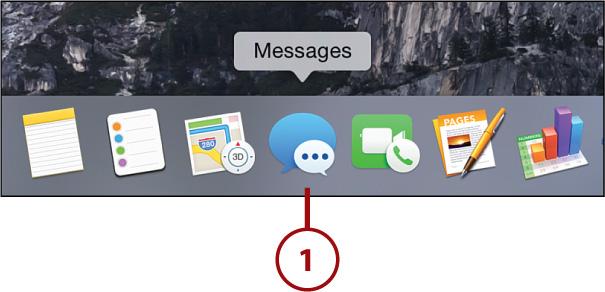
1. Start Messages from the Dock, Launchpad, or Applications folder.
2. Enter the Apple ID (and password) you want to use with the iMessage protocol.
3. Click Sign In.
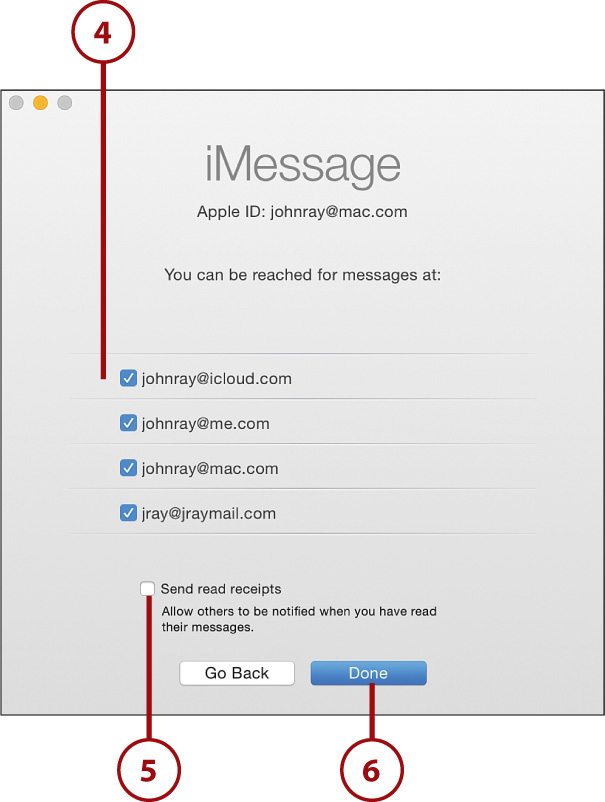
4. By default, the email address associated with your Apple ID can receive iMessages. Uncheck addresses to remove them. To add other addresses, edit your account settings after this initial setup.
5. Choose whether you want your contacts to view when you read messages sent using the iMessage protocol.
6. Click Done to begin using Messages.
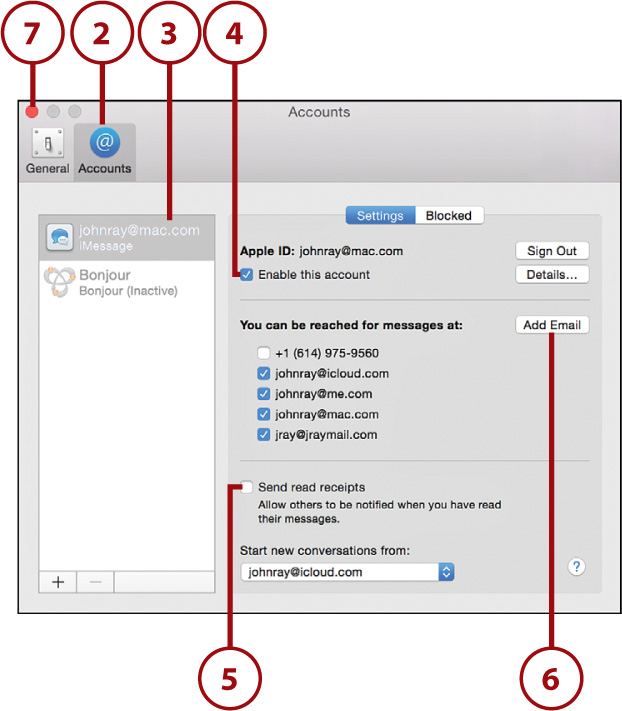
Editing Your iMessage Account Settings
To manage an iMessage account after you’ve first started the Messages application, you need to use the Messages preferences. Follow these steps to manage your settings:
1. Choose Messages, Preferences from the menu bar.
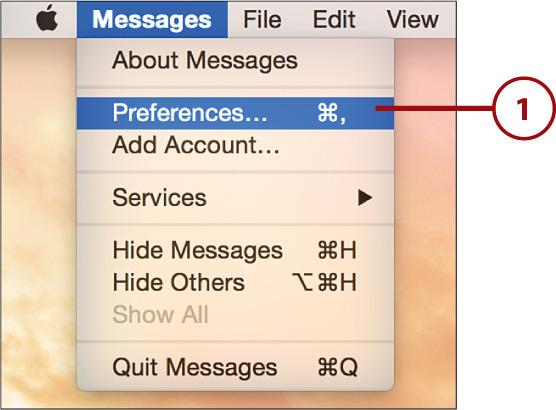
2. Click the Accounts toolbar icon.
3. Select the iMessage account entry.
4. Use the Enable This Account checkbox to enable or disable the account.
5. Uncheck Send Read Receipts if you don’t want your contacts to see when you’ve read their messages.
6. Click Add Email to add a new account that can receive iMessages.
7. Close the preferences when finished.
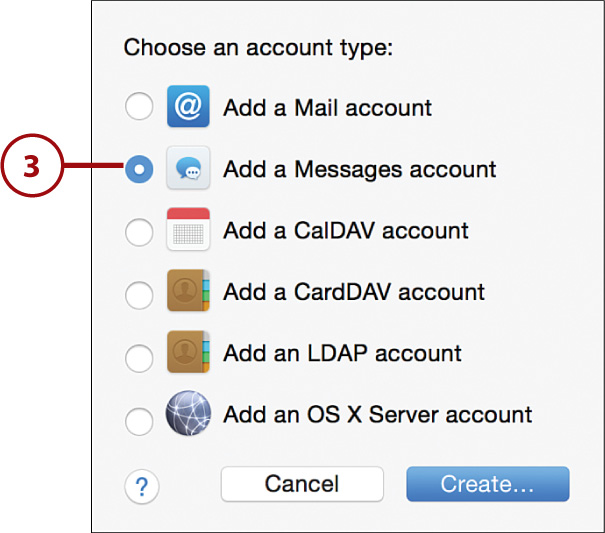
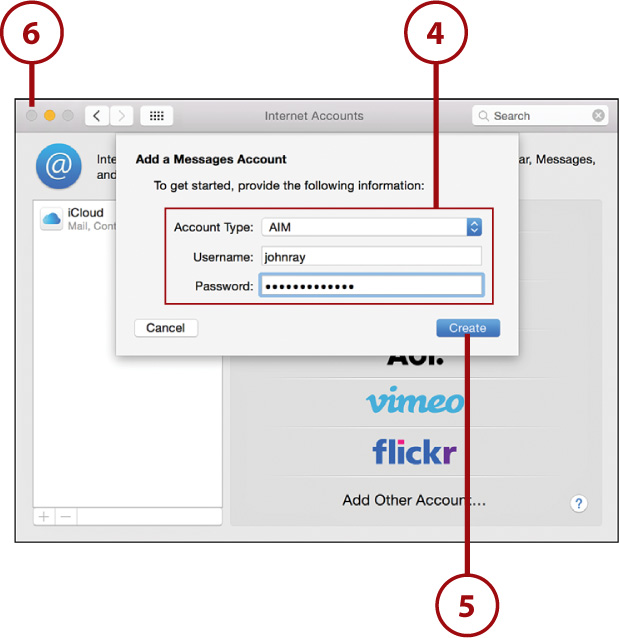
Adding a Traditional IM Account to Messages
If you want to configure IM after running Messages for the first time, I recommend using the central Internet Accounts Preferences panel. You need to know your account type, username, and password before continuing.
1. Open the Internet Accounts System Preferences panel.
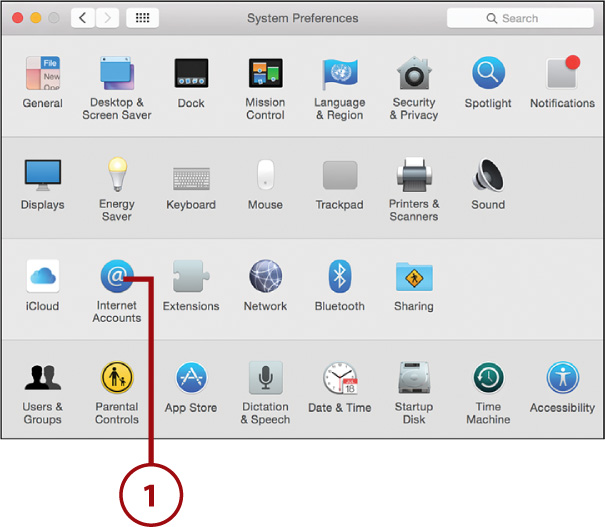
2. Choose the online service that provides your IM account by clicking its name on the right. If your service only provides IM and not mail or calendaring, click Add Other Account to directly configure an IM account.
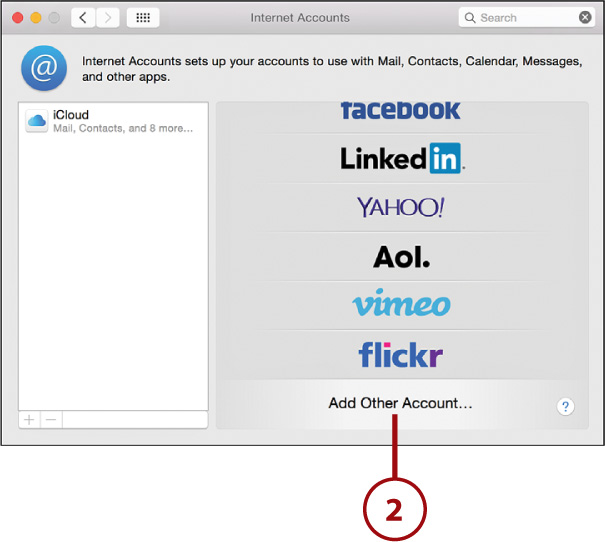
3. If you chose Add Other Account, select Add a Messages Account.
Multiple IM Accounts? No Problem!
Adding multiple IM accounts to Messages is no problem. The Messages buddy list window combines your buddy lists into a single consolidated list. You can log in and out of the different services using the availability controls for each account (they are stacked on top of each other), as described in the “Logging into (and out of) Your IM Account” task.
4. Fill in the requested information in the setup wizard that appears.
5. Click Create.
6. Close the System Preferences window.
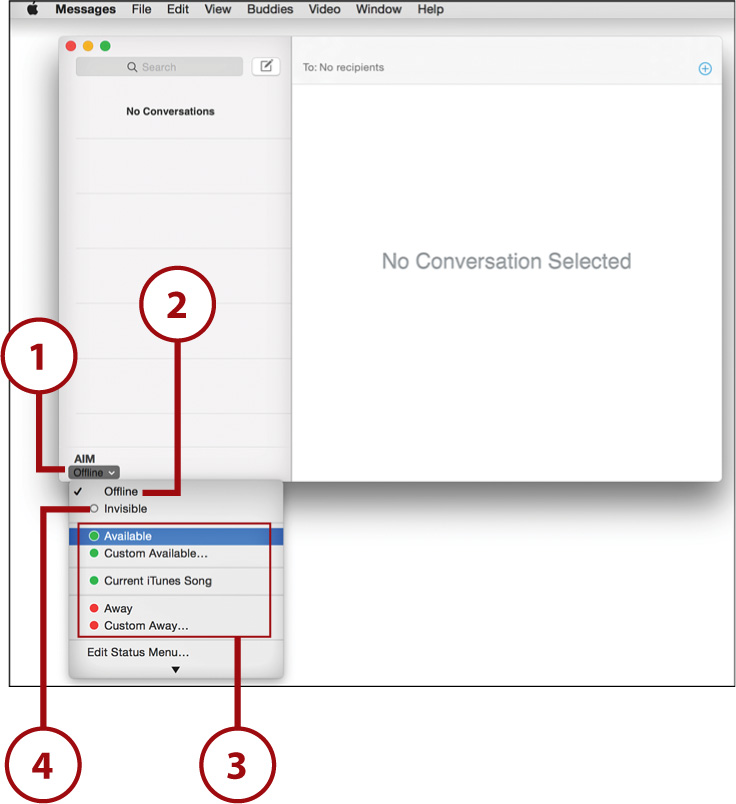
Logging into (and out of) Your IM Account
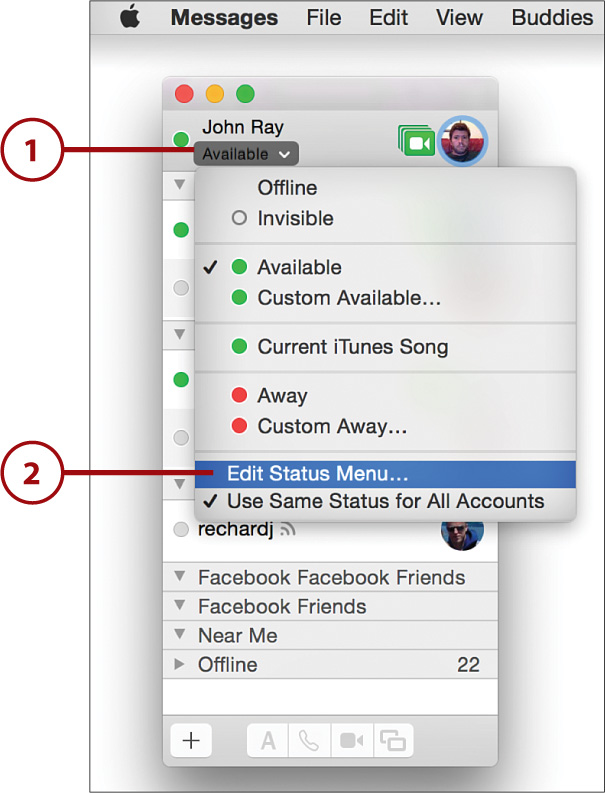
When Messages has an account configured, you’re ready to start Messages and begin chatting immediately. No “logging into” iMessage accounts is required; your IM account is automatically logged in when you start the application. To manually log out of or into your IM accounts, you simply need to set your status.
1. Click the status message in the lower-left corner of the Messages window.
2. Choose Offline to log out.
3. Choose any other status to log back into your IM account.
4. Choose Invisible to log in but hide your availability from other people.
If you configure multiple instant messaging accounts, you’ll see a special option appear in the status menu: Use Same Status for All Accounts. Choosing this ensures that whatever status you choose is reflected on all of the accounts in use.
Adding a Messages Status Menu
To add a Messages status menu to your menu bar, open the Messages Preferences and click Show Status in Menu Bar within the General settings. This gives you the ability to log in and out of your IM accounts when Messages isn’t running. Remember, however, that you can’t log out of your iMessage account; it is always active unless you explicitly deactivate it in the Messages preferences.
Configuring Your IM Identity
If you’re using traditional IM services (AIM, Yahoo!, and so on), you should customize your identity to better represent your online presence. With Messages, it’s simple to set custom status messages and pictures to reflect your current mood.
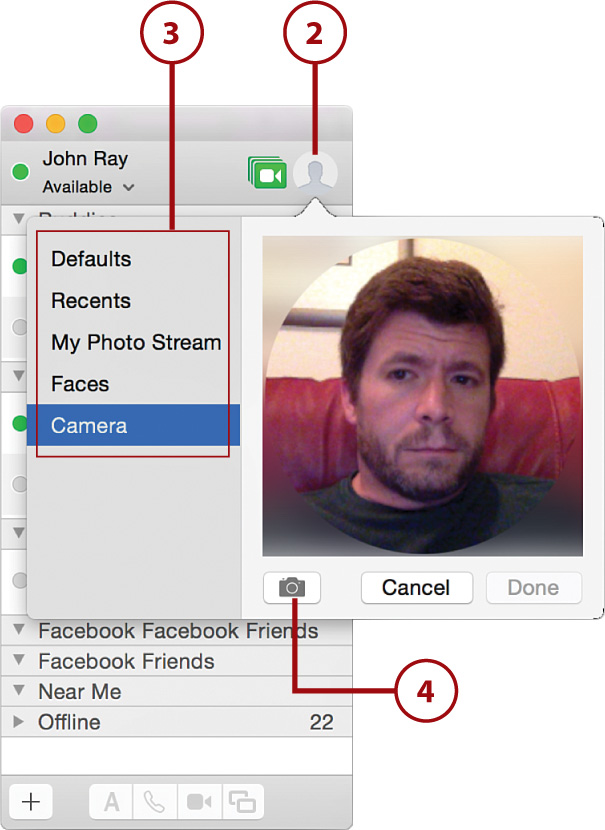
Setting the Messages Picture
Because your Mac has a camera built in, you can swap your IM picture whenever you want. Just smile and click, and instantly your buddies are seeing a new image.
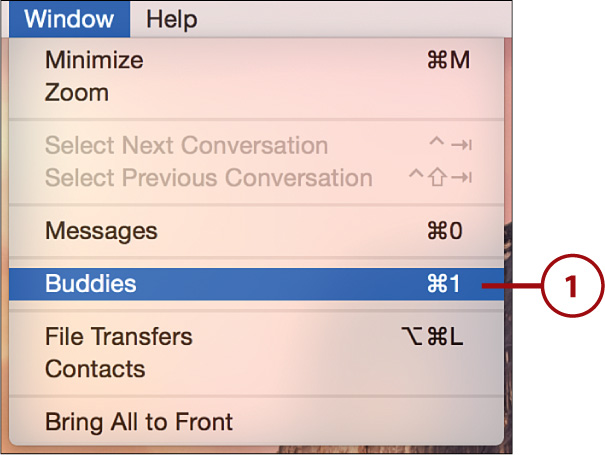
1. Choose Window, Buddies to open the IM buddy list.
2. Click the picture in the upper-right corner of the Messages buddy list.
3. Choose from a Recent picture, iPhoto Faces, iCloud Photo Stream, Photos linked to your IM account, Default IM pictures, or click Camera to use your Mac’s camera.
4. When Camera is selected, click the camera icon to take a new picture.
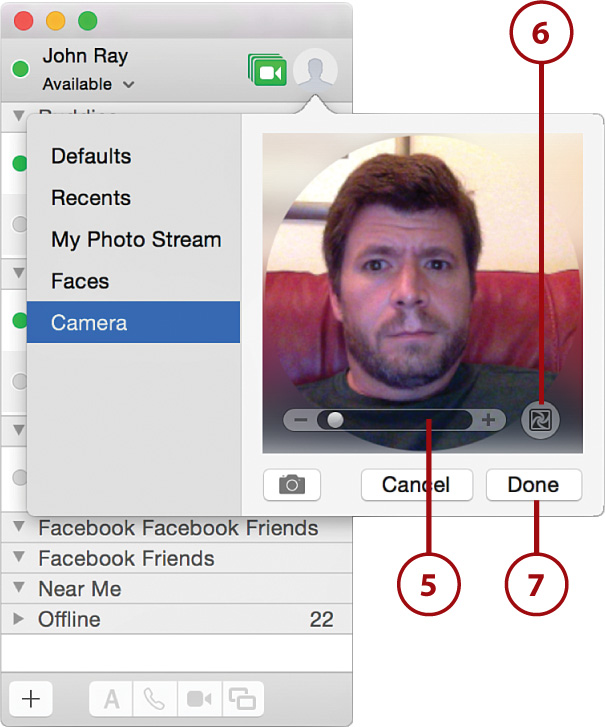
5. Set cropping and size for the picture by dragging it within the preview window and adjusting the zoom slider.
6. Apply effects, if desired, using the Effects button.
7. Click Done to start using the new picture.
Configuring Custom Status Messages
Your status message can convey your state of mind, ask a question, or present some other information to your buddies. To configure a new status message, follow these steps:
1. Click the status pop-up menu either in your buddy list or in the main messages window.
2. Choose Edit Status Menu.
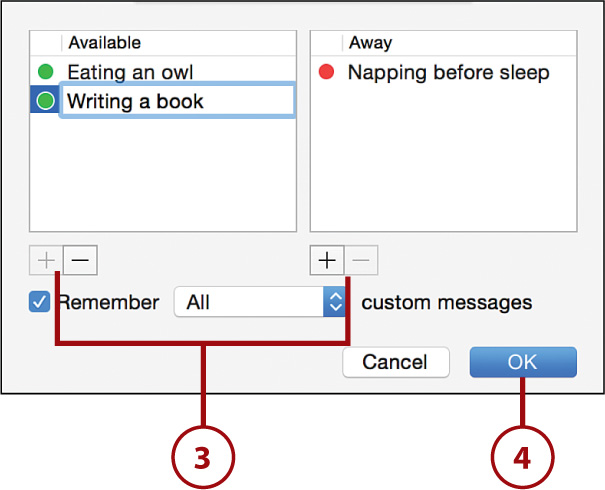
3. Click + or – under the Available or Away lists to add or remove status messages.
4. Click OK to save your status message settings.
Managing Your IM Buddy List
Sending iMessages to your friends on Macs and iOS devices requires that you know their iMessage address or have it listed in your Contacts application. If you’re using an IM account, however, you need to make sure that your buddy list is kept up-to-date with the people you want to chat with.
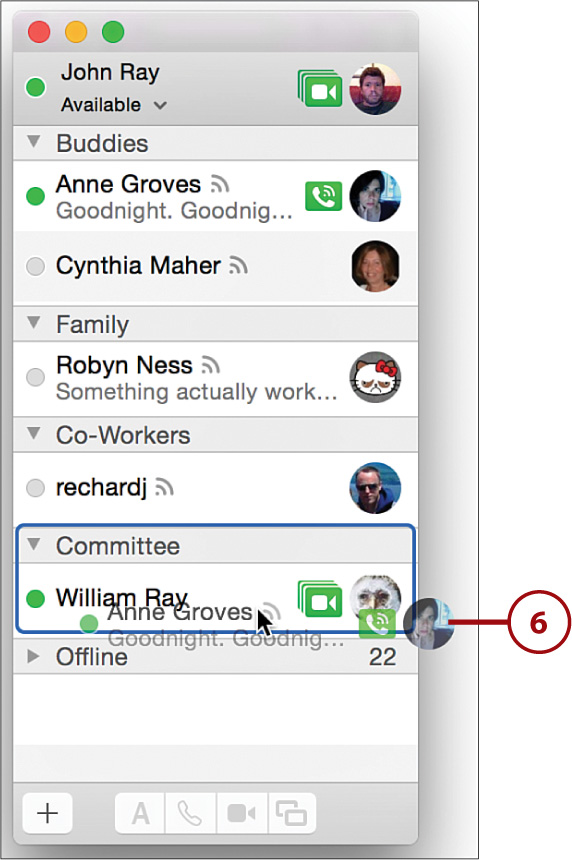
As you probably know, a buddy list contains all the people you want to chat with (and possibly some you don’t). With each buddy is a display of his status (Away, Available, Idle, and so on) and an icon to indicate his chat capability.
Cross-Platform Video Conferencing
Messages can carry out cross-platform A/V chats with Windows users using AIM, Google Talk, or Yahoo!.
Adding Buddies
To initiate an IM chat with someone, you must first add her to your buddy list.
1. Click the + button at the bottom of the buddy list.
2. Choose Add Buddy.
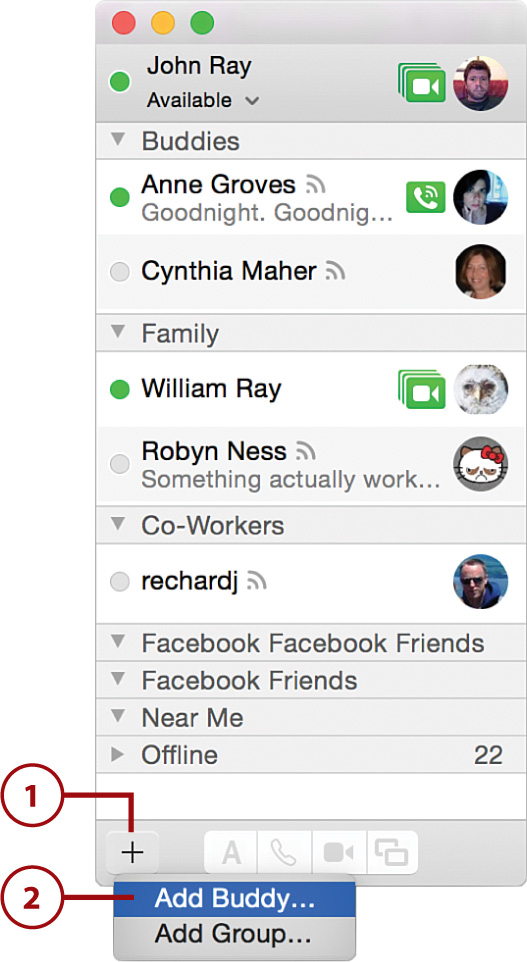
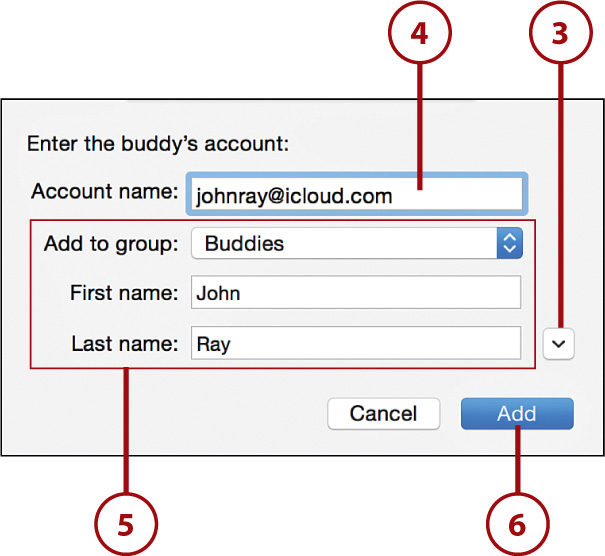
3. If you have a contact card for the person you want to add, click the disclosure arrow in the lower-right corner of the window to display your contacts, and then find and click the person’s name.
4. Enter your buddy’s screen name (Account Name).
5. Enter a first and last name for your addition, and choose a group, if any are available. Think of groups as a “folder” for your buddy.
6. Click Add.
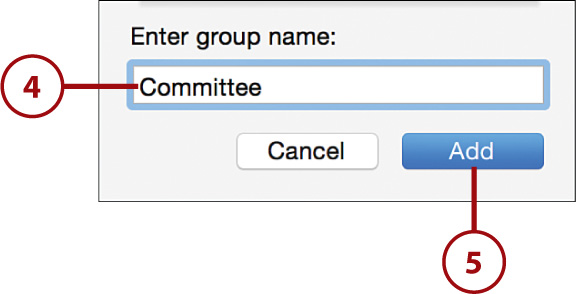
Adding Groups
As your IM buddy list grows, you might want to consider organizing your buddies into groups, such as friends, family, coworkers, and so on. Adding new groups is similar to adding new buddies.
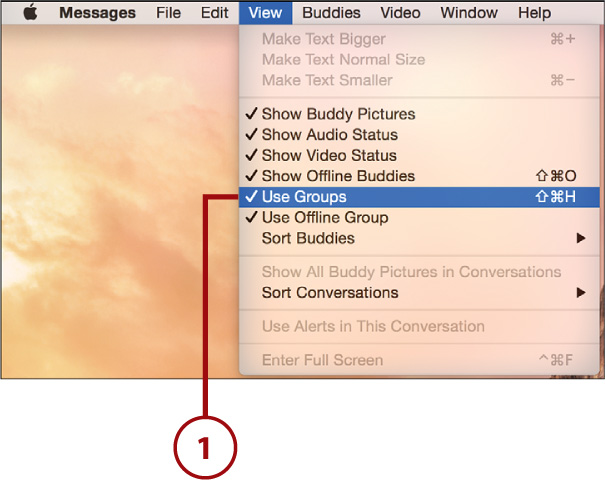
1. Make sure View, Use Groups is selected in the Messages menu bar.
2. Click the + button at the bottom of the buddy list.
3. Choose Add Group.
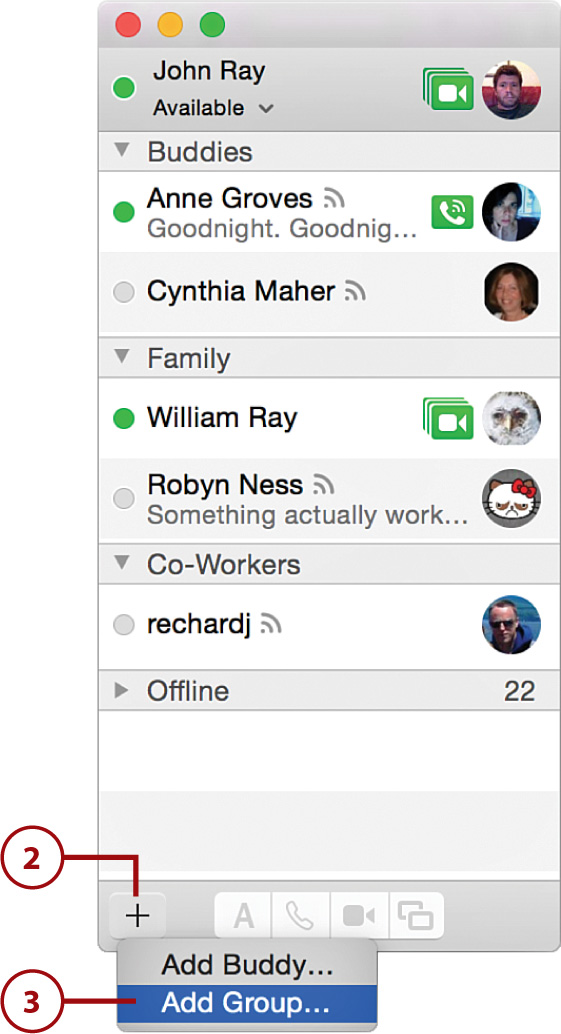
4. Enter a name for the new group.
5. Click Add.
6. Drag buddies within the buddy list into the group where you want them to appear.
Recent Buddies
By default, a group called Recent Buddies is added to your buddy list after you start chatting with people. This group contains all the new contacts you’ve communicated with recently. You can disable this group within the Messages IM account settings.
Communicating with IM and iMessage
Messages, through an iMessage account, can communicate with your friends and colleagues using text and file attachments, such as images, or you can even share your screen. iMessage accounts also work with FaceTime (discussed in the next section) to initiate voice and video calls.
When using IM accounts, Messages supports a similar range of features. If you have both an iMessage and an AIM account, for example, you can video conference with your friends across Mac and Windows platforms.
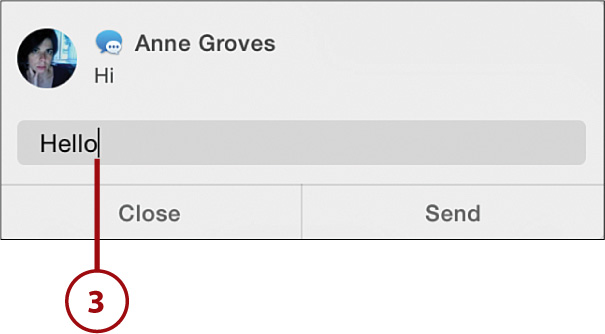
Responding to an Incoming Chat via Notification Center
After you’ve configured Messages and given your iMessage address screen name to your buddies, chances are, you’ll start getting a few messages. To respond to an incoming chat request, follow these steps:
1. If you’re in another application with no windows open, the Messages icon updates with a count of the messages you have waiting and a notification appears.
2. Click Reply in the notification,
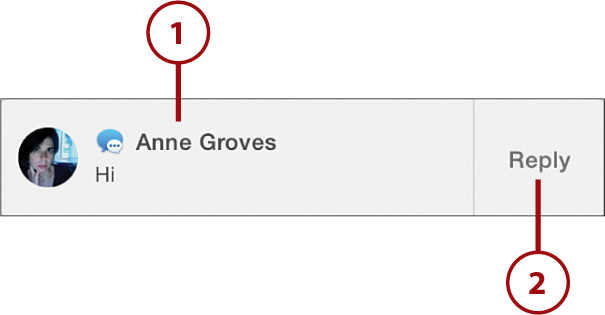
3. Type a reply and press Return.
Responding to an Incoming Chat in Messages
Notification Center is useful for quick replies. For a full chat experience, however, you’ll want to use Messages itself.
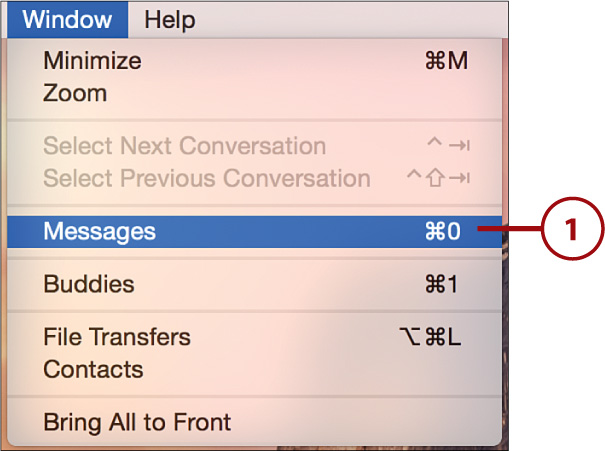
1. Open Messages and make sure the main window is visible. If it isn’t, choose Window, Messages from the menu bar.
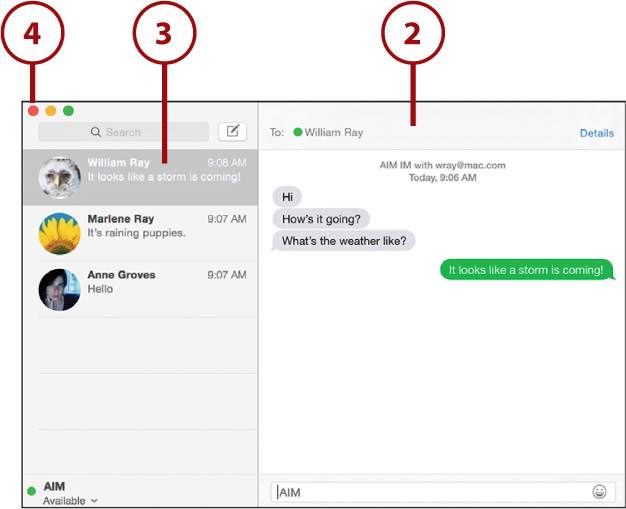
2. The Messages window shows all your current and new conversations.
3. To accept a conversation request, just click the entry in the list on the left and begin chatting.
4. When you’re finished chatting, close the Messages window.
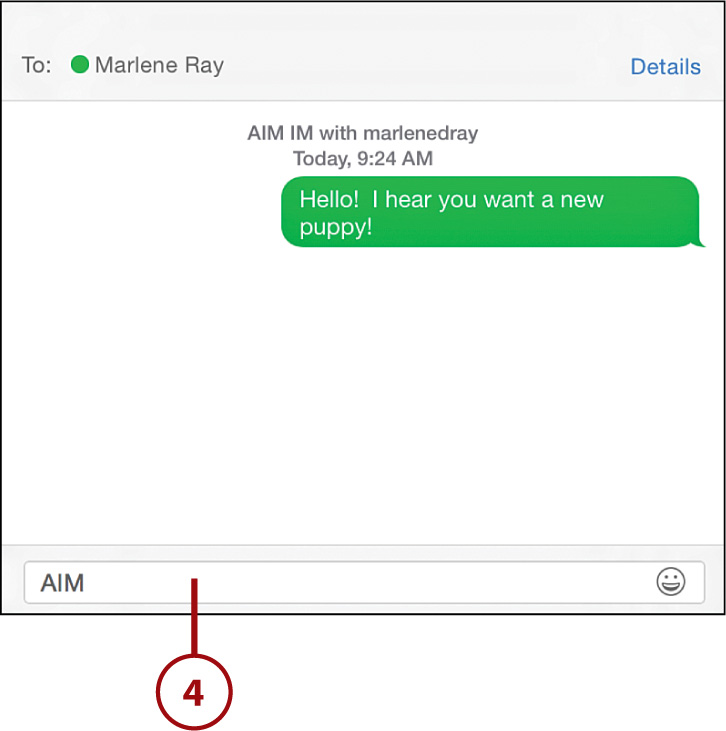
Starting a Chat in Messages
To initiate an IM or iMessage chat with one or more buddies, make sure the Messages window is visible (Window, Messages) and follow these steps:
1. Click the New Chat button.
2. Click the + button to choose from a list of your contacts (useful for iMessaging) or your IM buddy list.
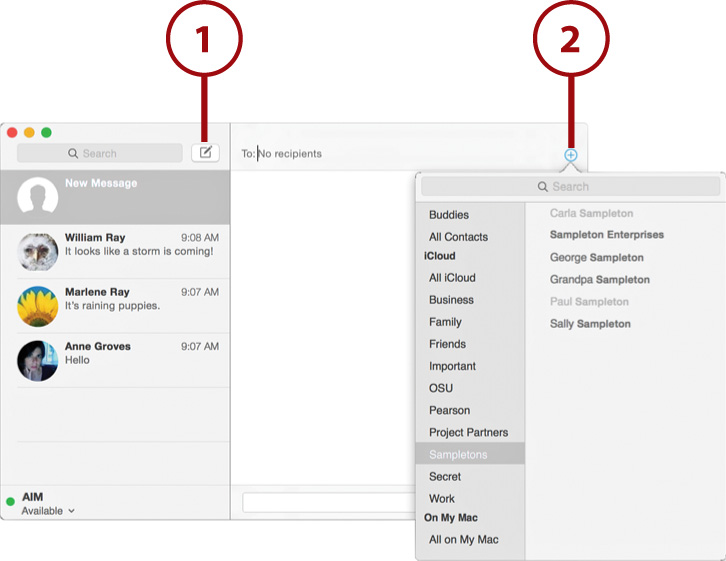
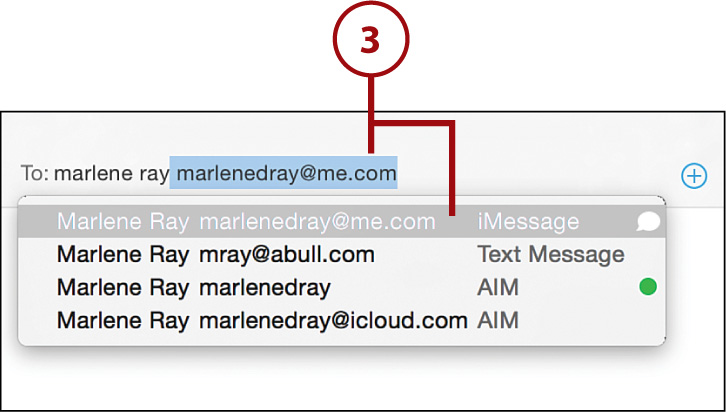
3. Alternatively, begin typing in the To field. Messages autocompletes as you type and shows you the different accounts you can use to communicate with someone. Click the contact (and communications method) you want.
4. Type to your friend, press Return, and wait for a response.
iOS 8, Yosemite, and SMS
If you’ve connected your iOS 8 device and Yosemite (as described in Chapter 12, “Using Yosemite with Your iDevices”), you’ll be able to select a contact’s phone number and send him or her text messages through your iPhone! You’ll even see incoming text messages appear directly in your Messages window.
Double-Click to Chat
If you’re viewing your buddy list, you can also initiate an IM chat by double-clicking a buddy or clicking his name and then clicking the A (for text chat) button at the bottom of the buddy list.
Consolidate or Separate Messages
Messages automatically consolidates your chats into a single window. To move a chat to a separate window, double-click one of the conversations in the Messages window. It becomes its own standalone chat window.
Starting a Chat via Notification Center
New in Yosemite is the ability to send a message via Notification Center—even if Messages isn’t running. To use this nifty feature, follow these steps:
1. Open Notification Center.
2. Click the Messages (speech bubble) icon at the top of the Notification Center pane.
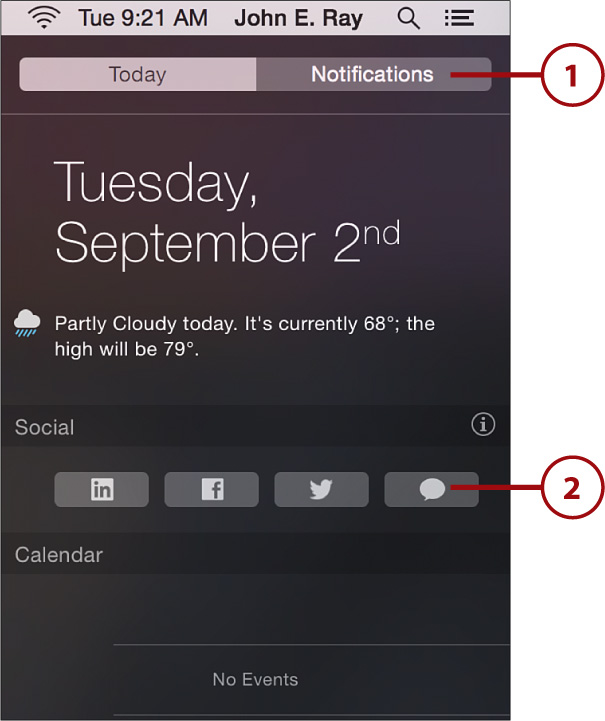
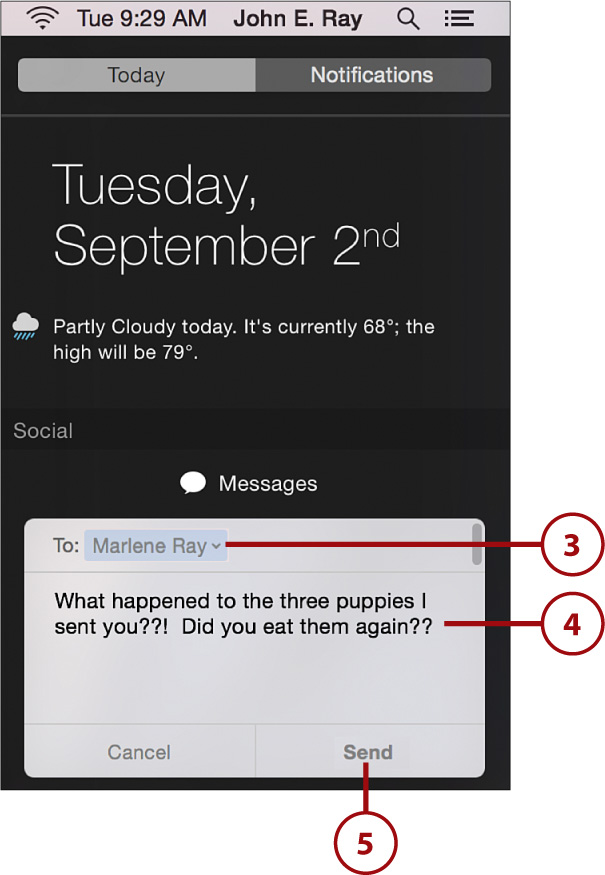
3. In the window that appears, type the name of a contact to message. Notification Center will auto-complete the name as you type.
4. Enter your message below the To: line.
5. Click Send to transmit the message.
Using Voice or Video for Chatting (New!)
A/V chats require significantly more bandwidth than text chats. Messages automatically senses the capabilities of your machine and Internet connection, and that of the people involved in your conversations. Messages does not allow chats unless it thinks they will be successful. Using Messages, you can chat with up to 3 other people via video and 10 via voice-only, depending on your connection and assuming that they have microphone- or camera-enabled systems. Unfortunately, not all chat programs are created equal—some of your contacts might not be able to use video; others may only use Facetime or AIM—it all depends on the software that they’re using.
Starting a Voice or Video Chat
When creating a voice or video chat, regardless of your system capabilities or those of your chat partners, Messages shows only the relevant options.
1. Begin a chat with the individuals you want to include in an audio or video session.
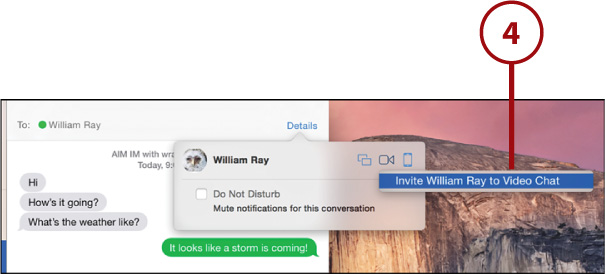
2. Click the Details link in the upper-right corner of the chat window.
3. You see icons for the available voice (an iPhone) and video (a camera) chat options listed. Choose one.
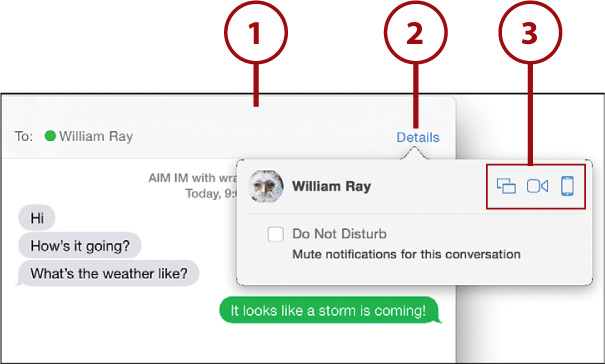
4. A menu showing available video/audio chat methods is shown. Here, you can only see one. If a user has both FaceTime and AIM, for example, you might see more. Pick the chat method you want.
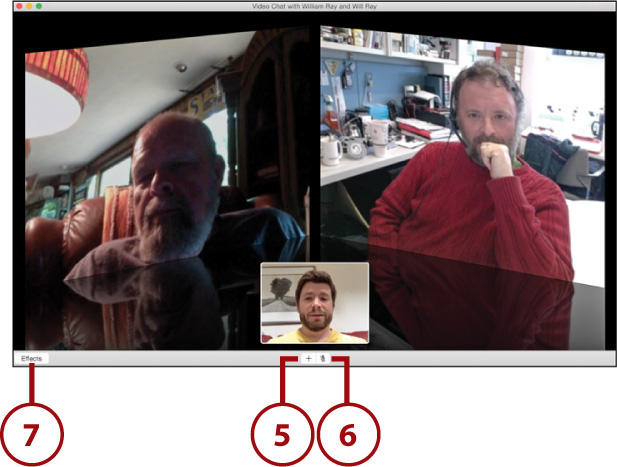
5. Your audio/video chat begins. Click the + button to add members to the chat. A three-way video conference is shown here.
6. Toggle mute on the chat by clicking the microphone.
7. When conducting a video chat, click Effects to apply real-time video effects to your onscreen image.
Be Heard with a Headset
If you find yourself using video or audio chat frequently, you might want to invest in a microphone or headset. To change the Messages microphone and set up a headset, open the Audio/Video section of the Messages preferences.
Silence Your Enemies (or Friends!)
When you click the Details link for someone, you see a checkbox labeled Do Not Disturb. If you check the box, you will not be alerted if the person tries to contact you. No beeps, no rings, nothing.
Sharing Your Files and Screen (New!)
In addition to being a great communications tool, Messages can serve as a collaboration platform. If you’ve ever found yourself in the position of having to talk through a document over a long distance or troubleshoot technical problems remotely, you’ll appreciate the additional functionality built into Messages.
Transferring Files over Messages
Messages provides a convenient mechanism for sending files while chatting. You can send individual files or even entire folders just by dragging them into Messages.
1. Find the file or folder that you want to share.
2. To transfer to an online buddy you aren’t currently chatting with, drag the file to her name in your buddy list (IM only).
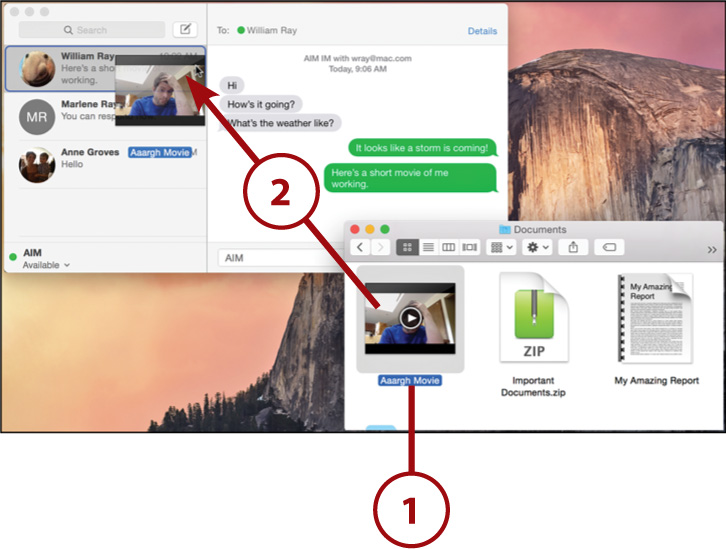
3. To transfer a file within an active chat session, drag the file to the chat window. Files such as images are displayed inline in the chat and can be previewed without opening the file.
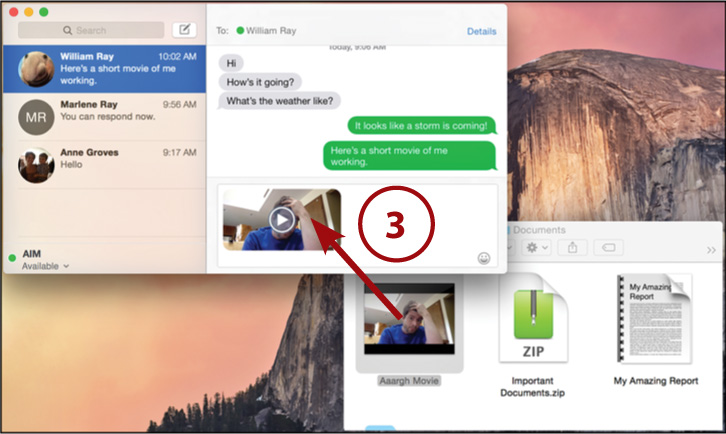
Confirming File Transfers
If someone attempts to transfer a file to you over Messages, you must click the download within the chat window to accept the file. By default, all transferred files are saved in the Downloads directory.
Starting a Screen-Sharing Session
A unique Mac-only feature of Messages is the capability to share someone else’s screen. Using this tool, you can control the other person’s computer as if you were sitting directly in front of it.
1. Begin a chat with the individuals you want to include in a screen-sharing session.
2. Click the Details link in the upper-right corner of the screen.
3. Click the Screen Sharing icon (overlapping rectangles).
4. Choose whether you want to request access to your buddy’s screen or if you want to share your screen.
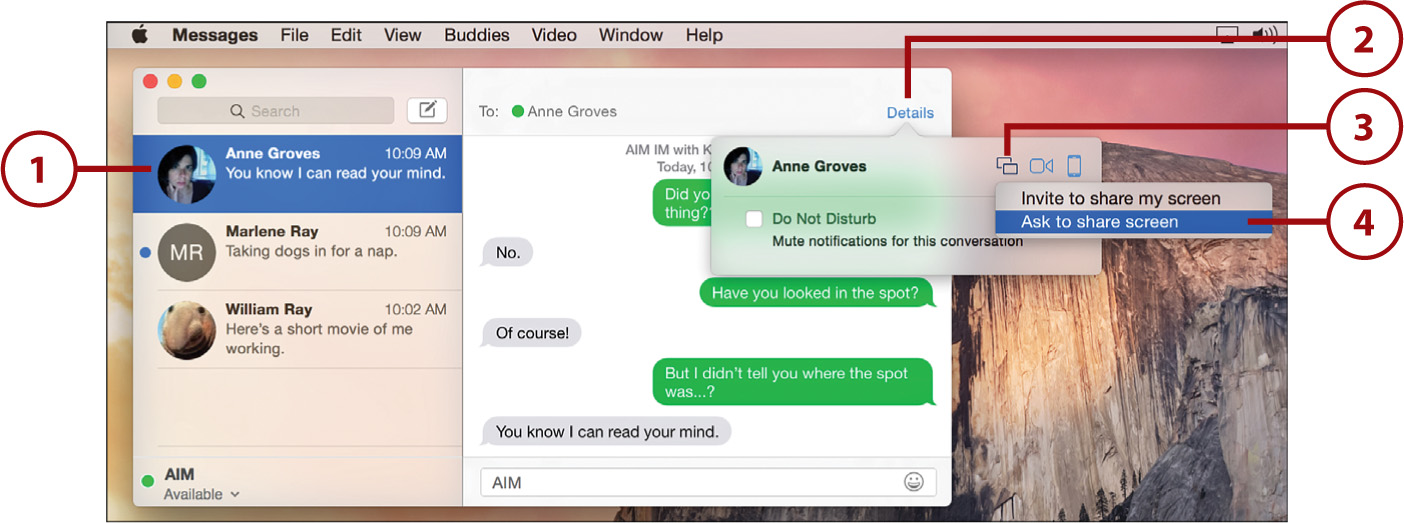
5. After the request is accepted, you (or your buddy) have access to the remote screen. You can interact with the desktop as if you were sitting in front of the computer.
6. Click the miniaturized version of the screen to switch between viewing the local screen and viewing the remote screen.
7. Click the X on the miniature screen to close the session.

When sharing a screen, Messages also starts a simultaneous audio chat, which makes it easy for you to talk through issues with the remote party.
Video Calls with FaceTime
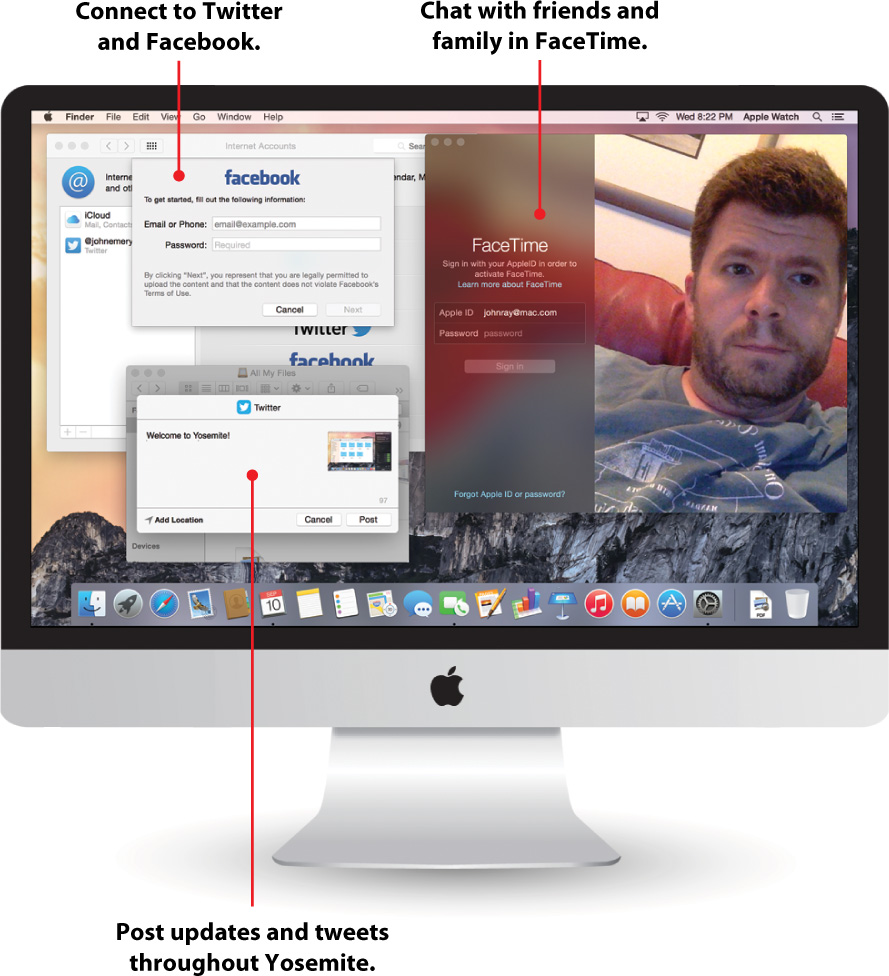
Similar to an iMessage account in Messages, FaceTime is an always-running video chat service that bridges your iOS devices and your Macs. FaceTime starts automatically if someone places a FaceTime call, and it simultaneously rings on as many Macs, iPhones, and iPads as you want.
Also as with iMessage, FaceTime requires zero configuration beyond providing an email address that your friends can “call.”
Setting Up FaceTime
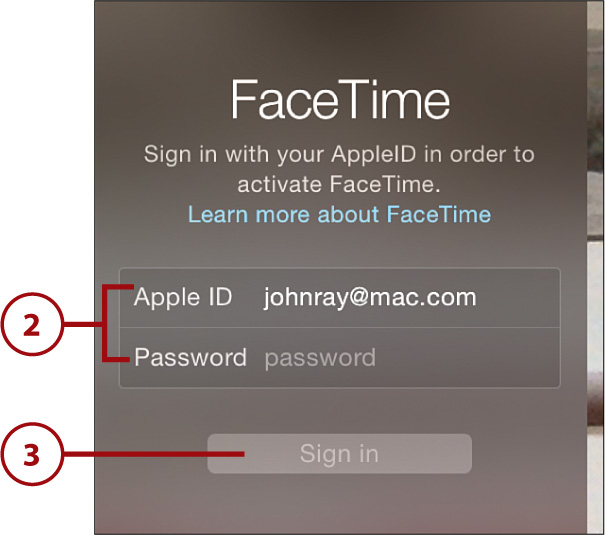
The first time FaceTime starts, you need to provide it with an Apple ID for registration. After the initial ID is provided, you can associate as many email addresses as you want with a given install. Follow these steps to add FaceTime addresses:
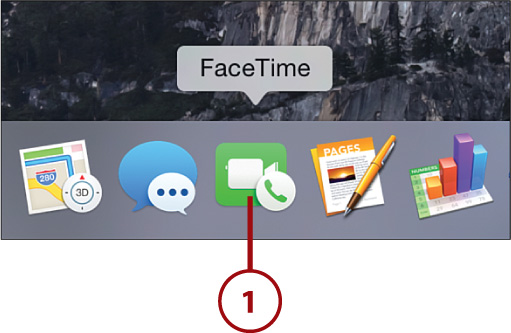
1. Open FaceTime from the Dock, Launchpad, or Applications folder.
2. Enter your Apple ID and password.
3. Click Sign In.
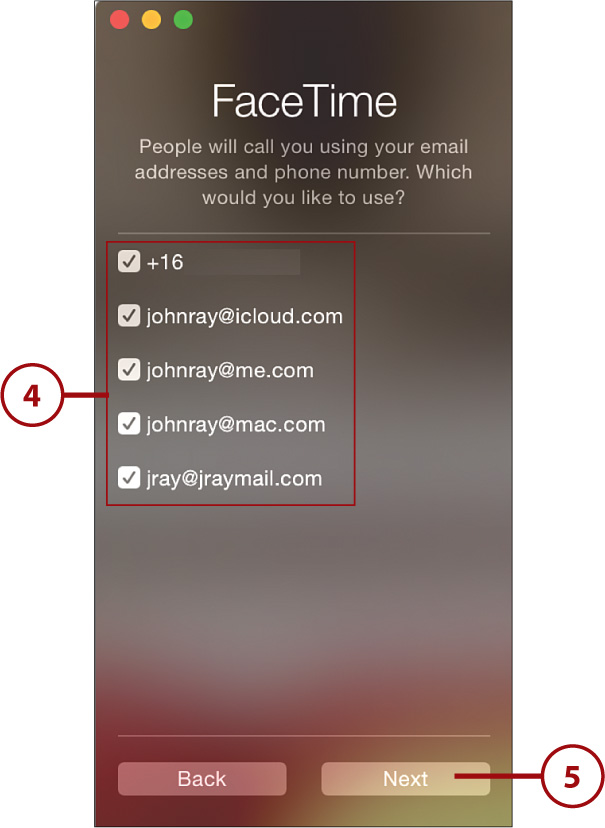
4. Check (or uncheck) the email addresses associated with your Apple ID that you want to use with FaceTime. You can edit this list in the preferences, discussed later.
5. Click Next.
6. FaceTime logs in, and you’re ready for calls.
Placing FaceTime Calls (New!)
To place a call with FaceTime, you need to have the address or phone number of a FaceTime-compatible contact in your address book. In other words, make sure your family and friends have an iOS device or a Mac and have configured FaceTime. You also need to be sure you’ve stored their contact information in the Contacts application. (See Chapter 8, “Managing Who, Where, When, and What,” for more information.)
Placing Calls from the Contacts List
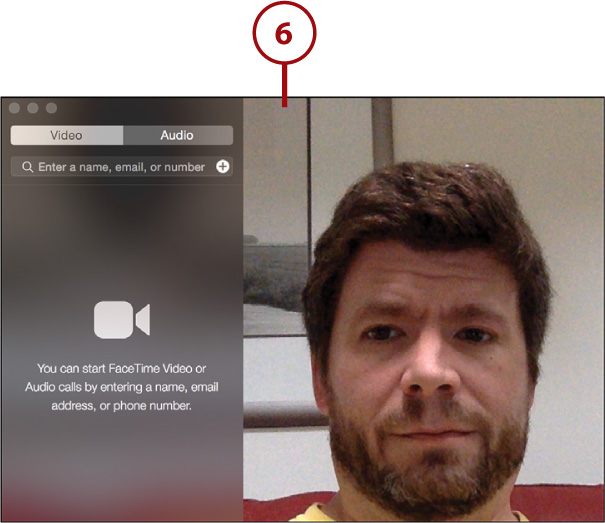
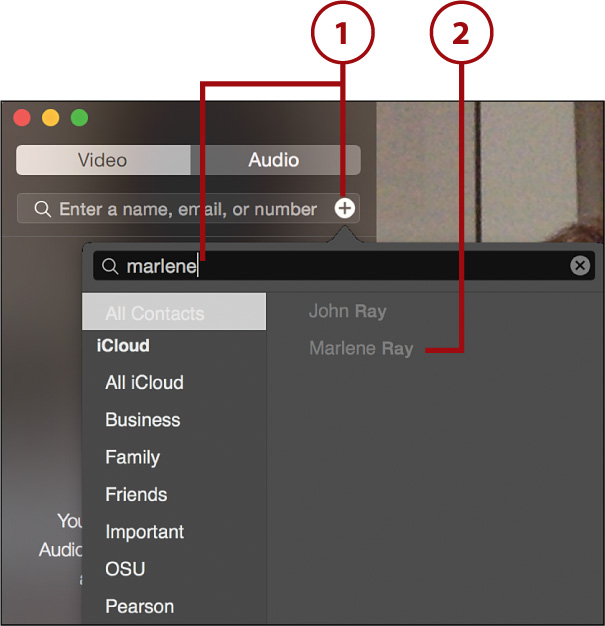
When you’ve got yourself a few equipped friends, follow these steps to call them over FaceTime:
1. Click the + button at the top of the FaceTime window, or begin typing a name.
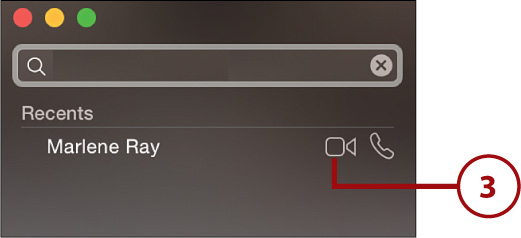
2. Browse your contacts. When you find the person you want to call, click her name.
3. The contact appears in the FaceTime window with a phone and camera icon to the right. Click the camera icon to initiate a video chat, or the phone icon to start a voice-only chat.
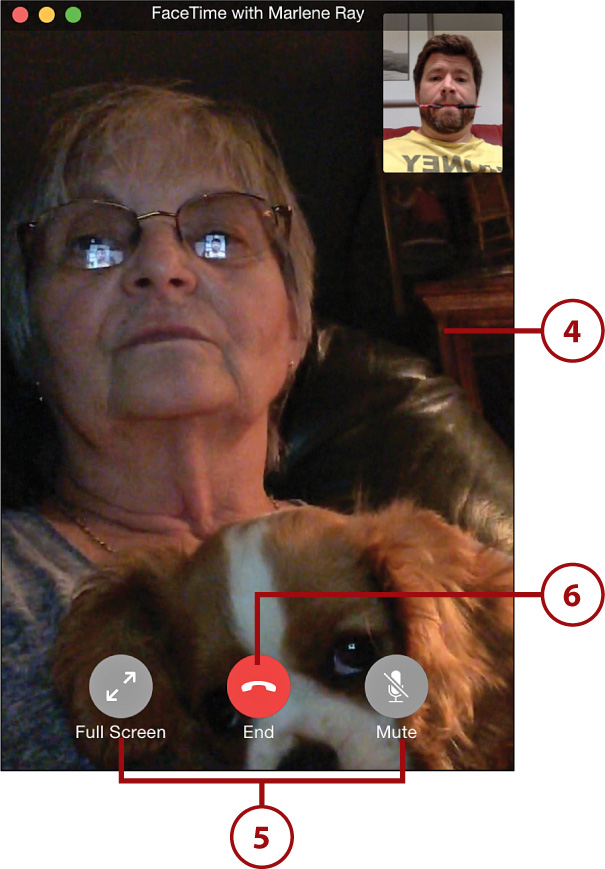
4. If the call is connected, you are able to see and talk to the other person. Otherwise, skip to step 7.
5. Use the button at the bottom-right corner of the window to mute the call, or use the button at the bottom-left corner to go full screen.
6. Click End to hang up when you are finished talking.
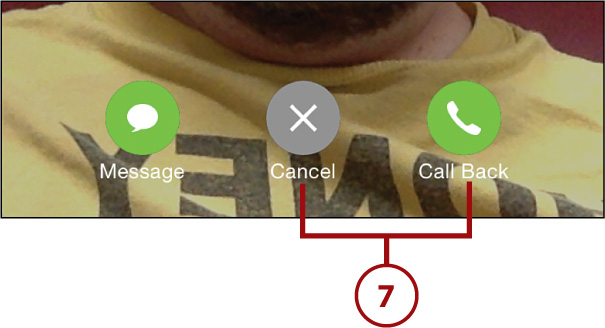
7. If the call does not connect, you’re given the options of cancelling the call or calling back (redial).
See Your Surroundings
By default, the FaceTime camera takes a portrait image. If you want to see more of your surroundings, you can rotate to landscape mode by choosing Video, Use Landscape (Command+R) from the menu bar.
Receiving a FaceTime Call
If you’ve ever received a call on an iPhone, you’ll be right at home receiving FaceTime calls on your Mac:
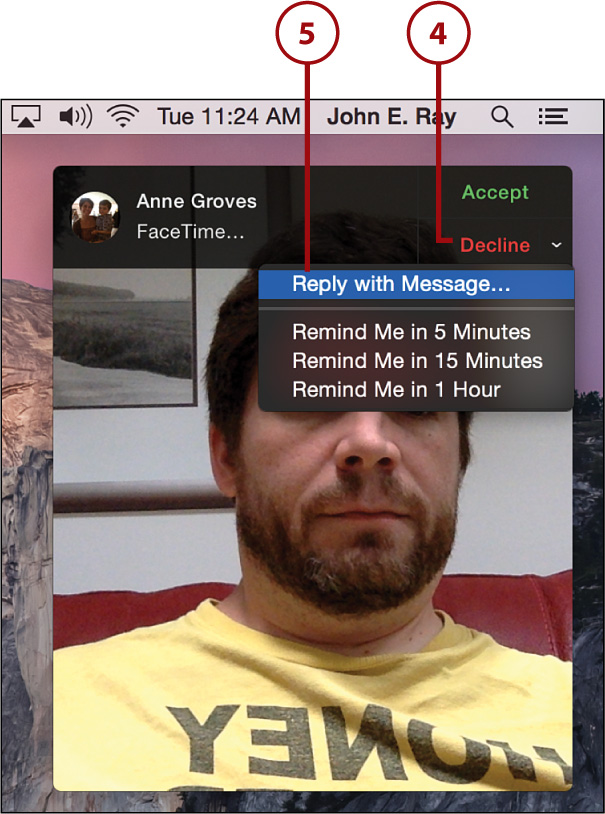
1. When an incoming call registers, FaceTime displays a notification—no need to start the application.
2. Click Decline to ignore the call.
3. Click Accept to begin talking.

4. Click and hold Decline to reply with Messages or to remind yourself to call back.
5. Click Reply with Message to send an instant message to your caller, rather than start a video chat.
Did I Miss a Call?
If you’re wondering whether someone tried to contact you while you were away, the FaceTime icon shows a count of your missed calls. You can find out details about the missed calls by accessing the call list, our next task.
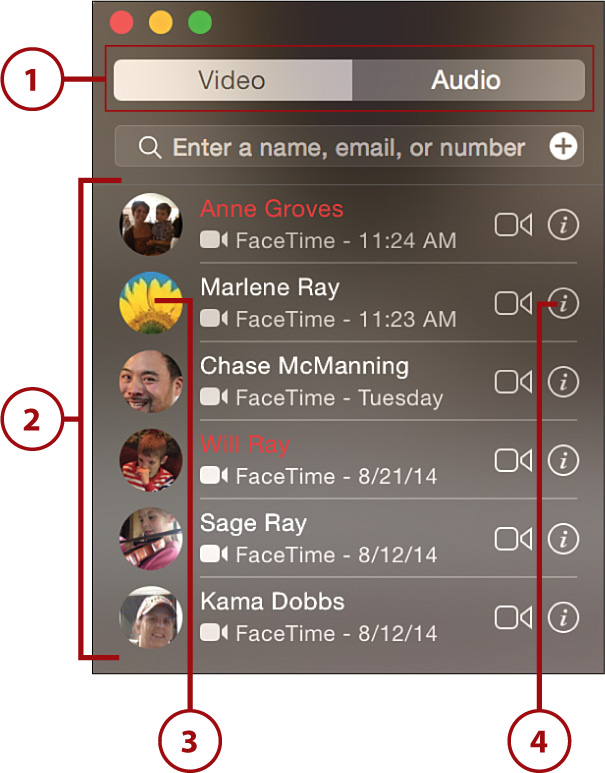
Accessing Your Call List
FaceTime keeps a list of all incoming and outgoing calls, even if you aren’t around your computer when a call comes, so that you can check later to see who called.
1. Click the Video button at the top of the FaceTime window for video calls or Audio for voice-only calls.
2. All incoming and outgoing calls are shown. Missed calls display in red.
3. Click an entry to place a call.
4. Click the “i” icon at the right side of an entry to view that person’s address book information and a full call history.
Disabling FaceTime
FaceTime is great, but as with a phone, sometimes you want to just ignore it. If you’re having one of those days, you can disable FaceTime on your Mac so that it won’t ring if someone tries to call.
1. Choose Turn FaceTime Off (Command+K) from the FaceTime menu.
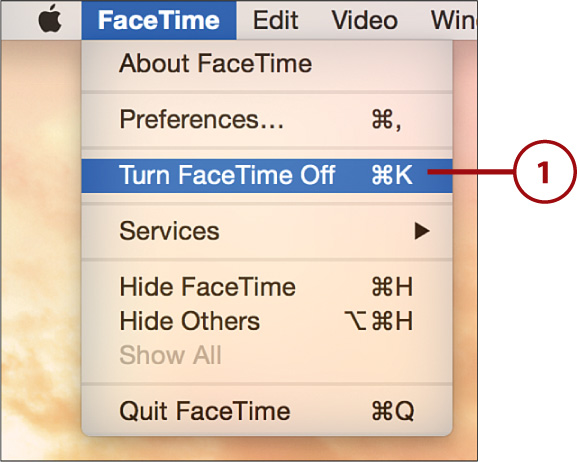
2. FaceTime is now disabled on your Mac (not shown).
Remember Do Not Disturb!
Turning on Do Not Disturb (see Chapter 1, “Managing Your Desktop”) keeps FaceTime from “ringing” your machine. You can effectively use Do Not Disturb to silence FaceTime for short periods of time, if you prefer that approach.
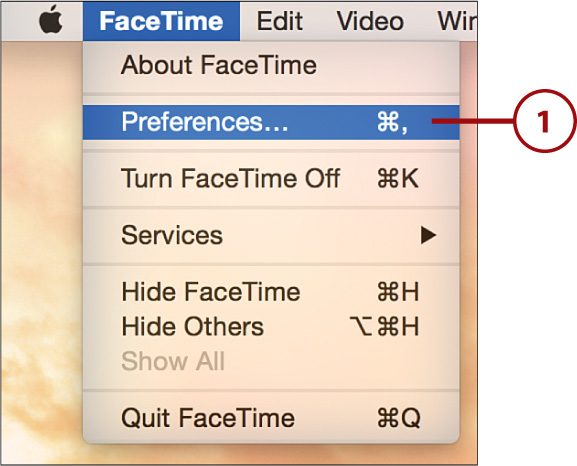
Updating Account Information FaceTime Preferences
If you’ve registered several FaceTime accounts and want them all to ring on your Mac, you need to edit the preferences to list all the email addresses you have. To do this, follow these steps:
1. Open the FaceTime Preferences by choosing FaceTime, Preferences from the menu.
2. Click Add Email to add an alternative email account. If you have not registered that address with Apple, you need to look for an email with a clickable link for verifying your address. Repeat this step for as many addresses as you want to use with your FaceTime installation.
3. Use the Start New Calls From menu to pick the address or phone number to use as your caller ID.
4. Use the Ringtone dropdown to set the sound that plays for incoming calls.
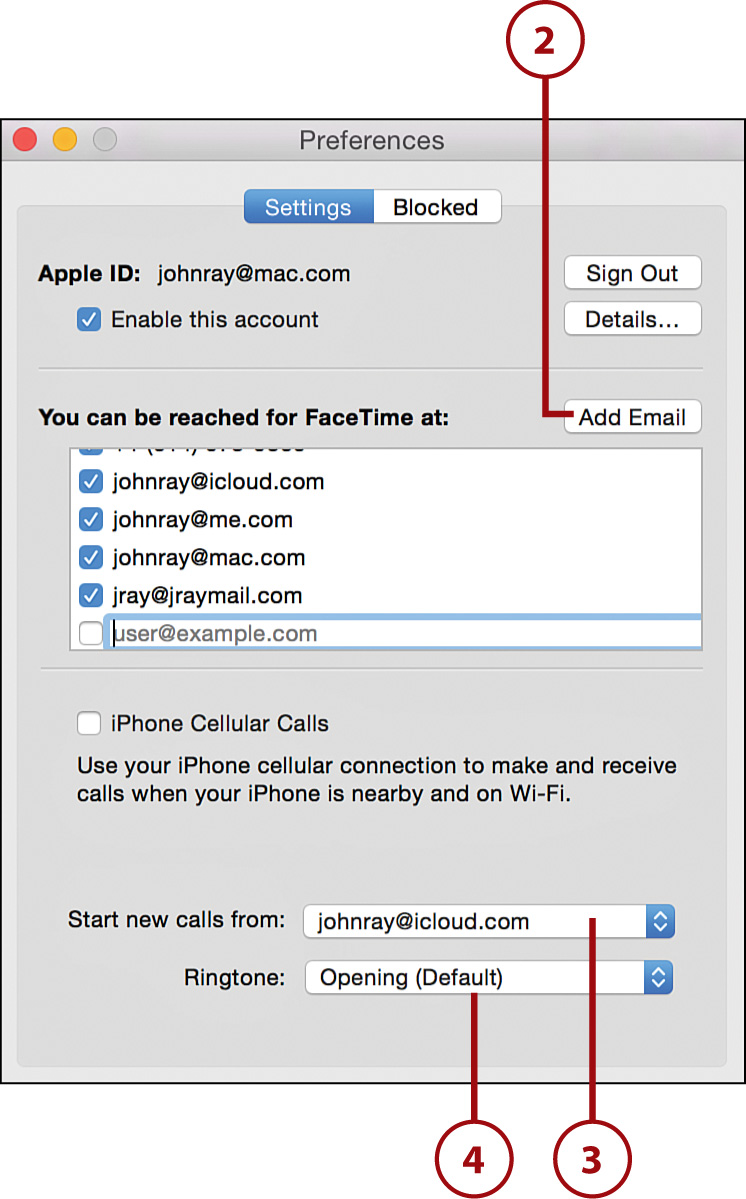
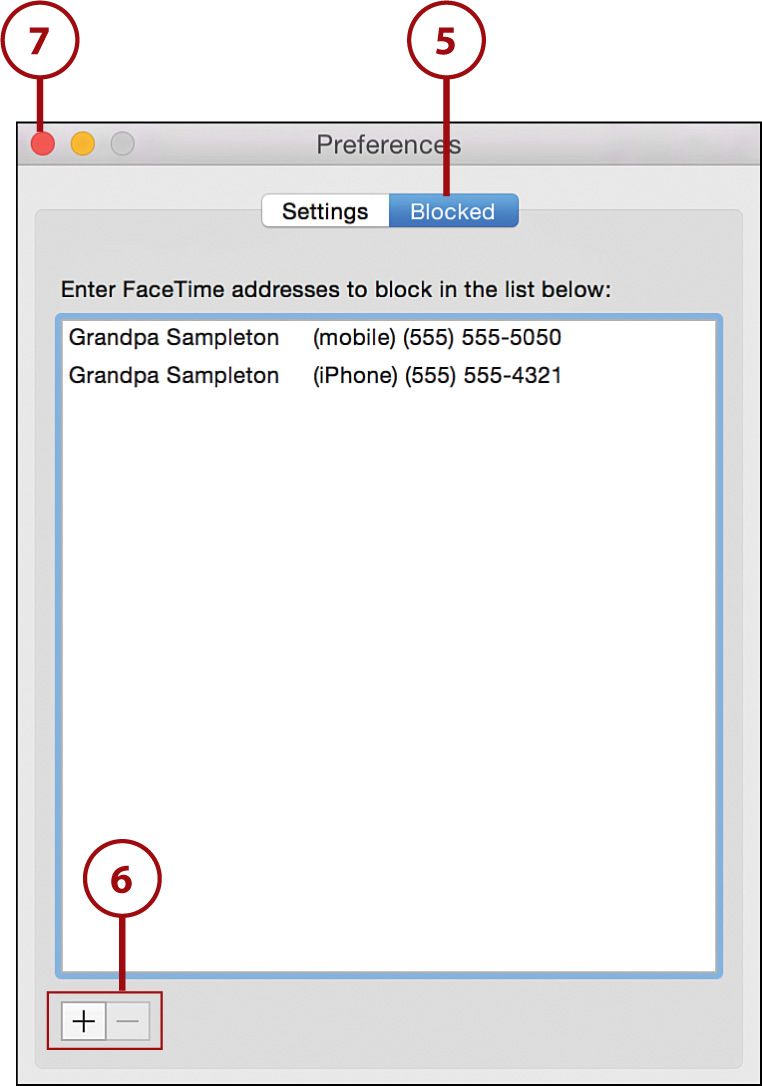
5. Click the Blocked button at the top of the window to manage the FaceTime “block” list. These are people who are ignored if they try to call you via FaceTime.
6. Use the + and – buttons to add and remove individuals from the block list.
7. Close the preferences when done.
Using the Yosemite Twitter and Facebook Posting Support
Yosemite has baked-in Twitter support to make sending tweets as easy as clicking a button in many of your favorite applications. Facebook users can also get in on the fun by posting to their wall and photo albums in the same way. This section looks at how you can enable Twitter and Facebook support throughout OS X and how to make use of them.
Enabling Twitter
To see the tweeting options in Yosemite, you must first enable Twitter. To do this, follow these steps:
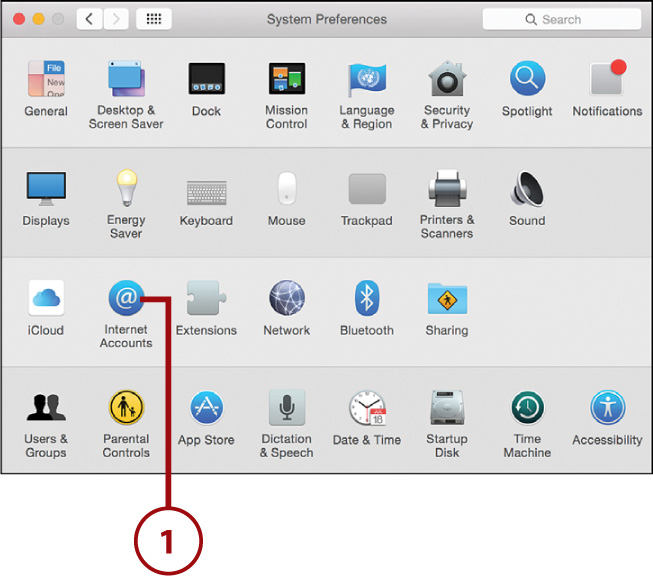
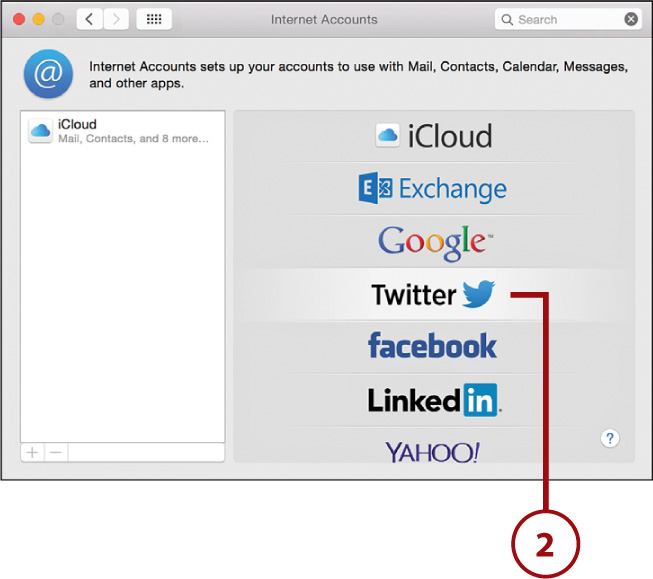
1. Open the Internet Accounts System Preferences panel.
2. Click the Twitter service link on the right.
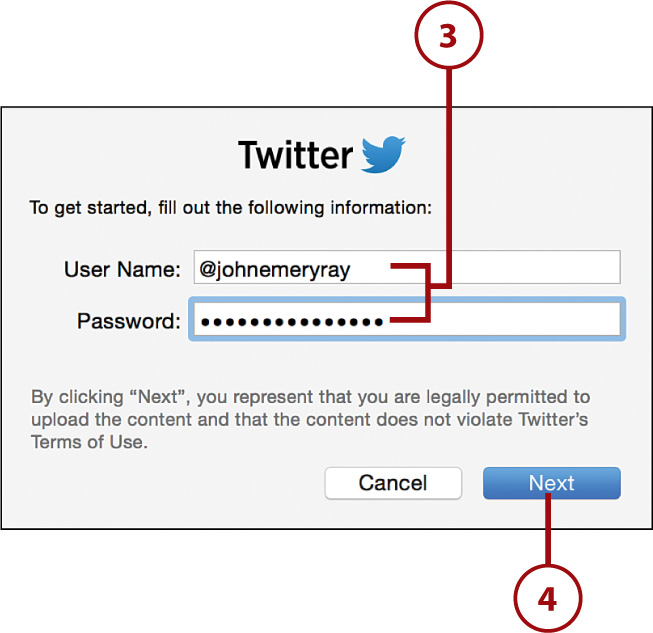
3. Enter your Twitter username and password.
4. Click Next.
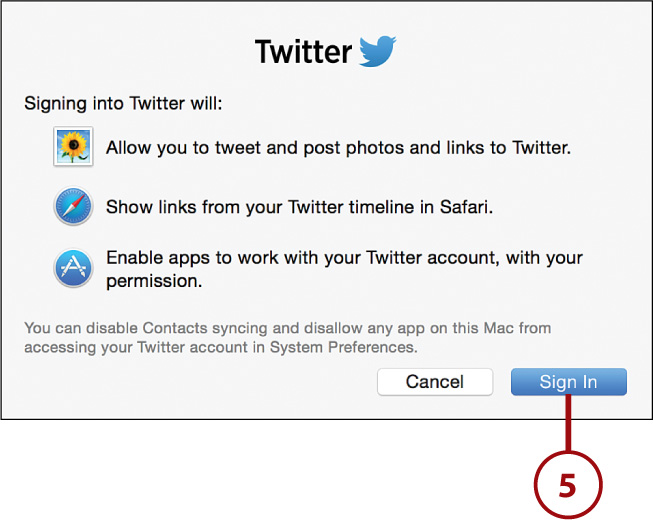
5. Read the service notices and then click Sign In.
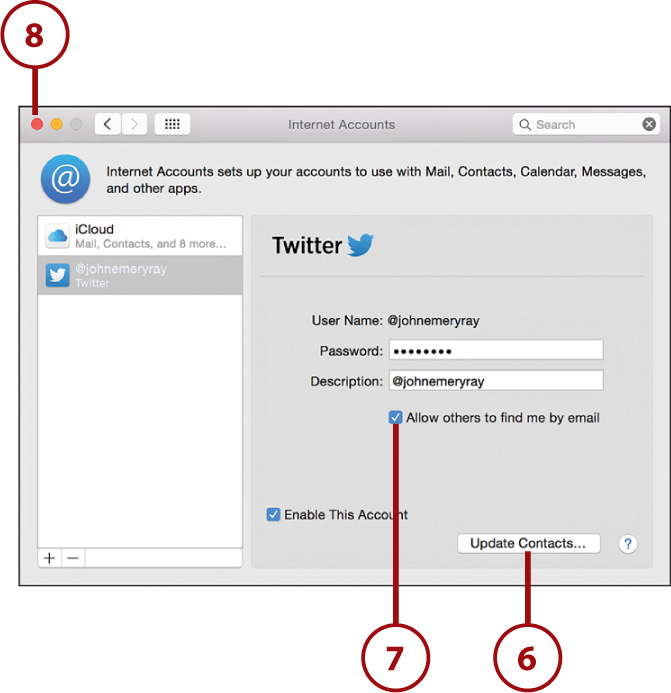
6. On the Summary screen, click Update Contacts to pull Twitter usernames and photos into your system-wide Contacts list.
7. Check or uncheck Allow Others to Find Me by Email to enable other Twitter users to find you online using your email address.
8. Close the System Preferences.
1. Open the Internet Accounts System Preferences panel.

2. Click the Facebook service link on the right.
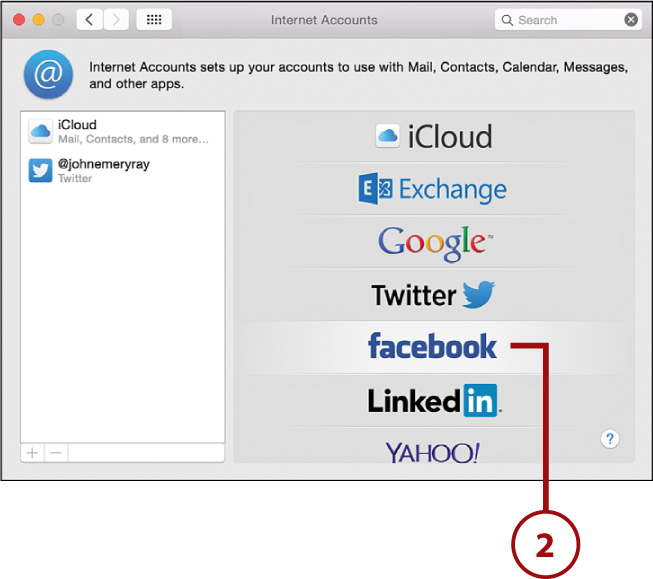
3. Enter your Facebook username and password.
4. Click Next.
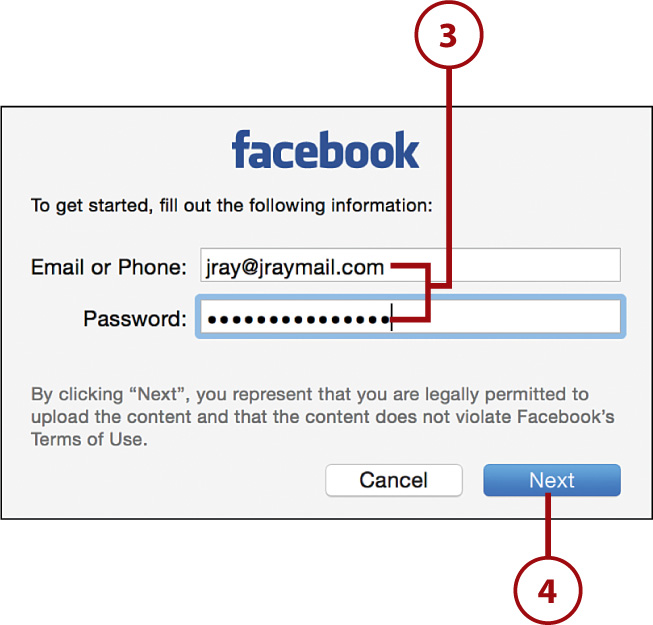
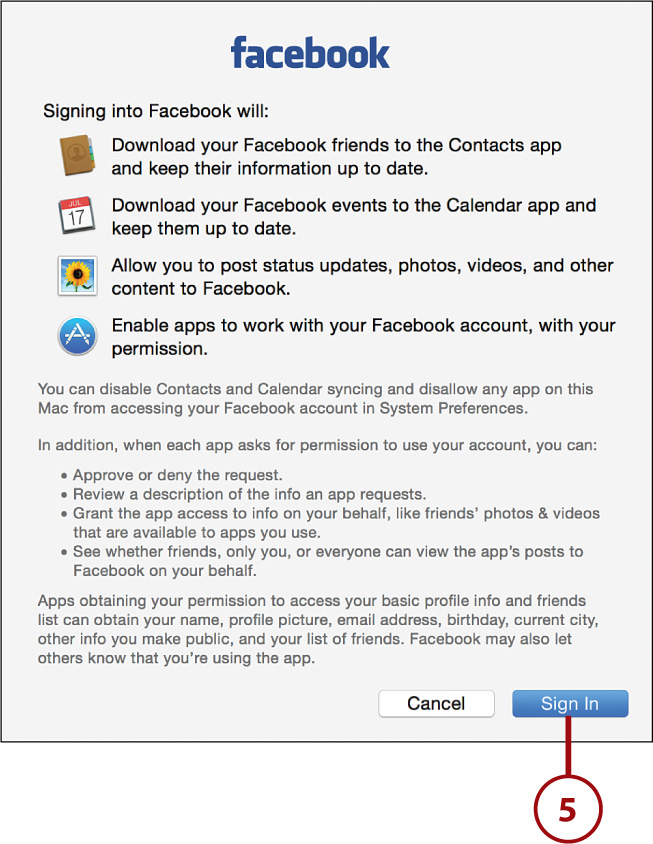
5. Read the Facebook conditions and click Sign In.
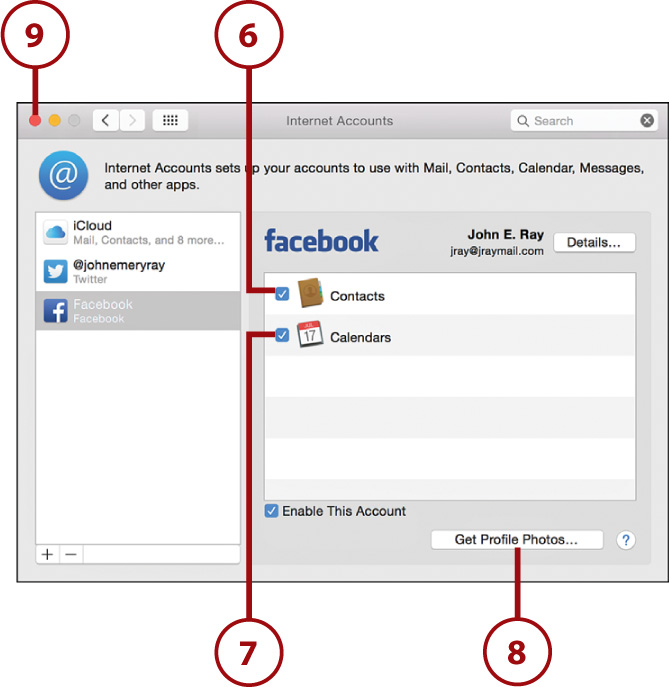
6. Click the Contacts checkbox to add Facebook friends to your address book.
7. Click Calendars to tie Facebook calendar into the Calendars application.
8. Click the Get Profile Photos button to pull Facebook photos into your system-wide Contacts list.
9. Close the System Preferences.
Wait, There’s More!
If you’ve opened the Internet Accounts panel, you’ve probably noticed that there are account options for more than just Twitter and Facebook. LinkedIn, Vimeo, and others are available for you to add. Why aren’t they covered here? Because they work identically to Facebook and Twitter. If you can activate one then you can activate them all!
Posting Tweets and Facebook Updates
You can send tweets and post Facebook updates from any application that has been updated to support Yosemite’s social networking implementation, such as the Finder or Safari.
Posting From the Finder and Other Apps
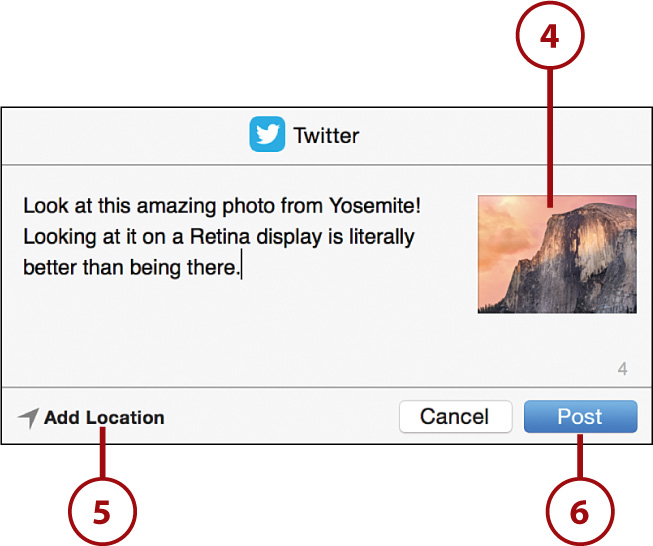
For example, suppose you want to post a photo from the Finder. To compose the update, do the following:
1. Select or open an image (if you want to attach an image to the tweet or Facebook update).
2. Click the Share Sheet button.
3. Choose Twitter or Facebook from the drop-down menu. (This example uses Twitter.)
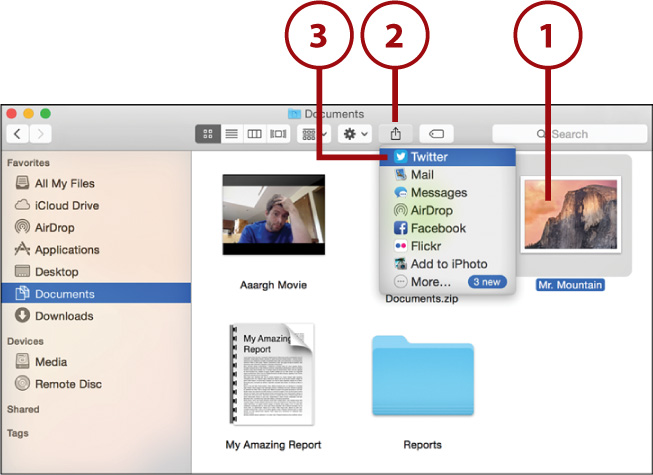
4. A composition window appears with the attachment (if any) in the upper-right corner. Enter your tweet/update here.
5. Click the Add Location button to add your current location to the post.
6. Click Send to Post a tweet (or click Post if posting to Facebook).
Posting via Notification Center
Yosemite also has the ability to post updates via Notification Center. To use this nifty feature, follow these steps:
1. Open Notification Center.
2. Click the Today button.
3. Click the Twitter or Facebook sharing buttons at the top of the pane.
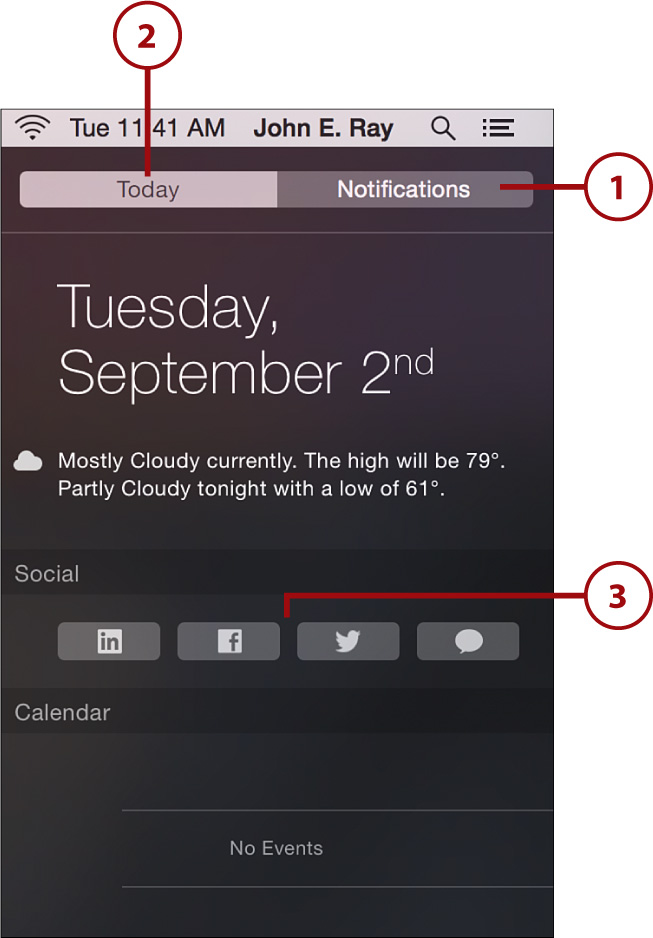
4. In the window that appears, type the message to post.
5. Click Send to send a tweet, or click Post to post to Facebook.

No Buttons, No Problem
If you don’t see buttons for your social networking sites inside the Notification Center’s Today view, make sure that you’ve added accounts (as described in this chapter) and that the Social widget is active in the Today section of the Extensions System Preferences panel (see Chapter 10, “Installing and Managing Applications and Extensions on Your Mac,” for details).
Being Social Is a Two-Way Street
You know how to post to Facebook and Twitter from Yosemite, but that’s only part of social networking; you also need to be able to read posts that others send to you. To receive updates from your friends and followers on Facebook and Twitter, configure the Notification Center, as described in Chapter 1. Apple has included Notification Center settings for Twitter and Facebook that let you receive and view updates right on your desktop. Of course, you’ll still want a browser handy to access all the features of these popular sites, but OS X has you covered for the basics.