
5. Reading Books

Find out how to purchase books from the iBooks store and how to read them on your iPad.
We finally have a better way to enjoy books. As an ebook reader, your iPad can give you access to novels and textbooks alike, storing hundreds inside and allowing you to purchase more right from the device.
A single app, the iBooks app, allows you to both read and purchase new books. You can also download and add books from other sources.
Buying a Book from Apple
The first thing to do with the iBooks app is to get some books! You can buy books using the store in the app. You can also find some free books there.
1. Tap the iBooks app icon to launch iBooks.
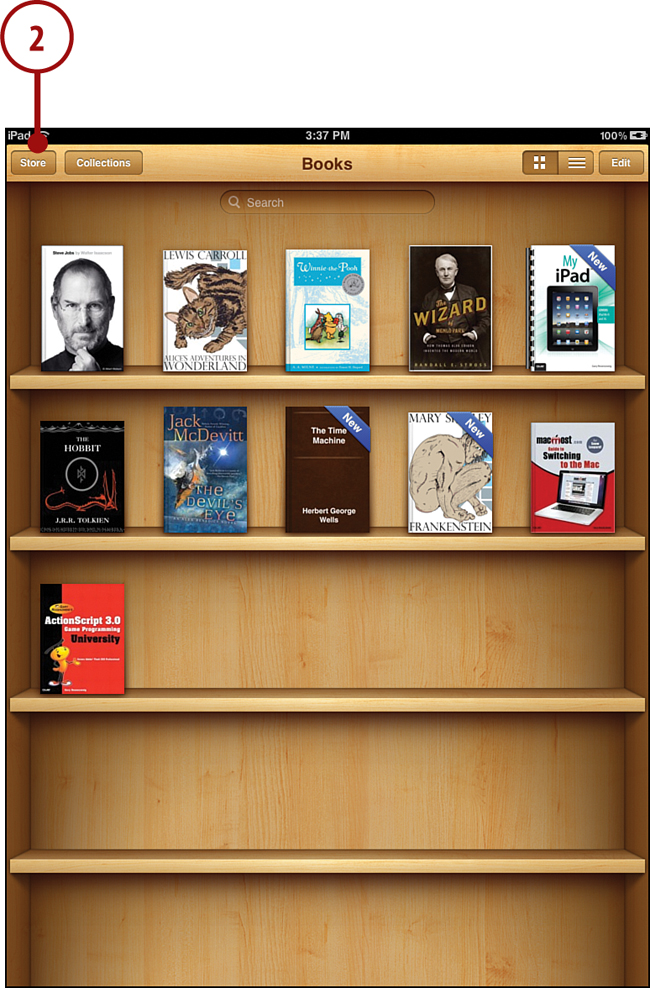
2. Tap the Store button to switch to the iBooks store.
Don’t Want to Purchase from Apple?
You don’t necessarily need to buy books from Apple. You can buy from any seller that sends you an ePub or PDF formatted file with no copy protection. After you have the file, just drag and drop it into iTunes. It will add it to your books collection there, ready to be synced to your iPad.
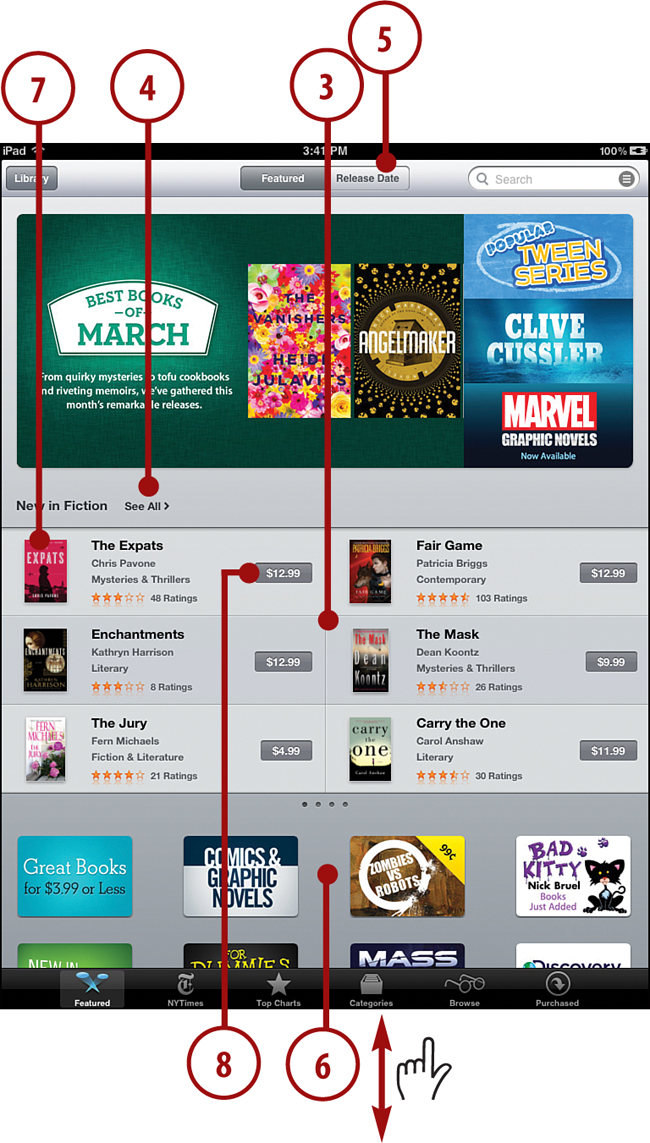
3. Swipe left and right to browse more featured books.
4. Tap See All to go to a list of the featured books.
5. Tap the Release Date button to see a list of the latest releases.
6. Swipe up to see more featured categories.
7. Tap any book cover to view more information about the book.
8. Tap the price next to a book to purchase it.
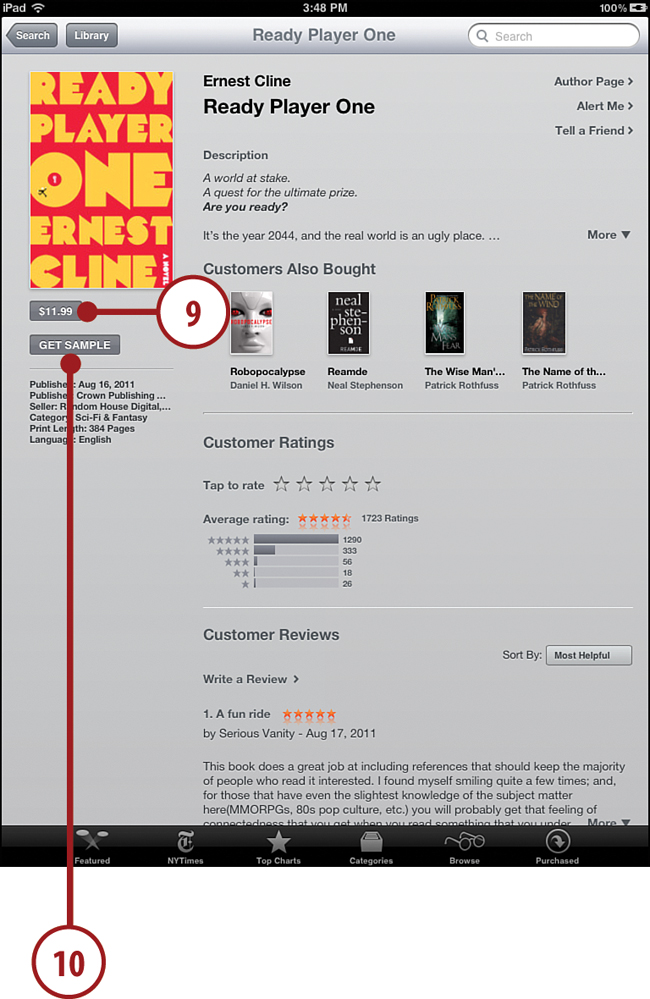
9. The price button changes to Buy Book. Tap it again to continue with the purchase.
10. Tap the Get Sample button to download a sample of the book.
Reading a Book
Reading books is a simple process. Following are the basics of reading your downloaded books.
1. Tap the iBooks app icon to launch iBooks.
2. Tap a book to open it.
Can’t Find Your Book?
Did you download a book only to discover that you can’t see it in your Library? Try tapping the Collections button at the top of the screen and switching to a different collection. For instance, by default, PDF documents are put in the PDF collection, not in the Books collection.
3. To turn a page, tap and hold anywhere along the right side of the page, and drag to the left. A virtual page turns.
4. Tap and drag from the left to the right or simply tap the left side of the page to turn the page back.
5. To move quickly through pages, tap and drag the small marker at the bottom of the page along the dotted line. Release to jump to a page.
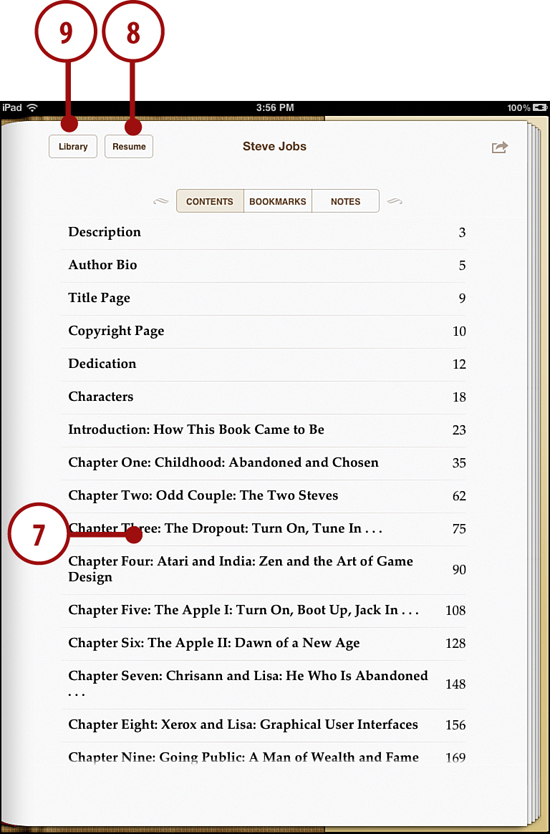
6. Tap the Table of Contents button at the top to view a table of contents.
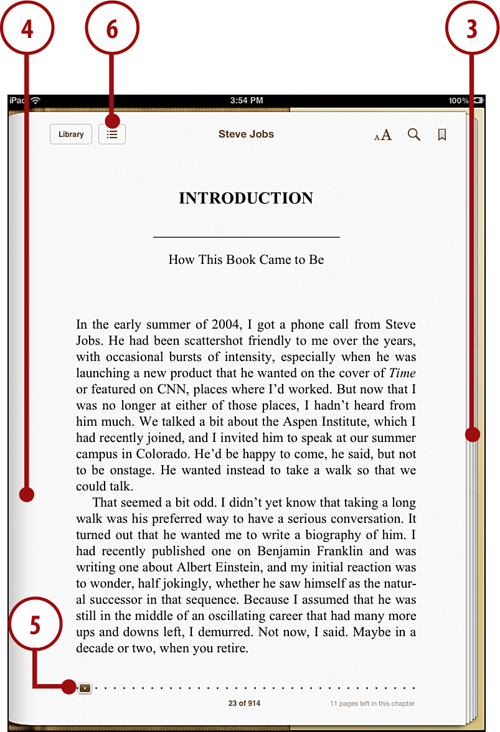
7. Tap anywhere in the table of contents to jump to that part of the book.
8. Tap the Resume button to return to the page you were previously viewing.
9. Tap the Library button to return to your books. If you return to the book later, you return to the last page you viewed.
Tired of the Special Effects?
If you tire of the page-turning special effect, a quick tap on the right or left side of the screen also turns pages. The effect still shows, but it’s quick.
Using Reading Aids
iBooks has a variety of ways you can customize your reading experience. You can change the font size, the font itself, and even turn your iPad on its side to see two pages at one time.
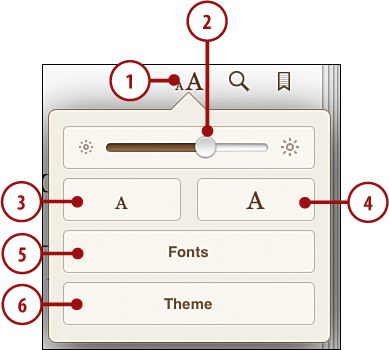
1. While viewing a page in iBooks, tap the display adjustment controls at the top of the screen.
2. Drag the brightness control left or right. Dragging to the left makes the screen dim, which you might use if you’re reading in a dark room. Dragging to the right makes it bright, which could make reading easier while outdoors.
3. Tap the smaller “A” button to reduce the size of the text.
4. Tap the larger “A” button to increase the size of the text.
5. Tap the Fonts button to choose from a few font options.
6. Tap the Theme button to select one of three display themes: Normal (black text on a white background), Sepia (brown text on a beige background), or Night (white text on a black background).
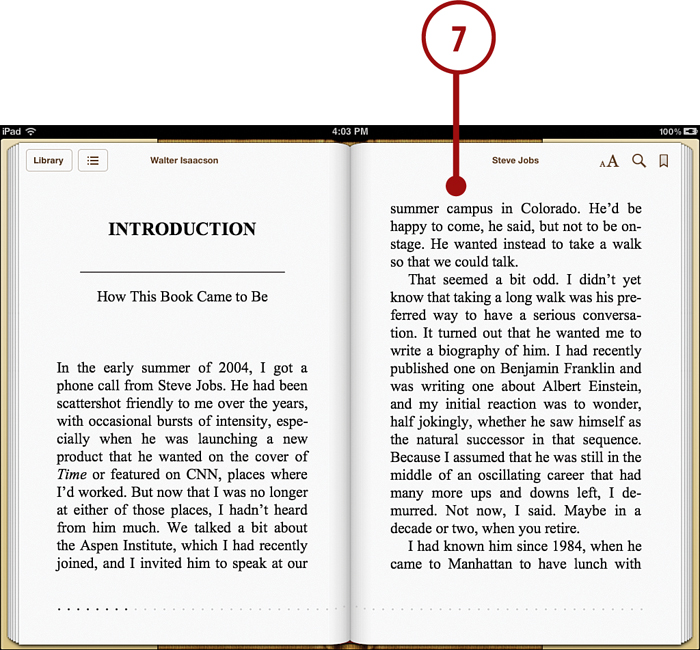
7. Turn your iPad on its side to change to a two-page view. (Make sure your orientation lock is not on.)
Where Did the Buttons Go?
If you tap in the middle of the screen, the buttons at the top and the dotted line at the bottom disappear. You can still turn the pages; you just don’t have access to these buttons. To see the buttons again, tap in the middle of the screen.
Adding Notes and Highlights
Each time you launch iBooks, your iPad returns you to the page you were last reading. However, you might want to mark a favorite passage or a bit of key information.
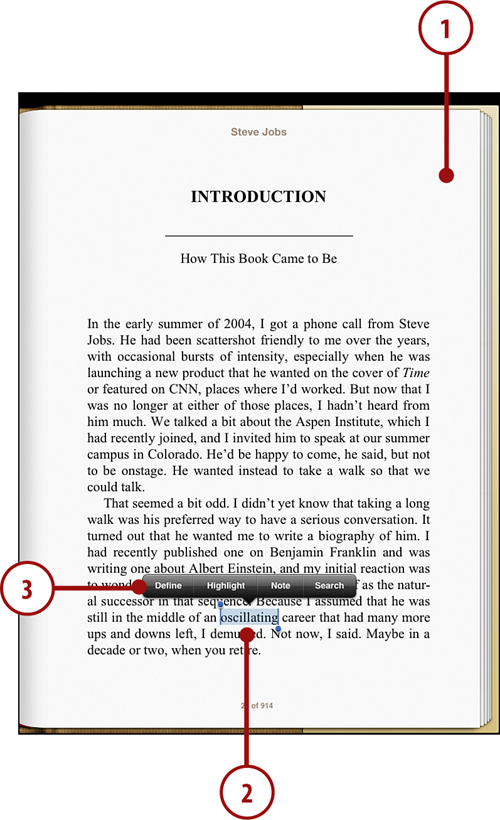
1. Go to a page in a book in iBooks.
2. Tap a word and hold your finger there for about a second.
3. Release your finger and you see four choices: Define, Highlight, Note, and Search.
Define and Search
Tapping Define brings up a definition of the word. Tapping Search brings up a list of the locations of the word throughout the text.
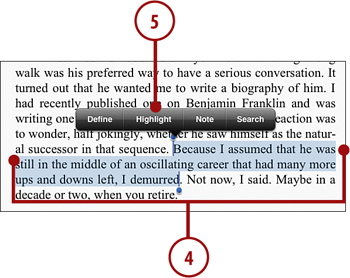
4. Drag the blue dots to enlarge the section of text highlighted.
5. Tap Highlight. Alternatively, you can tap a word and hold for a second and then immediately start dragging to highlight text.
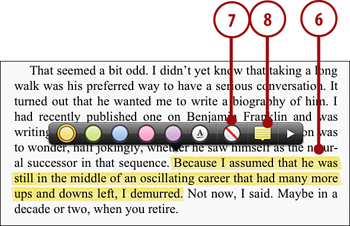
6. The text highlight now shows as a yellow stripe behind the text.
7. Tap a different color or tap the remove highlight button to remove the color. You can use different colors to represent different things. For instance, if you are marking passages in a textbook, you can highlight important facts with one color and points that you want to research in the future with another color.
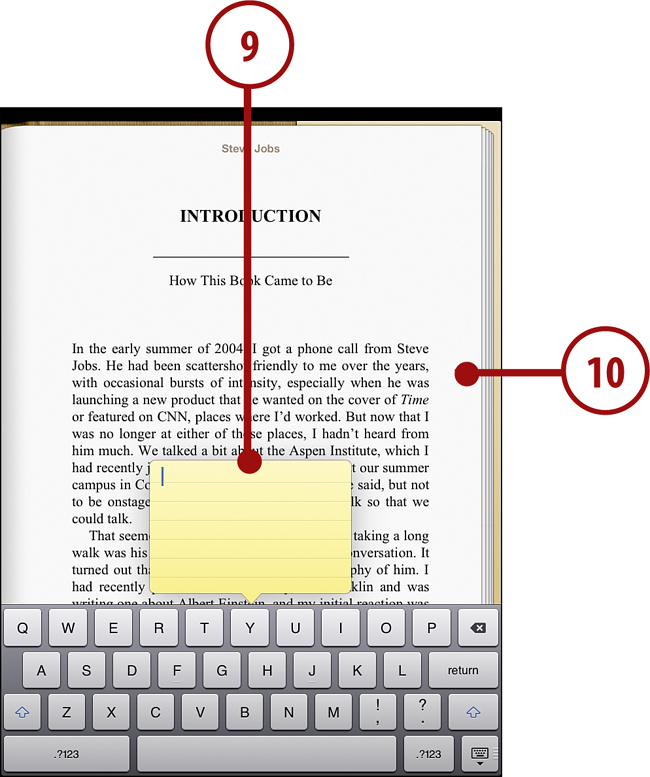
8. Tap Note instead of Highlight to bring up a yellow pad of paper and add a note.
9. Tap in the note to bring up the keyboard and start typing.
10. Tap outside the yellow paper to finish the note. It will then appear as a small yellow sticky note to the right side of the page. Tap it any time you want to view or edit the note. You can delete a note by removing all text in the note.
Adding Bookmarks
You can also bookmark a page to easily find it later.
1. Tap the bookmark button at the top of a page to bookmark the page. You can bookmark as many pages as you want in a book.
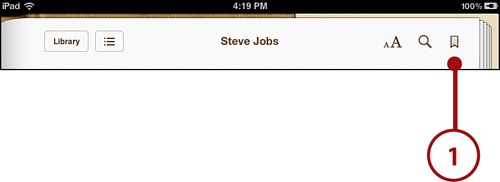
2. Tap it again to remove the bookmark from the page.
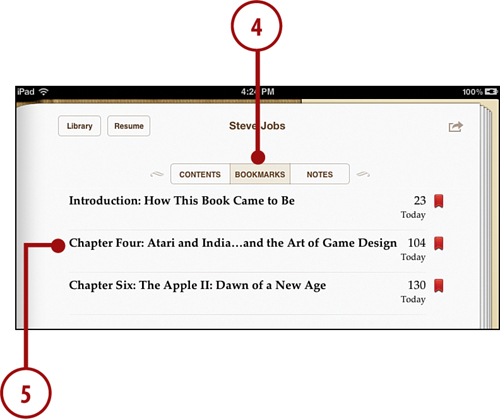
3. Tap the Table of Contents button to go to the table of contents.
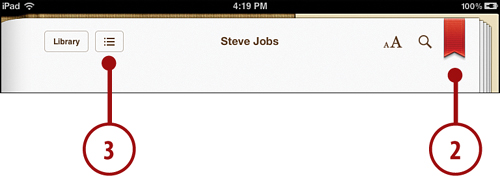
4. Tap the Bookmarks button at the top of the table of contents to see a list of all the bookmarks, highlights, and notes you have added to the book.
5. Tap any bookmark, note, or highlight to jump to it.
Organizing Your Books
Like to read a lot? You aren’t alone. I’m sure many people gather massive collections of ebooks on their iPads. Fortunately, iBooks includes a few ways to organize your ebooks.
1. Go to your iBooks main page—your Library.
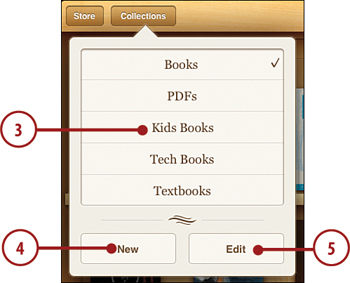
2. Tap the Collections button.
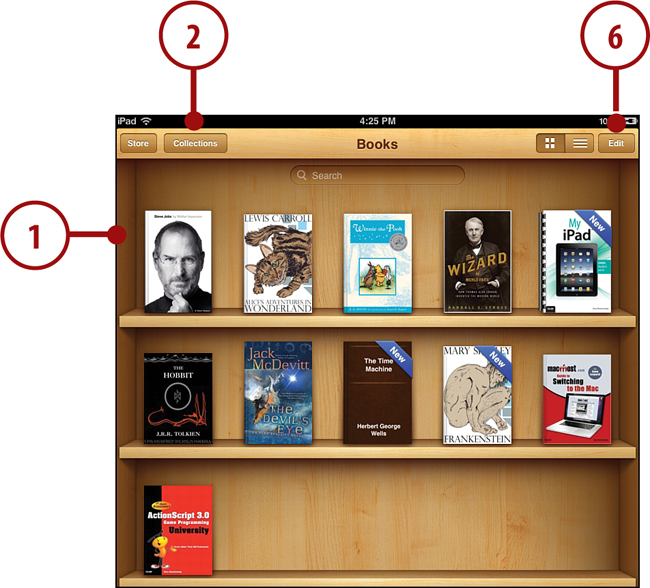
3. Tap a Collection name to jump to that collection. You can think of collections as different bookcases filled with books.
4. Tap New to create a new collection.
5. Tap Edit to delete or reorder collections in the list.
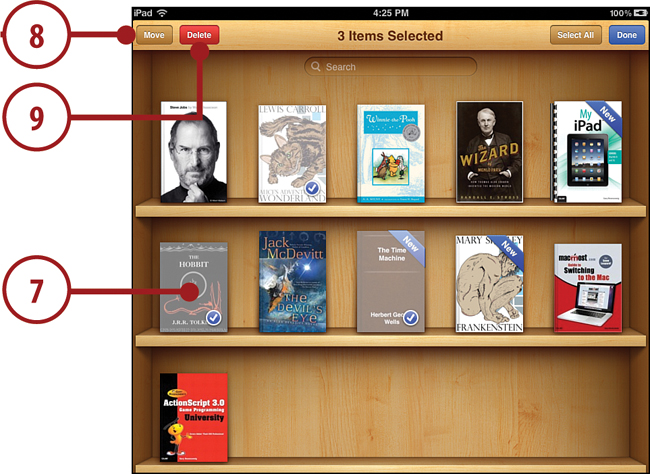
6. Tap the Edit button to enter edit mode.
7. Tap one or more books to select them.
8. Tap the Move button to move those books to another collection.
9. Tap the Delete button to delete those books.
10. Tap and hold your finger over a book to drag it to a new position in the library. You can also do this in normal mode or in edit mode.
11. Tap Done to exit edit mode.
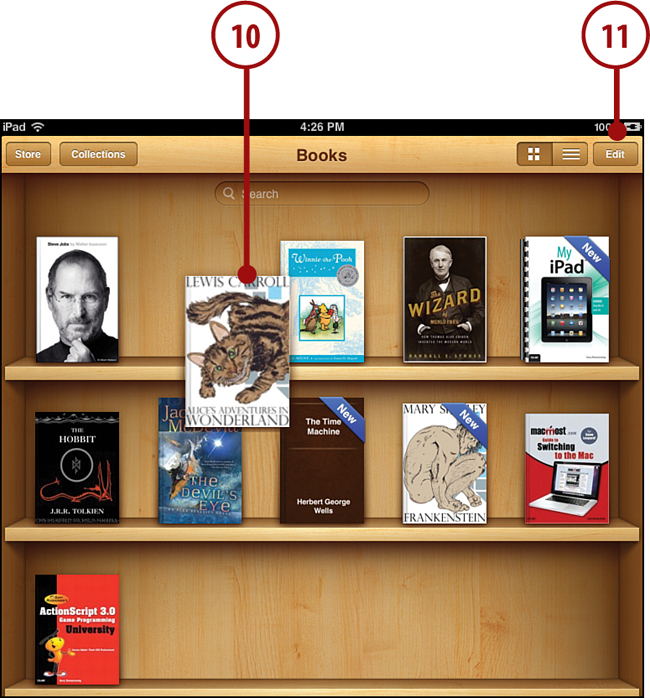
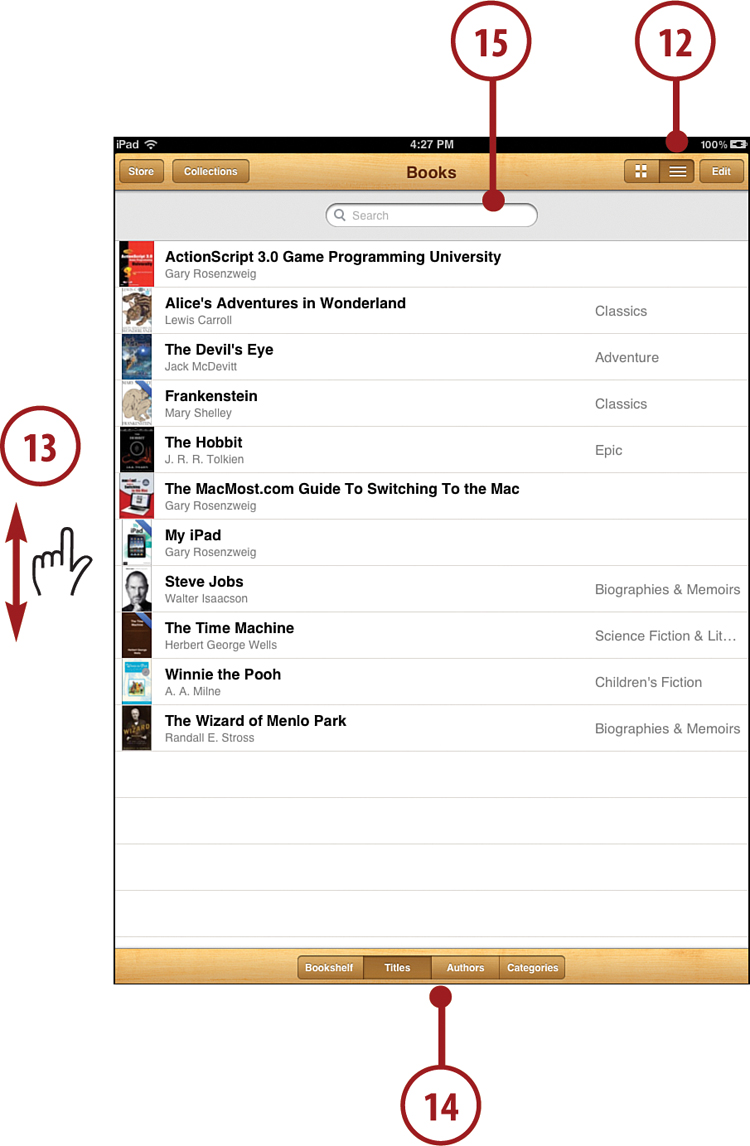
12. Tap the List View button.
13. Now you can see a vertical list of your books. Scroll up and down by dragging and flicking.
14. Tap the Titles, Authors, and Categories buttons at the bottom of the screen to change the order of the list.
15. Use the search field to search your library. If you don’t see a search field, tap and drag down on the whole list to reveal it. You can also drag down the screen to reveal the search box in the normal icon view of books and type in a search keyword there.
Another Way to Delete
You can also delete books in list view by swiping from left to right across the title of a book. A Delete button appears to the right. Tap it to delete the book.
Using iBooks Alternatives
Copy protection prevents you from taking your ebooks from one platform to the other. Thankfully there are Kindle and Nook apps for the iPad, so you can read the books you purchase from those stores.
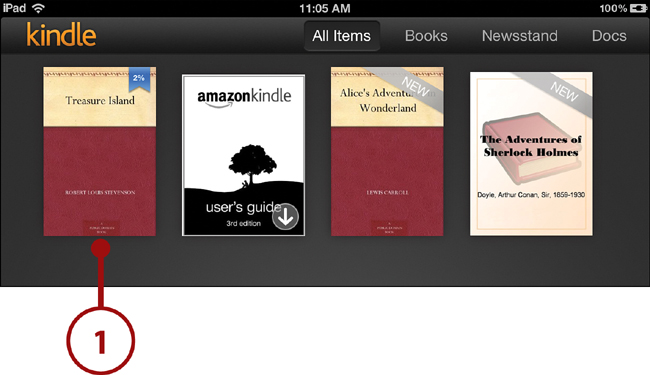
1. When you launch the Kindle app, you see a screen that displays your library. Tap a book to open it.
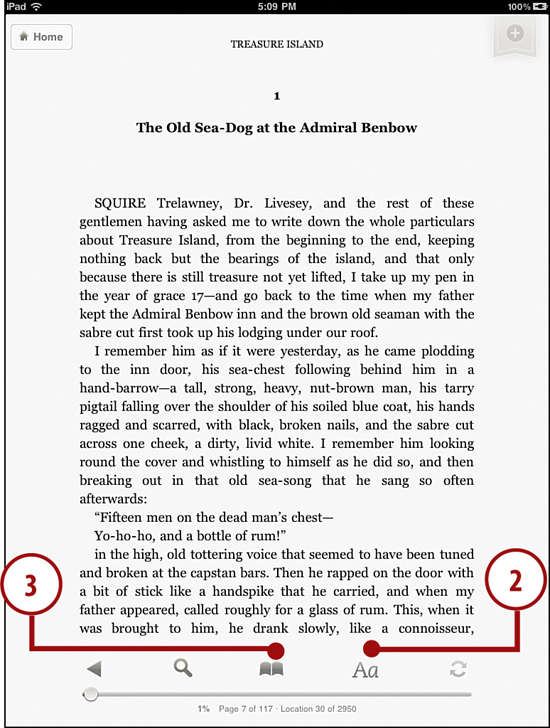
2. Tap the Font button to change the font size.
3. Tap the bookmark button to add bookmarks and jump to a new page.
Cloud Versus Device
The new Kindle app has a Cloud/Device control at the bottom of the screen. Selecting Cloud shows you all the books you have purchased. Selecting Device shows you which books are on your iPad and ready to read. You can tap on a book on the Cloud screen to download it to your device. You can tap on it again after it has been downloaded to read it.