8. Communicating with Email, Messaging, and Twitter
Next, we look at how to configure and use the Mail program on your iPad to correspond using email and how to use the Messaging and Twitter apps to send and receive messages.
• Deleting and Moving Messages
• Configuring How Email Is Received
Now that you have a take-anywhere iPad with a battery that seems to last forever, you have no excuse for not replying to emails, so you need to be comfortable using the built-in Mail app that enables you to connect with your home or work email using standard protocols such as POP and IMAP. You can even connect with more proprietary systems such as AOL, Exchange, and Yahoo!.
Configuring Your Email
Here is a complete list of what information you need to set up your iPad for a traditional email account. If you have a service such as Exchange, Gmail, AOL, Yahoo!, or MobileMe, you won’t need all this.
• Email Address
• Account Type (POP or IMAP)
• Incoming Mail Server Address
• Incoming Mail User ID
• Incoming Mail Password
• Outgoing Mail Server Address
• Outgoing Mail User ID
• Outgoing Mail Password
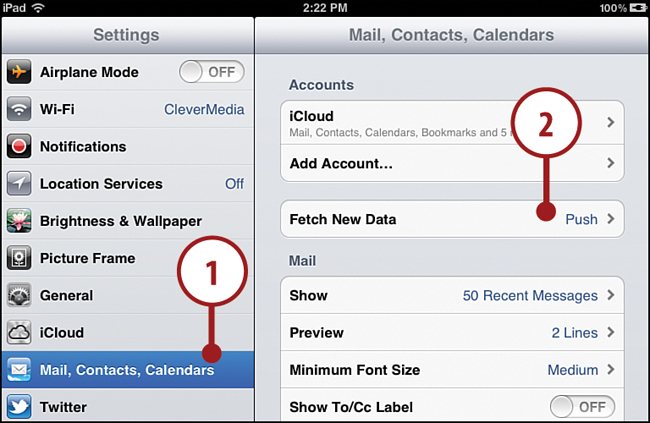
1. Tap the Settings icon on your Home screen.
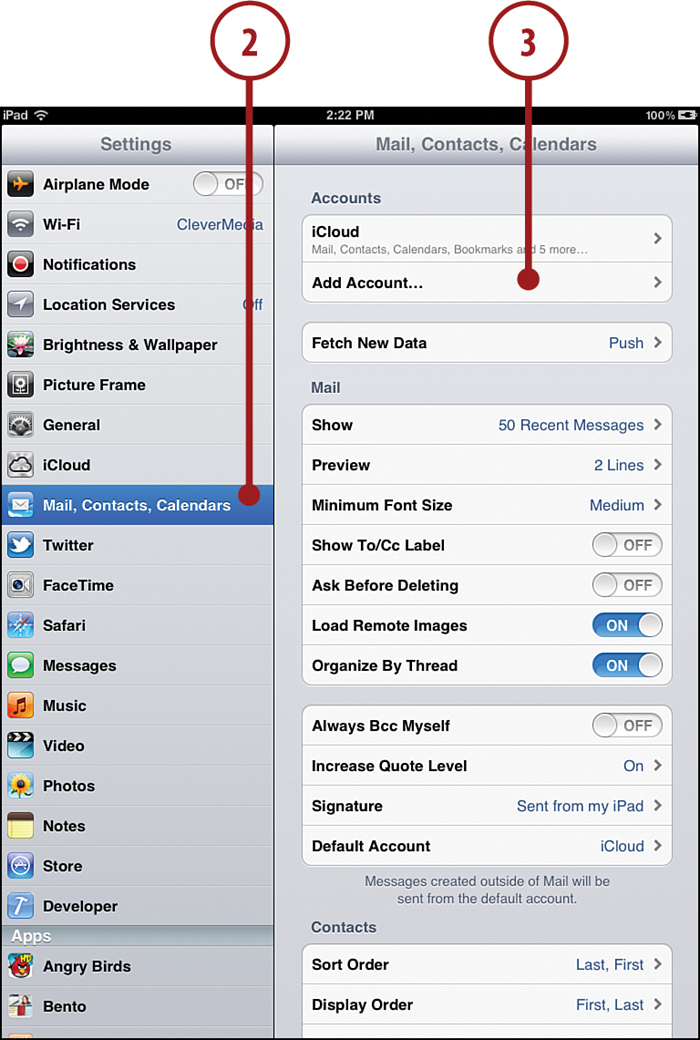
2. Tap Mail, Contacts, Calendars.
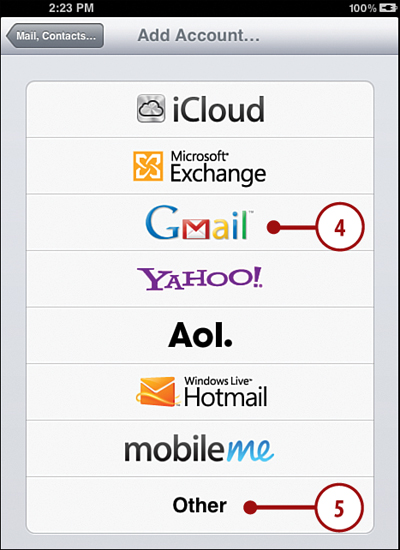
3. Tap Add Account.
4. If you have an iCloud, Microsoft Exchange, Gmail, Yahoo! Mail, AOL, Hotmail, or old MobileMe account, tap the corresponding button. From there, simply enter your information, and your iPad figures out the rest. You can skip the rest of the steps!
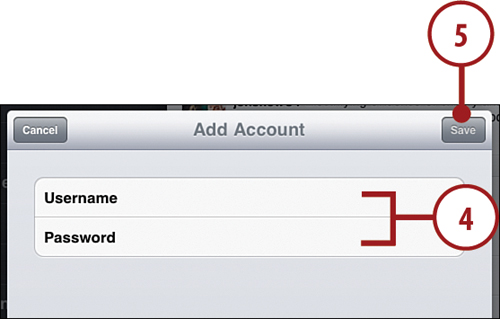
5. Tap Other if you have a traditional POP or IMAP account from work, your Internet providers, or a traditional hosting company.
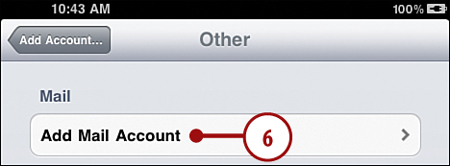
7. Tap in the Name field and enter your name.
8. Tap in the Address field and enter your email address.
9. Tap in the Password field and enter your password.
10. The Description field should automatically fill with a copy of your email address. Keep it or use another description for the account.
11. Tap Save.

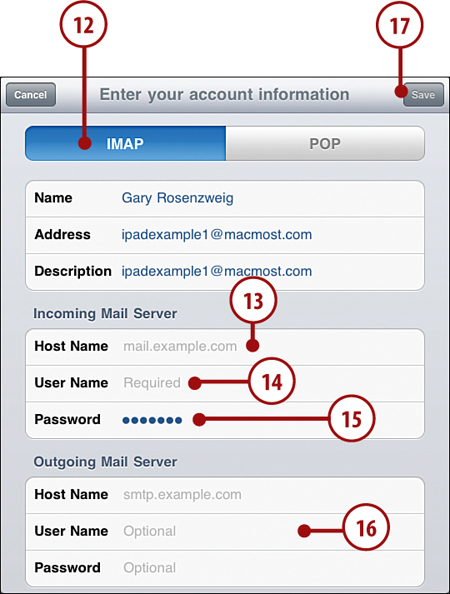
12. Tap IMAP or POP as the email account type.
13. Tap in the Incoming Mail Server, Host Name field and enter your email host’s address.
14. Tap in the Incoming Mail Server, User Name field and enter your user name.
15. Tap in the Incoming Mail Server, Password field and enter your password.
16. Repeat the previous three steps for Outgoing Mail Server.
17. Tap Save, and the verification process, which can take up to a minute, begins.
What if the Settings Won’t Verify?
If your settings fail to verify, you need to double-check all the information you entered. When something is wrong, it often comes down to a single character being mistyped in one of these fields.
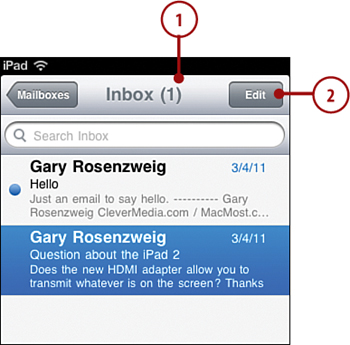
Reading Your Email
You use the Mail app to read your email, which is much easier to navigate and type in horizontal mode. Let’s start by reading some email.
1. Tap the Mail app icon on the Home screen.
2. On the left, you see a list of incoming mail. On the right, you see the selected message.
3. Tap a message to view it.
4. Tap the Refresh button to look for new mail.
5. Tap the Details button to see more fields, such as To: and Cc: email addresses.
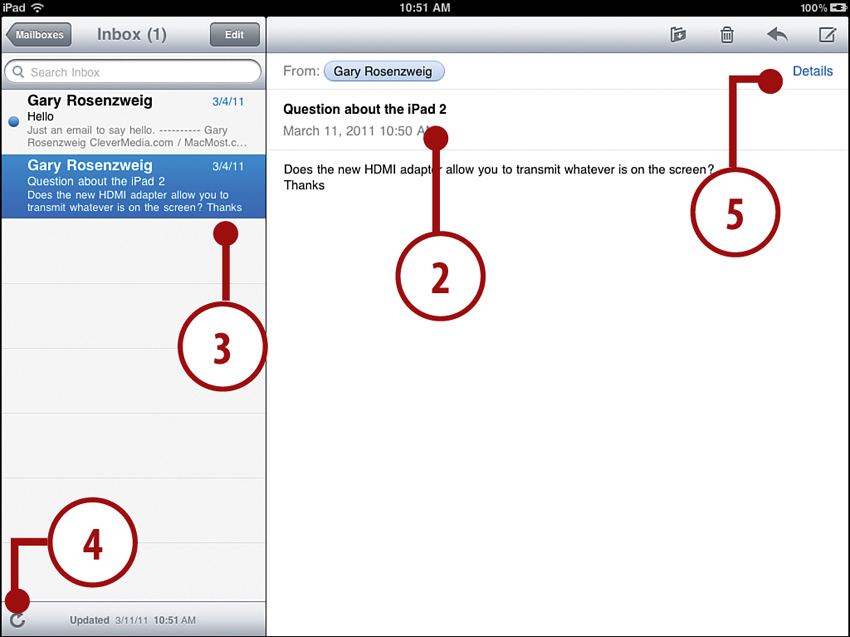
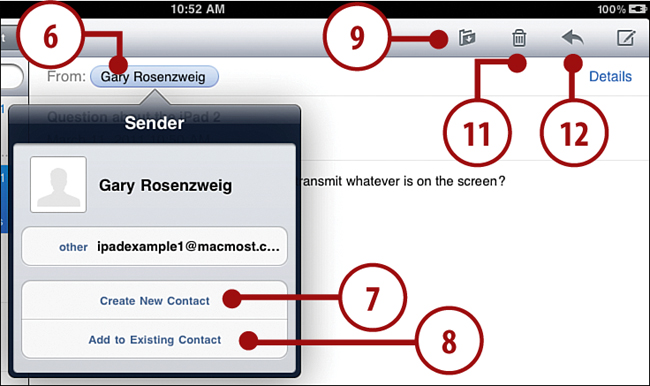
6. Tap the email address of the sender.
7. Tap Create New Contact to add the sender to your contacts.
8. Tap Add to Existing Contact to add the email address to a contact you already have in your Contacts app.
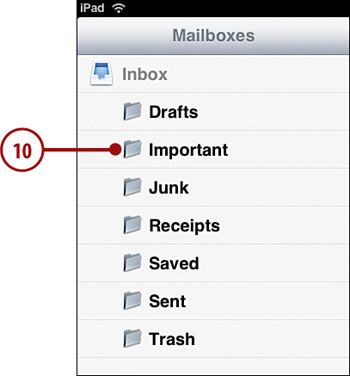
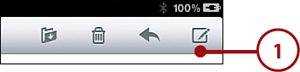
9. Tap the Folder button at the top of the message.
10. Tap a folder to move the current message to that folder.
11. Tap the Trash button at the top of the message to send the message directly to the Trash folder.
12. Tap the arrow button at the top of the message to reply or forward the message.
Multiple Inboxes
If you have more than one email account, you can choose to look at each inbox individually or a single unified inbox that includes messages from all accounts. Just tap the Mailboxes button at the upper-left corner of the screen and choose All Inboxes. You can also choose to look at the inbox of a single account, or dig down into any folder of an account.
How Do You Create Folders?
For most email accounts—particularly IMAP, Gmail, and iCloud accounts—you can create mailboxes using the Mail app. Use the back arrow at the upper-left corner of Mail and back out to the list of inboxes and accounts. Choose an account. Then tap the Edit button, and you’ll see a New Mailbox button at the bottom of the screen.
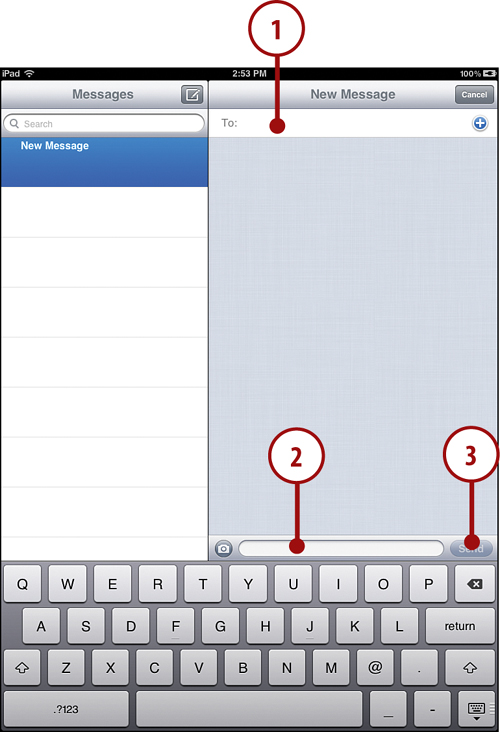
Composing a New Message
Whether you compose a new message or reply to one you received, the process is similar. Let’s take a look at composing one from scratch.
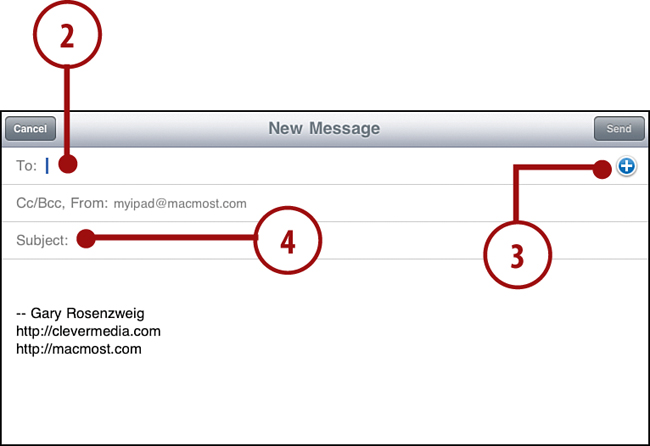
1. In the Mail app, tap the Compose button.
2. Enter a To: address.
3. Alternatively, tap the + button to bring up a list of contacts, and choose from there.
4. Tap in the Subject field and type a subject for the email.
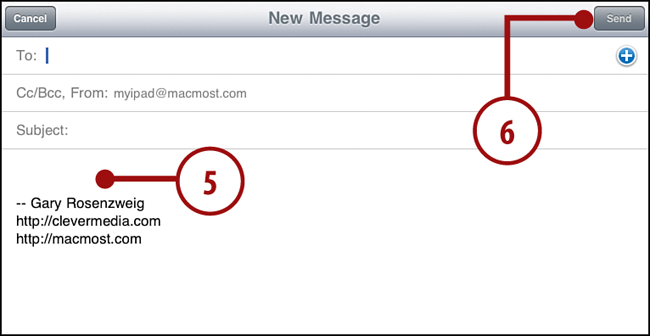
5. Tap below the subject field in the body of the email, and type your message.
6. Tap the Send button.
Including Images
You can copy and paste inside a Mail message just like you can inside of any text entry area on your iPad. But you can also paste in images! Just copy an image from any source—Photos app, Safari, and so on. Then tap in the message body and select Paste. You can paste in more than one image as well.
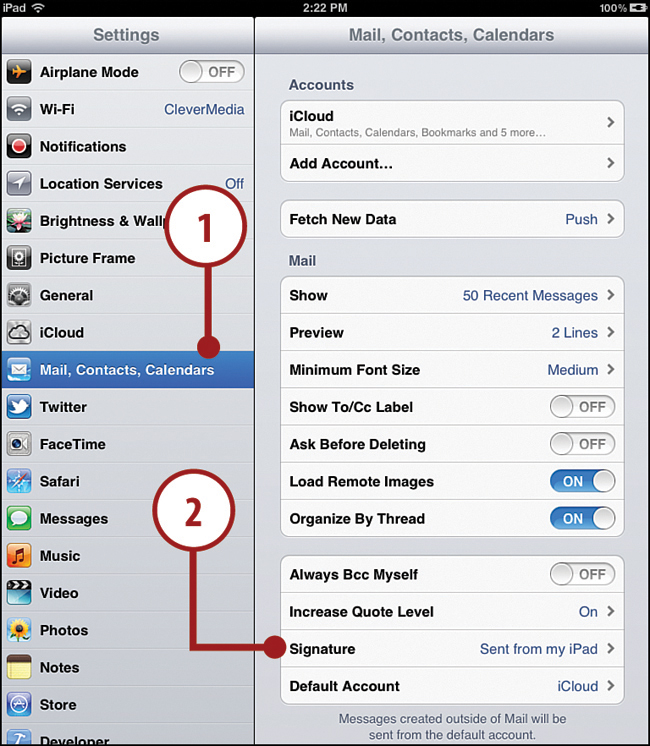
Creating a Signature
You can create a signature that appears below your messages automatically. You do this in the Settings app.
1. In the Settings app, choose Mail, Contacts, Calendars.
2. Tap Signature, which is way down in the list on the right.
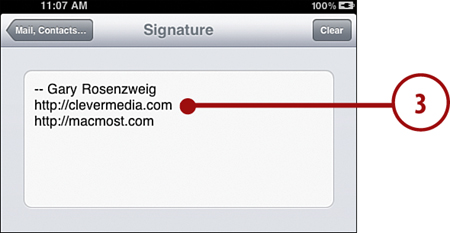
3. Type a signature in the text field. You don’t need to do anything to save the signature. You can tap the Home button on your iPad to exit Settings if you like.
Case-By-Case Signatures
You can have only one signature, even if you have multiple email accounts on your iPad. But the signature is placed in the editable area of the message composition field, so you can edit it like the rest of your message.
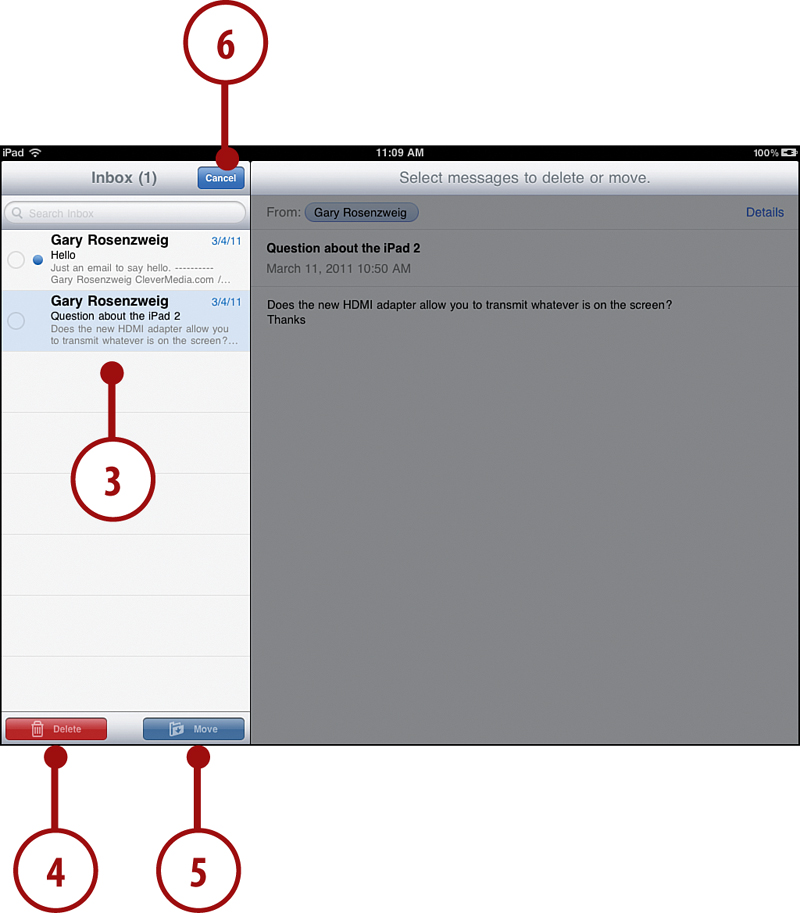
Deleting and Moving Messages
While viewing a message you can simply tap the Trash Can icon and move it to the trash. You can also move a group of messages to a folder or the trash.
1. In the Mail app, go to any mailbox and any subfolder, such as your Inbox.
2. Tap the Edit button.
3. Tap the circles next to each message to select them. They will be added to the middle of the screen in a slightly messy stack.
4. Tap the Delete button to delete the selected messages.
5. Tap the Move button, and the left side of the screen changes to a list of folders. You can select one to move all the messages to that folder.
6. Tap the Cancel button to exit without deleting or moving any messages.
What About Spam?
Your iPad has no built-in spam filter. Fortunately, most email servers filter out spam at the server level. Using a raw POP or IMAP account from an ISP might mean you don’t have any server-side spam filtering, unfortunately. But using an account at a service such as Gmail means that you get spam filtering on the server and junk mail automatically goes to the Junk folder, not your Inbox.
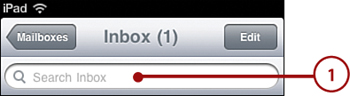
Searching Email
You can also search your messages using the Mail app.
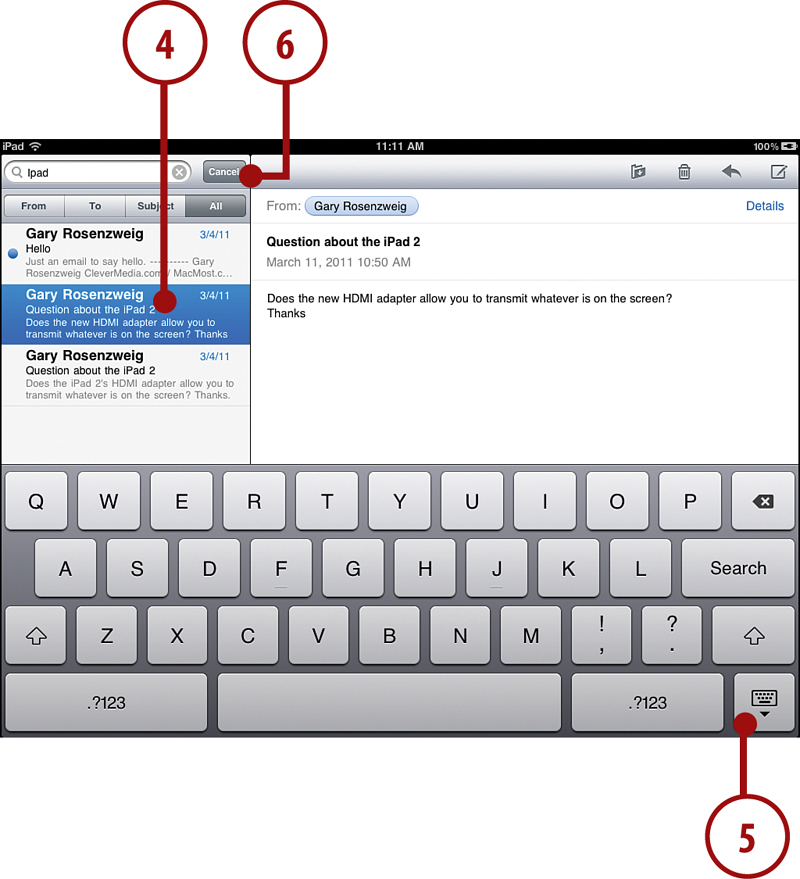
1. In the Mail app, from a mailbox view, tap the Search field.
2. Type a search term.
3. Select From, To, Subject, or All to decide which part of the messages to search.

4. Select a message to view from the search results.
5. Tap the keyboard hide key at the bottom right to hide the keyboard.
6. Tap Cancel to exit the search and return to the mailbox you were previously viewing.
Searching Text Inside Messages
Searches work on From, To, and Subject fields. You can also search the body of your messages by selecting the All option. However, this only works on messages stored on your iPad. If you are using a server-based email solution, such as IMAP, iCloud, Gmail, an so on, you may not get all the results you expect.
Configuring How Email Is Received
You have more settings for email beyond the basic account setup. You can decide how you want to receive email, using either push delivery (MobileMe and Microsoft Exchange) or fetch delivery (all other email accounts).
1. Go to the Settings app and tap on Mail, Contacts, Calendars.
2. Tap Fetch New Data.
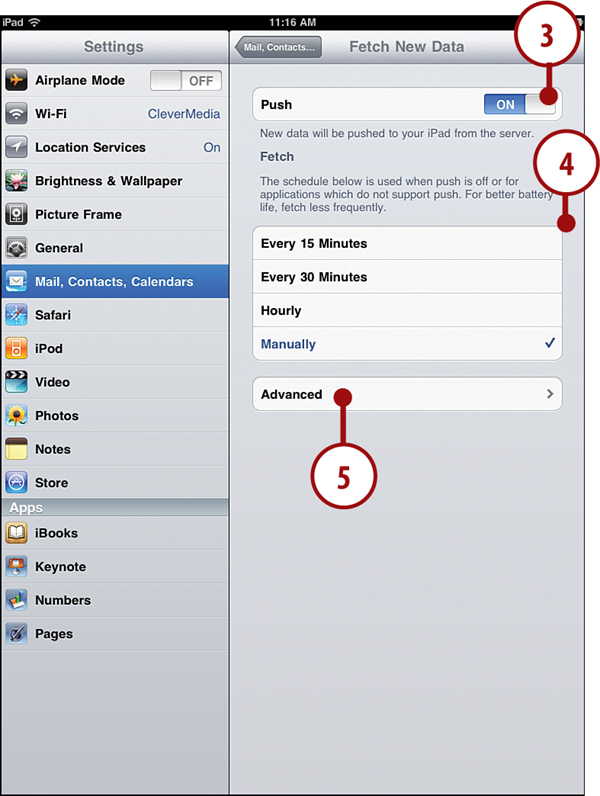
3. Turn on Push to use push email reception if you use email accounts that can send email via push.
4. Otherwise, select how often you want your iPad to go out to the server and fetch email.
5. Tap Advanced.
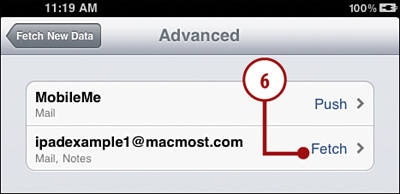
6. For each account using fetch, tap the account to turn Fetch to Fetch or Manual.
Push Settings
The two choices for most email accounts are Fetch and Manual. If you have a push account, such as MobileMe, you have three choices: Push, Fetch, and Manual. You can switch a Push account to Fetch or Manual if you prefer.
More Email Settings
You can change even more email settings in the Settings app. Let’s take a look at some of them.
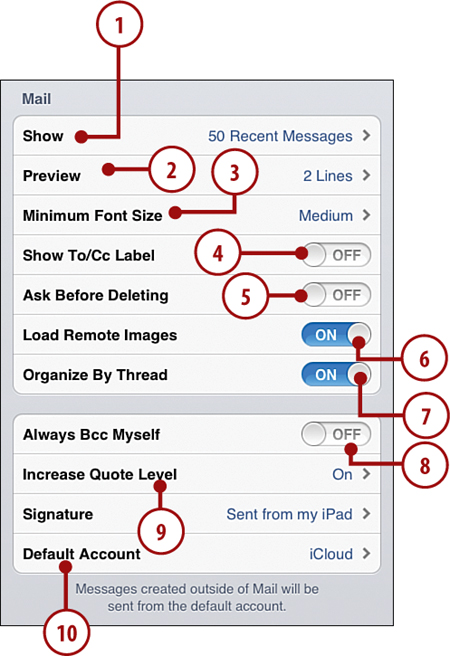
1. Tap Show to choose the number of messages to show in your Inbox. You can choose 25, 50, 75, 100, or 200.
2. Tap Preview to choose how many lines of message preview to show when stacking messages up in the list view.
3. Tap Minimum Font Size to modify the size of the text in messages.
4. Turn Show To/Cc Label on to view “To” or “Cc” in each email listed so that you know if you were the primary recipient or someone who was just copied on an email to someone else.
5. Turn Ask Before Deleting on to require a confirmation when you tap the trash can button in Mail.
6. Turn Load Remote Images off so that images referenced in an mail but stored on a remote server are not shown in the message body.
7. To group replies to a message under the original message, select Organize By Thread. This is handy when you subscribe to email discussion lists.
8. Turn Always Bcc Myself on if you want to get a copy of every email you send so that later you can move your copies of emails to your Sent folder on your computer.
9. Choose whether to indent the quoted text from the original email when replying to a message.
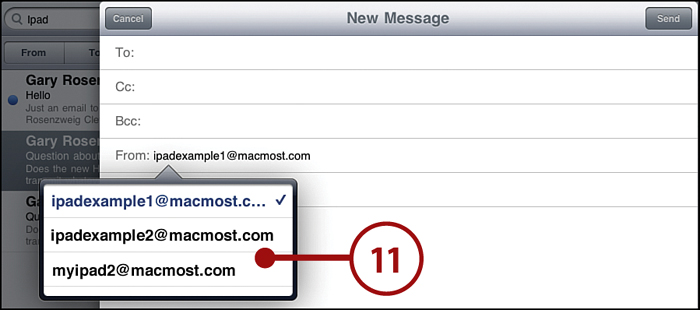
10. Tap Default Account to determine which account is used to send email by default if you have more than one account set up on your iPad.
11. In most apps from which you send emails, you can type a message and also change the account you use to send the email.
Why Not Show Remote Images?
The main reason to not show remote images is bandwidth. If you get an email that has 15 images referenced in it, you need to download a lot of data, and it takes a while for that email to show up completely. However, remote images are often used as ways to indicate whether you have opened and looked at messages. So, turning this off might break some statistics and receipt functionality expected from the sender.
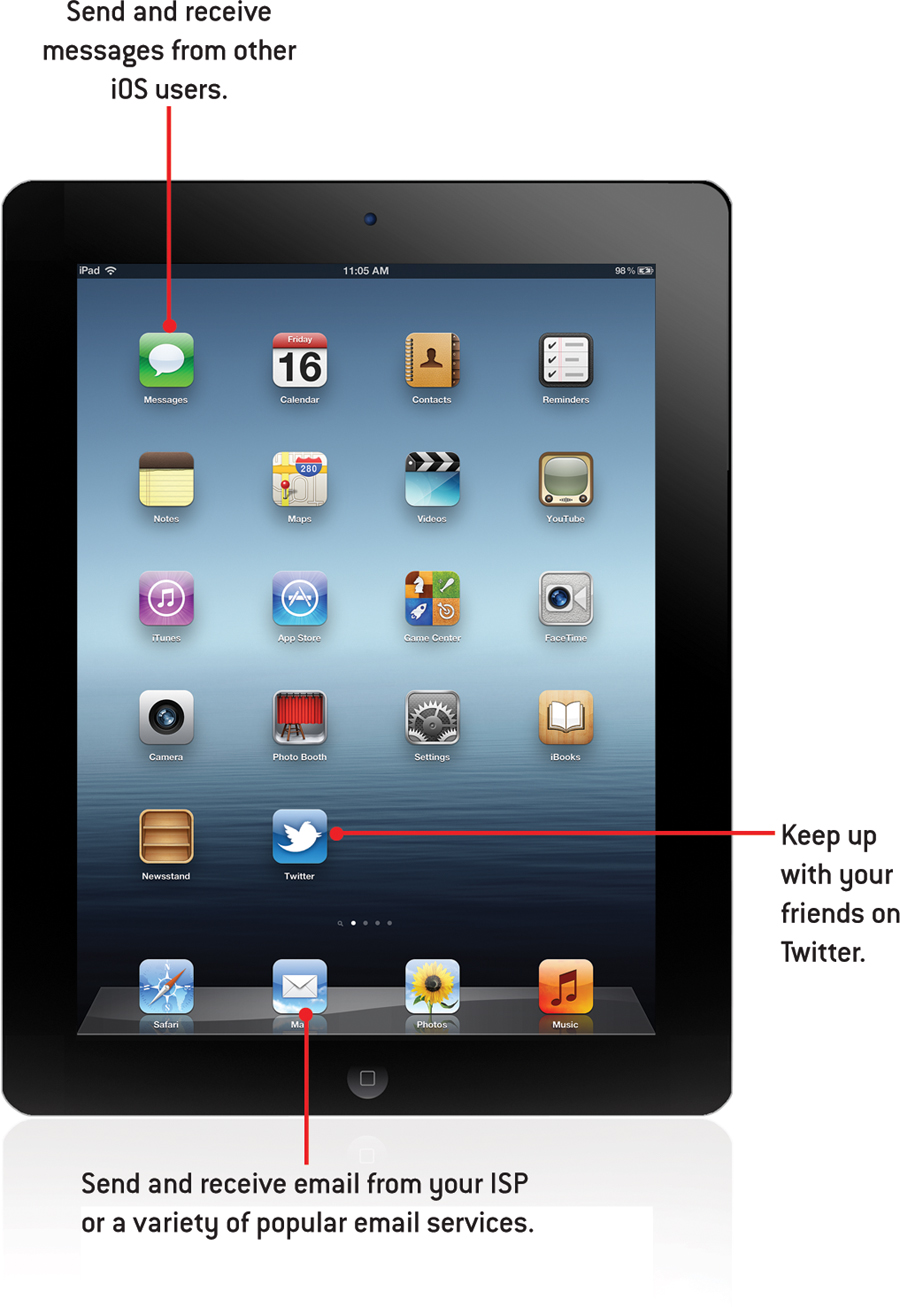
Setting Up Messaging
Even though your iPad isn’t a phone, you can send text messages. The catch is that you can only message others who are also using Apple’s iMessage system. This would include anyone using iOS 5 with an iPad, iPhone, or iPod touch, as long as they have signed up for the free service.
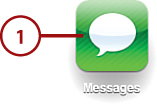
1. Launch the Messages app.
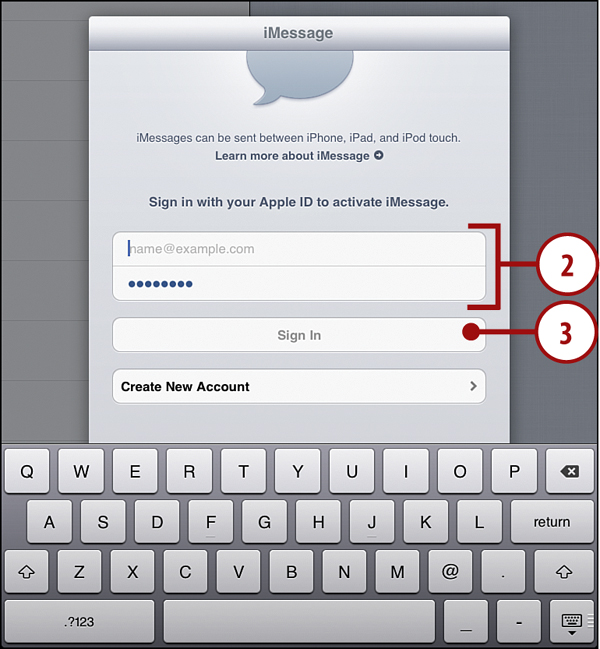
2. If this is your first time, you’ll need to enter your Apple ID and password. Otherwise, you can go to step 3.
3. Tap Sign In.
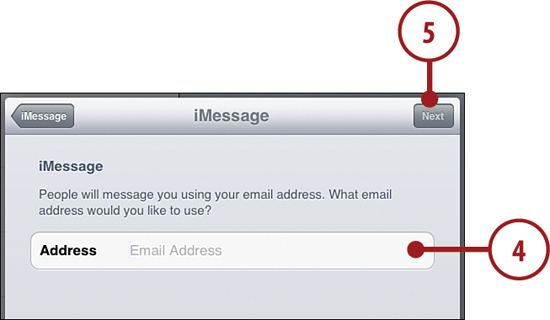
4. You can use any valid email address that you own for Messages, even if it is not the same as your Apple ID email address. This will be the email address that others use to send you messages.
5. Tap Next.
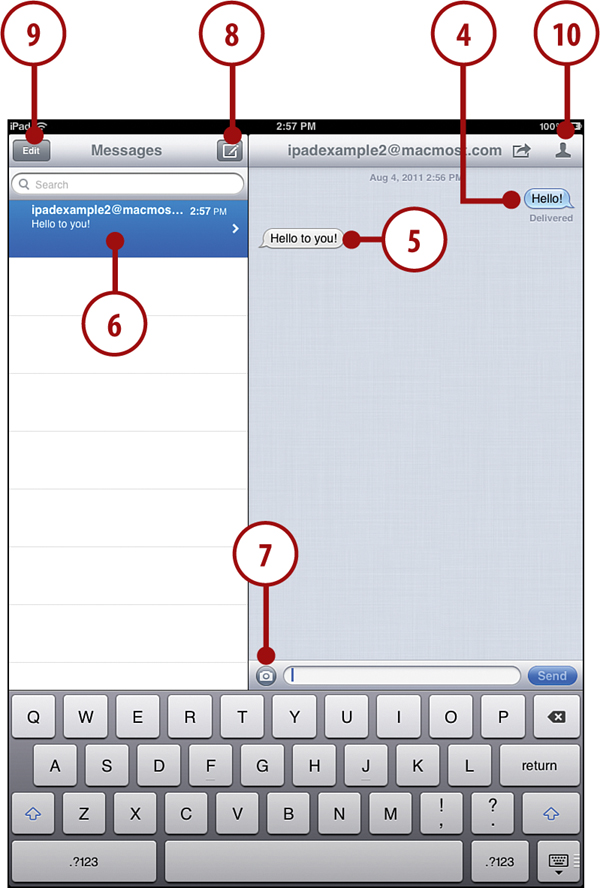
Conversing with Messages
After you have set up an account with Messages, you can quickly and easily send messages to others. The next time you launch Messages, you will be taken directly to the main screen.
1. In a new message, tap in the To field and enter the email address of the recipient. Note that they should already be signed up for iMessage or you will not be able to send them anything. Likewise, you can tap the + button to add a recipient from your contacts.
2. Tap the text field above the keyboard to type your message.
3. Tap Send to send your message.
4. You will see the conversation as a series of talk bubbles. Yours will appear on the right.
5. When your friend responds, you will see their talk bubbles as well.
6. A list of conversations appears on the left. You can have many going on at the same time, or use this list to look at old conversations.
7. You can send a picture as well as text by tapping the Picture button.
8. Tap the Compose button to start a new conversation.
9. Tap Edit to access buttons to delete old conversations.
10. Tap on the Person icon to do various tasks such as emailing the recipient, adding them to your contacts, or starting a FaceTime video chat.
Setting Up Twitter
Another way to message is to use the popular service Twitter. But instead of a private conversation, Twitter is all about telling the world what you are up to. If you already have a Twitter account, you can use the official Twitter app that comes with your iPad. Otherwise, you can set up a new account.
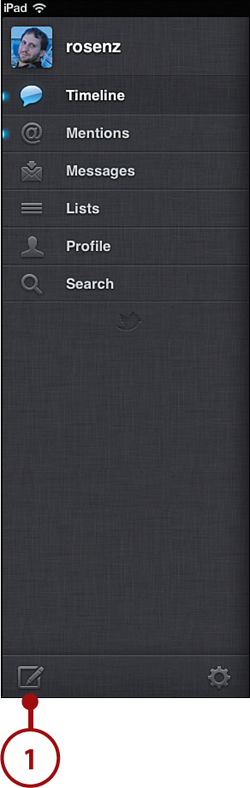
1. Install the Twitter app by going to Settings and tapping Twitter on the left side. Launch the Twitter app from the Home screen.
2. If you already have an account, tap Sign In.
3. If you need to create a Twitter account, you can do so here by tapping Sign Up. Then enter the required information for a new account.
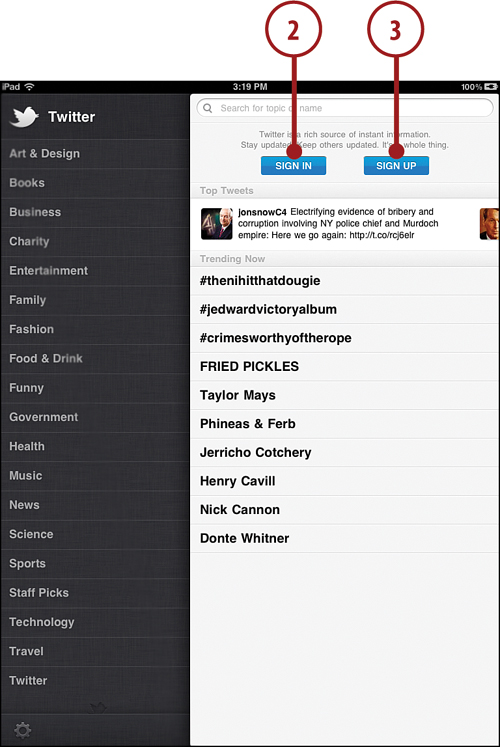
4. Enter your Twitter Username and Password.
5. Tap Save.
Following People on Twitter
Even if you don’t tweet much yourself, you can have fun with Twitter by following others. You can even learn things and stay informed. The key is to figure out who you want to follow and then add them.
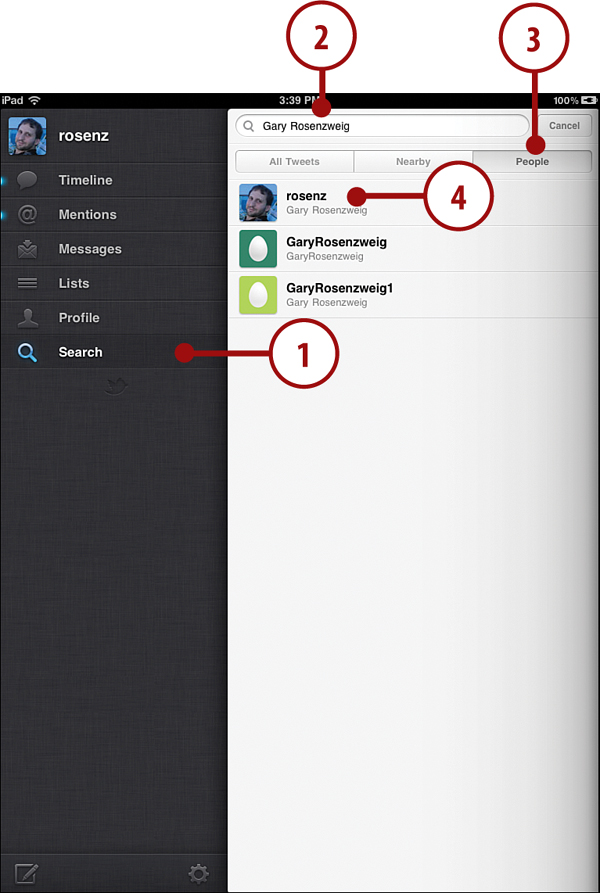
1. Tap the Search button.
2. Type in the name or Twitter handle of the person you wish to follow.
3. Tap the People button.
4. Tap the profile that matches your search, and then use the picture to help identify the right person.
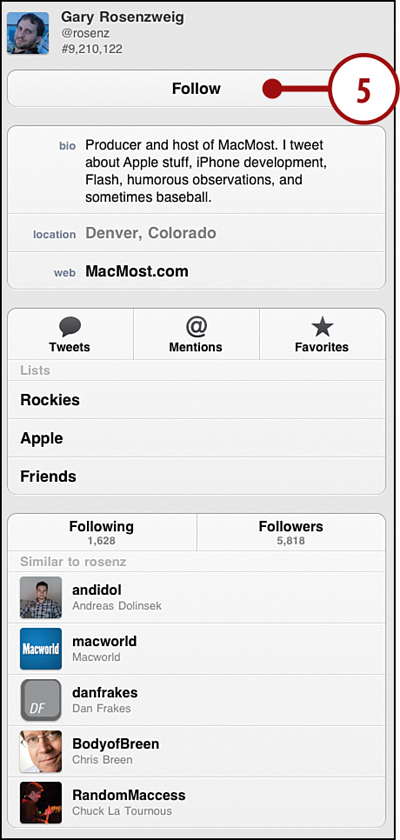
5. Tap the Follow button to add them to the list of people you follow.
Who to Follow?
This depends on what you want from Twitter. If you just want to know what your friends are up to, then only follow your friends. If you want to hear what celebrities have to say, then search for some of your favorites. You can also search for professional and industry experts to learn more and stay informed. And don’t limit your search to people. Local and worldwide news publications and organizations also have Twitter feeds.
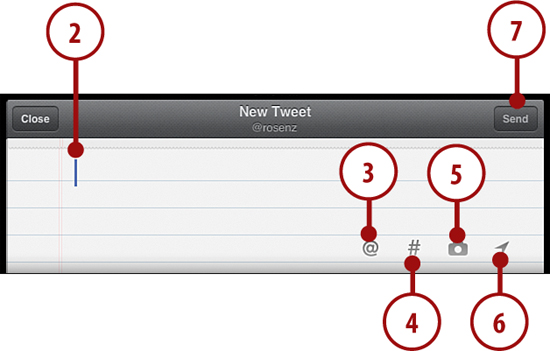
How to Tweet
Thinking about adding your voice to the conversation? You can send a tweet easily with the Twitter app.
1. Tap the Compose button.
2. Enter the text of your tweet. It must be 140 characters or less.
3. This button makes it easy to add references to another Twitter member. You can also just type @ and their Twitter name.
4. This button makes it easy to add hash tags, which help identify subjects in messages. For instance, you might type #Rockies instead of just Rockies when you are talking about the baseball team.
5. You can add a photo or video to your tweet. This will upload the image to the service you have selected in your Twitter preferences and put a link to the file in the tweet.
6. You can add your GPS location to the tweet.
7. Tap Send.