
4. Playing Music and Video
In this chapter, you learn how to use the Music and Video apps to play music and watch video.
• Using AirPlay to Play Music and Video on Other Devices
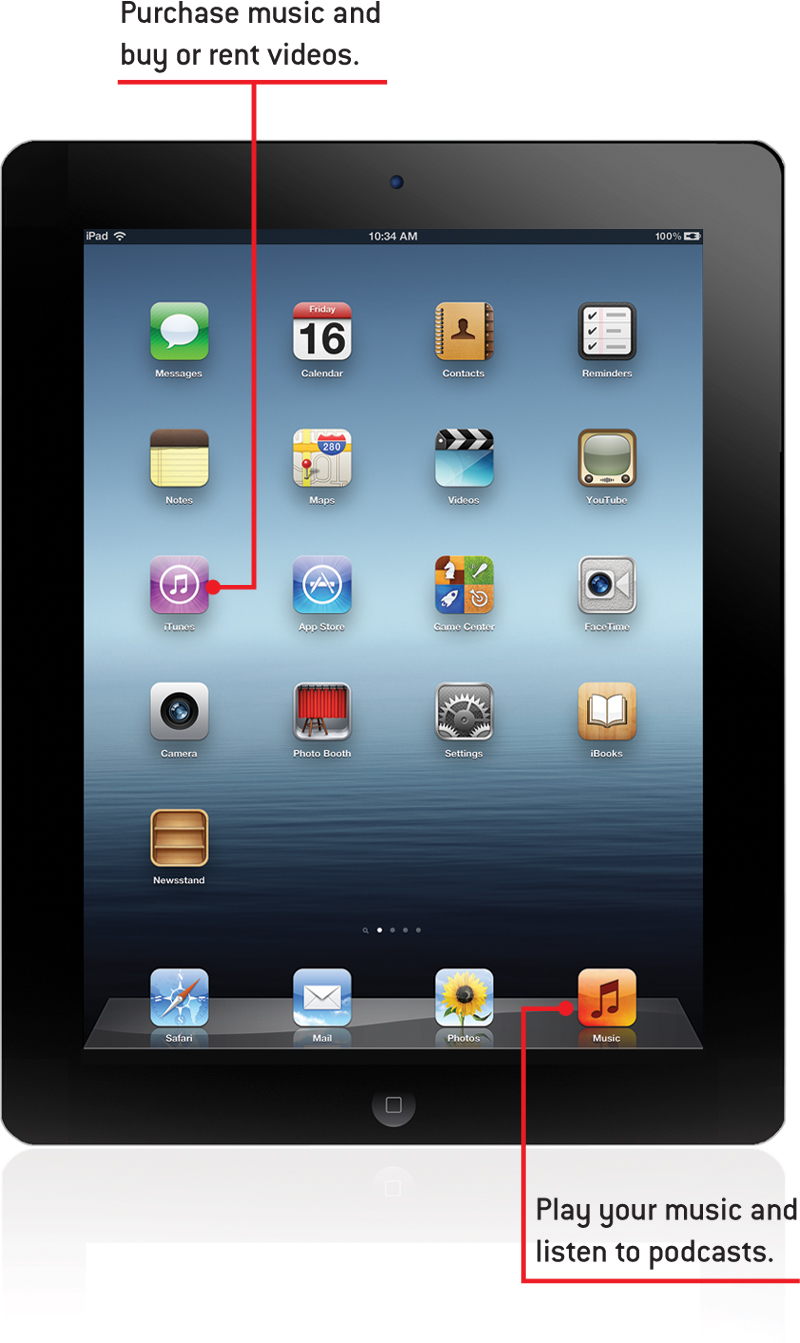
The iPad handles playing music as well as any iPod or iPhone ever has, plus it has a big screen for you to use to browse your collection.
Playing a Song
So let’s start by simply selecting and playing a song with the Music app.
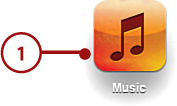
1. Tap the Music icon, which is most likely along the bottom of your Home screen.
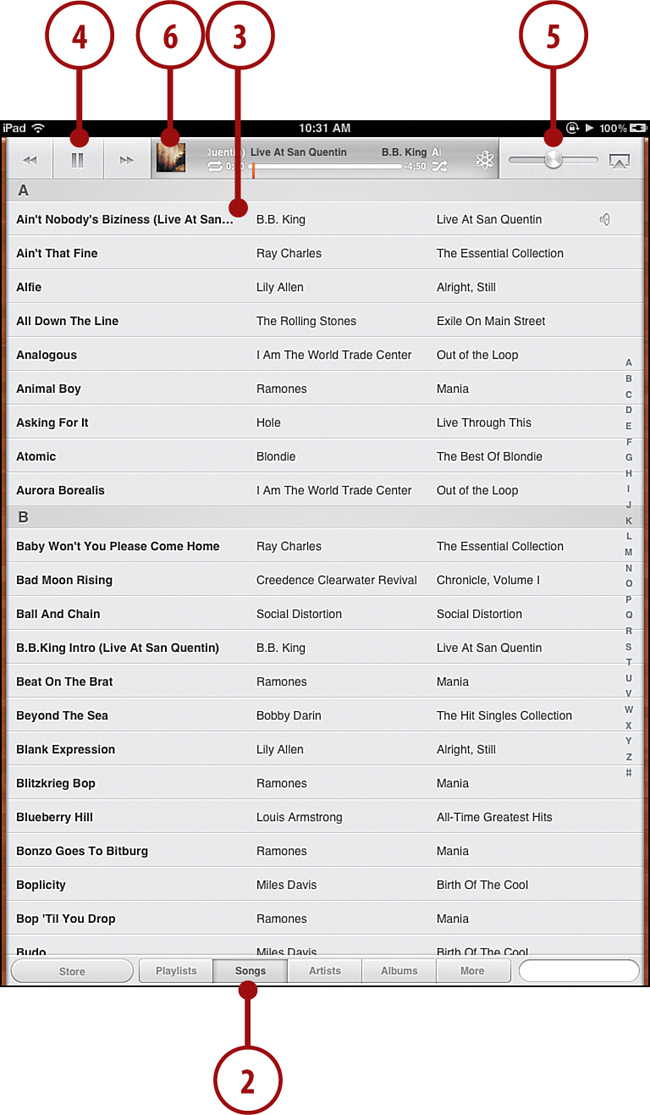
2. Tap Songs on the bottom if it isn’t already selected.
3. Tap the name of a song to start it.
Playing iTunes Match Music
If you are using iTunes Match, you will see all your music in the list, even songs not currently on your iPad. You can still tap the name of a song to start it. The song will download and play, assuming you are connected to the Internet. You can also tap the iTunes Match (cloud) icon for each song to simply download each song so it is ready to listen to later, even if you are not connected. You would want to do this for some songs if you are going to be away from your Internet connection and plan to listen to music.
Visit http://www.apple.com/itunes/itunes-match/ to find out more about Apple’s iTunes Match service.
4. At the top of the screen, the square Play button changes to a Pause button. The red time progress bar to the right begins to move.
5. Use the volume slider at the top to adjust the volume, or use the physical volume controls.
6. Tap the album art at the top to enlarge it.
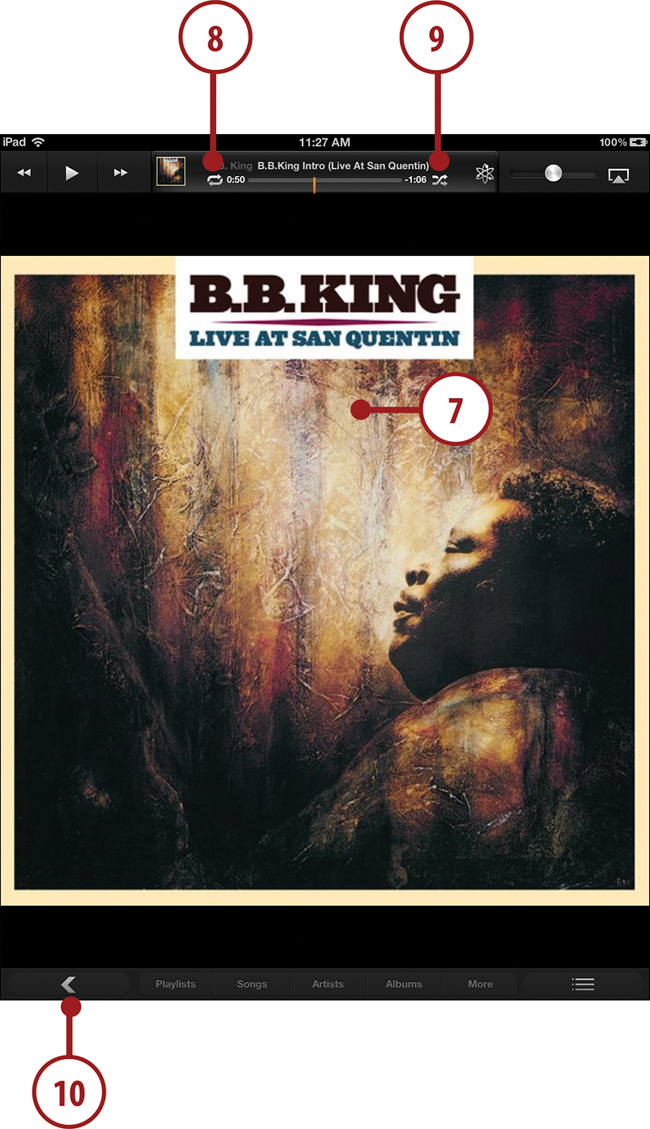
7. With the artwork on the screen, tap in the middle to bring back up the play and volume controls, along with the name of the artist, song, and album.
8. Tap the repeat button to make your iPad repeat all songs in the list. Tap the Repeat button a second time to repeat the current song over and over.
9. Tap the Shuffle button to make your iPad play the songs in the list in a random order.
10. Tap the left-facing arrow button at the bottom left to return to the main Music app interface.
How Else Can I Listen to Music?
You can also listen to music using other third-party apps. Some apps access your music collection on your iPad, but the most interesting ones play streaming music from over the Internet. We look at apps, such as Pandora, in Chapter 15, “The World of Apps.”
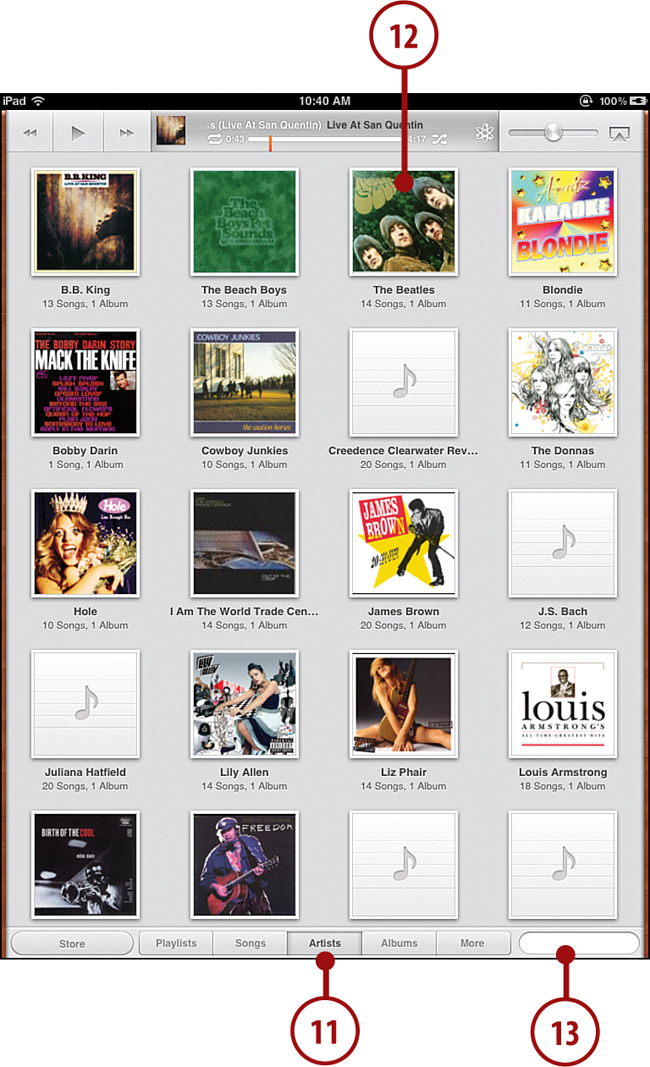
11. Tap any of the buttons at the bottom of the screen—Playlists, Songs, Artists, and Albums—to sort the list of songs.
12. When you sort by albums or genres, you will see a grid of album covers. Just tap on any album to view the album and the songs in it. Tap a song name to play it.
13. Tap in the Search field in the lower right to search your song list.
Building a Playlist
You can create playlists on your Mac or PC in iTunes, but you can also build actual playlists on your iPad.
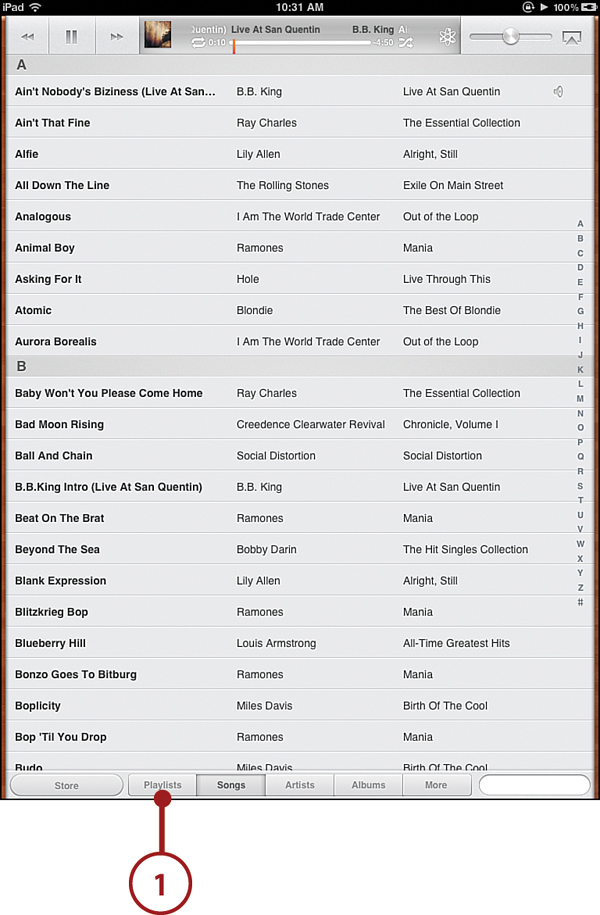
1. Tap the Playlists button in the bottom-left corner of the main Music app screen.
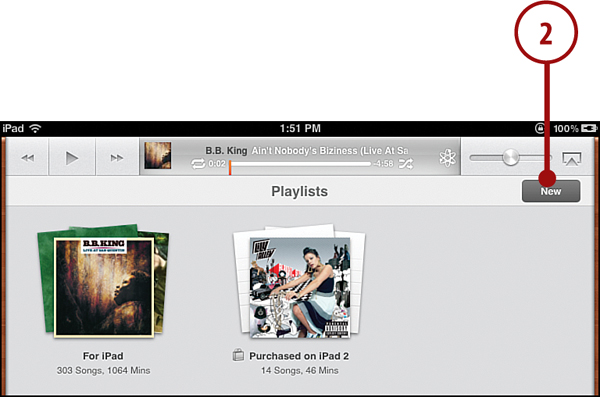
2. A list of current playlists appears. Tap the New button.
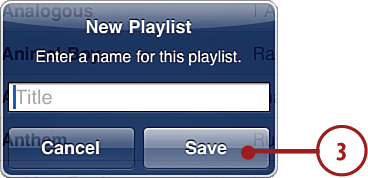
3. Give the new playlist a name and tap Save.
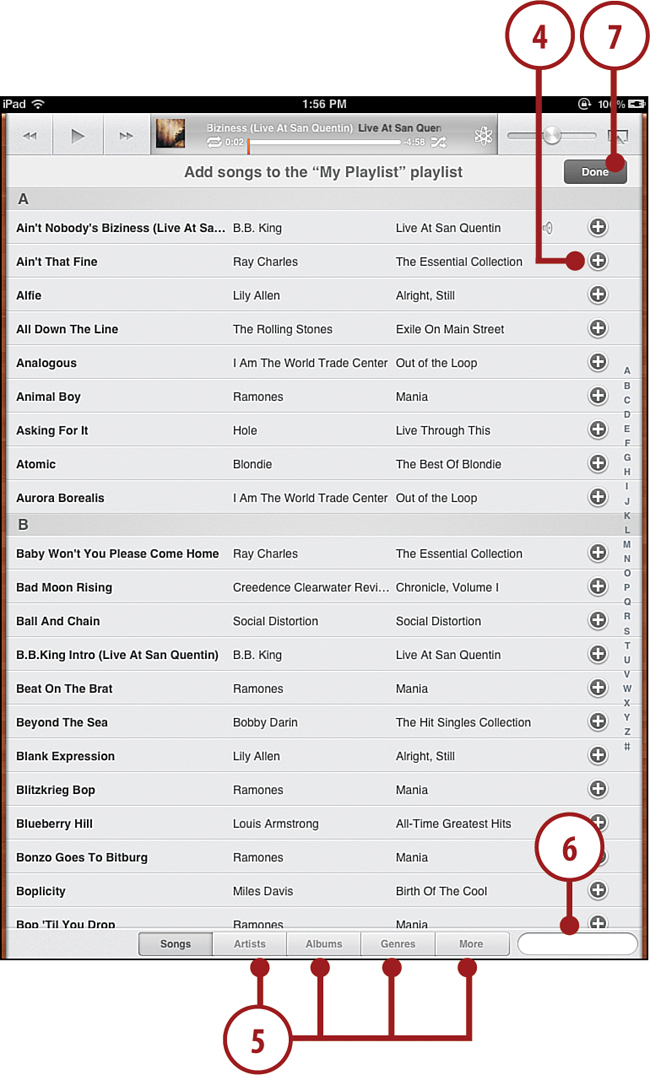
4. In the expanded list of your music, tap the + buttons next to each song you want to add to the playlist.
5. Tap the Sort buttons at the bottom of the screen to sort through your music.
6. Use the Search field in the lower right to find songs faster.
7. Tap the Done button when you have selected all the songs you want to add to the playlist.
Genius Playlists
If you turn on the Genius feature in your Mac or PC copy of iTunes, you can use the Genius playlist feature to create playlists. After you click the Atom icon, select a song to use as the start of the Genius playlist. iTunes selects other songs from your collection that are similar and creates a playlist using the name of that song.
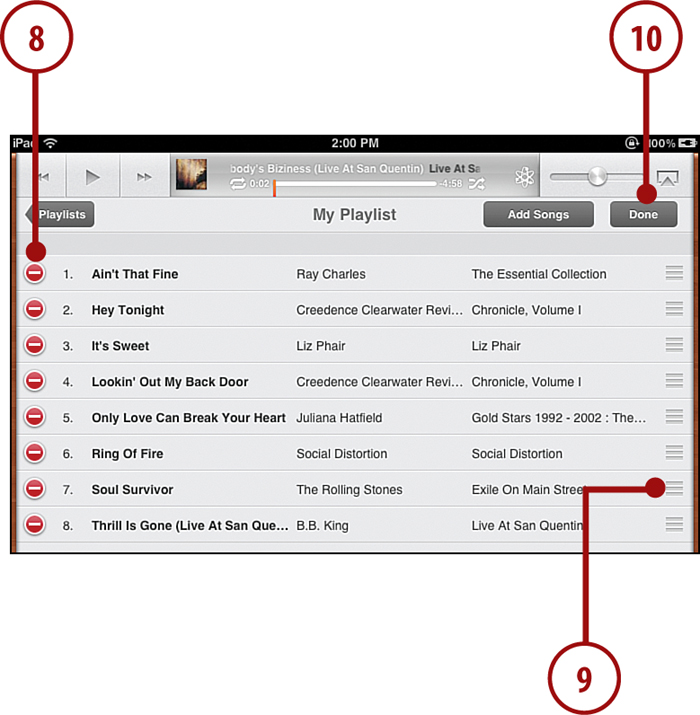
8. On the playlist edit screen, remove songs from the playlist by tapping on the red buttons.
9. Tap and drag on the three-line buttons to rearrange the songs.
10. Tap Done to complete the playlist. The next time you sync your iPad to iTunes, the new playlist syncs, too.
Making iTunes Purchases
You have lots of options when it comes to adding more music to your iPad. You can simply add more music to your iTunes collection on your computer and then sync those songs to your iPad. In that case, you can buy them from iTunes, from another online source, or import them from music CDs.
How Else Can I Get Music?
You can purchase music on your iPad only through the iTunes app. But you can sync music from your computer that you get from any source that doesn’t use special copy protection, like CDs you import into iTunes. You can buy online from places such as Amazon.com, eMusic.com, cdbaby.com, or even directly from the websites of some artists.
In addition to syncing music to your iPad from your computer, you can purchase music, movies, TV shows, and audio books directly on your iPad using the iTunes app and using the same account that you use in iTunes on your computer.
1. Tap the iTunes app icon on your Home screen to go to the iTunes store.
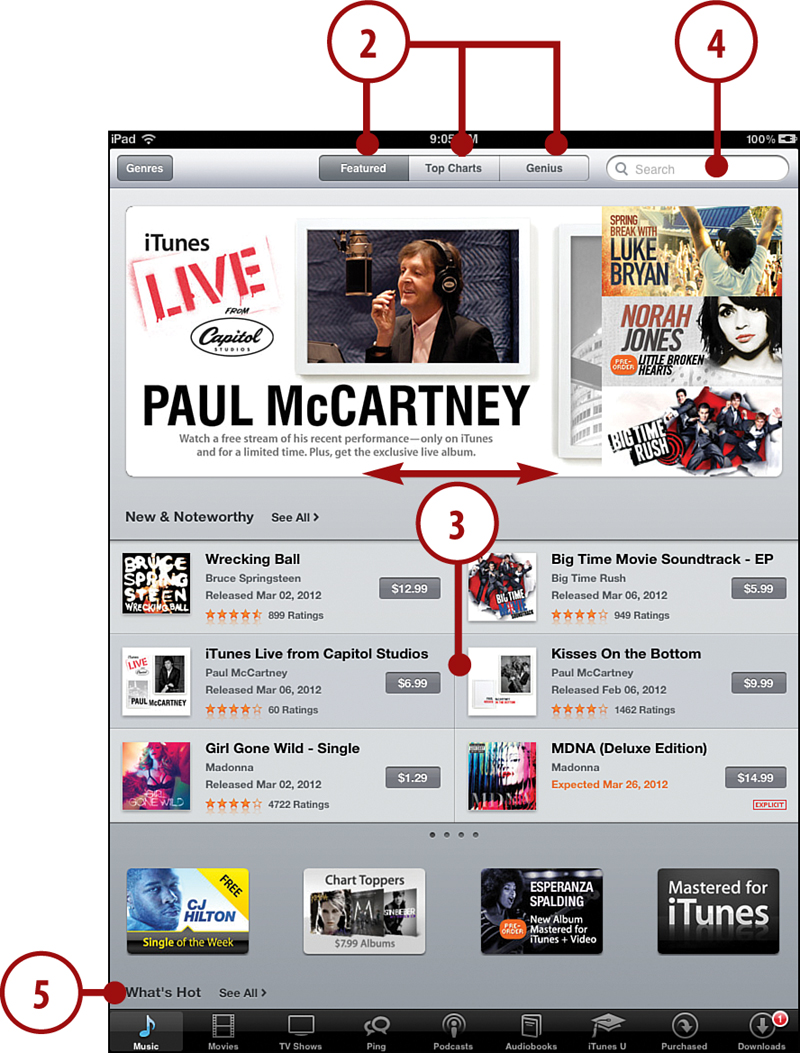
2. Use the buttons at the top of the screen to choose from today’s Featured selections or the Top Charts, or build a Genius list based on music you already own.
3. Swipe the New & Noteworthy section left and right to browse more featured albums.
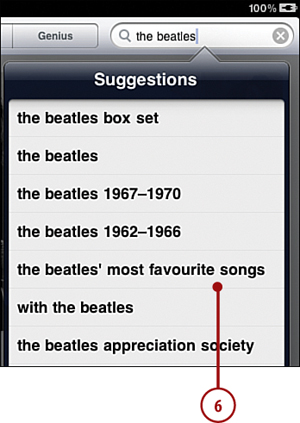
4. Use the Search field at the top to search for an artist, album, or song by name.
5. Drag the screen up to reveal more featured albums in the What’s Hot section.
6. Select a suggestion from the list, or tap the Search button on the keyboard to complete the search.
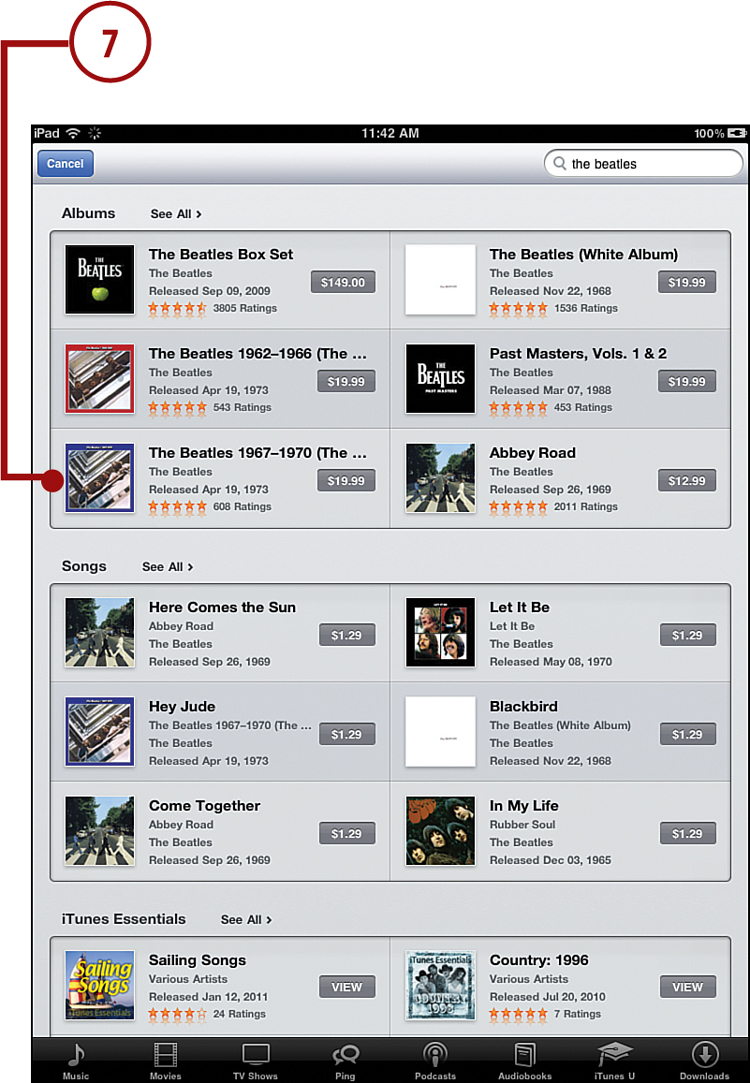
7. Find an album you want to buy, and tap its artwork to view more information.
Syncing Devices
After you make an iTunes purchase, the music, TV show, or movie you downloaded should transfer to your computer the next time you sync your iPad. From your computer, you can sync your new purchase to any other device you use that uses your iTunes account.
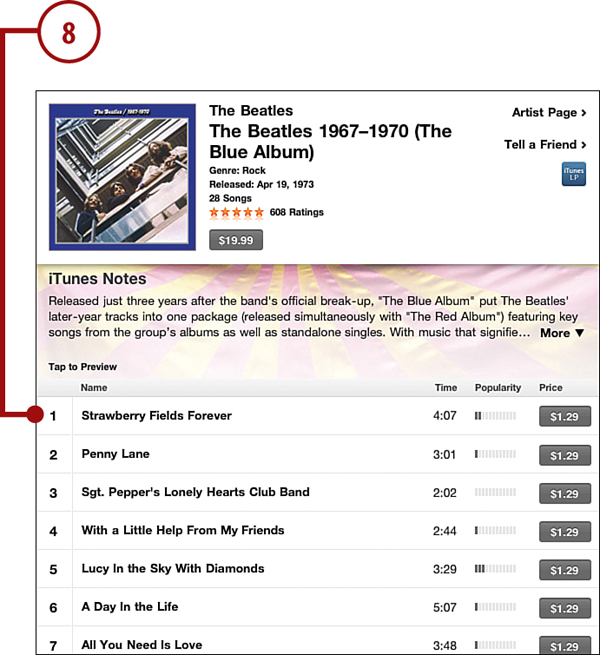
8. Tap a song name to listen to a sample of the song.
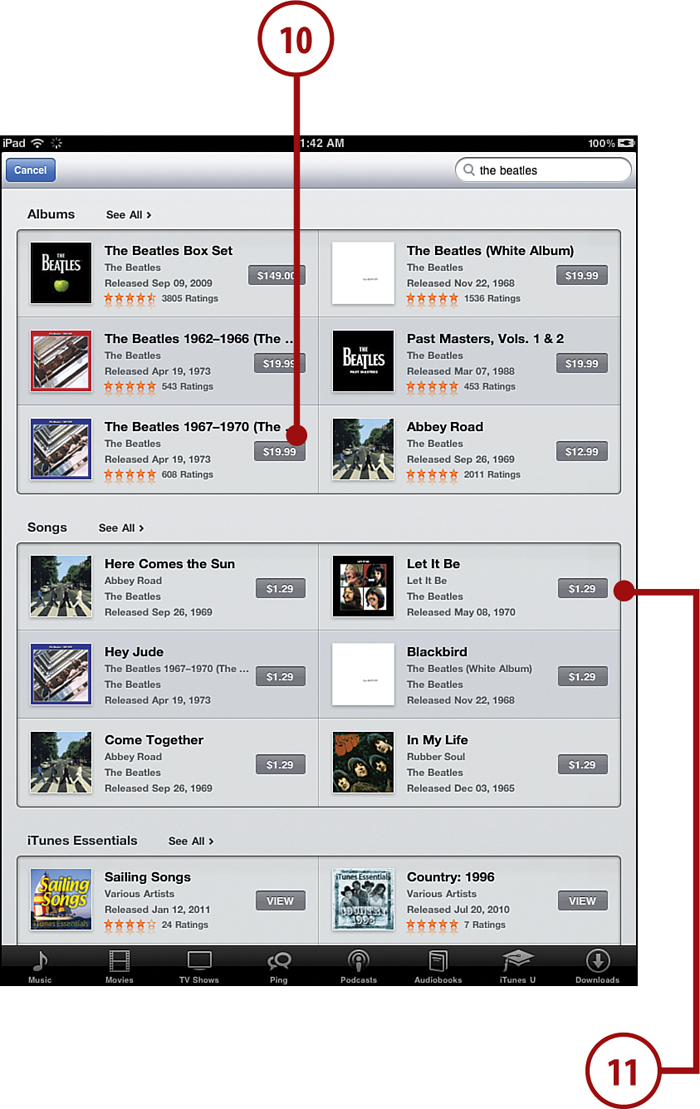
9. Tap outside of the album window to close it and return to the previous view.
10. To buy the album, tap the price of the album and then tap again on the Buy Album button.
11. You can also tap the price of a song to purchase just that song.
How About My Home Videos?
If you shoot a home video with a video camera, or iPod touch or iPhone, you can bring that into iTunes on your Mac or PC and sync it to your iPad. They appear as Movies, right next to your purchased content.
What About My DVDs?
If you can import CD music content into iTunes, you’d think you’d be able to import video content from your DVDs. Well, technically it is possible (although not necessarily legal) by using programs like Handbrake (http://handbrake.fr/) for your Mac or PC to import DVD content and then drag the resulting file into iTunes. Then you can sync it with your iPad.
Downloading Podcasts
Podcasts are episodic shows, either audio or video, produced by major networks, small companies, and single individuals. You’ll find news, information, tutorials, music, comedy, drama, talk shows, and more. There is something covering almost any topic you can think of.
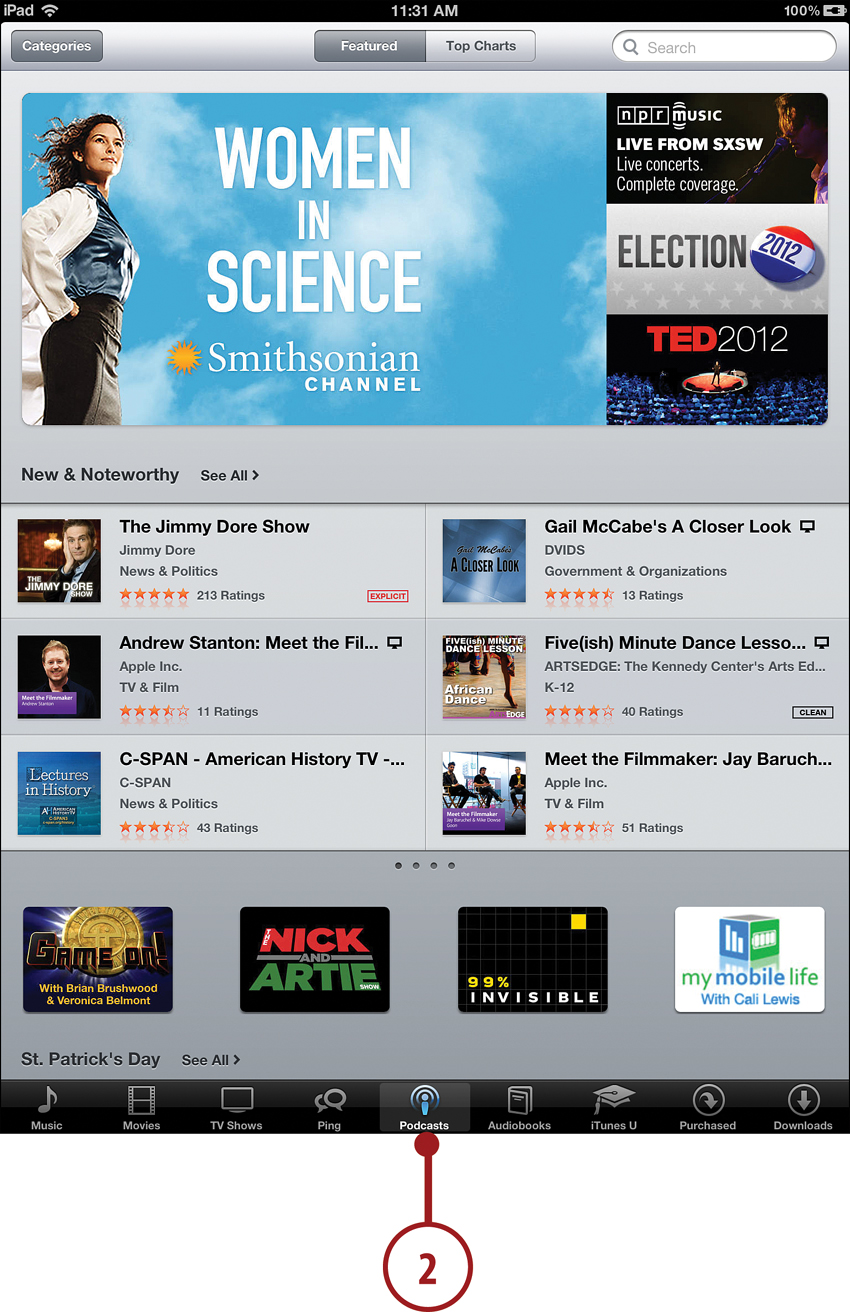
1. Tap the iTunes app icon on your Home screen.
2. Tap the Podcasts button at the bottom of the screen.
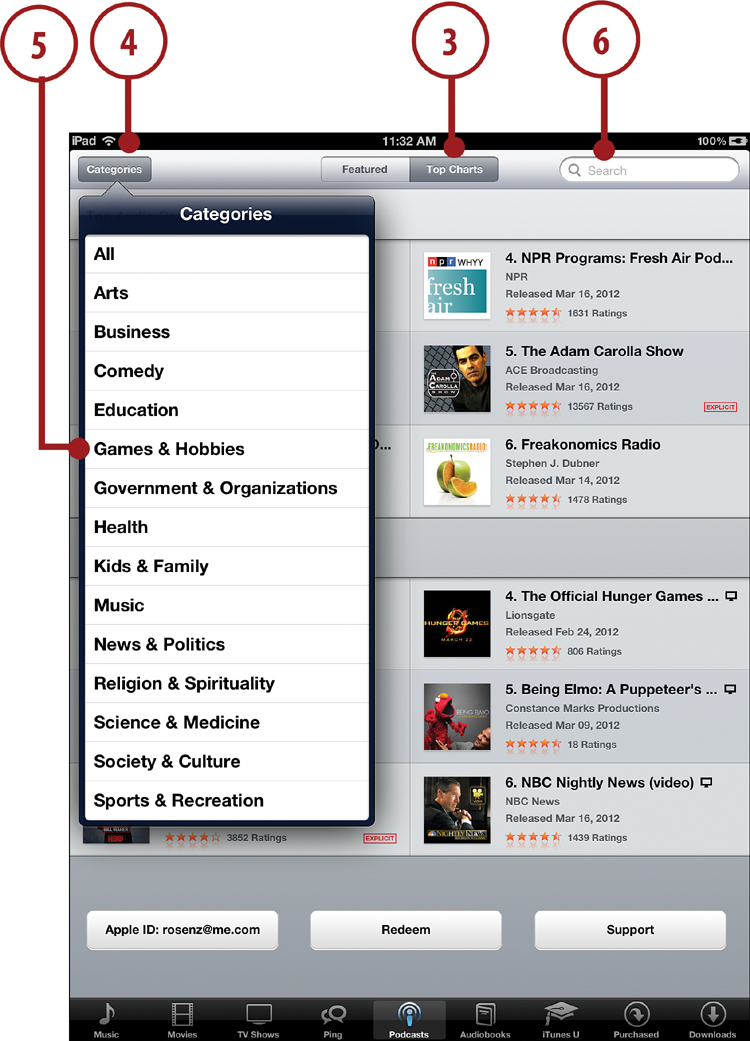
3. Tap Top Charts to see the top podcasts divided into audio and video podcasts.
4. Tap the Categories button to view all podcast categories.
5. Select a category to view featured podcasts for that category.
6. Tap the Search field to enter a search term. You can search for a podcast title or topic. Search results show podcasts and other iTunes content that matches the search term.
7. Tap a podcast to view more information about it.

8. Tap the Free button next to each episode to download the episode and add it to your podcast collection. A downloaded podcast appears under Podcast in your library.

9. Because the Music app plays back only audio, if you select a video podcast you will automatically launch the Videos app. This can get a little confusing because when the video is done or you press the Done button, you end up in the Videos app, not the Music app.
What About Subscribing?
Unfortunately the iPad cannot subscribe to podcasts on its own. Podcasts, being episodic, are meant to be subscribed to so that you automatically get new episodes. To use your iPad to follow an episodic podcast, subscribe to it on your computer, and then sync to your iPad to get new episodes.
Playing Video
After you have movies, TV shows, and Podcast videos on your iPad, you need to play them using the Videos app.
1. Tap the Videos icon on your Home screen.
2. The Movies you have on your iPad display by default. Tap TV Shows or Podcasts to switch lists. If you don’t have videos in one or more of these categories, then that button may not appear at all.
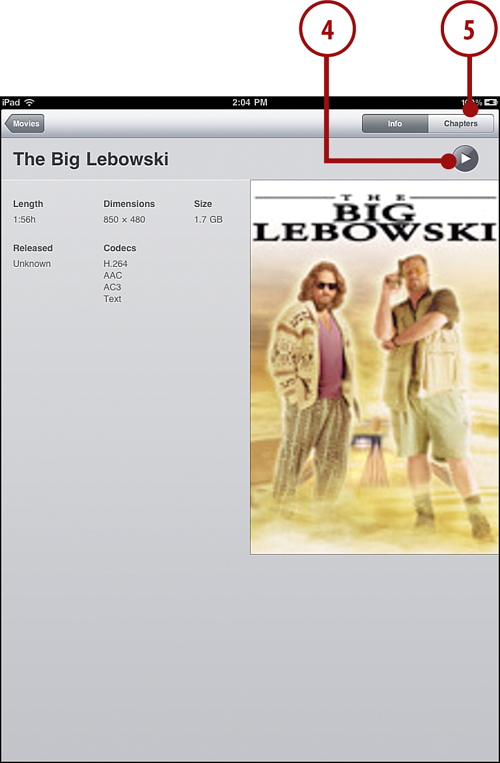
3. Tap a movie to view more information about it.

Any Video Alternatives to Apple?
You bet. An app for Netflix launched with the iPad that Netflix subscribers can use to rent movies. Some companies, such as ABC, have also provided their own apps for viewing their shows on the iPad. You can also view video from any site that has video in standard MP4 formats. The site www.archive.org/details/movies has public domain movies and videos, often in MP4 format. The popular video site http://blip.tv also works well with the iPad.
4. Tap the Play button to start the movie.
5. Tap the Chapters button to view a list of chapters in the movie.
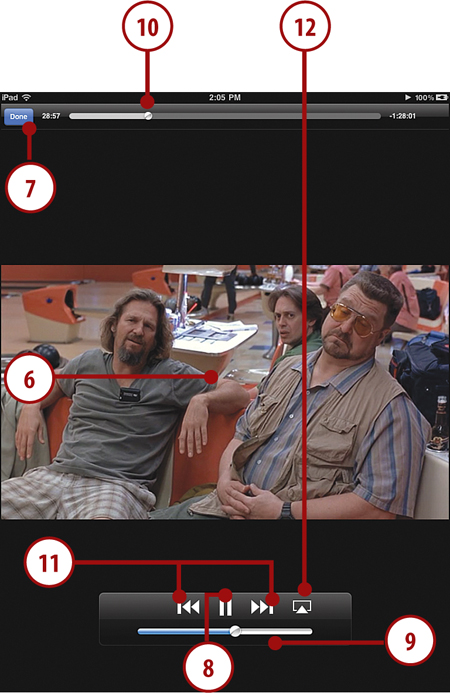
6. After a movie is playing, tap in the middle of the screen to bring up the controls.
7. Tap the Done button to exit the movie and return to the movie information screen.
8. Tap the Pause button to pause the movie and then again to resume.
9. Adjust the volume with the volume control.
10. Drag the dot along the line to move to a different section of the movie.
11. Use the Back and Forward buttons to jump between chapters.
12. Use the AirPlay button to send the video stream to another device, such as an Apple TV. See “Using AirPlay to Play Music and Video on Other Devices” later in this chapter.
Changing the Orientation
For most video content, you can rotate your iPad to view in a horizontal orientation and use the Zoom button at the upper right to crop the left and right sides of the video so that it fits vertically on the screen. This is similar to watching a movie on a standard TV.
Viewing YouTube Videos
It isn’t all about professionally produced movies and TV shows anymore. You might also want to use your iPad to watch poor-quality videos of cats playing pianos and kids lip-syncing to pop songs.
Fortunately, the YouTube app comes with your iPad. You can browse and play most, if not all, of the video at the most popular video site on the Web.
1. Tap the YouTube icon on your Home screen.
Do I Need a YouTube Account?
You don’t need a YouTube account to view videos. However, with a free online account, you can keep track of your favorites, subscribe to channels, and leave comments and ratings.
2. The Featured page of YouTube displays. Scroll up and down by dragging.
3. Tap the Top Rated and Most Viewed buttons to see other lists. You can sort those lists by Today, This Week, or All.
4. Tap Favorites to go to a page that lists your favorite videos and playlists after you signed in.
5. Tap Subscriptions to see the video channels that you subscribe to.
6. Tap My Videos button to see a list of the videos you have uploaded to your account.
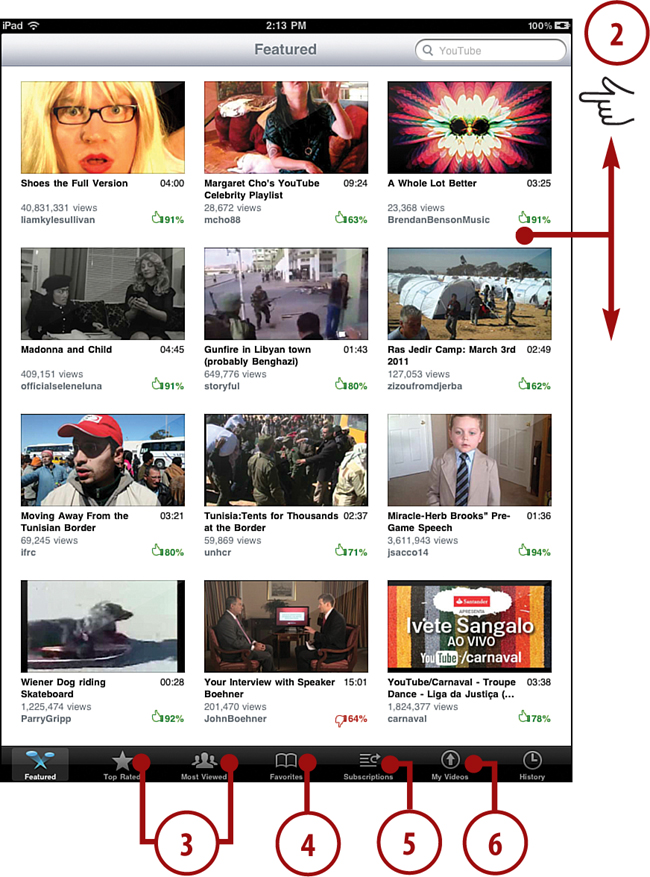
7. Tap the History button to see a list of the videos you most recently viewed.
8. Tap on a video on any screen to play the video. Rotating your iPad plays the video full screen.
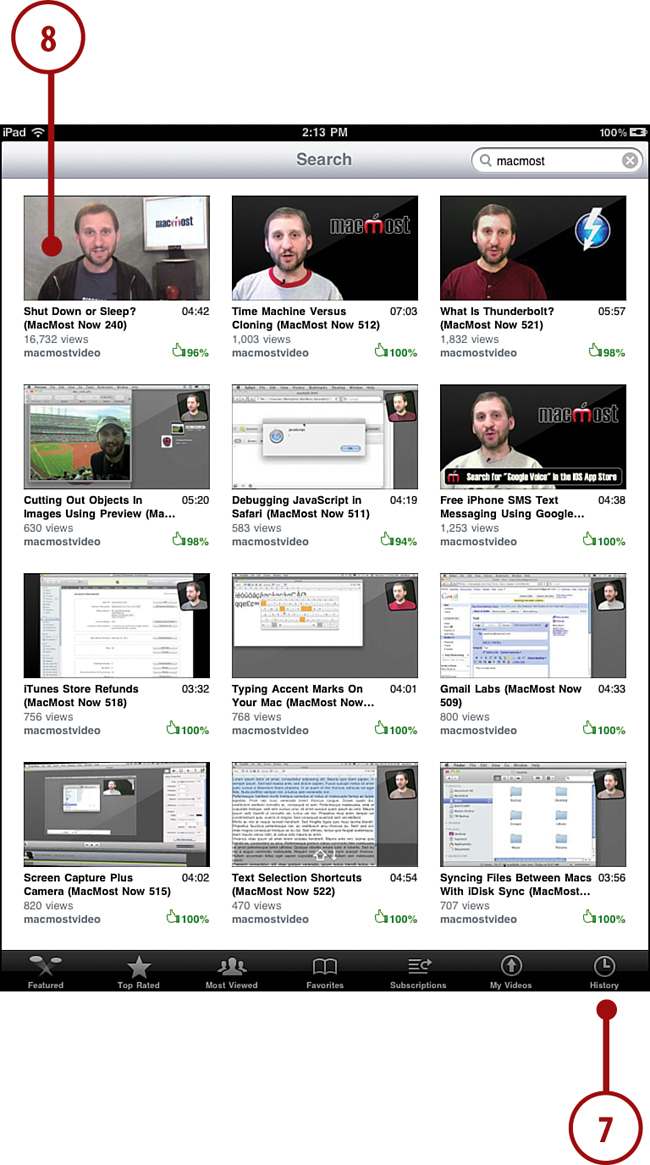
9. The video plays with controls at the top and bottom of the video. You might need to tap in the center of the video to bring up the controls.
10. Tap the Play/Pause button to start and stop the video.
11. Tap the buttons at the top of the video to add a video to your list of favorites, share a video link via email, rate a video, or flag it.
12. Tap the double arrow button to expand the playback to full screen.
13. Tap the buttons at the bottom of the video to switch between views of video information, related videos, more videos from the same channel, and comments.
14. Tap the Comments button, and then tap Add a Comment to type your own comment.

Using AirPlay to Play Music and Video on Other Devices
In iTunes, with the Video app and many other apps that play music or video, you have the option to send the audio or video stream from your iPad to another device that is connected to the same Wi-Fi network, such as an Apple TV.
You need to enable AirPlay on those devices first. For instance, using the Apple TV 2, you need to go into settings on the device and turn on AirPlay. You also need to make sure that the device is using the same Wi-Fi network as your iPad.
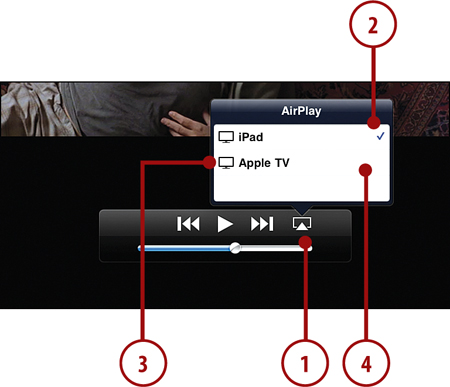
1. Look for the AirPlay button in the app you are using. Tap it to bring up a list of available devices.
2. Your iPad will show as the first device. Use this to switch back to playing the media on your iPad if you have switched to something else.
3. Next to each device, you will see either a screen icon or a speaker icon. This tells you whether you can stream video or just audio using that device.
4. Tap on another device, and the music or video currently playing will start to play over that device.
AirPlay Everything
You can also use AirPlay to mirror your iPad’s screen with an up-to-date Apple TV 2. Just access the multitask switcher and go all the way to the controls section. (See “Viewing Currently Running Apps” in Chapter 15.) There is an AirPlay button there, too. You can use that to turn on mirroring and send your screen to the Apple TV 2.
Home Sharing
If you are using iTunes on your Mac or PC, you can play this iTunes content on your iPad if it is on the same local network.
1. In iTunes on your Mac or PC, choose Turn On Home Sharing from the Advanced menu. You are prompted to enter your Apple account ID and password.

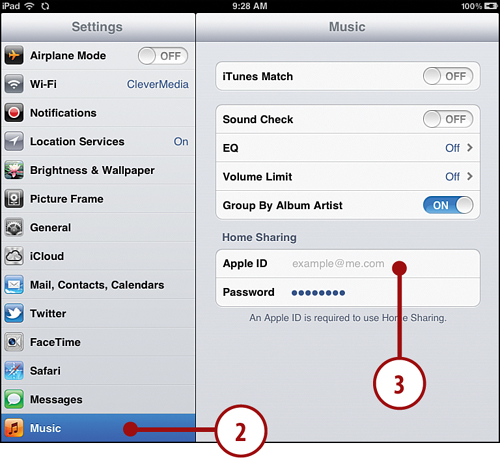
2. In the Settings App, choose Music settings.
3. Enter the same Apple account ID and password.
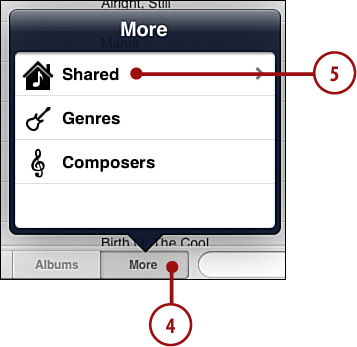
4. In the Music app, tap the More button at the bottom of the screen.
5. Tap Shared, and then choose the name of the library you want to access. The content in your Music app changes to reflect the content in the iTunes library on your Mac or PC. You can now play songs from your computer without having to transfer them to your iPad first.
What if My Library Doesn’t Appear?
Home Sharing is tricky. It requires that you use the same iTunes account IDs on both your iPad and on your Mac or PC. It also requires that you have the iPad on the same local network as your Mac or PC. In addition, network firewalls and other software may get in the way. It usually works effortlessly, but some users have reported trouble getting Home Sharing to work at all with their particular home network setup.