
2. Customizing Your iPad
In this chapter, you learn how to change some of the settings on your iPad such as your background images, sounds, password, and how some apps behave.
• Getting Details About Your iPad
• Password Protecting Your iPad
• Setting Parental Restrictions
• Setting Side Switch Functionality
• Notification Center Settings
Like with any relationship, you fall in love with your iPad for what it is. And then, almost immediately, you try to change it.
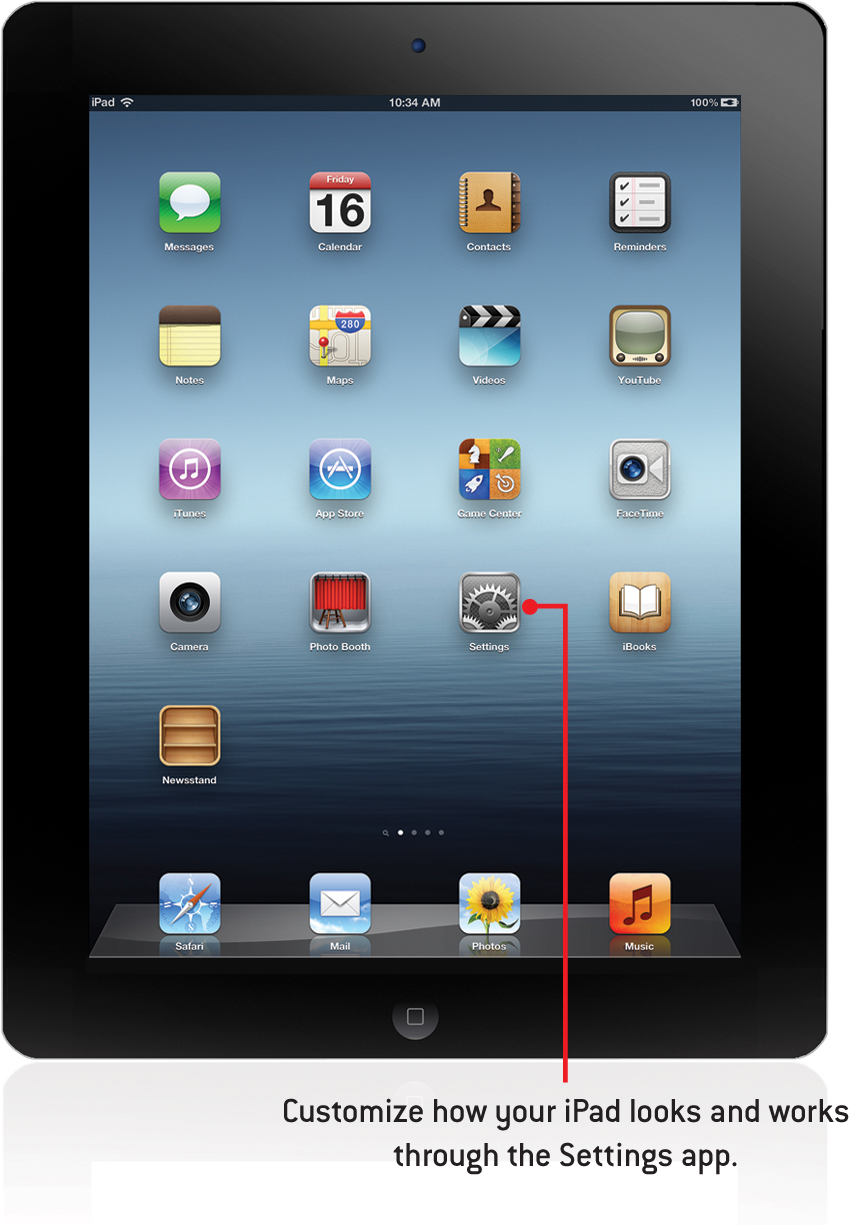
It’s easier, though, to customize your iPad than it is your significant other because you can modify various settings and controls in the Settings app. You can also move icons around on the Home screen and even change how the Home button works.
Changing Your Wallpaper
The wallpaper is the image behind the icons on the Home screen and on the lock screen, so make sure it’s something you like.
1. Tap the Settings icon on your Home screen.
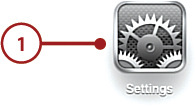
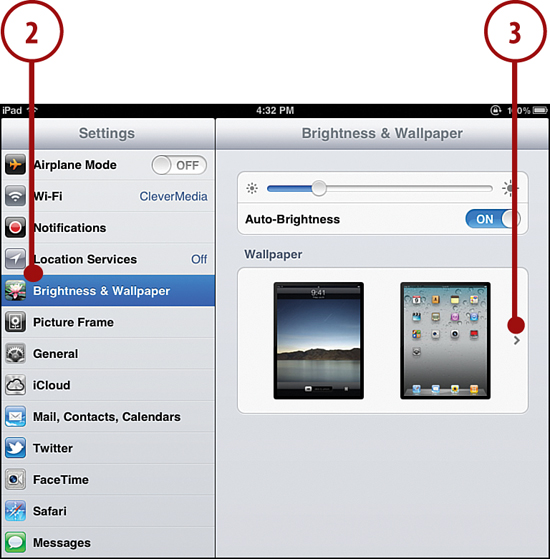
2. Choose Brightness & Wallpaper from the Settings on the left side of the screen.
3. Tap the Large Wallpaper button that shows previews of your lock and home screens.
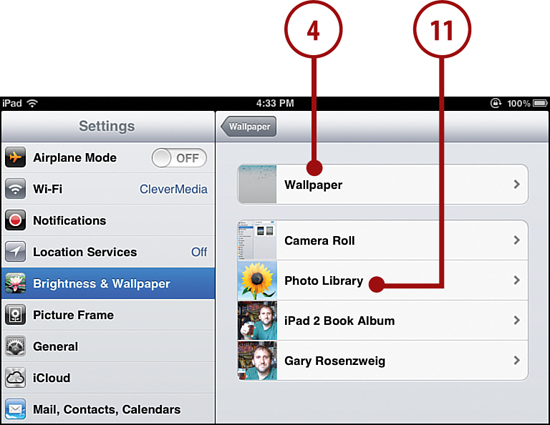
4. If you haven’t yet loaded or taken any pictures on to your iPad, you’ll move right to step 5. Otherwise, to choose an Apple-supplied wallpaper, tap Wallpaper or choose a photo album and skip ahead to step 11.
5. Tap an image icon to select it. You see a full view of the image.
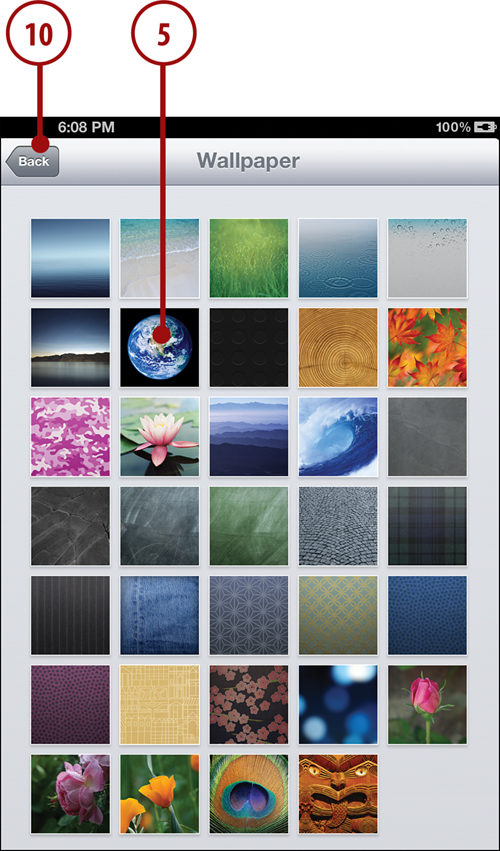
6. From this full view, choose Set Lock Screen to set this image as the background of your lock screen.
7. Choose Set Home Screen to set this image as the background for your Home screen.
8. Choose Set Both to make the image the background for both screens.
9. Tap Cancel at the upper-left corner of the screen to go back to the wallpaper icons.

10. When viewing the list of icons, tap the Back button at the top of the screen to go back to the previous screen.
11. Tap Photo Library or a photo album to view your photos.
12. Tap a photo icon to view that photo from your photo album.
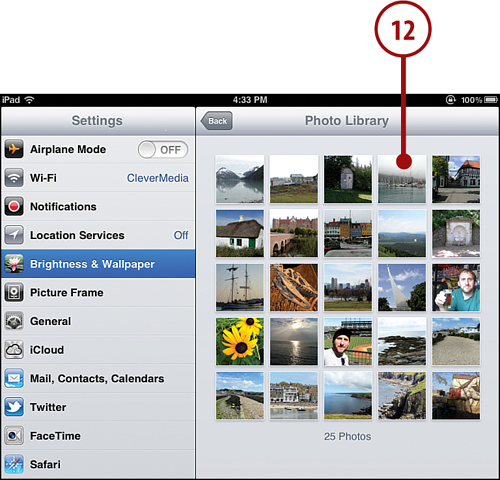
13. Use the buttons described in steps 6, 7, and 8 to set this image as a background.
Adjusting the Wallpaper Image
You can touch and drag in a photo to move to other areas of the image so you can choose the part of the image you want as your wallpaper. You can also pinch to zoom in and out on your photographs.
Getting Details About Your iPad
One of the many things in the Settings app on the iPad is an About section, from which you can learn details about your iPad.
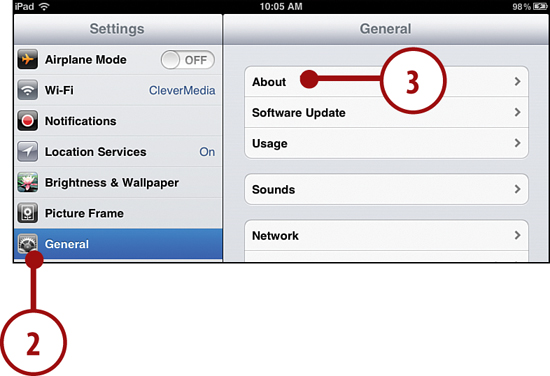
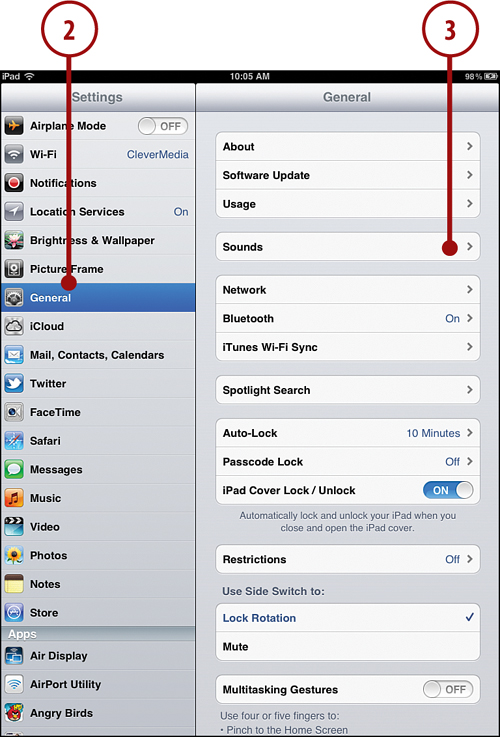
1. Tap the Settings app on your Home screen.
2. Tap General from the list of settings on the left.
3. Tap About, the first button at the top of the list of General settings.
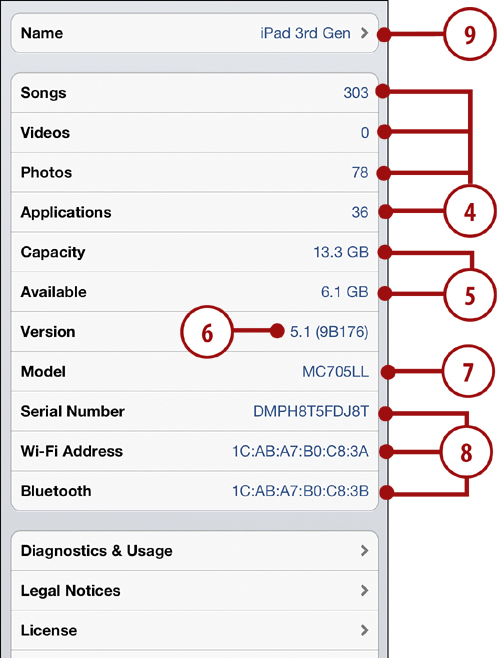
4. See how many songs, videos, photos, and apps you have.
5. See the total capacity of your iPad and the amount of space available.
Why Am I Missing Space?
Notice in the example here that the capacity of the iPad is shown as 13.3GB. However, that particular model is advertised as a “16GB” model. The discrepancy between the two is because of space used by the operating system and other system files.
6. The version number tells you which version of the iPad operating system you are running. Check this to make sure you are running the latest version of the iPad OS.
7. The model number tells you exactly which iPad you own if you happen to get it serviced or perhaps to report a bug to a third-party app developer.
8. The serial number, Wi-Fi address, and Bluetooth address are unique to your iPad. Apple may ask for your serial number if you are sending your iPad in for repairs. The Wi-Fi number is what you need if you are asked for a “MAC address” or “Ethernet address” for your iPad.
9. You can change the name of your iPad as it is seen in iTunes and iPhoto when you sync with your computer and various other instances.
Another Model Number?
If you tap the Regulatory button on the About screen, you are taken to another screen that lists another model number for your iPad. For the 3rd generation iPad, Wi-Fi only model, this is A1416. The models A1430 and A1403 represent the AT&T and Verizon 3G models. When you are buying third-party accessories for your iPad, the specifications for those accessories may say “compatible with model X.” In that case, X may represent either model number.
Setting Alert Sounds
Your iPad can be a noisy device with various events that trigger alert sounds. Just typing on the on-screen keyboard can produce a series of clicks.
Here’s how to adjust your iPad’s alert sounds.
1. Tap the Settings icon on the Home screen.
2. Tap General from the list of settings on the left.
3. Tap Sounds.
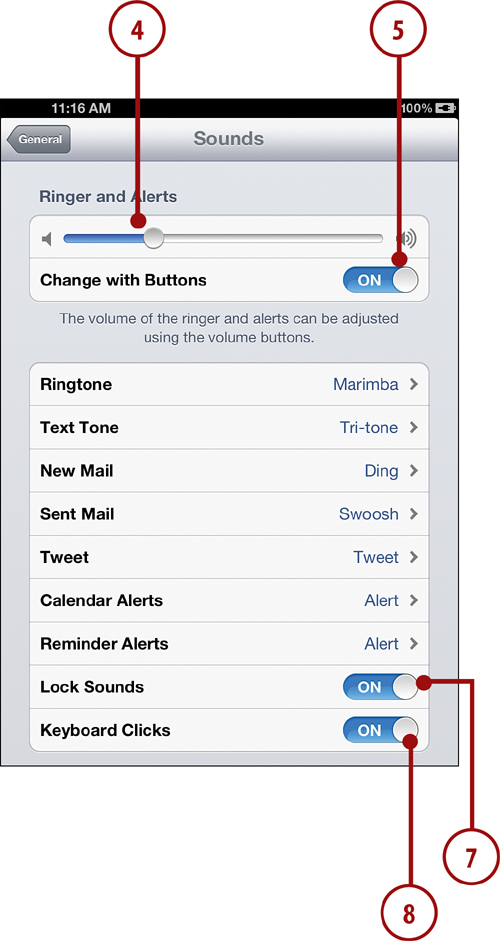
4. The volume slider is a separate control for incoming call rings from FaceTime.
5. When Change with Buttons is turned off, the ringer volume (see step 4) and alert volume (side volume buttons) are separate. When you turn this on, they are locked to the same setting, and you can use the slider to adjust both.
6. Tap any of these settings to set the sound that plays when an event occurs. You can choose ringtones, alert tones, or custom tones for any of the events. Ringtones refers to FaceTime calls and Text Tones refers to the Messages app.
7. Switch the Lock Sounds on or off. When this setting is on, a sound plays when you unlock the Lock screen.
8. Switch Keyboard Clicks on or off.
What? No Custom Sounds?
The current version of the iPad OS doesn’t enable you to set custom sounds for any alerts. Hopefully at some point we can change these sounds or even have them reflect different properties of mail messages and calendar events.
Password Protecting Your iPad
Password protecting your iPad is a great way to make sure that someone else can’t access your information or use your iPad.
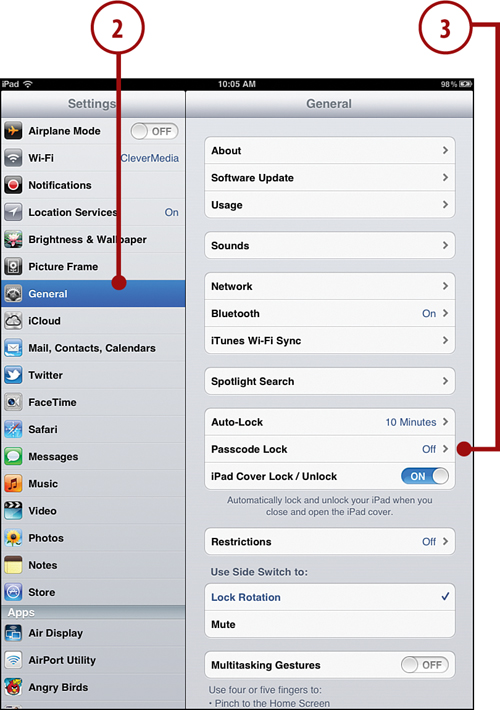
1. Tap the Settings icon on the Home screen.
2. Tap General from the list of settings on the left.
3. Tap Passcode Lock.
Even More Security
To lock your iPad automatically when you aren’t using it, choose Auto-Lock from the General Settings and set your iPad to automatically lock at 2, 5, 10, or 15 minutes. You can also choose to never have it auto-lock. Of course, you can manually lock your iPad at any time by pressing the Wake/Sleep button at the top.
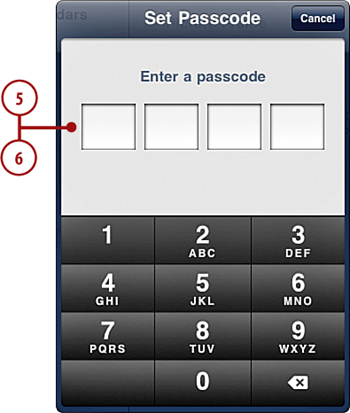
4. Tap Simple Passcode to switch from using a 4-digit number to a longer password that can include both letters and numbers, if you want additional security; otherwise, your password will consist of 4 digits. Tap Turn Passcode On.
5. Type in a four-digit passcode that you can easily remember. Write it down and store it in a safe place as you can run into a lot of trouble if you forget it.
6. You will be asked to re-enter your passcode.
7. Tap the Require Passcode button and choose the delay before a passcode is required. If you choose anything other than Immediately, then someone else using your iPad can work on it for that period of time before needing to enter the code.
8. Turn off Picture Frame to remove the Picture Frame slideshow button on the Lock screen.
9. Turn on Erase Data if you want to erase the iPad data after 10 failed passcode attempts.
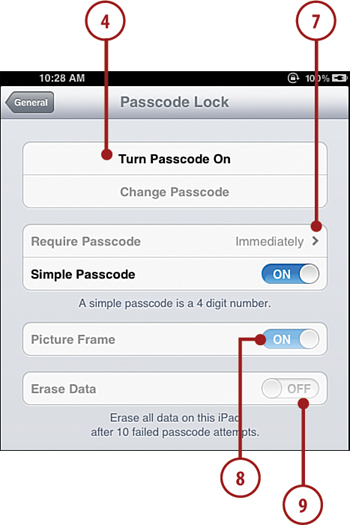
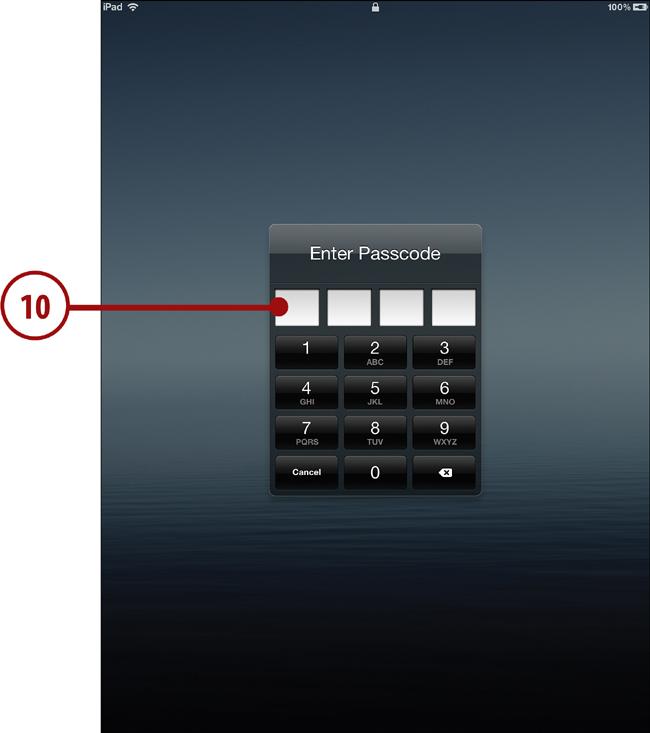
10. Press the Wake/Sleep button to confirm your new settings work. Then press the Home button and Slide to Unlock. The Enter Passcode screen displays.
You Forgot Your Passcode?
Well, it wouldn’t be secure if there were a way to get around the passcode, so you’re out of luck until you can connect your iPad to your Mac or PC and use iTunes to restore it. Hopefully, this never happens to you.
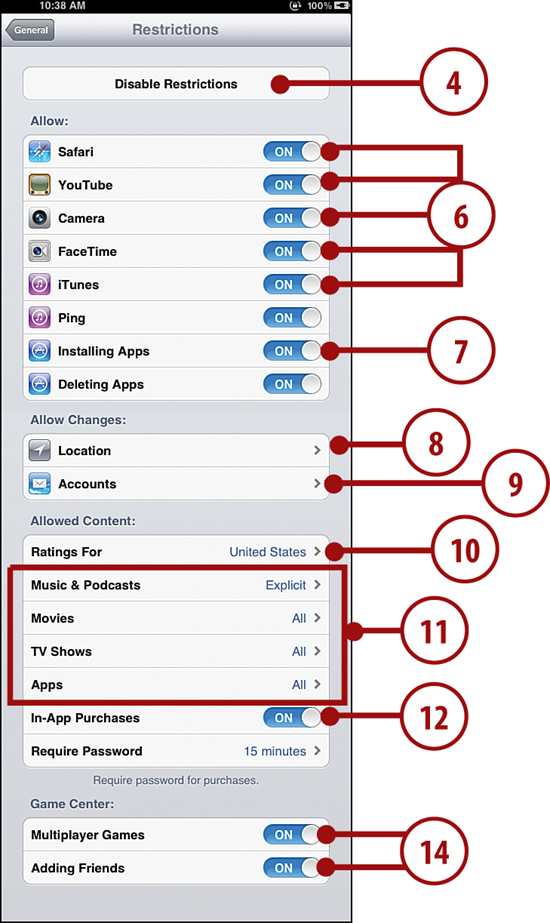
Setting Parental Restrictions
If you plan to let your kids play with your iPad, you might want to set some restrictions on what they can do.
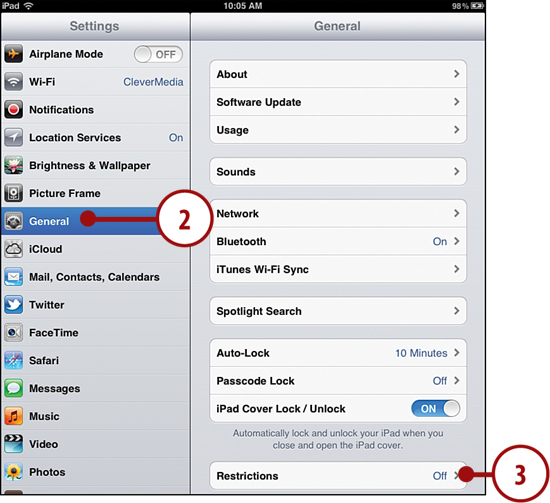
1. Tap the Settings icon on the Home screen.
2. Tap General.
3. Tap Restrictions.
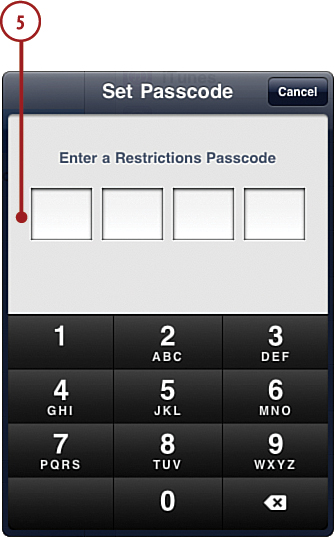
4. Tap Enable Restrictions to turn restrictions on or tap Disable Restrictions to turn them off.
5. Type in a four-digit code and then re-enter the code when prompted. Remember this code, or you can’t turn off restrictions.
6. To remove the Safari, YouTube, Camera, FaceTime, and iTunes apps from your Home screen, turn the switches to off.
7. The Installing Apps switch prevents new apps from being installed.
8. The Location switch turns off location-based functions of all apps.
9. You can disallow adding or changing email accounts.
10. Pick which country’s rating system to use from the Ratings For submenu.
11. On the last four items, choose the highest level of rating that a piece of content can have for it to be used. For instance, under Movies you can choose to allow only PG-13 or lower. You can also choose Allow All Movies or Don’t Allow Movies.
12. Use Allowed Content to determine whether In-App Purchases of paid app content, such as game levels or magazine issues, are allowed.
13. After an in-app purchase is made, the password won’t be required for future in-app purchases for 15 minutes. But you can change that here to require it again immediately.
14. Select options in the Game Center functions you want to allow. This will only affect games that use Game Center to communicate with other players. Some apps use their own system of communication or other systems like Facebook.
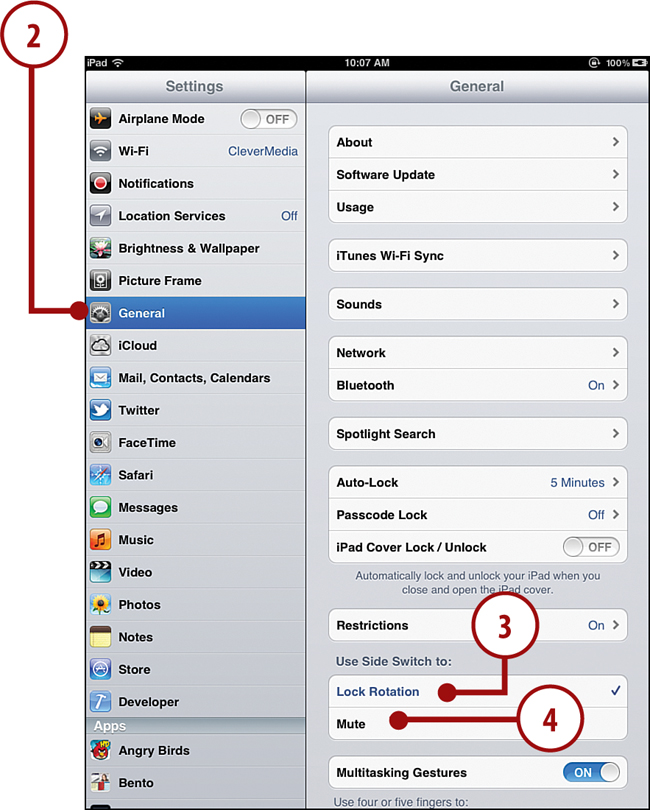
Setting Side Switch Functionality
When the original iPad came out, the side switch was an orientation lock. It was very useful for fixing the orientation while reading a book. But then Apple changed the functionality of the switch with a software update and turned it into a mute switch like the iPhone has. That made a lot of people unhappy. So starting with iOS 4.3 and after, you get to choose what you want the side button to do.
1. Tap the Settings icon on the Home screen.
2. Tap General.
3. Choose Lock Rotation if you want your side switch to be an orientation lock switch.
4. Choose Mute if you want the side switch to mute the volume on the speakers and earphones.
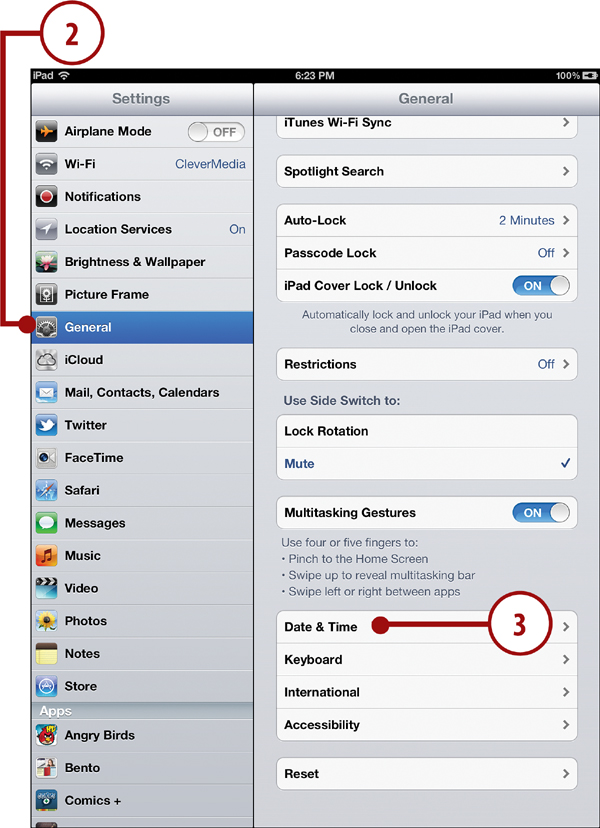
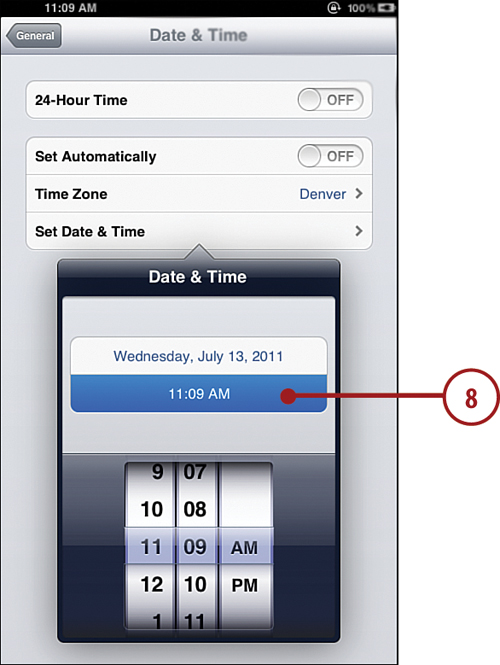
Setting Your Date and Time
You can set the date, time and time zone for your iPad and even choose whether to display the time in 12- or 24-hour mode.
1. Tap the Settings icon on the Home screen.
2. Tap General.
3. Tap Date & Time.
4. Set the 24-Hour Time switch to your preference.
5. Turning Set Automatically on will sync the date and time with the Wi-Fi network or wireless network that the iPad is connected to.
6. Tap the Time Zone button and then enter the name of your city, or a nearby city, to set the zone.
7. Tap the Set Date & Time to bring up date and time controls.
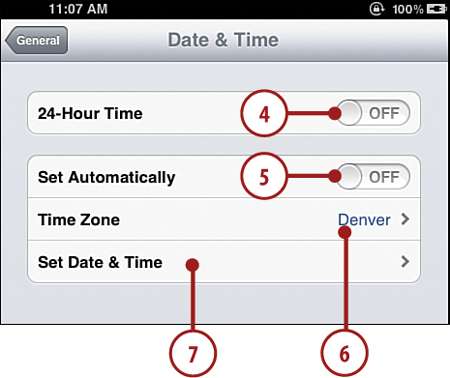
8. Tap either the day or the time at the top of the control to switch the bottom of the control to the correct interface. If you choose the time, you can set the hour and minute. If you choose the date, you can set the month, day, and year.
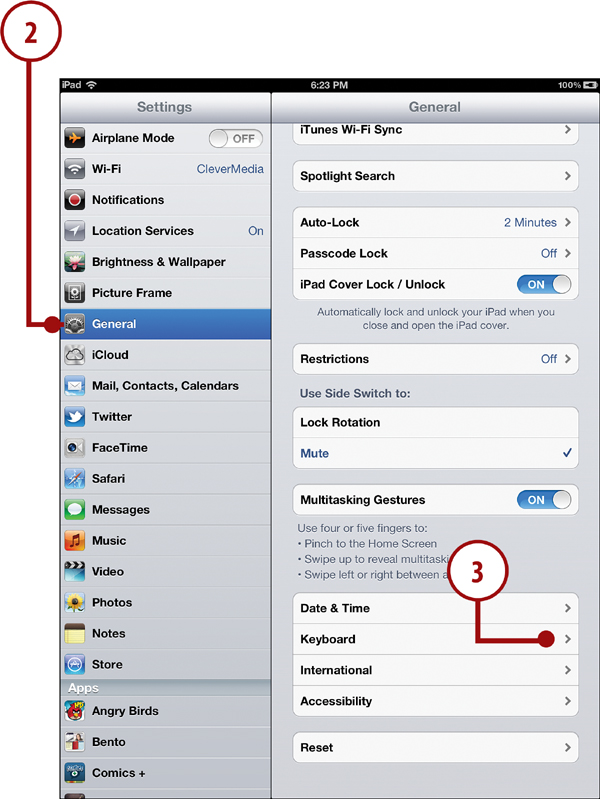
Modifying Keyboard Settings
If you use your iPad for email or word processing, you will use the on-screen keyboard a lot. The keyboard does several things to make it easier for you to type, but some of these might get in the way of your typing style. Use the following steps to modify the keyboard settings to your preferences.
1. Tap the Settings icon on the Home screen.
3. Tap Keyboard.
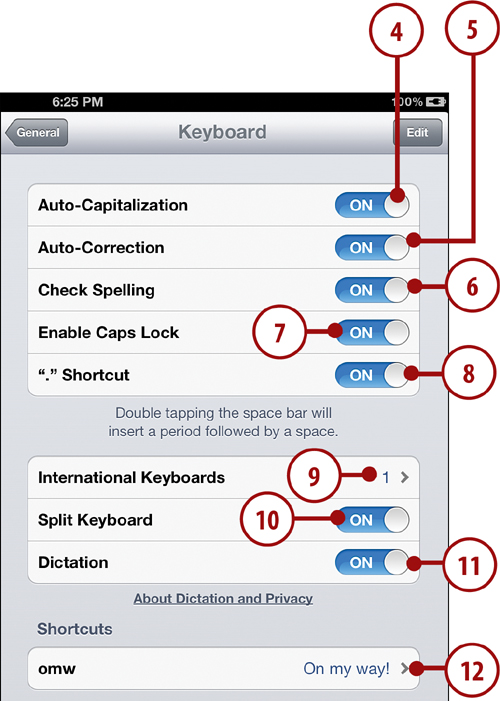
4. Turn Auto-Capitalization on to automatically make the first character of a name or a sentence a capital letter.
5. Turn Auto-Correction on to have mistyped words automatically corrected.
6. Turn on or off to control whether possible misspellings are indicated.
7. Turn Enable Caps Lock on or off. By default, this is off. When Caps Lock is enabled, you double-tap the shift key to lock it.
8. Turn on the “.” Shortcut if you want a double-tap of the spacebar to insert a period followed by a space.
9. Use the International Keyboards button to choose a different keyboard layout. In addition to keyboards commonly used in other countries, you can switch to a Dvorak keyboard or one of several other alternatives to the traditional QWERTY keyboard.
10. If you want to lock the keyboard so it can never be split and moved up vertically, then switch this to off. See “Using the On-Screen Keyboard” in Chapter 1.
11. You can turn off or on the dictation button that will appear on the standard on-screen keyboard. See “Dictating Text” in Chapter 1.
12. You can add your own shortcuts. For instance, when you type “omw,” it will instantly expand to “On my way!” Add your own shortcuts for things you commonly type.
Changing Safari Settings
We look at the Safari web browser in Chapter 7, “Surfing the Web,” but you can customize it right here in the Settings app.
1. Tap the Settings icon on the Home screen.
2. Tap Safari from the list of settings on the left.
3. Select which search engine to use. Google is the default, but you can also choose Yahoo! or Bing.
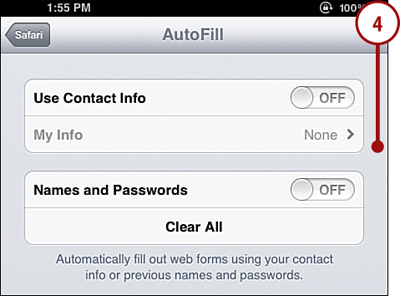
4. Adjust your AutoFill settings for filling out forms on the web. Your iPad can pull from your contact info in the Contacts app or from data you previously filled in on the same or similar web pages. Set Names and Passwords to On to have Safari remember your username and passwords for some websites.
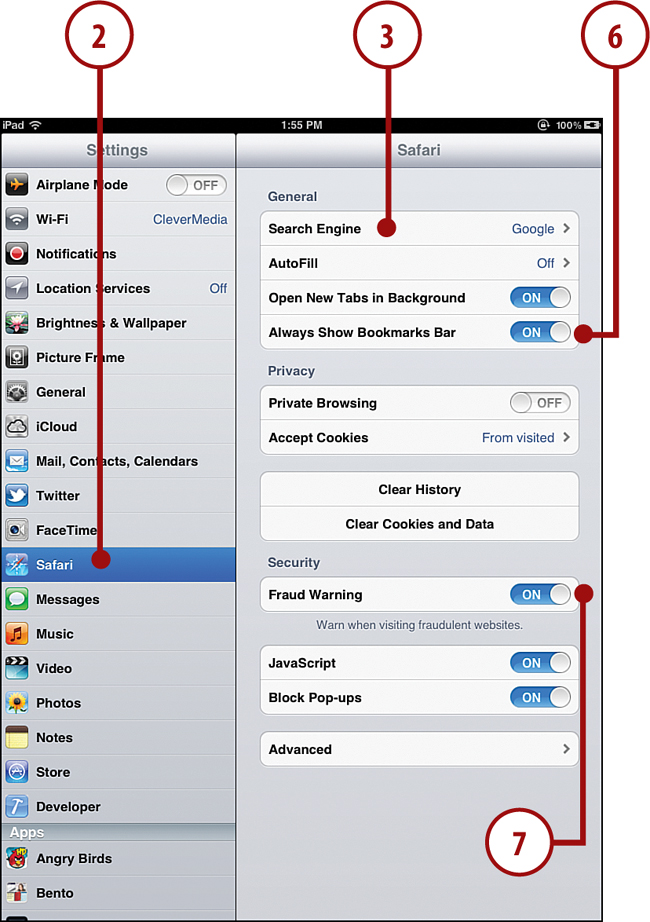
5. Decide whether you want to immediately jump to a new tab, or stay on the current page when you open a new tab and let the tab open silently in the background.
6. Choose whether to show the Bookmarks bar all the time or only when you have saved bookmarks in the bookmarks bar.
7. Fraud Warning checks websites against a public database of websites to avoid. I recommend leaving this switch on. If you try to follow a link to one of these sites, you get a warning and a chance to change your mind before loading the page.
Changing Music Settings
You have a few preferences to choose from when it comes to music playback. Most of them have to do with the quality and volume of sound you get from your iPad.
1. Tap the Settings icon on the Home screen.
2. Choose Music from the list of settings on the left.
3. Turn Sound Check on or off to play your music at approximately the same volume level, even if the song files themselves are louder or softer than each other.
4. Use EQ to select an equalizer setting. You can select from an equalizer setting according to the type of music you listen to, or settings like “Spoken Word,” “Small Speakers,” or “Bass Booster.”
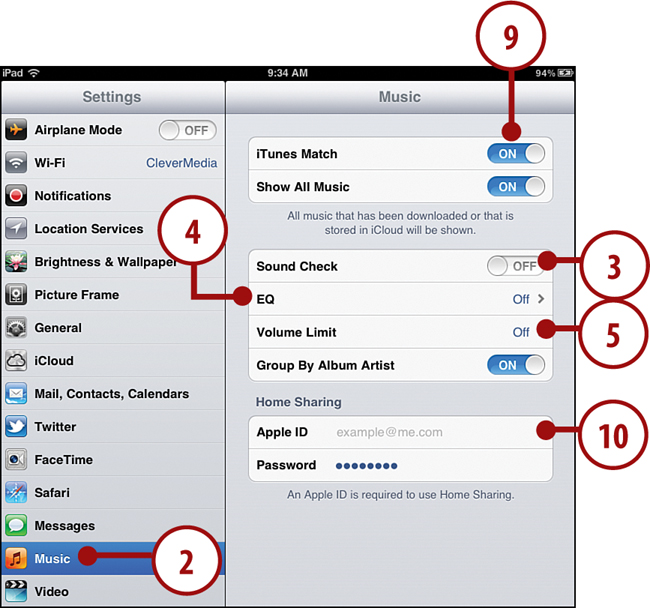
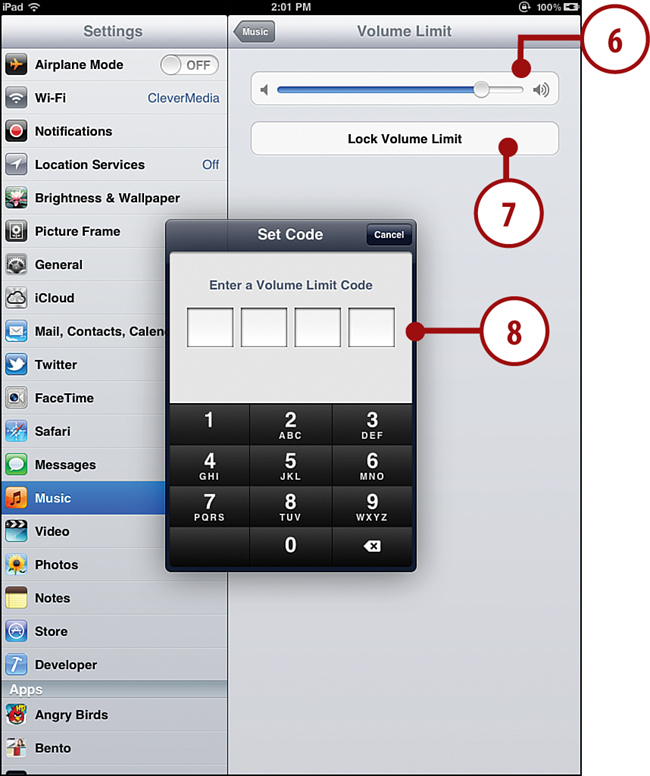
5. Tap Volume Limit to set a limit on the maximum volume.
6. To set a Volume Limit, simply move the slider.
7. Tap the Lock Volume Limit to set a code required to change or remove the Volume Limit.
8. Enter a four-digit code and confirm.
9. Tap to turn on iTunes Match. iTunes Match is a service where all the music you own is stored on Apple’s servers, and you can access it with iTunes on a Mac or PC and through the Music app on your iPad, iPhone, or iPod Touch. See www.apple.com/itunes/itunes-match/ for more information.
10. Enter your Apple ID and password information to allow streaming music and video from your Mac. See “Home Sharing” in Chapter 4.
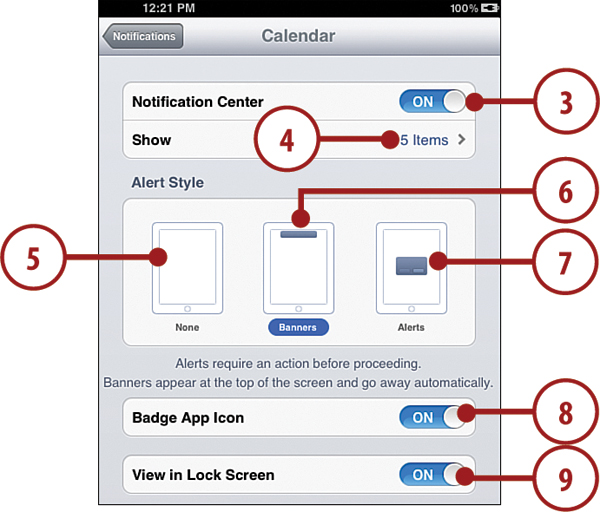
Notification Center Settings
From time to time, apps will need to interrupt what you are doing or alert you even when you are not using your iPad. In iOS 5, this is unified through the Notifications Center. The Notifications Center will give you alerts in one of two ways: as a box in the middle of your screen or as a drop-down notification from the top. You can change this setting for each app in the Notifications section of the Settings app.
1. Tap the Notifications category in the Settings app.
2. Tap any app to view its notifications settings. If an app isn’t listed, it doesn’t send out any notifications.
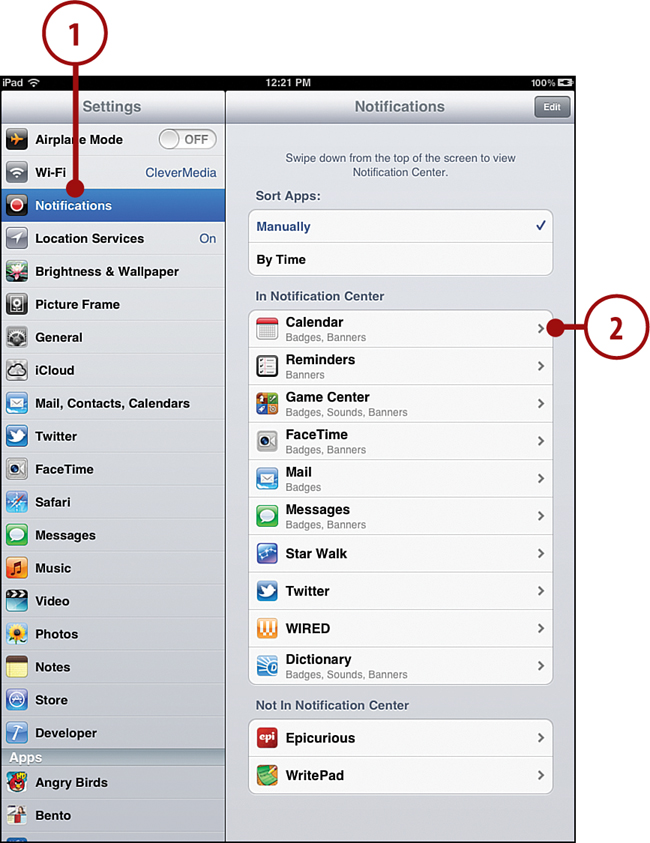
3. You can remove an app from the Notifications Center so it doesn’t send any notifications.
4. You can limit the number of items that the Notifications Center shows for this particular app at one time.
5. Choosing the None alert style means that neither a banner nor alert will appear.
6. Choosing Banners means that a drop-down banner will appear when the app has a message, and it will go away on its own after a few seconds. These do not interrupt your work when they appear.
7. Choosing Alerts means that a box pops up in the middle of the screen when the app has a message, and you must dismiss it to continue.
8. Badge App Icon means that the icon will show a number over it when there is a message.
9. View in Lock Screen means that alerts from this app will appear even when the iPad is locked.
More Settings
Too many settings categories exist to cover all of them here, but the following are a few other key items.
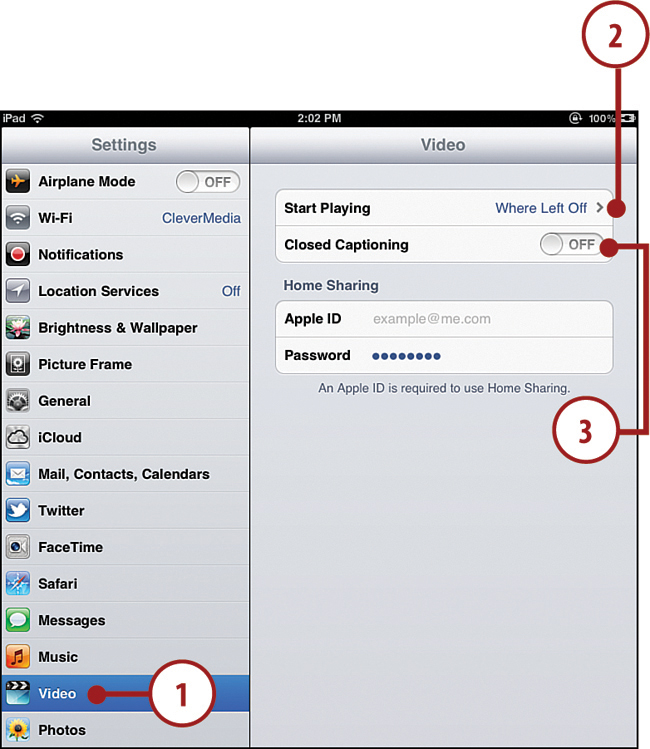
1. Tap Video.
2. Adjust whether a video starts playing where you left off or at the beginning each time.
3. Turn Closed Captioning on or off.
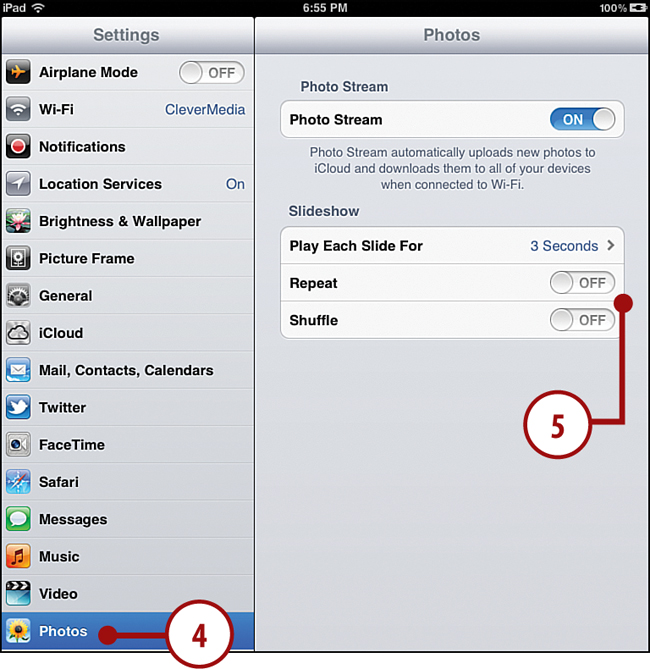
4. Tap Photos.
5. Set the slideshow preferences: how long to play each slide for, whether to repeat, and in which order to play the photos.
Adding More and More Apps
The Settings app adds new pages as you add new apps to your iPad. Some third-party apps do not add a component in the Settings app, so don’t be alarmed if you don’t see an app you added in the Settings list.