10. Managing Your Contacts
In this chapter, you learn how to manage contacts on your iPad for email, messaging, and video chatting.
When you use the Mail app to send an email to someone, you can enter that person’s email address manually. That’s not a big deal. Unless you send a lot of emails to that person, of course, in which case re-entering that same email address each time gets pretty annoying.
It’s also annoying to try to remember the email address of each and every person you communicate with. Or their phone numbers. Or their street addresses. If you have a lot of friends and family, all that information becomes overwhelming.
In the real world, you might keep people’s names and addresses in a physical card file or address book. On your iPad, you can do the same thing, by storing all their key information in the Contacts app. It’s a lot easier to have the Contacts app remember all these names and addresses than trying to do it yourself!
Using the Contacts App
The Contacts app is preinstalled on your new iPad. You use the Contacts app to store the names, email addresses, street addresses, phone numbers, and other important information of the people you contact most often.
Add a New Contact
To add a new contact to the Contacts app, all you need to know is that person’s name and any contact information about that person.
![]() Tap the Contacts icon to open the Contacts app. All your existing contacts are listed in alphabetical order.
Tap the Contacts icon to open the Contacts app. All your existing contacts are listed in alphabetical order.

![]() Tap the + icon to display the New Contact panel.
Tap the + icon to display the New Contact panel.

![]() Enter the person’s first and last name into the First Name and Last Name fields. (Or, if you’re entering a company or organization, enter that entity’s name into the Company field.) Past this point, any information you enter is optional—that is, you only need to enter the contact’s name.
Enter the person’s first and last name into the First Name and Last Name fields. (Or, if you’re entering a company or organization, enter that entity’s name into the Company field.) Past this point, any information you enter is optional—that is, you only need to enter the contact’s name.
![]() Tap the + next to Add Phone and enter the contact’s phone number.
Tap the + next to Add Phone and enter the contact’s phone number.

![]() The Contacts app assumes this is the person’s home phone number. If this is not the case, tap Home and then select another type of phone from the list—Work, Mobile, and so forth.
The Contacts app assumes this is the person’s home phone number. If this is not the case, tap Home and then select another type of phone from the list—Work, Mobile, and so forth.
![]() Add another phone number by tapping the + next to Add Phone and repeating steps 4 and 5.
Add another phone number by tapping the + next to Add Phone and repeating steps 4 and 5.
![]() Tap the + next to Add Email, and enter the contact’s email address.
Tap the + next to Add Email, and enter the contact’s email address.

![]() Scroll down, tap the + next to Add Address, and enter the contact’s address.
Scroll down, tap the + next to Add Address, and enter the contact’s address.
![]() Add other information by tapping the + next to that field and then entering the appropriate data.
Add other information by tapping the + next to that field and then entering the appropriate data.

![]() Include a photo of this person (if you have one) by tapping Add Photo and selecting a picture from your iPad photo library.
Include a photo of this person (if you have one) by tapping Add Photo and selecting a picture from your iPad photo library.
![]() Tap Done to save the contact.
Tap Done to save the contact.

>>>Go Further: IMPORT CONTACTS
Although you can manually enter new contacts into the Contacts app, you can also import any existing contacts you have in other apps. This way you don’t have to re-enter information you may have entered previously.
You do this by enabling contact sharing with those apps that have their own contacts, such as the Facebook and Mail apps. You do this from your iPad’s Settings page. Tap Contacts, tap Siri & Search, and then make sure the Find Contacts in Other Apps switch is on. (If it’s not, tap it “on.”)
Edit a Contact
Sometimes you may want to add new information about a given contact, or change existing info.
![]() From within the Contacts app, tap the name of the contact you want to edit.
From within the Contacts app, tap the name of the contact you want to edit.
![]() Tap Edit.
Tap Edit.

![]() Tap within any field you want to edit and make the necessary changes.
Tap within any field you want to edit and make the necessary changes.
![]() Tap Done.
Tap Done.

Delete a Contact
You can also delete contacts you’re no longer interested in.
![]() From within the Contacts app, tap the name of the contact you want to delete.
From within the Contacts app, tap the name of the contact you want to delete.
![]() Tap Edit.
Tap Edit.

![]() Scroll down to the bottom of the contact information and tap Delete Contact.
Scroll down to the bottom of the contact information and tap Delete Contact.
![]() When asked to confirm this deletion, tap Delete Contact.
When asked to confirm this deletion, tap Delete Contact.

Consolidate Contacts from Multiple Sources
When you import contacts from various sources, you might end up with multiple entries for a single person. Let’s say, for example, that you’ve manually entered Bob Smith’s contact information, but also imported that person’s info from Facebook and Gmail. You end up with three entries in the Contacts app for Bob Smith, with lots of duplicated information.
What you need to do is to consolidate these multiple contacts into a single contact—what Apple calls a unified contact. You do this by “linking” all the individual contacts together.
Automatic Linking
The Contacts app might attempt to automatically link contacts that it thinks are similar. You’ll probably still need to manually link some contacts, however.
![]() From within the Contacts app, tap to select one of the contacts you want to link.
From within the Contacts app, tap to select one of the contacts you want to link.
![]() Tap Edit.
Tap Edit.

![]() Scroll to the bottom of the screen and tap Link Contacts. This displays your entire contacts list.
Scroll to the bottom of the screen and tap Link Contacts. This displays your entire contacts list.

![]() Tap the other contact you want to link.
Tap the other contact you want to link.

![]() You now see information about the other contact. Tap Link to return to the original contact screen.
You now see information about the other contact. Tap Link to return to the original contact screen.

![]() Tap Done. The two contacts are combined.
Tap Done. The two contacts are combined.
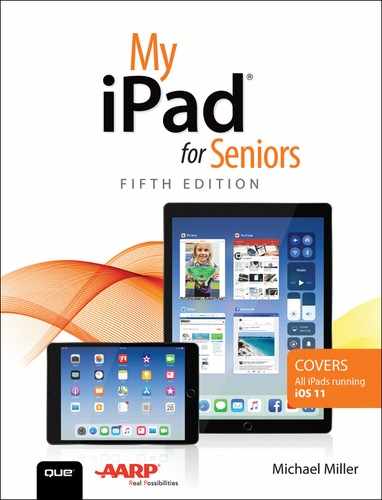
Viewing and Contacting Your Contacts
The Contacts app displays the names of all your contacts in the left column onscreen. When you select a contact, information for that person or entity is displayed on the right side of the screen.
Display a Contact
By default, your contacts are listed in alphabetical order by last name.
![]() From within the Contacts app, on the left side of the screen, tap a letter on the right edge of the list to display all contact names that start with that letter.
From within the Contacts app, on the left side of the screen, tap a letter on the right edge of the list to display all contact names that start with that letter.
![]() Tap a contact name to display that contact’s information on the right side of the screen.
Tap a contact name to display that contact’s information on the right side of the screen.

Search for a Contact
If you have a lot of names in your contacts list, it might be quicker and easier to search for a specific person instead of scrolling through all your contacts.
![]() From within the Contacts app, tap within the Search box. Use the onscreen keyboard to begin typing the person’s first or last name.
From within the Contacts app, tap within the Search box. Use the onscreen keyboard to begin typing the person’s first or last name.
![]() As you type, the Contacts app displays matching names. Tap to select the contact you want.
As you type, the Contacts app displays matching names. Tap to select the contact you want.

Change How Contacts Are Displayed
By default, your contacts are sorted by last name, but displayed as first name then last name, like this:
Bob Smith
You can change the way your contacts are both sorted and displayed.
![]() From the Dock or Home screen, tap the Settings icon to display the Settings page.
From the Dock or Home screen, tap the Settings icon to display the Settings page.

![]() In the left column, scroll down and tap Contacts.
In the left column, scroll down and tap Contacts.

![]() Tap Sort Order.
Tap Sort Order.

![]() Select either Last, First (the default) or First, Last.
Select either Last, First (the default) or First, Last.
![]() Tap Contacts to return to the previous screen.
Tap Contacts to return to the previous screen.

![]() Tap Display Order.
Tap Display Order.

![]() Select either First, Last (the default) or Last, First.
Select either First, Last (the default) or Last, First.
![]() Tap Contacts to return to the previous screen.
Tap Contacts to return to the previous screen.


![]() Make sure the Short Name switch is in the on position.
Make sure the Short Name switch is in the on position.
![]() Tap how you want the app’s “short names” to display. (Short names are used when space onscreen is at a premium.)
Tap how you want the app’s “short names” to display. (Short names are used when space onscreen is at a premium.)

Contact a Contact
Many apps—including Mail, Messages, and FaceTime—use your contacts list to help you easily email or message your contacts. You can also send email to, message, or call (via FaceTime) a person directly from the Contacts app.
![]() From within the Contacts app, tap to select the person you want to contact.
From within the Contacts app, tap to select the person you want to contact.

![]() Tap the Mail icon to send an email to this person. (The icon might say “Home” or “Work,” if you’ve specified that person’s home or work email address.)
Tap the Mail icon to send an email to this person. (The icon might say “Home” or “Work,” if you’ve specified that person’s home or work email address.)
![]() Tap Message to send a text message to this person.
Tap Message to send a text message to this person.
![]() Tap the Call icon to initiate a FaceTime voice call with this person.
Tap the Call icon to initiate a FaceTime voice call with this person.
![]() Tap the Video icon to initiate a FaceTime video call with this person. (This icon is grayed out if the person isn’t currently online and capable of receiving FaceTime calls.)
Tap the Video icon to initiate a FaceTime video call with this person. (This icon is grayed out if the person isn’t currently online and capable of receiving FaceTime calls.)

FaceTime and Messaging
To learn more about FaceTime and text messages, turn to Chapter 11, “Video Chatting and Texting.”