
NetBeans provides extensive support for developing with XML.[1] But it isn’t bundled with NetBeans 3.3.2, so you need to get it from the Update Center. Go to Tools menu → Update Center to launch the Update Center Wizard. Check the NetBeans Update Center. You will find several modules under the XML node, CSS Support through XML Tree Editor (see Figure 11-1). Install them all. After the IDE restarts, look at Help menu → Help Sets → XML Support for complete instructions on using all the features. In this chapter we’ll mention the high points and then build some examples.
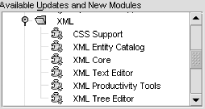
We’ll spend the bulk of this chapter delving into the XML support available in NetBeans. Before getting into detail, though, you should get an idea of what is available and how it all fits together. You’ll then be ready to dive into specific topics.
NetBeans provides a variety of templates to get you started on creating the following XML documents:
Plain XML
XML with DTD included or referenced
DTD alone
Cascading Style Sheet (CSS)
Extensible Style Sheet (XSL)
OASIS Specification XML entity catalog
You can also mount existing XML catalogs that meet other specifications, but only the OASIS specification is explicitly supported for creating new catalogs.
Once you’ve used a template to create a new XML-based document or mounted an existing document, you will want to browse and edit it. If the XML is well formed, you can open the document’s nodes and browse it in the Explorer. NetBeans also provides both a text editor and a tree editor for modifying XML files or for closely examinining their contents. The tree editor gives a node view just like the Explorer view, and specialized property editors that change to match the object type of the currently selected node. Context menus help you keep XML source well formed and consistent with DTD during editing through the Check XML and Validate XML actions, both of which will be explained in later sections.
After working hard to create a DTD, you probably want to document it so others can share its value. It’s as easy as generating a Javadoc for Java source. Right-click, select Generate Documentation, and it’s done. You get an XHTML document that describes the content of the DTD, which you may augment with text describing the business meaning of the XML elements and attributes.
Of course, you’ll want to access your XML documents with Java to take full advantage of XML’s power. The first step is as easy as generating documentation. Right-click the DTD and select Generate DOM Tree Scanner or SAX Document Handler Wizard to generate source for Java classes to access the XML. Use a DOM Tree Scanner to modify XML documents, and use a lighter-weight SAX Document Handler if you only need to read the documents. We’ll take a closer look at this throughout the rest of this chapter.
XML schema support is coming soon. NetBeans 3.4 will have several XML-related enhancements, including XML document validation by XML Schema. See XML— planned features for NetBeans 3.4 (http://xml.netbeans.org/plans/features34.html) for specifics. NetBeans 4.0 should get you even more excited. See XML—planned features index page (http://xml.netbeans.org/plans/features.html) for a look further ahead.
Of course, it’s impossible for any set of development tools to keep completely up to date with advancing technologies. But NetBeans with its highly modular architecture does a remarkable job of bringing out new features quickly. If you want to speed up the process, learn how to build NetBeans modules from this book and start participating in the open source community.
Let’s create an XML document with a DTD. We need a work area, so first create a new Java package named XMLWork. Right-click the package in the Explorer, select New → XML and DTD → XML with DTD to launch the New Wizard, and create a new XML document from a template. Name it Inventory and then click Finish. The document appears as a node in the Explorer and in a tree editor view of the Source Editor. Open the nodes in both the Explorer and the Source Editor, and you will see that both views are identical. When the top-level node is open, the name Inventory appears three times, first as the name of the entire document, next as DOCTYPE root element name in the DTD, and last as a top-level element name in the XML data (see Figure 11-2). Right-click the top-level node and select Edit to access the same information as plain text.
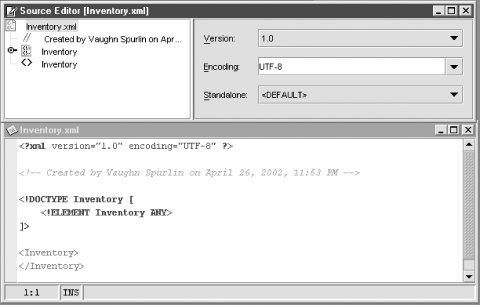
Any change made in the tree view is immediately applied to the text view. You can see this by clicking back and forth between the tree view and text view tabs at the bottom of the Source Editor. Let’s undock the text view to make it easier to watch. Right-click the text view tab, select Dock View Into → New Single Frame, and you can see both views at the same time.
We need to add a few elements and attributes to make our document interesting. Our Inventory document will describe Kits, which contain Parts; Suppliers, which produce the Parts; and Parts, which have Size and Color. Everything will have a Description.
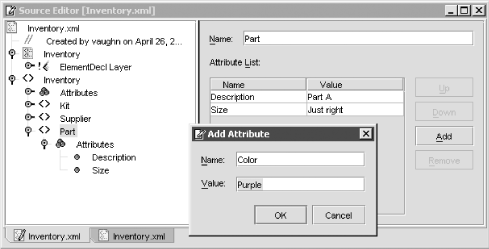
Right-click (in either the Explorer or the Source Editor tree view) the Inventory element node, which is the last node named Inventory. Select from the context menu Add Element. Name it Kit, click OK, and notice that a new element is added inside the top-level Inventory element. Did you see all the choices when the context menu for Add was open? You could add anything from Attribute to Text, everything you need for complete XML data editing. So let’s add an attribute. Right-click Inventory again; this time select Add Attribute. Name it Description, and give it the value Kit Inventory. It’s often easier to add new attributes while creating an element. Just click the Add button while the Element wizard is open, instead of going directly to the OK button, and the little Add Attribute wizard will open. You can also get to the Add Attribute wizard from the specialized property editor that appears in the right panel of the tree editor whenever an element is selected in the left panel. To add some text to the Part element, right-click, select Add Text and then fill in Part A in Kit.
Continue using the tree view to add elements and attributes (as shown in Figure 11-3) until the text view of your XML document matches Example 11-1 (except for insignificant blank lines). You can copy and paste in the tree editor. We want all the Part elements to have the same Description, Part A. Once you’ve created the first Part A Description, you can just copy and paste into the other Part elements. Of course, you could simply paste Example 11-1 directly into the text editor. But the purpose of this exercise is to gain experience with the tree editor. With large, complex XML documents the tree editor is much easier to use because it automatically keeps the syntax correct. Moving nodes to restructure the data with copy, cut, and paste operations is quick and accurate.
Example 11-1. Inventory.xml after adding elements and attributes
<?xml version="1.0" encoding="UTF-8"?>
<!-- Created by vaughn on April 26, 2002, 6:07 PM -->
<!DOCTYPE Inventory [
    <!ELEMENT Inventory ANY>
]>
<Inventory Description="Kit Inventory">
    <Kit Description="The first kit">
        <Part Description="Part A">Part A in Kit</Part>

    </Kit>
    <Supplier Description="Our favorite supplier">
        <Part Description="Part A">Part A in Supplier</Part>
    </Supplier>
    <Part Description="Part A" Size="Just right" Color="Purple">Part A
    alone</Part>
</Inventory>
Our example is small, but it’s enough to demonstrate what NetBeans can do with XML documents. We’ll keep it small while creating DTD, CSS, and other files based on its content.
Let’s look at the other features in addition to the editors that NetBeans provides for working with XML documents.
When an XML document is opened in the Explorer, it’s automatically checked for syntax. If you change an XML document in the text editor, it’s a good idea to run the syntax check manually. Right-click anywhere in the text editor or on the top-level node of an XML document in the Explorer or tree editor and then select Check XML. Any errors will be identified in the Output window.
You can also select Validate XML from the context menu. Validation verifies that the XML is fully and correctly described in a DTD. Do it now with our sample XML document. Right-click and select Validate XML. The output window will show lots of errors because the DTD section of our example is empty. Unfortunately, adding XML data elements does not generate corresponding DTD. More unfortunately, you can’t use the tree editor to build your DTD.
If a suitable external DTD file exists, you can simply assign the external DTD to your XML document. We do not yet have such a file, but let’s walk through the process for future reference. In the Explorer window right-click the node for the XML file that needs DTD. That’s Inventory in our example. In the context menu select Add Document Type to open the Add Document Type dialog. If the DTD file is accessible remotely, enter its URL in the Public ID: text field. Or, if it’s in the local filesystem, enter its name in the System ID: text field. Because we don’t have either choice available yet, just click Cancel.
The only other choice is to type in the DTD information manually in
the text editor. So you had better know what you’re
doing, and the Check XML feature will definitely come in handy.
Replace the <!DOCTYPE> instruction of your
sample XML document with the text in Example 11-2.
Don’t forget to Check XML and Validate XML.
Example 11-2. DTD text for Inventory.xml
<!DOCTYPE Inventory [
<!ELEMENT Inventory (Supplier|Kit|Part)*>
<!ATTLIST Inventory
    Description CDATA #IMPLIED
  >

<!ELEMENT Kit (Part)*>
<!ATTLIST Kit
    Description CDATA #IMPLIED
  >

<!ELEMENT Part ANY>
<!ATTLIST Part
    Description CDATA #IMPLIED
    Color CDATA #IMPLIED
    Size CDATA #IMPLIED
  >

<!ELEMENT Supplier (Part)*>
<!ATTLIST Supplier
    Description CDATA #IMPLIED

  >
]>Now that you’ve added a valid DTD to the sample XML document, let’s look at its node view. The Explorer window and the Source Editor tree view give exactly the same node view of an XML file, so it doesn’t matter which one you work in. Open the top-level node of Inventory and then open the two nodes below, also named Inventory, one for the document’s DTD, and one for its data. If you compare the tree view to the text view, you’ll find the elements and attributes in the data section match up, one to one in the same order. But the DTD section is different. In the tree view all the elements are listed first under the ElementDeclLayer node, and the attributes are listed separately under AttlistDeclLayer. The difference is determined by the document’s Node View setting. To access the Node View setting (as in Figure 11-4), Right-click the top Inventory node, select Properties from the context menu, and click the View tab.
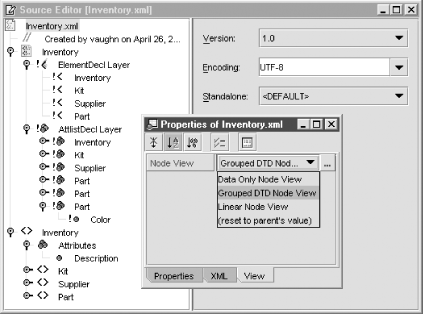
Try out the different views. The Linear Node View shows DTD element and attribute declarations in the same order as the text document. The Data Only Node View has the same order but hides comments and processing instructions. You can set the node view at any level, from the topmost node to the lowest, to completely customize the overall view of a large XML document. Setting a node’s view to (reset to parent’s value) gives the view the same setting as the next higher level. For the top level, (reset to parent’s value) applies the default, Grouped DTD Node View.
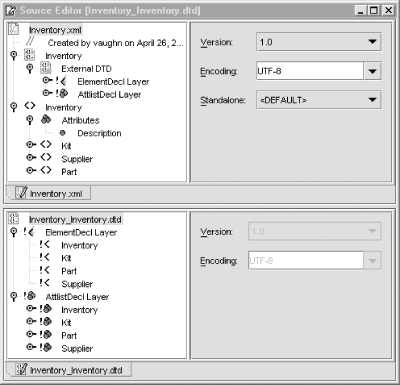
Several XML features require a DTD in a separate file, instead of an internal DTD. So there’s a way to split an XML document with an internal DTD into a separate DTD file and a data-only XML document. Right-click the top-level Inventory node, and select Generate DTD from the context menu. A little dialog will pop up prompting you to name the new DTD file. Accept the default Inventory_Inventory, click Yes in the next dialog (Do you want to use generated DTD as external document type?), and the original XML with DTD document is split neatly in two (see Figure 11-5). Now, you can create as many XML data files as desired, all validated by the same single DTD file. And you have the DTD input needed to use the following features.
Having a separate DTD file makes it possible for any number of XML documents to use it and for developers to design any number of applications to use the data that it describes. We need documentation that developers can read to help them build their applications. The IDE can generate an excellent HTML framework for building documentation. Just right-click the DTD file Inventory_Inventory, and select Generate Documentation from the context menu. Again a dialog pops up prompting you to name the new documentation file. Accept the default Inventory_InventoryDocumentation, and the HTML file shown in Example 11-3 is generated to document the DTD. Use the NetBeans editor or any HTML editor to enhance the documentation as needed.
Example 11-3. HTML documentation for Inventory.xml
<!DOCTYPE html PUBLIC "-//W3C//DTD XHTML 1.0 Strict//EN" "http://www.w3.org/TR/xhtml1/DTD/xhtml1-strict.dtd"> <html> <head> <title>DTD Grammar Documentation</title> <meta http-equiv="Content-Type" content="text/xhtml; charset=UTF-8" /> </head> <!-- Generated on May 11, 2002 by NetBeans XML module. --> <body> <hr /> <h2>Element Index</h2> <ul><li><tt><a href="#Inventory">Inventory</a></tt></li> <li><tt><a href="#Kit">Kit</a></tt></li> <li><tt><a href="#Part">Part</a></tt></li> <li><tt><a href="#Supplier">Supplier</a></tt></li> </ul> <hr /> <h2>Element Details</h2> <hr /> <h2><a name="Inventory"></a>Inventory</h2> <p><b>Declared Attributes</b></p> <ul><li><tt>#IMPLIED CDATA Description</tt></li> </ul> <p><b>Element Content Model</b></p> <p><tt>(<a href="#Supplier">Supplier</a> | <a href="#Kit">Kit</a> | <a href="#Part">Part</a>)*</tt></p> <p><b>Referenced by</b></p> <p><tt></tt></p> <hr /> <h2><a name="Kit"></a>Kit</h2> <p><b>Declared Attributes</b></p> <ul><li><tt>#IMPLIED CDATA Description</tt></li> </ul> <p><b>Element Content Model</b></p> <p><tt>(<a href="#Part">Part</a>)*</tt></p> <p><b>Referenced by</b></p> <p><tt><a href="#Inventory">Inventory</a></tt></p> <hr /> <h2><a name="Part"></a>Part</h2> <p><b>Declared Attributes</b></p> <ul><li><tt>#IMPLIED CDATA Description</tt></li> <li><tt>#IMPLIED CDATA Color</tt></li> <li><tt>#IMPLIED CDATA Size</tt></li> </ul> <p><b>Element Content Model</b></p> <p><tt>(#PCDATA)*</tt></p> <p><b>Referenced by</b></p> <p><tt><a href="#Inventory">Inventory</a>, <a href="#Kit">Kit</a>, <a href="#Supplier">Supplier</a></tt></p> <hr /> <h2><a name="Supplier"></a>Supplier</h2> <p><b>Declared Attributes</b></p> <ul><li><tt>#IMPLIED CDATA Description</tt></li> </ul> <p><b>Element Content Model</b></p> <p><tt>(<a href="#Part">Part</a>)*</tt></p> <p><b>Referenced by</b></p> <p><tt><a href="#Inventory">Inventory</a></tt></p> </body></html>
Similarly, you can easily generate a CSS document. Right-click the DTD file Inventory_Inventory, select Generate CSS from the context menu, accept the default name Inventory_InventoryStylesheet, and the CSS file shown in Example 11-4 is generated based on the DTD.
Example 11-4. Cascading Stylesheet for Inventory.xml
/* Cascade style sheet based on Inventory_Inventory.dtd DTD */
Inventory { display: block }
Kit { display: block }
Part { display: block }
Supplier { display: block }
Like the HTML file generated above, this CSS file is a framework that a developer can enhance as needed. The essential purpose of an XML document is to store information content in a standard format that is independant of any presentation appearance. Before the information can be viewed, it must be transformed into HTML, WML, or some other format that can be rendered by a browser, printer, or other presentation device. The essential purpose of a CSS document is to control the transformation process, making it possible to view information from an XML document in a comfortable format. The stylesheet information in Example 11-4 simply states that information from each element in Inventory.xml should be presented in a separate block of text. You could enhance the CSS file by adding specifications to give different font properties to each element type. For example, information from Kit elements could be big and green, and information from Part elements could be small and red.
Here comes the best part
(after all, we
are Java programmers): generating Java source
code to process XML documents. First, we’ll create a
SAX document handler to read through our sample
XML document and extract its element and attribute values. This gives
us serial read-only access, useful in applications that need to get
the information in an XML document quickly with minimal memory
requirements. Next, we’ll create a DOM tree scanner, useful in applications that need to access the
information from an XML document in random order, update it, and
output a modified XML document.
Our next example will be a basic Simple API for XML (SAX) parser that simply lists the attributes and text in our Inventory.xml XML document. First, we will use the SAX Document Handler Wizard to generate source for the Java classes that will parse Inventory.xml. We will add a few lines of code to invoke the parser and display the parsed information. Finally, we will configure the execution service parameters and run it.
To launch the Wizard, right-click the DTD file Inventory_Inventory and then select SAX Document Handler Wizard from the context menu. The wizard’s frame 1 of 4 specifies the API versions to use in generating code. For our example, select JAXP 1.1, not JAXP 1.0. Select SAX 2.0, not 1.0. Check the checkbox Propogate SAX Events to Generated Handler. Frame 2 allows you to customize the handling of each element. Accept the defaults because no special handling is needed. Frame 3 allows you to specify converter methods in case the extracted data requires a format conversion. Accept the defaults because no conversion is needed. Frame 4 allows you to specify the output File Names. Accept defaults for the file names, but uncheck the checkbox Save Customized Bindings. When the wizard is finished, three Java files will be generated:
Inventory_InventoryHandler.java: abstract class that declares callback methods for handling elements in Inventory.xml
Inventory_InventoryHandlerImpl.java: implementation of call back methods
Inventory_InventoryParser.java: logic to call SAX parser methods and then call handler methods to process the parsed data
After the files have been generated, a Confirm Changes dialog will pop up recommending changes in the implementation class to implement abstract methods. Check the Perform synchronization without confirmation radio button and click Process All.
Now that we have some source to work with, we need to make a few
additions. First, add a main method to the parser
classType or paste Example 11-5 into
Inventory_InventoryParser.java.
Example 11-5. main method for Inventory_InventoryParser
  public static void main(String[ ] args) throws Exception {
    Inventory_InventoryHandler handler =
      new Inventory_InventoryHandlerImpl( );
    EntityResolver resolver = null;
    Inventory_InventoryParser parser =
      new Inventory_InventoryParser(handler, resolver);
    InputSource input = new InputSource(args[0]);
    parser.parse(input);
  }
All we need now is some print logic in the handler class. We will
enhance a couple of callback methods in
Inventory_InventoryHandlerImpl.java to handle
the parsed data. Replace the characters method in
Inventory_InventoryHandlerImpl.java with Example 11-6.
Example 11-6. characters method for Inventory_InventoryHandlerImpl
  public void characters(char[ ] values, int param, int param2)
      throws org.xml.sax.SAXException {
    System.out.println("  Element Data: " +
      new String(values, param, param2));
  }
Replace the startElement method in
Inventory_InventoryHandlerImpl.java with Example 11-7. That’s all the source
changes we need. Right-click the package, and select Build All from the context menu to compile the
classes.
Example 11-7. startElement method for Inventory_InventoryHandlerImpl
  public void startElement(String str, String str1, String str2,
      org.xml.sax.Attributes attributes) throws org.xml.sax.SAXException {
    System.out.println("Element: " + str2);
    for (int i=0; i<attributes.getLength( ); i++){
      String name = attributes.getQName(i);
      String value = attributes.getValue(i);
      System.out.println("  Attribute: " + name + " = " + value);
    }
  }
One more step, configuring execution parameters for the parser, and we’ll be ready for a test. Open the Properties sheet for Inventory_InventoryParser.java. Click the Execution tab. Set the Arguments property to Inventory.xml. Invoke the Customizer dialog for the Executor property by clicking the value and then the ellipsis button. Click the Expert tab of the Customizer dialog to expose the Working Directory property. Set Working Directory to the directory that contains the Inventory.xml file, presumably the same as the source directory in which we’ve been working.
Finally, we’re ready to test the completed SAX parser. Right-click Inventory_InventoryParser.java and select Execute from the context menu. If all goes well, the IDE will switch to the Running workspace, open an Output Window, and produce the results shown in Example 11-8.
Example 11-8. Output from Inventory_InventoryHandlerImpl
Element: Inventory
  Attribute: Description = Kit Inventory
Element: Kit
  Attribute: Description = The first kit
Element: Part
  Attribute: Description = Part A
  Element Data: Part A in Kit
Element: Supplier
  Attribute: Description = Our favorite supplier
Element: Part
  Attribute: Description = Part A
  Element Data: Part A in Supplier
Element: Part
  Attribute: Description = Part A
  Attribute: Size = Just right
  Attribute: Color = Purple
  Element Data: Part A alone
And here we have the process for creating a basic Document Object Model (DOM) Tree Scanner. Like the SAX Document Handler above, it will list the attributes and text in our Inventory.xml document. But it will also make a small change to the attribute values to prove that the output is not exactly the same as the input. Our DOM Tree Scanner will change the input by prepending a coded abbreviation for each attribute’s qualified name to the attribute’s value. Finally, our DOM Tree Scanner will output XML data showing the modified attribute values.
We will start, just as with the SAX Document Handler, by generating the source, adding some code to display the input data, and running a test to verify the results. Then, we will code to output the attribute values and output the modified XML document. The output will be in the same format as the input but with slightly different data.
To generate the source, right-click the DTD file Inventory_Inventory and then select Generate DOM Tree Scanner from the context
menu. Accept the default name
Inventory_InventoryScanner. Add a
main method. Type or paste Example 11-9 into
Inventory_InventoryScanner.java. This code was
adapted from the example in the comments near the top of the
generated source, just after the package
statement. Notice that similar comments are sprinkled throughout the
source, code examples that could be uncommented to gain access to
data parsed out of the XML input.
Example 11-9. main method for Inventory_InventoryScanner
  public static void main(String[ ] args) throws Exception {
    javax.xml.parsers.DocumentBuilderFactory builderFactory =
      javax.xml.parsers.DocumentBuilderFactory.newInstance( );
    javax.xml.parsers.DocumentBuilder builder =
      builderFactory.newDocumentBuilder( );
    org.w3c.dom.Document document =
      builder.parse (new org.xml.sax.InputSource (args[0]));
    Inventory_InventoryScanner scanner =
      new Inventory_InventoryScanner (document);
    scanner.visitDocument( );
  }
The generated source includes a method to process each element in the
XML document, and each method includes logic to process the
element’s attributes. Each method is different, but
they all have a structure similar to
visitElement_Part shown in Table 11-1. We will augment the generated source as
instructed in the following text and tables.
We need to add logic to print the name of each element. Search the source for occurrences of the following commented line. This line is one of the comments sprinkled throughout the source that shows how to access the data parsed from the XML input.
// element.getValue( );
Add the print statements shown in Table 11-1 right after the commented lines that were found. Or replace the commented lines with the new statements, if you prefer.
Table 11-1. Printing element names in Inventory_InventoryScanner
|
Method |
Print statement |
|---|---|
|
visitElement_Inventory |
System.out.println(“Element: Inventory”); |
|
visitElement_Kit |
System.out.println(“Element: Kit”); |
|
visitElement_Part |
System.out.println(“Element: Part”); |
|
visitElement_Supplier |
System.out.println(“Element: Supplier”); |
We need to add logic to print the attribute names and values. Search the source for occurrences of the following commented line. Again, this is one of the comments sprinkled throughout the source that shows how to access the data parsed from the XML input:
// attr.getValue( );
Add the print statements shown in Table 11-2 right after the commented lines that were found. Or replace the commented lines with the new statements, if you prefer.
Table 11-2. Printing attribute values in Inventory_InventoryScanner
|
Method |
Attribute |
Print statement |
|---|---|---|
|
visitElement_Inventory |
Description |
System.out.println(” Attribute: Description = " + attr.getValue( )); |
|
visitElement_Kit |
Description |
System.out.println(” Attribute: Description = " + attr.getValue( )); |
|
visitElement_Part |
Description |
System.out.println(” Attribute: Description = " + attr.getValue( )); |
|
visitElement_Part |
Color |
System.out.println(” Attribute: Color = " + attr.getValue( )); |
|
visitElement_Part |
Size |
System.out.println(” Attribute: Size = " + attr.getValue( )); |
|
visitElement_Supplier |
Description |
System.out.println(” Attribute: Description = " + attr.getValue( )); |
Finally, we need to add logic to print the data for each element. This is easy in our example because only the Part element has data. Search the source for occurrences of the following commented line:
// ((org.w3c.dom.Text)node).getData( );
Add the print statements shown in Table 11-3 right after the commented line that was found. Or replace the commented line with the new statement, if you prefer.
Table 11-3. Printing element data in Inventory_InventoryScanner
|
Method |
Print statement |
|---|---|
|
visitElement_Part |
System.out.println(” Element Data: " + ((org.w3c.dom.Text)node).getData( )); |
Now, configure execution parameters for the scanner, just as you did
in the previous section for the parser. Open the Properties sheet for
Inventory_InventoryScanner.java, click the
Execution tab, and set the Arguments
property to Inventory.xml. Invoke the Customizer
dialog for the Executor property by clicking the value and then the
... button, click the Expert tab of
the Customizer dialog to expose the Working
Directory property, and set Working
Directory to the directory that contains the
Inventory.xml, the same as the source directory.
It’s time to test. Compile and execute
Inventory_InventoryScanner. The results should
match Example 11-8.
Next, add code to make a slight modification to the data values, just
enough to prove that they’re different when the new
XML is output later. Locate the statements that you added to print
the attribute values. Before each statement that you located, add a
new statement to change the value of the data. We want to prove that
the data was changed when it’s output again later.
Add statements that invoke attr.setValue as shown
in Table 11-3. For example, to see what
visitElement_Part looks like with all changes in
place, see Table 11-4.
Table 11-4. Modifying attribute values in Inventory_InventoryScanner
|
Method |
Attribute |
Statement to modify data |
|---|---|---|
|
visitElement_Inventory |
Description |
attr.setValue(“ID:” + attr.getValue( )); |
|
visitElement_Kit |
Description |
attr.setValue(“KD:” + attr.getValue( )); |
|
visitElement_Part |
Description |
attr.setValue(“PD:” + attr.getValue( )); |
|
visitElement_Part |
Color |
attr.setValue(“PC:” + attr.getValue( )); |
|
visitElement_Part |
Size |
attr.setValue(“PS:” + attr.getValue( )); |
|
visitElement_Supplier |
Description |
attr.setValue(“SD:” + attr.getValue( )); |
Near the end of the visitElement_Part method
locate the statement that prints the value of data in a Part node.
Before the print statement add a statement invoking
node.setData to change the text data, as shown in
Example 11-10. The entire method is given to show all
the added code in context.
Example 11-10. visitElement_Part method with all changes applied
  /** Scan through org.w3c.dom.Element named Part. */
  void visitElement_Part(org.w3c.dom.Element element) { // <Part>
    // element.getValue( );
    System.out.println("Element: Part");
    org.w3c.dom.NamedNodeMap attrs = element.getAttributes( );
    for (int i = 0; i < attrs.getLength( ); i++) {
      org.w3c.dom.Attr attr = (org.w3c.dom.Attr)attrs.item(i);
      if (attr.getName( ).equals("Description")) { // <Part Description="???">
        // attr.getValue( );
        attr.setValue("PD:" + attr.getValue( ));
        System.out.println(" Attribute: Description = " + attr.getValue( ));
      }
      if (attr.getName( ).equals("Color")) { // <Part Color="???">
        // attr.getValue( );
        attr.setValue("PC:" + attr.getValue( ));
        System.out.println(" Attribute: Color = " + attr.getValue( ));
      }
      if (attr.getName( ).equals("Size")) { // <Part Size="???">
        // attr.getValue( );
        attr.setValue("PS:" + attr.getValue( ));
        System.out.println(" Attribute: Size = " + attr.getValue( ));
      }
    }
    org.w3c.dom.NodeList nodes = element.getChildNodes( );
    for (int i = 0; i < nodes.getLength( ); i++) {
      org.w3c.dom.Node node = nodes.item(i);
      switch (node.getNodeType( )) {
        case org.w3c.dom.Node.CDATA_SECTION_NODE:
          // ((org.w3c.dom.CDATASection)node).getData( );
          break;
        case org.w3c.dom.Node.ELEMENT_NODE:
          org.w3c.dom.Element nodeElement = (org.w3c.dom.Element)node;
          if (nodeElement.getTagName( ).equals("Inventory")) {
            visitElement_Inventory(nodeElement);
          }
          if (nodeElement.getTagName( ).equals("Kit")) {
            visitElement_Kit(nodeElement);
          }
          if (nodeElement.getTagName( ).equals("Part")) {
            visitElement_Part(nodeElement);
          }
          if (nodeElement.getTagName( ).equals("Supplier")) {
            visitElement_Supplier(nodeElement);
          }
          break;
        case org.w3c.dom.Node.PROCESSING_INSTRUCTION_NODE:
          // ((org.w3c.dom.ProcessingInstruction)node).getTarget( );
          // ((org.w3c.dom.ProcessingInstruction)node).getData( );
          break;
        case org.w3c.dom.Node.TEXT_NODE:
          // ((org.w3c.dom.Text)node).getData( );
          ((org.w3c.dom.Text)node).setData("PT:" +
                           ((org.w3c.dom.Text)node).getData( ));
          System.out.println("  Element Data: " +
                           ((org.w3c.dom.Text)node).getData( ));
          break;
      }
    }
  }
We’re almost done. Let’s take a moment to compile and test. The new output should show our modifications to the input data.
Finally, we’ll add more code to output the modified
XML data. We will use a Transformer object to copy
the document with its modified data to an output stream. Add code to
the main method so that it matches Example 11-11.
Example 11-11. main method with all changes applied
  public static void main(String[ ] args) throws Exception {
    javax.xml.parsers.DocumentBuilderFactory builderFactory =
      javax.xml.parsers.DocumentBuilderFactory.newInstance( );
    javax.xml.parsers.DocumentBuilder builder =
      builderFactory.newDocumentBuilder( );
    org.w3c.dom.Document document =
      builder.parse (new org.xml.sax.InputSource (args[0]));
    Inventory_InventoryScanner scanner =
      new Inventory_InventoryScanner (document);
    scanner.visitDocument( );

    // Output modified Inventory.xml
    TransformerFactory tranFact = TransformerFactory.newInstance( );
    Transformer tran = tranFact.newTransformer( );
    DOMSource DSource = new DOMSource(document);
    StreamResult SResult = new StreamResult(System.out);
    tran.transform(DSource, SResult);
  }
Add the import statements in Example 11-12 after the package statement at the top.
Example 11-12. Import statements for Transformer references
import javax.xml.transform.*;
import javax.xml.transform.dom.*;
import javax.xml.transform.stream.*;
Compile and execute. Your output window should match Example 11-13 (except for a couple of line breaks added for readability). At the top is the data extracted and then modified from the input XML document. Next is the new XML document showing the modified data.
Example 11-13. Output from Inventory_InventoryScanner
Element: Inventory
  Attribute: Description = ID:Kit Inventory
Element: Kit
  Attribute: Description = KD:The first kit
Element: Part
  Attribute: Description = PD:Part A
  Element Data: PT:Part A in Kit
Element: Supplier
  Attribute: Description = SD:Our favorite supplier
Element: Part
  Attribute: Description = PD:Part A
  Element Data: PT:Part A in Supplier
Element: Part
  Attribute: Description = PD:Part A
  Attribute: Size = PS:Just right
  Attribute: Color = PC:Purple
  Element Data: PT:Part A alone

<!-- Created by vaughn on May 11, 2002, 9:01 PM -->
<Inventory Description="ID:Kit Inventory">
    <Kit Description="KD:The first kit">
        <Part Description="PD:Part A">PT:Part A in Kit</Part>

    </Kit>
    <Supplier Description="SD:Our favorite supplier">
        <Part Description="PD:Part A">PT:Part A in Supplier</Part></Supplier>
    <Part Description="PD:Part A" Size="PS:Just right"
                 Color="PC:Purple">PT:Part A alone</Part>
</Inventory>
These examples give the basics of reading, modifying, and writing XML documents with Java classes. NetBeans makes it easy to access XML documents wherever you find them or to generate your own whenever you need to share data with other applications. Just remember to use a SAX document handler if serial read access is adequate, especially when speed and memory are critical. Use a DOM tree scanner if you need random access to the data elements in the XML document, if you need to update the data, or if you need to generate a new document. SAX document handlers are widely used in web applications, where resources are tight. Keep that in mind while you’re reading the next chapter.
[1] To learn more about XML processing with Java, or to get an overview of XML- related technologies, see Java and XML (O’Reilly), by Brett McLaughlin.